Loading ...
Loading ...
Loading ...

6
Quick Start
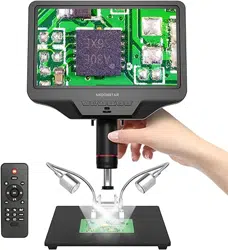
1. Connect the microscope main device to the power supply with the power cable. (See Figure 7)
2. The microscope will turn on automatically when power is applied. Do not repeatedly press the ‘power key
(Figure-5 / ①) or the ‘ON’ key on the switch cable. If the microscope does not turn on after power is applied,
press the power button again to turn it on.
Adjust Magnification & Focus
①Use the large knobs on the optical bracket to raise or lower the optical stack to the desired height. The lower
the height, the greater the magnification is. But be careful not to let the bottom of the stack contact the object
being imaged. (Note that you may need to repose the spotlights as you move the stack up or down.)Turn the
Focus controller( ⑧ from the Figure 5) to focus the image.
②To increase the digital magnification, press and hold the Up button (③ from the Figure 5 ) until the desired
digital magnification(up to an additional 3x beyond the optical magnification) is reached. Use the Down (number
④ from Figure 5) button to decrease the digital magnification.
Using a Micro SD Card to Save Images
By using a micro-SD card, you can record videos and take photos and save them for later importing to your
computer or other devices for viewing and use. There is a TF card slot on the top of the back of the microscope,
just insert the micro-SD card into the slot.
Note:
1. TF card does not come with the microscope, please purchase your own, class 10 high-speed TF card is
recommended.
2. Note the card insertion direction, with the TF card chip facing downward, please refer to Figure 7.
3. Push it into the slot until it clicks, if the card is not in place, the card will be ejected.
If the display shows "Memory Card Full" or "Memory Card Error" after card insertion or when taking pictures and
videos, please format the memory card first.
Formatting steps are as follows: Press and hold the ‘M key’ - Short press the ‘M’ key - ‘V’(down) key -
Select the "Format" option - ‘OK’ key to confirm.
*If a TF card is inserted while the microscope is operating, the unit will automatically shut down. In this case,
press and hold the power switch button until the screen lights up again.
The MODE button (Figure 5/
②
, labeled "M") can be used to switch between three modes: Video Standby ( ),
Photo Mode ( ) and Playback Mode ( ). In video standby mode, the white number to the right of the icon
indicates the remaining memory of the memory card available for video recording.
Loading ...
Loading ...
Loading ...