+
+
−
−
-
+
A
A
2-YEAR LIMITED WARRANTY:
Valid in U.S.A. Only. If your Wahl product fails to operate satisfactorily
within two (2) years from the date of original purchase or receipt as a gift,
Wahl will, at our option, repair or replace the product and return it to you
FREE OF CHARGE.
HOW TO GET WARRANTY SERVICE:
Do not return this product to store where purchased. Products needing
repair under this warranty should be returned with postage prepaid to the
address provided. Or call 1-800-767-9245 for assistance.
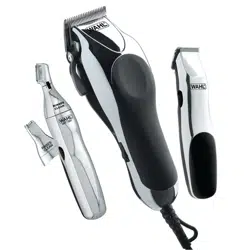
Battery
Touch-Up
Trimmer
Find us on social media:
@WAHLGROOMING
wahlUSA.com
1.800.767.9245
help@wahlclipper.com
WARRANTY
TIPS & TECHNIQUESTRIMMER CAREBATTERY REPLACEMENT
Model number can be found on the underside of the trimmer.
For Household Use Only
© 2022 WAHL CLIPPER CORPORATION
P.O. Box 578, St erling , Illinois 6108 1 USA
Art #3023759
v2022 .07
WHAT THIS WARRANTY DOES NOT COVER:
This warranty does not cover products damaged by: (1) Modication
or repair by anyone other than Wahl Clipper Corporation or a Wahl
authorized service center; (2) Commercial (non-consumer) use or
unreasonable use.
This warranty gives you specic legal rights, and you may also have other
rights which vary from state to state. No other written express warranty
is given. No responsibility is assumed for incidental or consequential
damages of any type or for the use of unauthorized attachments.
Some states may not allow the exclusion or limitation of incidental or
consequential damages, so the limitation may not apply to you. Warranty
valid in U.S.A. only. Outside U.S.A., check with store for Wahl authorized
distributor’s warranty.
Wahl Clipper Corp.
Attn: Repair Department
3001 Locust Street
Sterling, Illinois 61081
MAIL
TO
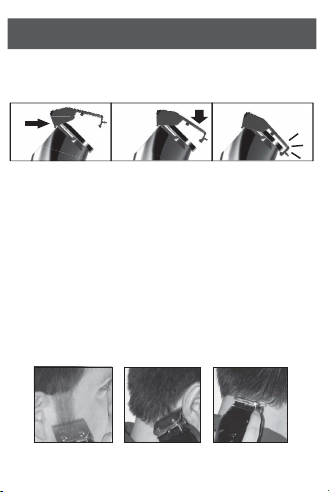
Sideburns
Ears
Neckline
When mailing, please include a note describing the defect and the date
of original purchase or receipt as a gift. Product out of warranty will be
repaired at our standard repair charges.
DETAILING / OUTLINING:
Use your trimmer without a guide comb for detailing and touch-ups
including sideburns, around ears, neckline, and cutting stray hairs from
around head or beard.
BATTERY TRIMMER MODELS:
• One battery units: 9962, 9966, 9307A
• Two battery units: 5537N, 5336, 5614, 9906
TROUBLESHOOTING:
If your trimmer fails to operate when switched “ON,” check your batteries
to see if they are properly installed. Make sure the switch is in the “ON”
position and check to be sure blades are free to move. If blades become
clogged with debris, manually pushing the blades back and forth a few
times while unit is turned “OFF” may help free the blades and allow the
trimmer to operate. Also, make sure blades are oiled per directions in this
sheet. If it still does not operate, your batteries have probably exceeded
their useful life. To maximize battery life, replace all batteries at the same
time.
Before trimming a thick beard, use a styling comb to comb it against the
direction it grows so all the hairs are facing the same direction.
Trimmer guide combs are available in different cutting lengths. If guides
are included, the number of guides and sizes will vary by kit.
Cutting against the grain cuts more hair; cutting with the grain cuts less
hair. Longer beards should be trimmed in the direction of hair growth.
Shorter styles can be trimmed in either direction.
To attach guide combs, hold comb with the teeth up. Snap guide comb
attachment rmly to the bottom of the trimmer blade.
To remove guide combs, while holding the top of the comb, place your
thumb on the underside of the comb and push up on tab to remove.
Motor bearings are permanently lubricated--do not attempt to oil. When
oiling your trimmer, turn the trimmer “ON-I,” hold the unit with the blades
facing DOWN and squeeze three drops across the front of the blade and
one drop on each side on the heel of the blade. Wipe off excess oil with
soft cloth.
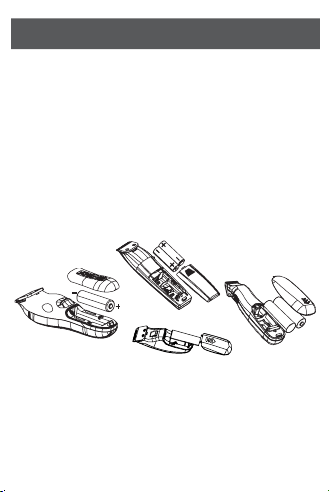
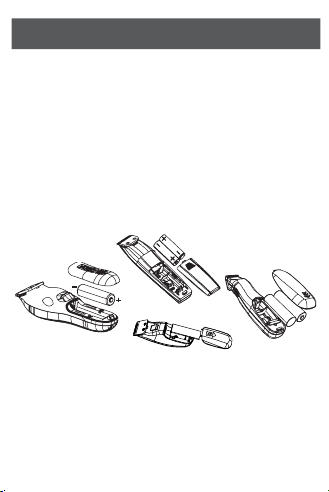
BATTERY INSTALLATION & REPLACEMENT:
1. To remove battery door cover: Slide cover off by using thumb to
push door away from trimmer. If replacing batteries, remove existing
batteries one at a time.
2. Insert one AA battery (for 9307A, 9966, 9962) or two AA batteries
(for 5537N, 5614, 9336, 9906) as indicated.
3. Replace battery cover to its original position.
4. Move switch upward to “ON” position to use.
5. To maximize battery life, trimmer should be shut “OFF” immediately
after using.
IMPORTANT: Be sure to insert the negative (-) end of each battery rst,
so that it depresses the spring of the battery compartment. Then slide
the positive (+) end in position. Do not allow the negative terminal clips to
bend and cut the casing of the batteries.
Carbon or alkaline batteries may be used with your Wahl trimmer. Alkaline
batteries will provide the longest operating time before battery replacement
is needed. Trimmer should run up to three hours on alkaline batteries.
OILING BLADES:
For best results, use Wahl Blade Oil on the blades only when
necessary, or approximately once a month.
BLADE CARE:
Trimmer blades have precision-hardened, ground and lapped cutting teeth.
Blades should be handled carefully and never bumped or used to cut dirty
or abrasive material. Never rinse the blades with water, or the blades
may rust. Clean with the included brush.
CLEANING / STORAGE:
Before storing your trimmer, use the cleaning brush to whisk any loose
hairs from the unit and the blades. Store unit in such a manner so that
blades are protected from damage. When the trimmer is not in use, the
trimmer blade guard attachment should be in place to protect the blades.
This appliance should be stored in a manner where it is not subjected to
crushing, heating above 100C (212F), or incineration.
NOTICE--DO NOT OVER OIL!
Excessive oiling or application of liquids will cause damage if allowed to
seep back into motor.
Model
9307A
Model
9966
Model
9962
Model
5537N
Model
5614
Model
9336
Model
9906
TRIMMER GUIDE COMBS: Not all kits include trimmer guide combs.
Trimmer guide comb attachments are used for blending, tapering, and
dening beards, as well as for achieving a stubble look around the face.
1 2 3
Model
9307A
Model 9962, 9966
Model 5537N, 5614, 9336
Model
9906
AA
AA
A
A
A
A
AA
+
+
−
−
-
+
A
A
2-YEAR LIMITED WARRANTY:
Valid in U.S.A. Only. If your Wahl product fails to operate satisfactorily
within two (2) years from the date of original purchase or receipt as a gift,
Wahl will, at our option, repair or replace the product and return it to you
FREE OF CHARGE.
HOW TO GET WARRANTY SERVICE:
Do not return this product to store where purchased. Products needing
repair under this warranty should be returned with postage prepaid to the
address provided. Or call 1-800-767-9245 for assistance.
Battery
Touch-Up
Trimmer
Find us on social media:
@WAHLGROOMING
wahlUSA.com
1.800.767.9245
help@wahlclipper.com
WARRANTY
TIPS & TECHNIQUESTRIMMER CAREBATTERY REPLACEMENT
Model number can be found on the underside of the trimmer.
For Household Use Only
© 2022 WAHL CLIPPER CORPORATION
P.O. Box 578, St erling , Illinois 6108 1 USA
Art #3023759
v2022 .07
WHAT THIS WARRANTY DOES NOT COVER:
This warranty does not cover products damaged by: (1) Modication
or repair by anyone other than Wahl Clipper Corporation or a Wahl
authorized service center; (2) Commercial (non-consumer) use or
unreasonable use.
This warranty gives you specic legal rights, and you may also have other
rights which vary from state to state. No other written express warranty
is given. No responsibility is assumed for incidental or consequential
damages of any type or for the use of unauthorized attachments.
Some states may not allow the exclusion or limitation of incidental or
consequential damages, so the limitation may not apply to you. Warranty
valid in U.S.A. only. Outside U.S.A., check with store for Wahl authorized
distributor’s warranty.
Wahl Clipper Corp.
Attn: Repair Department
3001 Locust Street
Sterling, Illinois 61081
MAIL
TO
Sideburns
Ears
Neckline
When mailing, please include a note describing the defect and the date
of original purchase or receipt as a gift. Product out of warranty will be
repaired at our standard repair charges.
DETAILING / OUTLINING:
Use your trimmer without a guide comb for detailing and touch-ups
including sideburns, around ears, neckline, and cutting stray hairs from
around head or beard.
BATTERY TRIMMER MODELS:
• One battery units: 9962, 9966, 9307A
• Two battery units: 5537N, 5336, 5614, 9906
TROUBLESHOOTING:
If your trimmer fails to operate when switched “ON,” check your batteries
to see if they are properly installed. Make sure the switch is in the “ON”
position and check to be sure blades are free to move. If blades become
clogged with debris, manually pushing the blades back and forth a few
times while unit is turned “OFF” may help free the blades and allow the
trimmer to operate. Also, make sure blades are oiled per directions in this
sheet. If it still does not operate, your batteries have probably exceeded
their useful life. To maximize battery life, replace all batteries at the same
time.
Before trimming a thick beard, use a styling comb to comb it against the
direction it grows so all the hairs are facing the same direction.
Trimmer guide combs are available in different cutting lengths. If guides
are included, the number of guides and sizes will vary by kit.
Cutting against the grain cuts more hair; cutting with the grain cuts less
hair. Longer beards should be trimmed in the direction of hair growth.
Shorter styles can be trimmed in either direction.
To attach guide combs, hold comb with the teeth up. Snap guide comb
attachment rmly to the bottom of the trimmer blade.
To remove guide combs, while holding the top of the comb, place your
thumb on the underside of the comb and push up on tab to remove.
Motor bearings are permanently lubricated--do not attempt to oil. When
oiling your trimmer, turn the trimmer “ON-I,” hold the unit with the blades
facing DOWN and squeeze three drops across the front of the blade and
one drop on each side on the heel of the blade. Wipe off excess oil with
soft cloth.
BATTERY INSTALLATION & REPLACEMENT:
1. To remove battery door cover: Slide cover off by using thumb to
push door away from trimmer. If replacing batteries, remove existing
batteries one at a time.
2. Insert one AA battery (for 9307A, 9966, 9962) or two AA batteries
(for 5537N, 5614, 9336, 9906) as indicated.
3. Replace battery cover to its original position.
4. Move switch upward to “ON” position to use.
5. To maximize battery life, trimmer should be shut “OFF” immediately
after using.
IMPORTANT: Be sure to insert the negative (-) end of each battery rst,
so that it depresses the spring of the battery compartment. Then slide
the positive (+) end in position. Do not allow the negative terminal clips to
bend and cut the casing of the batteries.
Carbon or alkaline batteries may be used with your Wahl trimmer. Alkaline
batteries will provide the longest operating time before battery replacement
is needed. Trimmer should run up to three hours on alkaline batteries.
OILING BLADES:
For best results, use Wahl Blade Oil on the blades only when
necessary, or approximately once a month.
BLADE CARE:
Trimmer blades have precision-hardened, ground and lapped cutting teeth.
Blades should be handled carefully and never bumped or used to cut dirty
or abrasive material. Never rinse the blades with water, or the blades
may rust. Clean with the included brush.
CLEANING / STORAGE:
Before storing your trimmer, use the cleaning brush to whisk any loose
hairs from the unit and the blades. Store unit in such a manner so that
blades are protected from damage. When the trimmer is not in use, the
trimmer blade guard attachment should be in place to protect the blades.
This appliance should be stored in a manner where it is not subjected to
crushing, heating above 100C (212F), or incineration.
NOTICE--DO NOT OVER OIL!
Excessive oiling or application of liquids will cause damage if allowed to
seep back into motor.
Model
9307A
Model
9966
Model
9962
Model
5537N
Model
5614
Model
9336
Model
9906
TRIMMER GUIDE COMBS: Not all kits include trimmer guide combs.
Trimmer guide comb attachments are used for blending, tapering, and
dening beards, as well as for achieving a stubble look around the face.
1 2 3
Model
9307A
Model 9962, 9966
Model 5537N, 5614, 9336
Model
9906
AA
AA
A
A
A
A
AA

+
+
−
−
-
+
A
A
2-YEAR LIMITED WARRANTY:
Valid in U.S.A. Only. If your Wahl product fails to operate satisfactorily
within two (2) years from the date of original purchase or receipt as a gift,
Wahl will, at our option, repair or replace the product and return it to you
FREE OF CHARGE.
HOW TO GET WARRANTY SERVICE:
Do not return this product to store where purchased. Products needing
repair under this warranty should be returned with postage prepaid to the
address provided. Or call 1-800-767-9245 for assistance.
Battery
Touch-Up
Trimmer
Find us on social media:
@WAHLGROOMING
wahlUSA.com
1.800.767.9245
help@wahlclipper.com
WARRANTY
TIPS & TECHNIQUESTRIMMER CAREBATTERY REPLACEMENT
Model number can be found on the underside of the trimmer.
For Household Use Only
© 2022 WAHL CLIPPER CORPORATION
P.O. Box 578, St erling , Illinois 6108 1 USA
Art #3023759
v2022 .07
WHAT THIS WARRANTY DOES NOT COVER:
This warranty does not cover products damaged by: (1) Modication
or repair by anyone other than Wahl Clipper Corporation or a Wahl
authorized service center; (2) Commercial (non-consumer) use or
unreasonable use.
This warranty gives you specic legal rights, and you may also have other
rights which vary from state to state. No other written express warranty
is given. No responsibility is assumed for incidental or consequential
damages of any type or for the use of unauthorized attachments.
Some states may not allow the exclusion or limitation of incidental or
consequential damages, so the limitation may not apply to you. Warranty
valid in U.S.A. only. Outside U.S.A., check with store for Wahl authorized
distributor’s warranty.
Wahl Clipper Corp.
Attn: Repair Department
3001 Locust Street
Sterling, Illinois 61081
MAIL
TO
Sideburns
Ears
Neckline
When mailing, please include a note describing the defect and the date
of original purchase or receipt as a gift. Product out of warranty will be
repaired at our standard repair charges.
DETAILING / OUTLINING:
Use your trimmer without a guide comb for detailing and touch-ups
including sideburns, around ears, neckline, and cutting stray hairs from
around head or beard.
BATTERY TRIMMER MODELS:
• One battery units: 9962, 9966, 9307A
• Two battery units: 5537N, 5336, 5614, 9906
TROUBLESHOOTING:
If your trimmer fails to operate when switched “ON,” check your batteries
to see if they are properly installed. Make sure the switch is in the “ON”
position and check to be sure blades are free to move. If blades become
clogged with debris, manually pushing the blades back and forth a few
times while unit is turned “OFF” may help free the blades and allow the
trimmer to operate. Also, make sure blades are oiled per directions in this
sheet. If it still does not operate, your batteries have probably exceeded
their useful life. To maximize battery life, replace all batteries at the same
time.
Before trimming a thick beard, use a styling comb to comb it against the
direction it grows so all the hairs are facing the same direction.
Trimmer guide combs are available in different cutting lengths. If guides
are included, the number of guides and sizes will vary by kit.
Cutting against the grain cuts more hair; cutting with the grain cuts less
hair. Longer beards should be trimmed in the direction of hair growth.
Shorter styles can be trimmed in either direction.
To attach guide combs, hold comb with the teeth up. Snap guide comb
attachment rmly to the bottom of the trimmer blade.
To remove guide combs, while holding the top of the comb, place your
thumb on the underside of the comb and push up on tab to remove.
Motor bearings are permanently lubricated--do not attempt to oil. When
oiling your trimmer, turn the trimmer “ON-I,” hold the unit with the blades
facing DOWN and squeeze three drops across the front of the blade and
one drop on each side on the heel of the blade. Wipe off excess oil with
soft cloth.
BATTERY INSTALLATION & REPLACEMENT:
1. To remove battery door cover: Slide cover off by using thumb to
push door away from trimmer. If replacing batteries, remove existing
batteries one at a time.
2. Insert one AA battery (for 9307A, 9966, 9962) or two AA batteries
(for 5537N, 5614, 9336, 9906) as indicated.
3. Replace battery cover to its original position.
4. Move switch upward to “ON” position to use.
5. To maximize battery life, trimmer should be shut “OFF” immediately
after using.
IMPORTANT: Be sure to insert the negative (-) end of each battery rst,
so that it depresses the spring of the battery compartment. Then slide
the positive (+) end in position. Do not allow the negative terminal clips to
bend and cut the casing of the batteries.
Carbon or alkaline batteries may be used with your Wahl trimmer. Alkaline
batteries will provide the longest operating time before battery replacement
is needed. Trimmer should run up to three hours on alkaline batteries.
OILING BLADES:
For best results, use Wahl Blade Oil on the blades only when
necessary, or approximately once a month.
BLADE CARE:
Trimmer blades have precision-hardened, ground and lapped cutting teeth.
Blades should be handled carefully and never bumped or used to cut dirty
or abrasive material. Never rinse the blades with water, or the blades
may rust. Clean with the included brush.
CLEANING / STORAGE:
Before storing your trimmer, use the cleaning brush to whisk any loose
hairs from the unit and the blades. Store unit in such a manner so that
blades are protected from damage. When the trimmer is not in use, the
trimmer blade guard attachment should be in place to protect the blades.
This appliance should be stored in a manner where it is not subjected to
crushing, heating above 100C (212F), or incineration.
NOTICE--DO NOT OVER OIL!
Excessive oiling or application of liquids will cause damage if allowed to
seep back into motor.
Model
9307A
Model
9966
Model
9962
Model
5537N
Model
5614
Model
9336
Model
9906
TRIMMER GUIDE COMBS: Not all kits include trimmer guide combs.
Trimmer guide comb attachments are used for blending, tapering, and
dening beards, as well as for achieving a stubble look around the face.
1 2 3
Model
9307A
Model 9962, 9966
Model 5537N, 5614, 9336
Model
9906
AA
AA
A
A
A
A
AA
+
+
−
−
-
+
A
A
2-YEAR LIMITED WARRANTY:
Valid in U.S.A. Only. If your Wahl product fails to operate satisfactorily
within two (2) years from the date of original purchase or receipt as a gift,
Wahl will, at our option, repair or replace the product and return it to you
FREE OF CHARGE.
HOW TO GET WARRANTY SERVICE:
Do not return this product to store where purchased. Products needing
repair under this warranty should be returned with postage prepaid to the
address provided. Or call 1-800-767-9245 for assistance.
Battery
Touch-Up
Trimmer
Find us on social media:
@WAHLGROOMING
wahlUSA.com
1.800.767.9245
help@wahlclipper.com
WARRANTY
TIPS & TECHNIQUESTRIMMER CAREBATTERY REPLACEMENT
Model number can be found on the underside of the trimmer.
For Household Use Only
© 2022 WAHL CLIPPER CORPORATION
P.O. Box 578, St erling , Illinois 6108 1 USA
Art #3023759
v2022 .07
WHAT THIS WARRANTY DOES NOT COVER:
This warranty does not cover products damaged by: (1) Modication
or repair by anyone other than Wahl Clipper Corporation or a Wahl
authorized service center; (2) Commercial (non-consumer) use or
unreasonable use.
This warranty gives you specic legal rights, and you may also have other
rights which vary from state to state. No other written express warranty
is given. No responsibility is assumed for incidental or consequential
damages of any type or for the use of unauthorized attachments.
Some states may not allow the exclusion or limitation of incidental or
consequential damages, so the limitation may not apply to you. Warranty
valid in U.S.A. only. Outside U.S.A., check with store for Wahl authorized
distributor’s warranty.
Wahl Clipper Corp.
Attn: Repair Department
3001 Locust Street
Sterling, Illinois 61081
MAIL
TO
Sideburns
Ears
Neckline
When mailing, please include a note describing the defect and the date
of original purchase or receipt as a gift. Product out of warranty will be
repaired at our standard repair charges.
DETAILING / OUTLINING:
Use your trimmer without a guide comb for detailing and touch-ups
including sideburns, around ears, neckline, and cutting stray hairs from
around head or beard.
BATTERY TRIMMER MODELS:
• One battery units: 9962, 9966, 9307A
• Two battery units: 5537N, 5336, 5614, 9906
TROUBLESHOOTING:
If your trimmer fails to operate when switched “ON,” check your batteries
to see if they are properly installed. Make sure the switch is in the “ON”
position and check to be sure blades are free to move. If blades become
clogged with debris, manually pushing the blades back and forth a few
times while unit is turned “OFF” may help free the blades and allow the
trimmer to operate. Also, make sure blades are oiled per directions in this
sheet. If it still does not operate, your batteries have probably exceeded
their useful life. To maximize battery life, replace all batteries at the same
time.
Before trimming a thick beard, use a styling comb to comb it against the
direction it grows so all the hairs are facing the same direction.
Trimmer guide combs are available in different cutting lengths. If guides
are included, the number of guides and sizes will vary by kit.
Cutting against the grain cuts more hair; cutting with the grain cuts less
hair. Longer beards should be trimmed in the direction of hair growth.
Shorter styles can be trimmed in either direction.
To attach guide combs, hold comb with the teeth up. Snap guide comb
attachment rmly to the bottom of the trimmer blade.
To remove guide combs, while holding the top of the comb, place your
thumb on the underside of the comb and push up on tab to remove.
Motor bearings are permanently lubricated--do not attempt to oil. When
oiling your trimmer, turn the trimmer “ON-I,” hold the unit with the blades
facing DOWN and squeeze three drops across the front of the blade and
one drop on each side on the heel of the blade. Wipe off excess oil with
soft cloth.
BATTERY INSTALLATION & REPLACEMENT:
1. To remove battery door cover: Slide cover off by using thumb to
push door away from trimmer. If replacing batteries, remove existing
batteries one at a time.
2. Insert one AA battery (for 9307A, 9966, 9962) or two AA batteries
(for 5537N, 5614, 9336, 9906) as indicated.
3. Replace battery cover to its original position.
4. Move switch upward to “ON” position to use.
5. To maximize battery life, trimmer should be shut “OFF” immediately
after using.
IMPORTANT: Be sure to insert the negative (-) end of each battery rst,
so that it depresses the spring of the battery compartment. Then slide
the positive (+) end in position. Do not allow the negative terminal clips to
bend and cut the casing of the batteries.
Carbon or alkaline batteries may be used with your Wahl trimmer. Alkaline
batteries will provide the longest operating time before battery replacement
is needed. Trimmer should run up to three hours on alkaline batteries.
OILING BLADES:
For best results, use Wahl Blade Oil on the blades only when
necessary, or approximately once a month.
BLADE CARE:
Trimmer blades have precision-hardened, ground and lapped cutting teeth.
Blades should be handled carefully and never bumped or used to cut dirty
or abrasive material. Never rinse the blades with water, or the blades
may rust. Clean with the included brush.
CLEANING / STORAGE:
Before storing your trimmer, use the cleaning brush to whisk any loose
hairs from the unit and the blades. Store unit in such a manner so that
blades are protected from damage. When the trimmer is not in use, the
trimmer blade guard attachment should be in place to protect the blades.
This appliance should be stored in a manner where it is not subjected to
crushing, heating above 100C (212F), or incineration.
NOTICE--DO NOT OVER OIL!
Excessive oiling or application of liquids will cause damage if allowed to
seep back into motor.
Model
9307A
Model
9966
Model
9962
Model
5537N
Model
5614
Model
9336
Model
9906
TRIMMER GUIDE COMBS: Not all kits include trimmer guide combs.
Trimmer guide comb attachments are used for blending, tapering, and
dening beards, as well as for achieving a stubble look around the face.
1 2 3
Model
9307A
Model 9962, 9966
Model 5537N, 5614, 9336
Model
9906
AA
AA
A
A
A
A
AA

+
+
−
−
-
+
A
A
2-YEAR LIMITED WARRANTY:
Valid in U.S.A. Only. If your Wahl product fails to operate satisfactorily
within two (2) years from the date of original purchase or receipt as a gift,
Wahl will, at our option, repair or replace the product and return it to you
FREE OF CHARGE.
HOW TO GET WARRANTY SERVICE:
Do not return this product to store where purchased. Products needing
repair under this warranty should be returned with postage prepaid to the
address provided. Or call 1-800-767-9245 for assistance.
Battery
Touch-Up
Trimmer
Find us on social media:
@WAHLGROOMING
wahlUSA.com
1.800.767.9245
help@wahlclipper.com
WARRANTY
TIPS & TECHNIQUESTRIMMER CAREBATTERY REPLACEMENT
Model number can be found on the underside of the trimmer.
For Household Use Only
© 2022 WAHL CLIPPER CORPORATION
P.O. Box 578, St erling , Illinois 6108 1 USA
Art #3023759
v2022 .07
WHAT THIS WARRANTY DOES NOT COVER:
This warranty does not cover products damaged by: (1) Modication
or repair by anyone other than Wahl Clipper Corporation or a Wahl
authorized service center; (2) Commercial (non-consumer) use or
unreasonable use.
This warranty gives you specic legal rights, and you may also have other
rights which vary from state to state. No other written express warranty
is given. No responsibility is assumed for incidental or consequential
damages of any type or for the use of unauthorized attachments.
Some states may not allow the exclusion or limitation of incidental or
consequential damages, so the limitation may not apply to you. Warranty
valid in U.S.A. only. Outside U.S.A., check with store for Wahl authorized
distributor’s warranty.
Wahl Clipper Corp.
Attn: Repair Department
3001 Locust Street
Sterling, Illinois 61081
MAIL
TO
Sideburns
Ears
Neckline
When mailing, please include a note describing the defect and the date
of original purchase or receipt as a gift. Product out of warranty will be
repaired at our standard repair charges.
DETAILING / OUTLINING:
Use your trimmer without a guide comb for detailing and touch-ups
including sideburns, around ears, neckline, and cutting stray hairs from
around head or beard.
BATTERY TRIMMER MODELS:
• One battery units: 9962, 9966, 9307A
• Two battery units: 5537N, 5336, 5614, 9906
TROUBLESHOOTING:
If your trimmer fails to operate when switched “ON,” check your batteries
to see if they are properly installed. Make sure the switch is in the “ON”
position and check to be sure blades are free to move. If blades become
clogged with debris, manually pushing the blades back and forth a few
times while unit is turned “OFF” may help free the blades and allow the
trimmer to operate. Also, make sure blades are oiled per directions in this
sheet. If it still does not operate, your batteries have probably exceeded
their useful life. To maximize battery life, replace all batteries at the same
time.
Before trimming a thick beard, use a styling comb to comb it against the
direction it grows so all the hairs are facing the same direction.
Trimmer guide combs are available in different cutting lengths. If guides
are included, the number of guides and sizes will vary by kit.
Cutting against the grain cuts more hair; cutting with the grain cuts less
hair. Longer beards should be trimmed in the direction of hair growth.
Shorter styles can be trimmed in either direction.
To attach guide combs, hold comb with the teeth up. Snap guide comb
attachment rmly to the bottom of the trimmer blade.
To remove guide combs, while holding the top of the comb, place your
thumb on the underside of the comb and push up on tab to remove.
Motor bearings are permanently lubricated--do not attempt to oil. When
oiling your trimmer, turn the trimmer “ON-I,” hold the unit with the blades
facing DOWN and squeeze three drops across the front of the blade and
one drop on each side on the heel of the blade. Wipe off excess oil with
soft cloth.
BATTERY INSTALLATION & REPLACEMENT:
1. To remove battery door cover: Slide cover off by using thumb to
push door away from trimmer. If replacing batteries, remove existing
batteries one at a time.
2. Insert one AA battery (for 9307A, 9966, 9962) or two AA batteries
(for 5537N, 5614, 9336, 9906) as indicated.
3. Replace battery cover to its original position.
4. Move switch upward to “ON” position to use.
5. To maximize battery life, trimmer should be shut “OFF” immediately
after using.
IMPORTANT: Be sure to insert the negative (-) end of each battery rst,
so that it depresses the spring of the battery compartment. Then slide
the positive (+) end in position. Do not allow the negative terminal clips to
bend and cut the casing of the batteries.
Carbon or alkaline batteries may be used with your Wahl trimmer. Alkaline
batteries will provide the longest operating time before battery replacement
is needed. Trimmer should run up to three hours on alkaline batteries.
OILING BLADES:
For best results, use Wahl Blade Oil on the blades only when
necessary, or approximately once a month.
BLADE CARE:
Trimmer blades have precision-hardened, ground and lapped cutting teeth.
Blades should be handled carefully and never bumped or used to cut dirty
or abrasive material. Never rinse the blades with water, or the blades
may rust. Clean with the included brush.
CLEANING / STORAGE:
Before storing your trimmer, use the cleaning brush to whisk any loose
hairs from the unit and the blades. Store unit in such a manner so that
blades are protected from damage. When the trimmer is not in use, the
trimmer blade guard attachment should be in place to protect the blades.
This appliance should be stored in a manner where it is not subjected to
crushing, heating above 100C (212F), or incineration.
NOTICE--DO NOT OVER OIL!
Excessive oiling or application of liquids will cause damage if allowed to
seep back into motor.
Model
9307A
Model
9966
Model
9962
Model
5537N
Model
5614
Model
9336
Model
9906
TRIMMER GUIDE COMBS: Not all kits include trimmer guide combs.
Trimmer guide comb attachments are used for blending, tapering, and
dening beards, as well as for achieving a stubble look around the face.
1 2 3
Model
9307A
Model 9962, 9966
Model 5537N, 5614, 9336
Model
9906
AA
AA
A
A
A
A
AA
+
+
−
−
-
+
A
A
GARANTÍA LIMITADA DE 2 AÑOS:
Válida solamente en EE.UU. Si su producto Wahl no funciona de forma
satisfactoria durante un período de dos (2) años contados a partir de
la fecha original de compra o de recibirlo como regalo, Wahl reparará o
reemplazará el producto a su criterio y se lo devolverá SIN CARGO.
CÓMO OBTENER EL SERVICIO DE GARANTÍA:
No devuelva este producto a la tienda donde fue adquirido. Los productos
que necesiten ser reparados conforme a esta garantía deben enviarse
con franqueo pagado a la dirección indicada. O llame al 1-800-767-9245
para recibir asistencia.
Recortadora a
baterías para
retocar
Encuéntrenos en redes sociales:
@WAHLGROOMING
wahlUSA.com
1.800.767.9245
help@wahlclipper.com
GARANTÍA
CONSEJOS Y TÉCNICAS
CUIDADO DE LA RECORTADORA
REEMPLAZO DE LA BATERÍA
Puede ver el número de modelo en la parte inferior de la recortadora.
Solo para uso doméstico
© 2022 WAHL CLIPPER CORPO RATION
P.O. Box 578, Sterling, Illinois 61 081 USA
Art #3023759
v2022.07
ESTA GARANTÍA NO CUBRE LO SIGUIENTE:
Esta garantía no cubre los productos dañados por las siguientes causas:
(1) Modicación o reparación efectuada por alguna persona que no
pertenezca a Wahl Clipper Corporation ni a un centro de servicio
autorizado por Wahl; (2) Uso comercial (no doméstico) o no razonable.
Esta garantía le otorga derechos legales especícos y usted también
puede tener otros derechos que varían en cada estado. No se otorga
ninguna otra garantía explícita por escrito. No se asume responsabilidad
alguna por daños indirectos o consecuentes de cualquier tipo, ni por el
uso de accesorios no autorizados. Algunos estados pueden prohibir la
exclusión o la limitación de daños indirectos o consecuentes, de modo
que esta limitación puede no aplicarse a su caso. Garantía sólo válida en
EE.UU. Fuera de EE.UU., pregunte en la tienda sobre la garantía del
distribuidor autorizado de Wahl.
Wahl Clipper Corp.
Attn: Repair Department
3001 Locust Street
Sterling, Illinois 61081
ENVÍE SU
PRODUCTO POR
CORREO A:
Patillas
Orejas
Línea del cuello
Cuando envíe un paquete por correo, incluya una nota que describa el
defecto y la fecha original en que se compró o se recibió como regalo.
Los productos fuera de garantía se repararán aplicando nuestros cargos
de reparación estándar.
DETALLADO / DELINEADO:
Use su recortadora sin peine guía para detallado y retoques, incluyendo
patillas largas, alrededor de las orejas, la línea del cuello y el recorte de
cabellos aislados alrededor de la cabeza o la barba.
MODELOS DE RECORTADORAS A BATERÍAS
• Unidades con una batería: 9962, 9966, 9307A
• Unidades con dos baterías: 5537N, 5336, 5614, 9906
SOLUCIÓN DE PROBLEMAS:
Si su recortadora no funciona cuanto coloca el interruptor en la posición
“ON”, verique que las baterías estén instaladas correctamente. Asegúrese
de que el interruptor esté en la posición “ON” y de que las cuchillas no
están bloqueadas. Si las cuchillas se atascan con residuos, presione
las cuchillas manualmente hacia atrás y adelante un par de veces
mientras la unidad está apagada para ayudar a liberarlas y permitir
que la recortadora funcione. Además, asegúrese de que las cuchillas
se lubriquen siguiendo las instrucciones de esta hoja. Si continúa sin
funcionar, es posible que se hayan agotado las baterías. Para maximizar
la vida útil de las baterías, reemplace todas las baterías al mismo tiempo.
Antes de recortar una barba poblada, use un peine de peluquero para
peinarla en contra de la dirección del crecimiento, para que todos los
cabellos volteen en la misma dirección.
Hay disponibles peines guía para la recortadora con diferentes longitudes
de corte. Si se incluyen las guías, la cantidad y el tamaño de las guías
variará en cada juego.
Al cortar contra el crecimiento se corta más cabello; al cortar a favor
del crecimiento se corta menos cabello. Las barbas más largas deben
recortarse en la dirección del crecimiento. Los estilos más cortos pueden
recortarse en cualquier dirección.
Para conectar los peines guía, sostenga el peine con los dientes hacia
arriba. Inserte el accesorio del peine guía con rmeza en la parte inferior
de la cuchilla de la recortadora.
Para quitar los peines guía, mientras sujeta la parte superior del peine,
coloque su pulgar en la parte inferior del peine y empuje la lengüeta hacia
arriba para quitarlo.
Los cojinetes del motor se lubrican de forma permanente, no intente
lubricarlos. Cuando lubrique su recortadora, colóquela en posición de
encendido (“ON – I”), sostenga la unidad con las cuchillas mirando hacia
ABAJO y escurra tres gotas por la parte delantera de las cuchillas y una
en cada lado de la parte plana de la cuchilla. Limpie el exceso de aceite
con un paño suave.
INSTALACIÓN Y REEMPLAZO DE LAS BATERÍAS:
1) Para quitar la cubierta de las baterías: Quite la cubierta deslizándola
con el pulgar para sacarla de la recortadora. Si va a reemplazar las
baterías, saque las baterías actuales una a la vez.
2) Inserte una batería AA (para los modelos 9307A, 9966, 9962) o dos
baterías AA (para los modelos 5537N, 5614, 9336, 9906) como se
indica.
3) Vuelva a colocar la cubierta de las baterías en su posición original.
4) Mueva el interruptor hacia arriba a la posición “ON” (Encendido) para
usarla.
5) Para maximizar la vida útil de la batería, la recortadora se debe apagar
(colocar en posición “OFF”) inmediatamente después de usarla.
IMPORTANTE: Asegúrese de insertar primero el extremo negativo (-)
de cada batería para que comprima el resorte del compartimento de
la batería. Luego deslice el extremo positivo (+) para colocarlo en su
posición. No permita que los sujetadores del extremo negativo se doblen
y corten la carcasa de las baterías.
Puede usar baterías de carbono o alcalinas con su recortadora Wahl.
Las baterías alcalinas le brindarán el tiempo de funcionamiento más
prolongado antes de necesitar un reemplazo. La recortadora debe
funcionar hasta tres horas con baterías alcalinas.
LUBRICACIÓN DE LAS CUCHILLAS:
Para lograr resultados óptimos, use aceite para cuchillas Wahl en las
cuchillas solo cuando sea necesario o aproximadamente una vez al mes.
CUIDADO DE LAS CUCHILLAS:
Las cuchillas de la recortadora tienen dientes templados a precisión,
esmerilados y pulidos. Las cuchillas deben manipularse con cuidado y
nunca deben golpearse o usarse para cortar material sucio o abrasivo.
Nunca enjuague las cuchillas con agua, ya que pueden oxidarse.
Límpielas con el cepillo incluido.
LIMPIEZA / ALMACENAMIENTO:
Antes de guardar su recortadora, use el cepillo de limpieza para retirar
cualquier vello suelto de la unidad y de las cuchillas. Guarde la unidad
de manera que las cuchillas queden protegidas de posibles daños.
Cuando la recortadora no esté en uso, el accesorio protector de cuchillas
de la recortadora debe estar colocado de forma tal que se protejan las
cuchillas. Este aparato debe guardarse de manera que no se aplaste ni se
someta a temperaturas superiores a los 100°C (212°F) ni al fuego.
IMPORTANTE: ¡NO COLOQUE ACEITE EN EXCESO!
La aplicación excesiva de aceite o líquidos ocasionará daños si se ltran
hacia el motor.
Modelo
9307A
Modelo
9966
Modelo
9962
Modelo
5537N
Modelo
5614
Modelo
9336
Modelo
9906
PEINES GUÍA DE LA RECORTADORA: No todos los juegos incluyen
peines guía de recortadora.
Los aditamentos de peines guía de la recortadora se usan para combinar,
desvanecer y denir barbas, y también para lograr un aspecto de barba
incipiente en el rostro.
1 2 3
Modelo
9307A
Modelo 9962, 9966
Modelo 5537N, 5614, 9336
Modelo
9906
A
A
AA
A
A
A
A
AA
+
+
−
−
-
+
A
A
GARANTÍA LIMITADA DE 2 AÑOS:
Válida solamente en EE.UU. Si su producto Wahl no funciona de forma
satisfactoria durante un período de dos (2) años contados a partir de
la fecha original de compra o de recibirlo como regalo, Wahl reparará o
reemplazará el producto a su criterio y se lo devolverá SIN CARGO.
CÓMO OBTENER EL SERVICIO DE GARANTÍA:
No devuelva este producto a la tienda donde fue adquirido. Los productos
que necesiten ser reparados conforme a esta garantía deben enviarse
con franqueo pagado a la dirección indicada. O llame al 1-800-767-9245
para recibir asistencia.
Recortadora a
baterías para
retocar
Encuéntrenos en redes sociales:
@WAHLGROOMING
wahlUSA.com
1.800.767.9245
help@wahlclipper.com
GARANTÍA
CONSEJOS Y TÉCNICAS
CUIDADO DE LA RECORTADORA
REEMPLAZO DE LA BATERÍA
Puede ver el número de modelo en la parte inferior de la recortadora.
Solo para uso doméstico
© 2022 WAHL CLIPPER CORPO RATION
P.O. Box 578, Sterling, Illinois 61 081 USA
Art #3023759
v2022.07
ESTA GARANTÍA NO CUBRE LO SIGUIENTE:
Esta garantía no cubre los productos dañados por las siguientes causas:
(1) Modicación o reparación efectuada por alguna persona que no
pertenezca a Wahl Clipper Corporation ni a un centro de servicio
autorizado por Wahl; (2) Uso comercial (no doméstico) o no razonable.
Esta garantía le otorga derechos legales especícos y usted también
puede tener otros derechos que varían en cada estado. No se otorga
ninguna otra garantía explícita por escrito. No se asume responsabilidad
alguna por daños indirectos o consecuentes de cualquier tipo, ni por el
uso de accesorios no autorizados. Algunos estados pueden prohibir la
exclusión o la limitación de daños indirectos o consecuentes, de modo
que esta limitación puede no aplicarse a su caso. Garantía sólo válida en
EE.UU. Fuera de EE.UU., pregunte en la tienda sobre la garantía del
distribuidor autorizado de Wahl.
Wahl Clipper Corp.
Attn: Repair Department
3001 Locust Street
Sterling, Illinois 61081
ENVÍE SU
PRODUCTO POR
CORREO A:
Patillas
Orejas
Línea del cuello
Cuando envíe un paquete por correo, incluya una nota que describa el
defecto y la fecha original en que se compró o se recibió como regalo.
Los productos fuera de garantía se repararán aplicando nuestros cargos
de reparación estándar.
DETALLADO / DELINEADO:
Use su recortadora sin peine guía para detallado y retoques, incluyendo
patillas largas, alrededor de las orejas, la línea del cuello y el recorte de
cabellos aislados alrededor de la cabeza o la barba.
MODELOS DE RECORTADORAS A BATERÍAS
• Unidades con una batería: 9962, 9966, 9307A
• Unidades con dos baterías: 5537N, 5336, 5614, 9906
SOLUCIÓN DE PROBLEMAS:
Si su recortadora no funciona cuanto coloca el interruptor en la posición
“ON”, verique que las baterías estén instaladas correctamente. Asegúrese
de que el interruptor esté en la posición “ON” y de que las cuchillas no
están bloqueadas. Si las cuchillas se atascan con residuos, presione
las cuchillas manualmente hacia atrás y adelante un par de veces
mientras la unidad está apagada para ayudar a liberarlas y permitir
que la recortadora funcione. Además, asegúrese de que las cuchillas
se lubriquen siguiendo las instrucciones de esta hoja. Si continúa sin
funcionar, es posible que se hayan agotado las baterías. Para maximizar
la vida útil de las baterías, reemplace todas las baterías al mismo tiempo.
Antes de recortar una barba poblada, use un peine de peluquero para
peinarla en contra de la dirección del crecimiento, para que todos los
cabellos volteen en la misma dirección.
Hay disponibles peines guía para la recortadora con diferentes longitudes
de corte. Si se incluyen las guías, la cantidad y el tamaño de las guías
variará en cada juego.
Al cortar contra el crecimiento se corta más cabello; al cortar a favor
del crecimiento se corta menos cabello. Las barbas más largas deben
recortarse en la dirección del crecimiento. Los estilos más cortos pueden
recortarse en cualquier dirección.
Para conectar los peines guía, sostenga el peine con los dientes hacia
arriba. Inserte el accesorio del peine guía con rmeza en la parte inferior
de la cuchilla de la recortadora.
Para quitar los peines guía, mientras sujeta la parte superior del peine,
coloque su pulgar en la parte inferior del peine y empuje la lengüeta hacia
arriba para quitarlo.
Los cojinetes del motor se lubrican de forma permanente, no intente
lubricarlos. Cuando lubrique su recortadora, colóquela en posición de
encendido (“ON – I”), sostenga la unidad con las cuchillas mirando hacia
ABAJO y escurra tres gotas por la parte delantera de las cuchillas y una
en cada lado de la parte plana de la cuchilla. Limpie el exceso de aceite
con un paño suave.
INSTALACIÓN Y REEMPLAZO DE LAS BATERÍAS:
1) Para quitar la cubierta de las baterías: Quite la cubierta deslizándola
con el pulgar para sacarla de la recortadora. Si va a reemplazar las
baterías, saque las baterías actuales una a la vez.
2) Inserte una batería AA (para los modelos 9307A, 9966, 9962) o dos
baterías AA (para los modelos 5537N, 5614, 9336, 9906) como se
indica.
3) Vuelva a colocar la cubierta de las baterías en su posición original.
4) Mueva el interruptor hacia arriba a la posición “ON” (Encendido) para
usarla.
5) Para maximizar la vida útil de la batería, la recortadora se debe apagar
(colocar en posición “OFF”) inmediatamente después de usarla.
IMPORTANTE: Asegúrese de insertar primero el extremo negativo (-)
de cada batería para que comprima el resorte del compartimento de
la batería. Luego deslice el extremo positivo (+) para colocarlo en su
posición. No permita que los sujetadores del extremo negativo se doblen
y corten la carcasa de las baterías.
Puede usar baterías de carbono o alcalinas con su recortadora Wahl.
Las baterías alcalinas le brindarán el tiempo de funcionamiento más
prolongado antes de necesitar un reemplazo. La recortadora debe
funcionar hasta tres horas con baterías alcalinas.
LUBRICACIÓN DE LAS CUCHILLAS:
Para lograr resultados óptimos, use aceite para cuchillas Wahl en las
cuchillas solo cuando sea necesario o aproximadamente una vez al mes.
CUIDADO DE LAS CUCHILLAS:
Las cuchillas de la recortadora tienen dientes templados a precisión,
esmerilados y pulidos. Las cuchillas deben manipularse con cuidado y
nunca deben golpearse o usarse para cortar material sucio o abrasivo.
Nunca enjuague las cuchillas con agua, ya que pueden oxidarse.
Límpielas con el cepillo incluido.
LIMPIEZA / ALMACENAMIENTO:
Antes de guardar su recortadora, use el cepillo de limpieza para retirar
cualquier vello suelto de la unidad y de las cuchillas. Guarde la unidad
de manera que las cuchillas queden protegidas de posibles daños.
Cuando la recortadora no esté en uso, el accesorio protector de cuchillas
de la recortadora debe estar colocado de forma tal que se protejan las
cuchillas. Este aparato debe guardarse de manera que no se aplaste ni se
someta a temperaturas superiores a los 100°C (212°F) ni al fuego.
IMPORTANTE: ¡NO COLOQUE ACEITE EN EXCESO!
La aplicación excesiva de aceite o líquidos ocasionará daños si se ltran
hacia el motor.
Modelo
9307A
Modelo
9966
Modelo
9962
Modelo
5537N
Modelo
5614
Modelo
9336
Modelo
9906
PEINES GUÍA DE LA RECORTADORA: No todos los juegos incluyen
peines guía de recortadora.
Los aditamentos de peines guía de la recortadora se usan para combinar,
desvanecer y denir barbas, y también para lograr un aspecto de barba
incipiente en el rostro.
1 2 3
Modelo
9307A
Modelo 9962, 9966
Modelo 5537N, 5614, 9336
Modelo
9906
A
A
AA
A
A
A
A
AA

+
+
−
−
-
+
A
A
GARANTÍA LIMITADA DE 2 AÑOS:
Válida solamente en EE.UU. Si su producto Wahl no funciona de forma
satisfactoria durante un período de dos (2) años contados a partir de
la fecha original de compra o de recibirlo como regalo, Wahl reparará o
reemplazará el producto a su criterio y se lo devolverá SIN CARGO.
CÓMO OBTENER EL SERVICIO DE GARANTÍA:
No devuelva este producto a la tienda donde fue adquirido. Los productos
que necesiten ser reparados conforme a esta garantía deben enviarse
con franqueo pagado a la dirección indicada. O llame al 1-800-767-9245
para recibir asistencia.
Recortadora a
baterías para
retocar
Encuéntrenos en redes sociales:
@WAHLGROOMING
wahlUSA.com
1.800.767.9245
help@wahlclipper.com
GARANTÍA
CONSEJOS Y TÉCNICAS
CUIDADO DE LA RECORTADORA
REEMPLAZO DE LA BATERÍA
Puede ver el número de modelo en la parte inferior de la recortadora.
Solo para uso doméstico
© 2022 WAHL CLIPPER CORPO RATION
P.O. Box 578, Sterling, Illinois 61 081 USA
Art #3023759
v2022.07
ESTA GARANTÍA NO CUBRE LO SIGUIENTE:
Esta garantía no cubre los productos dañados por las siguientes causas:
(1) Modicación o reparación efectuada por alguna persona que no
pertenezca a Wahl Clipper Corporation ni a un centro de servicio
autorizado por Wahl; (2) Uso comercial (no doméstico) o no razonable.
Esta garantía le otorga derechos legales especícos y usted también
puede tener otros derechos que varían en cada estado. No se otorga
ninguna otra garantía explícita por escrito. No se asume responsabilidad
alguna por daños indirectos o consecuentes de cualquier tipo, ni por el
uso de accesorios no autorizados. Algunos estados pueden prohibir la
exclusión o la limitación de daños indirectos o consecuentes, de modo
que esta limitación puede no aplicarse a su caso. Garantía sólo válida en
EE.UU. Fuera de EE.UU., pregunte en la tienda sobre la garantía del
distribuidor autorizado de Wahl.
Wahl Clipper Corp.
Attn: Repair Department
3001 Locust Street
Sterling, Illinois 61081
ENVÍE SU
PRODUCTO POR
CORREO A:
Patillas
Orejas
Línea del cuello
Cuando envíe un paquete por correo, incluya una nota que describa el
defecto y la fecha original en que se compró o se recibió como regalo.
Los productos fuera de garantía se repararán aplicando nuestros cargos
de reparación estándar.
DETALLADO / DELINEADO:
Use su recortadora sin peine guía para detallado y retoques, incluyendo
patillas largas, alrededor de las orejas, la línea del cuello y el recorte de
cabellos aislados alrededor de la cabeza o la barba.
MODELOS DE RECORTADORAS A BATERÍAS
• Unidades con una batería: 9962, 9966, 9307A
• Unidades con dos baterías: 5537N, 5336, 5614, 9906
SOLUCIÓN DE PROBLEMAS:
Si su recortadora no funciona cuanto coloca el interruptor en la posición
“ON”, verique que las baterías estén instaladas correctamente. Asegúrese
de que el interruptor esté en la posición “ON” y de que las cuchillas no
están bloqueadas. Si las cuchillas se atascan con residuos, presione
las cuchillas manualmente hacia atrás y adelante un par de veces
mientras la unidad está apagada para ayudar a liberarlas y permitir
que la recortadora funcione. Además, asegúrese de que las cuchillas
se lubriquen siguiendo las instrucciones de esta hoja. Si continúa sin
funcionar, es posible que se hayan agotado las baterías. Para maximizar
la vida útil de las baterías, reemplace todas las baterías al mismo tiempo.
Antes de recortar una barba poblada, use un peine de peluquero para
peinarla en contra de la dirección del crecimiento, para que todos los
cabellos volteen en la misma dirección.
Hay disponibles peines guía para la recortadora con diferentes longitudes
de corte. Si se incluyen las guías, la cantidad y el tamaño de las guías
variará en cada juego.
Al cortar contra el crecimiento se corta más cabello; al cortar a favor
del crecimiento se corta menos cabello. Las barbas más largas deben
recortarse en la dirección del crecimiento. Los estilos más cortos pueden
recortarse en cualquier dirección.
Para conectar los peines guía, sostenga el peine con los dientes hacia
arriba. Inserte el accesorio del peine guía con rmeza en la parte inferior
de la cuchilla de la recortadora.
Para quitar los peines guía, mientras sujeta la parte superior del peine,
coloque su pulgar en la parte inferior del peine y empuje la lengüeta hacia
arriba para quitarlo.
Los cojinetes del motor se lubrican de forma permanente, no intente
lubricarlos. Cuando lubrique su recortadora, colóquela en posición de
encendido (“ON – I”), sostenga la unidad con las cuchillas mirando hacia
ABAJO y escurra tres gotas por la parte delantera de las cuchillas y una
en cada lado de la parte plana de la cuchilla. Limpie el exceso de aceite
con un paño suave.
INSTALACIÓN Y REEMPLAZO DE LAS BATERÍAS:
1) Para quitar la cubierta de las baterías: Quite la cubierta deslizándola
con el pulgar para sacarla de la recortadora. Si va a reemplazar las
baterías, saque las baterías actuales una a la vez.
2) Inserte una batería AA (para los modelos 9307A, 9966, 9962) o dos
baterías AA (para los modelos 5537N, 5614, 9336, 9906) como se
indica.
3) Vuelva a colocar la cubierta de las baterías en su posición original.
4) Mueva el interruptor hacia arriba a la posición “ON” (Encendido) para
usarla.
5) Para maximizar la vida útil de la batería, la recortadora se debe apagar
(colocar en posición “OFF”) inmediatamente después de usarla.
IMPORTANTE: Asegúrese de insertar primero el extremo negativo (-)
de cada batería para que comprima el resorte del compartimento de
la batería. Luego deslice el extremo positivo (+) para colocarlo en su
posición. No permita que los sujetadores del extremo negativo se doblen
y corten la carcasa de las baterías.
Puede usar baterías de carbono o alcalinas con su recortadora Wahl.
Las baterías alcalinas le brindarán el tiempo de funcionamiento más
prolongado antes de necesitar un reemplazo. La recortadora debe
funcionar hasta tres horas con baterías alcalinas.
LUBRICACIÓN DE LAS CUCHILLAS:
Para lograr resultados óptimos, use aceite para cuchillas Wahl en las
cuchillas solo cuando sea necesario o aproximadamente una vez al mes.
CUIDADO DE LAS CUCHILLAS:
Las cuchillas de la recortadora tienen dientes templados a precisión,
esmerilados y pulidos. Las cuchillas deben manipularse con cuidado y
nunca deben golpearse o usarse para cortar material sucio o abrasivo.
Nunca enjuague las cuchillas con agua, ya que pueden oxidarse.
Límpielas con el cepillo incluido.
LIMPIEZA / ALMACENAMIENTO:
Antes de guardar su recortadora, use el cepillo de limpieza para retirar
cualquier vello suelto de la unidad y de las cuchillas. Guarde la unidad
de manera que las cuchillas queden protegidas de posibles daños.
Cuando la recortadora no esté en uso, el accesorio protector de cuchillas
de la recortadora debe estar colocado de forma tal que se protejan las
cuchillas. Este aparato debe guardarse de manera que no se aplaste ni se
someta a temperaturas superiores a los 100°C (212°F) ni al fuego.
IMPORTANTE: ¡NO COLOQUE ACEITE EN EXCESO!
La aplicación excesiva de aceite o líquidos ocasionará daños si se ltran
hacia el motor.
Modelo
9307A
Modelo
9966
Modelo
9962
Modelo
5537N
Modelo
5614
Modelo
9336
Modelo
9906
PEINES GUÍA DE LA RECORTADORA: No todos los juegos incluyen
peines guía de recortadora.
Los aditamentos de peines guía de la recortadora se usan para combinar,
desvanecer y denir barbas, y también para lograr un aspecto de barba
incipiente en el rostro.
1 2 3
Modelo
9307A
Modelo 9962, 9966
Modelo 5537N, 5614, 9336
Modelo
9906
A
A
AA
A
A
A
A
AA
