User Manual
TIPS & TECHNIQUES
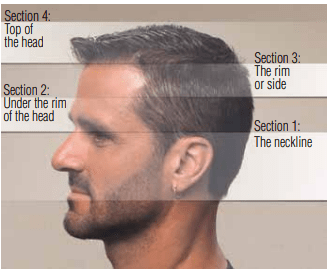
When you cut your hair, you should visualize the head as if it were divided into four sections. Image below shows the different sections. Using proper techniques Haircutting when moving from one section to the next will help you blend the sections together for professional looking results.
- The first time you cut hair, cut only a small amount of hair until you become accustomed to the length of hair each attachment guard provides.
- For best results, hair should be dry before using clipper.
- For best results, when cutting hair, go through hair at a slow, even speed. Don’t force the clipper through the hair.
- For best results, go through the hair against the direction of your hair’s growth, so you can catch more hair with the guard.
- The blades on your new clipper should be oiled every few haircuts.
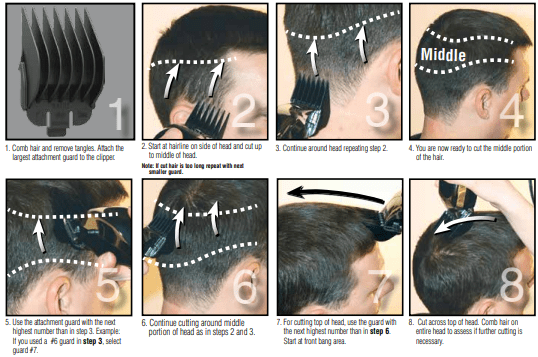
STEP-BY-STEP GUIDE FOR CUTTING HAIR
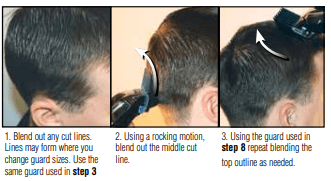
BLENDING
When you want to blend from one section to the next, you will need to practice moving the clipper in an upward rocking motion. This motion will leave the hair slightly longer where the clipper pulls away from the scalp, enabling you to blend between the sections and achieve a smooth transition from one length of hair to the next. This technique will enhance the appearance of your haircuts
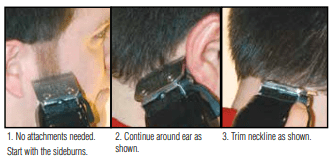
OUTLINING
CLIPPER MAINTENANCE
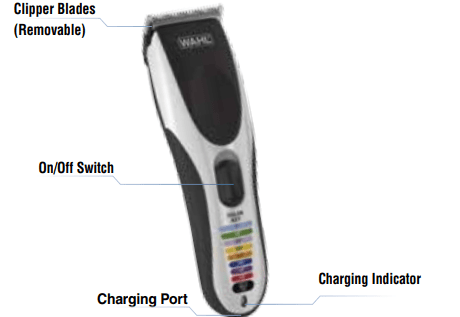
RECHARGEABLE CORD/CORDLESS OPERATION
- Before use, the clipper must be fully charged for 12 to 15 hours.
- Once fully charged, the unit may be used without cord.
- After use, move the on/off switch to the “O” (OFF/CHARGE) position. Reconnect the clipper to the cord and recharge batteries by connecting the cord into any convenient electrical outlet.
NOTE: If the batteries have completely run out, the clipper can be used as a corded clipper (see the following “corded operation”).
CORDED OPERATION
- Be sure the on/off switch is in the “O” (OFF) position.
- Connect the clipper to the cord, and plug it into an electrical outlet.
- Move the on/off switch to th “1” (ON) position.
- After use, disconnect cord from outlet.
CLIPPER USE AND MAINTENANCE
- A fully charged clipper can deliver up to 40-90 minutes of continuous use. (varies by product)
- When clipper is not in use, it should be connected to the cord to assure maximum power whenever it is used. The cord is designed to continuously charge the battery, without overcharging.
- It is normal for the unit to become somewhat warm during normal use.
- Avoid pressing the blades strongly against the skin, being especially careful around the ears. (The blades should be directed toward the skin at a right angle, but without significant pressure.)
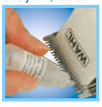
- After cutting damp hair, clean and oil the blades before storing the unit. Place a small drop of WAHL CLIPPER OIL ONLY on the ends of the blades then move the switch to the “1” (ON) position.
- To clean the unit, use either a clean, dry or dampened cloth. DO NOT USE benzine or thinner to clean the unit.
- Do not store the clipper in a wet or moist environment.
- To prolong blade life, do not use clipper on hair that is coated with a permanent wave solution or hair spray.
- Do not touch any of the internal mechanisms. If the unit should need repair, do not repair it yourself. Return it to Wahl Clipper Corporation.
REMOVING AND CLEANING DETACHABLE BLADES
To remove the blades - be sure the on/off switch is in the “O” (OFF) position. Hold the clipper firmly in one hand. Using the thumb of your other hand, simply push the blades away from the front of the clipper. The blades and mounting plate behind them will all come off in one piece
To remove hair from between the blades, use the cleaning brush provided. Be sure to use Wahl Clipper Oil between the blades before each use. Before replacing the blades, be sure the top blades move freely.
To reattach the blade, place the hook at the bottom of the blade set into the space provided on the clipper housing. Then pivot the blade set toward the housing. Once it is seated, snap blade set to case so that you hear a click.
WASHING BLADES
The blades are washable directly around the blade area housing only. Avoid washing all areas around the on/off switch and power adaptor connection areas.
Note: Do not submerge under water.
OIL
The blades of your new clipper should be oiled every few haircuts. Simply place a few drops of Wahl Clipper Oil on the teeth of the blades. Use only the Wahl Clipper Oil included in the pack. Due to the high speed of your Wahl clipper, the correct type of oil must be used. Do not use hair oil, grease or any oil mixed with kerosene or any solvent, as the solvent will evaporate and leave the thick oil, slowing down the blades. Wahl Clipper Oil is a very thin, natural oil which will not evaporate and will not slow down the blades.
CORD CARE
The cord should not be used to pull the clipper. Since freedom of movement needs to be maintained, care should be used to keep the cord untwisted and unobstructed. When stored, the cord should be coiled and the unit placed in original box or storage pouch (if provided), away from children.
CLIPPER/RECYCLING OF BATTERIES
Depending on use, your batteries should last five years. At the end of its life, when it can no longer take a full charge, it cannot be replaced. The clipper must be discarded, but first the battery must be removed & recycled properly. To do so, follow these steps.
- Make sure the on/off switch is in the “0” (OFF) position and that the cord is NOT plugged into the clipper or any electrical outlet.
- Remove blade assembly from clipper and remove screws and retainer plate.
- Remove cover plate by releasing visible cover “hooks” and pulling cover away.
- Locate circuit board and battery and pry battery off of circuit board.
- Apply tape to both ends of the battery before recycling or properly disposing of it
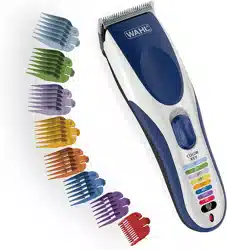
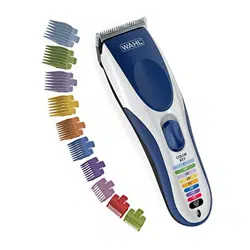
EASY-TO-USE ATTACHMENT GUARDS
Some kits do not include all size Wahl guards.
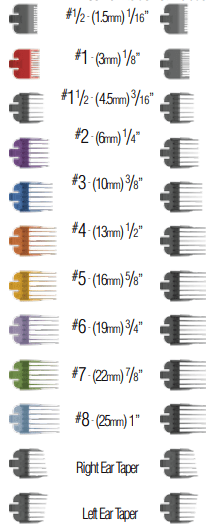
- Attachment guards help you cut hair to a desired length by keeping the blades at set distance from the skin helping ensure an even hair length when cutting hair with a clipper. For reference, each guard is numbered and also lists what the length of the hair will be after being cut.
- Attachment guard sizes vary. Always start with a longer length guard (you can always use a shorter length guard if the length is not short enough).
- The first time you cut hair, cut only a small amount of hair until you become accustomed to the length of hair each attachment guard provides.
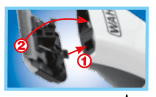
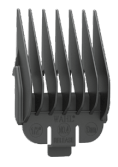
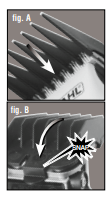
ADDING GUARDS: Pictured in fig A & fig B
Before adding guards, make sure the on/off switch is turned to the “0” or “OFF” position.
- While holding at a slight angle, place the attachment guard onto the clipper so the tips of the blade rests into the slots of the guard fingers. (fig A)
- Using your thumb, push down on the guard, where the guard size number is located, until you hear a “SNAP”. (fig B)
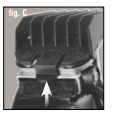
REMOVING GUARDS: Pictured in fig C
Before removing guards, make sure the on/off switch is turned to the “0” or “OFF” position.
- While holding the top of attachment guard, place your thumb on the underside of the attachment guard tab. Push up on tab to remove guard from clipper. (fig C)
EARS
Some kits do not include ear taper guards
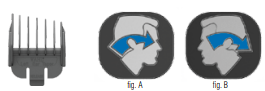
To achieve a “tapered” cut around the ears, use the left and right tapered attachment guards
1) Attach the “R” RIGHT attachment guard to the clipper.
fig. A) First, starting behind the RIGHT ear (so shorter portion of guard fingers are closest to the ear), move the clipper upward and around towards the front side of the ear. Repeat as needed.
fig B) Second, starting on the front of the LEFT ear, (so shorter portion of guard fingers are closest to the ear), move the clipper upward and around towards the back side of the ear. Repeat as needed.
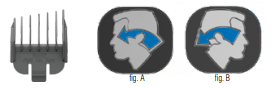
2) Repeat, except now using the “L” LEFT guard. Attach the “L” LEFT attachment guard to the clipper.
fig. A) First, starting behind the LEFT ear (so shorter portion of guard fingers are closest to the ear), move the clipper upward and around towards the front side of the ear. Repeat as needed.
fig. B) Second, starting on the front of the RIGHT ear, (so shorter portion of guard fingers are closest to the ear), move the clipper upward and around towards the back side of the ear. Repeat as needed.
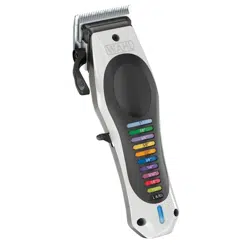
YOUR NEW CLIPPER
YOUR NEW BATTERY TRIMMER
BATTERY INSTRUCTIONS Select clipper kits include a battery trimmer, your kit may or may not include a trimmer
1. Remove battery cover from trimmer by pushing in and back on the plastic door in the direction of the arrow.
2. IMPORTANT: Be sure to insert the negative (-) end of each battery first, so that it depresses the spring at the top of the battery compartment. Then slide the positive (+) end into position. Do not allow the negative terminal clips to bend and cut the casing of the batteries. Use alkaline batteries with your Wahl Trimmer. Alkaline batteries will provide the longest operating time before battery replacement is needed. Trimmer should run approximately three hours on alkaline batteries.
3. Replace battery cover to its original position.
4. Move switch to “ON” position to use.
5. To maximize battery life, trimmer should be shut “OFF” immediately after using
WARRANTY
5-YEAR LIMITED WARRANTY - CORDED CLIPPER
Valid in U.S.A.
Only If your Wahl product fails to operate satisfactorily within five (5) years from the date of original purchase or receipt as a gift, Wahl will, at our option, repair or replace it and return it to you FREE OF CHARGE.
2-YEAR LIMITED WARRANTY - BATTERY TRIMMER
Valid in U.S.A.
Only If your Wahl battery trimmer product fails to operate satisfactorily within two (2) years from the date of original purchase or receipt as a gift, Wahl will, at our option, repair or replace it and return it to you FREE OF CHARGE.
Do not return this product to store where purchased. Products needing repair under this warranty should be returned with postage prepaid to: Wahl Clipper Corp. Attn: Repair Department - 3001 Locust Street, Sterling, Illinois 61081
Include a note describing the defect and the date of original purchase or receipt as a gift (if in warranty). Products out of warranty will be repaired at our standard repair charges.
This warranty is void and no repair or replacement will be made under this warranty or otherwise if: (1) The product is modified in any manner or repaired by anyone other than Wahl Clipper Corporation or Wahl authorized service center. (2) The product has been used commercially or subjected to unreasonable use.
This warranty gives you specific legal rights and you may also have other rights which may vary from state to state. No other written express warranty is given. Any implied warranty, including any warranty of merchantability which may arise from purchase or use, is limited to the year period provided in this express warranty. Some states may not allow such limitation, so it may not apply to you. No responsibility is assumed for incidental or consequential damages of any type, or for the use of unauthorized attachments. Some states may not allow the exclusion or limitation of incidental or consequential damages, so the limitation or exclusion may not apply to you. Outside U.S.A., check with store for Wahl authorized distributor’s warranty