When using your clipper, basic precautions should always be followed: READ ALL INSTRUCTIONS BEFORE USING
DANGER
To reduce the risk of death or injury by electric shock:
Do not place or store appliance where it can fall or be pulled into a tub or sink. Do not place in or drop into water or other liquid.
Except when charging, always unplug this appliance from the electrical outlet when not in use.
Unplug the cord before cleaning recharge stand.
Do not reach for an appliance that has fallen into water. Unplug immediately.
Do not use while bathing or in a shower.
WARNING
To reduce the risk of burns, fire, electric shock or injury to persons:
Do Not Crush, Disassemble, Heat above 100˚C (212˚F), or Incinerate the appliance, due to Risk of Fire, Explosion, or Burns.
This appliance is not suitable for use by people (including children) with physical, sensory or mental disabilities or who do not have the relevant experience or knowledge of using such appliance unless under the supervision of or after having received instruction in the use of the appliance by an individual who is responsible for their safety. Children should be supervised to ensure they do not play with the appliance.
Use this appliance only for its intended use as described in this manual. Do not use attachments not recommended by the manufacturer.
Do not use this appliance with a damaged or broken blades or broken attachments, as facial injury may occur.
Never operate this appliance if it has a damaged cord or battery charger transformer, if it is not working properly, if it has been dropped or damaged, dropped into water. Return the appliance to Wahl Clipper Corporation for examination and repair.
Do not carry this appliance by supply cord or use cord as a handle.
Keep the cord away from heated surfaces.
Never drop or insert any object into any opening.
Do not use outdoors.
Do not operate where aerosol (spray) products are being used or where oxygen is being administered. Do not use clipper germicide cleaners containing phynyl phenol.
Use only the charger supplied by the manufacturer to recharge.
Always attach plug to appliance first, then to outlet. To disconnect, turn all controls to "off" then remove plug from outlet.
SAVE THESE INSTRUCTIONS
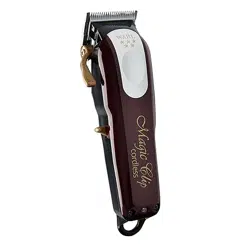
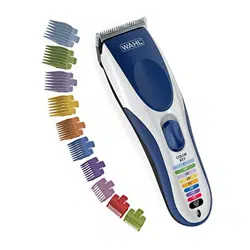
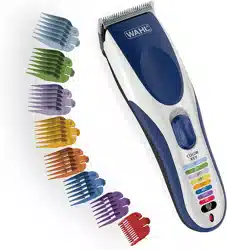
USING RECHARGEABLE CORD/ CORDLESS CLIPPERS
This unit may be used without a cord when fully charged. If battery power is low, a power cord can attach directly to the unit for continued use as a corded unit.
Plug power cord into an outlet at the correct voltage.
Plug power cord directly into unit. Be sure clipper is switched OFF when charging.
FOR CORDED OPERATION, connect to receptacle on the bottom of the unit. If your battery is completely run down, allow the unit to charge for 1 minute (switched OFF) before using as a corded unit.
If the cord is left attached to the unit when not in use, the cord will automatically charge the unit when left in the OFF position.
To clean the unit, use a clean cloth (dry or dampened with water).
DO NOT USE bleach, benzene or thinner to clean the unit.
TROUBLESHOOTING
If your cordless clipper does not seem to be operating or charging properly, please check the following: Check the outlet’s current by plugging another appliance (one you know is in proper working condition) into the outlet.
Make sure the unit is not connected to a power source that turns itself off when lights are turned off.
Make sure the clipper and charging transformer contacts are clean and free of hair or other contaminants.
Verify that the blade assembly moves freely and is mounted properly.
The battery is a non-consumer replaceable battery. Return to Wahl for replacement if and when necessary.
If you still encounter problems with your unit, ship your clipper and power cord, pre-paid, to our factory with a note explaining the problem: Attn: Repair Dept. – Wahl Annex – 3001 North Locust – P.O. Box 578 – Sterling, IL 61081
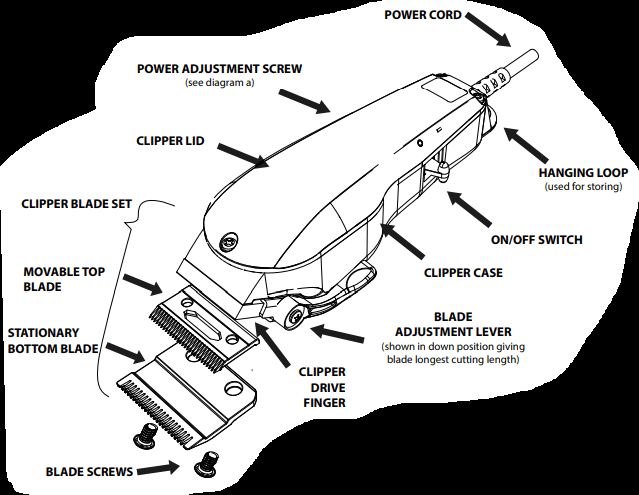
Directions for Operating
YOUR WAHL ELECTRIC CLIPPER WILL GIVE YEARS OF SATISFACTORY SERVICE IF YOU WILL PUT A FEW DROPS OF OIL ON THE BLADES BEFORE AND AFTER EACH HAIRCUT.
Put a small drop of Wahl Clipper Oil between the blades after each use. Oil should be applied while the clipper is running. After cutting wet hair, clean the blades and apply a small drop of Wahl Clipper Oil. Use Wahl Clipper Oil ONLY.
Blades must be realigned if they have been removed for cleaning or replacement.
Streaks and missing hair are caused by a gummy sticky surface on the blades, so keep your clipper clean and the blades well oiled.
Make sure the cord is not twisted or kinked while the unit is charging or being stored.
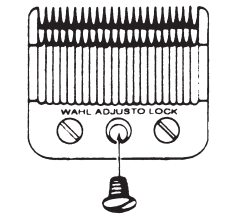
On Clippers Using "Adjusto-Lock" Blades
To remove the blades loosen only center screw. Leave the two outside screws tight as they hold bushings in place to keep alignment of blades. Keep screws tight when in operation.
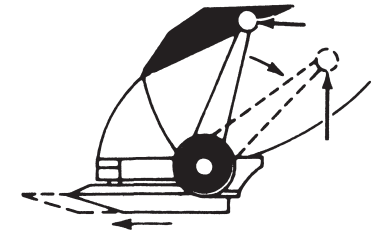
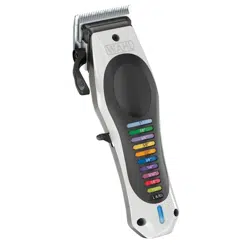
Taper Lever
Some clippers are equipped with an adjustable taper lever that changes the closeness of your cut. When the lever is in the uppermost position, the blades will give the closest cut. Pushing the lever downward gradually increases the cutting length.
Charging the Battery
Before the equipment is used for the first time, it should be charged 3-5 hours. Plug power cord directly into unit. Be sure clipper is switched OFF when charging. During charging, the charge indicator is illuminated. The charge indicator will begin to blink when almost fully charged and may shut off when fully charged.
Recommendation: the batteries should only be recharged when the performance of the equipment has deteriorated noticeably.
Battery Operation
Switch on the equipment using the on/off switch and, after use, switch it off again. When the battery is fully charged, the equipment can be used for up to 90 minutes continuous run time. 2 hours to reach a full charge with a discharged battery.
Lithium-Ion Battery Replacement, Clipper Disposal and Recycling
This product uses a lithium-ion battery. For proper disposal of this appliance, please refer to item 1, located in the Warnings.
For battery replacement send the entire, intact clipper unit to: Wahl Annex 3001 North Locust, P.O. Box 578, Sterling, IL 61081.
Do not attempt to remove the battery. Lithium-Ion batteries can explode, catch fire, and/or cause burns if disassembled, damaged, or exposed to water or high temperatures.
If you choose not to replace the battery, the entire, intact clipper must be disposed. Do not attempt to remove the battery for disposal. Lithium-Ion batteries may be subject to local disposal regulations. Many locations prohibit disposal in standard waste receptacles. Check your local laws and regulations.
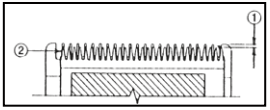
Maximizing power to the blades:
To adjust power, turn power screw in clockwise direction until clipper makes a noise caused by the arm hitting the coil. Then, slowly turn power screw out (counter-clockwise) just until noise stops then continue turning 1/8 to 1/4 of a turn more, this is maximum power.
Each time clipper is used:
1. Clean the clipper blade set by brushing hair clippings and debris from the blades and carriage with the stiff brush provided.
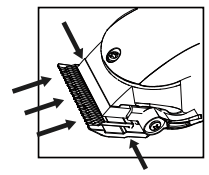
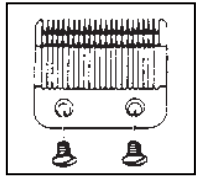
2. Sanitize clipper blade set with Wahl disinfectant. (Follow directions on disinfectant label)3. Oil the clipper blade set: Place one drop of clipper oil in the center of the movable top blade and one drop of oil on each end of the top blade. Next, add one drop of oil to the heel of the stationary bottom blade on each side. (See diagram)
Turn clipper on and run to distribute the oil. When oil is evenly distributed, turn clipper off and wipe off excess oil with a soft cloth.
3. Oil the clipper blade set: Place one drop of clipper oil in the center of the movable top blade and one drop of oil on each end of the top blade. Next, add one drop of oil to the heel of the stationary bottom blade on each side. (See diagram)
Turn clipper on and run to distribute the oil. When oil is evenly distributed, turn clipper off and wipe off excess oil with a soft cloth.
When to replace blades:
The following conditions require immediate replacement of blades:
- dull blades (will pull hair)
- rusty blades (causes sticking)
- broken or bent teeth on either blade (always replace both)
Blades should always be replaced in blade sets. A blade set consists of one movable top blade and one stationary bottom blade. Keep at least one set of blades for each type of working clipper in your shop.
Aligning 2-hole blades:
Slightly loosen both blade screws at base of stationary blade, just enough to be able to shift the blade. Move blade adjustment lever to the full forward position. With the blade screws loosened, the bottom blade can be aligned with the top blade.
1. Points of the top blade teeth should be 1/32” to 1/16” (.79mm to 1.59mm) back and parallel to the points of the bottom blade teeth. This is important so the clipper doesn’t cut too close or allow the moving top blade to touch the skin. (see blade alignment diagram)
2. Extreme left hand tooth of top blade must be on the first small tooth of bottom blade. (see blade alignment diagram)
3. After blade is aligned, tighten screws.
4. Plug clipper in, turn switch on and off a couple of times, and then recheck alignment of blades.
Replacing 2-hole blades:
On adjustable clippers, move blade adjustment lever to full forward position. Position the small top blade over the clipper drive finger. Set large bottom blade on top of small top blade and partially tighten blade screws. With the blade screws partially tightened, the bottom blade can be aligned with the top blade.
1. Points of the top blade teeth should be 1/32” to 1/16” (.79mm to 1.59mm) back and parallel to the points of the bottom blade teeth. This is important so the clipper doesn’t cut too close or allow the moving top blade to touch the skin. (see blade alignment diagram)
2. Extreme left hand tooth of top blade must be on the first small tooth of bottom blade. (see blade alignment diagram)
3. After blade is aligned, tighten screws.
4. Plug clipper in, turn switch on and off a couple of times, and then recheck alignment of blades.
Aligning 3-hole blades:
Slightly loosen the three blade screws of the stationary blade, just enough to be able to shift the blade. Move blade adjustment lever to the full forward position. With the blade screws loosened, the bottom blade can be aligned with the top blade.
1. Points of the top blade teeth should be 1/32” to 1/16” (.79mm to 1.59mm) back and parallel to the points of bottom blade teeth. This is important so the clipper doesn’t cut too close or allow the moving top blade to touch the skin. (see blade alignment diagram)
2. Extreme left hand tooth of top blade must be on the first small tooth of bottom blade. (see blade alignment diagram)
3. After blade is aligned, tighten screws.
4. Plug clipper in, turn switch on and off a couple of times, and then recheck alignment of blades.
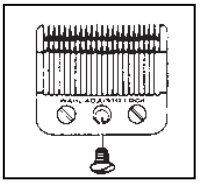
Replacing 3-hole blades:
On adjustable clippers, move blade adjustment lever to full forward position. Loosen and remove the center screw only. Outside screws hold bushings in place and maintain alignment. Position the small top blade over the clipper drive finger. Place large bottom blade on top of small top blade, fitting down over the bushings on either side. Replace and partially tighten center screw.
1. Points of the top blade teeth should be 1/32” to 1/16” (.79mm to 1.59mm) back and parallel to the points of the bottom blade teeth. This is important so the clipper doesn’t cut too close or allow the moving top blade to touch the skin. (see blade alignment diagram)
2. Extreme left hand tooth of top blade must be on the first small tooth of bottom blade. (see blade alignment diagram)
3. After blade is aligned, tighten screws.
4. Plug clipper in, turn switch on and off a couple of times, and then recheck alignment of blades.
TROUBLE SHOOTING
Clipper doesn’t start:
Check to see if clipper is plugged in.
Replace power cord if frayed, cracked, or damaged
If clipper is plugged in and cord is in good condition, check the switch by turning on and off
Motor runs, but blade isn’t moving or sticks:
Clean blade set and oil
Replace blade set if blade teeth are broken
Adjust power screw to retune the clipper
Clipper making loud noise:
Adjust power screw to retune the clipper
Clipper pulls hair:
Dirty or dry blades, clean blades and oil
Blades are dull - replace blades
Check blade alignment
Blade nicks or cuts:
Check blade alignment
Replace blade set if blade teeth are chipped or broken