
Loading ...
Loading ...
Loading ...
+1 (800) 732-267718
Step 8: Set the Boundary Width and Test the Receiver Collar
With the boundary wire in place and properly connected, and the receiver collar fully charged, it is time to set the boundary width and test
the system.
The receiver collar should not be on your dog when the system is tested.
Note: The receiver collar is waterproof, which can make the tone hard to hear.
The flashing test light, when held to the contact points, indicates that the receiver collar is delivering static correction. To best utilize the
automatic Run Through Prevention feature, the containment boundary width should extend at least 6 to 10 ft. on each side of the boundary wire
(total boundary width of 12 to 20 ft.).
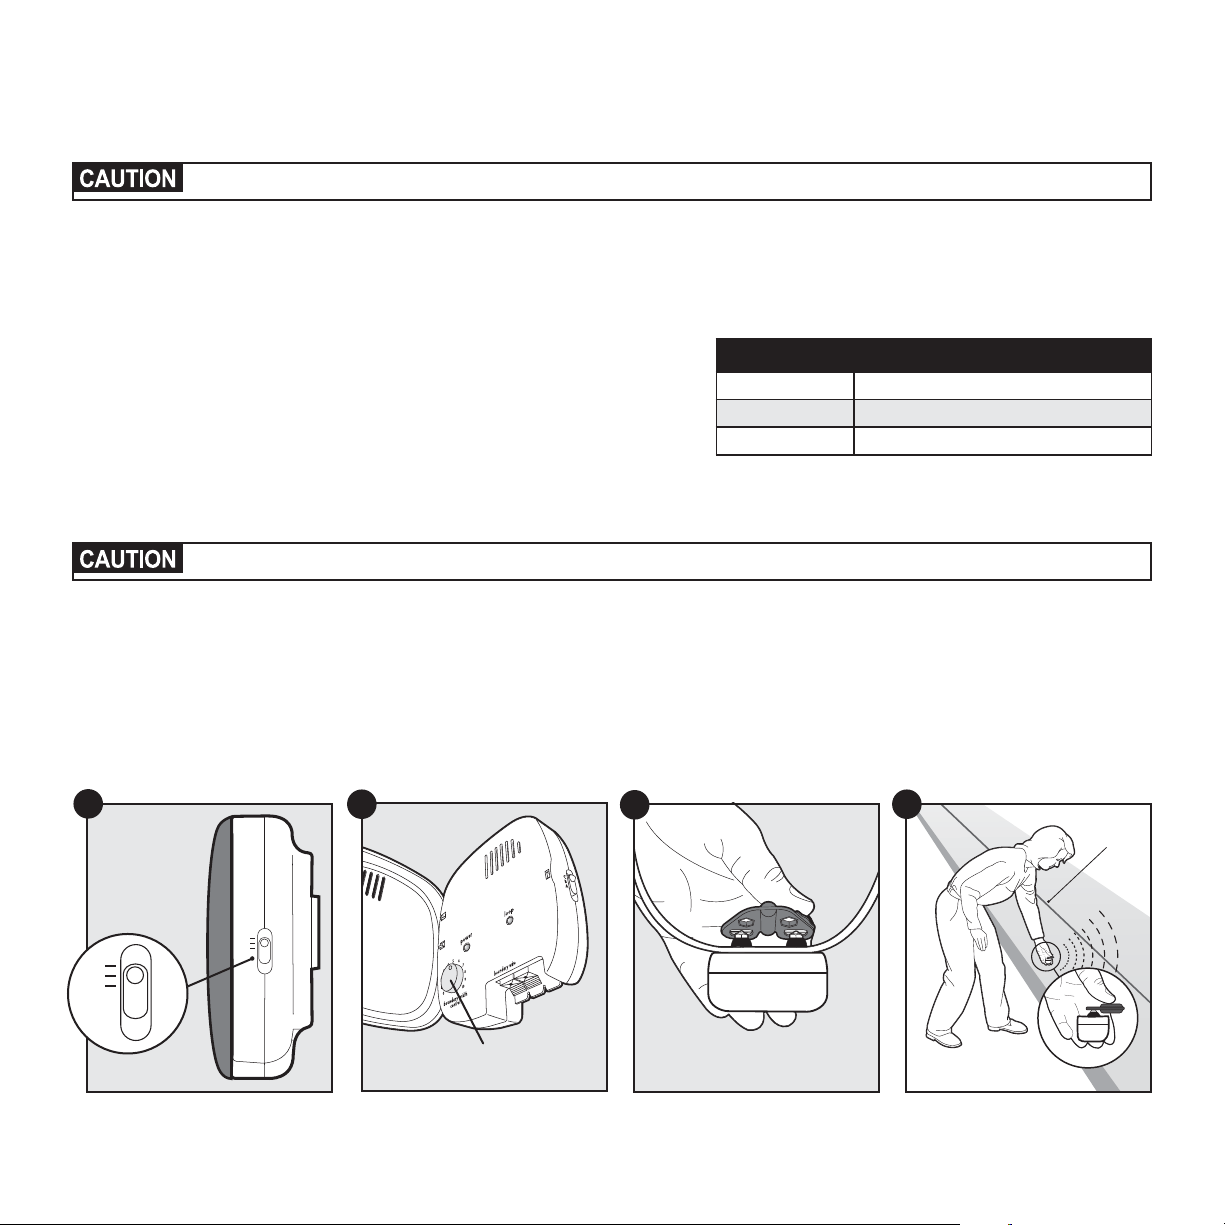
1. Apply power to the fence transmitter with the supplied power adaptor.
2. Set the boundary width control switch (located on the side of the fence
transmitter)
(8A)
to setting A, B, or C, based on the total length of boundary
wire used.
Setting B is used for most properties.
Refer to the table to the right for
the proper setting for your yard.
3. The boundary width is adjusted by using the transmitter’s boundary width
control knob (8B). Turn the knob counterclockwise until the alarm sounds and the loop indicator light is no longer lit. Turn the knob clockwise
and increase by 2 numbers. The alarm should turn off and the light should turn on.
The receiver collar should not be on your dog when the system is tested. Your pet may receive an unintended correction.
4. To identify the warning and static correction zones make sure the static correction on the receiver collar is set at level 5 (see Step 7).
5. Test the boundary width of the system by selecting a section of straight boundary wire that is at least 50 ft. long. Start inside the center of the
pet area.
6. Place the test light tool contacts against the receiver collar contact points (8C). Hold the receiver collar at your dog’s neck height with the
contact points pointing up. Slowly walk toward the boundary wire until you hear the warning tone (8D). When you hear the warning tone,
you have identified the boundary width distance (static correction zone). Two seconds after the warning tone, the test light will begin to
flash. This flashing light can aid you in identifying the boundary width if you have difficulty hearing the tone.
Setting Amount of Wire Used
A Greater than 2400 ft.
B Up to 1300 ft.
C 1300 to 2400 ft.
Boundary Width
Control Knob
Boundary
Wire
8C
8D
C
B
A
C
B
A
8A
8B
Loading ...
Loading ...
Loading ...