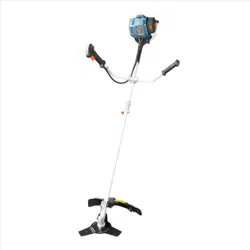
Loading ...
Loading ...
Loading ...
EN - 20 WWW.SENIXTOOLS.COM
5. Wrap the line evenly and rmly around the spool (Fig.
19).
6. Position the lines in the spool holding slots (Fig. 18).
7. Install the spool in the cutting head. See "REPLACING
THE SPOOL".
NOTE:
Use only exible, nonmetallic line recommended by the
manufacturer. Never use, for example, wire or wire-rope,
which can break off and become a dangerous projectile.
MAINTENANCE SCHEDULE
Perform these required maintenance procedures at the
frequency stated in the table. These procedures should
also be a part of any seasonal tune-up. Some maintenance
procedures may require special tools or skills. If you are
unsure about these procedures, take the unit to a qualied
service dealer.
NOTE:
Maintenance, replacement, or repair of the emission control
devices and system may be performed by a qualied
service dealer.
NOTE:
Please read the California/EPA statement that came with
the unit for a complete listing of terms and coverage for
the emissions control devices, such as the spark arrestor,
mufer, carburetor, etc.
FREQUENCY MAINTENANCE REQUIRED
Every 10 hours
• Clean the air lter. Refer to
"
MAINTAINING THE AIR FILTER".
Every 6 hours
• Change the oil. Refer to "CHANGING
THE OIL".
After the rst 10
hours and at 38
hours
• Have the rocker arm clearance
checked by a qualied service
dealer.
• Check the spark plug condition and
gap. Refer to"MAINTAINING THE
SPARK PLUG".
CHECKING THE OIL LEVEL
Check the oil level before each use. The importance of
maintaining the proper oil level cannot be overemphasized.
Failure to keep the engine level may result in a faulty oil
level reading.If the oil level is too high, tip the unit and drain
the excess oil into an appropriate container.
DO NOT overll the oil level. Overlling will result in too
much oil in the engine crankcase, and may cause smoke or
fumes that can injure the user.
Inspecting the Oil Level
1. Stop the engine and allow it to cool.
2. Set the unit on a at, level surface, such as a workbench
or table. The cutting head shield should hang over the
edge so that the engine is level.
3. Unscrew the oil ll plug. The oil level should be visible
on the rst thread of the oil reservior (Fig. 20). If the oil
level is too low, add oil. Refer to "ADDING OIL".
Adding Oil
1. Clean the area around the oil ll plug to prevent debris
from entering the oil ll hole.
2. Unscrew the oil ll plug.
3. Add oil to the oil ll hole until the oil level is visible on the
rst thread of the oil reservoir (Fig. 20).
4. Wipe up any oil that may have spilled.
5. Make sure the O-ring is in place on the oil ll plug.
6. Reinstall the oil ll plug.
Changing The Oil
Old engine oil is considered special waste and has to be
disposed according to your local environment protection
regulation. Do not pour the oil into a garbage can, sewer,
soil etc.Dispose of the old oil according to federal, state and
local regulations.
Change the oil while the engine is still warm. The oil will ow
freely and carry away more impurities.
1. Clean the area around the oil ll plug to prevent debris
from entering the oil ll hole.
2. Unscrew the oil ll plug.
3. Tip the unit vertically to pour the oil out of the oil ll
hole and into a container (Fig. 21). Allow ample time for
complete drainage.
4. Wipe up any oil that may have spilled.
5. Pour 2.03 .oz. (60 ml) of SAE 10W-30 oil into the oil
ll hole.
6. Wipe up any oil that may have spilled.
7. Make sure the O-ring is in place on the oil ll plug.
8. Reinstall the oil ll plug.
MAINTAINING THE AIR FILTER
Failure to maintain the air lter can result in poor
performance or can cause permanent damage to the
engine.
Loading ...
Loading ...
Loading ...