Loading ...
Loading ...
Loading ...
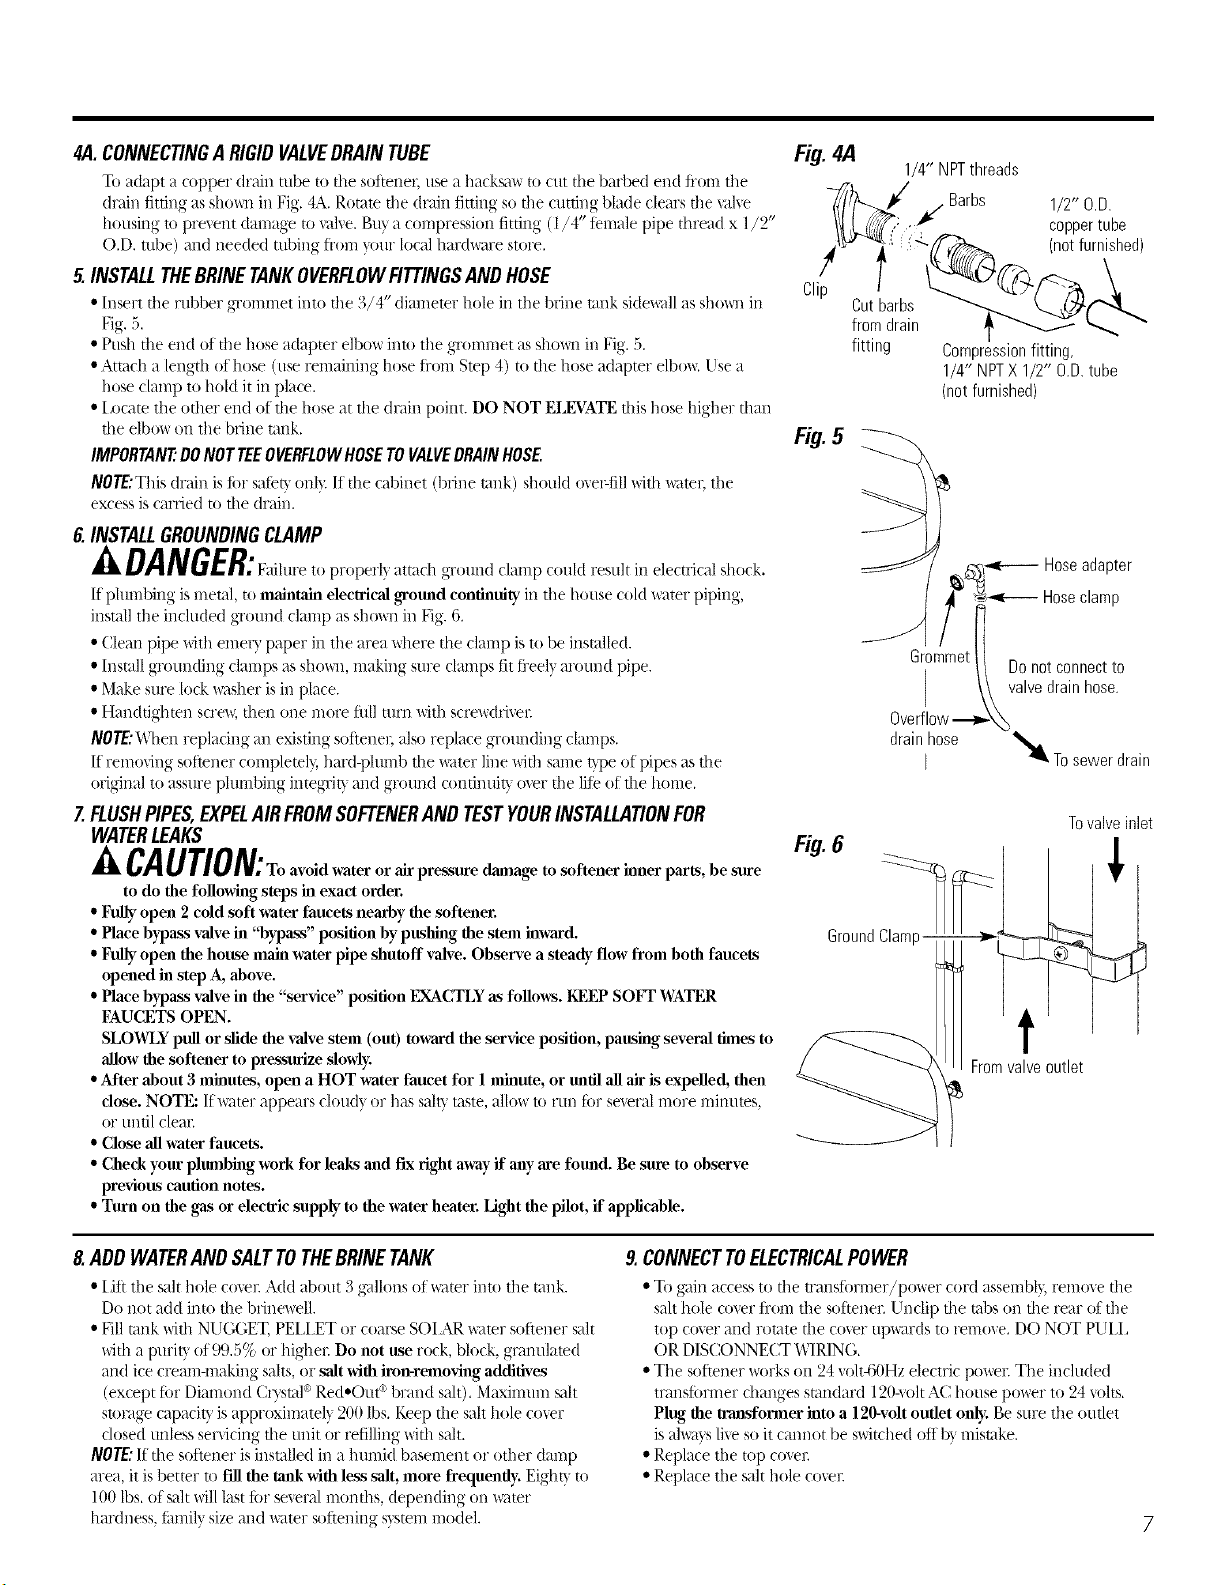
#,4.CONNECTINGA RIGIDVALVEDRAINTUBE
To adapt a copper drain tube to the soiteneL use a hack_m to cut the barbed end fl'om the
drain fitting as shown in Fig. 4A. Rotale file drain fitting st) file cutting blade clears file xahe
housing u) pre\ent damage to valve. But a compression fitting (1/4" fi:male pipe thread x l/2"
O.D. robe) and needed tubing fi'om p)ur It)cadhardware store.
5.INSTALLTHEBRINETANKOVERFLOWRT"I'INGSANDHOSE
• Insert tt/e rubber gxommet into tile 3/4" diameter hole in tile brine tank sidewall as sho_ql in
Fig. 5.
• Push the end of tile hose adapter elbow into tile gxonm/et as shown in Fig. 5.
• Attach a length of hose (use remaining hose Ii'om Stop 4) to the hose adapter e/bo_. Use a
hose clamp to hold it in place.
• I_ocam tile other end of the hose at the drain point. DO NOT ELEVATE this hose higher than
the elbowson tile bdne rank.
IMPORTANT:DONOTTEEOVERFLOWHOSETOVALVEDRAINHOSE.
NOTE:This drain is %I" safieff only. If the cabinet (brine rank) should o\er-Iill with watel; tile
excess is carried m the drain.
6.INSTALLGROUNDINGCLAMP
If plumbing is metal, to maintain electrical gromld continuity in tile house cold water piping,
iusmll tile included gTotmd clamp as sho_n ill Fig. 6.
• (;lean pipe with emery paper in the area _dmre the clamp is to be iusmlled.
• Install grounding clamps as shoxnl, making sure damps fit li'eely arotmd pipe.
• Make sure lock x<@mris ill place.
• Handtighten scre_, then one more fll[I mrn with scre_ddver
NOTE:When repladng ml existing soltenel; also replace grounding clamps.
If removing soltener completel b hard-plumb the water line with same t_pe of pipes as the
original to assure plumbing inmgrit} and ground confimlit_ over the lile of the home.
Z FLUSHPIPES,EXPELAIRFROMSOftENERANDTESTYOURINSTALLATIONFOR
WATERLEAKS
CAUTION:To avoid water or air pressure damage to softener inner parts, be sure
to do the following steps in exact order.
• Fully open 2 cold soft water faucets nearby the softener.
• Place bypass valve in "bypass" position by puslfing the stem inwaxd.
• Fully open the house main water pipe shutoff valve. Observe a steady flow from both faucets
opened in step A, above.
• Place bypass valve in the "service" position I_NACTLYas follows. I@'EP SO_3" WATER
FAUCETS OPFN.
SLOWLY pull or slide the valve stem (out) towaxd the service position, pausing several times to
allow the softener to pressurize slowly.
• After about 3 minutes, open a HOT water faucet for 1 minute, or mlfil all air is expelled, then
dose. NOTE: If water appears cloudy or has salt}'"u_ste,allow to run for several more minutes,
or until cleaI:
• Close all water faucets.
• Check your plumbing won for leaks and fix rigbt awayif any axe fomld. Be sure to observe
previous caution notes.
• Tunl on the gas or eledric supply to the water beater. Light the pilot, if applicable.
Fig4A
1/4" NPTthreads
Cutbarbs
fromdrain
fitting
1/2" O.D.
coppertuhe
(notfurnished
Compressionfitting,
1/4" NPTX 1/2" O.D.tube
(notfurnished)
Bg5_
J
££_,,-_ Hoseadapter
e--- Hoseclamp
-_@°mmet/i Donotconnectto
] \\valve drainhose.
Overflow.i_&_
drainhose
I _ Tosewerdrain
Tovalveinlet
Fromvalveoutlet
7
8.ADDWATERANDSALTTOTHEBRINETANK
• LiR tile salt hole cove£ Add about 3 g'4llons of _<_terinto tile rank.
Do not add into the brineweg.
• Fig rank wifll NUGGET, PELI.ET or coarse SOI.AR wamr softener salt
with a purit_ of99.5% or hi0_er Do not use rock, block, gramdated
and ice cream-making salts, or salt with iron-removing additives
(except for Diamond (2I')rS_] _ Red"Out c'>brand salt). Maximum sdt
su)rage capacity is approximatel} 200 Ibs. Keep the salt hole co\er
closed unless set\icing the unit or refilling with salt.
NOTE:If the softener is installed ill a humid basement or other damp
area, it is bettor m flUthe tank with less salt, more frequently. Eight} to
100 Ibs. of salt willlast tor se\eral months, depending on _<_mr
hardness, fiunily size and water softening S}rSml_ modeh
9.CONNECTTOELECTRICALPOWER
• To gain access to the U'ausfbrmer/po_er cord assemb(v, remo_e the
salt hole co\er fi'om tile softener. Undip the mt)s on the rear of tile
top co\er and rotate the cover 11pwaYdstOremox e. DO NOT PUI 1_
OR DISCONNECT WIRING.
• The softener works on 94 xolta;(lHz electric powei: The included
transf6rmer dmnges standard 120-xoltAC house power to 24 \oiLs.
Plug, the transformer into a 120-volt outlet only. Be sure tile outlet
is alwa}s/i\e so it cannot be switched offb} mistake.
• Replace tile top cmer
• Replace tile salt hole cover
7
Loading ...
Loading ...
Loading ...