Loading ...
Loading ...
Loading ...
Step-by-step installation instructions.
i_g:Turn off the gas or electric suppl) to the water heateL in the possibilit} that the water _i_. 3A
heater ma} be drained while draining pipes.
i:g:Turn off the water supp]) to pipes to be cut and drain tile house water pipes,
i:g:Open both hot and cold timcets at tile lo_vst location possible.
NOTE:For easier installation, remove file top covei; Release 9 clips at rear of tile cove_:
Rotate coxvr ti)rward and lift up.
1.INSTALLBYPASSVALVE
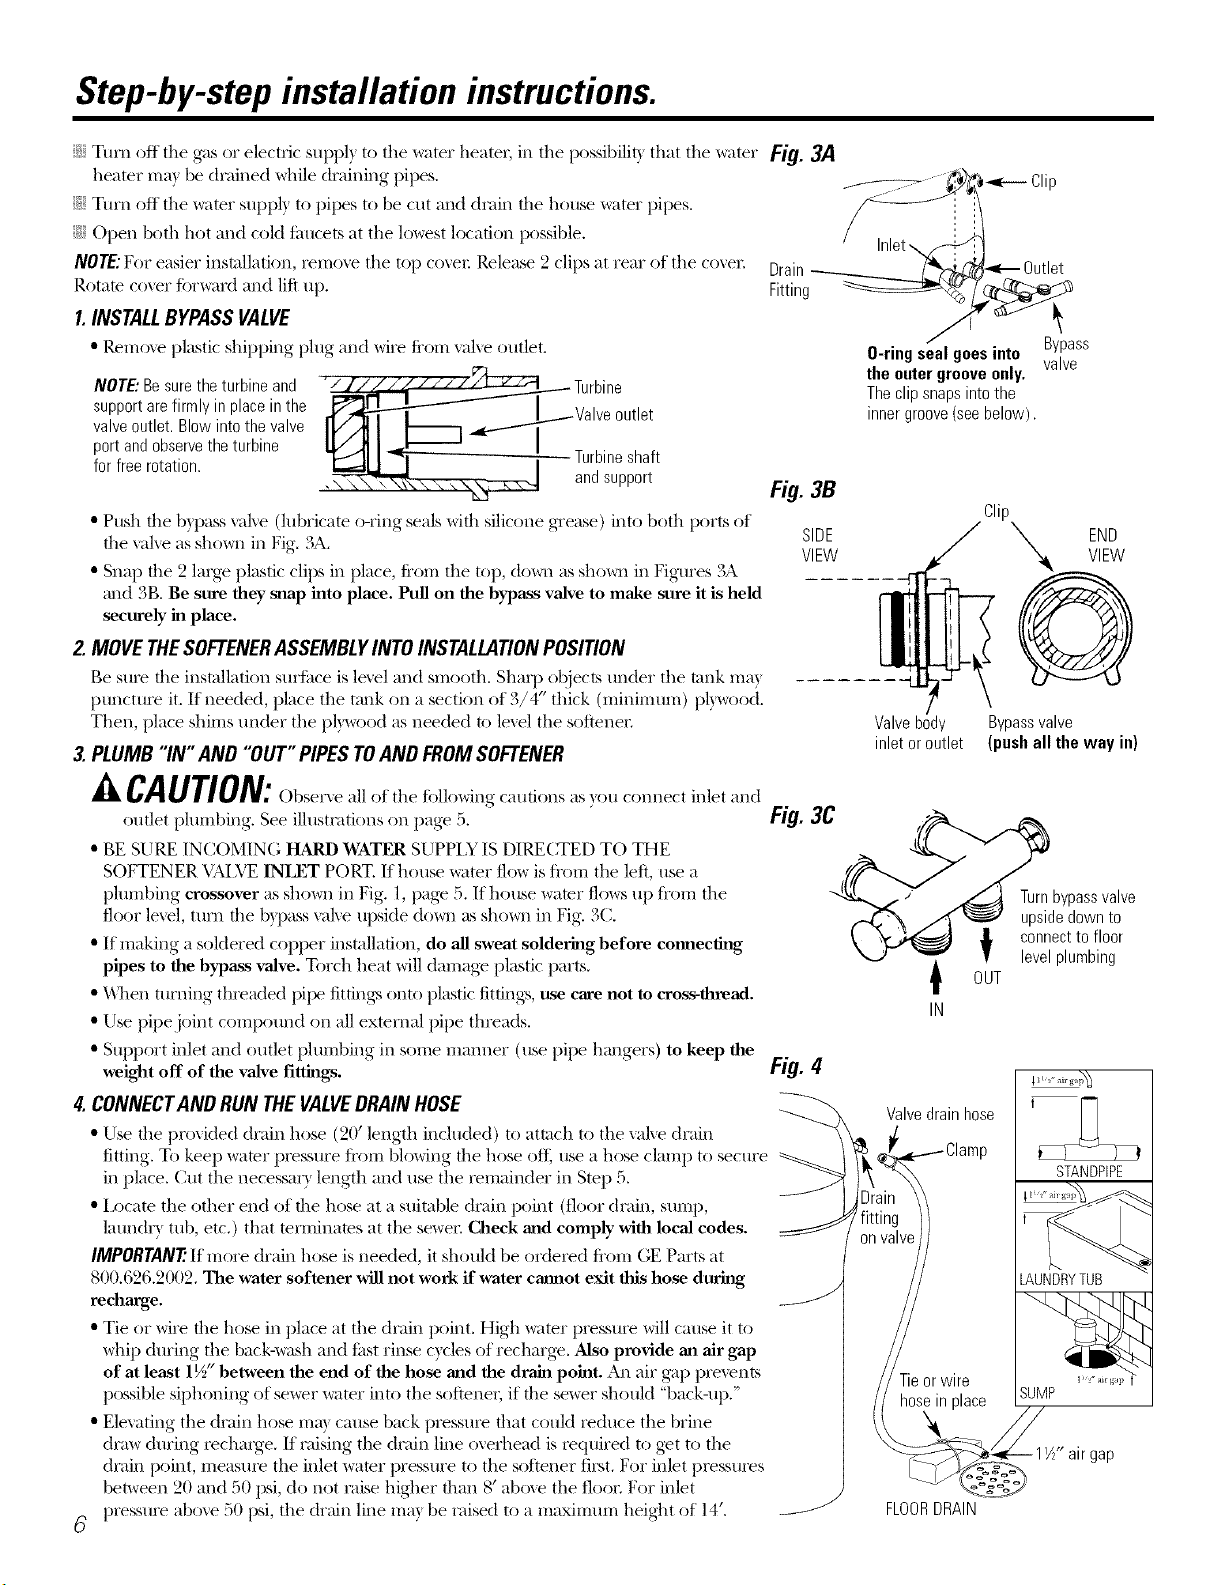
• Remo_v plastic shipping plug and wire fi'om valve outlet.
NOTE:Besuretheturbine and '__;_;
supportarefirmlyin placeinthe I utlet
valveoutlet. Blowinto the valve _ Ta_blsn:p;_[
port and observe the turbine
for free rotation, t
• Push the b}pass vane (lubricate o4"ing seals with silicone g_'ease) into both ports of
the valve as shown in Fig. 3%
• Snap the 2 lm'ge plasdc clips in place, fi'om the top, down as sho_m in Figures 3A
ml(t 3B, Be sure they snap into place. Pull on the bypass valve to make sure it is held
securely in place.
Z MOVETHESOFTENERASSEMBLYINTOINSTALLATIONPOSITION
Drain
Fitting
Hg3B
SIDE
VIEW
i-c--- Clip
Be sure file installation suriiJce is lexel and smoofll. Sharp objects under the rank ma)
ptxxlcttxre it. If needed, place tile tmlk on a section of 3/4" thick (minimum) pb'_)od.
Then, place shims under the pl)'_)od as needed to level the softener
3.PLUMB "IN" AND "OUT" PIPESTOAND FROMSOFTENER
,&CAUTION:Obser.eall tle ca,.,,,lsas,o. o,nle.,lle anal
outlet phmlbing'. See illustrations on page 5. Fig.3C
• BE SURE INCOMING HARD WATER SUPPIX IS DIRECTED TO THE
SOFTENER VA[YE INLET PORT. If house water flow is from the left, use a
plumbing crossover as sho_m in Fig. 1, pag> 5. If house water flows up from tile
floor lexvl, ttxrn tile bypass valxe upside ctoxm as shoxm in Fig. 3C.
• If making a soldered copper installation, do all sweat soldering before connecting
pipes to the bypass valve. Torch heat will dmnage plastic pm'ts.
• _'\]len turning threaded pipe fittings onto plastic fittings, use care not to cross-thread.
• Use piI)ejoint compound on all exmrnal pipe threads,
• Supl)ort inlet and outlet phmlbing in some manner (txse pipe hangers) to keep the
weight off of the valve fittings. Fig. 4[
4 CONNECTANDRUN THEVALVEDRAINHOSE
O-ringseal goesinto
the outer grooveonly.
Theclip snapsintothe
innergroove(seebelow).
Bypass
valve
• Use file In'ovided drain hose (20' length included) to attach to the valxe drain
fitting. To keep wamr presstxre ti'om blowing the hose oft; use a hose clamp to secure
in place. Cut the necessm? length and use the remainder in Step 5.
• i z)cate the other end of the hose at a stfitable chain point (floor chain, sump,
launch 3 tub, etc,) that mrminams at the sewex: Check and comply with local codes.
IMPORTANT'.If more drain h()se is needed, it should be orctexed from GE Parts at
800.626,2002, The water softener will not work if water cannot exit this hose during
recharge.
• Tie or wire the hose in place at the chain point. High water pressure will cause it to
whip during the back-wash and thst rinse cycles of rechargv. Also provide an air gap
of at least 1½" between the end of the hose and the drain point. An air gap pre_vnts
possible siphoning of sewer water into the soflenex; if the sewer should "back-up."
• Elevating the chain hose ma) cause back pressure that could reduce the brine
draw during rechaxge. If raising the chain line overhead is reqtfired to get to the
drain point, measure the inlet water pressure to the softener first. For inlet pressures
between 20 and 50 psi, do not raise higher dlan 8' abo_e the floox: For inlet
6' presstxre above 50 psi, the drain line ma) be raised to a maximmn height of 14'.
Valvebody
inletor outlet
Clip
END
Bypassvalve
(pushall the way in)
Turnbypassvalve
upsidedownto
O_U connectto floor
levelplumbing
T
IN
Valvedrainhose
gap
FLOORDRAIN
Loading ...
Loading ...
Loading ...