Loading ...
Loading ...
Loading ...

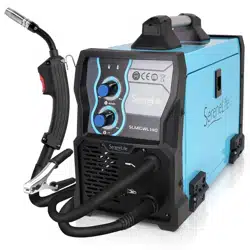
3. FAULT/THERMAL OVERLOAD INDICATOR LED
This will be illuminated under the following conditions:
a. The duty cycle of the machine has been exceeded or airow is blocked. The fan
will continue to run until the machine has cooled, but output power will be
disabled. Ensure that the cooling fan is running and that there are 12 inches of
clearance around all vents. When the LED turns o, welding power will be
enabled again.
b. If the LED Indicator Light remains illuminated for more than 10 minutes, it is
likely that there is an input voltage problem.
4. VOLTAGE ADJUSTMENT KNOB
Use this dial to adjust the arc voltage or “heat” of your welder. Dierent materials
and material thickness will require dierent voltage settings. You will need to
adjust your voltage accordingly for dierent welding conditions. By properly
adjusting your voltage settings and wire feed speed, you will produce clean welds.
5. WIRE FEED ADJUSTMENT KNOB
Use this dial to adjust the speed at which the welder feeds wire to the gun.
You will need to adjust or “tune-in” your wire-speed for dierent welding
conditions (thickness of metals, metal type, wire size, etc.) Refer to the setup chart
for a starting point. When the wire speed is properly “tuned-in” the welding wire
will melt into the material you’re welding as quickly as it is fed through the
welding gun.
NOTE: This is a scale, not actual wire feed speed.
6. MIG GUN AND CABLE
The welding gun controls the delivery of the welding wire to the material to be
welded. The welding wire is fed through the welding cable and welding gun when
the welding gun trigger is pulled. You will need to install a contact tip and welding
nozzle to the end of the welding gun prior to welding.
7. GROUND CLAMP AND CABLE
Attaching the ground clamp to your workpiece completes the welding current
circuit. You must attach the ground clamp to the metal you are welding. If the
ground clamp is not connected to the metal workpiece you intend to weld, the
welder will not have a completed circuit and you will be unable to weld. A poor
connection at the ground clamp will create an erratic arc and may damage your
welder. Scrape away dirt, rust, scale, oil, or paint before attaching the ground
clamp.
www.SereneLifeHome.com
9
Loading ...
Loading ...
Loading ...