Loading ...
Loading ...
Loading ...

www.SereneLifeHome.com
10
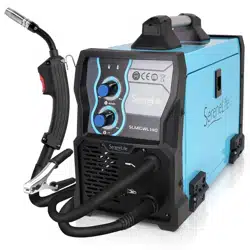
8. ON/OFF SWITCH
This switch turns the welder ON and OFF. (Make sure the power switch is in the
OFF position before performing any maintenance on the welder.)
9. INPUT POWER CABLE
This is a standard, grounded 120-volt power cord. (Make sure you are using a
properly grounded 120 Volt AC, single-phase power source with 20 amp time-
delay (“slow-blow”) breakers.)
10. WIRE SPOOL SPINDLE
11. TWO-ROLL WIRE FEEDER
SELECTING THE WELDING WIRE
This welder uses only four or eight-inch spools of 0.030-inch (0.8mm) self- shielding
ux-core wire. Steel from 24 gauge up to 1/4-inch thick can be welded with 0.030
-inch wire. Larger diameter wire will be less capable with thicker materials, will not
increase your deposition rate, and may overdraw your AC power source.
NOTE:
• If a spool has developed heavy oxidation, the only solution to the problem is to
discard the spool of wire.
• If you have an oxidized spool of wire, do not discard it until you have unspooled a
few turns of wire to see if the wire farther down on the spool is in usable condition.
If it is not, discard the spool.
MIG WELDING GAS SET UP
The rst thing that we need to do before setting up MIG welding with gas is
about safety and securing the tank to the back of your cart. You can use a chain,
rope or whatever method you want to avoid falling and hitting the oor. Always
secure the tank and make sure of all the safety precautions.
1. Check your hoses, make sure they're still in good shape. Check your ttings and
also make sure everything is snug, put together well and you're ready to reach
over to the tank to take the valve and want to crack it. Open quickly and shut it
fast so it won't take all that debris and blow it up.
2. Stick the tting into the hole of the tank and use your nger to tighten it down.
Start to thread it in with your hand and go down as much as you can, then use
the crescent wrench to secure it down a little bit better. Set those gauges and just
snug it.
Loading ...
Loading ...
Loading ...