
User’s Guide
CMP0416-00 EN

Copyrights and Trademarks
No part of this publication may be reproduced, stored in a retrieval system, or transmitted in any form or by any means, electronic, mechanical,
photocopying, recording, or otherwise, without the prior written permission of Seiko Epson Corporation. The information contained herein is
designed only for use with this Epson printer. Epson is not responsible for any use of this information as applied to other printers.
Neither Seiko Epson Corporation nor its affiliates shall be liable to the purchaser of this product or third parties for damages, losses, costs, or expenses
incurred by the purchaser or third parties as a result of accident, misuse, or abuse of this product or unauthorized modifications, repairs, or alterations
to this product, or (excluding the U.S.) failure to strictly comply with Seiko Epson Corporation’s operating and maintenance instructions.
Seiko Epson Corporation shall not be liable for any damages or problems arising from the use of any options or any consumable products other than
those designated as Original Epson Products or Epson Approved Products by Seiko Epson Corporation.
Seiko Epson Corporation shall not be held liable for any damage resulting from electromagnetic interference that occurs from the use of any interface
cables other than those designated as Epson Approved Products by Seiko Epson Corporation.
EPSON, EPSON EXCEED YOUR VISION, EXCEED YOUR VISION and their logos are registered trademarks or trademarks of Seiko Epson
Corporation.
Microsoft
®
and Windows
®
are registered trademarks of Microsoft Corporation.
Apple, Mac, macOS, OS X, Bonjour, Safari, AirPrint, iPad, iPhone, iPod touch, iBeacon, iTunes and ColorSync are trademarks of Apple Inc., registered
in the U.S. and other countries.
Use of the Works with Apple badge means that an accessory has been designed to work specifically with the technology identified in the badge and has
been certified by the developer to meet Apple performance standards.
Adobe, Photoshop, Photoshop Elements, Photoshop Lightroom, Acrobat, and Reader are either registered trademarks or trademarks of Adobe in the
United States and/or other countries.
Firefox is a trademark of the Mozilla Foundation in the U.S. and other countries.
Google Chrome, Chromebook, Android and Google Play are trademarks of Google LLC.
Mopria
®
and the Mopria
®
Logo are registered trademarks and service marks of Mopria Alliance, Inc. in the United States and other countries.
Unauthorized use is strictly prohibited.
General Notice: Other product names used herein are for identification purposes only and may be trademarks of their respective owners. Epson
disclaims any and all rights in those marks.
© 2022 Seiko Epson Corporation.
SL-D500 Series User's Guide
Copyrights and Trademarks
2

Contents
Copyrights and Trademarks
Notes on Manuals
Meaning of Symbols........................ 6
Screen Shots In the Guide.................... 6
Manual Organization....................... 6
Viewing PDF Manuals....................... 7
Before Use
Printer Parts.............................. 8
Front................................. 8
Inside................................ 10
Rear................................. 12
Control Panel.......................... 13
Understanding and Operating the Display. . . . . . . 14
Home Screen.......................... 14
Text Input Screen....................... 15
Notes on Usage........................... 16
Notes When Handling the Main Unit......... 16
Notes on Paper......................... 16
Notes on Handling Ink Bottles.............. 18
Introducing the Software.................... 19
Installing Maintenance Tool (Windows Only). . . . . 22
North America and Latin America........... 22
Other Regions.......................... 22
How to Use EPSON Software Updater.......... 22
Checking Software Update Availability........ 22
Receiving Update Notifications............. 23
How to Use Web Config.................... 23
Instructions for Starting.................. 23
Exiting Procedure....................... 23
Uninstalling Software...................... 23
Windows............................. 23
Mac................................. 24
Basic Operations
Loading paper............................ 25
Items to Prepare........................ 25
How to Load Paper...................... 25
Basic Printing Methods (Windows)............ 28
How to Print from Photoshop.............. 28
How to Cancel Printing (from the Computer). . . 30
How to Cancel Printing (from the Printer)..... 31
Basic Printing Methods (Mac)................ 31
How to Print from Photoshop.............. 31
How to Cancel Printing (from the Computer). . . 34
How to Cancel Printing (from the Printer). . . . . 34
Printing Using Various Print Functions
Color Management........................ 35
Color Management Settings................ 35
Setting Colors Manually.................. 35
Color Management from the Application (No
Color Management)..................... 38
Color Management from the Printer Driver
(ICM) (Windows)....................... 39
Color Management from the Printer Driver
(ColorSync) (Mac)...................... 40
Borderless Printing on All Sides............... 41
Types of Borderless Printing Methods........ 41
Setting Procedure....................... 42
Printing on Non-Standard Size Paper........... 43
Settings on Windows..................... 43
Settings on Mac......................... 44
Double-Sided Printing...................... 45
Settings on Windows..................... 45
Settings on Mac......................... 46
Printing from Smart Devices
Printing Photos Using Epson Smart Panel........ 47
Printing Documents Using Epson Smart Panel. . . . 47
Use AirPrint............................. 47
Printing Using Mopria Print Service............ 48
Printing from Cloud Services
Registering to Epson Connect from the Control
Panel.................................. 49
Maintenance
List of Maintenance Items................... 50
Disposal of Used Consumables............... 50
Refilling Ink............................. 51
Precautions Regarding Maintenance.......... 51
How to Refill Ink........................ 51
Replacing the Maintenance Box............... 53
Cleaning the Platen........................ 55
SL-D500 Series User's Guide
Contents
3

Cleaning and Replacing the Roller Assembly Kit. . . 56
Cleaning the Roller Assembly Kit............ 56
Replacing the Roller Assembly Kit........... 60
Print Head Nozzle Check.................... 60
Types of Nozzle Checks................... 60
How to Print a Nozzle Check Pattern......... 61
Print Head Cleaning....................... 61
Types of Cleaning....................... 61
Print Head Cleaning (Normal Cleaning)....... 62
Powerful Cleaning....................... 62
Power Ink Flushing...................... 63
Using the Maintenance Tool
(Windows)
Summary of the Maintenance Tool............. 64
Starting and Closing..................... 64
Explanation of the Main Screen............. 65
Explanation of the Printer settings........... 66
Explanation of the System Environment
Settings Screen......................... 71
Printer Maintenance....................... 72
Maintenance Operations.................. 72
Nozzle Check Methods................... 72
Print Nozzle Check Pattern Method.......... 73
Print Head Cleaning Method............... 74
Print Head Alignment Method.............. 76
Paper Feed Adjustment Method. . . . . . . . . . . . . 76
Using the Maintenance Tool (Mac)
Summary of the Maintenance Tool............. 78
Starting and Closing..................... 78
Explanation of the Main Screen............. 79
Explanation of the Printer Window Screen. . . . . 80
Explanation of the Operation Condition
Settings Screen......................... 81
Explanation of the Auto Nozzle Check
Settings Screen......................... 82
Printer Maintenance....................... 84
Maintenance Operations.................. 84
Nozzle Check Methods................... 84
Print Nozzle Check Pattern Method.......... 85
Print Head Cleaning Method............... 86
Print Head Alignment Method.............. 87
Paper Feed Adjustment Method. . . . . . . . . . . . . 88
Adding Paper Information
Adding Paper Information by Using a Paper
Type File................................ 90
Settings on Windows..................... 90
Settings on Mac......................... 91
Adding Paper Information from Custom
Settings (Windows Only).................... 92
Control Panel Menu
Menu List............................... 94
Details of the Menu........................ 98
Wireless LAN Connection
Types of Wireless LAN Connection........... 106
Wi-Fi Connection...................... 106
Wi-Fi Direct (Simple AP) Connection....... 106
Connecting to a Computer.................. 106
Connecting to a Smart Device............... 107
Connecting to a Smart Device Over a
Wireless Router........................ 107
Connecting to an iPhone, iPad, iPod touch
Using Wi-Fi Direct..................... 107
Connecting to Devices Other Than iOS
Using Wi-Fi Direct..................... 109
Selecting Wi-Fi Settings from the Printer. . . . . . . 109
Selecting Wi-Fi Settings by Entering the SSID
and Password......................... 110
Selecting Wi-Fi Settings by Push Button Setup. 110
Setting Up Using Wi-Fi Auto Connect. . . . . . . 111
Selecting Wi-Fi Settings by PIN Code Setup
(WPS).............................. 112
Printing a Network Connection Report........ 112
Messages and Solutions on the Network
Connection Report..................... 113
E-1................................. 113
E-2, E-3, E-7.......................... 113
E-5................................. 114
E-6................................. 114
E-8................................. 115
E-9................................. 115
E-10................................ 115
E-11................................ 115
E-12................................ 115
E-13................................ 116
Message on the Network Environment. . . . . . . 117
Replacing or Adding New Wireless Routers. . . . . 118
Selecting Settings for Connecting to the
Computer............................ 118
Selecting Settings for Connecting to the
Smart Device......................... 118
SL-D500 Series User's Guide
Contents
4

Problem Solver
When a Message Is Displayed................ 119
Messages Displayed on the Printer.......... 119
Error Messages (Windows)............... 121
Error Messages (Mac)................... 122
Message Codes that Appear in Maintenance
Tool (Windows Only)................... 123
Troubleshooting......................... 128
When Paper Jams...................... 128
You Cannot Print (Because the Printer Does
Not Work)........................... 130
The Printer Sounds Like It Is Printing, but
Nothing Prints........................ 131
Cannot Do Borderless Printing............ 131
The Prints Are Not What You Expected...... 132
Feeding or Ejecting Problems.............. 133
Cannot Print from Smart Device Even
Though It Is Connected (iOS)............. 133
Others.............................. 134
If Troubles Are Not Resolved.............. 134
Appendix
Consumables and Optional Items............. 135
Supported Media......................... 136
Epson Special Media.................... 136
Other Commercially Available Paper........ 136
Moving and Transporting the Printer.......... 138
Moving the Printer..................... 138
Transport............................ 138
System Requirements..................... 142
Printer Driver......................... 142
Maintenance Tool...................... 142
Web Config........................... 143
Specifications Table....................... 143
Necessary Space....................... 147
OPEN SOURCE SOFTWARE LICENSE TERMS. 147
SL-D500 Series User's Guide
Contents
5
Notes on Manuals
Meaning of Symbols
War ni ng :
Warnings must be followed
to avoid serious bodily injury.
Caution:
Cautions must be followed to
avoid damage to this product
or bodily injury.
c
Important:
Important must be followed
to avoid damage to this
product.
Note:
Notes contain important
information on the operation
of this product.
Screen Shots In the Guide
❏ Screen shots used in this manual may differ to the
actual screens. Also, the screens may differ
depending on the operating system used and the
usage environment.
❏ Unless otherwise noted, screen shots in this
manual shows case of Windows 10 and macOS
Monterey.
Manual Organization
North America
To view user manuals, visit https://www.epson.com/
support (U.S.) or https://www.epson.ca/support
(Canada) and search for your product.
Latin America
To view user manuals, visit https://
www.latin.epson.com (Caribbean), https://
www.epson.com.br/suporte (Brazil), or https://
www.latin.epson.com/soporte (other regions) and
search for your product.
Other Regions
The manuals for the product are organized as shown
below.
You can view the PDF manuals using Adobe Acrobat
Reader or Preview (Mac).
Setup Guide This manual explains the work
to do after removing the
printer from the box so that
the printer can be used.
Safety Instructions This manual explains rules that
must be followed to prevent
damage to property and the
risk of injury to customers and
other people. Be sure to read
this manual to use the product
safely and correctly.
User’s Guide
(Excerpt) (PDF)
This manual explains the
necessary basic operations and
maintenance for daily use.
Epson Support (PDF) Provides information about
Epson Support for each region.
Online Manuals
User’s Guide
(this manual)
This manual explains the
general ways to use the printer,
such as operating procedures,
things required for everyday
usage, maintenance work, and
troubleshooting.
Administrator’s
Guide
(PDF)
This manual explains how
system administrators set up
and manage the printer.
Epson Support
(PDF)
Provides information about
Epson Support for each region.
SL-D500 Series User's Guide
Notes on Manuals
6
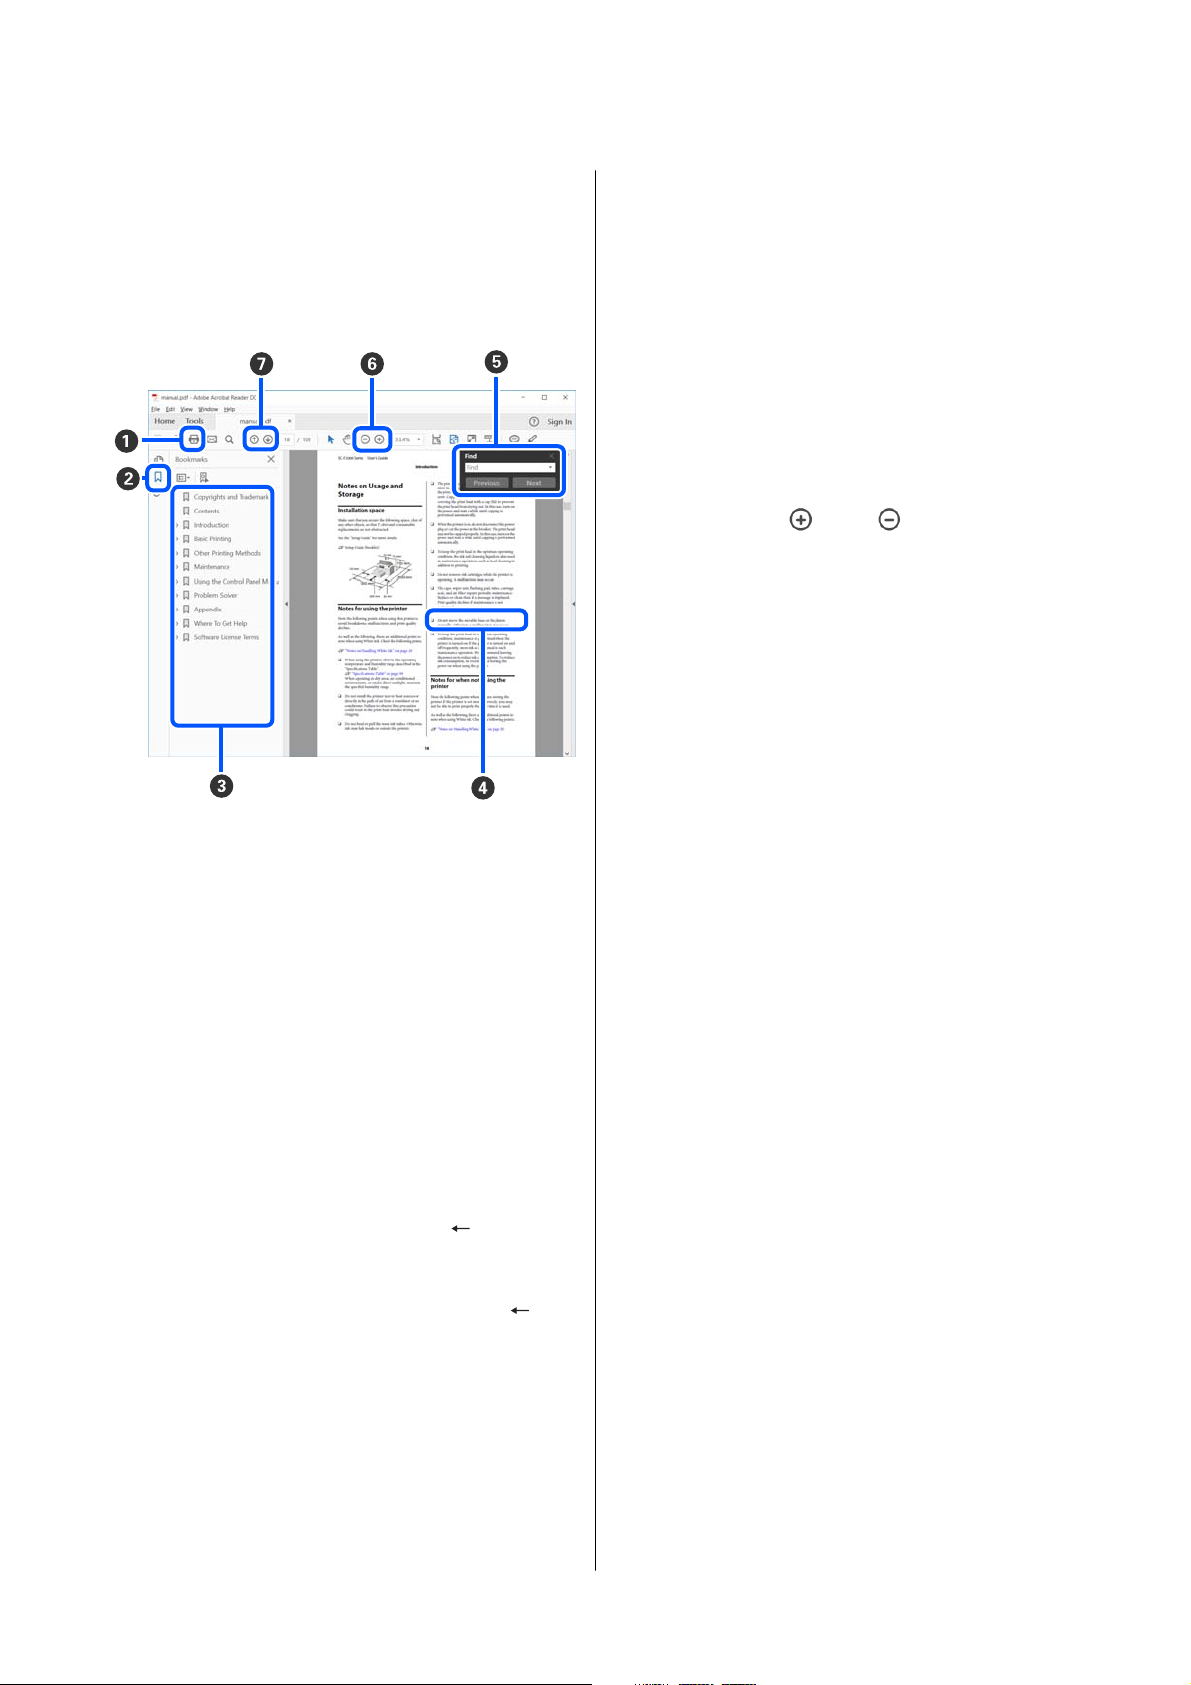
Viewing PDF Manuals
This section uses the Adobe Acrobat Reader DC as an
example to explain the basic operations for viewing
the PDF in Adobe Acrobat Reader.
A
Click to print the PDF manual.
B
Each time it is clicked the bookmarks are hidden
or shown.
C
Click the title to open the relevant page.
Click [+] to open the titles lower in the hierarchy.
D
If the reference is in blue text, click the blue text to
open the relevant page.
To return to the original page, do the following.
For Windows
While pressing the Alt key press the key.
For Mac
While pressing the command key press the key.
E
You can input and search for keywords, such as the
names of items you want to confirm.
For Windows
Right click on a page in the PDF manual and select
Find in the menu that is displayed to open the
search toolbar.
For Mac
Select Find in the Edit menu to open the search
toolbar.
F
To enlarge the text in the display that is too small
to see well, click
. Click to reduce the size.
To specify a part of an illustration or screenshot to
enlarge, do the following.
For Windows
Right click on the page in the PDF manual and
select Marquee Zoom in the menu that is
displayed. The pointer changes to a magnifying
glass, use it to specify the range of the place you
want to enlarge.
For Mac
Click View menu - Zoom - Marquee Zoom in this
order to change the pointer to a magnifying glass.
Use the pointer as a magnifying glass to specify the
range of the place you want to enlarge.
G
Opens the previous page or next page.
SL-D500 Series User's Guide
Notes on Manuals
7
Before Use
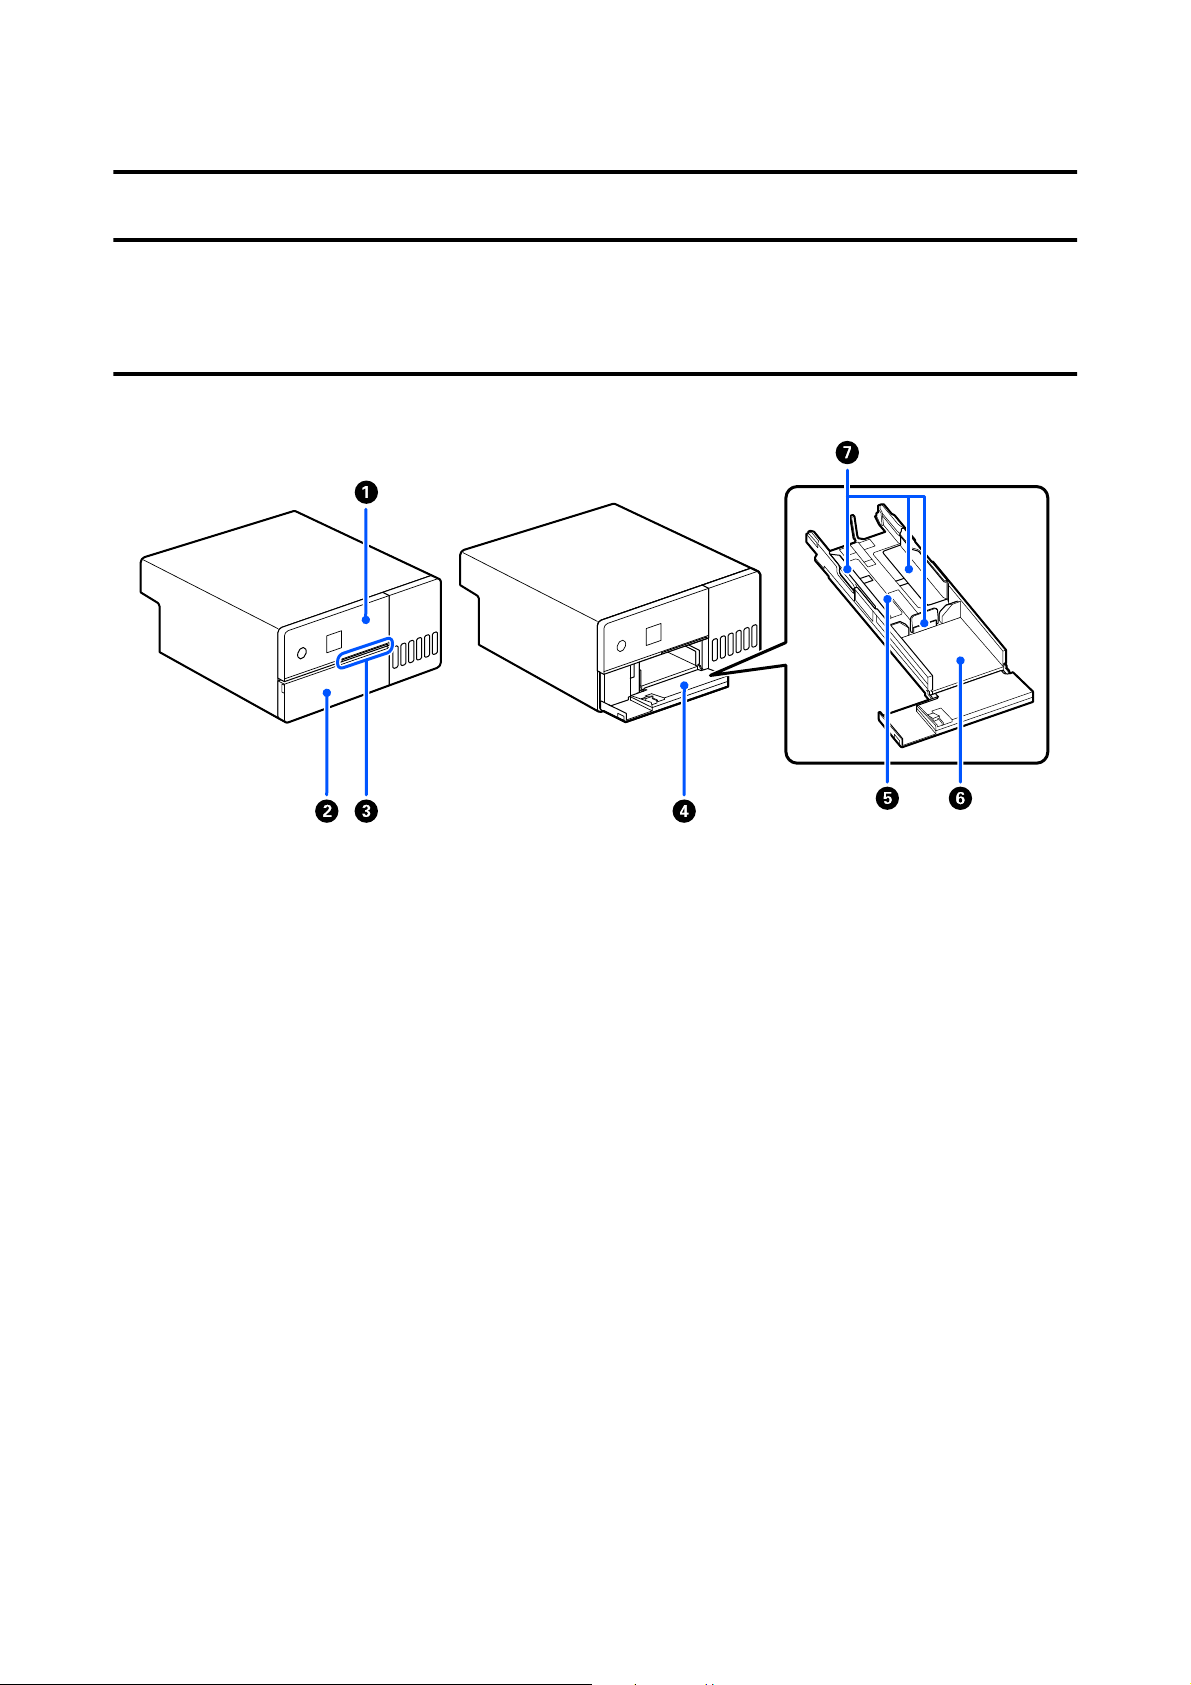
Printer Parts
Front
A Control panel
U “Control Panel” on page 13
B Front cover
Open when loading paper or printing. It opens automatically when printing starts.
C Status light
On : Error has occurred.
Check the error message on the screen.
Off : Status is normal.
D Paper cassette
Pull out to load paper.
E Feed area
Load paper here.
F Output area
Holds the printed paper.
SL-D500 Series User's Guide
Before Use
8

G Edge guides
Align them with the edges of the paper when loading paper.
SL-D500 Series User's Guide
Before Use
9

Inside
A Inner cover
Open when doing maintenance or removing paper jams.
B Maintenance box cover
Open to replace the maintenance box.
C Maintenance box
Container that holds the waste ink fluid.
U “Replacing the Maintenance Box” on page 53
D Ink tank
Supplies ink to the print head and shows the ink levels.
E Print head
The print head prints by moving left and right while emitting ink. Do not move the print head manually with
too much force. Otherwise, it may break down.
F Ink tank caps
Open to refill the ink tank with ink.
G Ink tank cover
Open to refill the ink tank with ink.
H Transportation lock
SL-D500 Series User's Guide
Before Use
10

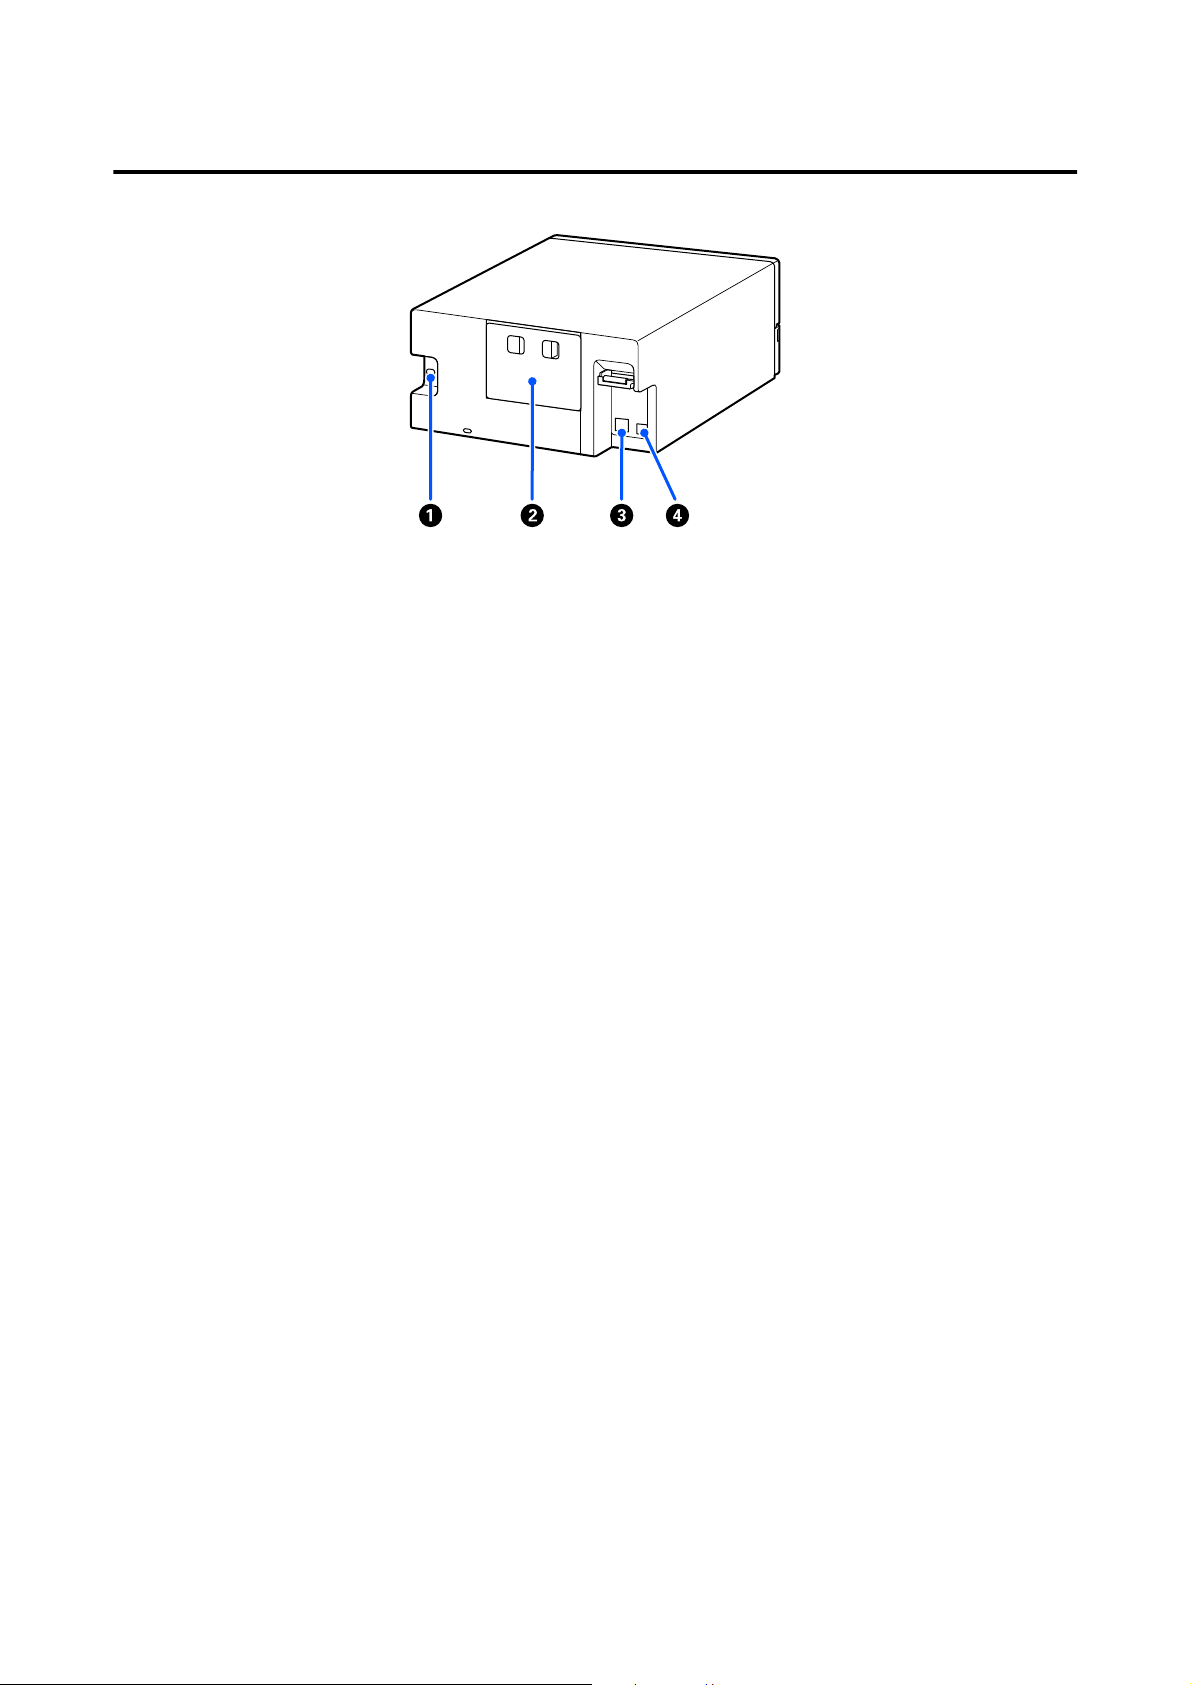
Rear
A AC inlet
Connects the power cord to the printer.
B Rear cover
Remove when doing maintenance or removing paper jams.
By removing the rear cover, you can pull out the interior to the point that the print head is visible.
C LAN port
Connect the LAN cable here.
D USB port
Connect the USB cable here.
SL-D500 Series User's Guide
Before Use
12
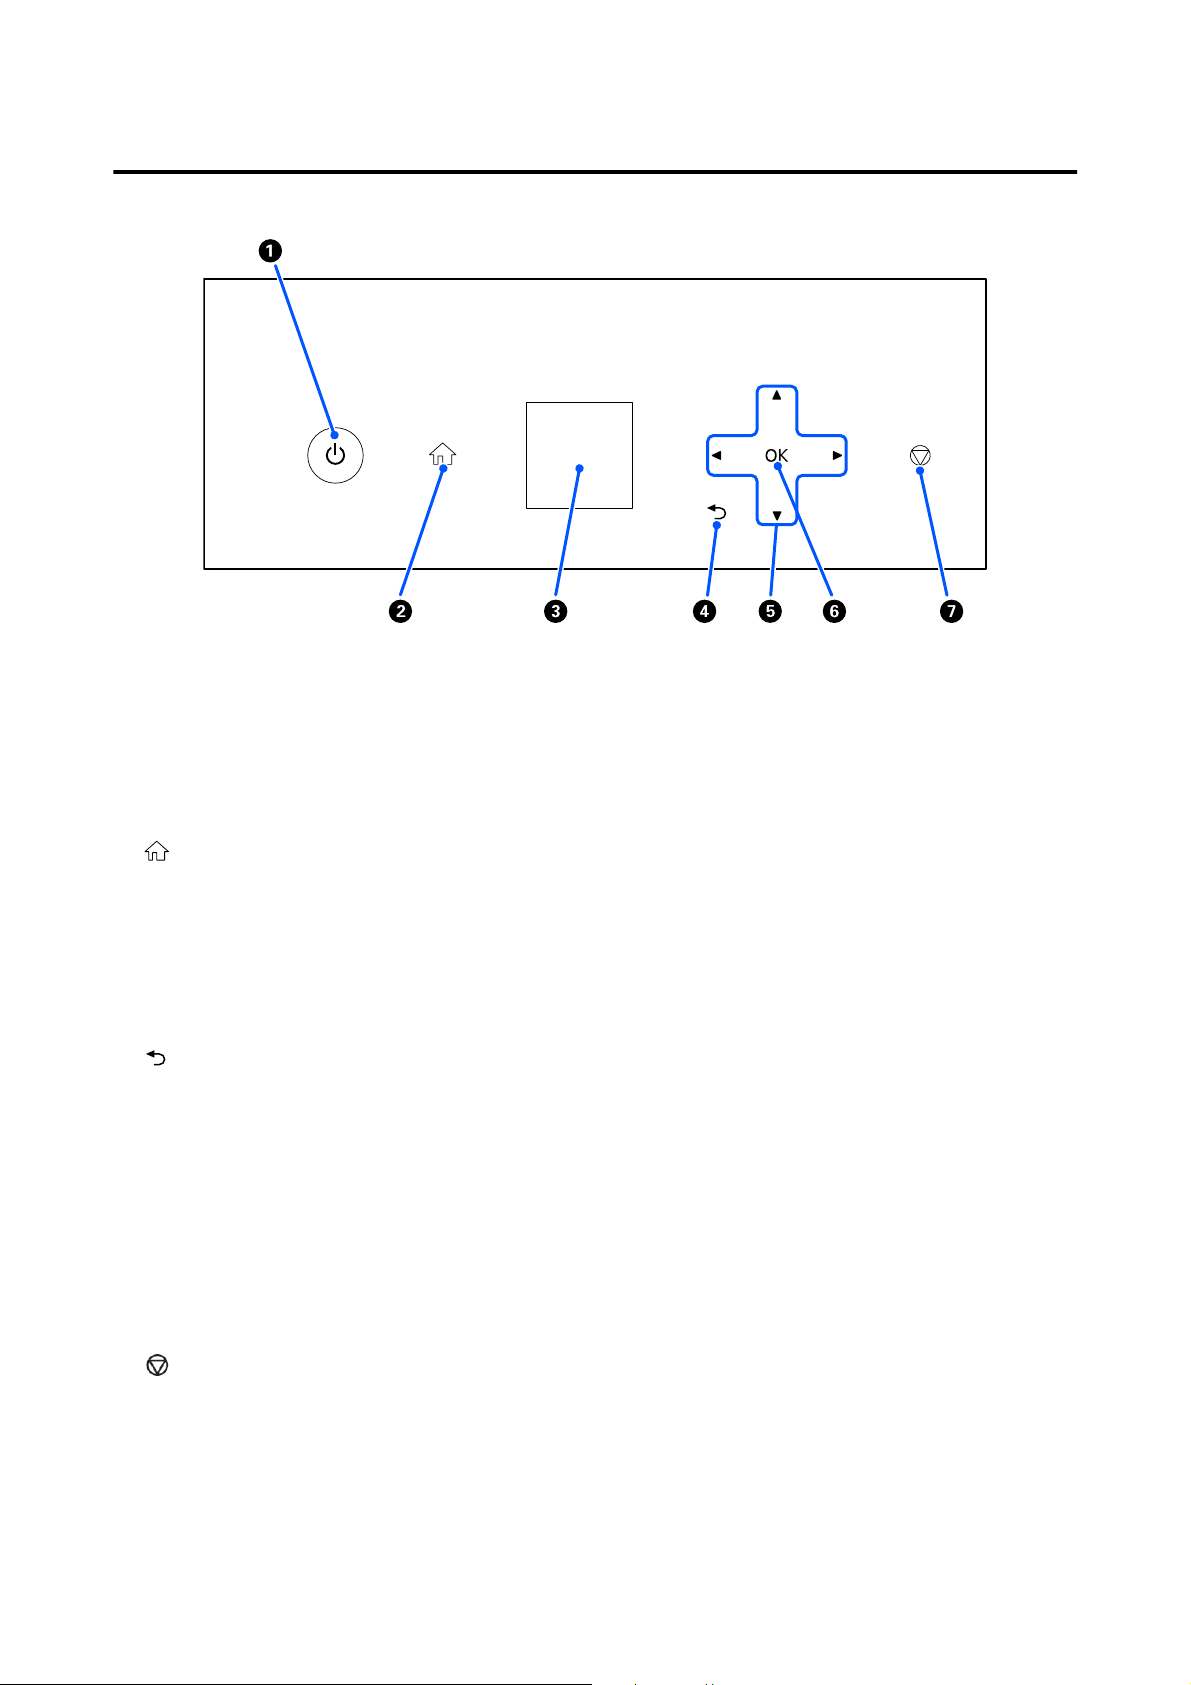
Control Panel
A
P button (power button), P light (power light)
This is normally on (the light is lit) during use. If an emergency occurs, or when the printer is not going to be
used for an extended period, press this button to turn the printer off (the light turns off).
The light flashes while the printer is operating.
B button (home button)
Press this, such as when a settings menu is displayed, to return to the Home screen.
C Screen
Displays the printer’s status, menus, and error messages.
D button (back button)
Press to go back one level in the displayed settings menu.
E
u/d/l/r buttons (arrow buttons)
Press when selecting items or entering text in settings menus.
F
Z button
Press to execute functions, and to apply selections and inputs.
G button (stop button)
Press to stop operations.
SL-D500 Series User's Guide
Before Use
13
Understanding and Operating the Display
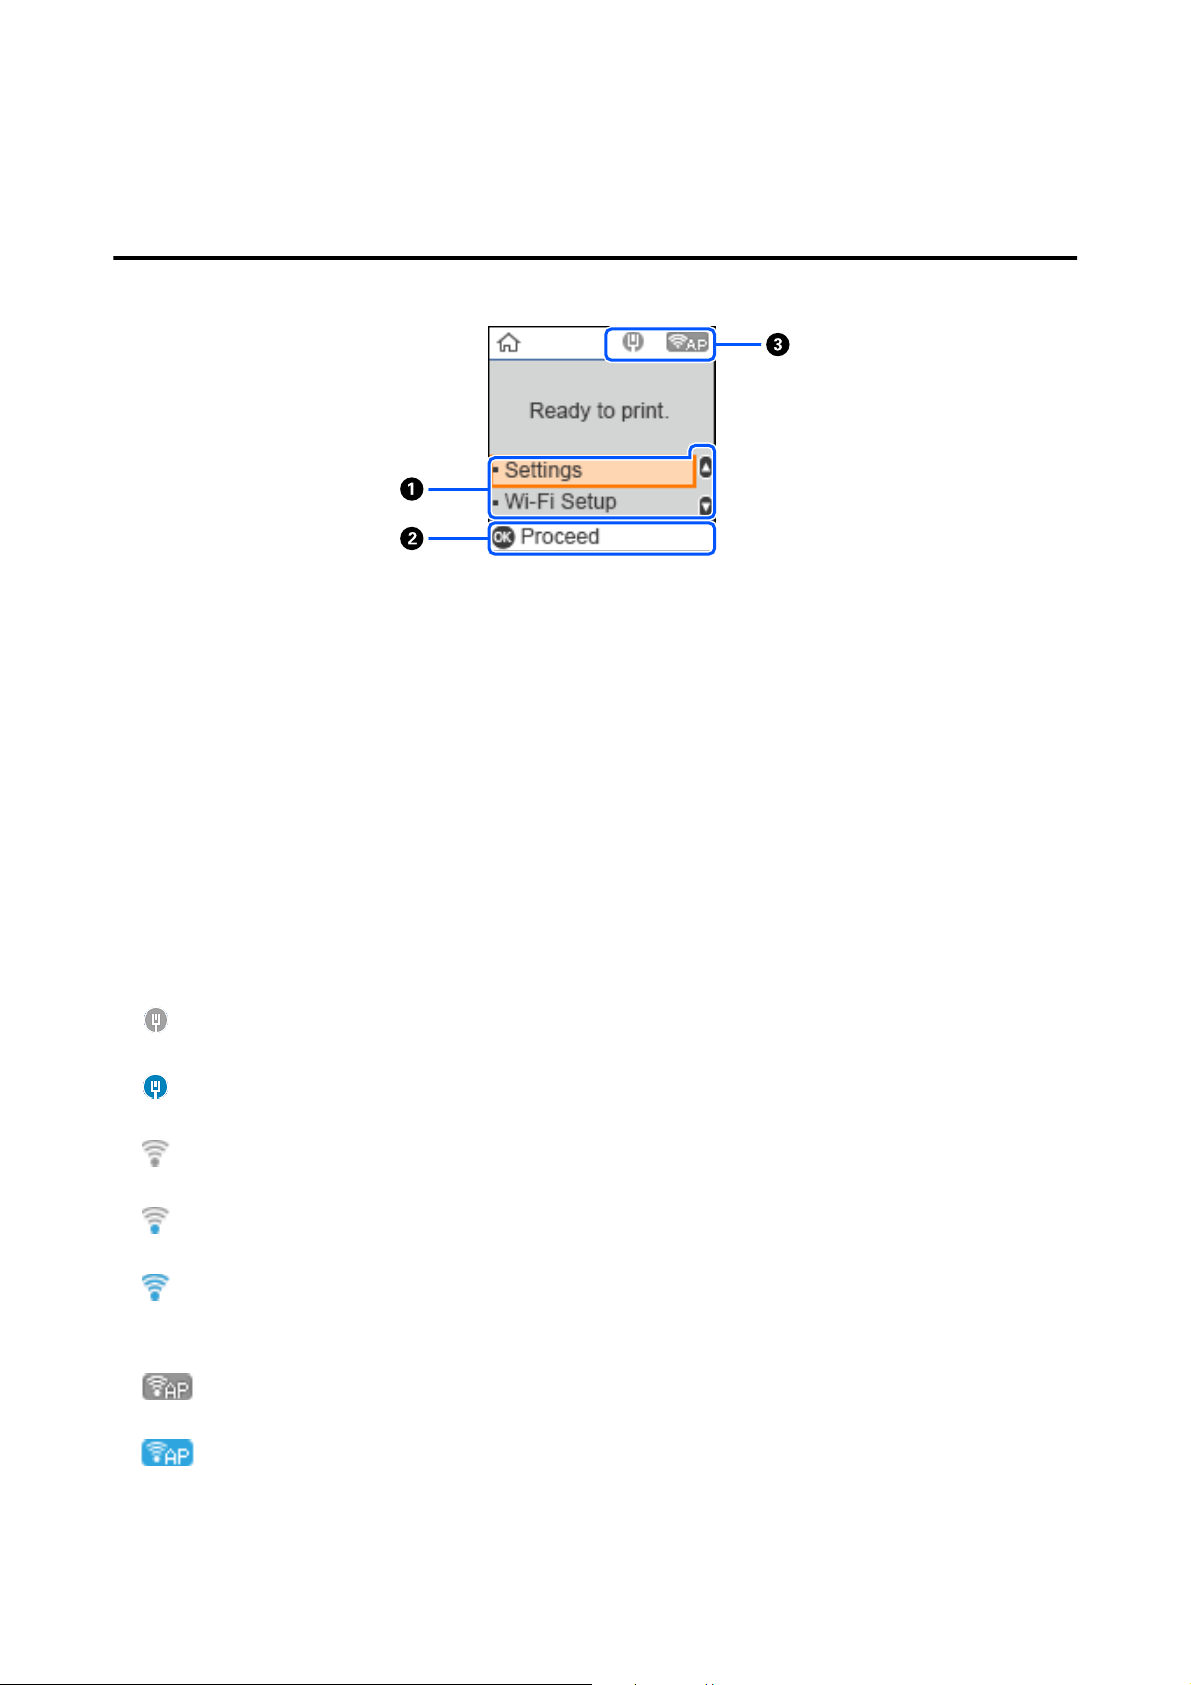
Home Screen
A Settings menu
Select printer settings and execute maintenance functions.
Use the u/d buttons to select items and press the Z button to go to the next screen.
U “Control Panel Menu” on page 94
B Operation Button Guide
Buttons that can be used appear here. This example shows you can go to a selected menu by using the Z
button.
C Network Status
The network connection statuses are shown by icons.
: Wired LAN is not connected, network is not set.
: Wired LAN is connected
: Wireless LAN (Wi-Fi) is disabled or processing the connection
: Wireless LAN (Wi-Fi) has a problem with or the printer is searching for a connection
: Wireless LAN (Wi-Fi) is connected
The number of lines shows the status of the signal. More lines indicate a better signal status.
: Wi-Fi Direct (simple AP) connection disabled
: Wi-Fi Direct (simple AP) connection enabled
SL-D500 Series User's Guide
Before Use
14
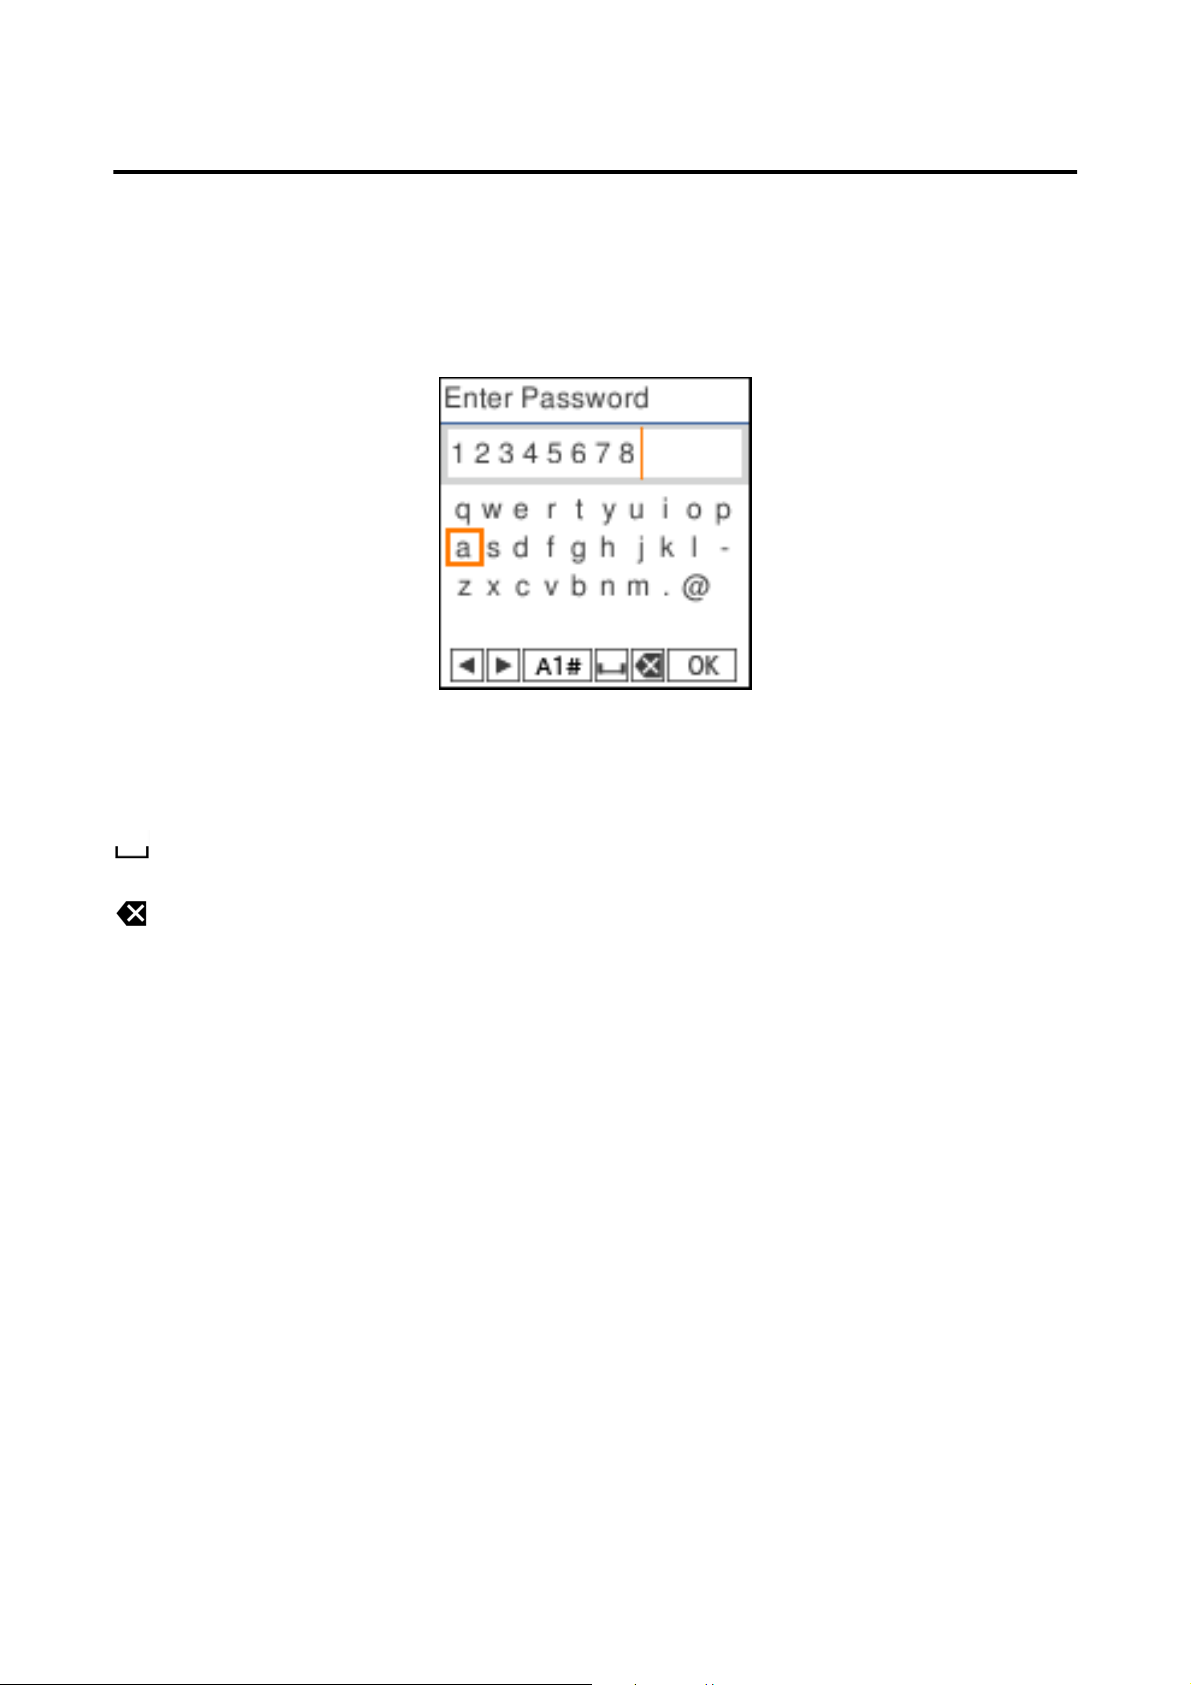
Text Input Screen
To enter characters and symbols for network settings from the control panel, use the u/d/l/r buttons and the
software keyboard on the screen. Press the u/d/l/r button to select a character or function button on the
keyboard, and then press the Z button. When you have finished entering characters, select OK, and then press
the Z button.
l r
: Moves the cursor to the left or right.
A 1 # : Switches the character type. You can enter alphanumerics or symbols.
: Enters a space.
: Deletes a character to the left (backspace).
OK : Enters the selected characters.
SL-D500 Series User's Guide
Before Use
15

Notes on Usage
Notes When Handling the Main Unit
❏ Do not suddenly change the temperature in the room where the printer is installed.
If the temperature changes suddenly, drops of water (condensation) could occur inside the printer which may
have an adverse effect on operations.
❏ Use the printer in an environment with a temperature of 10 to 35 °C (50 to 95 °F), and a humidity of 20 to
80%. When the printer is placed on a system rack, make sure the environment of the rack is within these
ranges.
Even when the conditions above are met, you may not be able to print properly if the environmental
conditions are not suitable for the paper. Be sure to use the printer in an environment where the paper’s
requirements are met. For more details, see the documentation supplied with the paper.
Also, when operating in dry areas, air conditioned environment, or under direct sunlight, maintain the
appropriate humidity.
❏ Do not place any containers containing water, such as vases or cups, on the printer. If water enters the printer,
it may break down.
❏ Do not use accessories designed for this printer with any other products.
❏ Depending on the performance of the computer being used, the printer stops printing temporarily; however,
this is not a malfunction.
❏ If the printer is not to be used for an extended period of time, store it with the maintenance box installed.
❏ When the printer is operating, do not unplug the power plug from the electric outlet or cut the power at the
breaker. The print head may not be capped properly (the print head is not positioned at the far right). Capping
is a function for automatically covering the print head with a cap (cover) to prevent the print head from drying
out. In this case, turn on the power and wait a while until capping is performed automatically.
❏ Ink may leave stains inside the printer. Be careful not to stain your hands or clothes when pulling out the
inside of the printer during maintenance. We recommend using a commercially available soft cloth to wipe off
any ink inside the printer before starting work.
Notes on Paper
Note the following points when handling and storing the paper. If the paper is not in good condition, print quality
may decline.
Check the documentation supplied with each paper.
Notes on Handling
Use paper recommended by our company.
Note the following points when handling paper.
❏ Use Epson special media under normal room conditions (temperature: 15 to 25 °C (59 to 77 °F), humidity: 40
to 60%).
SL-D500 Series User's Guide
Before Use
16
❏ Do not fold the paper or scratch the surface of the paper.
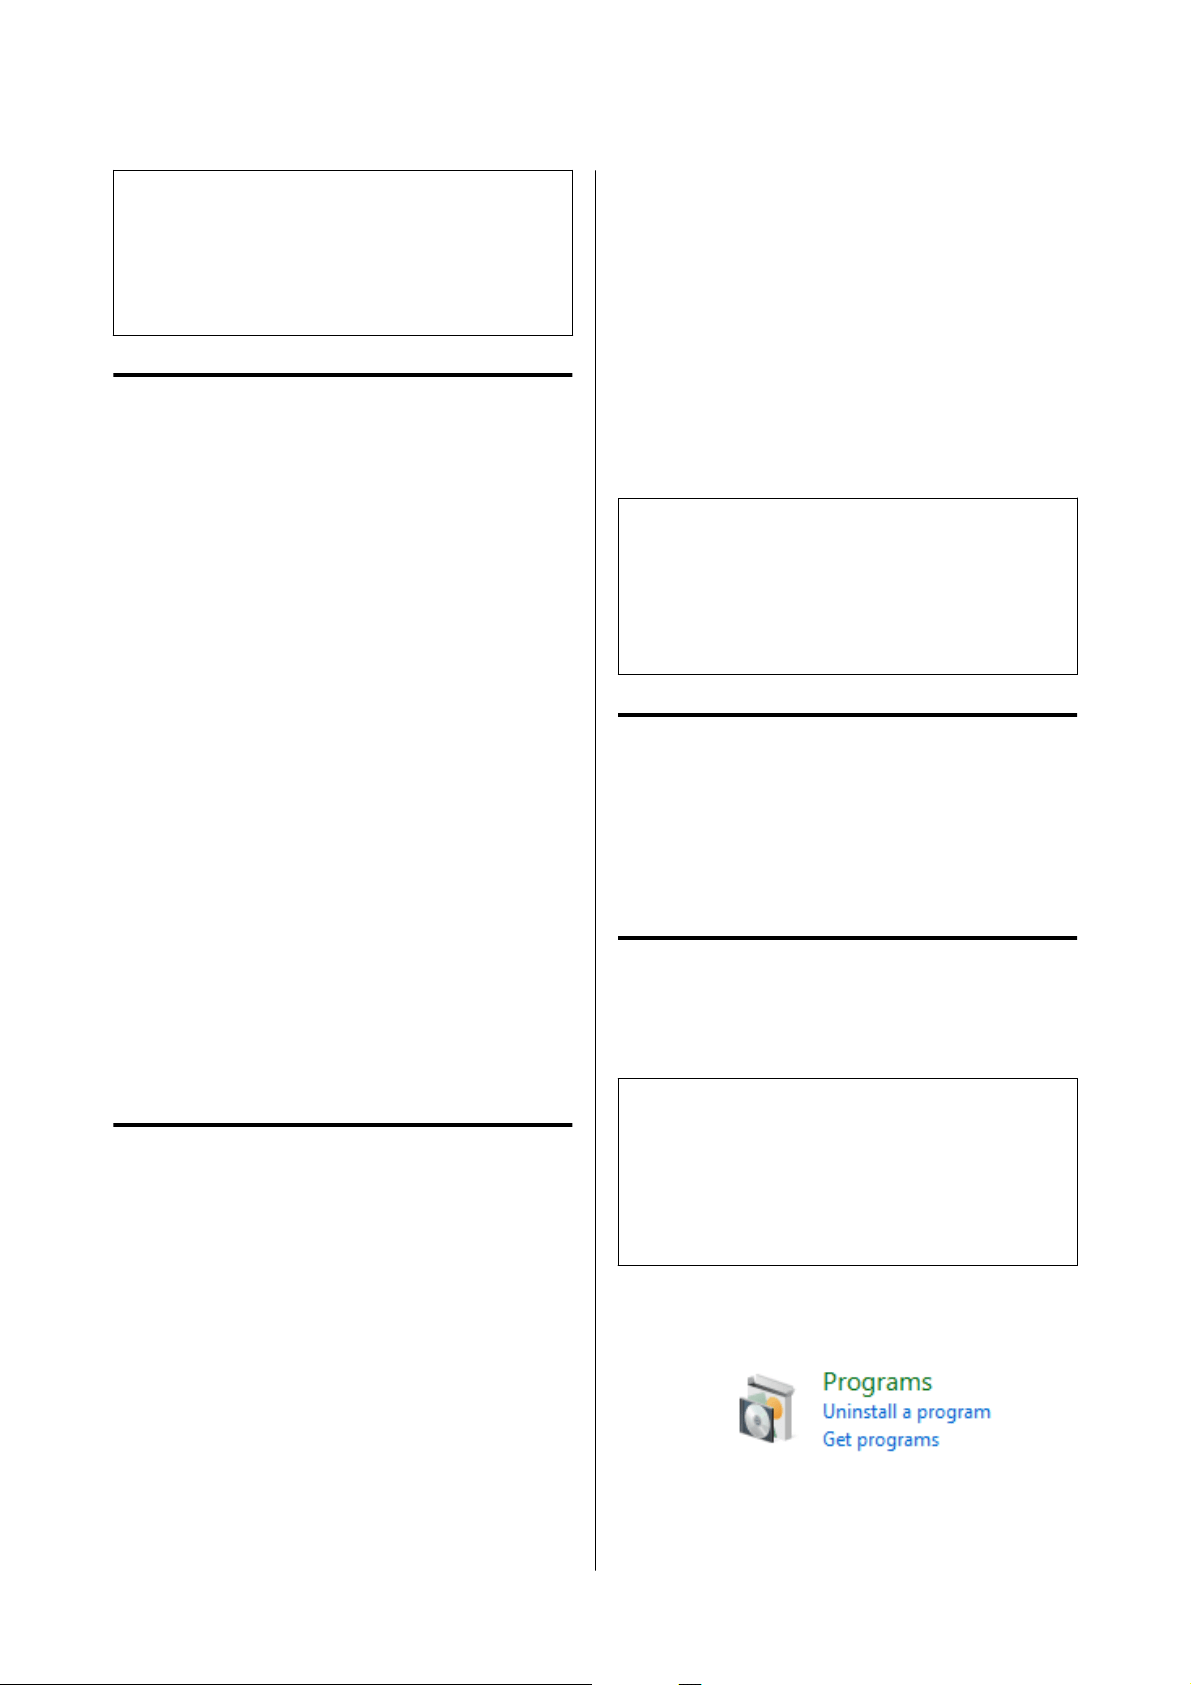
❏ Avoid touching the printable surface of the paper with your bare hands. Moisture and oil from hands can have
an adverse effect on the print quality.
❏ Handle paper by the edges of the paper. Also, we recommend wearing cotton gloves when handling paper.
❏ Do not throw away the paper packaging as you can use it for storing the paper.
❏ If the printer is not used every day, after you finish using it, remove all the paper that was loaded in the paper
cassette.
If the paper is left loaded in the paper cassette, then some parts of the paper may change color.
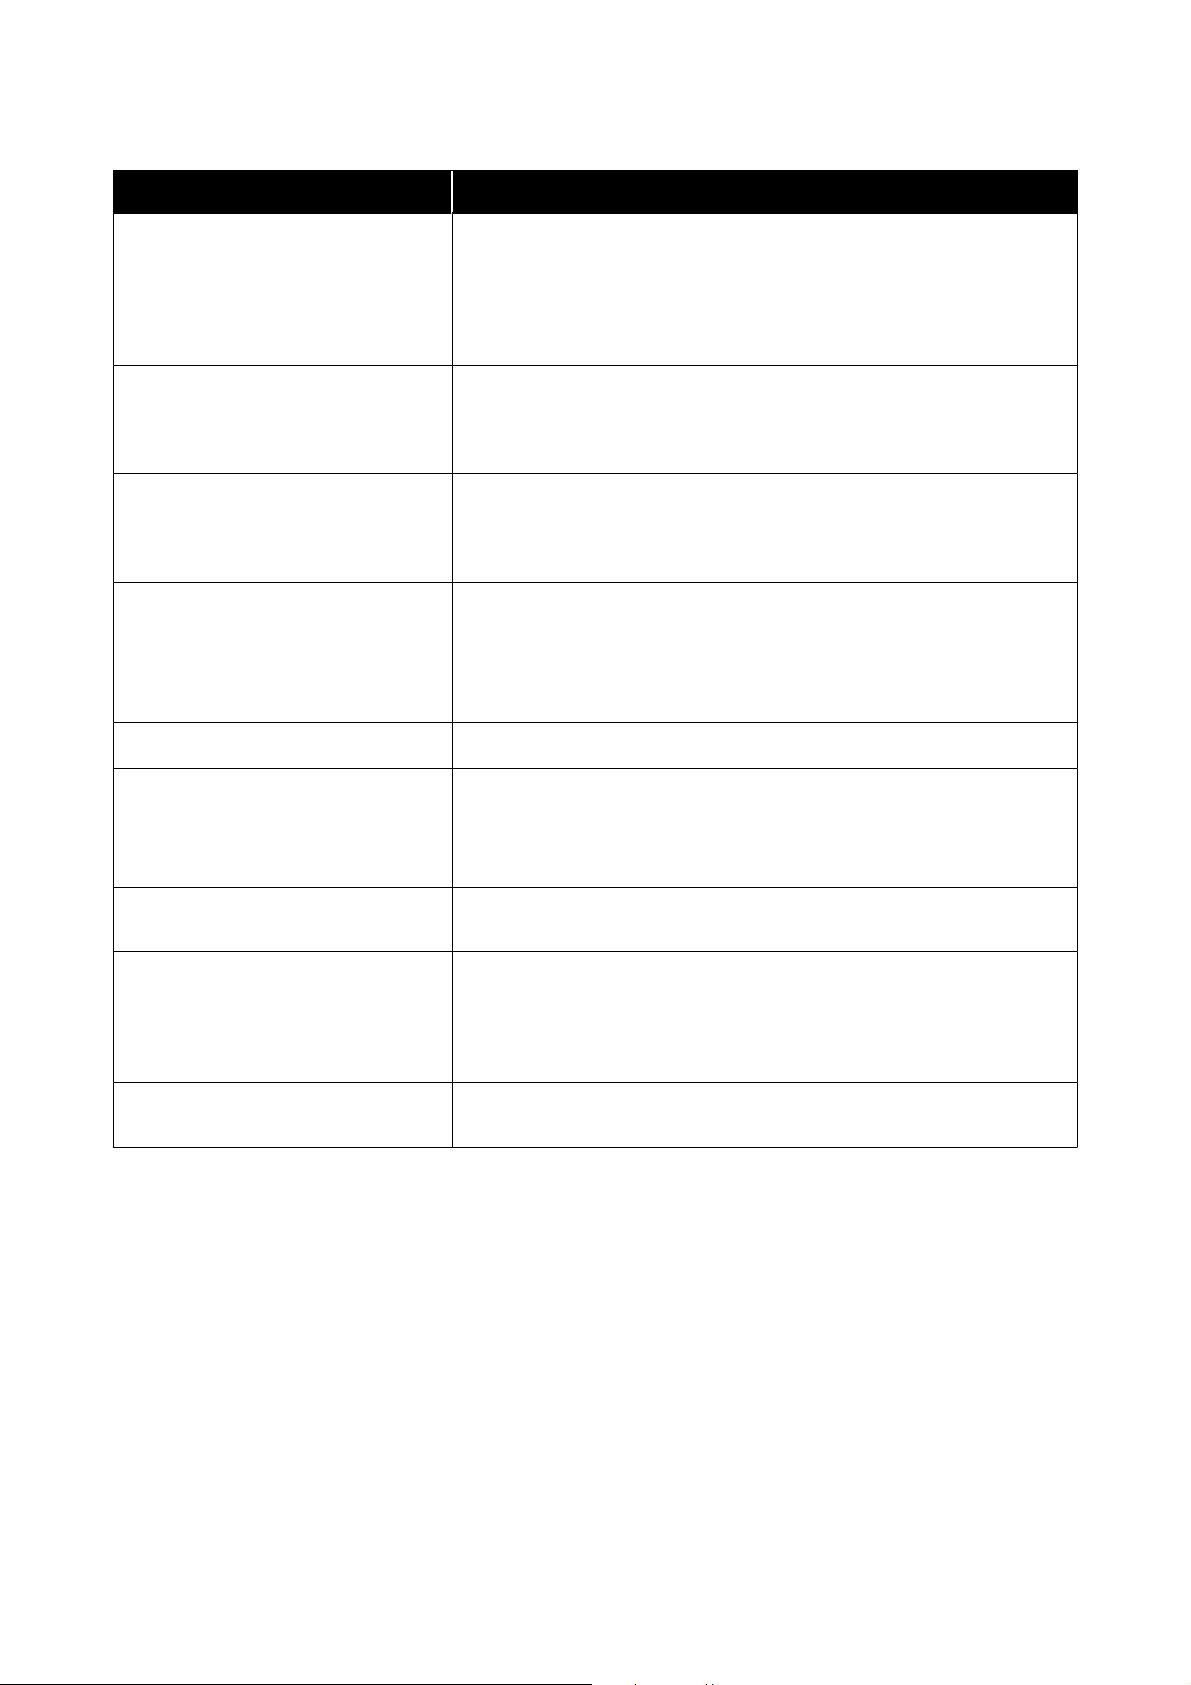
❏ Changes in temperature and humidity may cause paper to become wavy or curled. Check the following points.
❏ Load the paper just before printing.
❏ Do not use wavy or curled paper.
❏ Do not wet the paper.
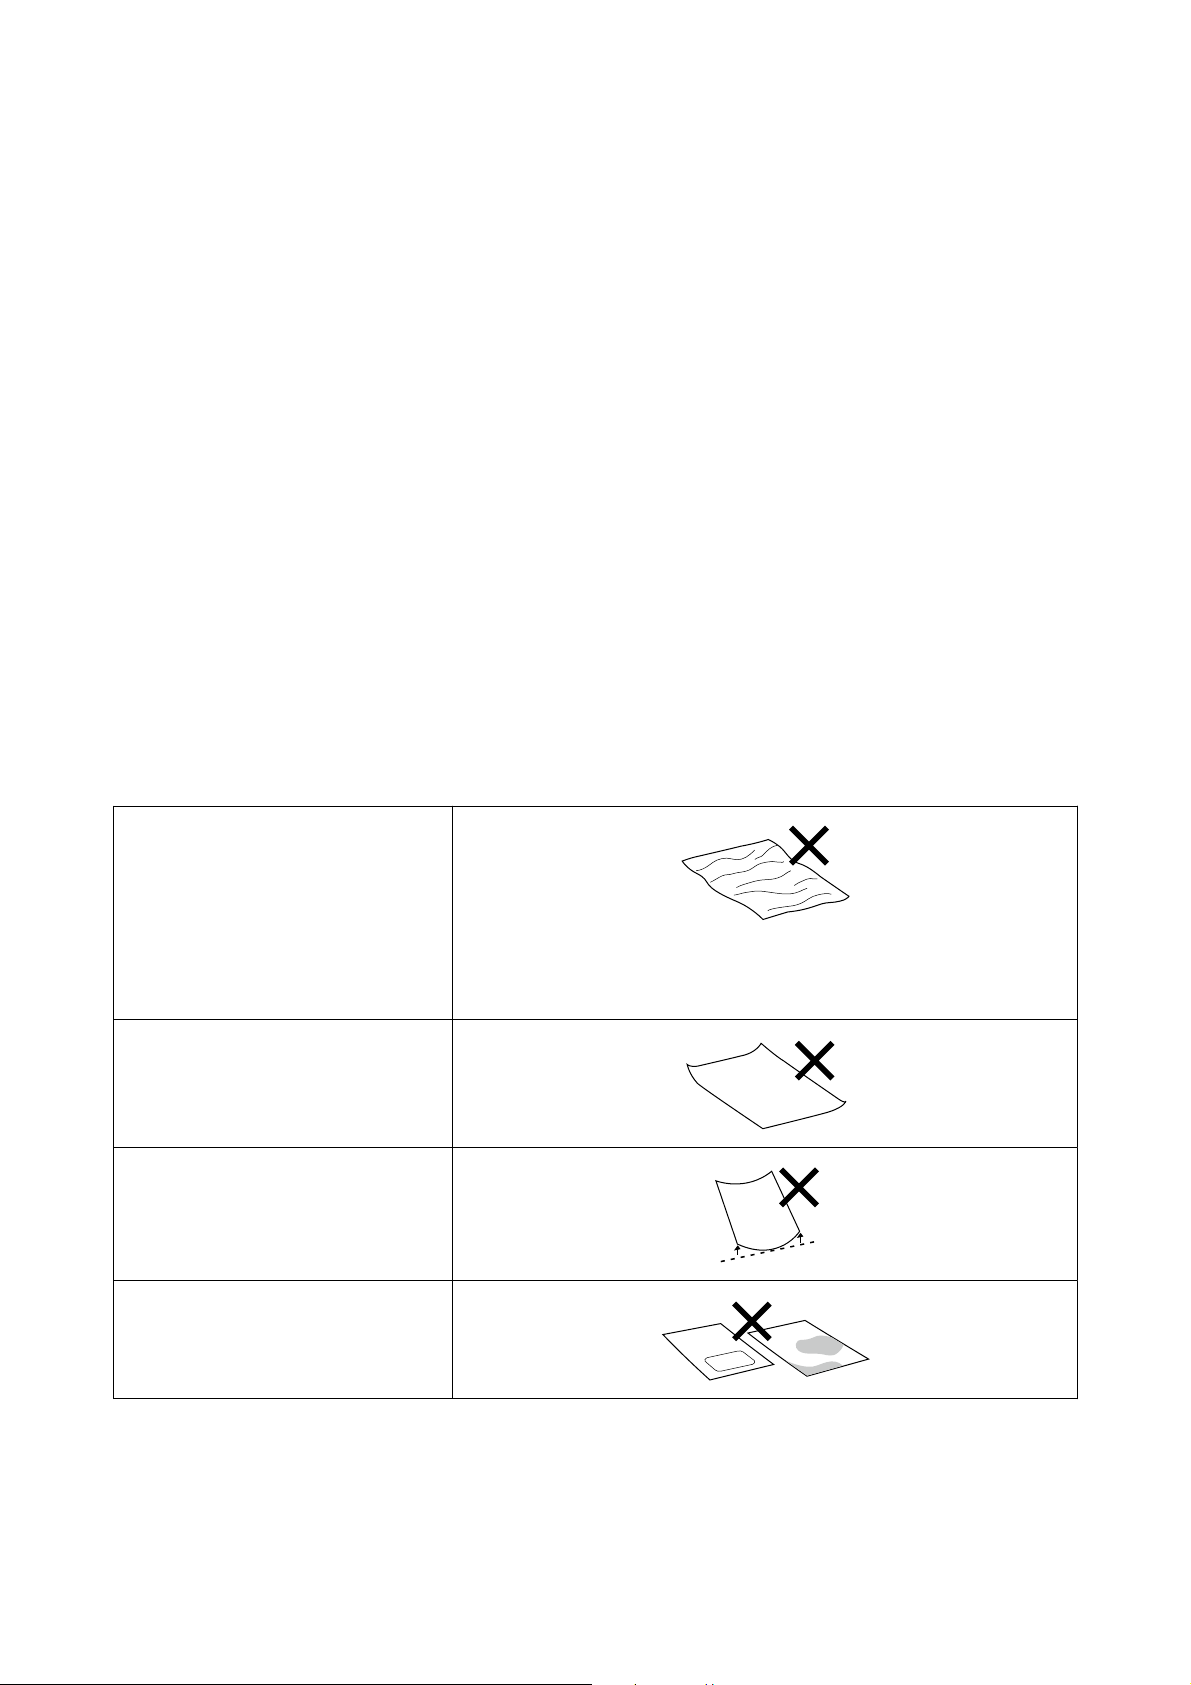
Paper that cannot be used
Do not load paper as described below. Doing so could cause paper jams and dirty printouts.
❏ Paper that is wavy
❏ Paper that is torn
❏ Paper that is cut
❏ Paper that is too thick
❏ Paper that is too thin
❏ Paper that is hard
❏ Paper that has folded corners
❏ Paper that is creased
❏ Paper that has been rolled up
❏ Paper that has curled up more than
3 mm
❏ Paper on which stickers, etc., have
been stuck
❏ Paper that is damp
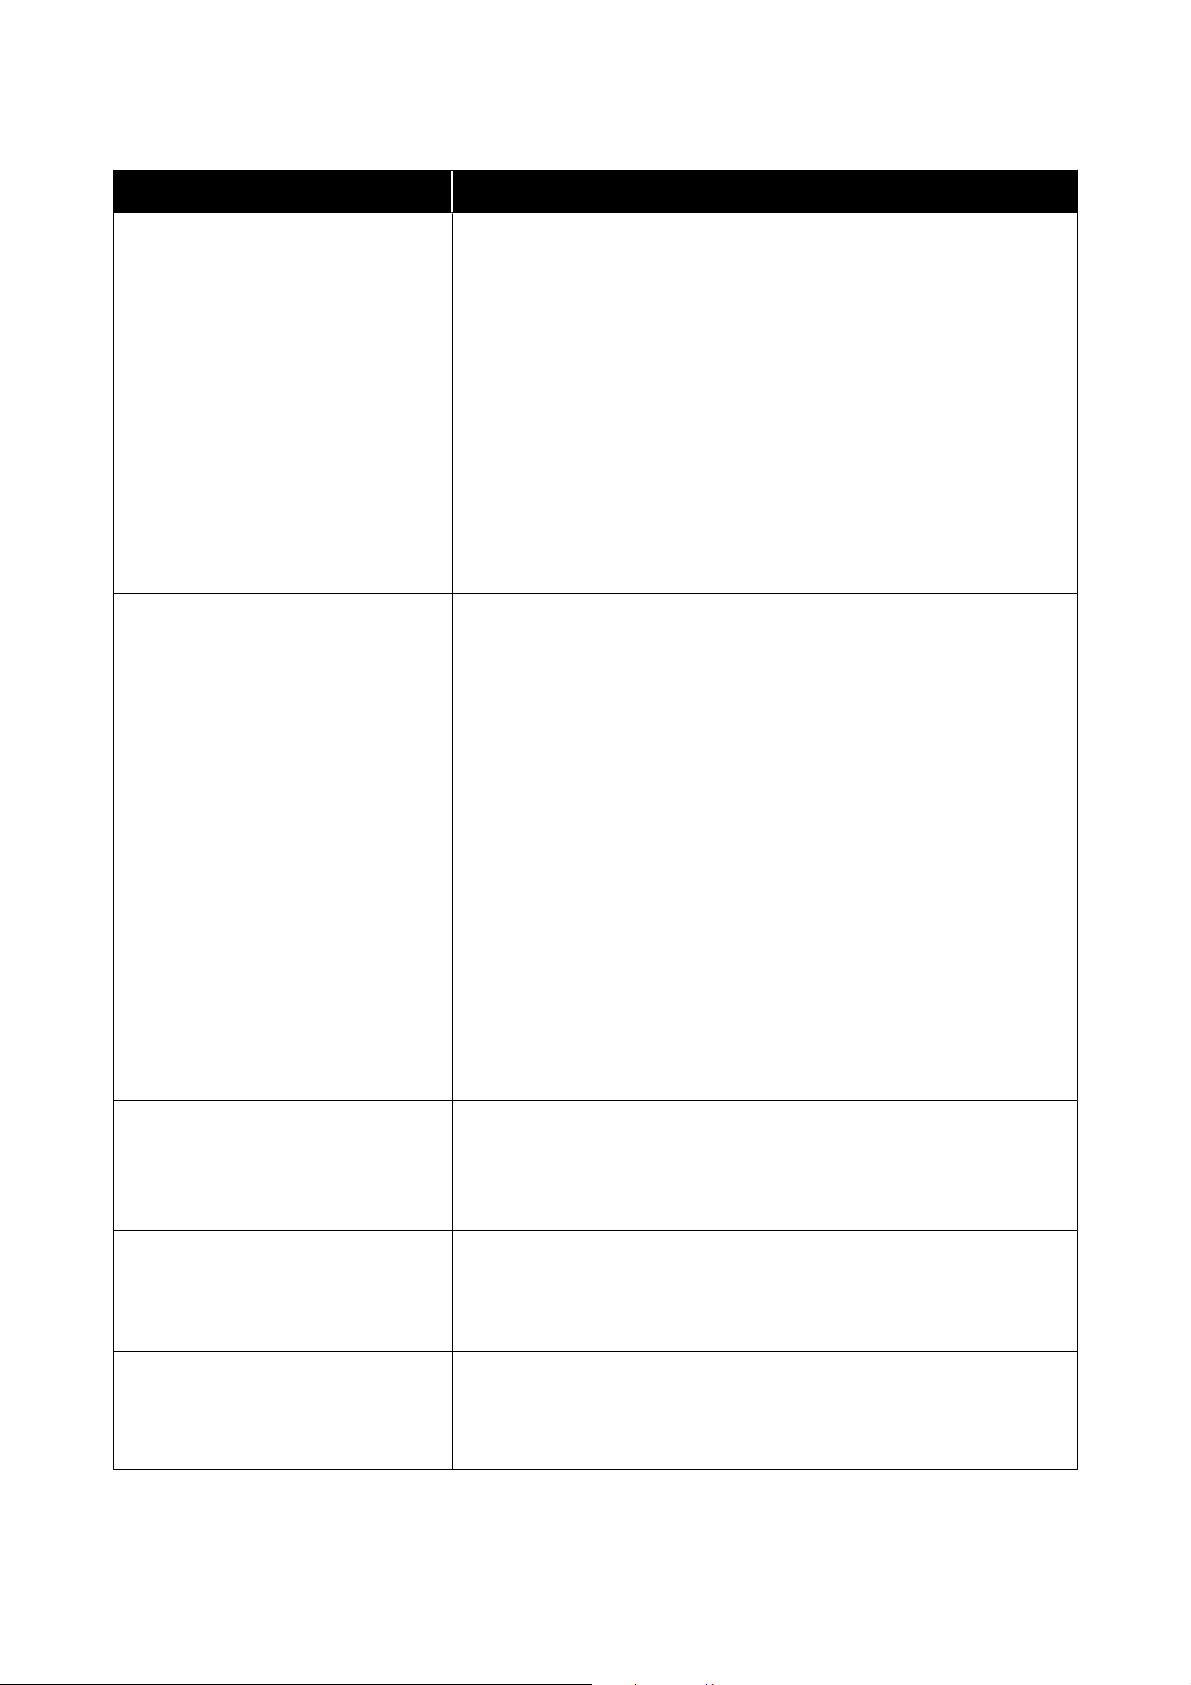
Notes before Loading Paper
Before loading paper in the paper cassette, carefully riffle the stack of paper so the sheets do not stick together, and
then align all four edges.
SL-D500 Series User's Guide
Before Use
17

How to riffle U “How to Load Paper” on page 25
Notes on storage
❏ Avoid locations that are subject to direct sunlight, excessive heat, or humidity.
❏ Keep the paper in its original package after opening it, and keep the paper flat.
Notes on Printing
Make sure that the leading edge of the paper is perpendicular to the long side and cut completely straight.
Storing and displaying printouts
❏ Do not rub or scratch printouts. If they are rubbed or scratched, the ink may peel off.
❏ Make sure the printouts are completely dry before folding or stacking; otherwise, the color may change where
they touch (leaves a mark). These marks will disappear if they are separated immediately and dried; however,
they will remain if not separated.
❏ Do not use a dryer to dry the printouts.
❏ Avoid locations that are subject to high temperature, humidity, and direct sunlight, and store in a dark place.
❏ Avoid displaying printouts outdoors or in direct sunlight. This may accelerate the fading.
❏ When displaying printouts indoors, we recommend placing them in glass frames and so on. This allows you to
display your printouts for a long time without them fading.
Notes on Handling Ink Bottles
To maintain high quality print results, note the following points for handling ink bottles.
Notes on How to Refill Ink
❏ Use ink bottles dedicated for this printer.
❏ When using the printer, be careful when handling the ink. Ink may splatter when refilling the ink tanks. You
may not be able to clean off ink that splashes onto clothes or belongings.
❏ Do not shake or crush the ink bottles.
❏ To maintain the quality of the printer’s print head, the printer is designed to stop printing before the ink supply
is completely expended, which is why some ink is left in the ink tanks.
❏ To keep the printer in optimum operating condition, we recommend that you do not leave the printer with
only a small amount of ink remaining in the ink tanks.
❏ To get the optimum print results, refill the ink to the upper line in the ink tank at least once each year.
SL-D500 Series User's Guide
Before Use
18

Notes on storage of ink bottles
❏ Avoid storage in locations subject to direct sunlight.
❏ Do not store in hot or damp environments.
❏ We recommend using the ink bottle before the expiration date printed on the packaging.
❏ When storing or transporting ink bottles, do not tilt them or subject them to shocks or sudden changes in
temperature. Ink may leak even if the cap of the ink bottle is firmly tightened. Make sure you keep the ink
bottle straight up when tightening the ink bottle cap. Also, when transporting the bottles, put them in a bag to
prevent ink from leaking.
❏ Ink bottles that have been stored at low temperatures for an extended period should be allowed to return to
room temperature over a period of at least three hours.
❏ Do not open the ink bottle bag until you are ready to refill the ink tank. A vacuum pack is used to maintain
quality. If the ink is left for too long after opening the pack, you may not be able to print properly.
❏ Use opened bottles as soon as possible.
Ink consumption
❏ As well as when printing, the printer also uses ink from all cartridges during head cleaning and other
maintenance operations to keep the print head in good condition. Some is also consumed when the power is
turned on.
❏ A mixture of color inks may be used to print black, depending on the paper type and print quality settings,
even for black and white and grayscale printing.
❏ Initial ink charging after purchasing the printer consumes enough ink to fill up to the tips of the print head
nozzles (the holes from which the ink is fired) allowing you to print right away. Therefore, the number of
printed sheets may be lower than the ink bottles used from the second and subsequent refills.
Introducing the Software
Install the printer driver and Maintenance Tool on your computer to use the printer.
Download and install the latest printer driver and Maintenance Tool from the Epson website to use the printer in
the best conditions.
SL-D500 Series User's Guide
Before Use
19
Software Name Summary
Printer Driver This software is for printing according to print commands from application
software.
The main functions of the printer driver are described below.
❏ Converts print data received from applications into printable data and
sends it to the printer.
❏ Set print conditions, such as the paper type and paper size, on the printer
driver’s settings screen.
The following functions can be executed when using Windows.
❏ The Maintenance Tool can be started.
U “Using the Maintenance Tool (Windows)” on page 64
❏ Start up the Paper Type add-on tool to be able to add paper information to
the printer and printer driver.
U “Adding Paper Information” on page 90
Maintenance Tool From your computer you can perform adjustment and maintenance operations
such as checking the printer’s status, making settings, and performing Print
Head Cleaning.
Also, the Maintenance Tool must be installed in the following cases, so install
Maintenance Tool on your computer.
❏ To use the automatic print head nozzle check.
❏ To add types of paper to be used on the printer.
❏ To use EPSON SureLab OrderController/EPSON SureLab OrderController LE.
Maintenance Tool is not installed automatically if you are using Windows. See
the following to install it.
It is installed together with the printer driver if you are using Mac.
U “Installing Maintenance Tool (Windows Only)” on page 22
See the following for more details on Maintenance Tool.
U “Using the Maintenance Tool (Windows)” on page 64
U “Using the Maintenance Tool (Mac)” on page 78
SL Paper Type Additional Tool Software to add paper types for Mac. It is installed together with the printer
driver if you are using Mac.
See the following for more details on SL Paper Type Additional Tool.
U “Adding Paper Information by Using a Paper Type File” on page 90
EPSON Software Updater The software checks if new software or update information is available on the
Internet and installs it when available. You can also update the manuals for this
printer.
U “How to Use EPSON Software Updater” on page 22
EPSON NetConfig SE With this software, you can configure various network settings for the printer
from your computer. This is useful as it allows you to enter addresses and names
using the keyboard.
This manual is also installed during installation.
SL-D500 Series User's Guide
Before Use
20
Software Name Summary
Web Config This software comes preinstalled in the printer. Start and use it from a Web
browser via the network.
Select network security settings from Web Config. This software also has an
email notification function for notifying of printer errors and other problems.
U “How to Use Web Config” on page 23
EPSON SureLab OrderController/EPSON
SureLab OrderController LE
*1
This software is for receiving orders, and managing and processing photos to
be printed as orders. It also has image processing functions, such as auto
compensation. EPSON SureLab OrderController LE has limited functionality of
EPSON SureLab OrderController.
EPSON Print Factory for DPE
*1
This software is for terminals that receive orders and that support EPSON
SureLab OrderController/EPSON SureLab OrderController LE. Simple operability
and audio guidance mean that orders can be placed easily. It has functions for
multiple split screens, calendars, design templates, and more.
EPSON SureLab Layout and ID
*1
This software has photo processing functions and layout functions. It can do
various processes to received photos, such as creating ID photos, inserting text,
and creating frames.
Printing cannot be done with just EPSON SureLab Layout and ID alone. Use it
with EPSON SureLab OrderController/EPSON SureLab OrderController LE.
EPSON SureLab FrameEditor
*1
This software creates frames by using EPSON SureLab Layout and ID.
Epson Photo Creator (for users)/Epson
Mobile Order Manager (for shops)
*2
This software is used at photo shops for ordering and printing photo-books and
snapshots from smart devices.
The user app is used to edit, save, and upload photo-books and snapshots,
while the shop app is used to receive, download, and print the data.
Epson Smart Panel
*2
This software is for printing and for checking the status of the printer from a
smart device.
Epson Device Admin
*3
This software can centrally manage the status of and do settings for multiple
printers connected over a network or by USB. It can also notify administrators
with error information, such as paper jams and ink depletion, as well as allow
settings to be changed remotely, such as IP addresses when a new printer is
installed.
Firmware Updater
*3
This software is for updating firmware. It uses EFU format files for firmware
updates to update the printer firmware.
*1 This is optional software.
*2 Download this software from App Store or Google Play if necessary.
*3This is not installed automatically. Download it from Epson’s website and install it, if necessary.
SL-D500 Series User's Guide
Before Use
21

Installing Maintenance
Tool (Windows Only)
If your computer runs on a Windows OS, use the
following procedure to install Maintenance Tool.
Note:
If your computer runs on a Mac OS, Maintenance Tool
is installed together when you install the printer driver.
North America and Latin
America
A
Download and run the installer from the Epson
website.
The setup wizard starts.
B
Click Next.
Follow the on-screen instructions to install.
See the following for more details on
Maintenance Tool.
U “Using the Maintenance Tool (Windows)”
on page 64
Other Regions
A
Insert the software disc into your computer,
and then double-click D500Inst.exe in the
Apps - SystemSoftware folder.
The setup wizard starts.
B
Click Next.
Follow the on-screen instructions to install.
See the following for more details on
Maintenance Tool.
U “Using the Maintenance Tool (Windows)”
on page 64
How to Use EPSON
Software Updater
Checking Software Update
Availability
A
Check the following status.
❏ The computer is connected to the Internet.
❏ The printer and the computer can
communicate.
B
Start EPSON Software Updater.
Windows 8.1
Enter the software name in the search charm,
and select the icon displayed.
Windows 10/11
Click the Start button, and then select All Apps
- Epson Software-EPSON Software Updater
in this order.
Mac
Click Go - Applications - Epson Software -
EPSON Software Updater.
Note:
In Windows, you can also start by clicking the
printer icon on the desktop toolbar and selecting
Software Update.
C
For Windows, select the printer from the top of
the screen.
Check whether the software is the latest.
D
Update the software and manuals.
Follow the on-screen instructions to continue.
c
Important:
Do not turn off the computer or printer while
updating.
SL-D500 Series User's Guide
Before Use
22
Note:
Software that is not displayed in the list cannot be
updated using EPSON Software Updater. Check for the
latest versions of the software from the Epson website.
https://www.epson.com
Receiving Update Notifications
A
Start EPSON Software Updater.
B
Click Auto update settings.
C
Select an interval for checking for updates on
the printer’s Interval to Check box, and then
click OK.
How to Use Web Config
This section explains how to start and close Web
Config.
North America and Latin America:
See the online Administrator’s Guide for details about
using Web Config.
Other regions:
See the Administrator’s Guide in the Online Manual for
details about using Web Config.
Instructions for Starting
Launch a browser on a computer connected to the
same network as the printer.
A
Check the IP address of the printer.
From the Home screen, press Settings -
Network Settings - Advanced Setup - TCP/IP
- Manual, in this order.
B
Launch a Web browser on a computer
connected to the printer via a network.
C
Enter the IP address of the printer in the
address bar of the Web browser and press the
Enter or Return key.
Format:
IPv4: https://IP address of printer/
IPv6: https://[IP address of printer]/
Example:
IPv4: https://192.168.100.201/
IPv6: https://[2001:db8::1000:1]/
Note:
The initial value for the administrator’s user name is
blank (nothing has been input), and the initial value for
the administrator’s password is the product’s serial
number. Confirm the product serial number printed on
a label on the printer.
Exiting Procedure
Close the Web browser.
Uninstalling Software
Windows
The printer driver and Maintenance Tool need to be
deleted individually.
c
Important:
❏ You must log in as an Administrator.
❏ If the password or confirmation of an
administrator is requested, enter the password
and then continue with the operation.
A
Open the Control Panel, and then click
Uninstall a program.
SL-D500 Series User's Guide
Before Use
23
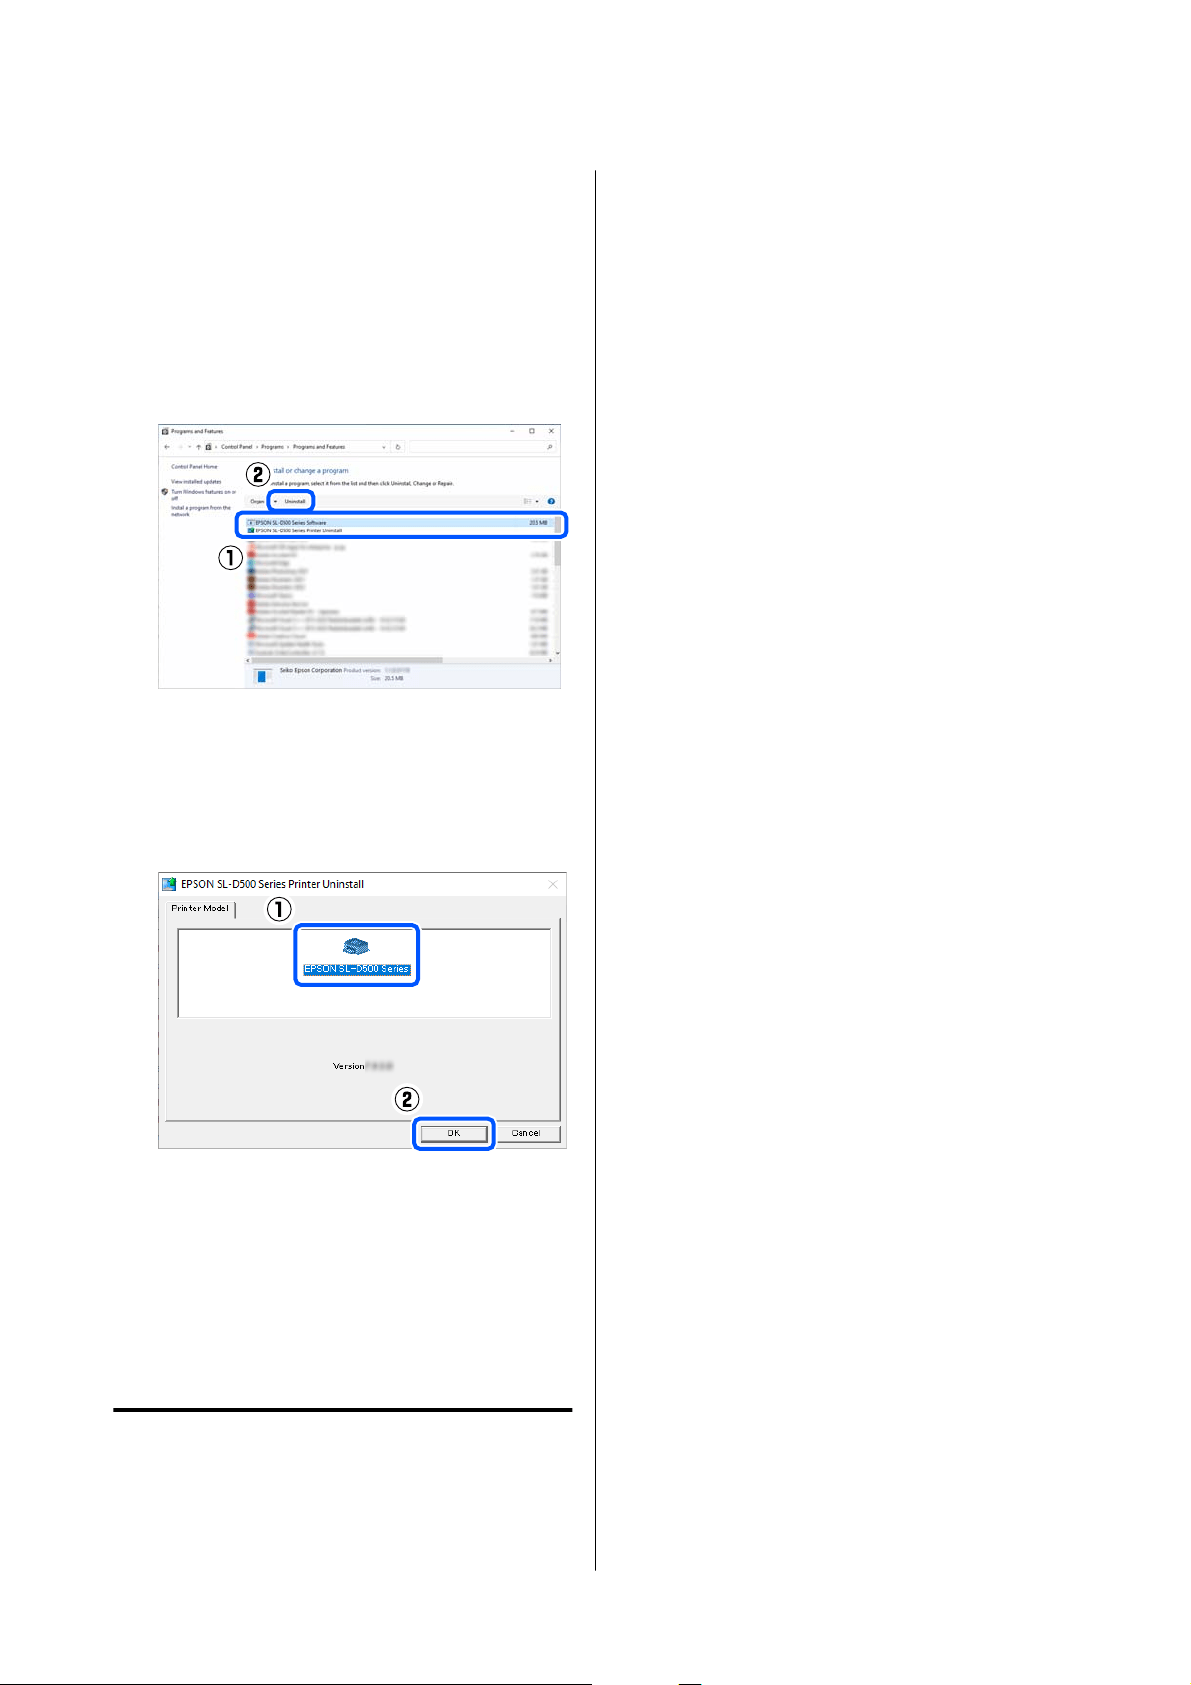
B
Select the software to delete, and then click
Uninstall/Change (or Uninstall).
To Delete the Printer Driver
Select EPSON SL-D500 Series Printer
Uninstall.
To Delete Maintenance Tool
Select EPSON SL-D500 Series Software.
To delete the printer driver, go to step 3.
To delete Maintenance Tool, go to step 4.
C
Select the target printer icon, and then click
OK.
D
Follow the on-screen instructions to continue.
When the delete confirmation message appears,
click Ye s .
Restart the computer if you are reinstalling the printer
driver.
Mac
When the printer driver is deleted, Maintenance Tool
is also deleted.
Use the "Uninstaller" to uninstall the printer driver.
Downloading the Uninstaller
Download the "Uninstaller" from the Epson website.
https://www.epson.com/
Using the Uninstaller
Check the procedure when downloading "Uninstaller"
on the Epson website, and follow the instructions.
SL-D500 Series User's Guide
Before Use
24
Basic Operations
Loading paper
Items to Prepare
Prepare the following items.
❏ New paper to be loaded
❏ Gloves
Wear when handling the paper so that the paper
does not get dirty.
How to Load Paper
Note:
See the following for details on paper that can be used
with the printer.
U “Supported Media” on page 136
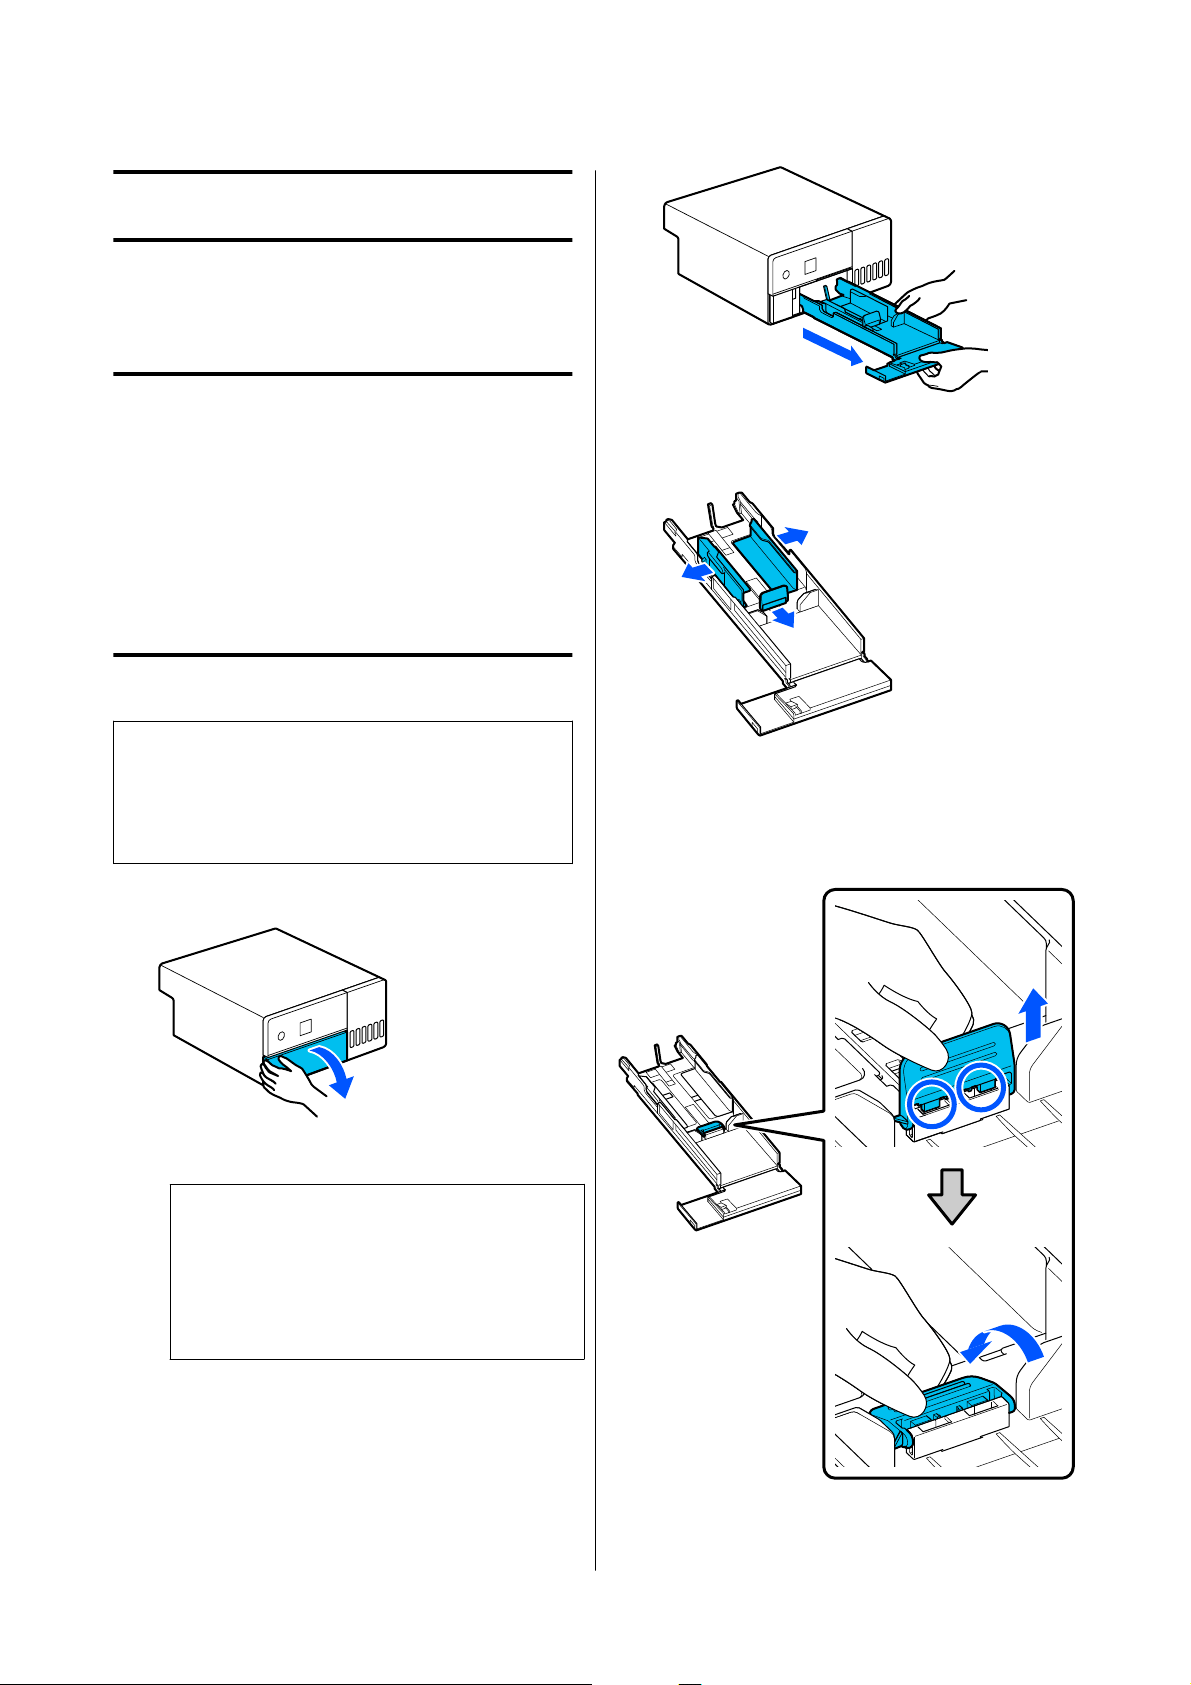
A
Open the front cover.
B
Pull the paper cassette out.
c
Important:
Use both hands to pull the paper cassette out.
If you use only one hand, the paper cassette
may fall and be damaged because the paper
cassette is heavy when it is pulled out.
C
Spread apart the left, right, and front edge
guides all the way.
D
Lower the front edge guide.
Lift up the edge guide until you can see the 2
hooks and then lower it, as shown in the
illustration.
SL-D500 Series User's Guide
Basic Operations
25
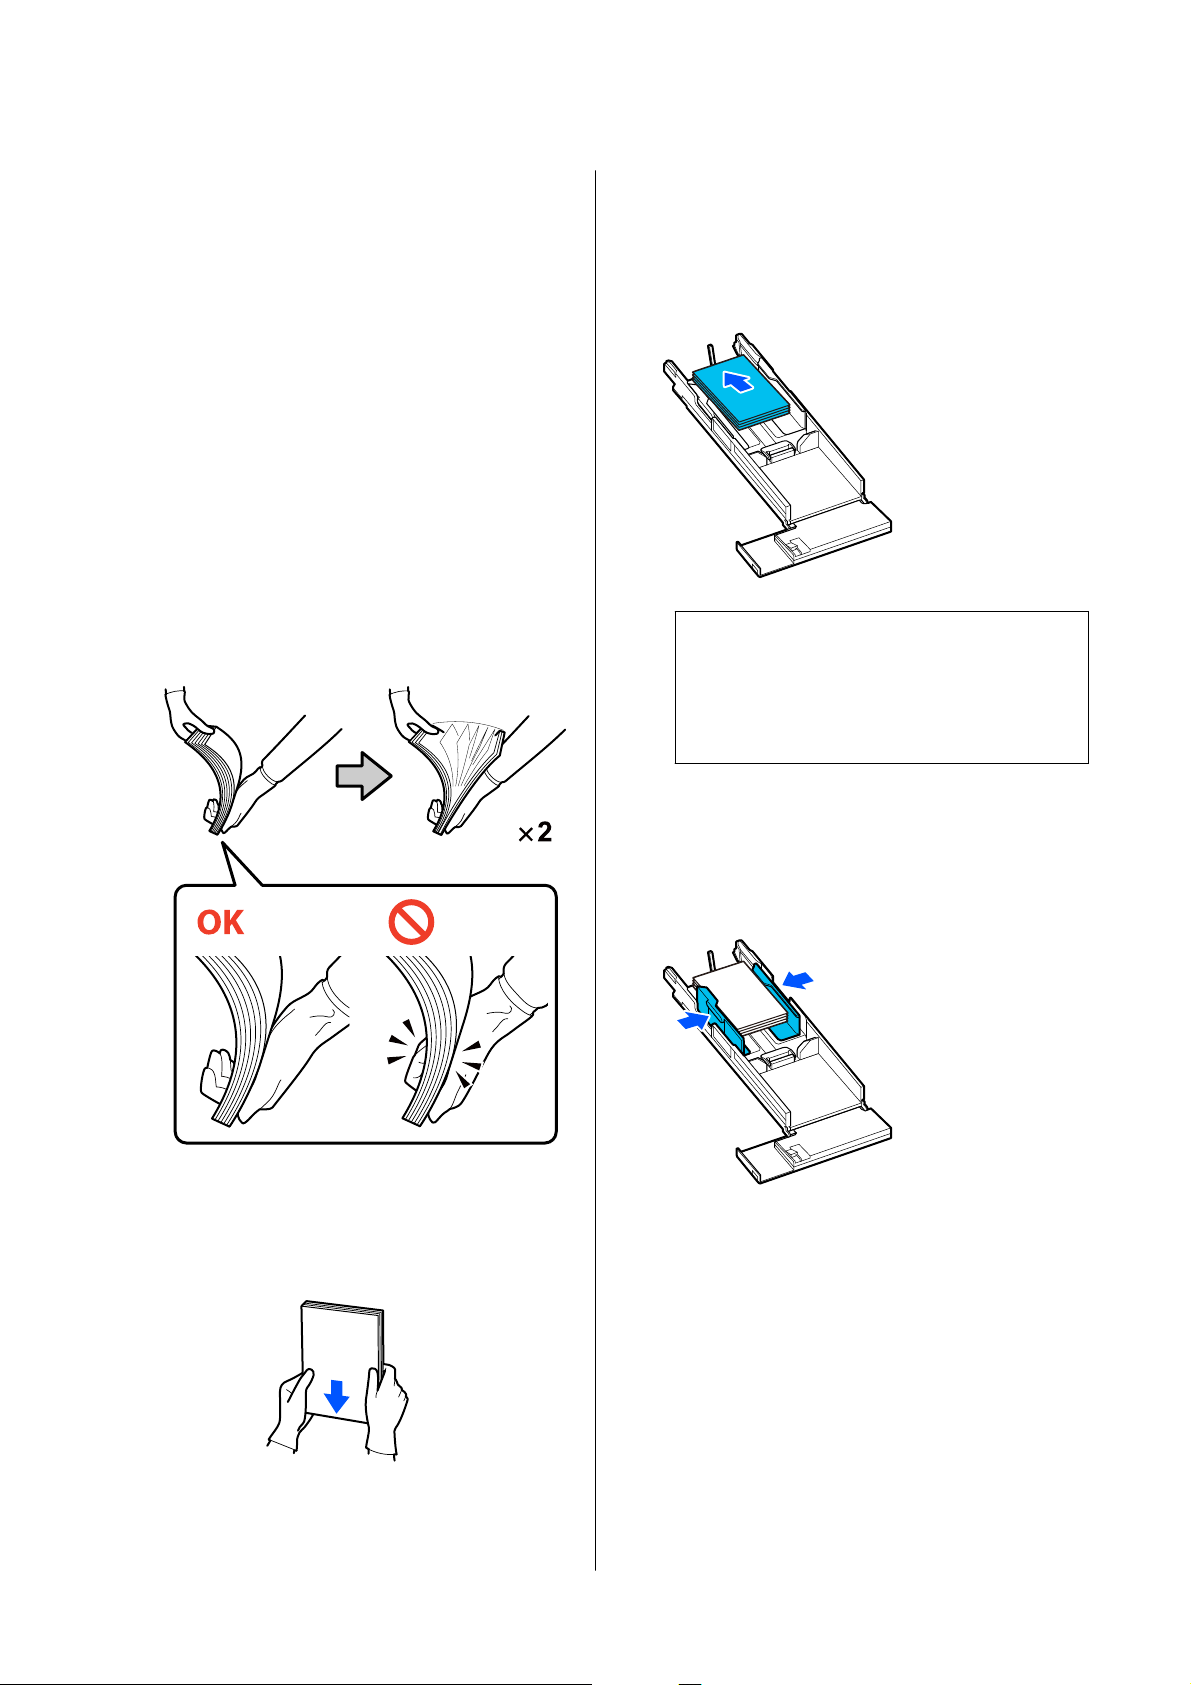
E
Riffle the paper to be loaded.
Static electricity may cause sheets of paper in a
stack to stick to each other. Loading paper like
that into the cassette could cause paper feeding
problems, so follow the procedure below to
riffle the paper. Riffling paper forces air
between the sheets, which causes them to
separate.
Riffle the short edges of the paper two times
each.
(1) Riffle the short edges of the paper as shown
in the illustration.
Hold the paper lightly, without gripping it too
tightly. If you grip too tightly, air cannot get
into the edges of the paper to separate the
sheets that are stuck together.
(2) Riffle the other short edges two times in the
same way.
(3) Align all four edges of the paper.
F
Load the paper with the printable side facing
down.
Load paper so that it touches the inside of the
paper cassette.
You can load up to 100 sheets of paper.
Note:
For Epson Special Media that supports two-sided
printing, load it so the side facing the opening
when the paper package is opened faces
downward.
G
Align the left and right edge guides to the
paper.
If there are gaps between the edge guides and
the paper, the paper may skew during printing,
so align them accurately.
SL-D500 Series User's Guide
Basic Operations
26
H
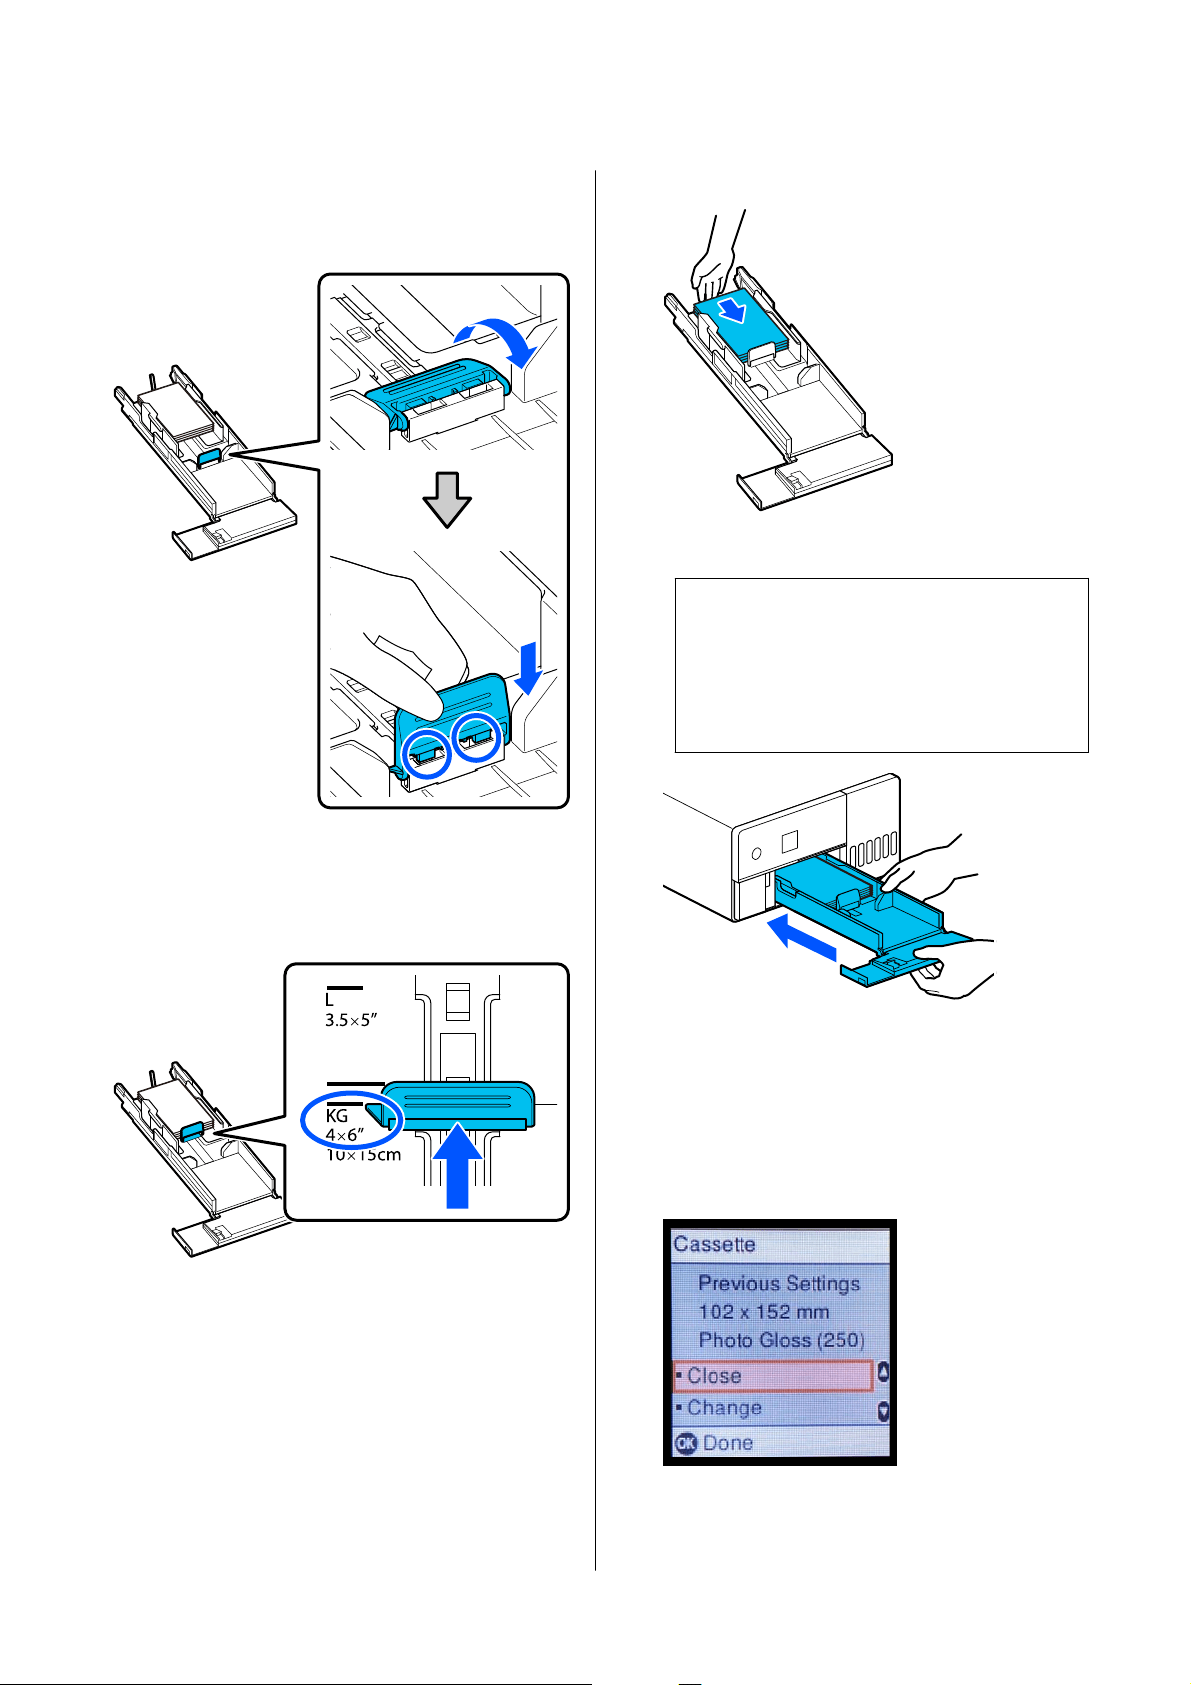
Raise the front edge guide.
Insert the 2 hooks, as shown in the illustration,
until you hear them click.
I
Align the front edge guide to the position of the
size of paper to be loaded.
The following illustration shows an example of
aligning to 10 x 15 cm (4 x 6 in).
J
Move the paper against the front edge guide.
K
Insert the paper cassette
c
Important:
Use both hands to insert the paper cassette. If
you use only one hand, the paper cassette
may fall and be damaged because the paper
loaded in it is heavy.
L
Set the paper size and paper type on the control
panel screen.
When the type of paper shown on the screen
and the type of paper that is loaded match,
confirm that Close has been selected, and then
press the Z button.
If the type of paper is different, select Change
and choose the correct type.
SL-D500 Series User's Guide
Basic Operations
27
Basic Printing Methods
(Windows)
This section explains how to print and how to cancel
printing.
Printing is executed from application software on a
computer connected to the printer.
See the following for more details on stopping
printing.
U “How to Cancel Printing (from the Computer)”
on page 30
How to Print from Photoshop
This section uses Adobe Photoshop 2021 as an
example of how to print image data.
Operations may differ depending on the application
software being used. See the manual supplied with the
application for more details.
A
Turn on the printer, and load the paper to be
used.
U “Loading paper” on page 25
B
Start Adobe Photoshop 2021, and open an
image.
C
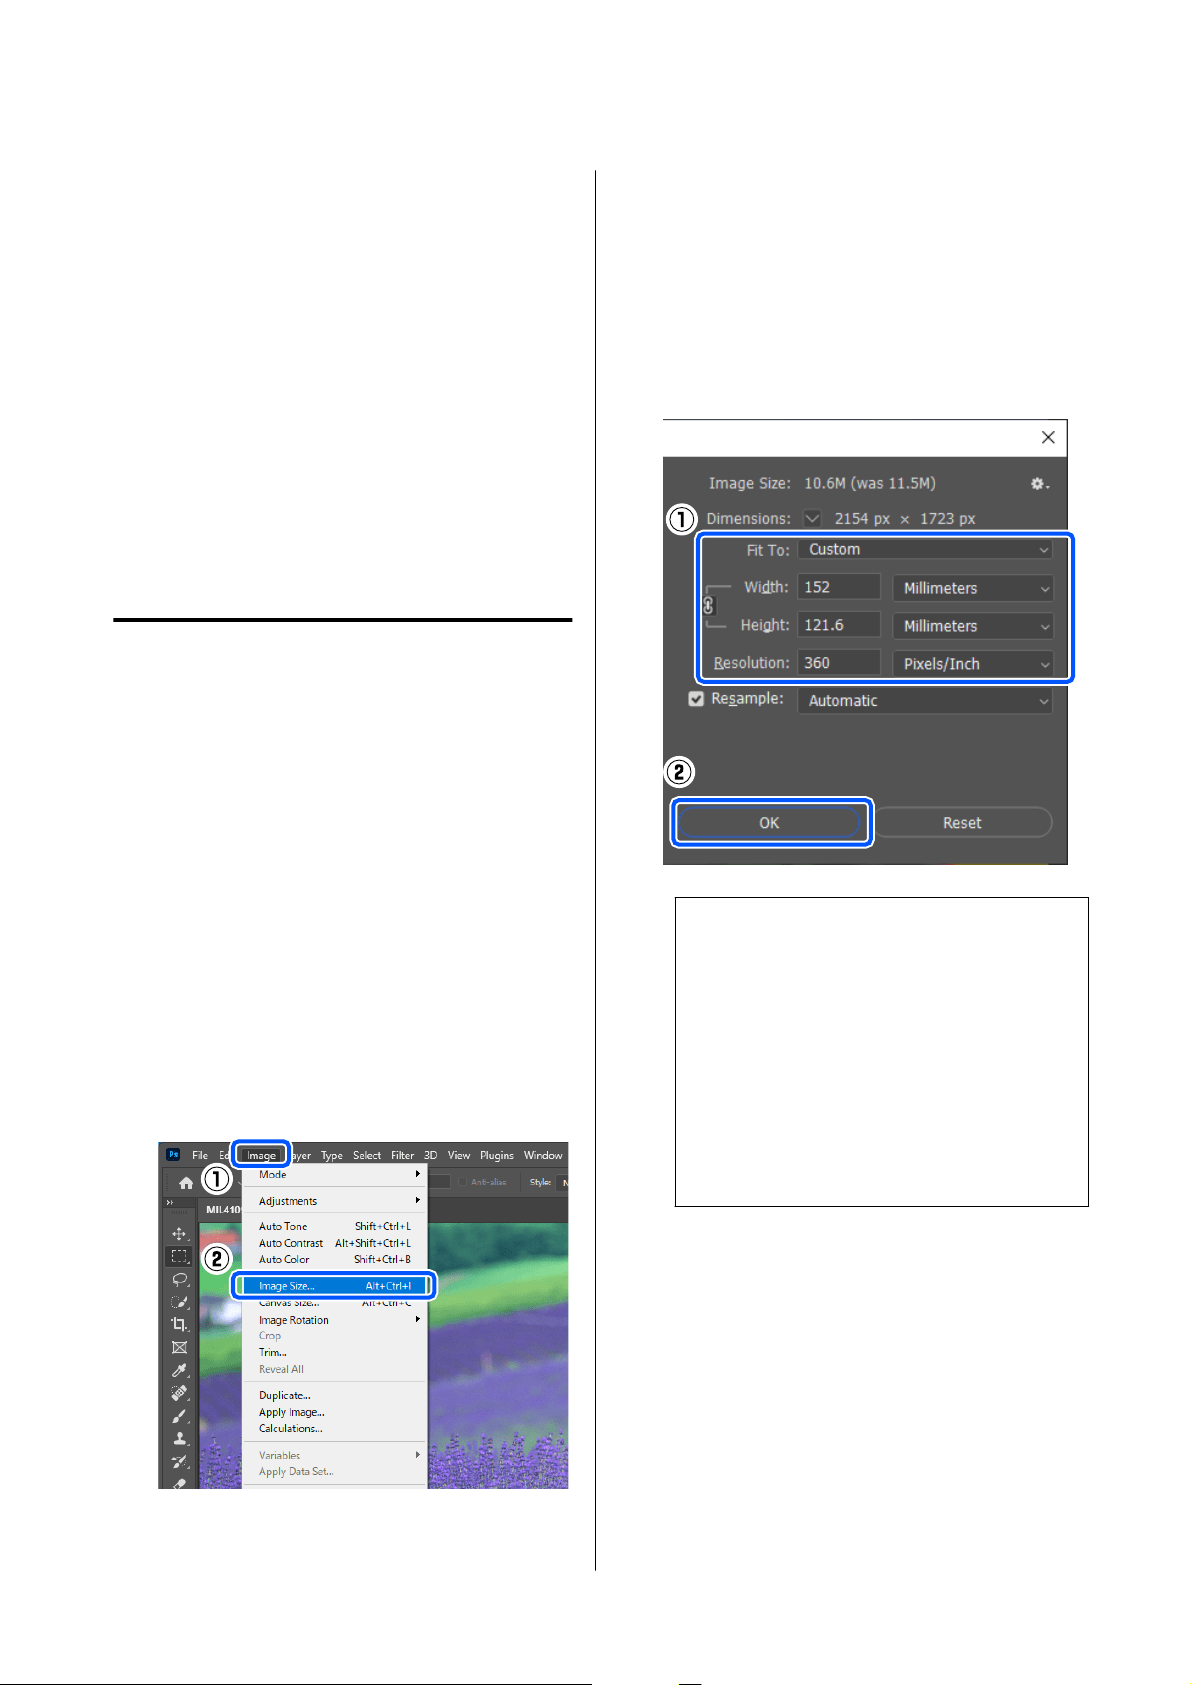
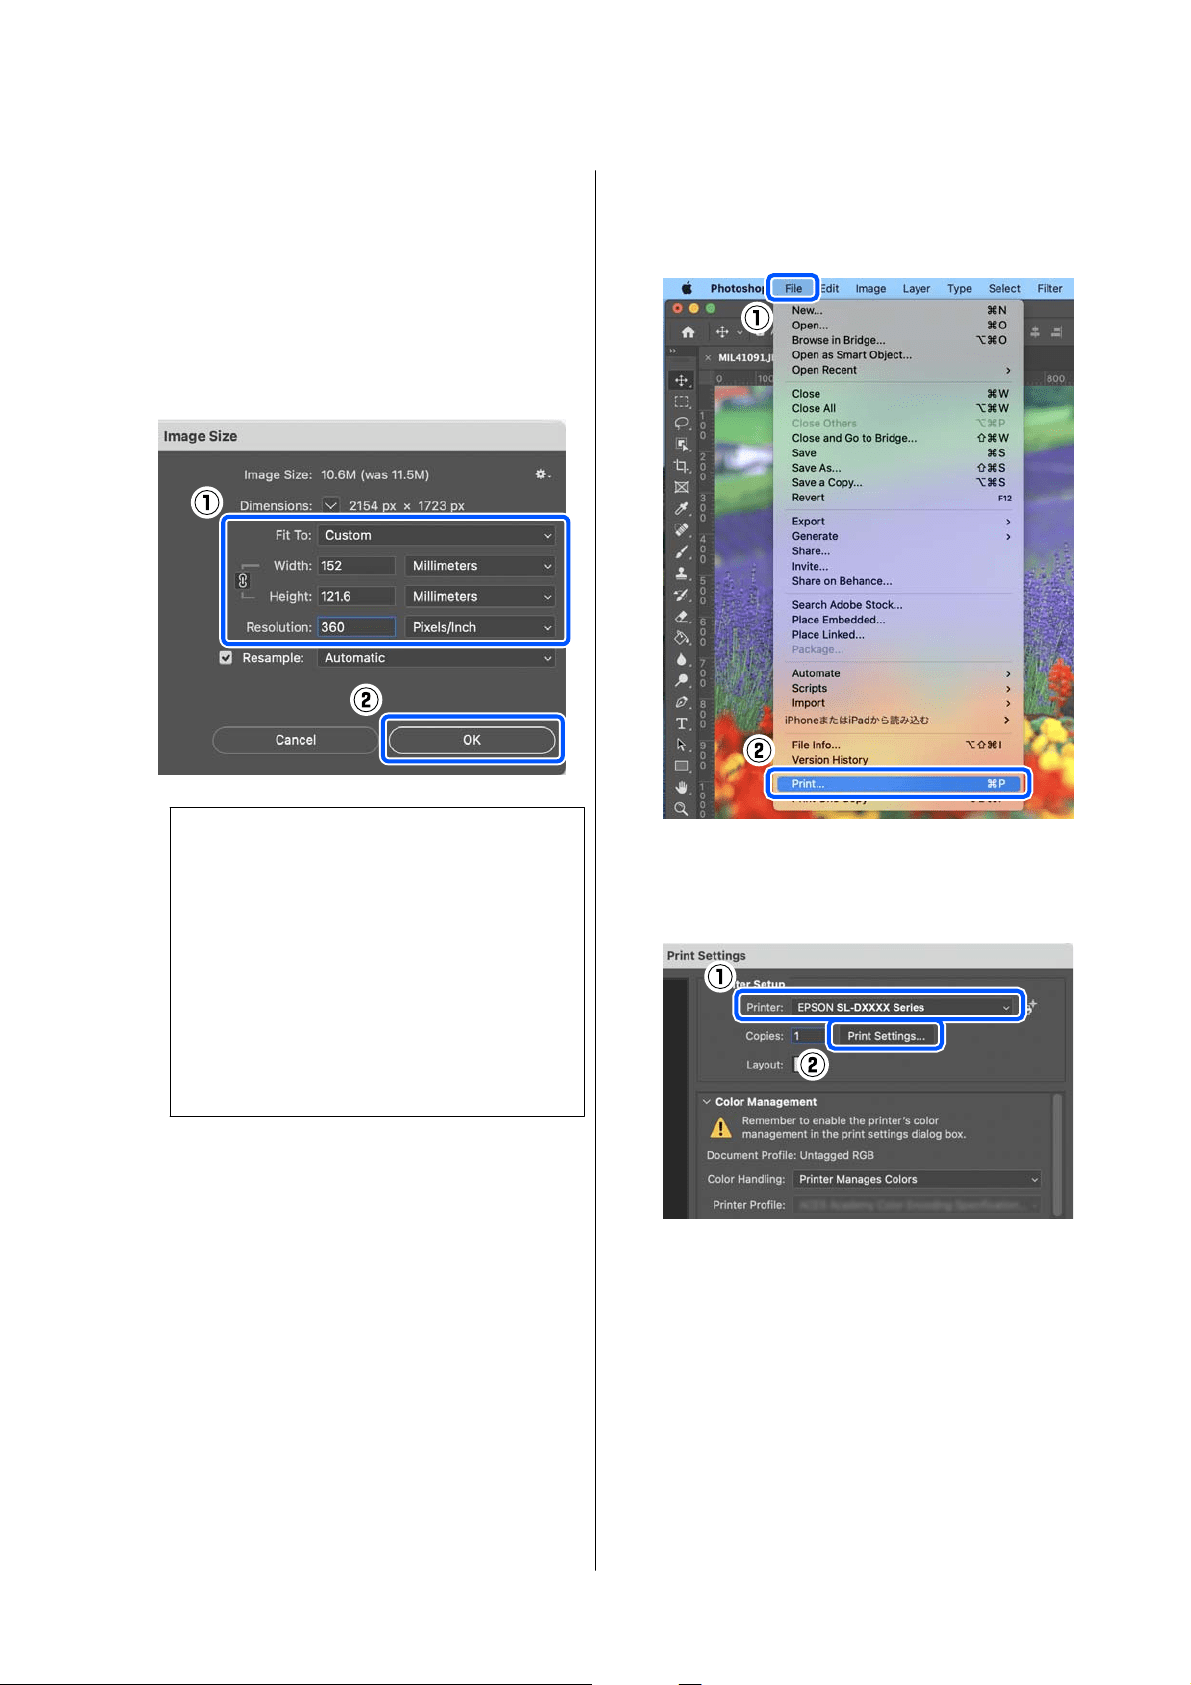
Click Image - Image Size, in this order.
The Image Size screen is displayed.
D
Set the Image Size and Resolution, and then
click OK.
Select Original Size for Fit To, and then match
the Width and Height to the size of the paper
being printed.
Set the Resolution.
Setting the Width or Height changes Fit To to
Custom.
Note:
We recommend Resolution normally be set to 360
dpi.
However, if all the following printing preferences
are met, setting 720 dpi can produce very clear
printouts.
❏ When Finest Detail is selected in the printer
driver.
❏ When a setting other than Draft is set for
Print Quality in the printer driver.
SL-D500 Series User's Guide
Basic Operations
28
E
Click File - Print in this order.
The Photoshop Print Settings screen is
displayed.
F
Select the printer in Printer, and then click
Print Settings.
The Main screen of the printer driver is
displayed.
G
Set the various items in Print Settings.
❏ Media Type
Select the type of paper that is loaded in the
printer.
❏ Print Quality
The print quality settings that you can select
vary depending on the type of paper that was
selected.
Normally, set Standard. If you want to print
with an emphasis on quality, set High
Quality. If you want to print quickly, set
Draft. When Draft is set, the printing speed
is quicker, however the print quality may
decline a little.
To do advanced settings according to your
preferences for color management and color
modes, click Advanced.
U “Color Management” on page 35
H
Set the various items in Paper Source Settings.
❏ Paper Size
Select a size to print. Make sure this is the
same as the image size you set in step 4.
SL-D500 Series User's Guide
Basic Operations
29
To print without borders (margins), select
Borderless.
U “Borderless Printing on All Sides” on
page 41
I
To do double-sided printing on paper that
supports two-sided printing, click Page Layout,
and set the binding position for Double-Sided
Printing.
U “Double-Sided Printing” on page 45
J
Click OK.
K
Set each item, such as color management and
print position, while checking the image
displayed on the Photoshop Print Settings
screen.
Note:
❏ When the printer driver’s Color Adjustment
is set to Color Controls, select Printer
Manages Colors in Color Handling in
Color Management.
❏ When performing detailed color
management using the Photoshop functions,
set Color Management according to the
conditions.
See the following for more details on color
adjustment.
U “Color Management” on page 35
L
Click Print.
Note:
If the image size is larger than the print size, the
following screen is displayed.
Click Proceed. If you click Cancel, printing is
canceled and you are returned to the application’s
screen.
Print data is sent to the printer, the front cover
opens automatically, and printing starts.
c
Important:
Do not close the front cover until printing
ends.
See the following for how to handle printed
paper.
U “Storing and displaying printouts” on
page 18
How to Cancel Printing (from
the Computer)
When the computer has finished sending data to the
printer, you cannot cancel the print job from the
computer. Cancel on the printer.
SL-D500 Series User's Guide
Basic Operations
30

U “How to Cancel Printing (from the Printer)” on
page 31
A
Click the printer icon on the taskbar.
Whether or not an icon is displayed depends on
the settings selected for Windows.
B
Select the job you want to cancel, and then
select Cancel from the Document menu.
To c ancel all jobs, click Cancel All Documents
in the Printer menu.
If the job has been sent to the printer, print data
is not displayed on the above screen.
How to Cancel Printing (from
the Printer)
Press the button (stop button) on the control
panel.
The print job is canceled even in the middle of
printing. After cancelling, it may take a while before
the printer returns to the ready status.
Note:
You cannot delete print jobs which are in the print
queue on the computer using the above operation. See
"How to Cancel Printing (from the Computer)" in the
previous section to delete print jobs from the print
queue.
Basic Printing Methods
(Mac)
This section explains how to print and how to cancel
printing.
Printing is executed from application software on a
computer connected to the printer.
See the following for more details on stopping
printing.
U “How to Cancel Printing (from the Computer)”
on page 34
How to Print from Photoshop
This section uses Adobe Photoshop 2021 as an
example of how to print image data.
Operations may differ depending on the application
software being used. See the manual supplied with the
application for more details.
A
Turn on the printer, and load the paper to be
used.
U “Loading paper” on page 25
B
Start Adobe Photoshop 2021, and open an
image.
C
Click Image - Image Size, in this order.
The Image Size screen is displayed.
SL-D500 Series User's Guide
Basic Operations
31
D
Set the Image Size and Resolution, and then
click OK.
Select Original Size for Fit To, and then match
the Width and Height to the size of the paper
being printed.
Set the Resolution.
Setting the Width or Height changes Fit To to
Custom.
Note:
We recommend Resolution normally be set to 360
dpi.
However, if all the following printing preferences
are met, setting 720 dpi can produce very clear
printouts.
❏ When Finest Detail is selected in the printer
driver.
❏ When a setting other than Draft is set for
Print Quality in the printer driver.
E
Click File - Print in this order.
The Photoshop Print Settings screen is
displayed.
F
Select the printer in Printer, and then click
Print Settings.
The Print screen is displayed.
G
Make the necessary settings.
You can set the Media Type and Print Quality
by selecting Print Settings in the pop-up menu.
❏ Paper Size
Select a size to print. Make sure this is the
same as the image size you set in step 4.
❏ Media Type
Select the type of paper that is loaded in the
printer.
❏ Print Quality
SL-D500 Series User's Guide
Basic Operations
32
The print quality settings that you can select
vary depending on the type of paper that was
selected.
Normally, set Normal. If you want to print
with an emphasis on quality, set High
Quality. If you want to print quickly, set
Draft. When Draft is set, the printing speed
is quicker, however the print quality may
decline a little.
To print without borders (margins), select a
paper size for borderless printing in Paper Size.
U “Borderless Printing on All Sides” on
page 41
H
To do two-sided printing on paper that
supports two-sided printing, select Two-sided
Printing Settings in the pop-up menu, and set
the binding position in Two-sided Printing.
U “Double-Sided Printing” on page 45
I
Click Print.
J
Set each item, such as color management and
print position, while checking the image
displayed on the Photoshop Print Settings
screen.
SL-D500 Series User's Guide
Basic Operations
33
Note:
❏ When the printer driver’s color adjustment is
set to Manual Settings, select Printer
Manages Colors in Color Handling in
Color Management.
❏ When performing detailed color
management using the Photoshop functions,
set Color Management according to the
conditions.
See the following for more details on color
adjustment.
U “Color Management” on page 35
K
Click Print.
Print data is sent to the printer, the front cover
opens automatically, and printing starts.
c
Important:
Do not close the front cover until printing
ends.
See the following for how to handle printed
paper.
U “Storing and displaying printouts” on
page 18
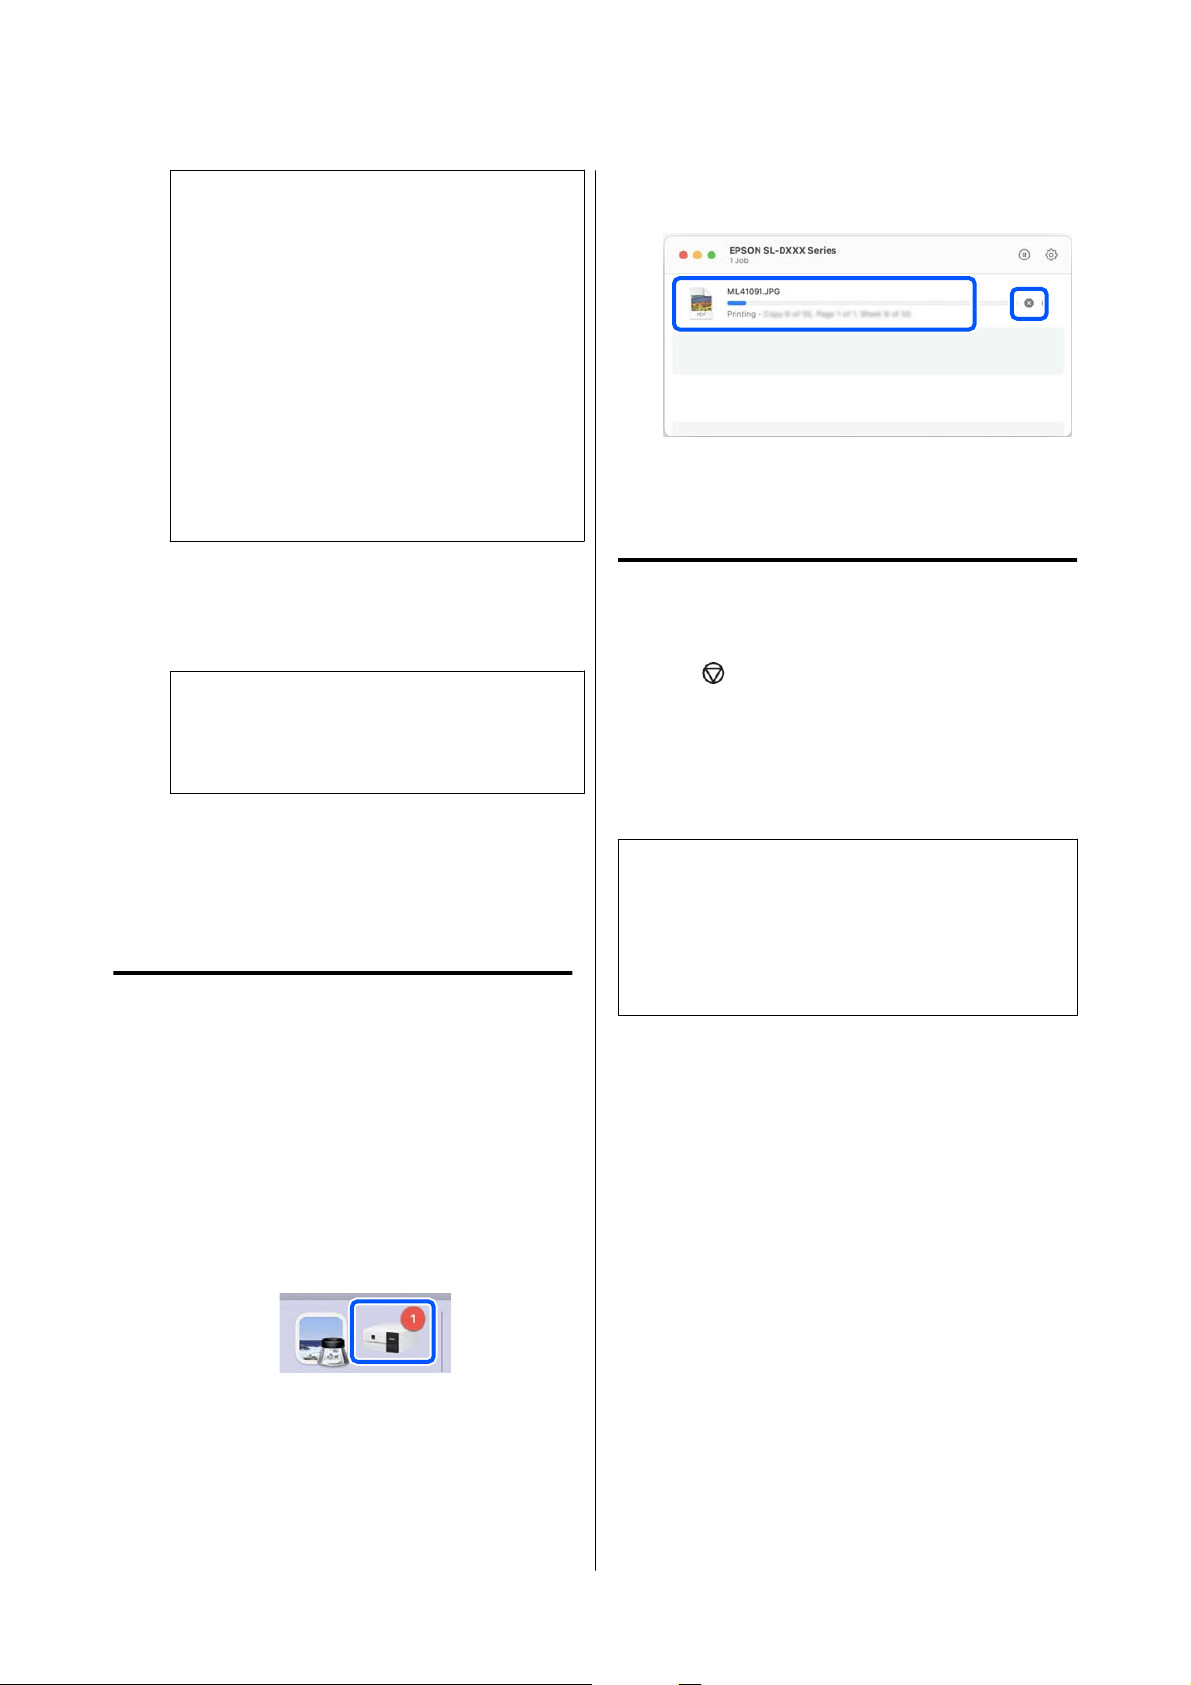
How to Cancel Printing (from
the Computer)
When the computer has finished sending data to the
printer, you cannot cancel the print job from the
computer. Cancel on the printer.
U “How to Cancel Printing (from the Printer)” on
page 34
A
Click the printer icon in the Dock.
B
Select the print data you want to cancel, and
then click[×].
If the job has been sent to the printer, print data
is not displayed on the above screen.
How to Cancel Printing (from
the Printer)
Press the button (stop button) on the control
panel.
The print job is canceled even in the middle of
printing. After cancelling, it may take a while before
the printer returns to the ready status.
Note:
You cannot delete print jobs which are in the print
queue on the computer using the above operation. See
"How to Cancel Printing (from the Computer)" in the
previous section to delete print jobs from the print
queue.
SL-D500 Series User's Guide
Basic Operations
34

Printing Using
Various Print
Functions
Color Management
Color Management Settings
When printing on the printer, you can select from the
following color correction methods.
Choose the best method according to the application
you are using, the operating system environment, and
the aim of the printout.
Setting colors manually
Manually adjust the color space and color tone settings
used for printing. Use this option when the
application in use does not have a color correction
function.
U “Setting Colors Manually” on page 35
Color management from the
application (no color management)
This method is for printing from applications that
support color management. All color management
processes are carried out by the application’s color
management system. This method is used when you
want to obtain the same color management results
using a common application among different
operating system environments.
U “Color Management from the Application (No
Color Management)” on page 38
Color management from the printer
driver
The printer driver uses the operating system’s color
management system and carries out all color
management processes. This is used when you want to
produce similar print results from different
applications under the same operating systems.
However, to do this, you also need an application that
supports color management.
U “Color Management from the Printer Driver
(ICM) (Windows)” on page 39
U “Color Management from the Printer Driver
(ColorSync) (Mac)” on page 40
Setting Colors Manually
You can select one of the following color correction
modes. In addition, you can fine tune the brightness,
contrast, saturation, and color balance, while looking
at a preview image.
❏ sRGB: Optimizes the sRGB space and corrects the
color. This should normally be selected.
❏ Adobe RGB: Optimizes the Adobe RGB space and
corrects the color. Select when printing image
data using the Adobe RGB color space
information.
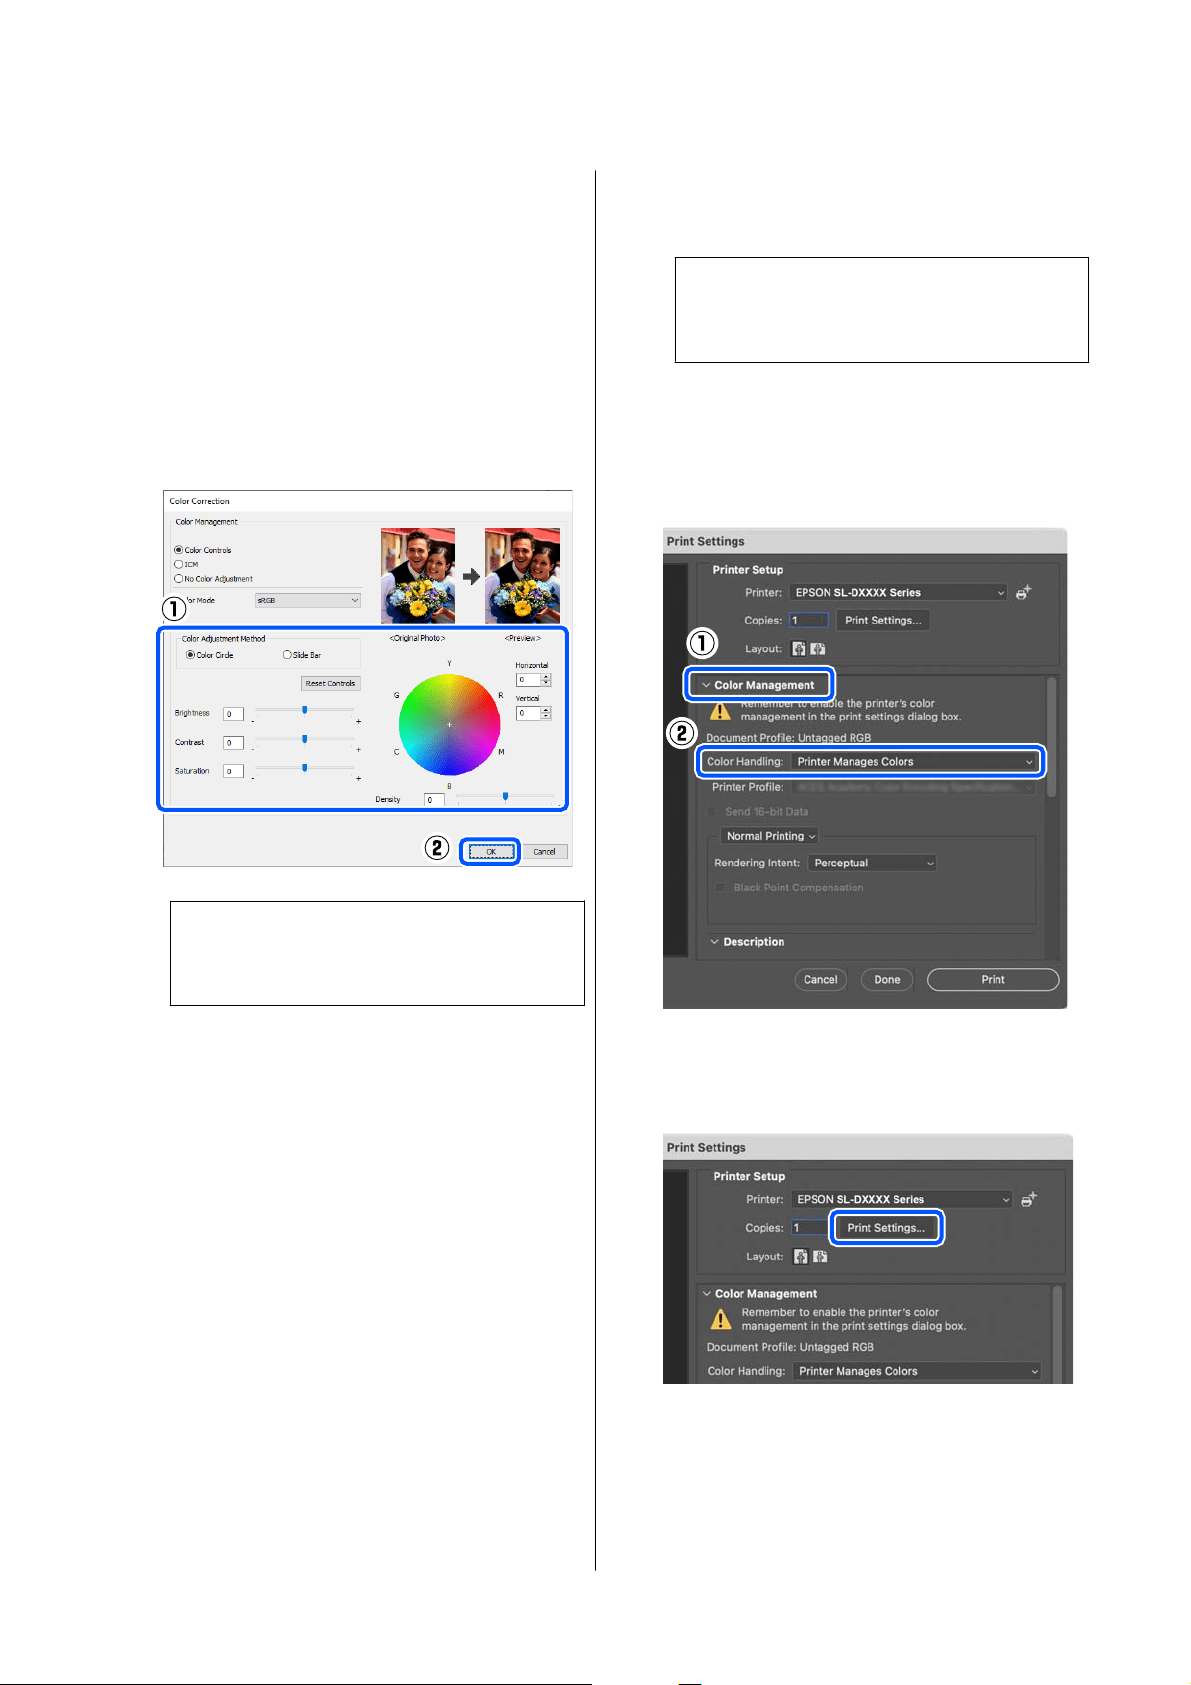
Settings on Windows
A
When using applications featuring a color
management function, specify how to adjust
colors from these applications.
When using applications without a color
management function, start from step 2.
When using the following applications, select
the Printer Manages Colors color management
option.
❏ Adobe Photoshop CS6 or later
❏ Adobe Photoshop Elements 11 or later
❏ Adobe Photoshop Lightroom 5 or later
In other applications, set No Color
Management.
SL-D500 Series User's Guide
Printing Using Various Print Functions
35
Note:
For information on supported platforms, see the
website for the application in question.
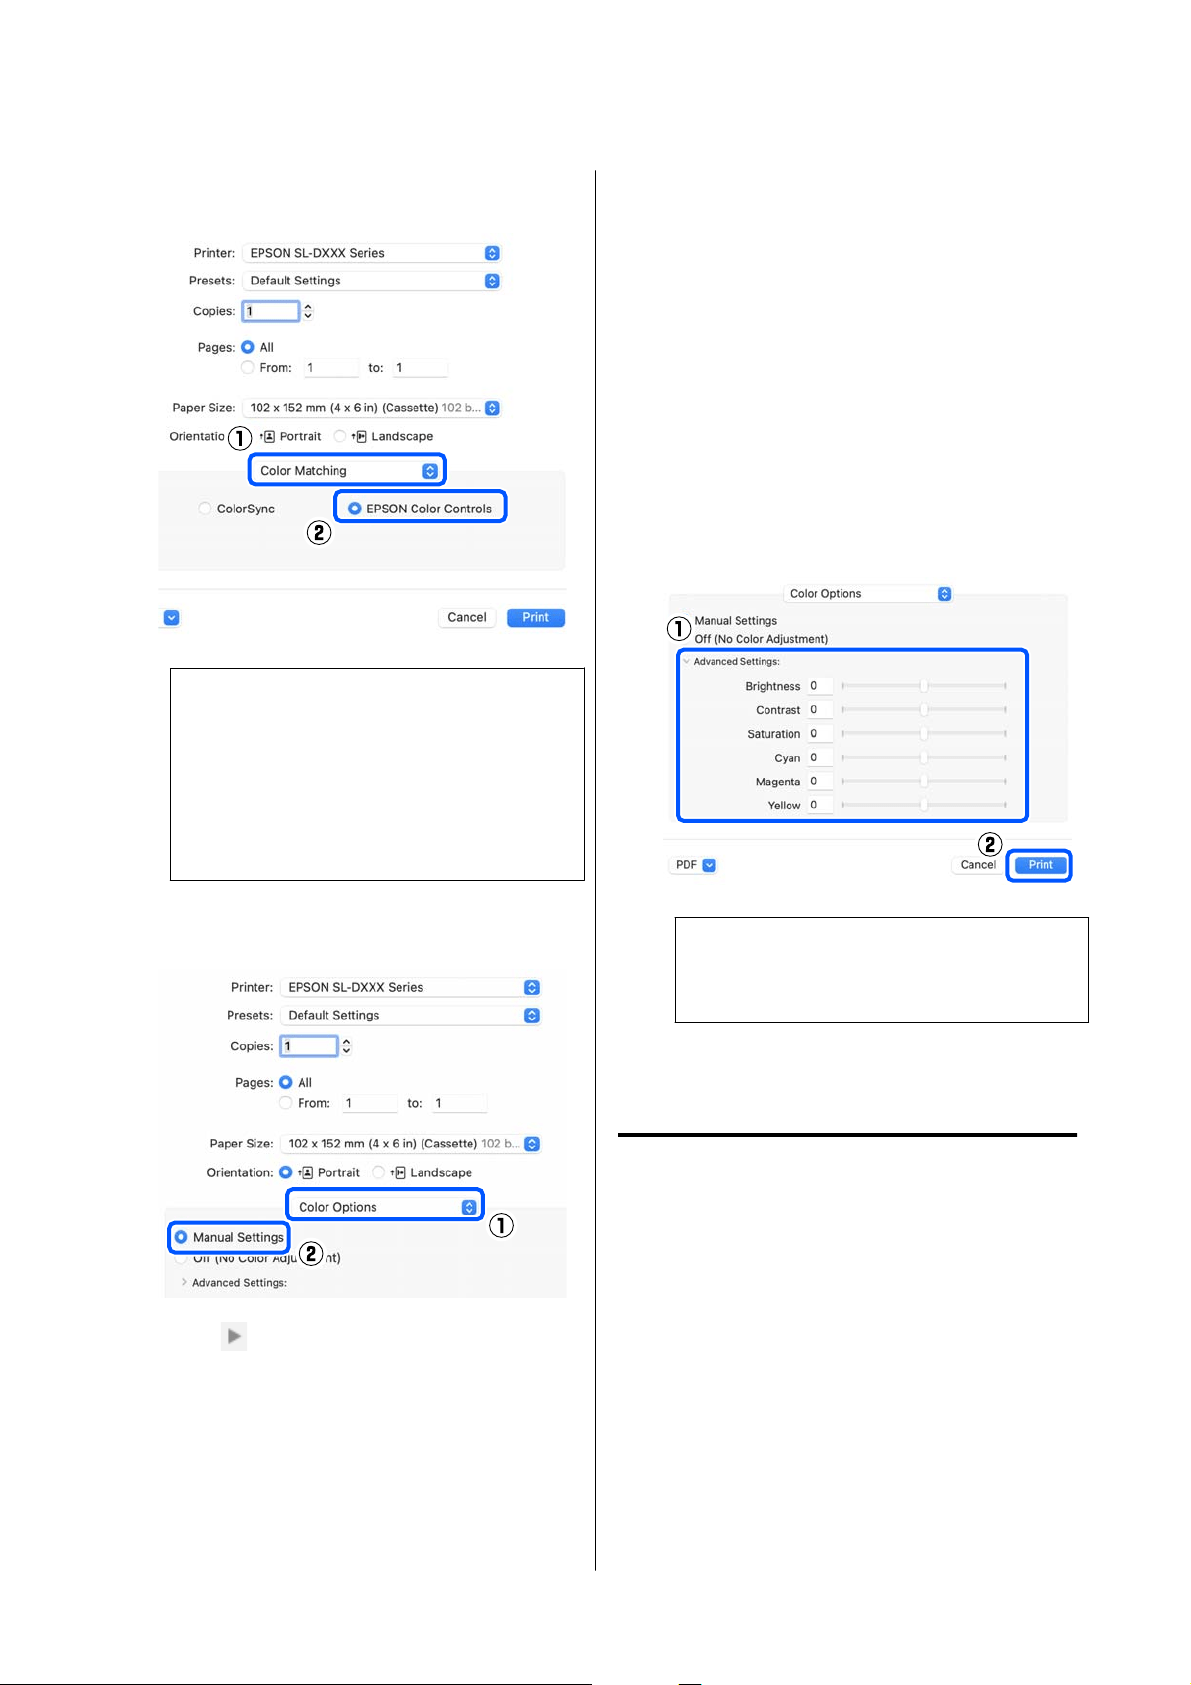
Example of Adobe Photoshop 2021
The Photoshop Print Settings screen opens.
Select Color Management, then select Printer
Manages Colors in Color Handling.
B
Display the printer driver’s Main screen.
When using Adobe Photoshop 2021, click Print
Settings to display the printer driver’s Main
screen.
C
Click Advanced in Color Adjustment.
D
Select Color Controls in Color Management.
The setting items are displayed on the Color
Correction screen.
E
Select Color Mode.
❏ sRGB
Manages colors using sRGB. Prints at the
optimum color tones. This should normally
be selected.
❏ Adobe RGB
Manages colors based on the larger Adobe
RGB color space. Select when printing image
data using the Adobe RGB color space
information.
F
Set the various items, and then click OK.
❏ Color Adjustment Method
Select the color adjustment method.
By selecting Color Circle, you can click on
the color circle to adjust the colors and move
the density slide bar to adjust the density.
By selecting Slide Bar, you can move the slide
bar of each color to adjust the colors.
❏ Brightness
Adjusts the brightness of the image.
❏ Contrast
Adjusts the contrast (difference between light
and dark) of the image.
SL-D500 Series User's Guide
Printing Using Various Print Functions
36
When the contrast is raised, bright sections
become brighter, and dark sections become
darker. When the contrast is lowered, the
difference between light and dark sections
decreases.
❏ Saturation
Adjusts the saturation (color clarity) of the
image.
When the saturation is raised, colors become
vivid. When the saturation is lowered, the
colors become dull until they are close to
gray.
Note:
You can adjust the colors while checking the
sample image on the right side of the screen.
G
Set other items if necessary, and then print.
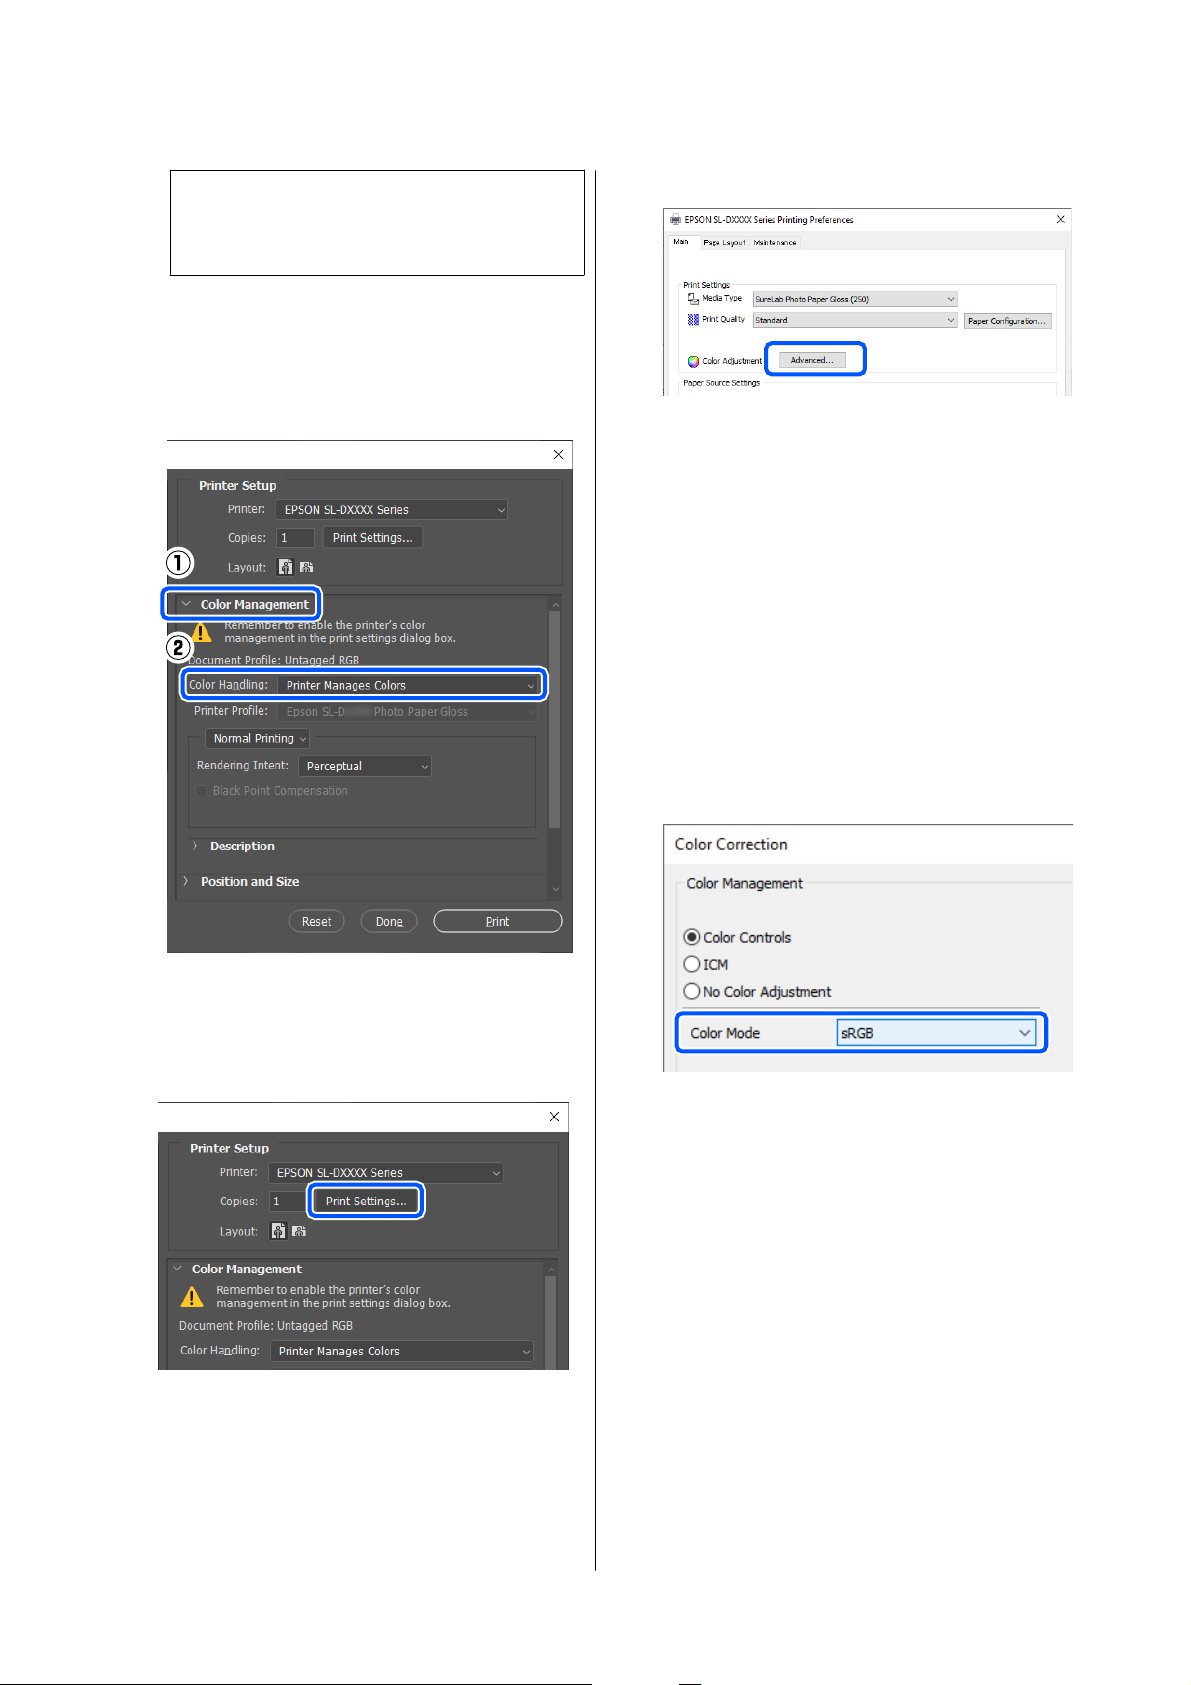
Settings on Mac
A
When using applications featuring a color
management function, specify how to adjust
colors from these applications.
When using applications without a color
management function, start from step 2.
When using the following applications, select
the Printer Manages Colors color management
option.
❏ Adobe Photoshop CS6 or later
❏ Adobe Photoshop Elements 12 or later
❏ Adobe Photoshop Lightroom 5 or later
In other applications, set No Color
Management.
Note:
For information on supported platforms, see the
website for the application in question.
Example of Adobe Photoshop 2021
The Photoshop Print Settings screen opens.
Select Color Management, then select Printer
Manages Colors in Color Handling.
B
Display the Print screen.
When using Adobe Photoshop 2021, click Print
Settings to display the print screen.
SL-D500 Series User's Guide
Printing Using Various Print Functions
37
C
Select Color Matching from the pop-up menu,
and then select EPSON Color Controls.
Note:
EPSON Color Controls will not be available in
the following applications if step 1 is omitted.
❏ Adobe Photoshop CS6 or later
❏ Adobe Photoshop Elements 12 or later
❏ Adobe Photoshop Lightroom 5 or later
D
Select Color Options from the pop-up menu,
and then select Manual Settings.
E
Click for Advanced Settings, and then set
the various items and click Print.
❏ Brightness
Adjusts the brightness of the image.
❏ Contrast
Adjusts the contrast (difference between light
and dark) of the image.
When the contrast is raised, bright sections
become brighter, and dark sections become
darker. When the contrast is lowered, the
difference between light and dark sections
decreases.
❏ Saturation
Adjusts the saturation (color clarity) of the
image.
When the saturation is raised, colors become
vivid. When the saturation is lowered, the
colors become dull until they are close to
gray.
❏ Cyan, Magenta, Yellow
Move the slide bar of each color to adjust the
colors.
Note:
You can adjust the colors while checking the
sample image on the left side of the screen.
F
Set other items if necessary, and then print.
Color Management from the
Application (No Color
Management)
Print using applications with a color management
function. Enable the color management settings in the
application and disable the printer driver’s color
adjustment function.
A
Make the settings for color adjustment using
the application.
Example of Adobe Photoshop 2021
The Photoshop Print Settings screen opens.
SL-D500 Series User's Guide
Printing Using Various Print Functions
38
Select Color Management, then select
Photoshop Manages Colors in Color
Handling, and then select Printer Profile and
Rendering Intent.
Note:
If you are not using an original printer profile,
select a profile for the paper type being used from
Printer Profile.
B
Display the printer driver’s settings screen
(Windows) or Print screen (Mac).
When using Adobe Photoshop 2021, click Print
Settings to display the various screens.
C
Set color management to off.
For Windows
(1) Click Advanced in Color Adjustment in the
Main screen.
(2) In Color Management, select No Color
Adjustment, and then click OK.
For Mac
Select Color Options from the pop-up menu,
and then select Off (No Color Adjustment).
D
Set other items if necessary, and then print.
Color Management from the
Printer Driver (ICM) (Windows)
Performs color management from the printer driver.
An ICC profile that supports the paper type set in the
printer driver is automatically selected for doing color
adjustment.
SL-D500 Series User's Guide
Printing Using Various Print Functions
39
A
When using applications featuring a color
management function, specify how to adjust
colors from these applications.
When using applications without a color
management function, start from step 2.
When using the following applications, select
the Printer Manages Colors color management
option.
❏ Adobe Photoshop CS6 or later
❏ Adobe Photoshop Elements 11 or later
❏ Adobe Photoshop Lightroom 5 or later
In other applications, set No Color
Management.
Note:
For information on supported platforms, see the
website for the application in question.
Example of Adobe Photoshop 2021
The Photoshop Print Settings screen opens.
Select Color Management, then select Printer
Manages Colors in Color Handling.
B
Display the printer driver’s Main screen.
When using Adobe Photoshop 2021, click Print
Settings to display the printer driver’s Main
screen.
C
Click Advanced in Color Adjustment.
D
In Color Management, select ICM, and then
click OK.
E
Set other items if necessary, and then print.
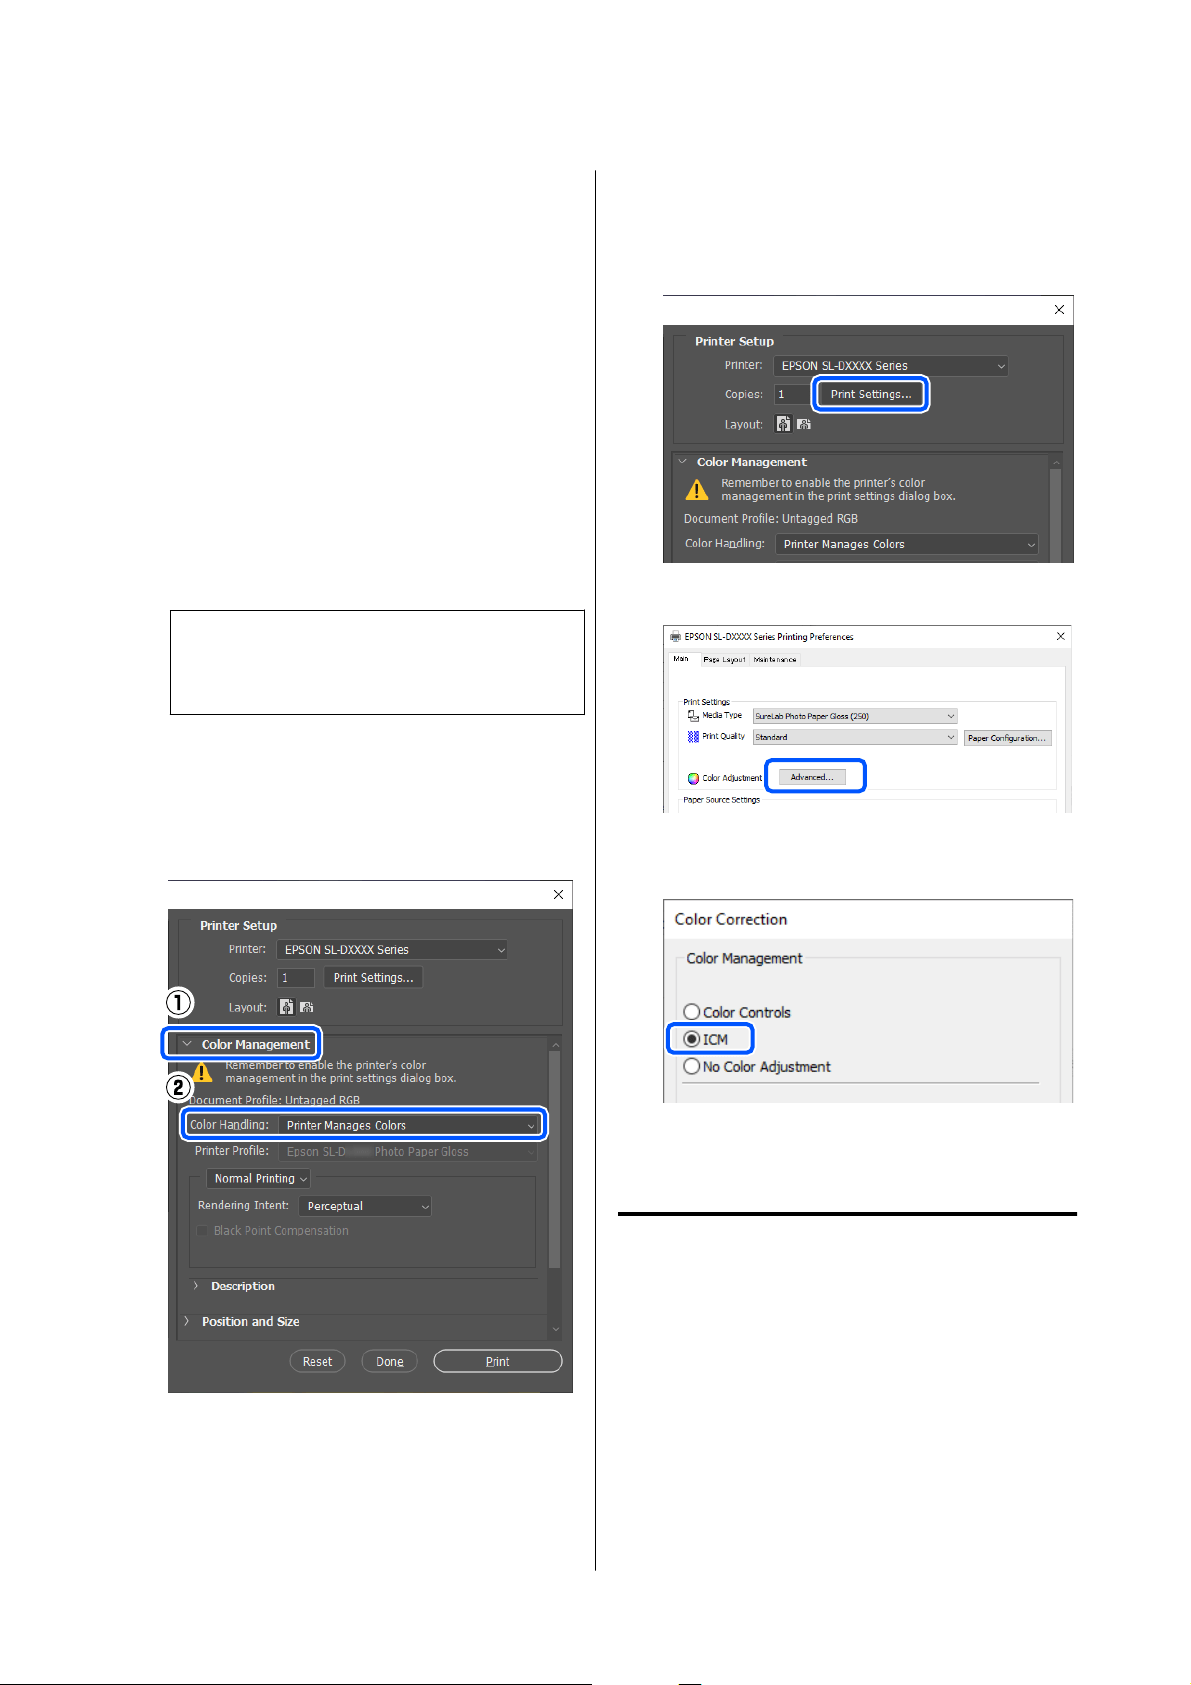
Color Management from the
Printer Driver (ColorSync) (Mac)
Performs color management from the printer driver.
The application needs to support ColorSync. When
performing color management using ColorSync, use
image data in which an input profile is embedded.
SL-D500 Series User's Guide
Printing Using Various Print Functions
40
Note:
The following applications do not support color
management printing by ColorSync.
❏ Adobe Photoshop
❏ Adobe Photoshop Elements
❏ Adobe Photoshop Lightroom
A
Set color adjustment to No Color Management
in the application.
Note:
For information on supported platforms, see the
website for the application in question.
B
Display the Print screen.
C
Select Color Matching from the pop-up menu,
then select ColorSync, and then select Profile.
D
Set other items if necessary, and then print.
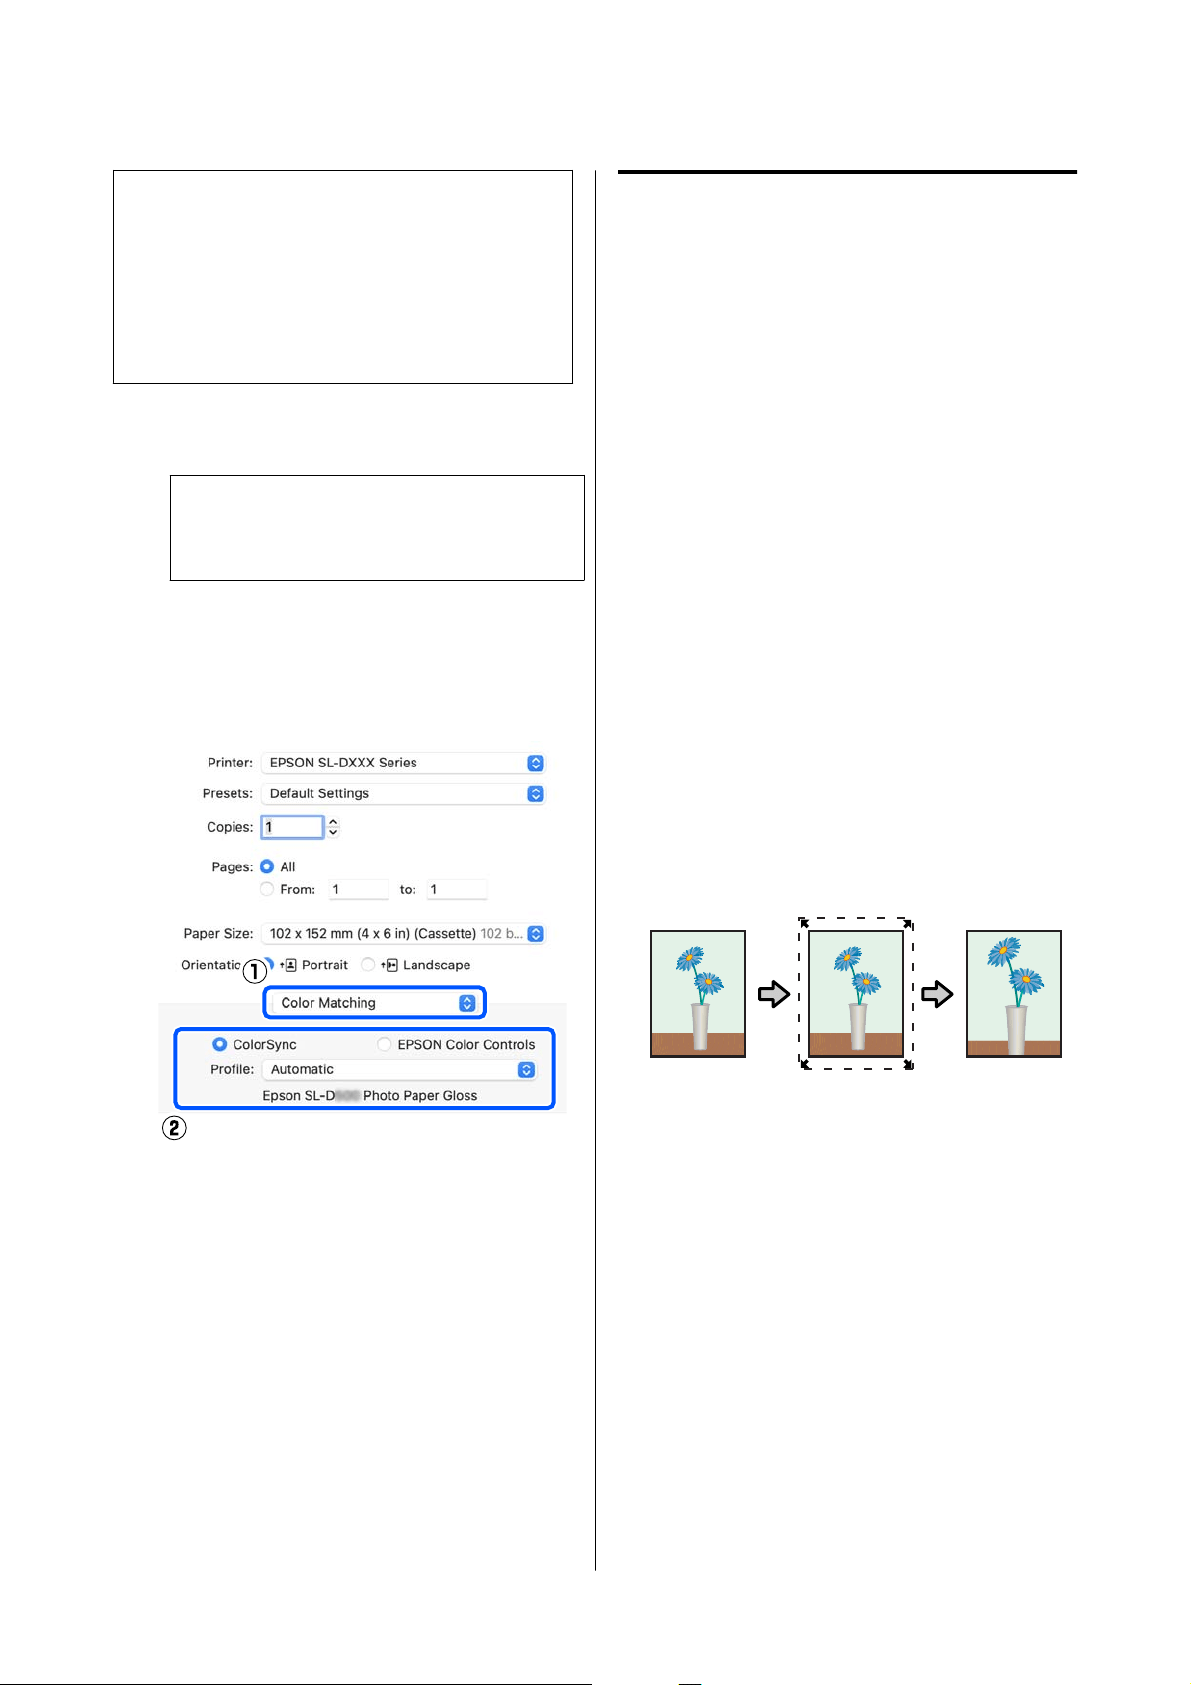
Borderless Printing on All
Sides
You can print your data without margins on the paper.
Types of Borderless Printing
Methods
You can perform borderless printing using the
following two methods: Auto Expand or Retain Size.
For simple borderless printing, we recommend Auto
Expand. To prevent the printer driver from enlarging
your image, we recommend Retain Size.
Auto Expand
The printer driver enlarges the print data to a size
slightly larger than the paper size and prints the
enlarged image. The sections which are beyond the
paper edges are not printed; therefore, resulting in
borderless printing.
Use settings such as Page Layout in the applications to
set the size of the image data as follows.
❏ Match the paper size and page setting for the print
data.
❏ If the application has margin settings, set the
margins to 0 mm.
❏ Make the image data as large as the paper size.
Retain Size
Create the print data larger than the paper size in the
applications to produce borderless output. The printer
driver does not enlarge the image data. Use settings
such as Page Layout in the applications to set the size
of the image data as follows.
❏ Set the page layout to extend 2.7 mm beyond the
actual paper size on all four edges.
❏ If the application has margin settings, set the
margins to 0 mm.
SL-D500 Series User's Guide
Printing Using Various Print Functions
41

❏ Make the image data as large as the paper size.
Setting Procedure
Settings on Windows
A
Open the printer driver’s Main screen, and set
the various settings required for printing, such
as Media Type, Print Quality, and Paper Size.
See the following for how to display the Main
screen.
U “Basic Printing Methods (Windows)” on
page 28
B
Select Borderless, and then click Settings.
C
Select Auto Expand or Retain Size as the
Method of Enlargement, and then click OK.
When Auto Expand is selected, set the slider to
set the amount of enlargement.
Note:
Selecting Med or Min decreases the image
enlargement ratio. Therefore, some margins may
appear at the edges of the paper depending on the
paper and printing environment.
D
Set other items if necessary, and then print.
Settings on Mac
A
Open the Print screen and in Paper Size select
the paper size and a borderless printing
method.
See the following for how to display the Print
screen.
U “Basic Printing Methods (Mac)” on page 31
The selections for borderless printing methods
are displayed as shown below.
XXXX (Cassette - Borderless (Auto Expand))
XXXX (Cassette - Borderless (Retain Size))
SL-D500 Series User's Guide
Printing Using Various Print Functions
42
Where XXXX is the actual paper size, such as
102 x 152 mm (4 x 6 in).
B
When Auto Expand is selected in Paper Size,
select Print Settings in the pop-up menu, and
then select the Expansion.
Note:
Select the Mid or Min decreases the image
enlargement ratio. Therefore, some margins may
appear at the edges of the paper depending on the
paper and printing environment.
C
Set other items if necessary, and then print.
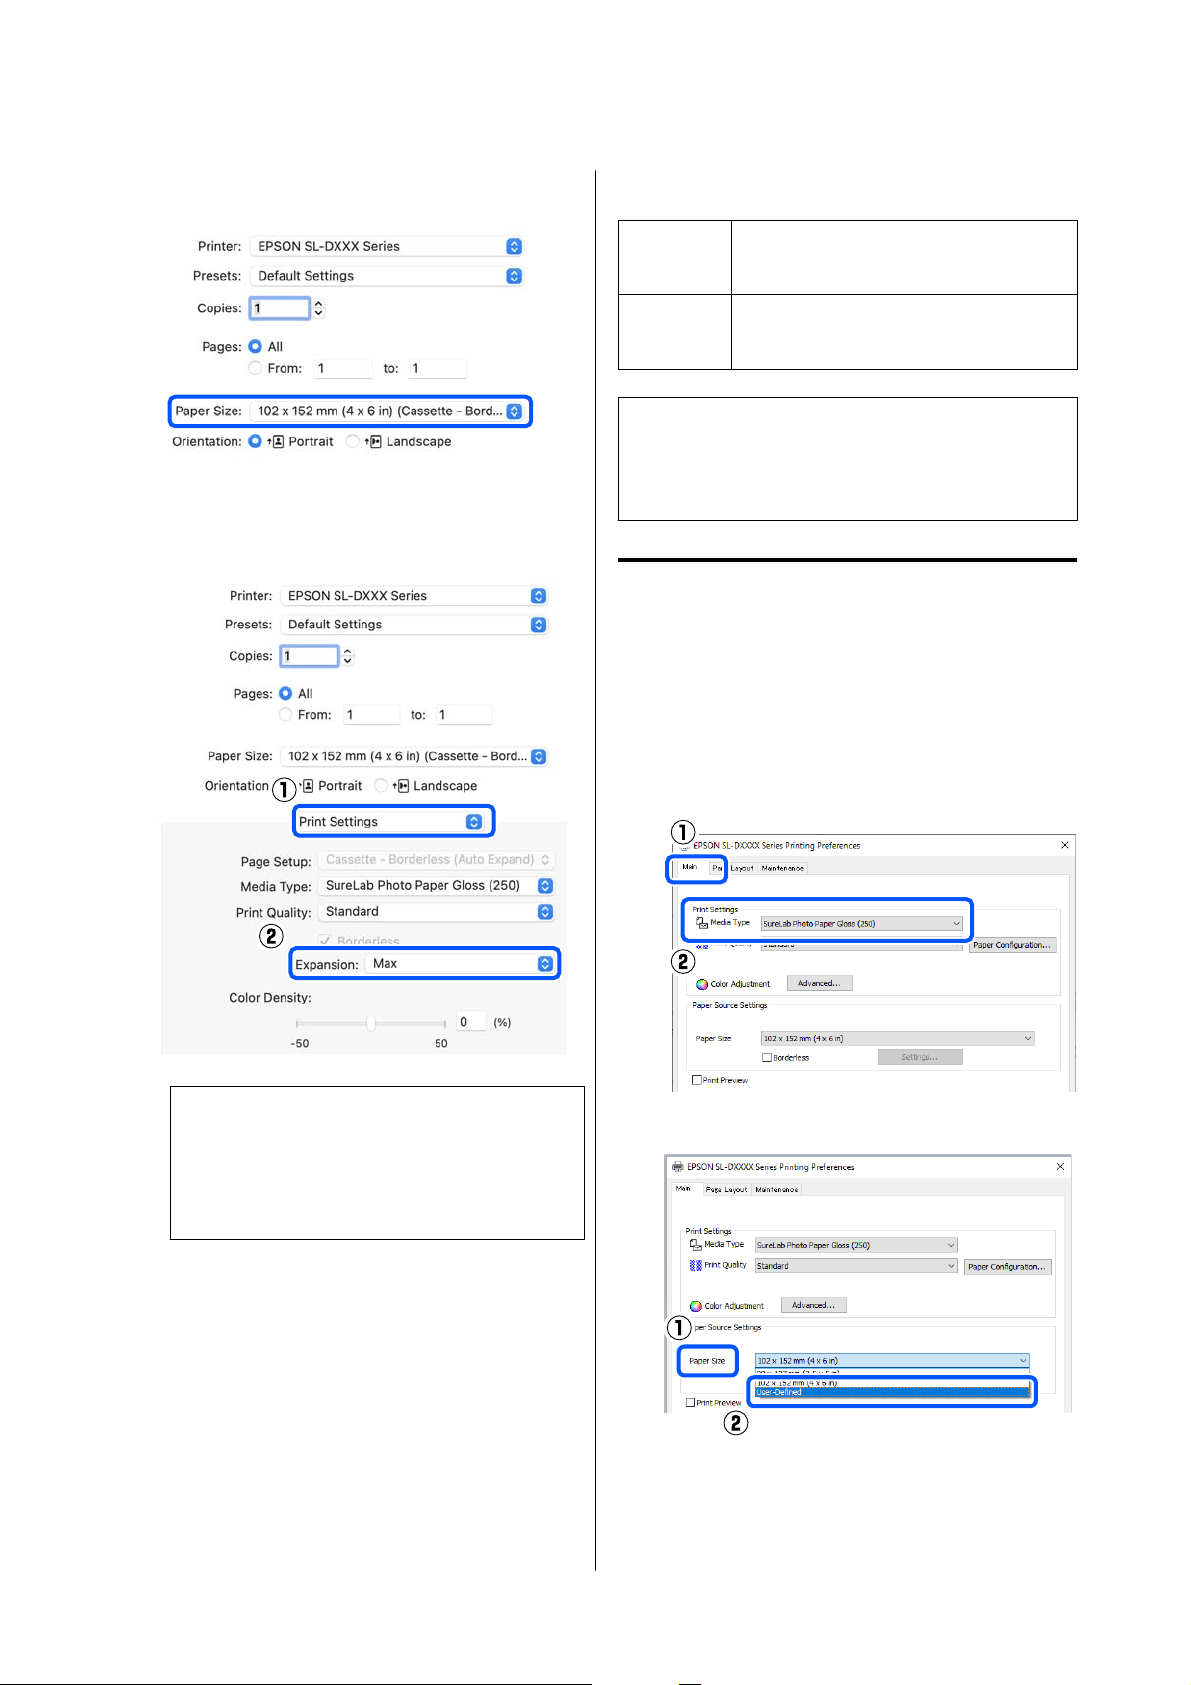
Printing on Non-Standard
Size Paper
You can print on paper sizes not included in the
printer driver.
The paper sizes you can set are shown below.
Width Printing with margins: 89.0 to 101.6 mm
Borderless printing: 89.0, 101.6 mm
Length Single-sided printing: 127.0 to 152.4 mm
Double-sided printing: 148.0 to 152.4 mm
c
Important:
Output sizes may be restricted by the application
being used for printing.
Settings on Windows
A
Open the printer driver’s Main screen, and then
select Media Type.
See the following for how to display the Main
screen.
U “Basic Printing Methods (Windows)” on
page 28
B
Select User-Defined for Paper Size.
SL-D500 Series User's Guide
Printing Using Various Print Functions
43
C
On the User-Defined Paper Size screen, enter
Paper Size Name, set a paper size to use, and
then click Save.
Note:
❏ To change the information you saved, click
the Paper Size Name in the list on the left
side of the screen.
❏ To delete a paper you saved, select the Paper
Size Name in the list on the left side of the
screen, and then click Delete.
❏ You can save up to 30 paper sizes.
D
Click OK.
You can now select the saved paper size from
Paper Size in the Main screen.
You can now print as normal.
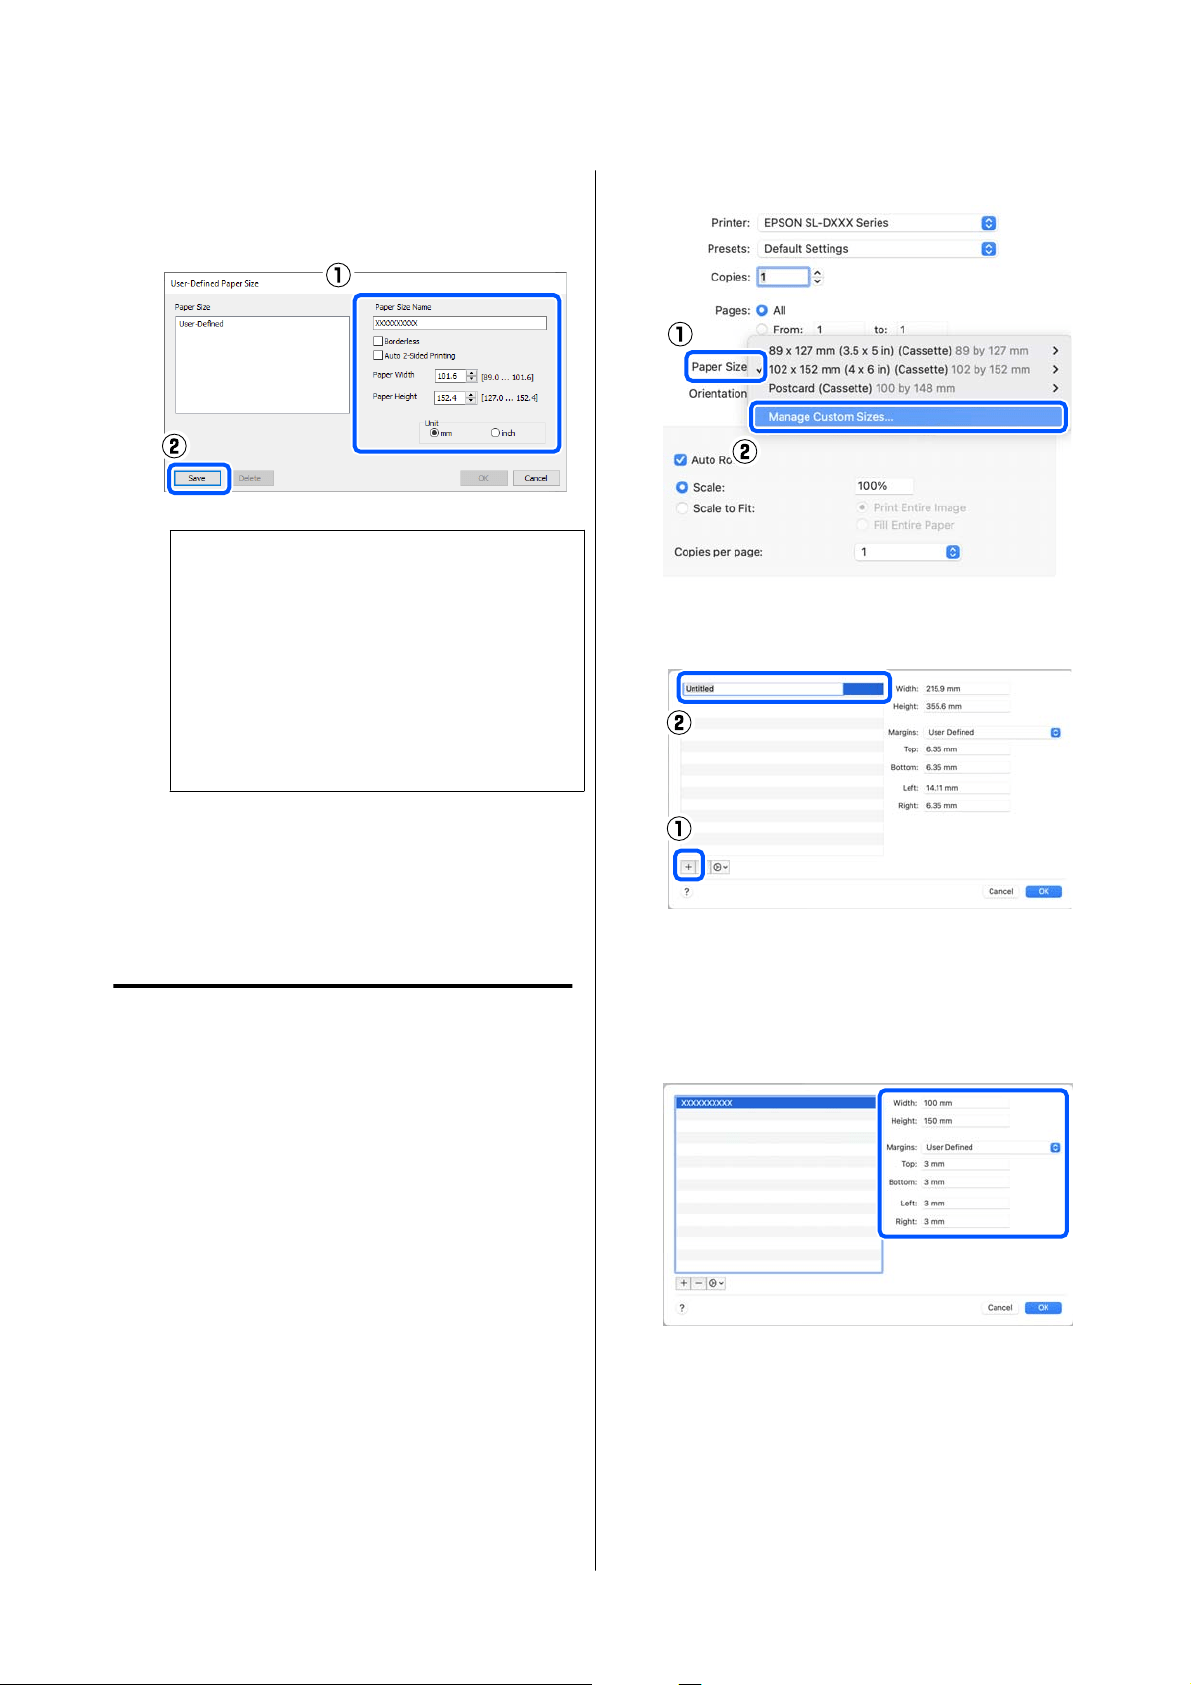
Settings on Mac
A
Open the Print screen, and select Manage
Custom Sizes for Paper Size.
See the following for how to display the Print
screen.
U “Basic Printing Methods (Mac)” on page 31
B
Click +, and then enter a name for the paper
size.
C
Enter the Width and Height for the Paper Size
as well as the margins.
Set the page size range and the margin sizes
according to what can be specified for the
printing method.
SL-D500 Series User's Guide
Printing Using Various Print Functions
44
Note:
❏ To edit saved information, click the paper size
name from the list on the left side of the
custom paper sizes screen.
❏ To copy a saved paper size, select the paper
size name in the list on the left side of the
screen, and then click Duplicate.
❏ To delete a saved paper size, select the paper
size name in the list on the left side of the
screen, and then click −.
❏ The custom paper size setting differs
depending on the operating system version.
See your operating system’s documentation
for details.
D
Click OK.
You can select the paper size you saved from
the Paper Size pop-up menu.
You can now print as normal.
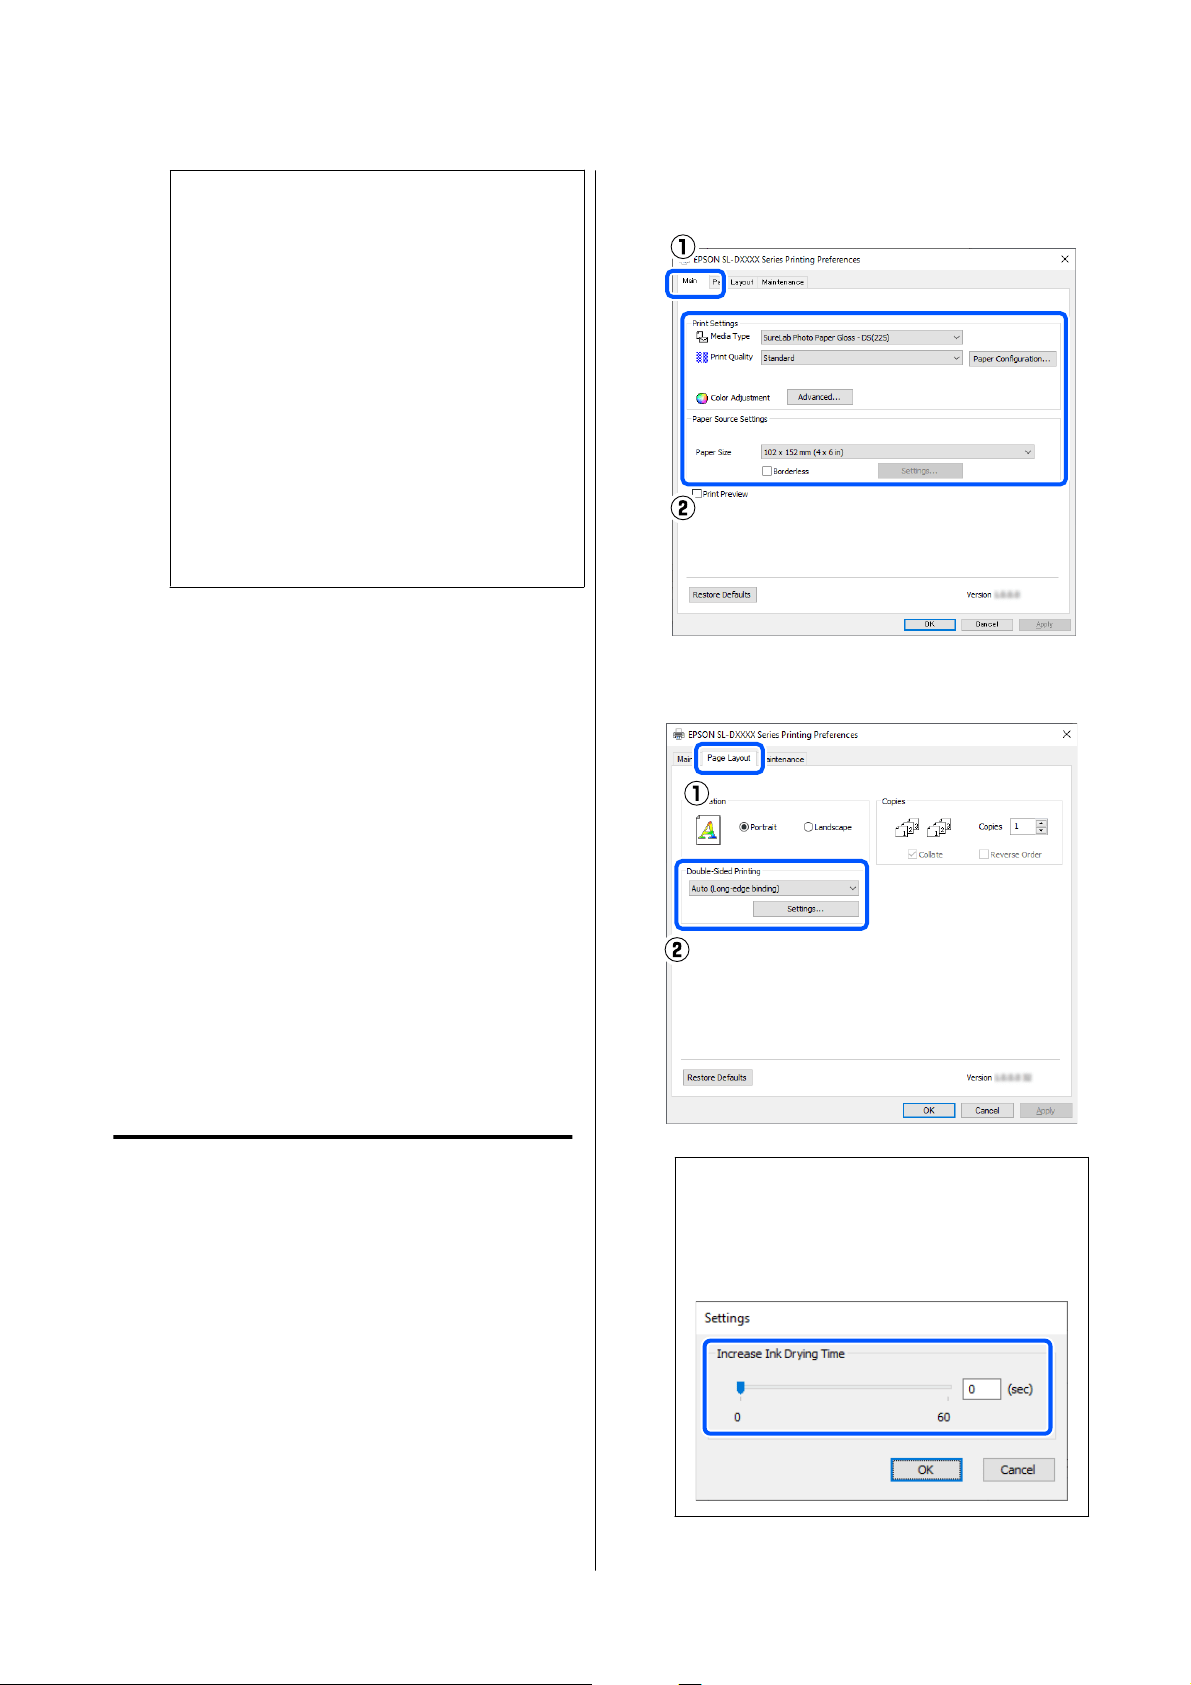
Double-Sided Printing
You can print on both sides of paper that supports
two-sided printing. Double-sided printing is
automatic, so that after the front side is printed the
back side is printed automatically.
See the following for more details on paper that
supports two-sided printing.
U “Supported Media” on page 136
Settings on Windows
A
Open the printer driver’s Main screen, and set
the various settings required for printing, such
as Media Type, Print Quality, and Paper Size.
See the following for how to display the Main
screen.
U “Basic Printing Methods (Windows)” on
page 28
B
Select Page Layout, and then select the binding
position in Double-Sided Printing.
Note:
If you notice scratching or the transfer of ink to
the back side of other sheets of paper in the print
results, click Settings and set additional drying
time.
SL-D500 Series User's Guide
Printing Using Various Print Functions
45
C
Set other items if necessary, and then print.
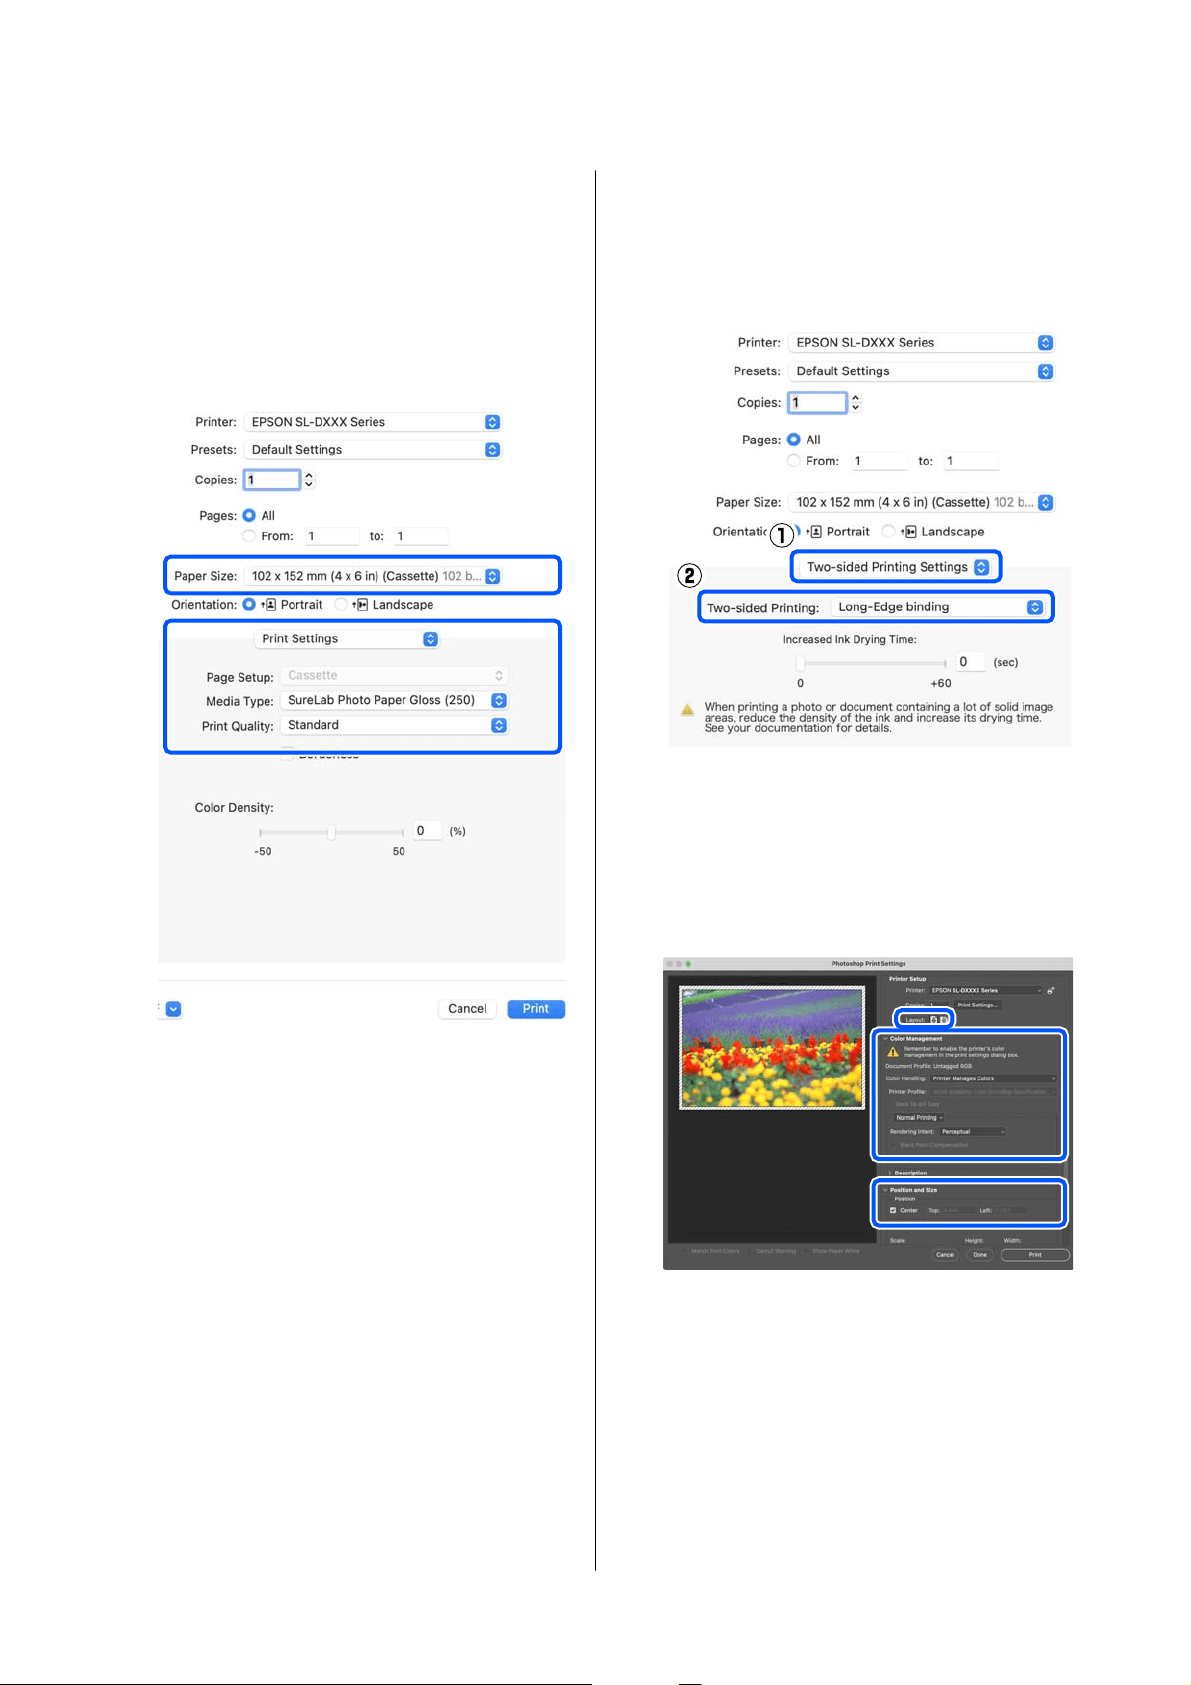
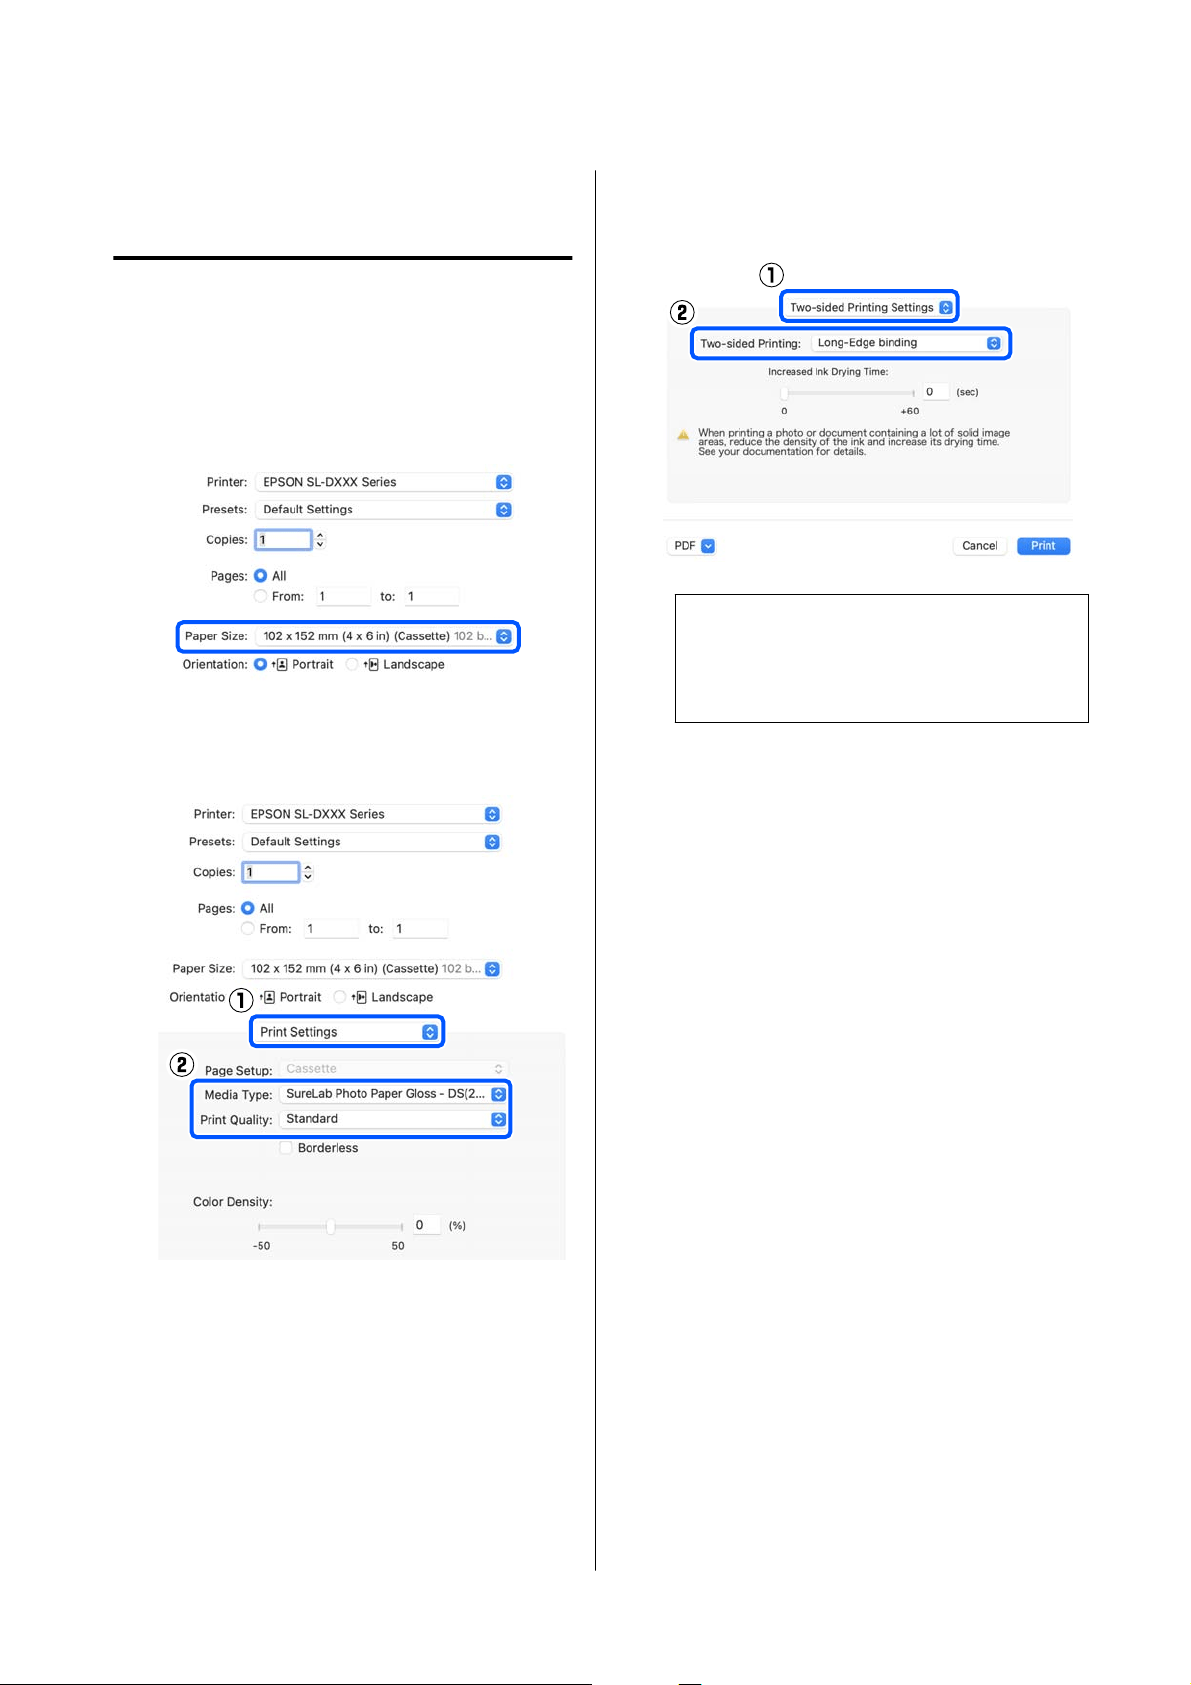
Settings on Mac
A
Open the Print screen, and set the Paper Size.
See the following for how to display the Print
screen.
U “Basic Printing Methods (Mac)” on page 31
B
Select Print Settings in the pop-up menu, and
then select the settings needed for printing,
such as Media Type and Print Quality.
C
Select Two-sided Printing Settings in the
pop-up menu, and set the binding method in
Two-sided Printing.
Note:
If you notice scratching or the transfer of ink to
the back side of other sheets of paper in the print
results, set Increased Ink Drying Time.
D
Set other items if necessary, and then print.
SL-D500 Series User's Guide
Printing Using Various Print Functions
46
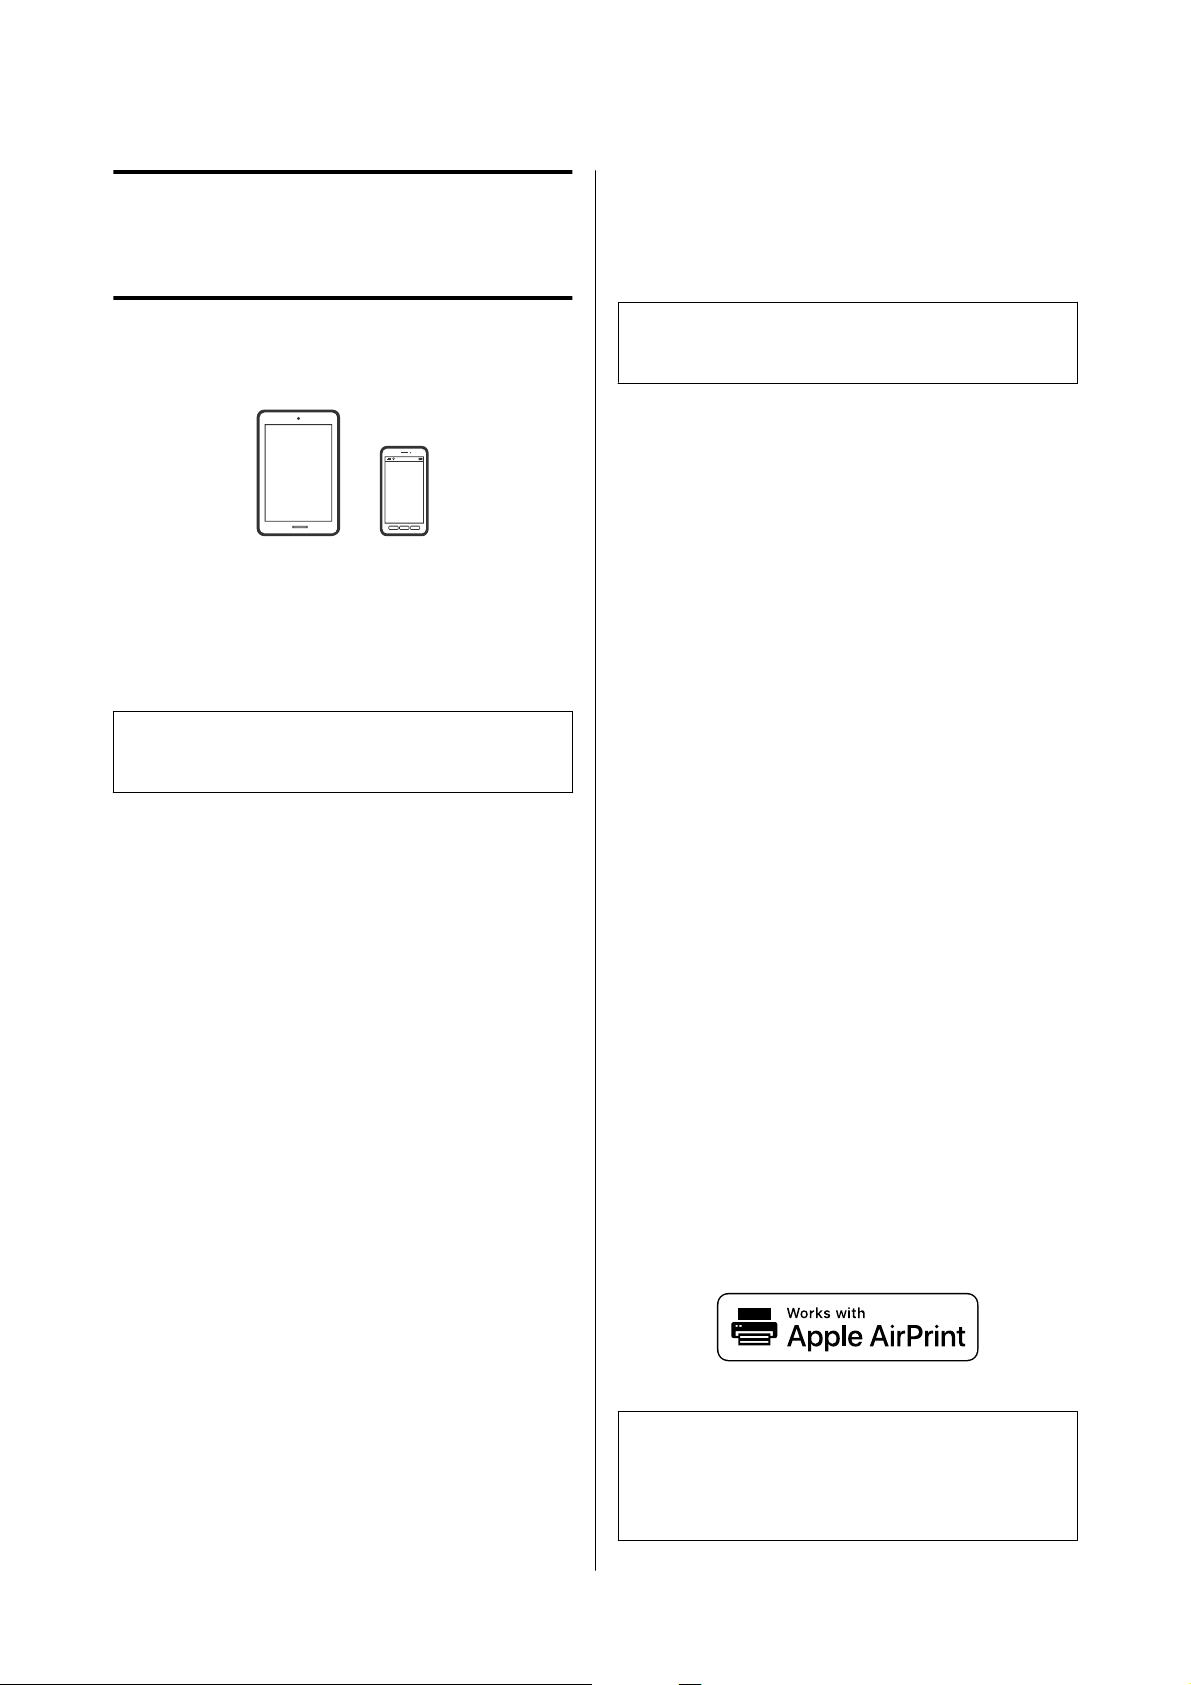
Printing from Smart
Devices
You can print photos and text from a smart device,
such as a smartphone or tablet.
Printing Photos Using
Epson Smart Panel
Note:
Operations may differ depending on the device.
A
Load paper in the printer.
U “Basic Operations” on page 25
B
Set up your printer for wireless printing.
C
If Epson Smart Panel is not installed, install it.
U “Introducing the Software” on page 19
D
Connect your smart device to the same wireless
network as your printer.
E
Start Epson Smart Panel.
F
Select the print photo menu on the home
screen.
G
Select the photo you want to print.
H
Start printing.
Printing Documents
Using Epson Smart Panel
Note:
Operations may differ depending on the device.
A
Load paper in the printer.
U “Basic Operations” on page 25
B
Set up your printer for wireless printing.
C
If Epson Smart Panel is not installed, install it.
U “Introducing the Software” on page 19
D
Connect your smart device to the same wireless
network as your printer.
E
Start Epson Smart Panel.
F
Select the print document menu on the home
screen.
G
Select the document you want to print.
H
Start printing.
Use AirPrint
AirPrint enables instant wireless printing from
iPhone, iPad, iPod touch, and Mac without the need to
install drivers or download software.
Note:
If you disabled paper configuration messages on your
product control panel, you cannot use AirPrint. See the
link below to enable the messages, if necessary.
SL-D500 Series User's Guide
Printing from Smart Devices
47
A
Load paper in the printer.
B
Set up your printer for wireless printing.
C
Connect your smart device to the same wireless
network as your printer.
D
Print from your device to your printer.
Note:
For details, see the AirPrint page on the Apple
website.
Related information
U “Cannot Print from Smart Device Even Though It
Is Connected (iOS)” on page 133
U “Basic Operations” on page 25
Printing Using Mopria
Print Service
Mopria Print Service enables instant wireless printing
from Android smart phones or tablets.
A
Install Mopria Print Service from Google Play.
B
Load paper in the printer.
U “Basic Operations” on page 25
C
Set up your printer for wireless printing.
D
Connect your smart device to the same wireless
network as your printer.
E
Print from your device to your printer.
Note:
For more details, access the Mopria website at
https://mopria.org.
SL-D500 Series User's Guide
Printing from Smart Devices
48
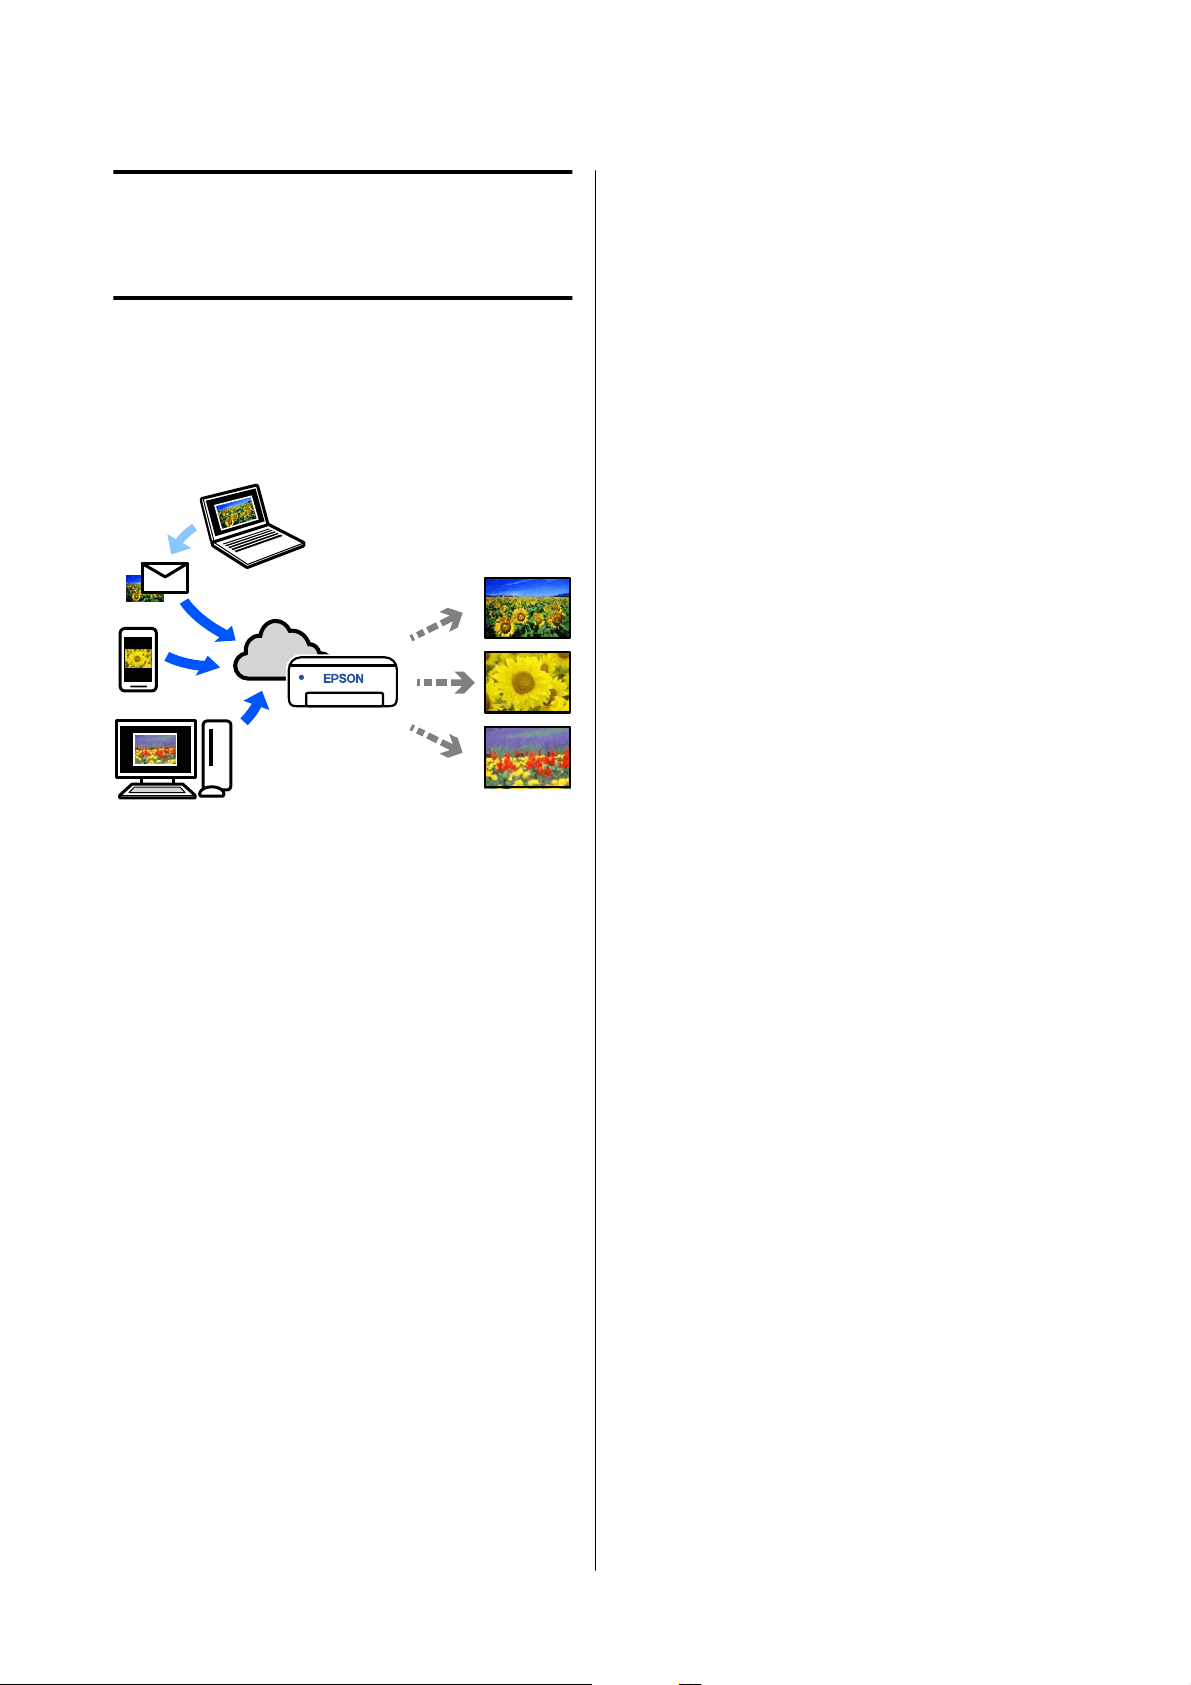
Printing from Cloud
Services
By using Epson Connect service available on the
Internet, you can print from your smart phone, tablet
PC, or laptop, anytime and practically anywhere. To
use this service, you need to register the user and the
printer in Epson Connect.
The features available on the Internet are as follows.
❏ Email Print
When you send an email with attachments, such
as documents or images that you want to print, to
the email address assigned to the printer, you can
print the email and attached files. You can print
on your printer from remote locations.
❏ Remote Print Driver
This is a shared driver supported by Remote Print
Driver. When printing using a printer in a remote
location, you can print by changing the printer on
the usual applications window.
See the Epson Connect web portal for details on how
to setup or print.
https://www.epsonconnect.com/
Registering to Epson
Connect from the Control
Panel
Follow the steps below to register the printer.
A
Load paper in the paper cassette.
U “How to Load Paper” on page 25
B
Select Settings on the home screen.
To select an item, use the u/d buttons to move,
and then press the Z button.
C
Select Epson Connect Services - Register/
Delete, in this order.
To select an item, move the focus to the item
using the u/d/l/r buttons, and then press the
Z button.
D
Follow the on-screen instructions to do
operations, and print a registration sheet.
Continue printing without stopping printing
when a paper size error appears on the control
panel screen.
E
Follow the instructions on the registration sheet
to register the printer.
SL-D500 Series User's Guide
Printing from Cloud Services
49
Maintenance
List of Maintenance Items
See the following table for details on maintenance.
Contents When to perform Reference
Refilling ink When a Remaining Alert is displayed on
the control panel screen
U “Refilling Ink” on page 51
Replacing Maintenance Box When a replacement message is displayed
on the control panel screen
U “Replacing the Maintenance
Box” on page 53
Cleaning the Platen When the back of printed paper is dirty
U “Cleaning the Platen” on
page 55
Cleaning the Roller Assembly Kit When paper feed trouble repeatedly
occurs
U “Cleaning and Replacing the
Roller Assembly Kit” on page 56
Replacing the Roller Assembly Kit When paper feed trouble repeatedly
occurs even though the Roller Assembly
Kit has been cleaned appropriately
U “Cleaning and Replacing the
Roller Assembly Kit” on page 56
Doing a Print Head Nozzle Check ❏ When checking if nozzles are clogged
❏ When checking which colors are
clogged
❏ Horizontal stripes or tint unevenness
(banding) have appeared
U “Print Head Nozzle Check” on
page 60
Cleaning the print head When a clogged nozzle is found
U “Print Head Cleaning” on
page 61
The printer has other maintenance functions, that can be executed from the maintenance tool, than those
mentioned above. See the following for more details.
U “Using the Maintenance Tool (Windows)” on page 64
U “Using the Maintenance Tool (Mac)” on page 78
Disposal of Used Consumables
Dispose of consumables and optional parts in accordance with your local laws and statutes, such as by entrusting
them to an industrial waste disposal company. In such cases, submit the “Safety data sheet” to the industrial waste
disposal company.
You can download it at your local Epson website.
SL-D500 Series User's Guide
Maintenance
50
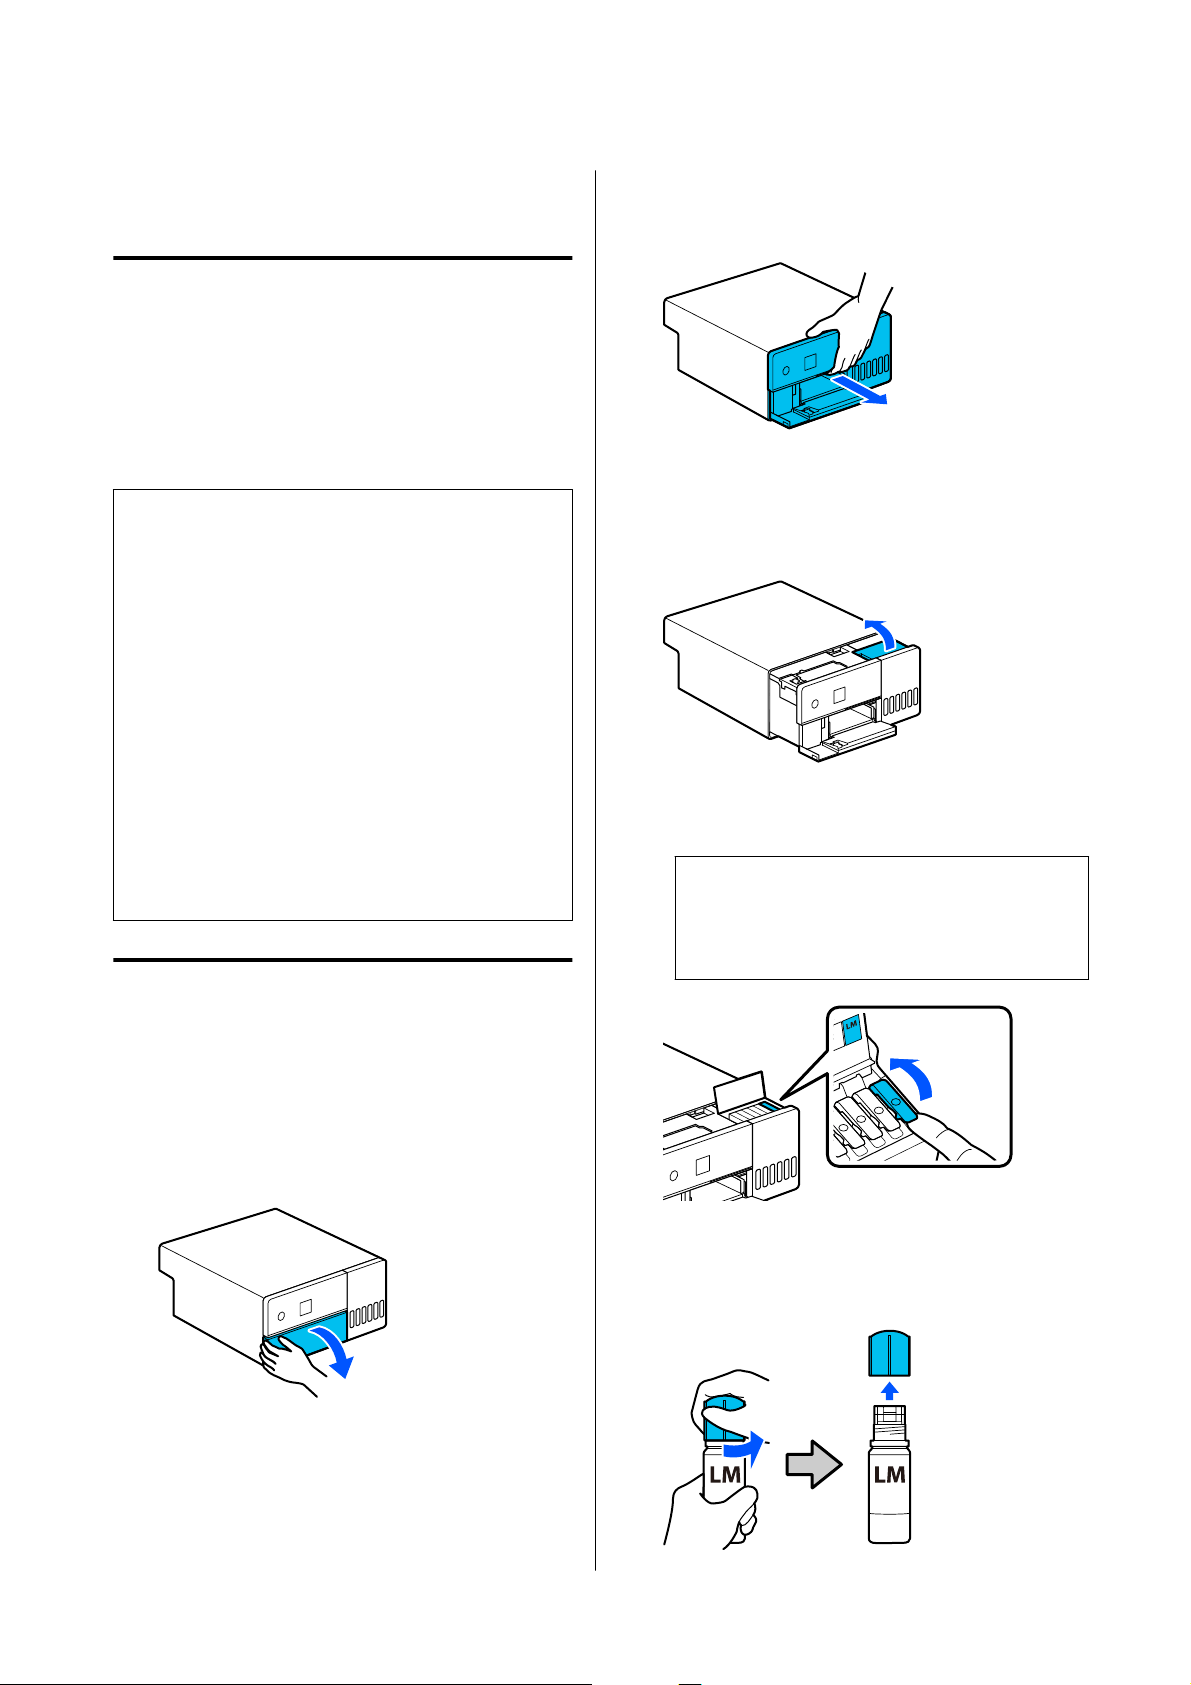
Refilling Ink
Precautions Regarding
Maintenance
Before starting this procedure, be sure to read the
precautions about handling the ink bottles.
U “Notes on Handling Ink Bottles” on page 18
c
Important:
❏ Epson recommends the use of genuine Epson
ink bottles.
❏ Do not repeatedly refill with small amounts of
ink. Otherwise, the printer could be damaged.
❏ Do not allow the top of the ink bottle to hit
against any objects after removing its cap;
otherwise ink may spill.
❏ Do not shake the bottles too hard. Ink could
leak out.
❏ Do not leave the bottle inserted into the ink
tank. Doing so could damage the bottle or
cause ink to leak.
How to Refill Ink
A
Check that the power light is lit.
When the power light is flashing, the printer is
operating. Wait until all operations have
stopped.
B
Open the front cover.
C
Place your hand as shown in the illustration,
and pull out the interior of the printer until it
stops.
D
Open the ink tank cover.
Read the precautions for filling ink that are
shown on screen, and then proceed to the next
screen.
E
Open the ink tank cap of the color that you
want to refill.
c
Important:
Make sure that the color of the ink tank
matches the ink color that you want to refill.
F
While the ink bottle is standing fully upright,
slowly turn the cap to remove it.
Be careful not to spill any ink.
SL-D500 Series User's Guide
Maintenance
51
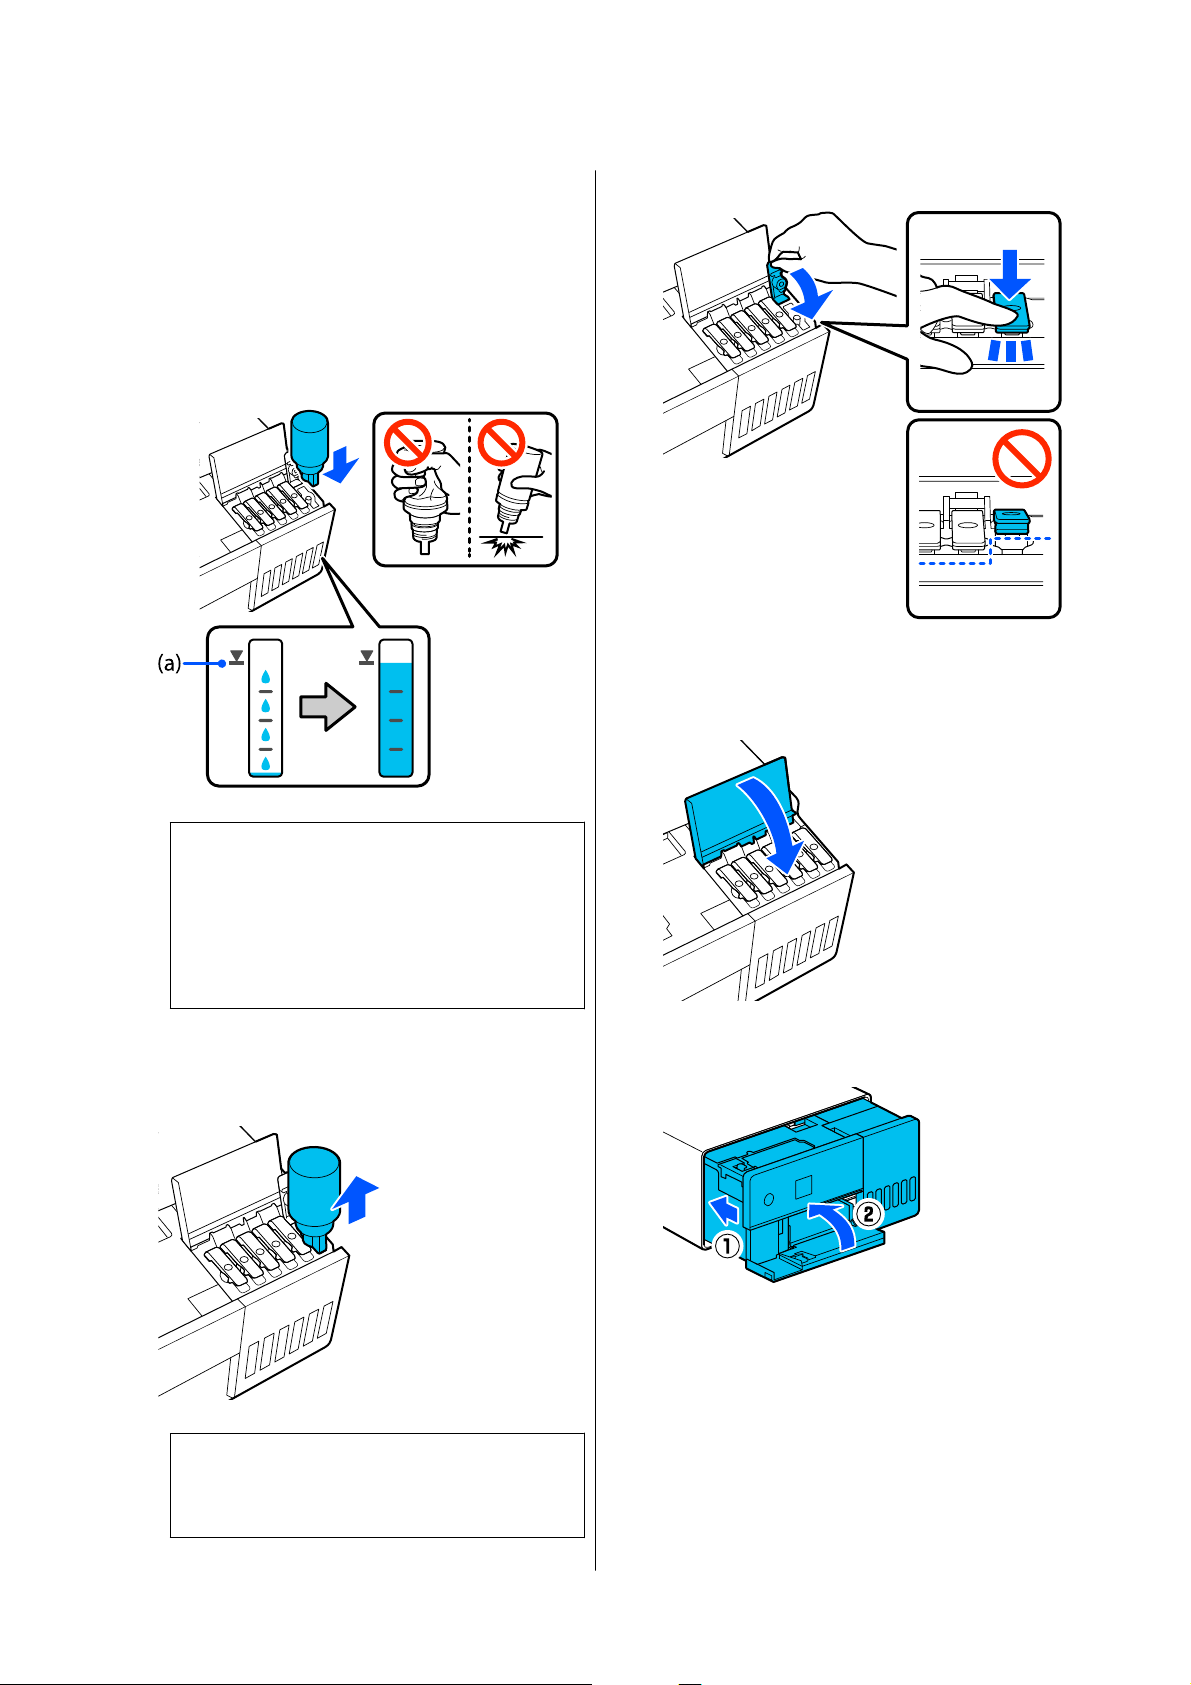
G
Align the bottle with the ink inlet and insert it,
and then wait until the ink stops by itself at the
upper limit line (a).
By inserting the bottle into the ink inlet for the
correct color, the ink automatically starts filling
and then stops at the upper limit line.
If the ink does not start flowing, reinsert the
bottle.
c
Important:
Do not pull out or reinsert the bottle until the
ink has filled to the upper limit. Ink could
leak out.
Do not squeeze the bottle.
H
After the ink has finished filling, remove the
bottle, and then securely tighten the cap of the
ink bottle.
Note:
If any ink remains in the ink bottle, tighten the
cap and store the bottle upright for later use.
I
Securely close the ink tank cap.
Repeat steps 5 to 9 to refill other colors of ink.
J
Securely close the ink tank cover.
K
Return the interior of the printer to its original
position, and then close the front cover.
SL-D500 Series User's Guide
Maintenance
52
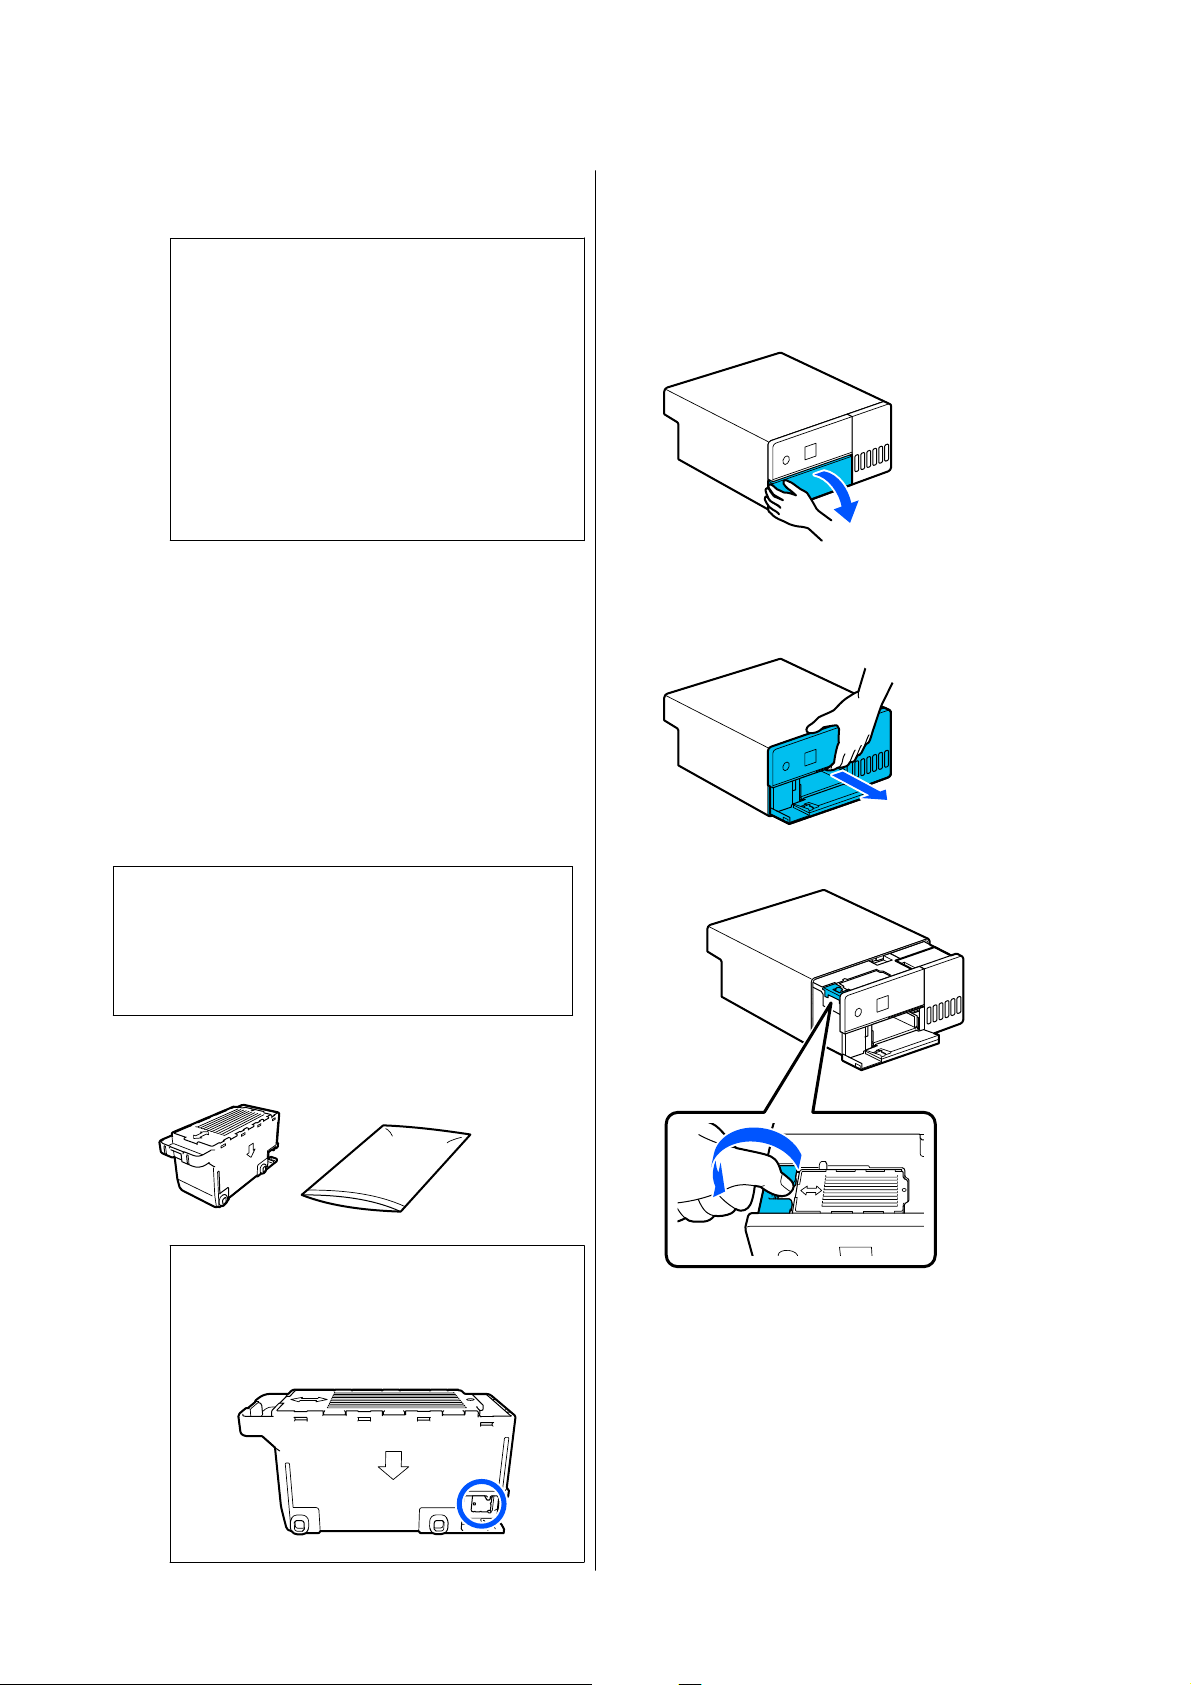
L
Follow the on-screen instructions to update the
ink levels of the colors of ink you filled.
c
Important:
Be sure to update the ink levels after refilling
the ink.
If you have refilled 2 or more colors of ink,
select all the colors you refilled and update
their ink levels.
If you do not update the ink levels, the ink
levels will not change even though the ink has
been refilled.
Replacing the
Maintenance Box
The maintenance box is to absorb ink consumed when
Print Head Cleaning is executed.
If a replace the maintenance box message appears,
follow the steps below to replace it.
c
Important:
After removing the maintenance box, replace it
immediately, and do not leave the maintenance
box cover open.
A
Obtain a new maintenance box and supplied
bag.
c
Important:
Do not touch the chip on the maintenance
box. Doing so may prevent normal operation
and printing.
B
Check that the power light is lit.
When the power light is flashing, the printer is
operating. Wait until all operations have
stopped.
C
Open the front cover.
D
Place your hand as shown in the illustration,
and pull out the interior of the printer until it
stops.
E
Open the maintenance box cover.
F
Remove the maintenance box.
As shown in the illustration, pull it out and
then lift it up.
SL-D500 Series User's Guide
Maintenance
53
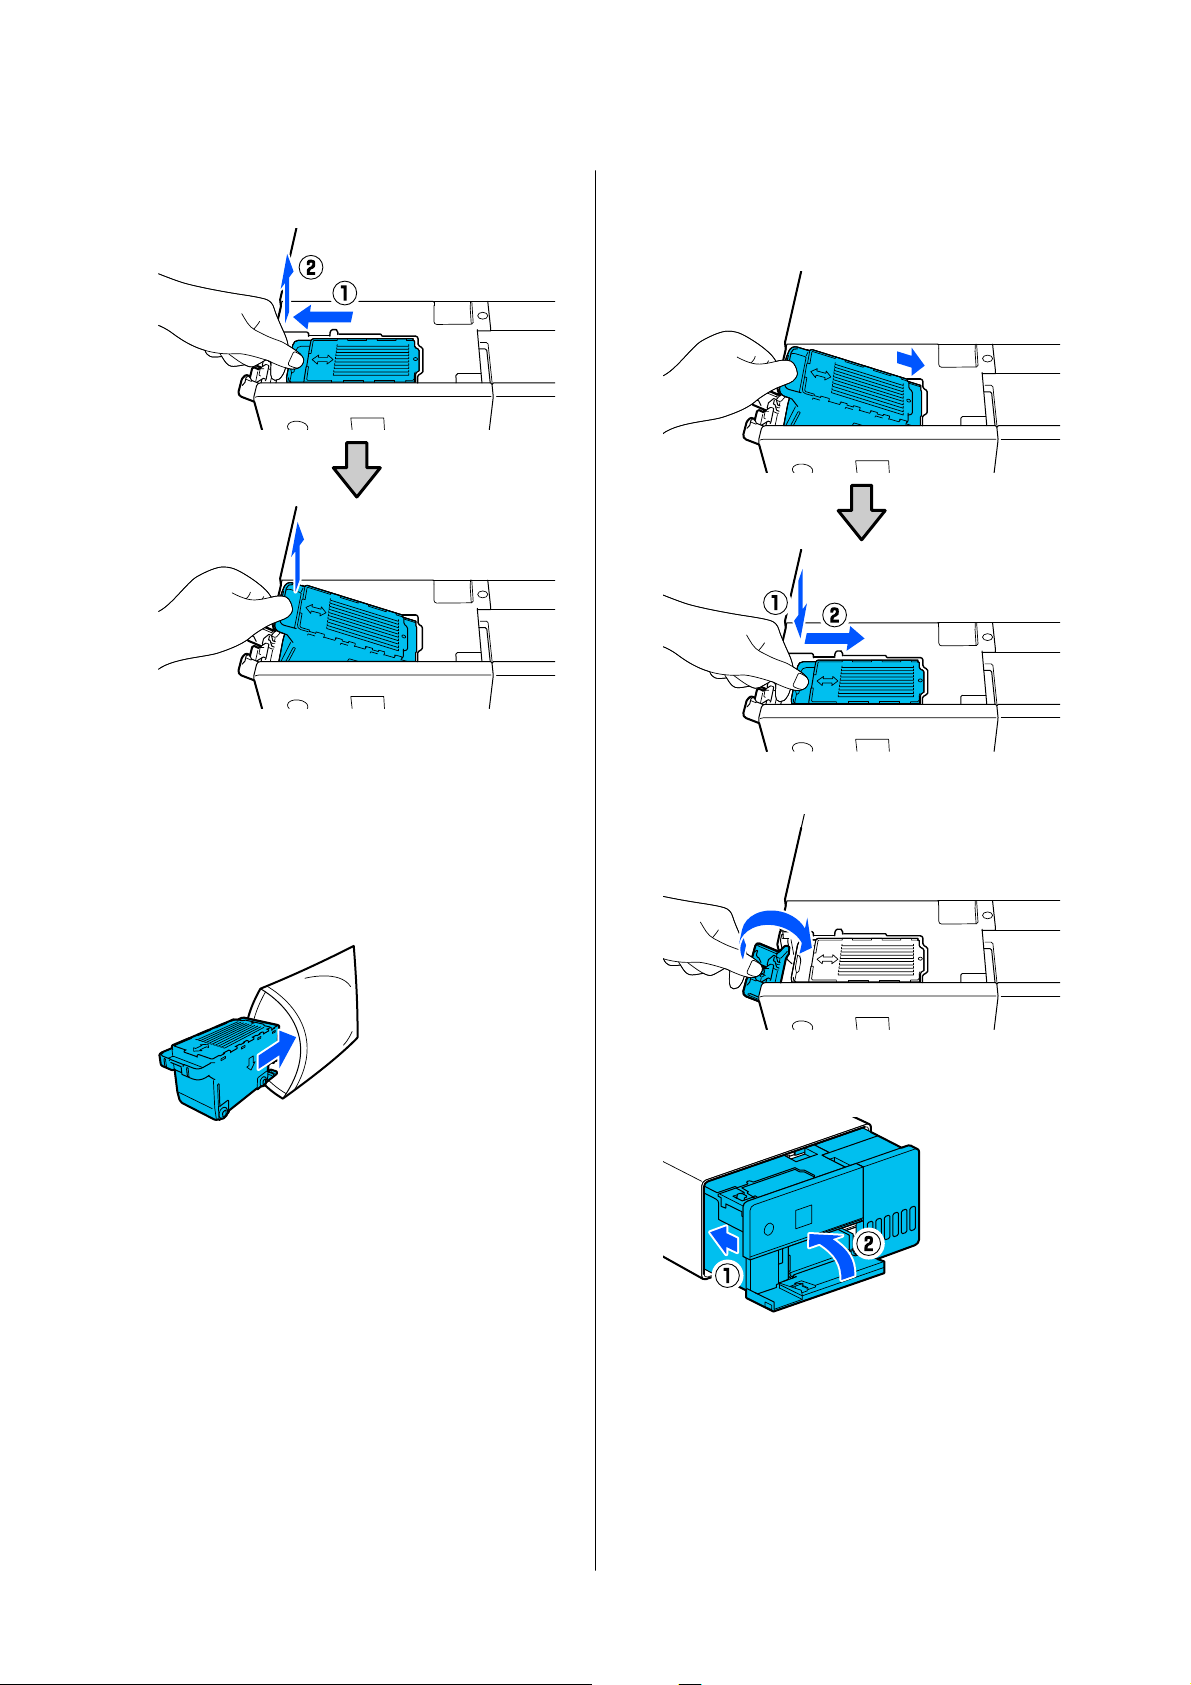
A buzzer sounds when it is pulled out in the
orientation shown in the illustration.
See the following for more information on
disposing of the maintenance box.
U “Disposal of Used Consumables” on
page 50
G
Put the used maintenance box in the supplied
bag.
H
Install the new maintenance box.
Press the maintenance box being installed all
the way in until it stops.
I
Close the maintenance box cover.
J
Return the interior of the printer to its original
position, and then close the front cover.
K
Follow the on-screen instructions, and then
press the Z button.
Confirm that the status light is off.
SL-D500 Series User's Guide
Maintenance
54
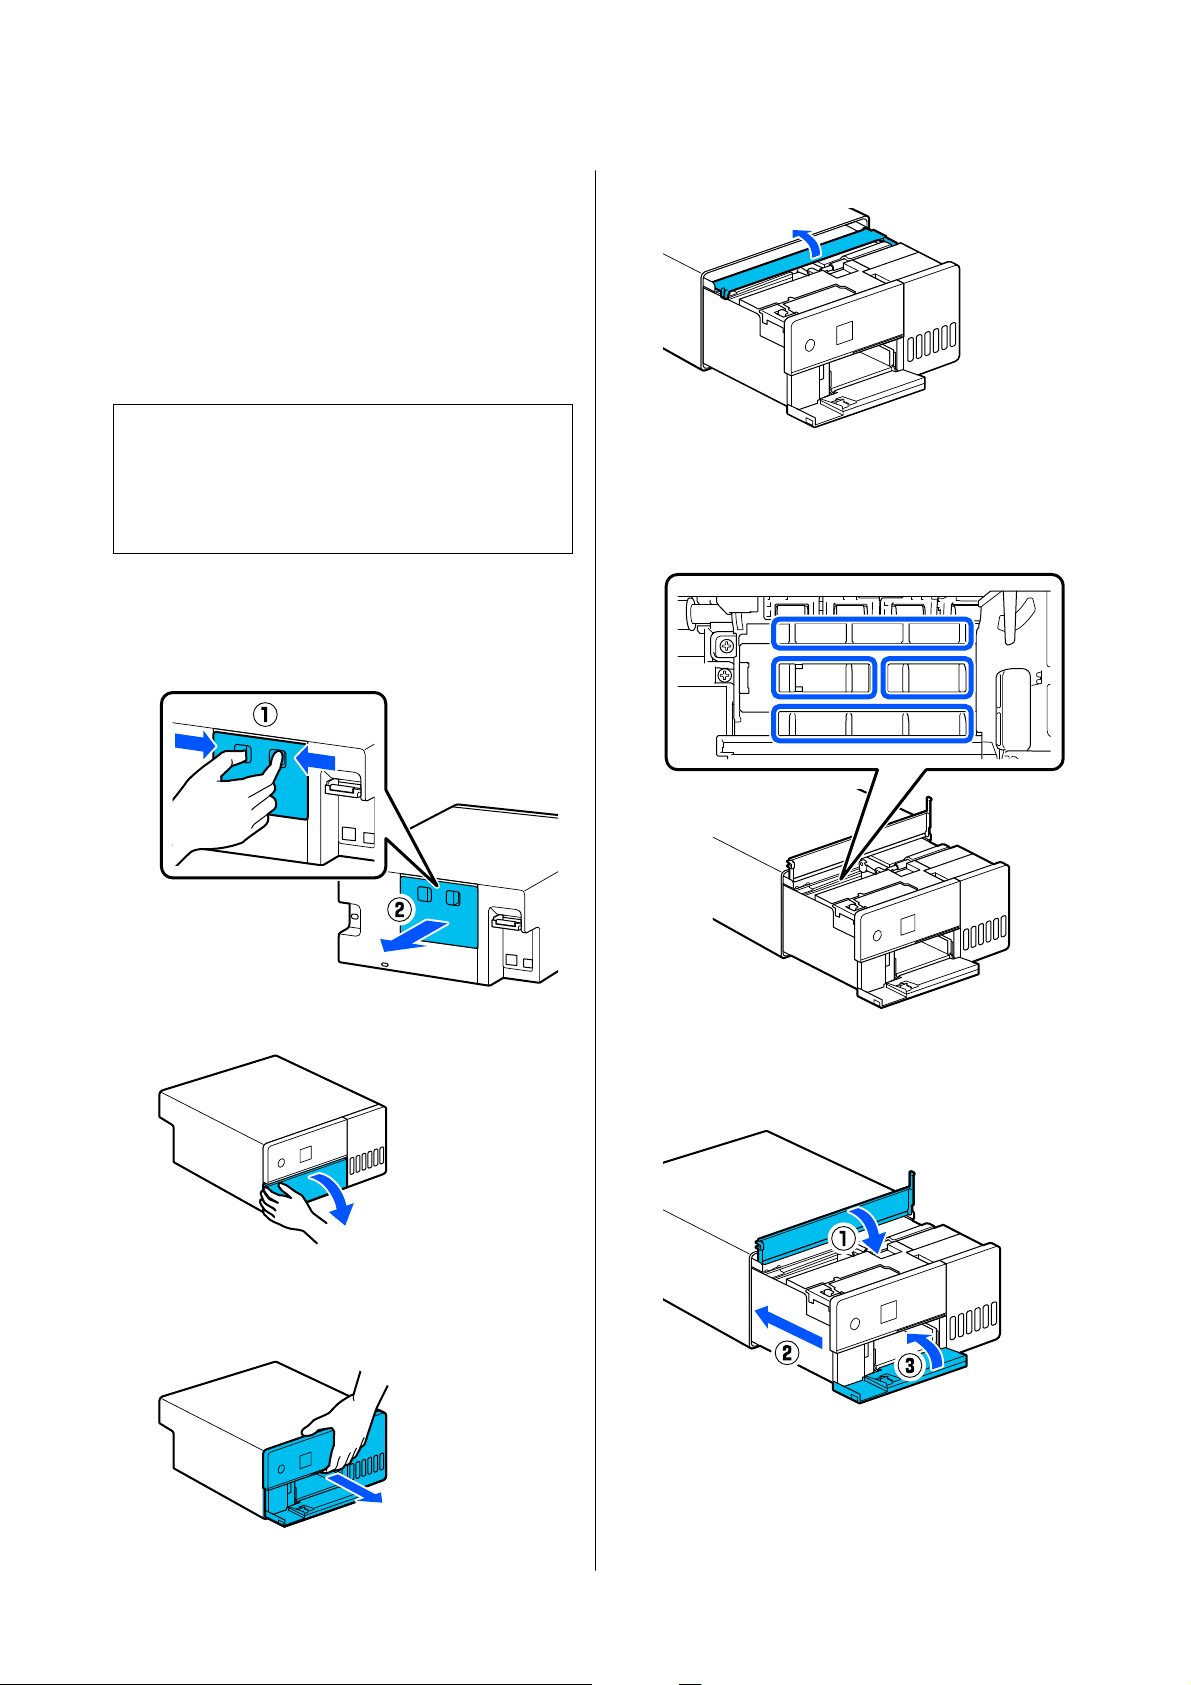
Cleaning the Platen
If the back of printed paper is dirty, paper dust (white
dust) has accumulated on the platen, making it dirty.
Clean the platen according to the following procedure.
Execute cleaning while the power to the printer is off.
c
Important:
Do not touch any parts except where instructed to
clean. Otherwise, it may break down or reduce
print quality.
A
Turn off the printer.
B
Remove the rear cover.
C
Open the front cover.
D
Place your hand as shown in the illustration,
and pull out the interior of the printer until it
stops.
E
Open the inner cover.
F
Wipe off any dirt, such as paper dust, on the
platen (the area outlined in blue in the
illustration) with a commercially available
cotton swab.
G
Close the inner cover, return the interior of the
printer to its original position, and then close
the front cover.
SL-D500 Series User's Guide
Maintenance
55
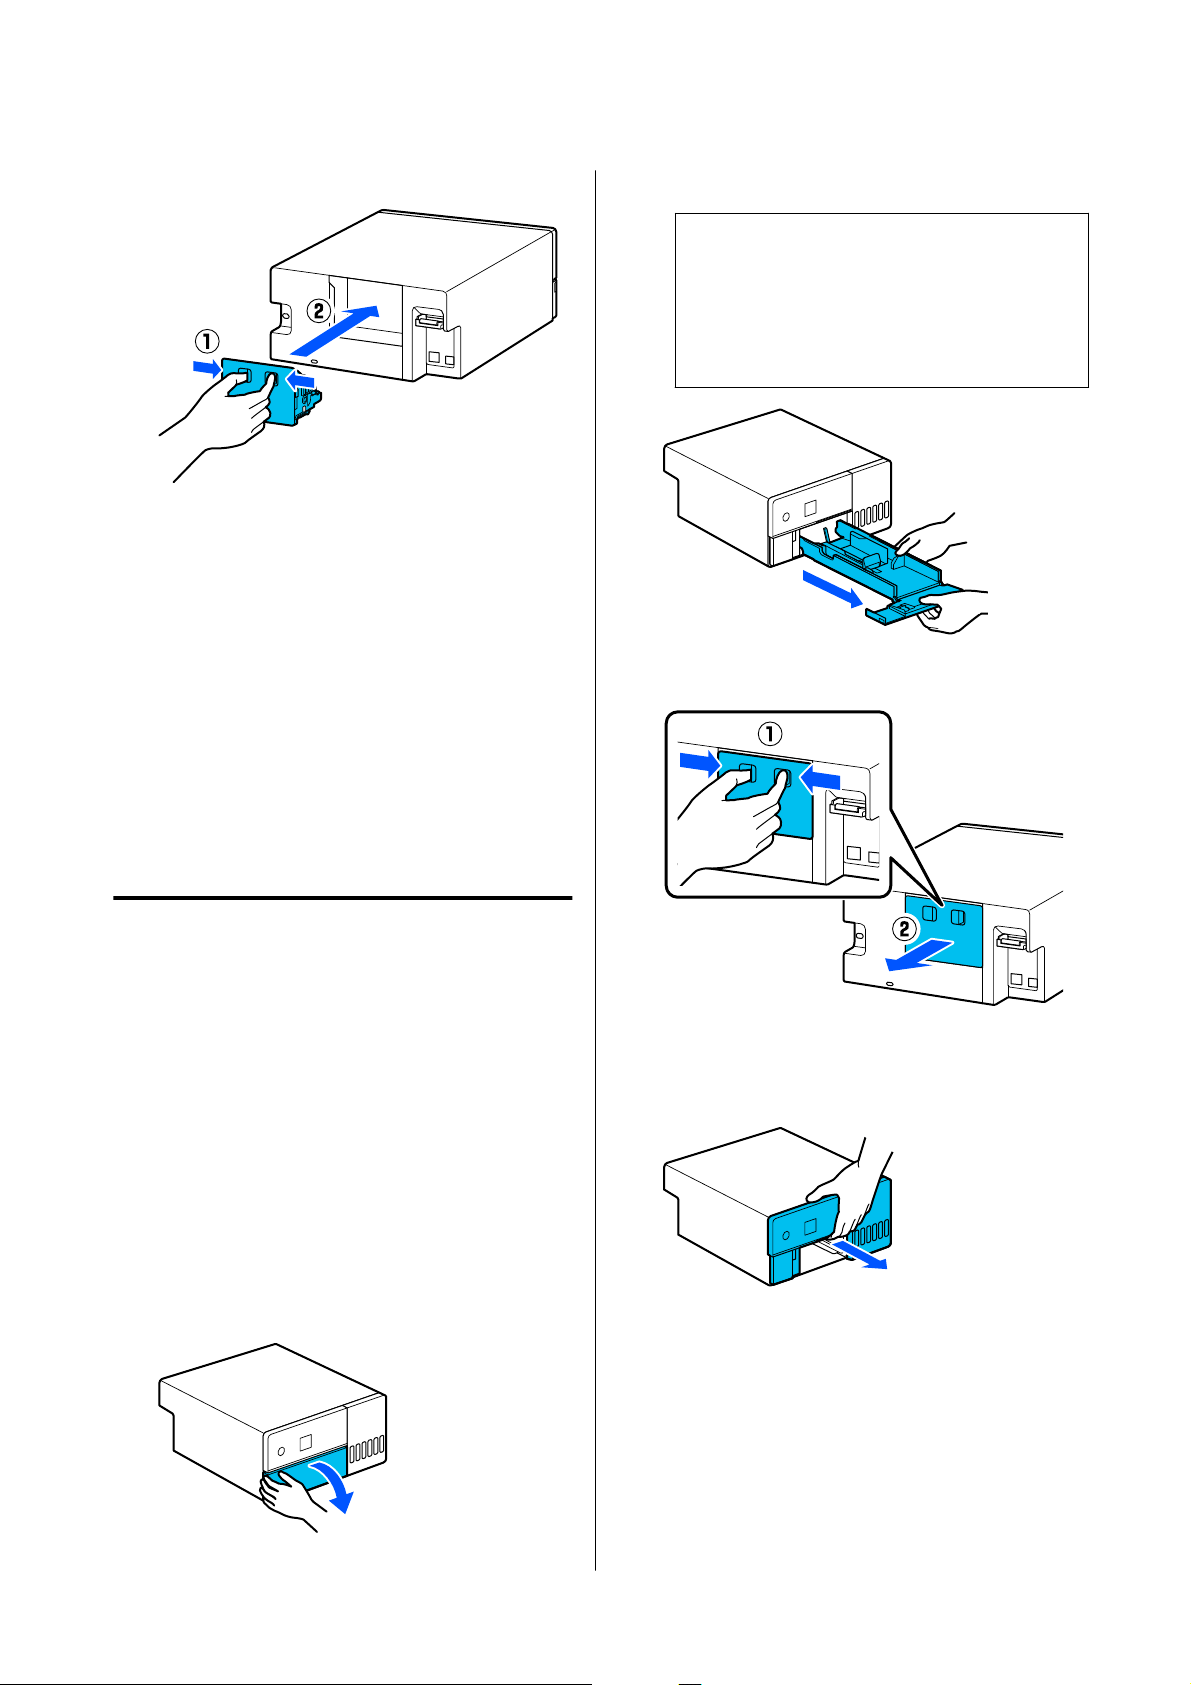
H
Install the rear cover.
Cleaning and Replacing
the Roller Assembly Kit
If the paper does not feed correctly from the paper
cassette, then clean the Roller Assembly Kit, which is
attached to the bottom of the printer.
When paper feed trouble repeatedly occurs even
though the Roller Assembly Kit has been cleaned
appropriately, replace the Roller Assembly Kit with a
new one.
Cleaning the Roller Assembly
Kit
Items to Prepare
Use a soft commercially available cloth to clean the
rollers. Prepare this in advance. We recommend using
a cloth that is low-lint and anti-static.
How to Clean the Roller Assembly Kit
A
Turn off the power to the printer, and unplug
all cables, including the power cable.
B
Open the front cover.
C
Pull the paper cassette out.
c
Important:
Use both hands to pull the paper cassette out.
If you use only one hand, the paper cassette
may fall and be damaged because the paper
cassette is heavy when it is pulled out.
D
Remove the rear cover.
E
Place your hand as shown in the illustration,
and pull out the interior of the printer until it
stops.
SL-D500 Series User's Guide
Maintenance
56
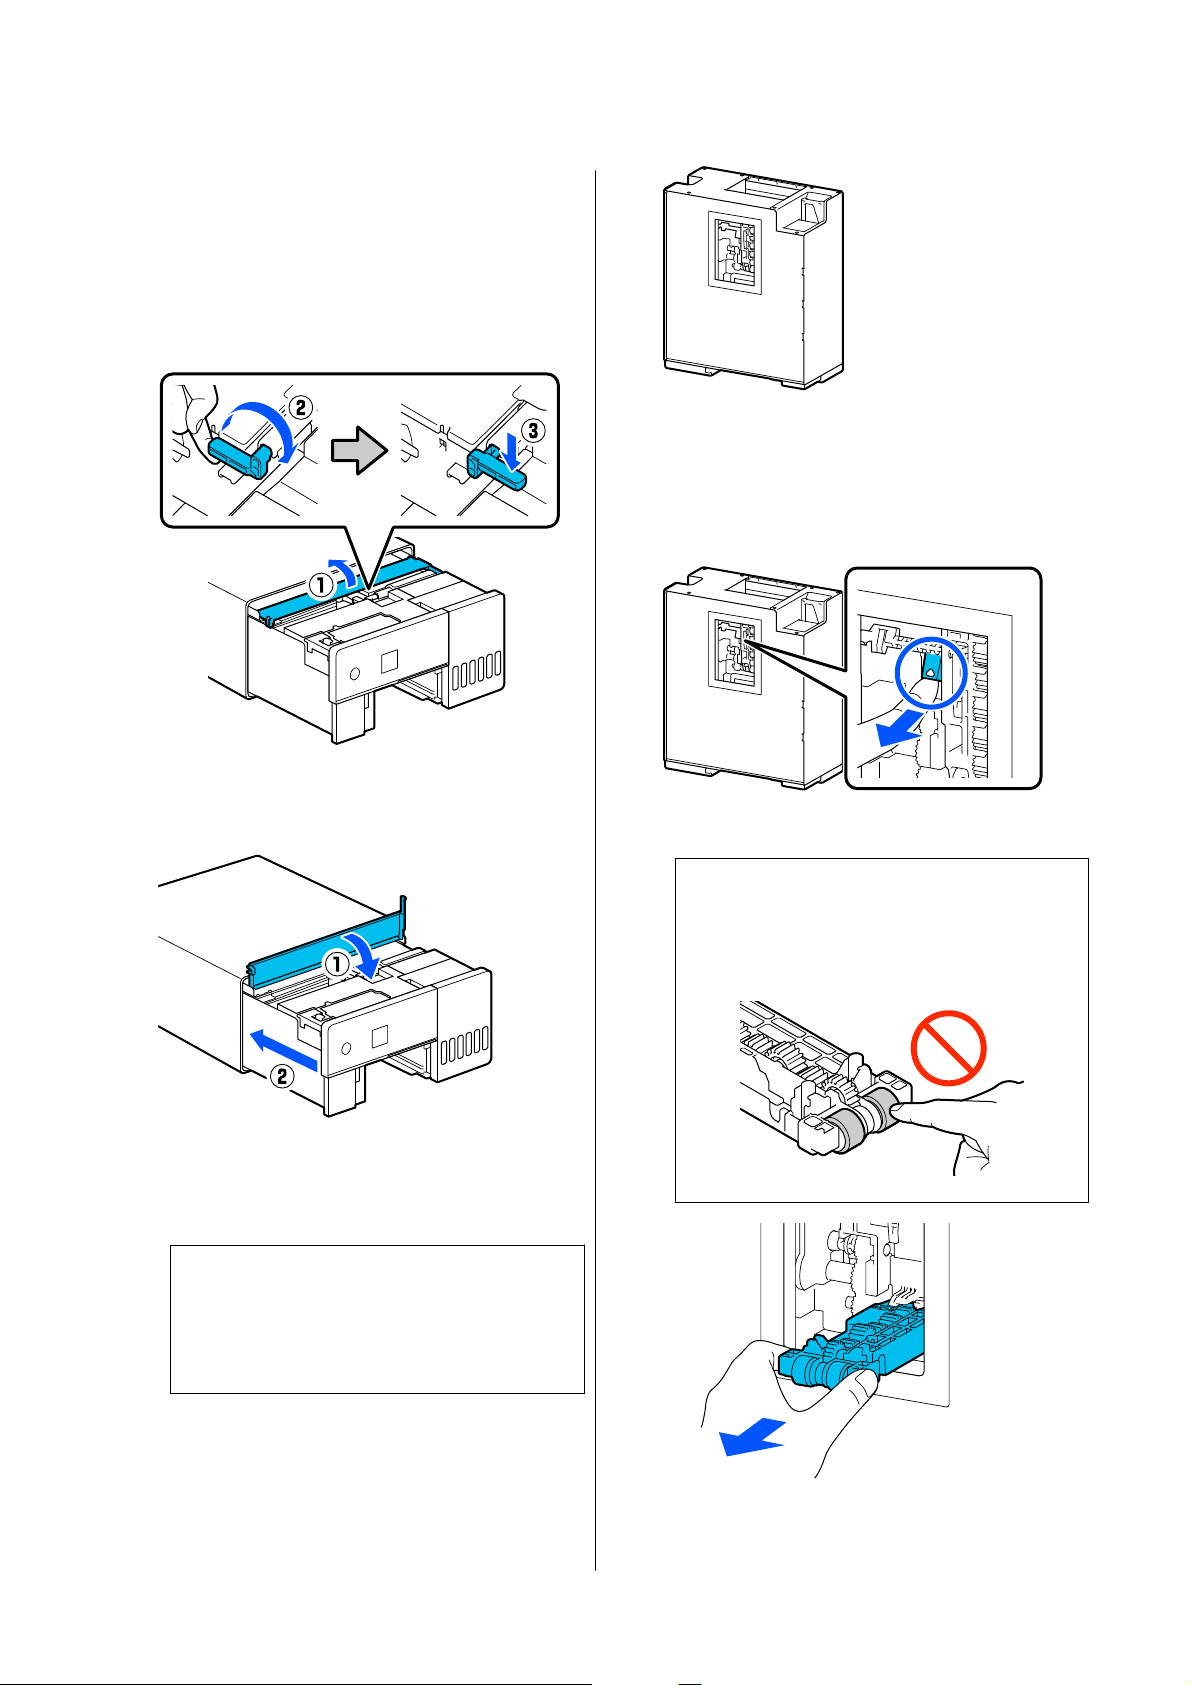
F
Open the inner cover and set the transportation
lock in the transportation position, as shown in
the illustration.
Putting the transportation lock in the
transportation position prevents the ink from
leaking when the printer is stood on end in step
8.
G
Close the inner cover, return the interior of the
printer to its original position.
H
Stand the printer vertically as shown in the
illustration (with the front side of the printer
face down).
c
Important:
Be careful to not pinch your hands or fingers
when standing the printer on end. An injury
could occur.
I
As shown in the illustration, raise the roller
lock lever, on the left side of the Roller
Assembly Kit, toward you.
Raising the roller lock lever drops the Roller
Assembly Kit towards you.
J
Remove the Roller Assembly Kit.
c
Important:
Do not touch the roller surfaces of the Roller
Assembly Kit. Oil from your skin could stick
to them and make printed materials dirty.
SL-D500 Series User's Guide
Maintenance
57
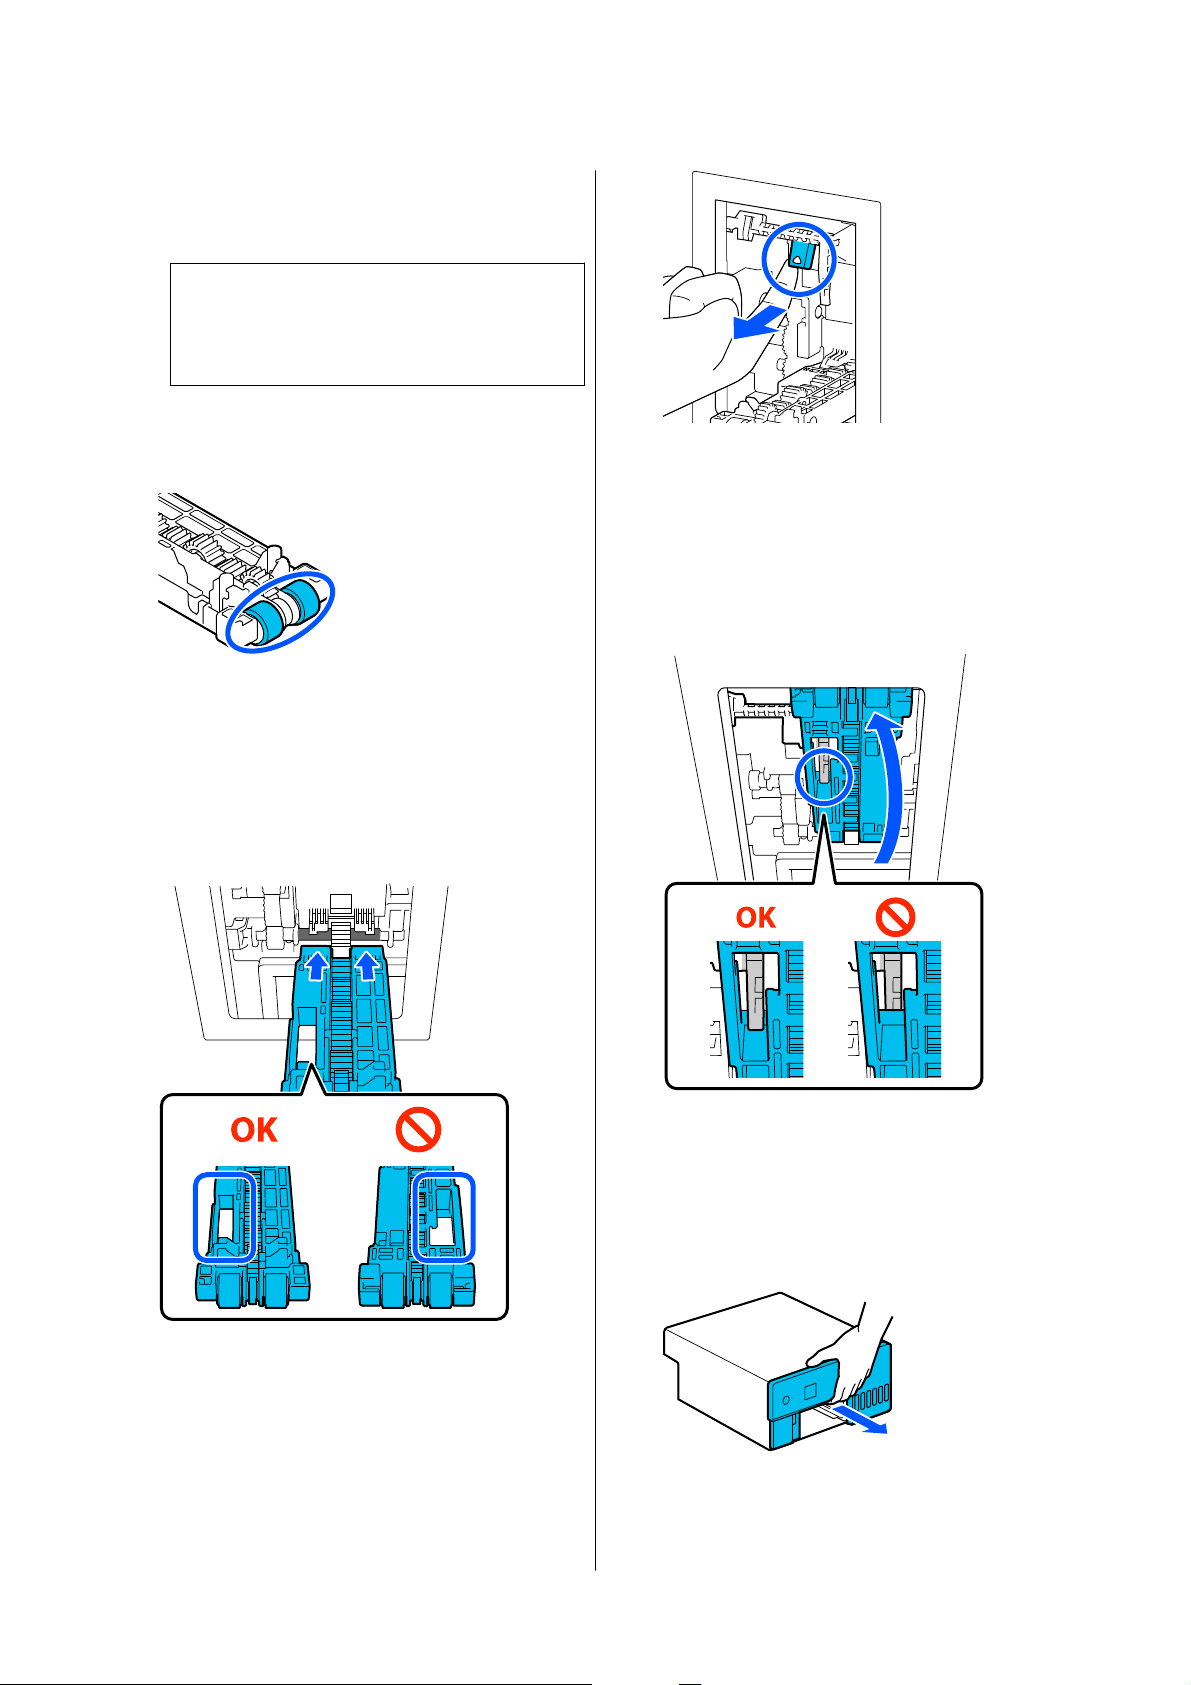
K
Use a soft cloth that has been dipped in water
and carefully wrung out to wipe any dirt, such
as paper dust, off of the rollers.
c
Important:
Do not wipe the rollers with a dry cloth. This
could scratch the surface of the rollers.
Rotate the roller as you wipe off any dirt stuck
to the surface of the roller as shown in the
illustration.
L
Install the Roller Assembly Kit.
Follow the steps below to install the Roller
Assembly Kit in the printer.
(1) Insert the Roller Assembly Kit onto the shaft
in the orientation shown in the illustration.
(2) As shown in the illustration, raise the roller
lock lever toward you.
(3) Keep the lever in step 12-(2) raised as you
raise the Roller Assembly Kit so that the tips
of the protrusions extend out of the holes in
the Roller Assembly Kit as shown in the
illustration, and then release your finger from
the roller lock lever.
Confirm that the Roller Assembly Kit does
not fall out when you remove your hands.
M
Put the printer back down flat, and pull out the
interior of the printer until it stops.
SL-D500 Series User's Guide
Maintenance
58
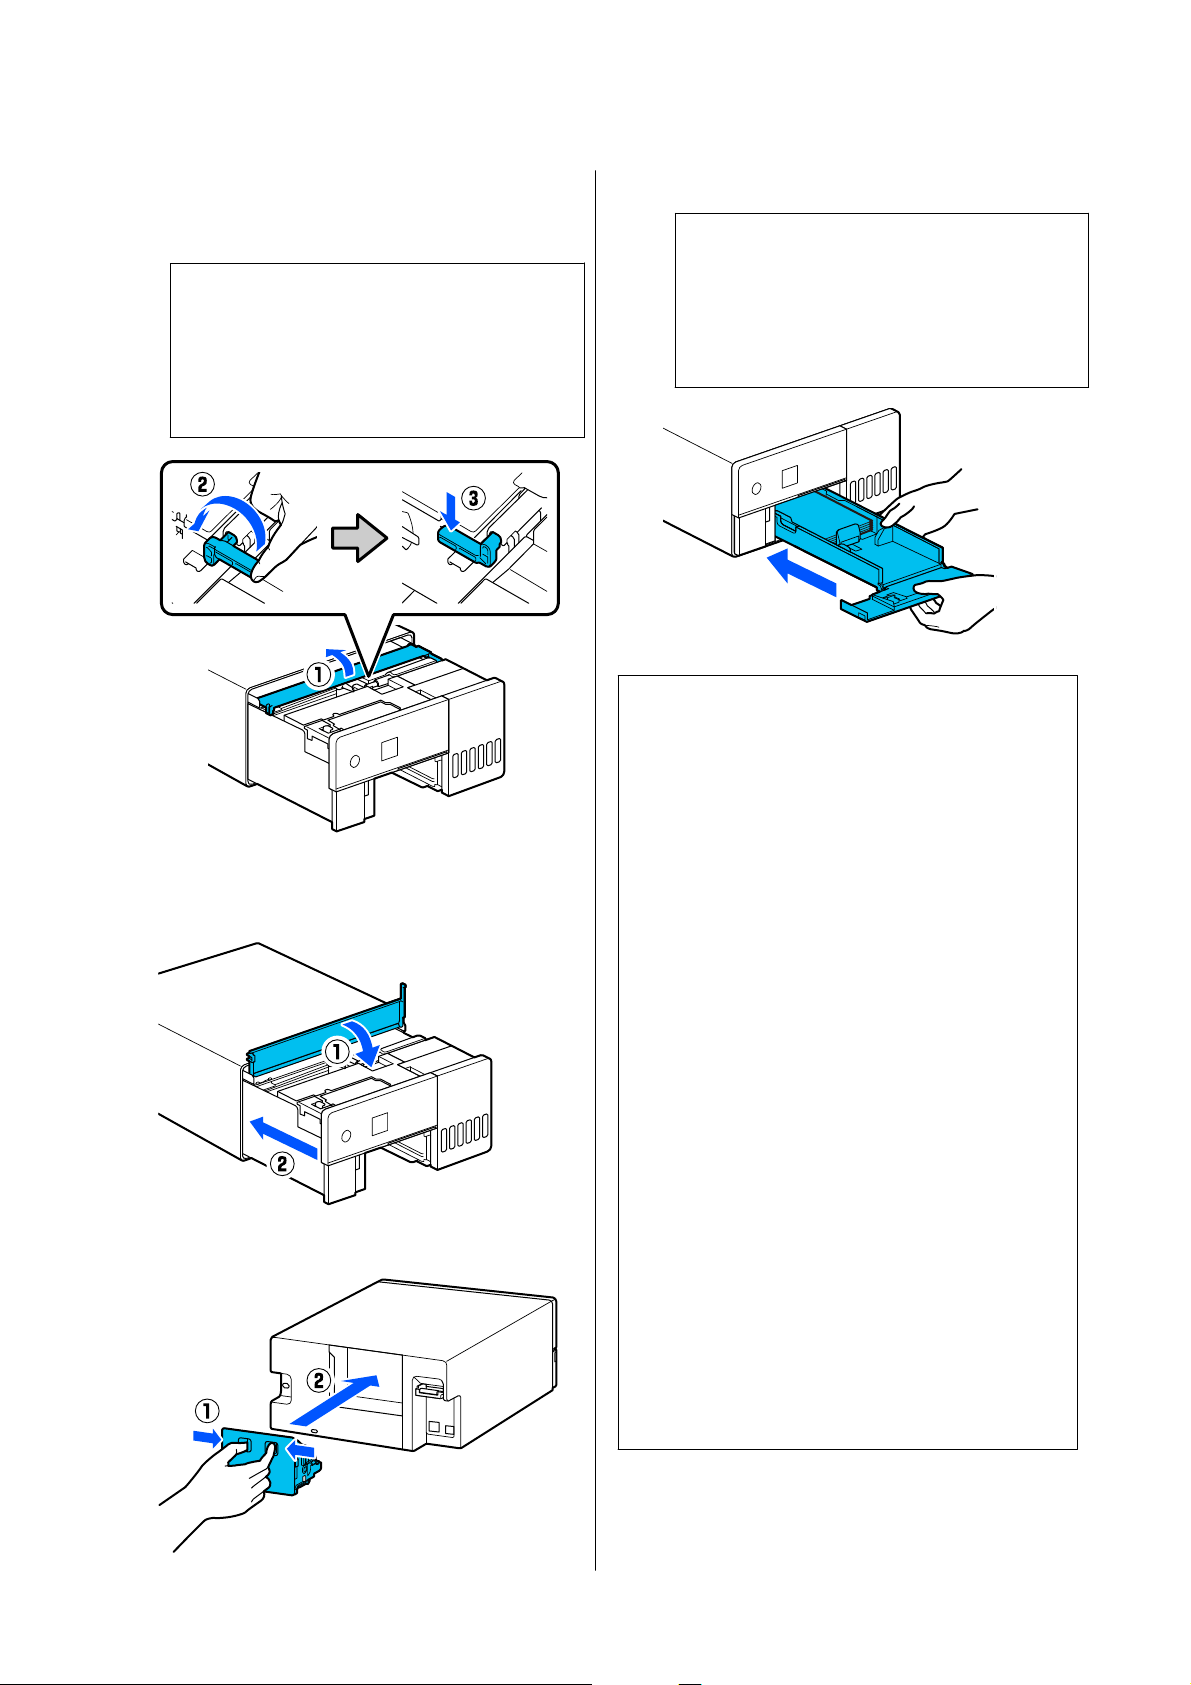
N
Open the inner cover, and set the
transportation lock in the print position, as
shown in the illustration.
c
Important:
After cleaning the Roller Assembly Kit, return
the transportation lock to the printing
position. You cannot print if it is in the
transportation position.
O
Close the inner cover, return the interior of the
printer to its original position.
P
Install the rear cover.
Q
Insert the paper cassette
c
Important:
Use both hands to insert the paper cassette. If
you use only one hand, the paper cassette
may fall and be damaged because the paper
loaded in it is heavy.
Note:
North America
See the Start Here sheet for the procedure to connect
LAN/USB cables to the printer.
If you do not have a Start Here sheet on hand, you can
go to https://www.epson.com/support (U.S.) or https://
www.epson.ca/support (Canada) and search for your
product to view it.
Latin America
See the Start Here sheet for the procedure to connect
LAN/USB cables to the printer.
If you do not have a Start Here sheet on hand, you can
go to https://www.latin.epson.com (Caribbean), https://
www.epson.com.br/suporte (Brazil), or https://
www.latin.epson.com/soporte (other regions) and
search for your product to view it.
Other Regions
See the Setup Guide for the procedure to connect
LAN/USB cables to the printer.
If you do not have a Setup Guide on hand, you can go
to https://epson.sn to select and view one for your
printer model.
You can watch the procedure on video also.
Epson Video Manuals
SL-D500 Series User's Guide
Maintenance
59
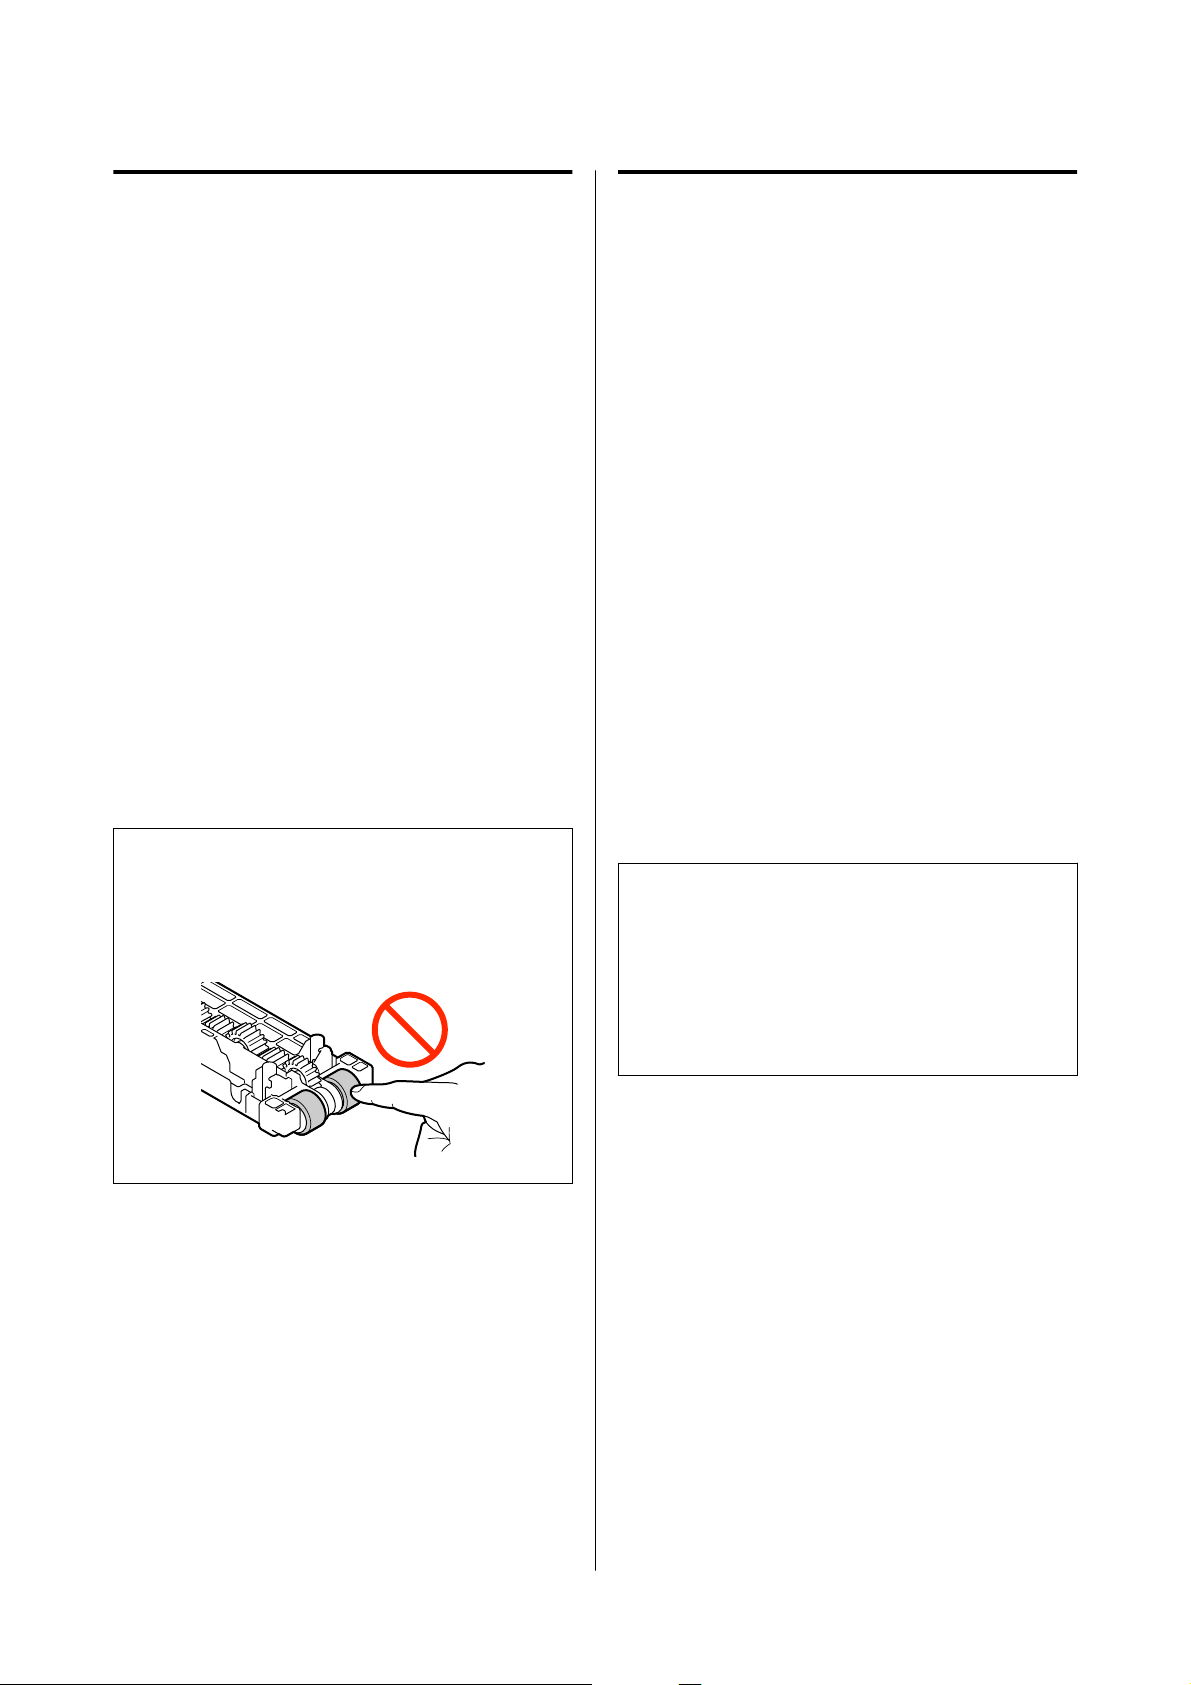
Replacing the Roller Assembly
Kit
When paper feed trouble repeatedly occurs even
though the Roller Assembly Kit has been cleaned
appropriately, replace the Roller Assembly Kit with a
new one.
Removing the Roller Assembly Kit
See steps 1 to 10 in the following section for how to
remove the Roller Assembly Kit.
U “How to Clean the Roller Assembly Kit” on
page 56
Installing the Roller Assembly Kit
See steps 12 to 17 in the following section to install a
new Roller Assembly Kit.
U “How to Clean the Roller Assembly Kit” on
page 56
c
Important:
Do not touch the roller surfaces of the Roller
Assembly Kit. Oil from your skin could stick to
them and make printed materials dirty.
Print Head Nozzle Check
The print head nozzles may be clogged if there are
streaks or scrapes in the printouts or if printed colors
are different from usual.
This section explains how to do a Print Head Nozzle
Check.
Types of Nozzle Checks
There are three methods to check the state of the print
head nozzles, as shown below.
Automatically checking the state of the nozzles
The printer has an auto nozzle check function that
checks the state of the nozzles at a specified interval
and automatically cleans the nozzles if they clog and
uses normal nozzles to compensate for clogged
nozzles while printing. Because of this, you do not
normally need to check the print head nozzles
manually.
The auto nozzle check settings (such as changing the
interval or disabling the function) are set from
Maintenance Tool.
See the following for more details on Maintenance
To ol.
U “Using the Maintenance Tool (Windows)” on
page 64
U “Using the Maintenance Tool (Mac)” on page 78
c
Important:
When checking the state of the nozzles, 1 sheet of
paper is used because the printer prints a check
pattern on the paper that is loaded.
Also, the paper on which the check pattern is
printed could be mixed in with other printouts.
Manually checking the state of the nozzles
You can check the state of the nozzles by executing a
nozzle check from Maintenance Tool, such as before
printing an important job, or if the printer has not
been used for an extended period or the Auto Nozzle
Check function is disabled. By executing a Nozzle
Check, the printer automatically detects clogged
nozzles. Depending on the results of the check, you
can do Print Head Cleaning.
See the following for more details on Maintenance
To ol.
U “Using the Maintenance Tool (Windows)” on
page 64
U “Using the Maintenance Tool (Mac)” on page 78
SL-D500 Series User's Guide
Maintenance
60
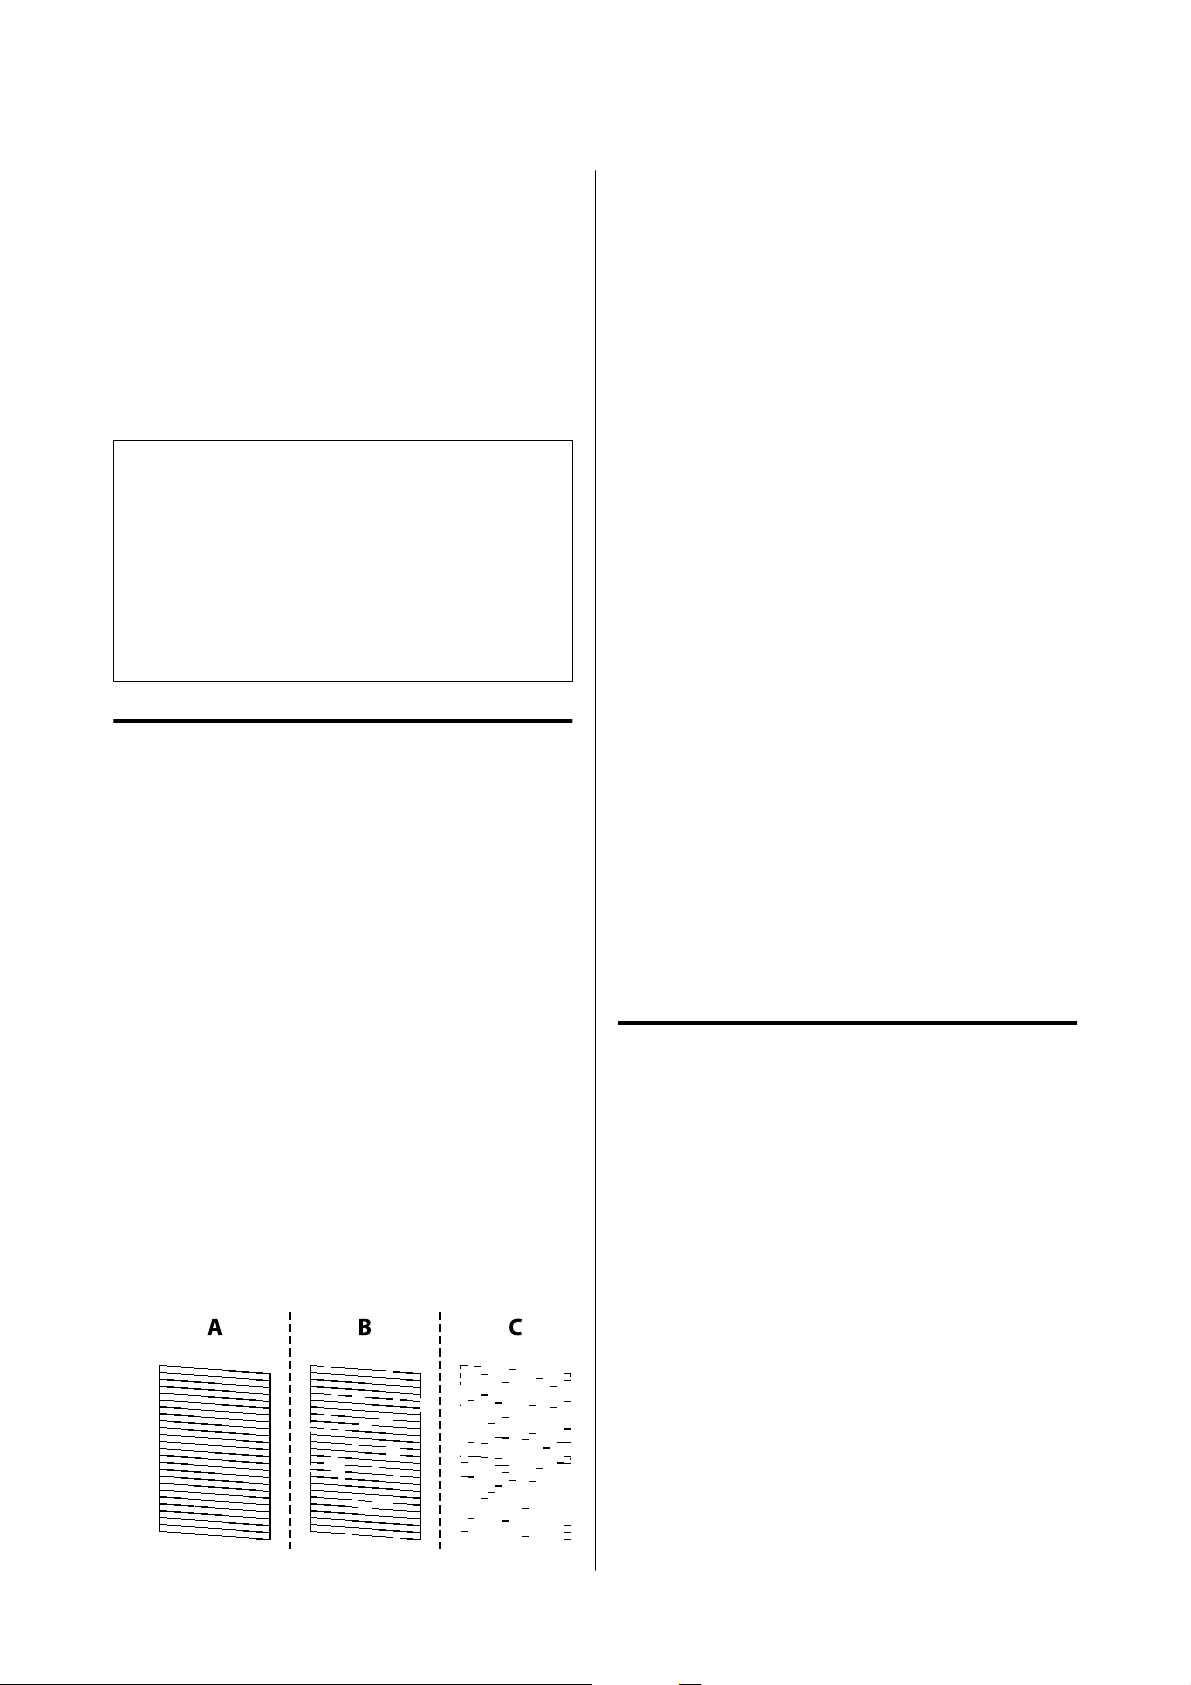
On-Demand Nozzle Pattern
Print a nozzle check pattern when you want to
confirm whether clogged nozzles have been cleared
after Print Head Cleaning or when you want to
confirm the condition of the nozzles visually with a
printed nozzle check pattern.
See the following page for how to print a check pattern
from the printer.
Note:
You can also print a nozzle check pattern from
Maintenance Tool.
See the following for more details on Maintenance Tool.
U “Using the Maintenance Tool (Windows)” on
page 64
U “Using the Maintenance Tool (Mac)” on page 78
How to Print a Nozzle Check
Pattern
A
Load paper in the paper cassette.
U “How to Load Paper” on page 25
B
Select Settings - Maintenance on the home
screen.
To select an item, move the focus to the item
using the u/d/l/r buttons, and then press the
Z button.
C
Select Print Head Nozzle Check.
D
Follow the on-screen instructions to print a
nozzle check pattern.
E
Look at the printed pattern to check for print
head nozzles that are clogged.
❏ Same as A:
All lines are printed. Select No. Print Head
Cleaning is not needed.
❏ Close to B:
Some nozzles are clogged. Select Ye s to
execute Print Head Cleaning.
A confirmation message is displayed when
cleaning is complete. Go to step 6.
❏ Close to C:
If most lines are missing or not printed, this
indicates most nozzles are clogged. Powerful
Cleaning needs to be executed. Select No and
see the following.
U “Powerful Cleaning” on page 62
F
Print a nozzle check pattern to check whether
any nozzles are clogged, and then select Nozzle
Check. Repeat checking and cleaning until all
the lines in the nozzle check pattern are
printed.
If you do not want to print a nozzle check
pattern, select Finish.
If the clogs are not cleared after repeating Print
Head Cleaning about three times, then execute
Powerful Cleaning.
U “Powerful Cleaning” on page 62
Print Head Cleaning
Types of Cleaning
There are two methods of Print Head Cleaning, as
shown below.
Executing Cleaning Automatically
When the auto nozzle check function is enabled, it
checks the state of the nozzles at a specified interval
and if nozzles are clogged, it executes Print Head
Cleaning automatically. Because of this, you do not
need to regularly execute Print Head Cleaning
manually.
The auto nozzle check settings (such as changing the
interval or disabling the function) are set from
Maintenance Tool.
See the following for more details on Maintenance
To ol.
SL-D500 Series User's Guide
Maintenance
61

U “Using the Maintenance Tool (Windows)” on
page 64
U “Using the Maintenance Tool (Mac)” on page 78
Executing Cleaning as Necessary
Execute Print Head Cleaning when the nozzle Check
Pattern has gaps, when there are streaks or scrapes in
the printouts, or if printed colors are different from
usual. Print Head Cleaning can be done from the
printer or Maintenance Tool, but the items that can be
executed vary according to the following table.
Printer menu Maintenance Tool
Print Head Cleaning Forced Cleaning - Normal
Powerful Cleaning Forced Cleaning - Power
- Diagnostic Cleaning -
Normal
Power Ink Flushing -
The following explains about cleaning executed from
the printer.
See the following for details about cleaning executed
from Maintenance Tool.
U “Using the Maintenance Tool (Windows)” on
page 64
U “Using the Maintenance Tool (Mac)” on page 78
Print Head Cleaning (Normal
Cleaning)
Note:
When ink is low, you may not be able to perform
cleaning, so refill the ink in advance.
U “Refilling Ink” on page 51
A
Load paper in the paper cassette.
U “How to Load Paper” on page 25
B
Select Settings - Maintenance on the home
screen.
To select an item, move the focus to the item
using the u/d/l/r buttons, and then press the
Z button.
C
Select Print Head Cleaning.
D
Follow the on-screen instructions to execute
Print Head Cleaning.
A confirmation message is displayed when
cleaning is complete.
E
Print a nozzle check pattern to check whether
any nozzles are clogged, and then select Nozzle
Check. Repeat checking and cleaning until all
the lines in the nozzle check pattern are
printed.
If you do not want to print a nozzle check
pattern, select Finish.
If the clogs are not cleared after repeating Print
Head Cleaning about three times, then execute
Powerful Cleaning.
See the following for more details on Powerful
Cleaning.
Powerful Cleaning
Executing Powerful Cleaning may improve quality in
the following cases.
❏ When most nozzles are clogged.
❏ Clogs are not cleared even after doing Print Head
Cleaning three times
Note:
Powerful Cleaning consumes more ink than Print Head
Cleaning.
A
Load paper in the paper cassette.
U “How to Load Paper” on page 25
B
Select Settings - Maintenance on the home
screen.
C
Select Powerful Cleaning.
SL-D500 Series User's Guide
Maintenance
62

D
Follow the on-screen instructions to execute
Powerful Cleaning.
A confirmation message is displayed when
cleaning is complete.
E
Print a nozzle check pattern to check whether
any nozzles are clogged, and then select Nozzle
Check. Check whether all of the lines in the
nozzle check pattern were printed correctly.
If you do not want to print a nozzle check
pattern, select Finish.
If the clogs are not cleared even after executing
Powerful Cleaning, then do not use the printer
for printing for at least 12 hours. Waiting for
this amount of time may allow the clogged ink
to dissolve.
If that does not improve the situation, execute
Power Ink Flushing.
See the next section for details about Power Ink
Flushing.
Power Ink Flushing
If clogs do not clear after executing Powerful Cleaning
and then not using the printer to print for more than
12 hours, executing Power Ink Flushing may improve
print quality.
Executing Power Ink Flushing replaces all of the ink in
the ink tubes.
c
Important:
❏ Before starting work, visually check that the
ink tank is more than 50% percent full.
Because all of the ink in the ink tubes is
replaced, if you perform this operation with
only a small amount of ink remaining, the ink
may contain bubbles and you will not be able
to print correctly.
❏ You may need to replace the maintenance box.
Ink in the tubes is discharged into the
maintenance box. When the maintenance box
is full, you cannot print until it has been
replaced. We recommend preparing a new
maintenance box in advance.
A
Select Settings - Maintenance on the home
screen.
B
Select Power Ink Flushing.
C
Follow the on-screen instructions to perform
Power Ink Flushing.
A message is displayed when complete.
D
Print a Nozzle Check to confirm whether the
clogged nozzles were cleared.
U “How to Print a Nozzle Check Pattern” on
page 61
If the clogs are not cleared even after executing
Power Ink Flushing, then do not use the printer
for printing for at least 12 hours, and then print
a Nozzle Check again.
If the clogs are not cleared even after doing this,
contact your dealer or Epson Support.
SL-D500 Series User's Guide
Maintenance
63
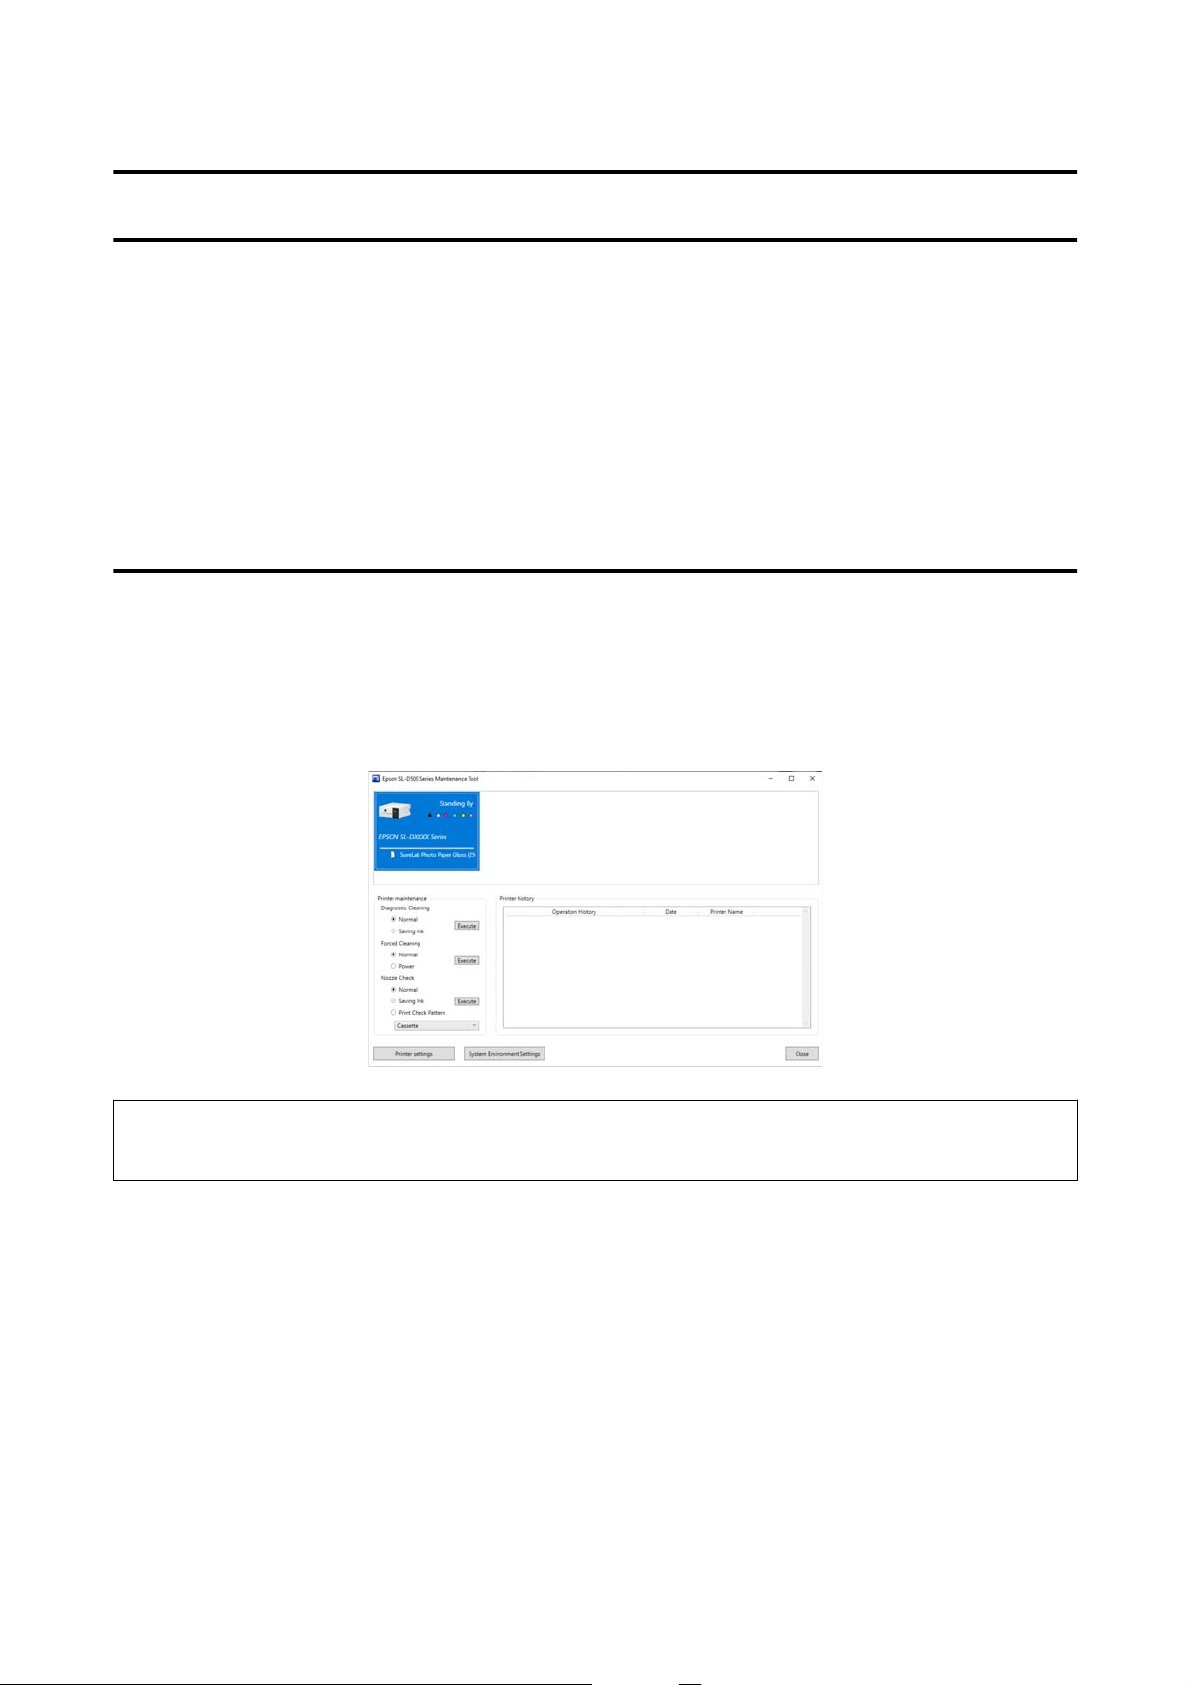
Using the Maintenance Tool (Windows)
This section explains how to use Maintenance Tool by starting it from the computer connected to the printer.
Summary of the Maintenance Tool
From your computer you can perform adjustment and maintenance operations such as checking the printer’s
status, making settings, performing head cleaning and so on.
When multiple printers are connected to a single computer, you can operate multiple printers at one time.
Starting and Closing
Starting
On the computer, click Start - Applications List - EPSON - EPSON SL-D500 Series Maintenance Tool in this
order.
Note:
You can also start it by clicking Maintenance Tool in the Maintenance tab of the printer driver screen.
Closing
Click Close at the bottom-right of the screen.
SL-D500 Series User's Guide
Using the Maintenance Tool (Windows)
64
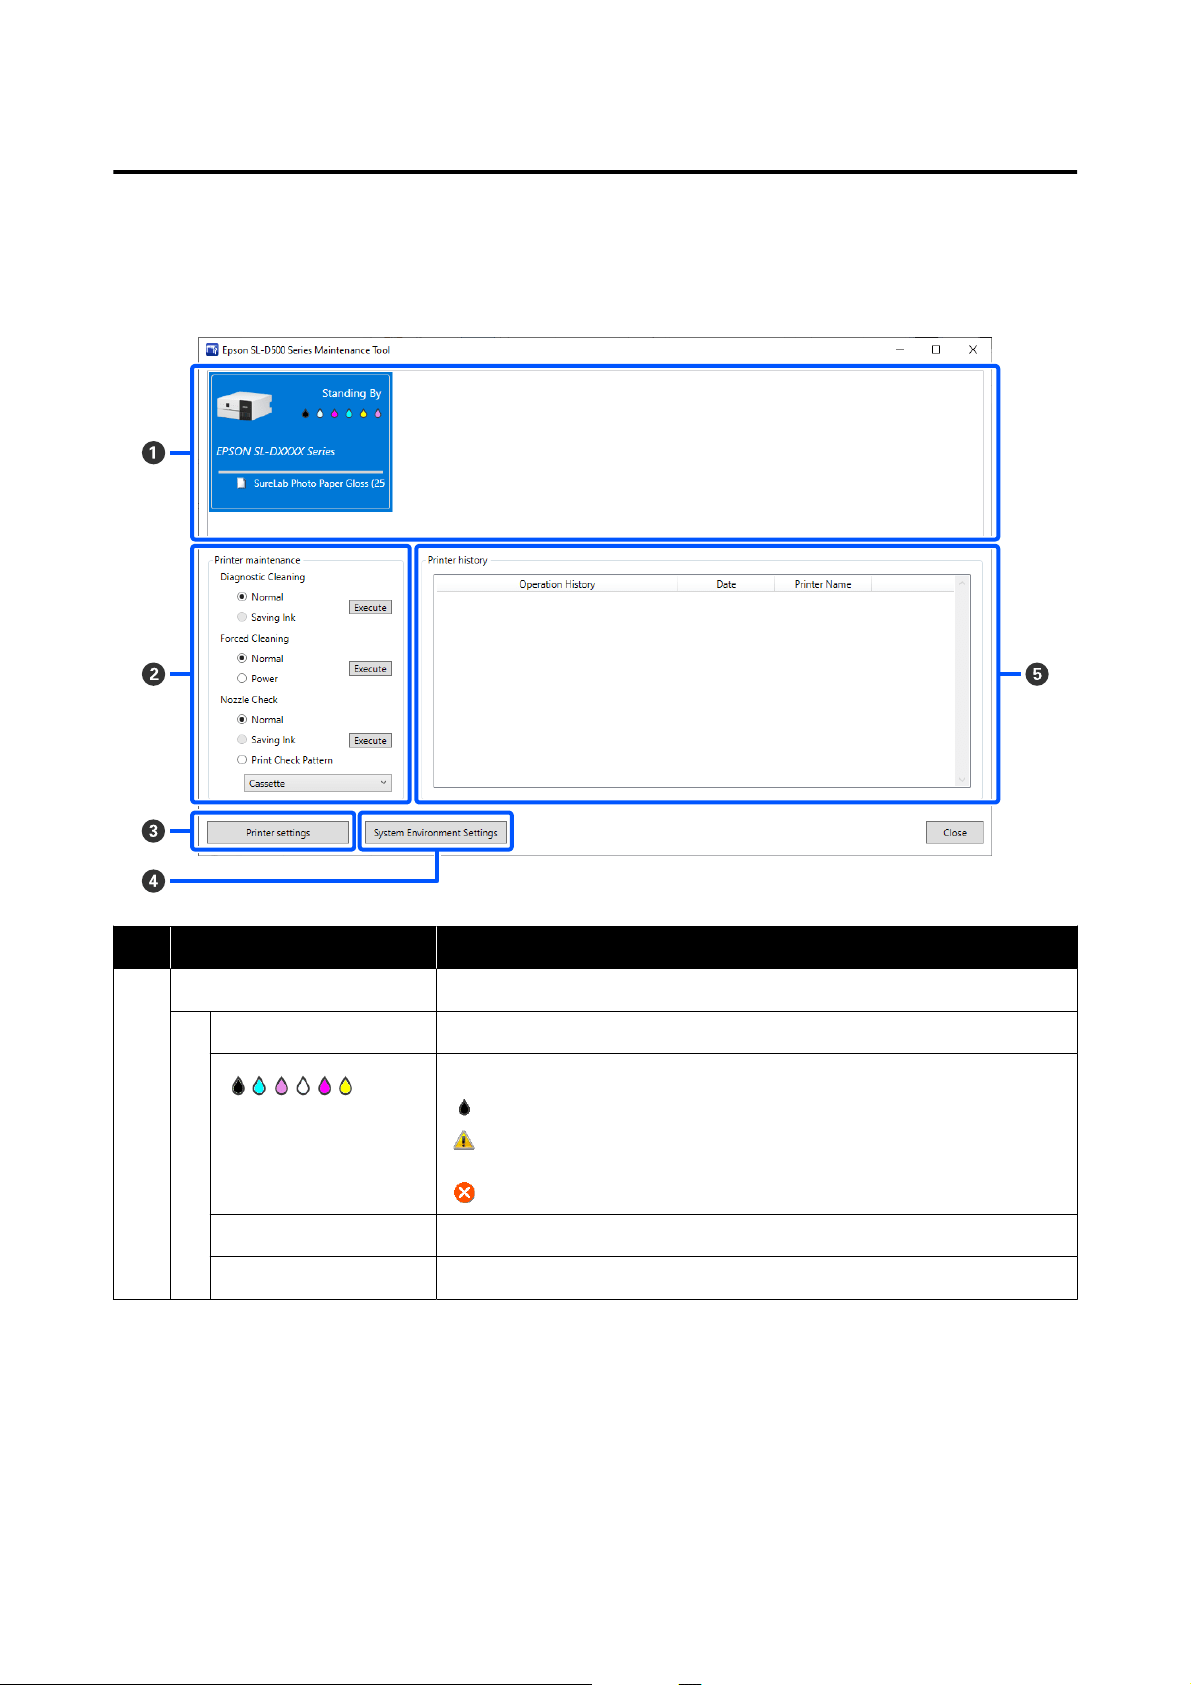
Explanation of the Main Screen
The following main screen appears when you start Maintenance Tool.
The configuration and functions of the main screen are shown below.
Item Functions
A
Printer list area Displays a list of printers that are connected to the computer.
Status Displays the printer’s status.
Displays the ink level for each color. The following is shown for each color of ink.
: No problems with ink levels.
: There is only a little ink remaining, so we recommend filling the ink tank with
ink.
: Remaining ink level is below the minimum value. Fill the ink tank with ink.
Printer Name Displays the printer name.
Paper Type Displays paper type that is currently set.
SL-D500 Series User's Guide
Using the Maintenance Tool (Windows)
65
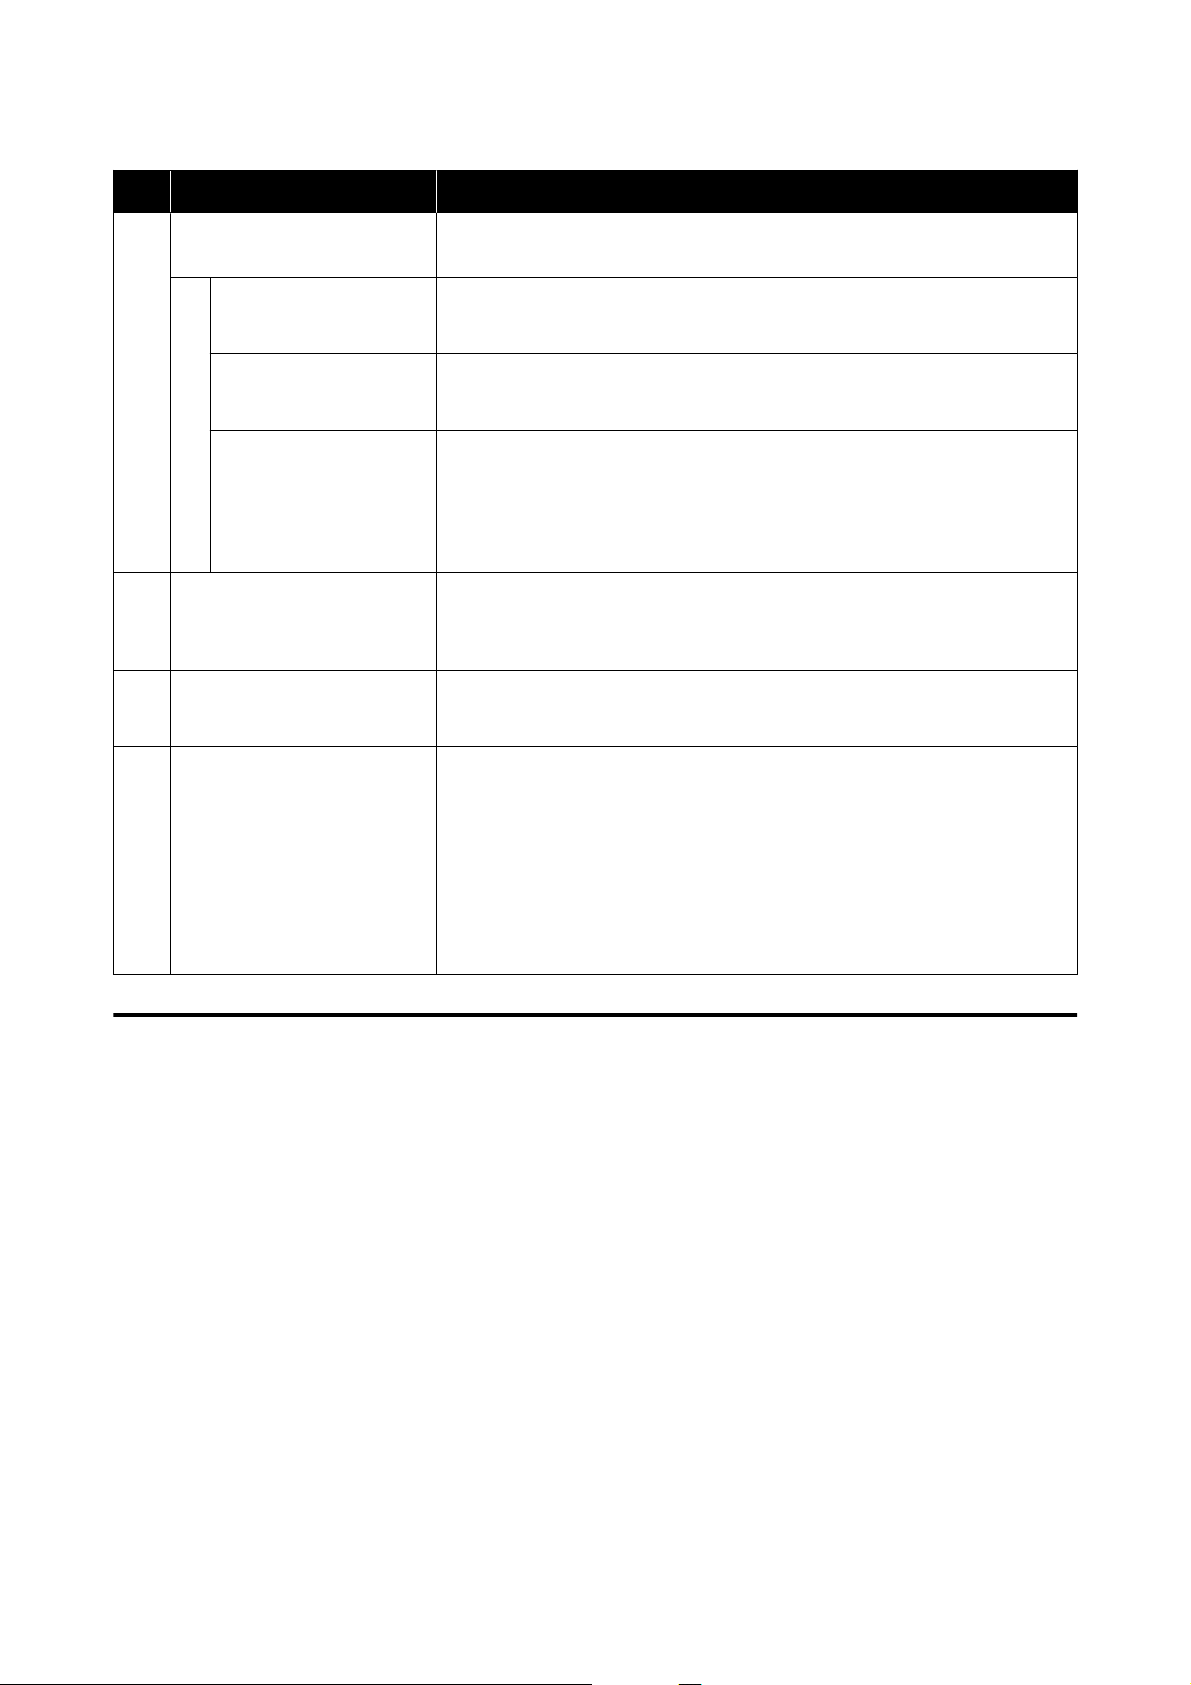
Item Functions
B
Printer maintenance The following maintenance functions can be executed for the printer selected in
the printer list area (A).
Diagnostic Cleaning Detects clogged nozzles and automatically performs cleaning.
U “Diagnostic Cleaning” on page 74
Forced Cleaning Performs manual cleaning.
U “Forced Cleaning” on page 75
Nozzle Check Checks for clogged nozzles.
A nozzle check pattern can also be printed.
U “Nozzle Check Methods” on page 72
U “Print Nozzle Check Pattern Method” on page 73
C
Printer settings button A screen for setting printer operations, Auto Nozzle Check Settings, and adjusting
the printer is displayed.
U “Explanation of the Printer settings” on page 66
D
System Environment Settings
button
A screen for saving log files and status sheets is displayed.
U “Explanation of the System Environment Settings Screen” on page 71
E
Printer history Shows a history of settings and maintenance executed from Maintenance Tool
and information about errors that occur on printers that are connected to the
computer.
This operation history is not retained at the next startup, it is deleted
automatically when you exit Maintenance Tool.
See the following for more details about error information.
U “Message Codes that Appear in Maintenance Tool (Windows Only)” on
page 123
Explanation of the Printer settings
Clicking on Printer settings in the main screen displays the following Printer settings screen.
SL-D500 Series User's Guide
Using the Maintenance Tool (Windows)
66
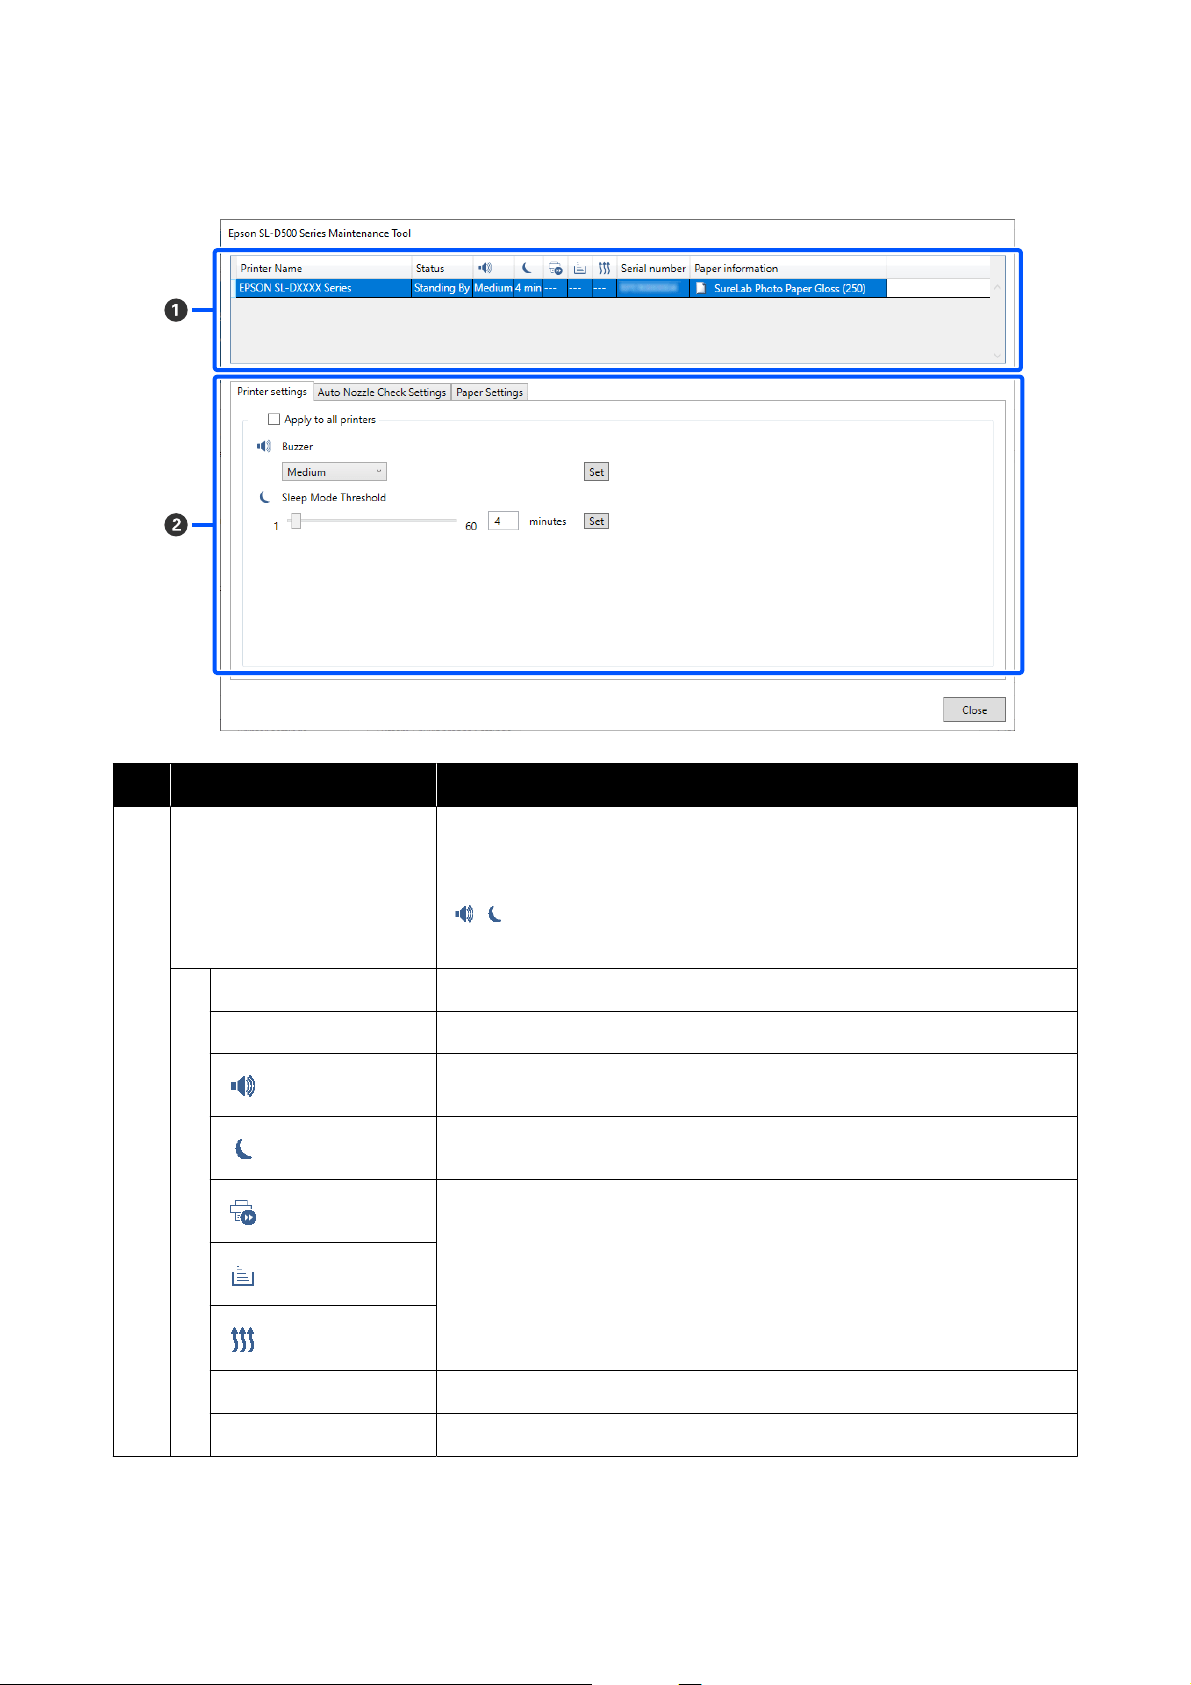
The configuration and functions of the Printer settings screen are shown below.
Item Functions
A
Printer list area Displays a list of printers that are connected to the computer.
The settings of the items indicated by the following icons can be changed in the
Printer settings tab.
,
U “Printer settings tab” on page 68
Printer Name Displays the printer name.
Status Displays the printer’s status.
Indicates the state of the warning buzzer settings.
Indicates the sleep mode threshold.
--- is displayed. This item is not used on the printer.
Serial number Displays the printer’s serial number.
Paper information Displays paper type that is currently set.
SL-D500 Series User's Guide
Using the Maintenance Tool (Windows)
67
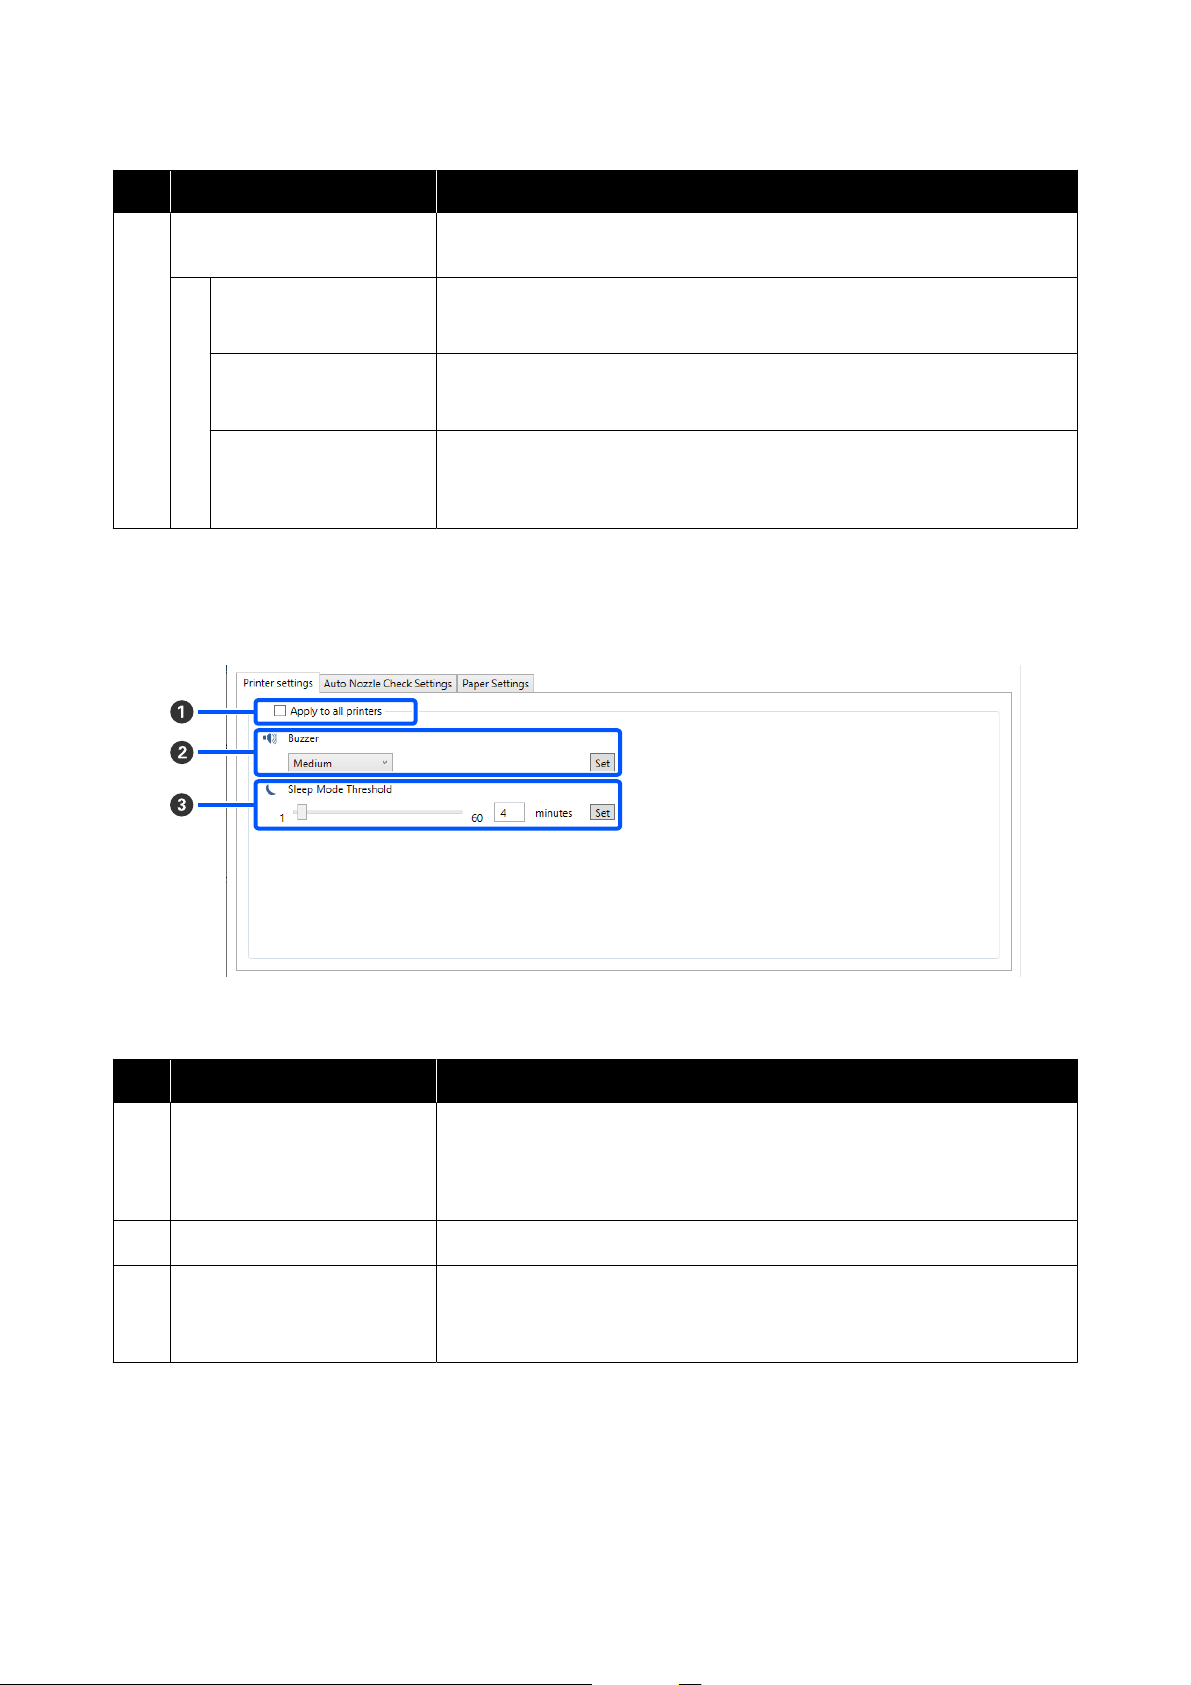
Item Functions
B
Tabs and information display
area
The following three types of tabs are displayed.
Printer settings tab You can set the printer’s various operations.
U “Printer settings tab” on page 68
Auto Nozzle Check
Settings tab
You can set the various settings related to auto nozzle checks.
U “Auto Nozzle Check Settings tab” on page 68
Paper Settings tab You can adjust the printer, such as Print Head Alignment and Paper Feed
Adjustment.
U “Paper Settings tab” on page 70
Printer settings tab
The configuration and functions of the Printer settings tab in the Printer settings screen are shown below.
After changing the settings in items B to C, the changes are applied for each item by clicking Set.
Item Functions
A
Apply to all printers By selecting this, the results of settings changed in B to C are batch applied to
all printers displayed in the printer list area at the top of the screen.
Select this and then change the settings in B to C, and then click Set for each
item.
B
Buzzer Set volume of and whether to sound the warning buzzer.
C
Sleep Mode Threshold Set the time before switching to Sleep Mode.
If an error has not occurred on the printer and no print jobs have been received
for the specified length of time, the printer automatically switches to Sleep Mode.
Auto Nozzle Check Settings tab
In this section you can do advanced settings for auto nozzle check to confirm the state of the nozzles at specified
times so that the nozzles are automatically cleaned if they clog.
SL-D500 Series User's Guide
Using the Maintenance Tool (Windows)
68
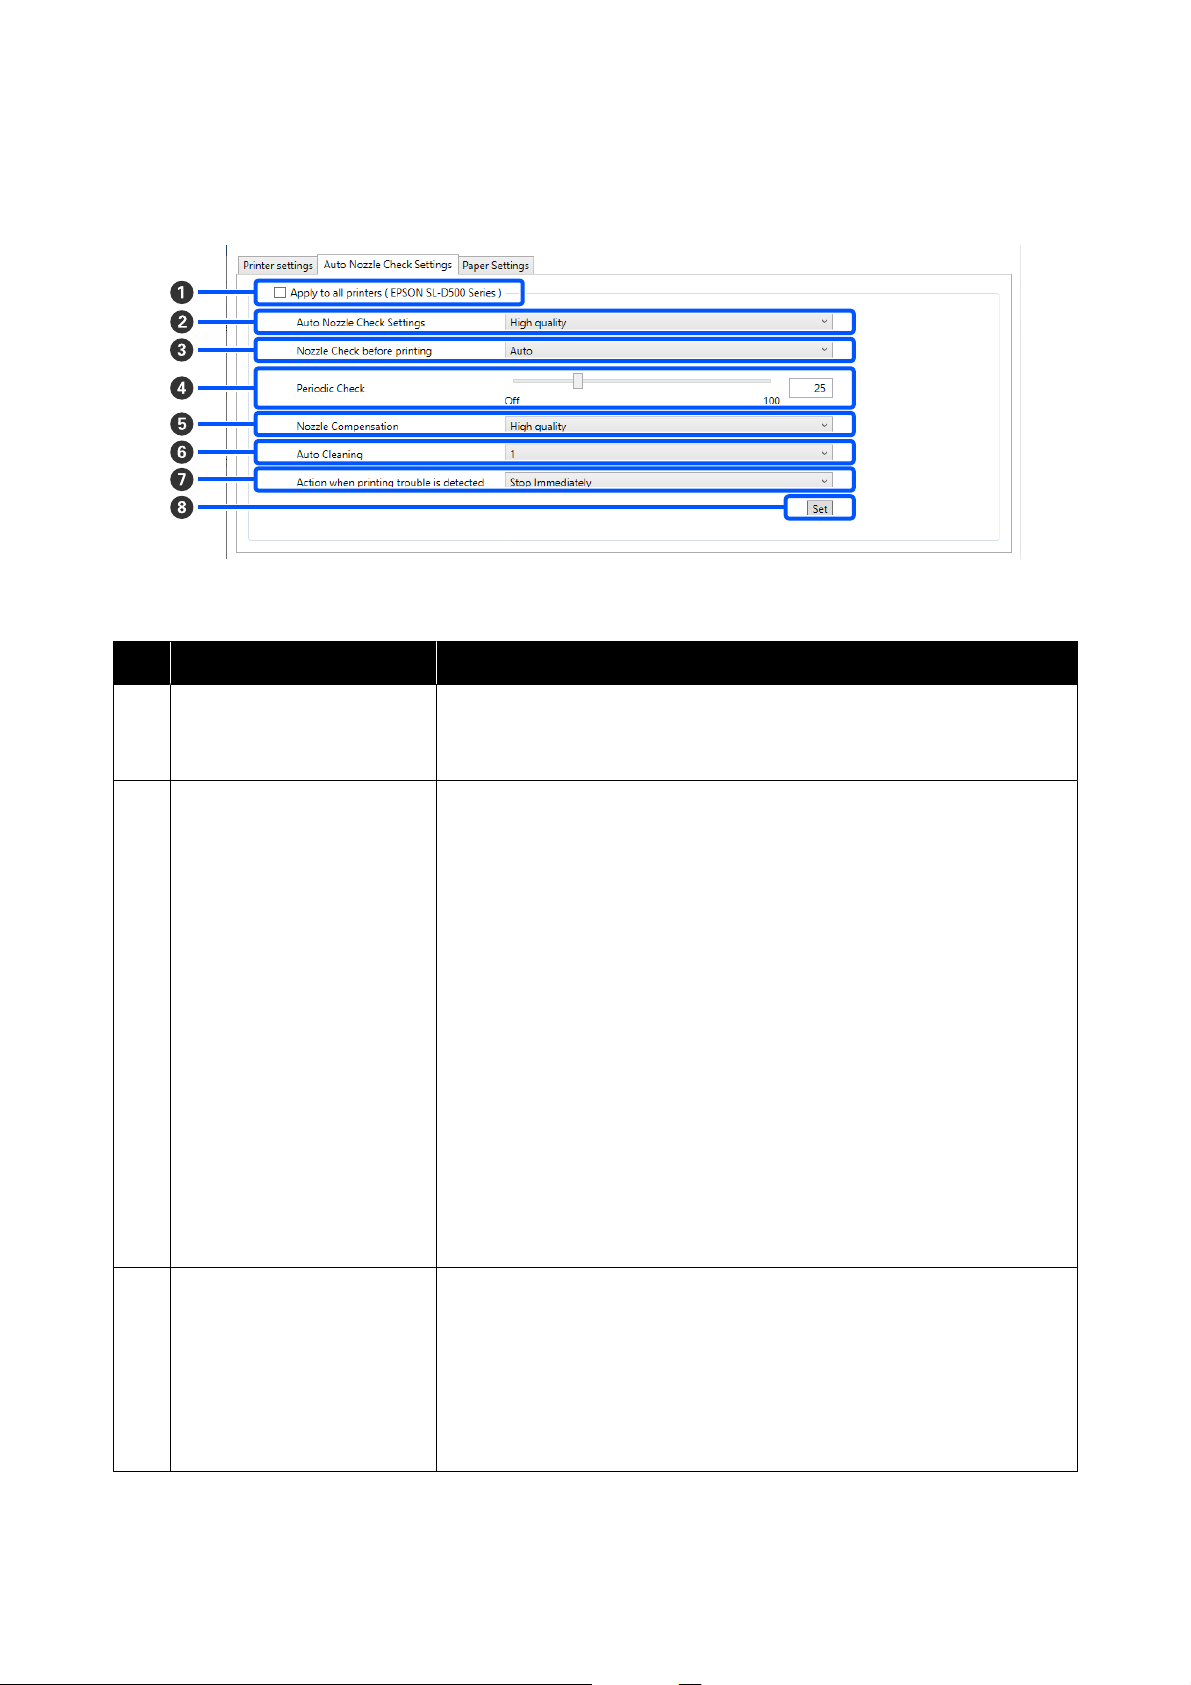
The configuration and functions of the Auto Nozzle Check Settings tab in the Printer settings screen are shown
below.
After changing the settings in items B to G, the changes are applied by clicking Set.
Item Functions
A
Apply to all printers By selecting this, the results of settings changed in B to G are batch applied to
all printers displayed in the printer list area at the top of the screen.
Select this and then change the settings in B to G, and then click Set.
B
Auto Nozzle Check Settings Set the conditions in which an automatic nozzle check is done. Select one of the
following.
❏ High quality
You can print at high print quality because you can execute a Nozzle Check
automatically before printing and stop printing if clogged nozzles are
detected while printing.
You can set all the items from C to G.
❏ Normal
Automatic nozzle check is done less frequently than when High quality is
set.
Nozzle Check before printing (C) and Action when printing trouble is
detected (G) are disabled. Also, you can set more sheets for executing
Periodic Check (D) than the number of sheets when High quality is set.
❏ Off
Nozzles are not checked automatically. Select his when you want to visually
confirm the printed check pattern to confirm the state of the nozzles.
❏ Default
Returns all the settings (B to G) in the Auto Nozzle Check Settings tab to
the manufacturer’s settings.
C
Nozzle Check before printing You can set this when High quality is selected in Auto Nozzle Check Settings
(B).
Set whether to execute auto nozzle check before printing.
When set to Auto, auto Nozzle Check is executed according to the state of the
printer, such as after changing the auto nozzle check settings, or after executing
nozzle cleaning.
When set to Every time, auto nozzle check is executed for each print job.
SL-D500 Series User's Guide
Using the Maintenance Tool (Windows)
69
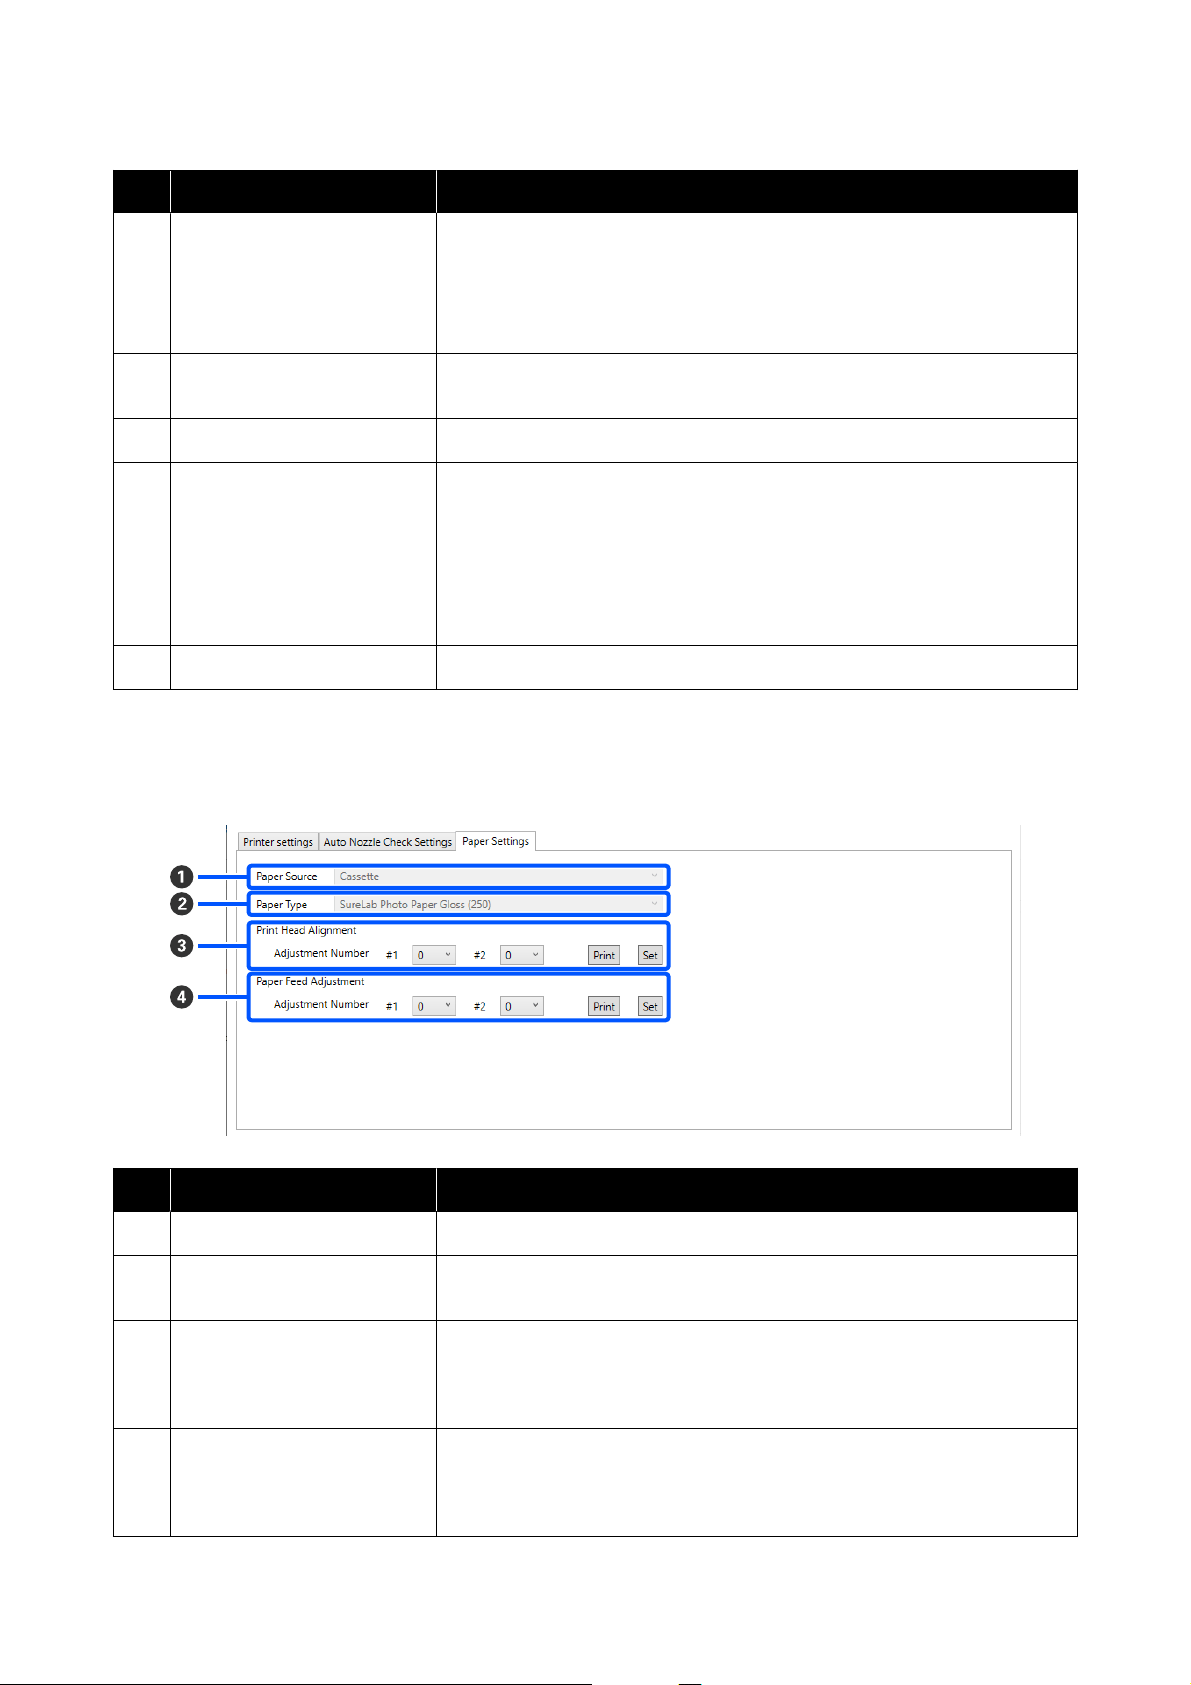
Item Functions
D
Periodic Check Set the time to execute auto nozzle check according to the number of sheets
printed.
If the number of sheets being printed for a single job exceeds the number of
printed sheets set for this item, then the number of sheets for that job is printed,
after which auto nozzle check is executed.
E
Nozzle Compensation Set the print quality for when normal nozzles compensate for the ink that could
not be ejected by clogged nozzles.
F
Auto Cleaning Sets the number of times to do auto cleaning when clogged nozzles are detected.
G
Action when printing trouble is
detected
You can set this when High quality is selected in Auto Nozzle Check Settings
(B).
Sets whether to stop printing when clogged nozzles are detected.
When set to Stop Immediately, printing is stopped when clogged nozzles are
detected.
When set to Ignore, printing is continued even if clogged nozzles are detected.
H
Set button Clicking this reflects the changes to each item B to G.
Paper Settings tab
The configuration and functions of the Paper Settings tab in the Printer settings screen are shown below.
Item Functions
A
Paper Source Usually Cassette is displayed.
B
Paper Type Shows the type of paper loaded in the printer selected in the printer list area at
the top of the screen.
C
Print Head Alignment Corrects print head misalignments when printing.
See the following for details on Print Head Alignment.
U “Print Head Alignment Method” on page 76
D
Paper Feed Adjustment Adjusts the amount of paper feed.
See the following for details on Paper Feed Adjustment.
U “Paper Feed Adjustment Method” on page 76
SL-D500 Series User's Guide
Using the Maintenance Tool (Windows)
70
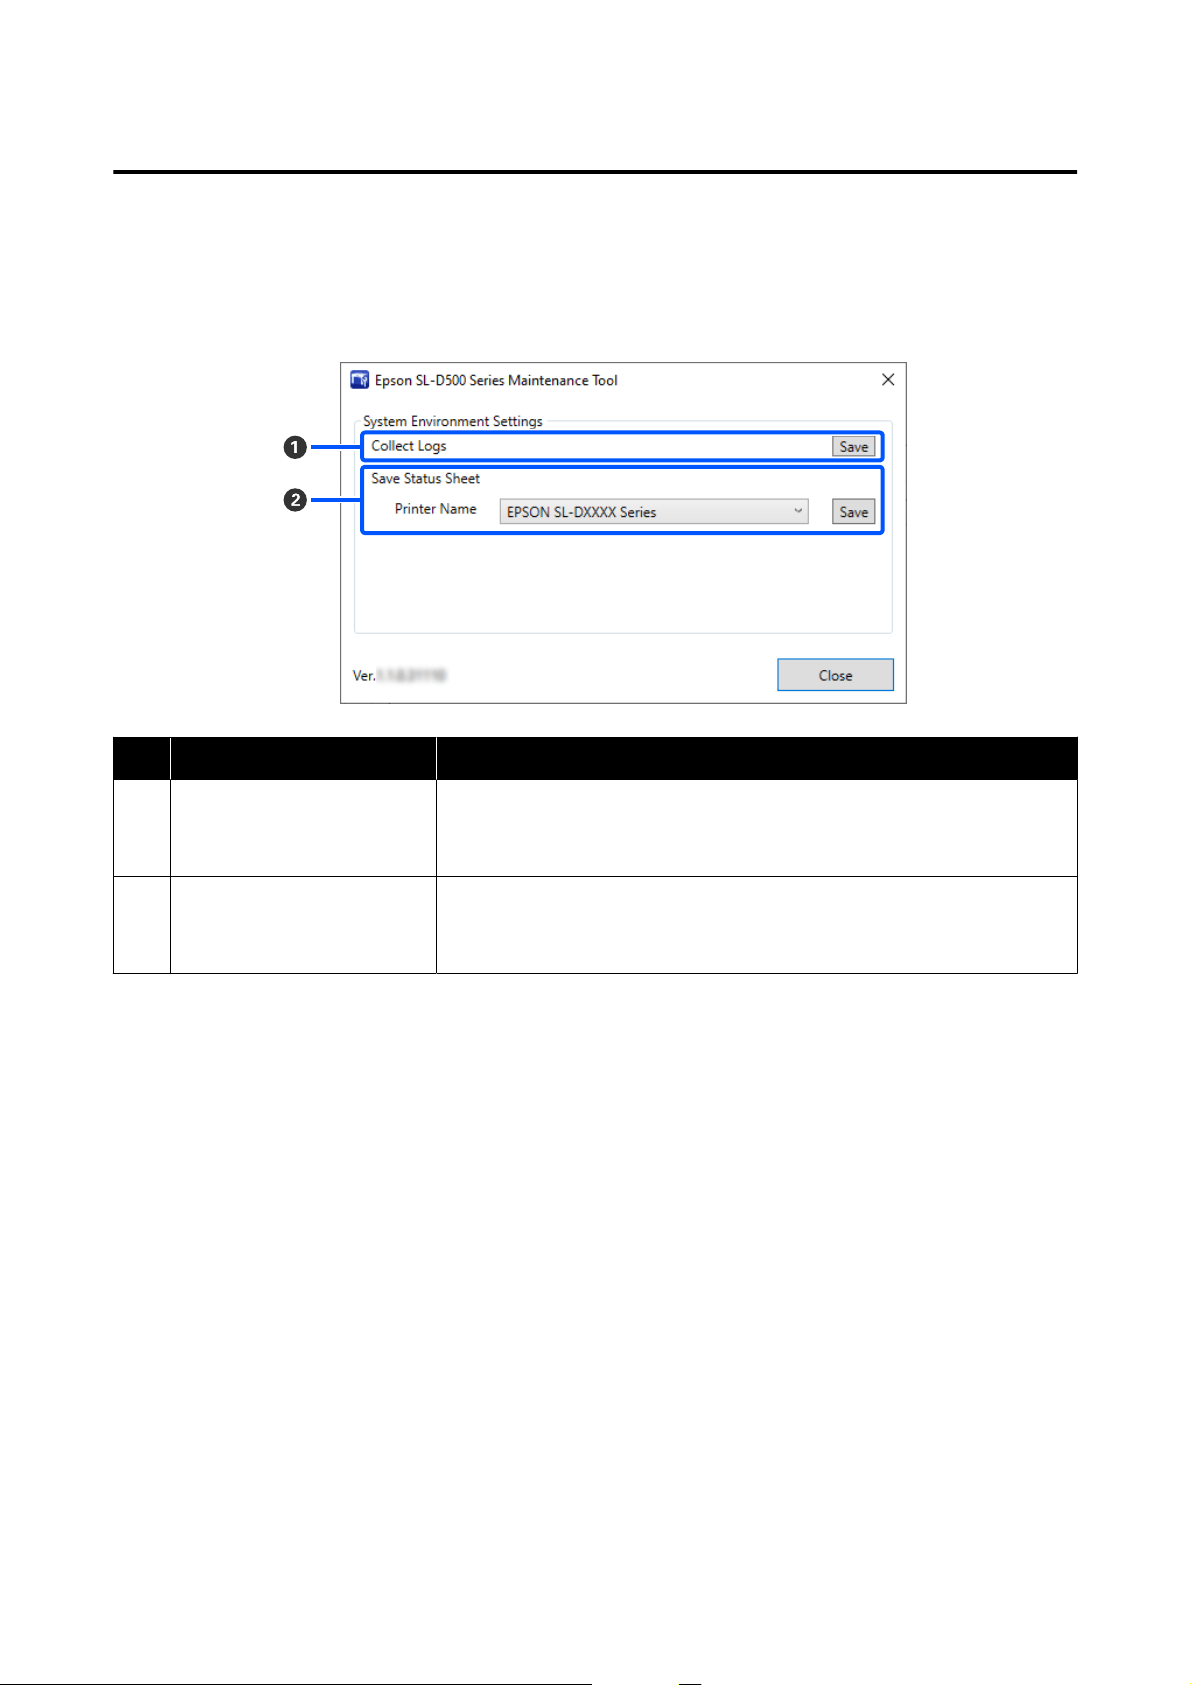
Explanation of the System Environment Settings Screen
Clicking on System Environment Settings in the main screen displays the following System Environment Settings
screen.
The configuration and functions of the System Environment Settings screen are shown below.
Item Functions
A
Collect Logs Clicking Save saves log files saved on the printer to the desktop of the computer.
The following shows the file name.
Epson SL-D500 Series_<saved date>.zip
B
Save Status Sheet Select a printer in Printer Name, and then click Save to save a status sheet of the
selected printer to a PDF file.
You can change the file name and where the file is saved.
SL-D500 Series User's Guide
Using the Maintenance Tool (Windows)
71

Printer Maintenance
You need to perform print head maintenance if there
are problems in the printed results, such as streaks or
scrapes in the printouts or if printed colors are
different from usual.
Maintenance Operations
Maintenance Tool has the following functions to keep
the print head in good condition and to get the best
print results.
Carry out appropriate maintenance depending on the
print results and situation.
Auto Nozzle Check
By enabling this setting, an auto nozzle check function
checks the state of the nozzles at a specified interval
and automatically cleans the nozzles if they clog and
uses normal nozzles to compensate for clogged
nozzles while printing.
You can change the conditions to execute a nozzle
check and the timing for nozzle checks in Auto Nozzle
Check. You can also disable this setting so nozzles are
not checked automatically.
U “Auto Nozzle Check Settings tab” on page 68
c
Important:
When checking the state of the nozzles, 1 sheet of
paper is used because the printer prints a check
pattern on the paper that is loaded.
Also, the paper on which the check pattern is
printed could be mixed in with other printouts.
Manual Nozzle Check
You can check the state of the nozzles by executing a
nozzle check, such as before printing an important job,
or if the printer has not been used for an extended
period or if Auto Nozzle Check is disabled. The
printer automatically detects clogged nozzles.
Depending on the results of the check, you can do
Print Head Cleaning.
U “Nozzle Check Methods” on page 72
Print Nozzle Check Pattern
Print a nozzle check pattern when you want to
confirm whether clogged nozzles have been cleared
after cleaning the print head or when you want to
confirm the condition of nozzles visually with a
printed nozzle check pattern.
U “Print Nozzle Check Pattern Method” on
page 73
Print Head Cleaning
Do this when the nozzle Check Pattern has gaps, when
there are streaks or scrapes in the printouts, or if
printed colors are different from usual. This function
clears clogged nozzles.
There are two types, Forced Cleaning, which is
cleaning the print head manually, and Diagnostic
Cleaning, which detects clogged nozzles and cleans
the print head automatically.
U “Print Head Cleaning Method” on page 74
Print Head Alignment
If the print results appear grainy or out of focus,
perform Print Head Alignment. The Print Head
Alignment function corrects print head
misalignments when printing.
U “Print Head Alignment Method” on page 76
Paper Feed Adjustment
Execute this when streaks and unevenness that occur
in print results are not improved even though print
head cleaning was executed.
U “Paper Feed Adjustment Method” on page 76
Nozzle Check Methods
Prints a check pattern on the paper and automatically
checks the state of the nozzles. Paper must be loaded
in the printer.
A
Load paper in the paper cassette.
U “How to Load Paper” on page 25
SL-D500 Series User's Guide
Using the Maintenance Tool (Windows)
72
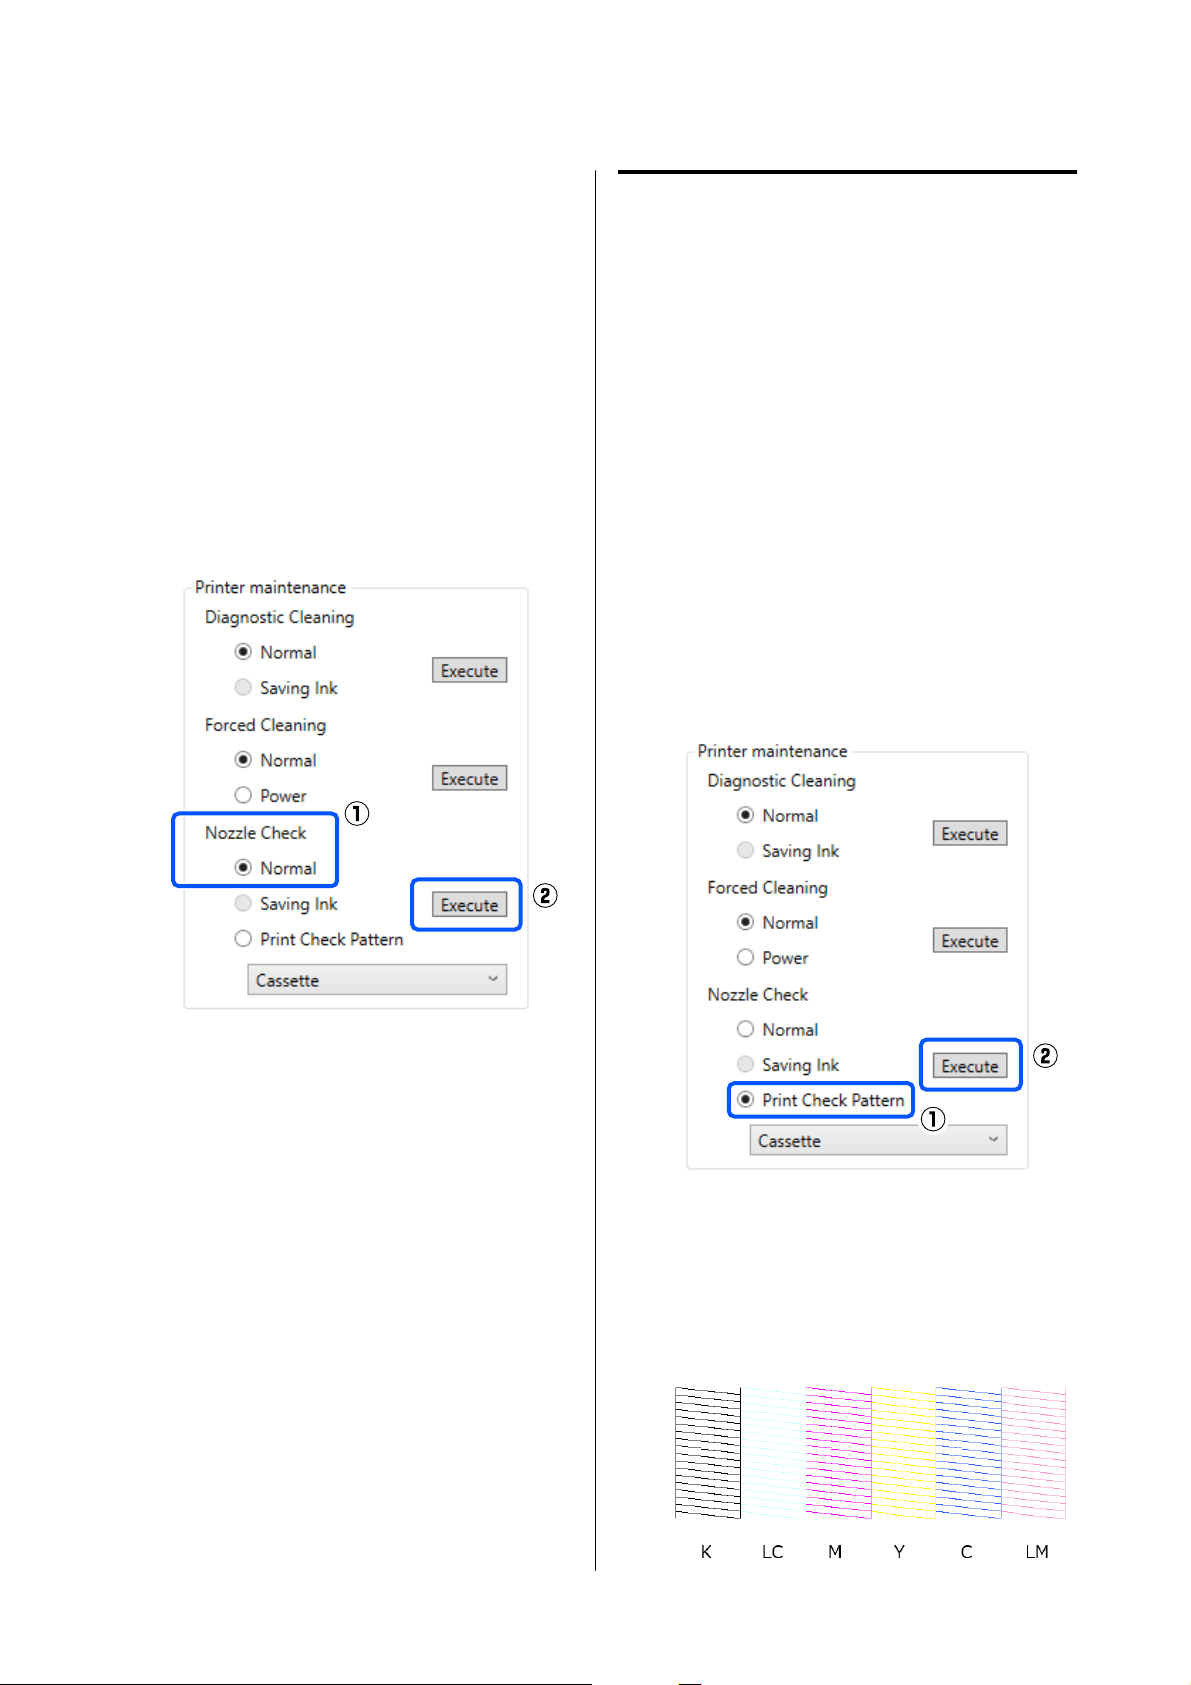
B
Select a printer, in the printer list area on the
main screen, on which to execute a nozzle
check.
When you select multiple printers, press and
hold Ctrl as you select the targeted printers.
See the following for more details on the main
screen.
U “Explanation of the Main Screen” on
page 65
C
In Printer maintenance - Nozzle Check, select
Normal, and then click Execute.
Saving Ink cannot be selected.
Nozzle check is executed.
D
Check the results of nozzle checks in the
message displayed in Printer history.
When "<Printer name>-Nozzle Check is
complete." is displayed, the work is complete.
When “Clogged nozzles detected. Perform
[Forced Cleaning].” is displayed, execute
Forced Cleaning.
U “Forced Cleaning” on page 75
Perform Print Check Pattern to check the
condition of the nozzles.
U “Print Nozzle Check Pattern Method” on
page 73
Print Nozzle Check Pattern
Method
A
Load paper in the paper cassette.
U “How to Load Paper” on page 25
B
Select a printer, in the printer list area on the
main screen, on which to print a nozzle check
pattern.
When you select multiple printers, press and
hold Ctrl as you select the targeted printers.
See the following for more details on the main
screen.
U “Explanation of the Main Screen” on
page 65
C
In Printer maintenance - Nozzle Check, select
Print Check Pattern, and click Execute.
The check pattern is printed.
D
Review the printed check pattern while
referring to the following section.
Example of clean nozzles
SL-D500 Series User's Guide
Using the Maintenance Tool (Windows)
73
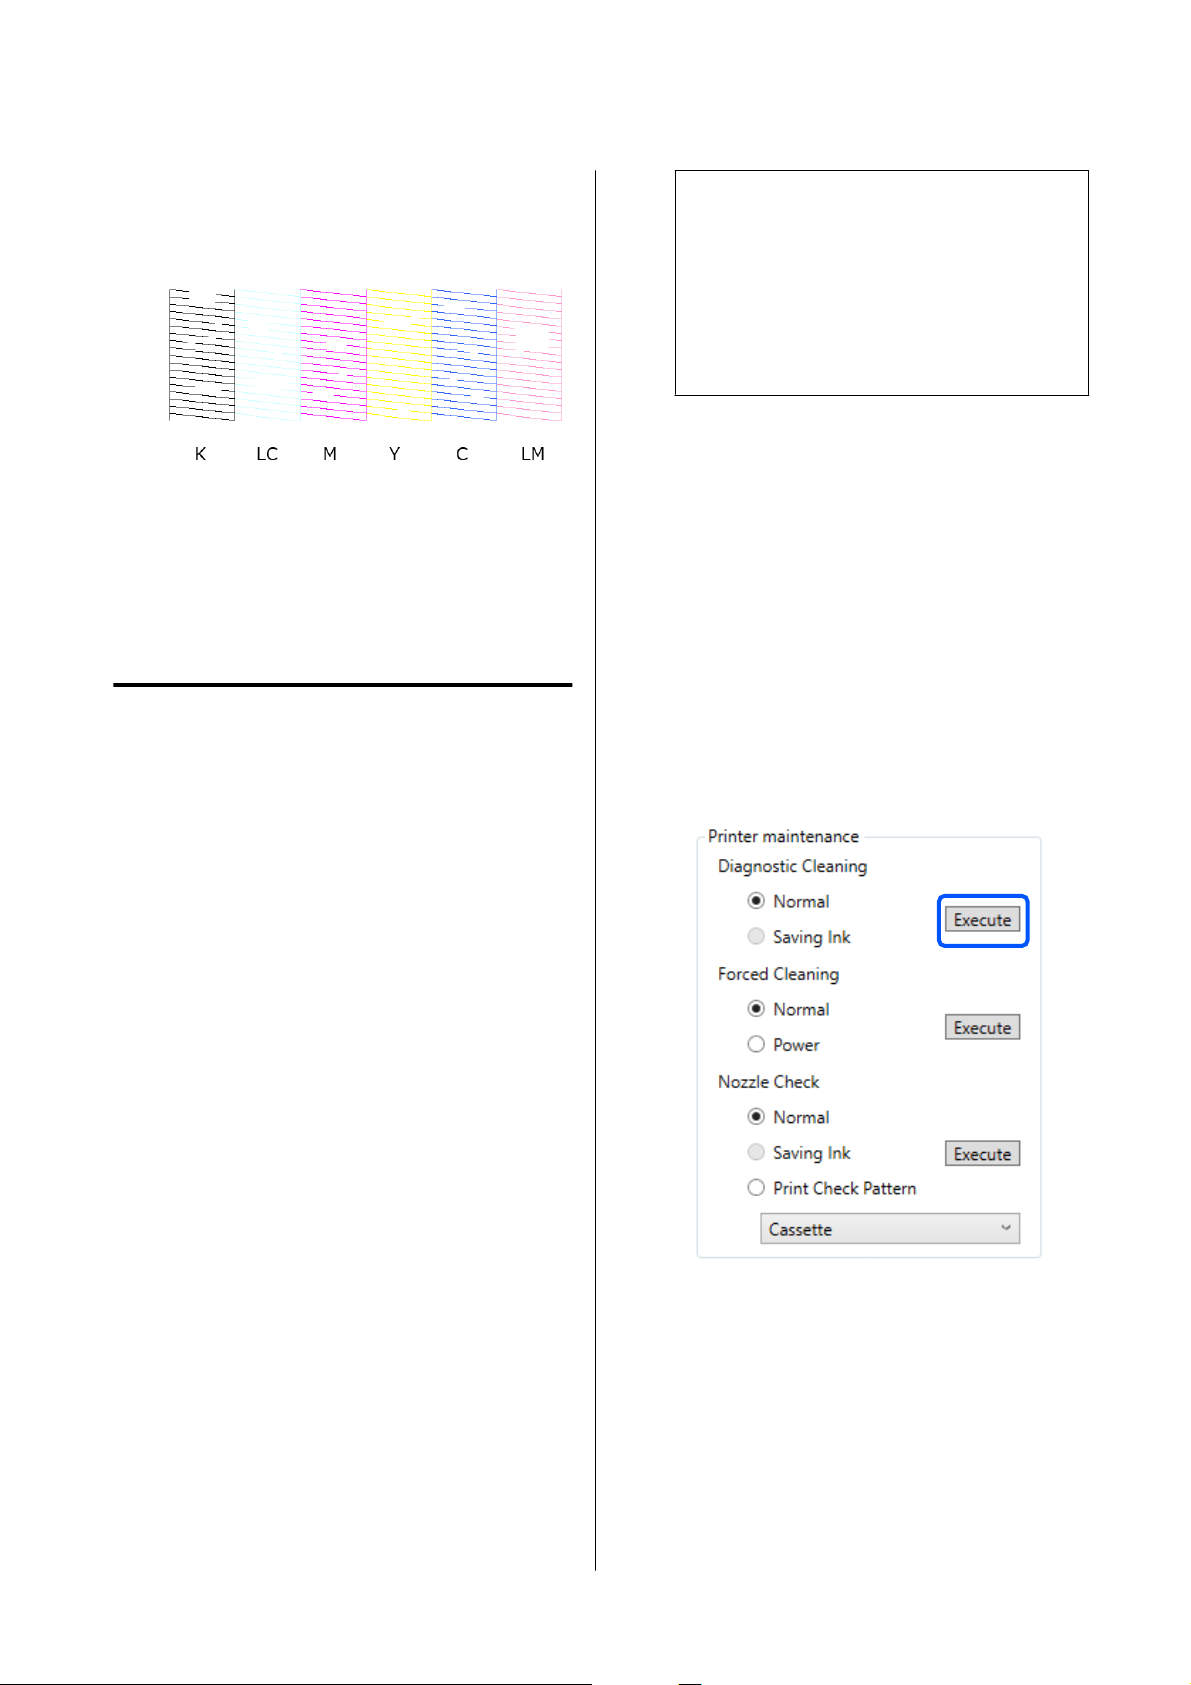
If none of the check pattern is missing, then the
print head nozzles are not clogged.
Example of clogged nozzles
If part of the pattern is missing, then the print
head nozzles are clogged. The print head needs
to be cleaned.
U “Print Head Cleaning Method” on
page 74
Print Head Cleaning Method
Types of Cleaning and Order of
Implementation
There are two types of cleaning, Forced Cleaning,
which is cleaning the print head manually, and
Diagnostic Cleaning, which detects clogged nozzles
and cleans the print head automatically.
First, implement Diagnostic Cleaning.
After doing that, when “Clogged nozzles detected.
Perform [Forced Cleaning].” is displayed in Printer
history on the main screen, implement Diagnostic
Cleaning.
If the clogged nozzles are not cleared after repeating
Diagnostic Cleaning three times, then do Forced
Cleaning set to Power.
Diagnostic Cleaning
Prints a check pattern on the paper and automatically
checks the state of the nozzles. Paper must be loaded
in the printer.
A
Load more than 2 sheets of paper in the paper
cassette.
U “How to Load Paper” on page 25
Note:
Diagnostic Cleaning uses 1 sheet of paper each
time for the following.
❏ During Nozzle Check immediately after
clicking Execute in step 3
❏ When checking nozzles after cleaning when
cleaning was executed
B
Select a printer, in the printer list area on the
main screen, on which to execute cleaning.
When you select multiple printers, press and
hold Ctrl as you select the targeted printers.
See the following for more details on the main
screen.
U “Explanation of the Main Screen” on
page 65
If an error is displayed for the printer you want
to select, clear the error before selecting it.
C
In Printer maintenance - Diagnostic
Cleaning, click Execute.
The nozzle check starts and cleaning is
executed if necessary.
The time needed for cleaning varies according
to the status of the nozzles.
SL-D500 Series User's Guide
Using the Maintenance Tool (Windows)
74
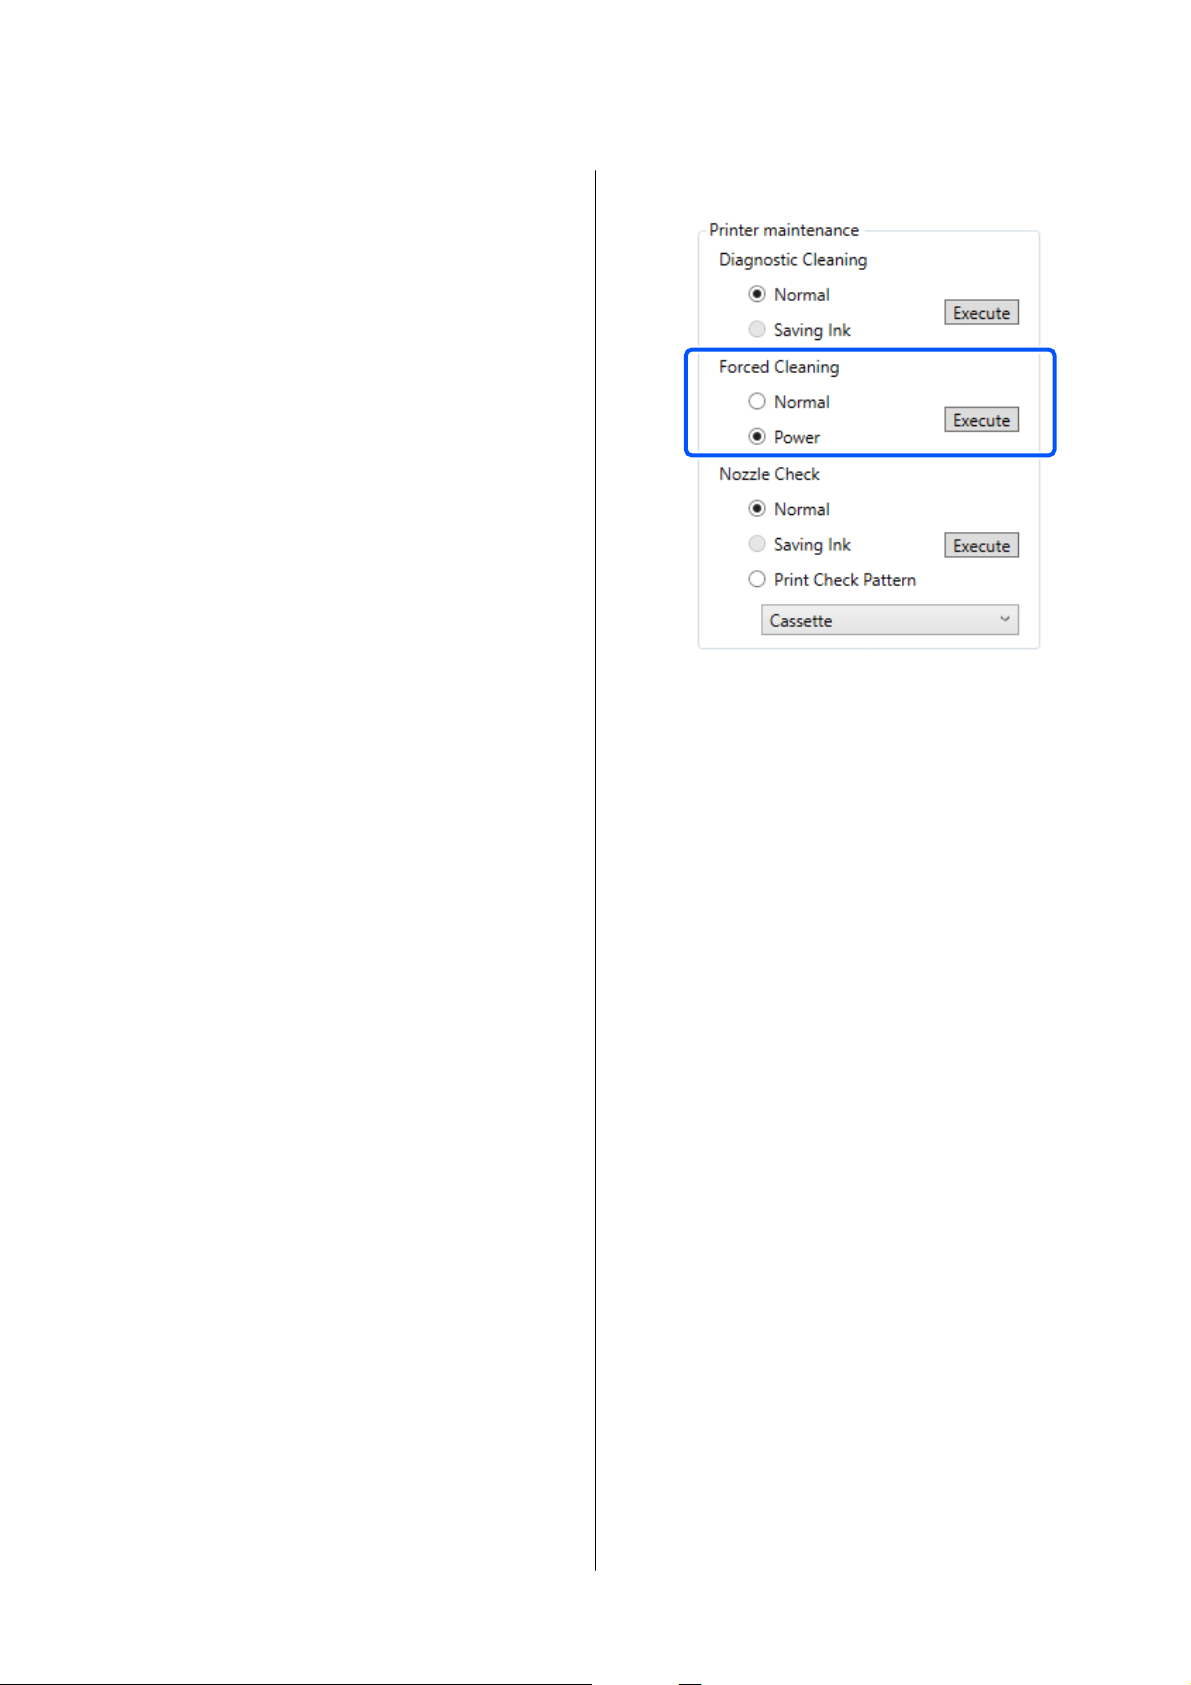
D
Check the results of Diagnostic Cleaning in the
message displayed in Printer history.
When “Clogged nozzles detected. Perform
[Forced Cleaning].” is displayed, execute
Diagnostic Cleaning again.
If "Auto Nozzle Check has failed." is displayed,
contact your dealer or Epson Support.
If the clogged nozzles are not cleared after
repeating Diagnostic Cleaning three times,
then execute Forced Cleaning set to Power.
U “Forced Cleaning” on page 75
Forced Cleaning
A
Select a printer, in the printer list area on the
main screen, on which to execute cleaning.
When you select multiple printers, press and
hold Ctrl as you select the targeted printers.
See the following for more details on the main
screen.
U “Explanation of the Main Screen” on
page 65
If an error is displayed for the printer you want
to select, clear the error before selecting it.
B
In Printer maintenance - Forced Cleaning,
select Normal or Power, and then click
Execute.
Select Normal to clean the surface of the print
head and to clear clogged nozzles.
Power cleans more powerfully than Normal.
Use this setting if the nozzles are still clogged
even after repeating Normal cleaning several
times. Power consumes more ink than Normal
cleaning. If a message is displayed informing
you that here is not enough ink remaining,
refill the ink tank and then execute.
U “Refilling Ink” on page 51
Cleaning is executed.
Cleaning may take some time depending on the
selected cleaning level.
When cleaning is complete, the results are
displayed in Printer history.
C
Check the results of Forced Cleaning.
There are the following two ways to check the
cleaning results.
❏ Execute a nozzle check to check for clogged
nozzles.
U “Nozzle Check Methods” on page 72
❏ Print a nozzle check pattern to check for
clogged nozzles.
U “Print Nozzle Check Pattern Method” on
page 73
If the clogged nozzles are not cleared by
executing Normal cleaning, execute Normal
cleaning again. If the clogged nozzles are not
cleared even by repeating this several times,
execute Power cleaning.
If the clogged nozzles are not cleared even after
executing cleaning at Power, then do not use
the printer for printing for at least 12 hours.
Waiting for this amount of time may allow the
clogged ink to dissolve.
If that does not improve the situation, execute
Power Ink Flushing from the printer’s control
panel.
SL-D500 Series User's Guide
Using the Maintenance Tool (Windows)
75
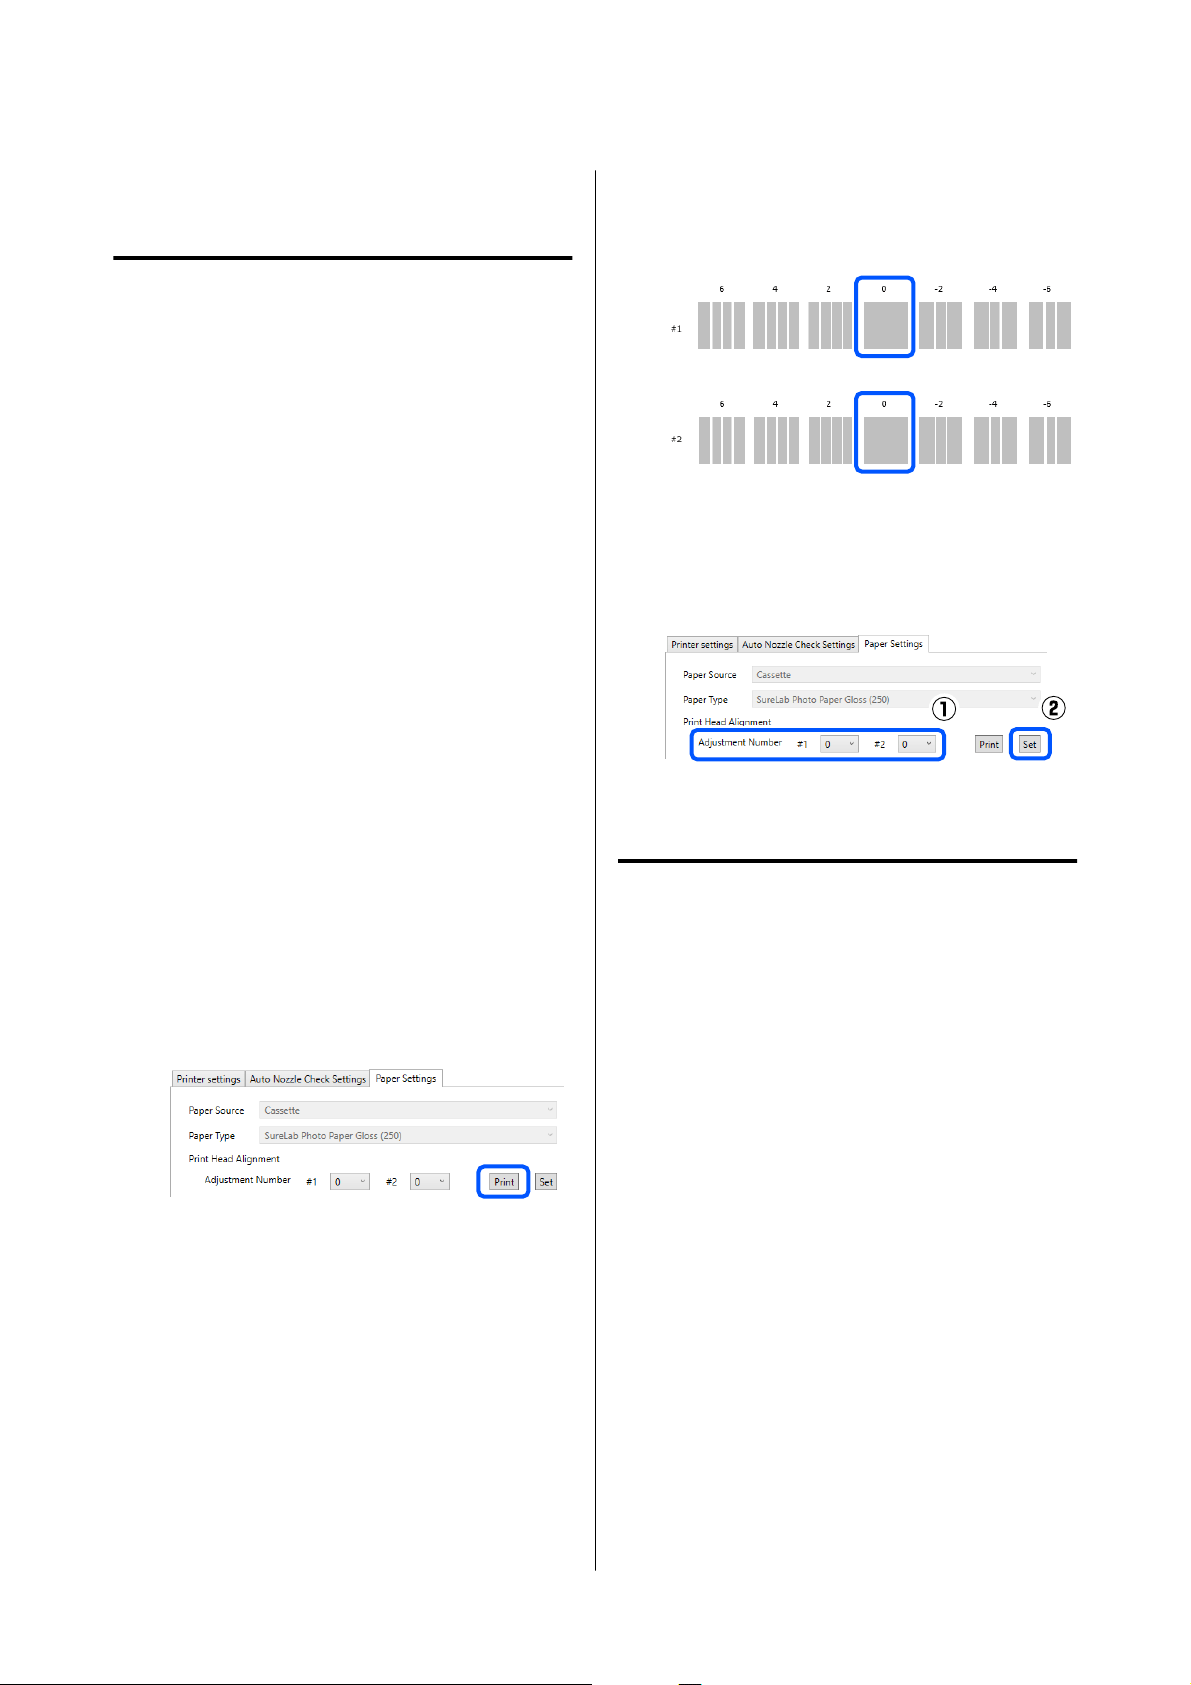
U “Power Ink Flushing” on page 63
Print Head Alignment Method
If the print results appear grainy or out of focus,
perform Print Head Alignment. The Print Head
Alignment function corrects print head
misalignments when printing.
A
Load 2 sheets of paper in the paper cassette.
U “How to Load Paper” on page 25
B
Click Printer settings on the main screen.
See the following for more details on the main
screen.
U “Explanation of the Main Screen” on
page 65
C
Select a printer, in the printer list area on the
top of the Printer settings screen, on which to
execute Print Head Alignment, and then select
Paper Settings.
You cannot select multiple printers.
See the following for more details on the printer
settings screen.
U “Explanation of the Printer settings” on
page 66
D
Click Print in Print Head Alignment.
2 sheets of adjustment patterns are printed. Two
groups of adjustment patterns, #1 and #2, are
printed on separate sheets of paper.
E
Check the printed adjustment pattern.
Confirm which of the print pattern numbers
has no gaps between the nozzles in each group.
F
Select the number of the print pattern you
confirmed, and then click Set.
Select the number of the print pattern you
confirmed individually for both #1 and #2.
The adjustment values are applied.
Paper Feed Adjustment Method
Execute this when streaks and unevenness that occur
in print results are not improved even though print
head cleaning was executed.
A
Load paper in the paper cassette.
U “How to Load Paper” on page 25
B
Click Printer settings on the main screen.
See the following for more details on the main
screen.
U “Explanation of the Main Screen” on
page 65
C
Select a printer, in the printer list area on the
top of the Printer settings screen, on which to
execute Paper Feed Adjustment, and then select
Paper Settings.
You cannot select multiple printers.
See the following for more details on the printer
settings screen.
SL-D500 Series User's Guide
Using the Maintenance Tool (Windows)
76
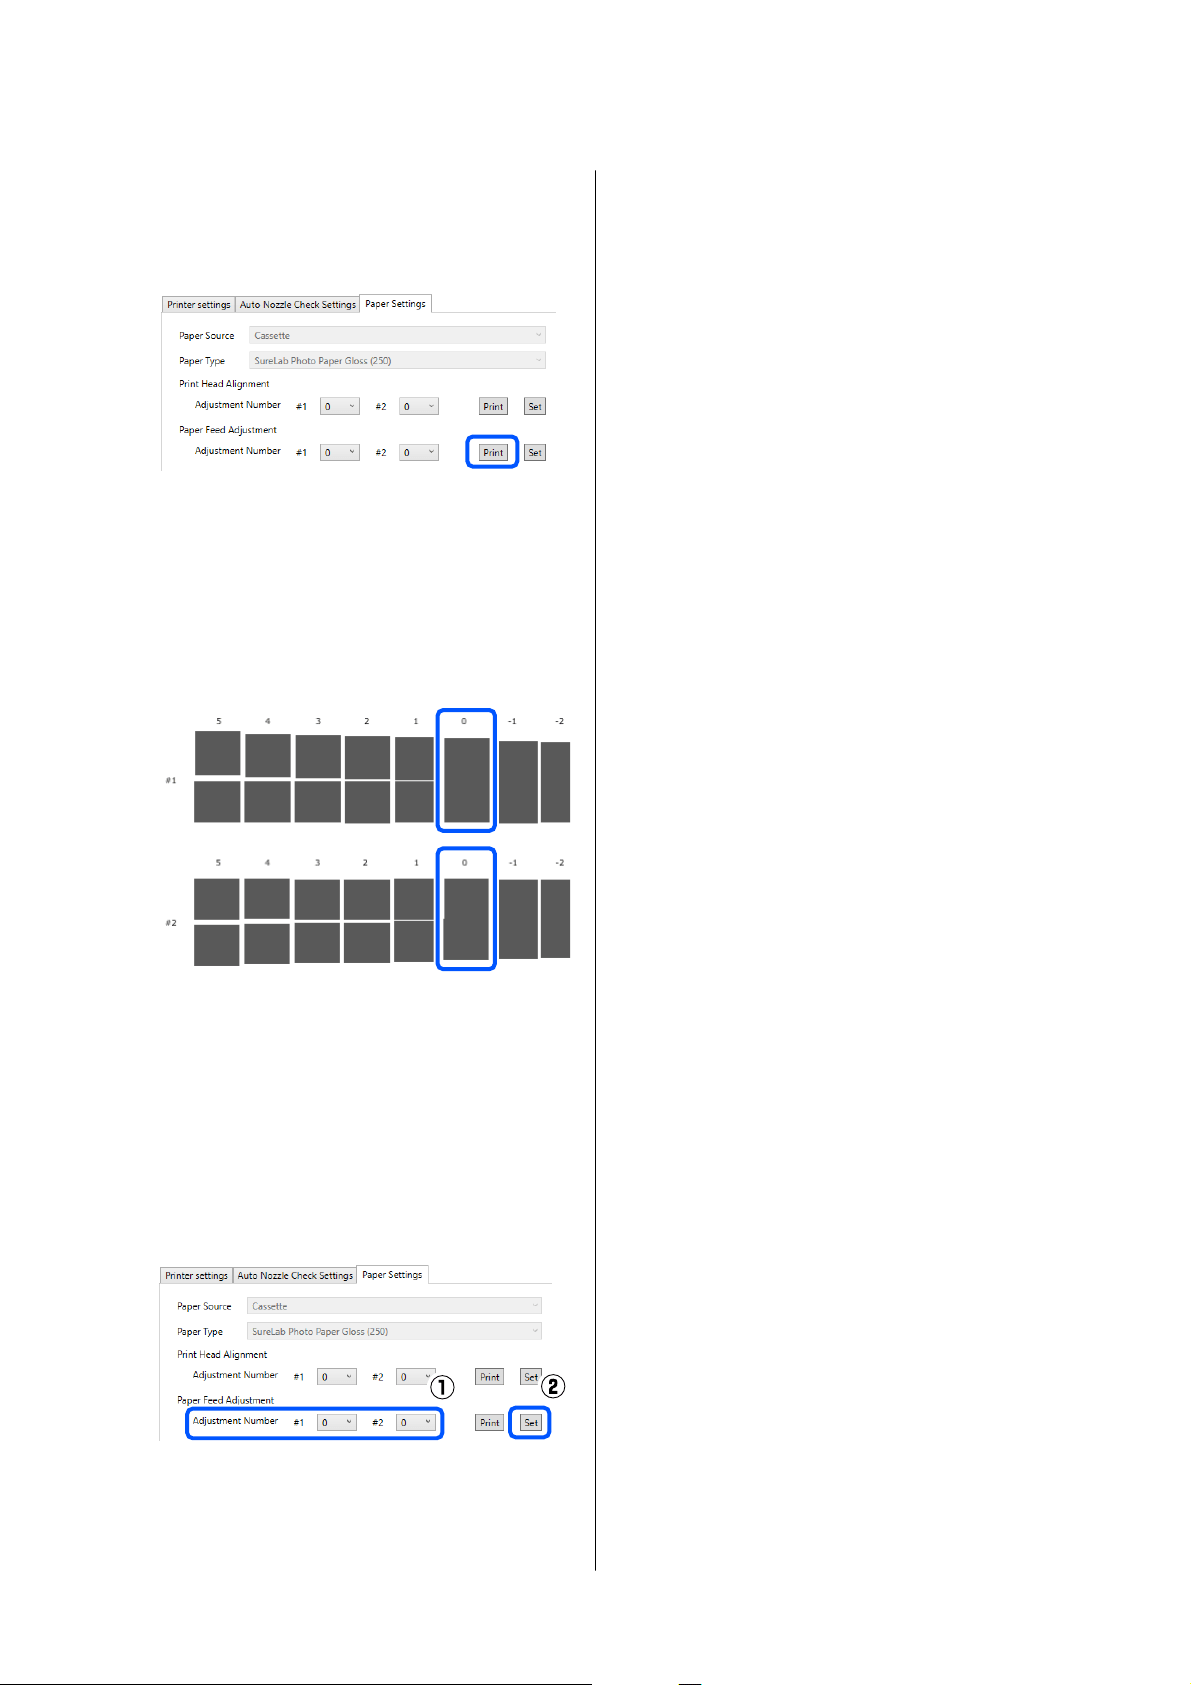
U “Explanation of the Printer settings” on
page 66
D
Click Print in Paper Feed Adjustment.
Adjustment patterns are printed.
E
Check the printed adjustment pattern.
Two groups of adjustment patterns, #1 and #2,
are printed. Confirm the number of the print
pattern with the least amount of overlapping or
gaps for each group.
If all of the adjustment patterns contain
overlaps or gaps, and you cannot narrow it
down to one, select the pattern with the least
overlap or gap.
F
Select the number of the print pattern you
confirmed, and then click Set.
Select the number of the print pattern you
confirmed individually for both #1 and #2.
The adjustment values are applied.
SL-D500 Series User's Guide
Using the Maintenance Tool (Windows)
77
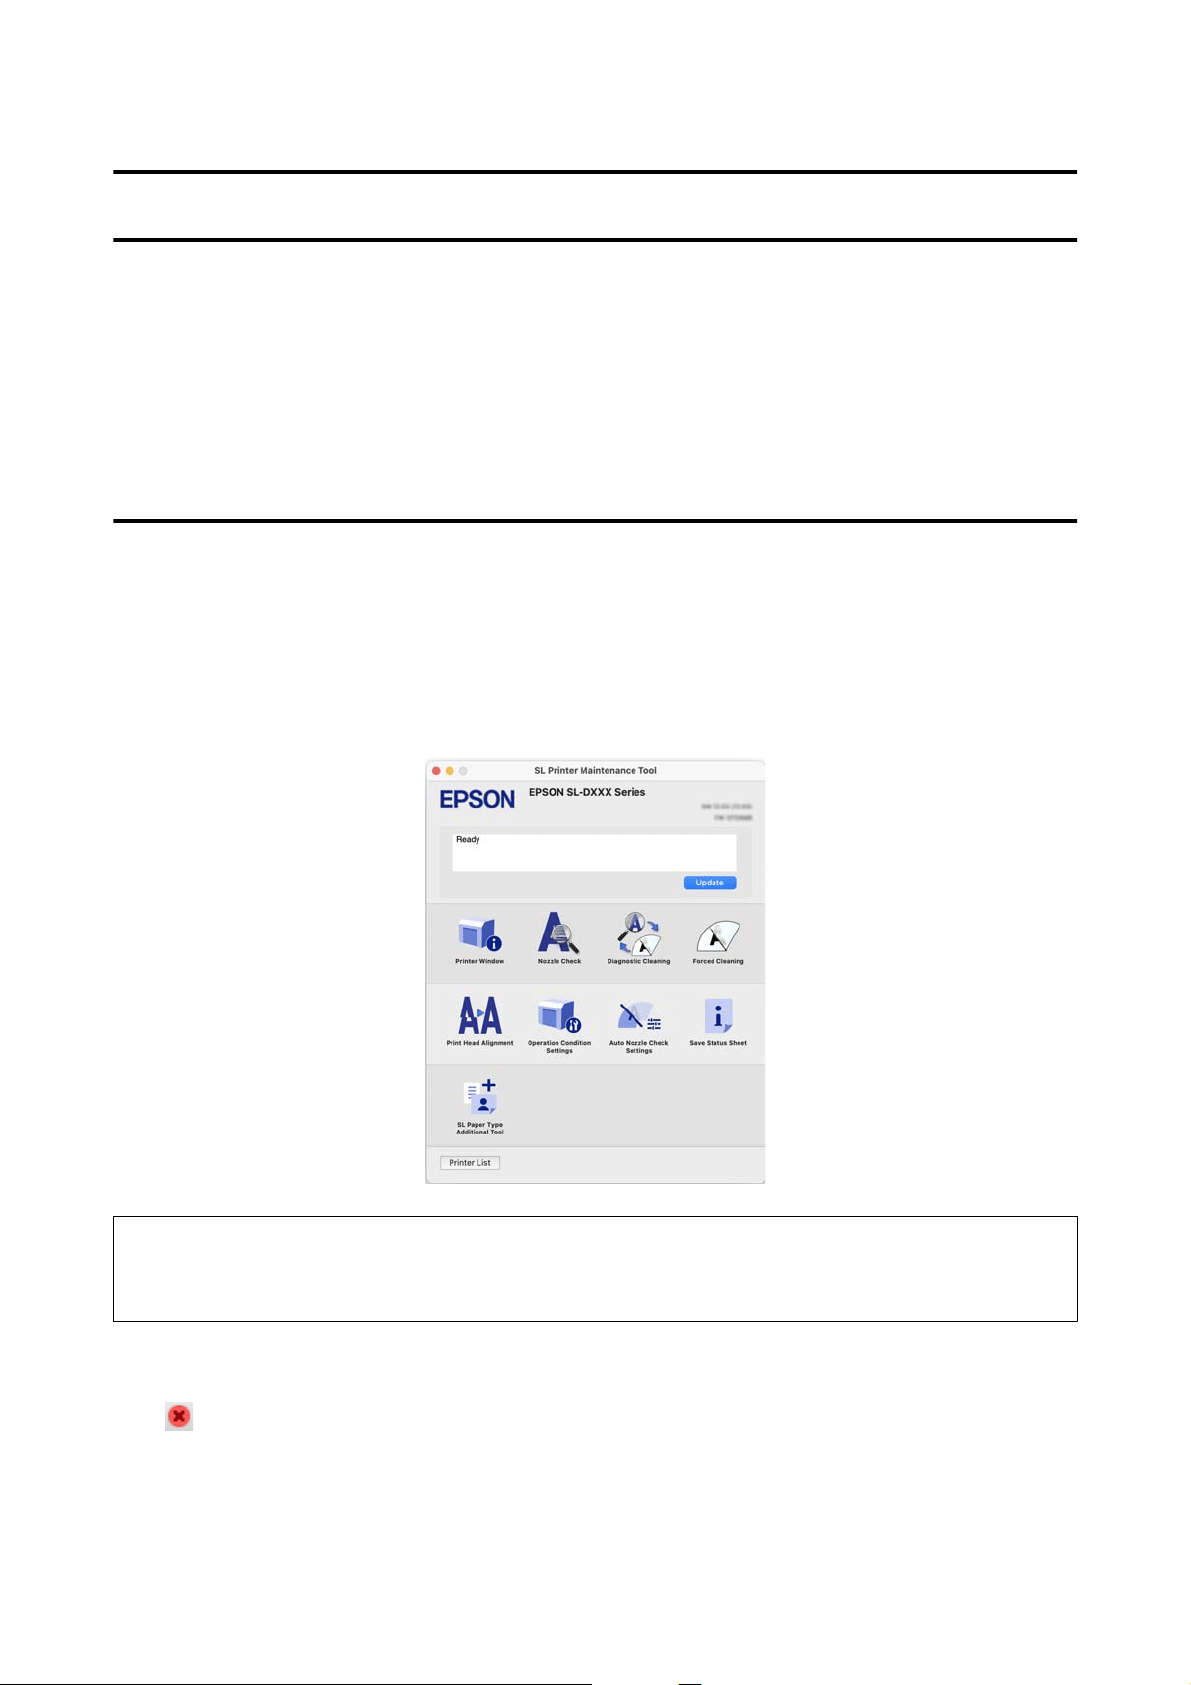
Using the Maintenance Tool (Mac)
This section explains how to use Maintenance Tool by starting it from the computer connected to the printer.
Summary of the Maintenance Tool
From your computer you can perform adjustment and maintenance operations such as checking the printer’s
status, making settings, performing head cleaning and so on.
Starting and Closing
Starting
A
Click the Apple menu - System Preferences - Printers & Scanners, in this order.
B
Select the printer and click Options & Supplies - Utility - Open Printer Utility.
Note:
When multiple printers are connected to a single computer, after starting Maintenance Tool, you can change which
printer is being operated.
Closing
Click on the top left of the screen.
SL-D500 Series User's Guide
Using the Maintenance Tool (Mac)
78
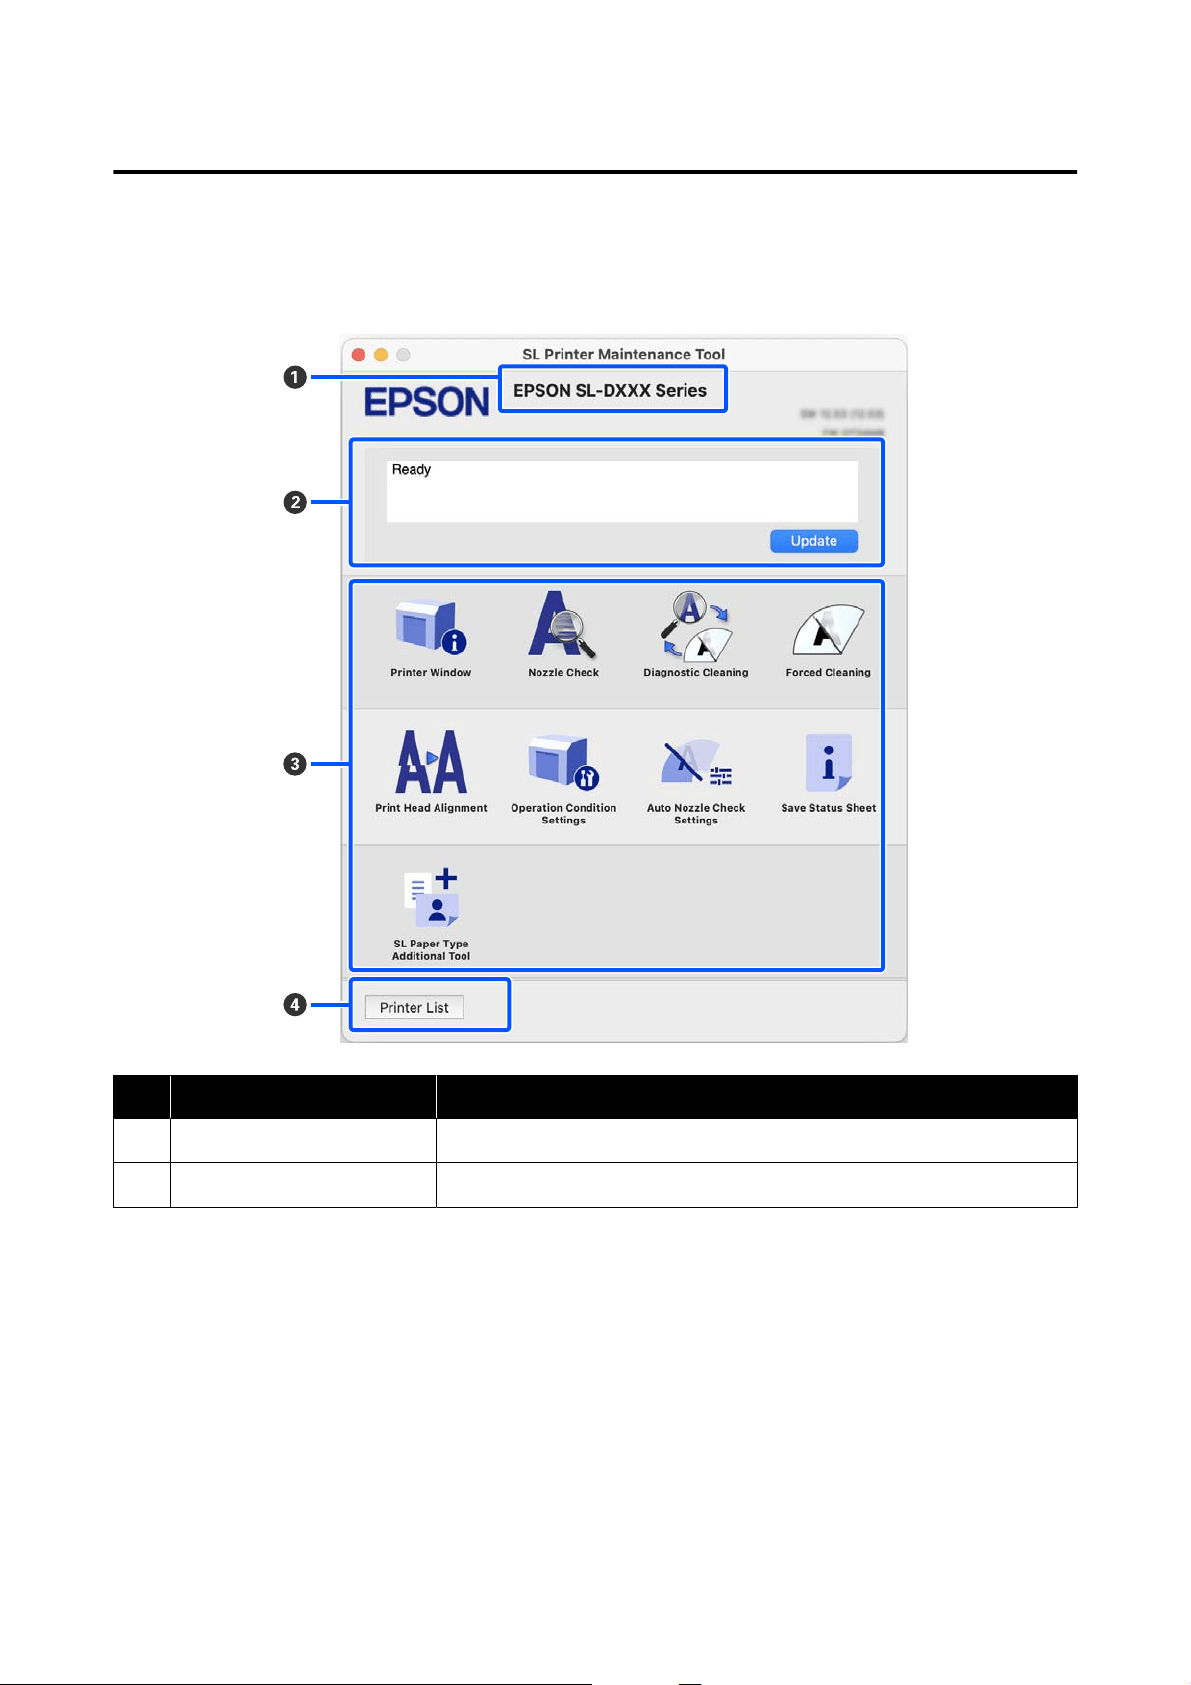
Explanation of the Main Screen
The following main screen appears when you start Maintenance Tool.
The configuration and functions of the main screen are shown below.
Item Functions
A
Printer Name Displays the printer name.
B
Status Display Area Displays the printer’s status. Clicking Update updates the status information.
SL-D500 Series User's Guide
Using the Maintenance Tool (Mac)
79

Item Functions
C
Menu List Clicking on an icon executes the following functions for the printer displayed in
printer name (A).
Printer Window Displays information about the loaded paper, the approximate amount of space
in the maintenance box, and the ink levels.
U “Explanation of the Printer Window Screen” on page 80
Nozzle Check Checks for clogged nozzles.
A nozzle check pattern can also be printed.
U “Nozzle Check Methods” on page 84
U “Print Nozzle Check Pattern Method” on page 85
Diagnostic Cleaning Detects clogged nozzles and automatically performs cleaning.
U “Diagnostic Cleaning” on page 86
Forced Cleaning Performs manual cleaning.
U “Forced Cleaning” on page 86
Print Head Alignment Corrects print head misalignments and corrects paper feed amounts when
printing.
U “Print Head Alignment Method” on page 87
U “Paper Feed Adjustment Method” on page 88
Operation Condition
Settings
Sets the various operations of the printer.
U “Explanation of the Operation Condition Settings Screen” on page 81
Auto Nozzle Check
Settings
Sets the details for automatic nozzle checks.
U “Explanation of the Auto Nozzle Check Settings Screen” on page 82
Save Status Sheet Saves the status sheet of the printer as a PDF file.
You can change the file name and where the file is saved.
SL Paper Type Additional
Tool
Starts a tool for adding paper information to a printer or printer driver.
U “Adding Paper Information by Using a Paper Type File” on page 90
D
Printer List button This is enabled only when multiple printers are registered to a computer.
Clicking this displays a list, on the side of the main screen, of printers that can be
operated. You can change the printer to be operated by selecting a printer from
the list.
Click the button again to close the list of printers.
Explanation of the Printer Window Screen
Clicking on Printer Window in the main screen displays the following Printer Window screen.
SL-D500 Series User's Guide
Using the Maintenance Tool (Mac)
80
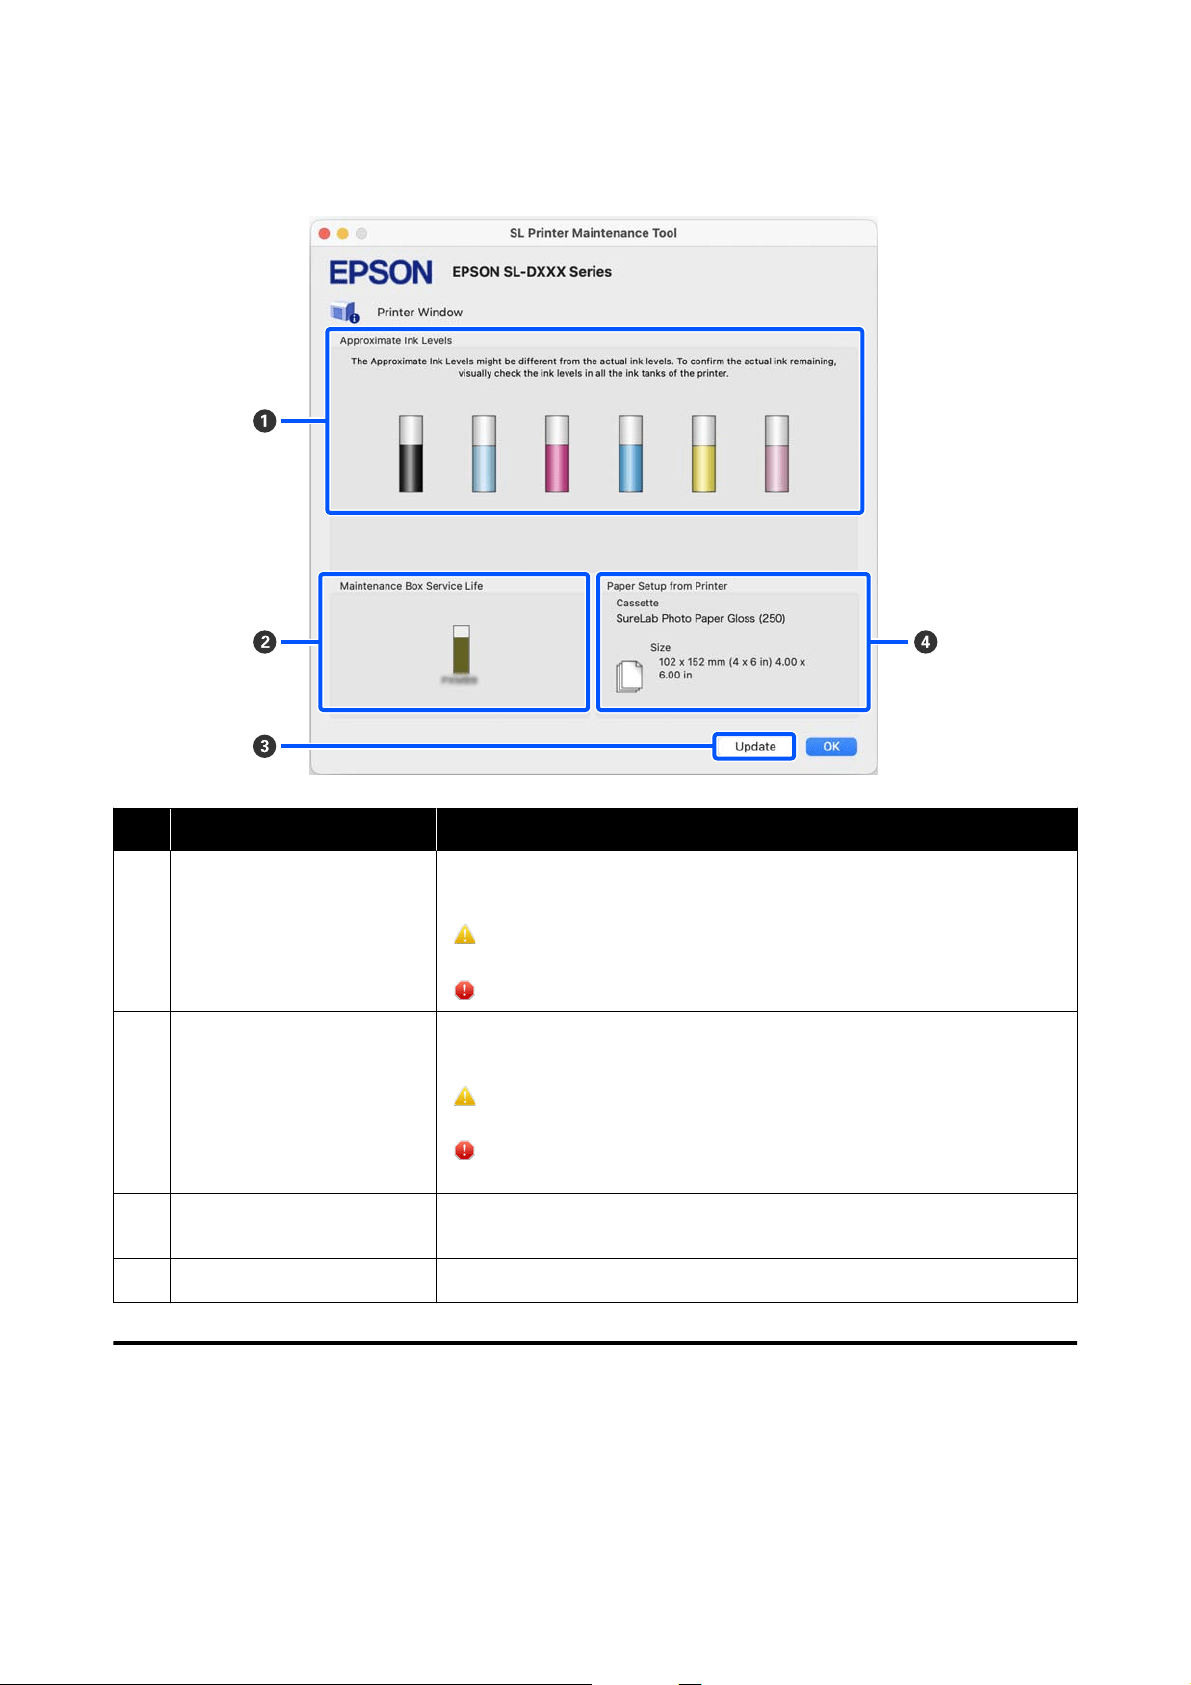
The configuration and functions of the Printer Window screen are shown below.
Item Functions
A
Ink Levels Displays the ink level for each color. The following is shown for each color of ink.
No icon display: No problems with ink levels.
: There is only a little ink remaining, so we recommend filling the ink tank with
ink.
: Remaining ink level is below the minimum value. Fill the ink tank with ink.
B
Maintenance Box Service Life The approximate amount of space in the maintenance box is shown below.
No icon display: No problems with the amount of space in the maintenance box.
: Free space in the maintenance box is running low, prepare a new
maintenance box.
: Amount of free space in the maintenance box is below the minimum value.
Replace the maintenance box with a new one.
C
Update button Clicking this acquires the printer status and updates the A, B, and D
information.
D
Paper Setup from Printer Displays information about the paper that is currently loaded in the printer.
Explanation of the Operation Condition Settings Screen
Clicking on Operation Condition Settings in the main screen displays the following Operation Condition
Settings screen.
SL-D500 Series User's Guide
Using the Maintenance Tool (Mac)
81
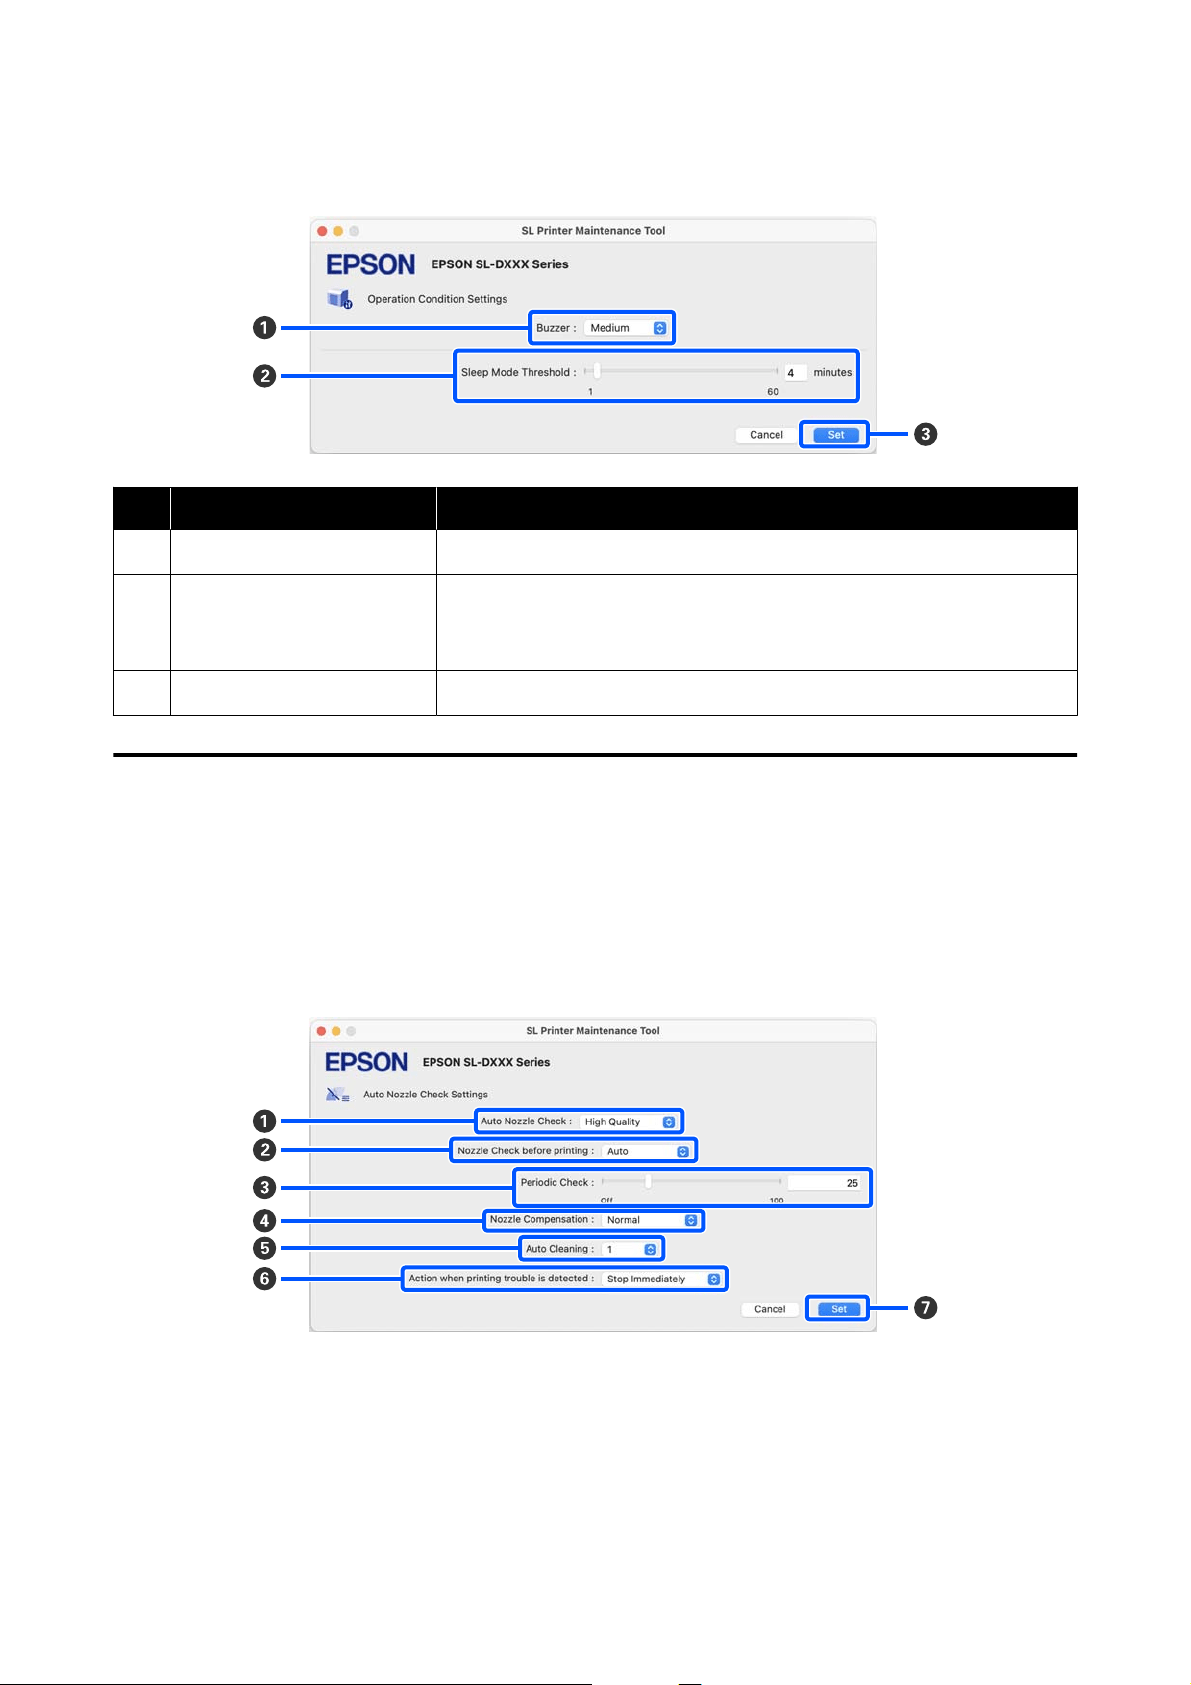
The configuration and functions of the Operation Condition Settings screen are shown below.
Item Functions
A
Buzzer Set volume of and whether to sound the warning buzzer.
B
Sleep Mode Threshold Set the time before switching to Sleep Mode.
If an error has not occurred on the printer and no print jobs have been received
for the specified length of time, the printer automatically switches to Sleep Mode.
C
Set button Clicking this reflects the changes to each item A to B.
Explanation of the Auto Nozzle Check Settings Screen
Clicking on Auto Nozzle Check Settings in the main screen displays the following Auto Nozzle Check Settings
screen.
In this section you can do advanced settings for auto nozzle check to confirm the state of the nozzles at specified
times so that the nozzles are automatically cleaned if they clog.
The configuration and functions of the Auto Nozzle Check Settings screen are shown below.
SL-D500 Series User's Guide
Using the Maintenance Tool (Mac)
82
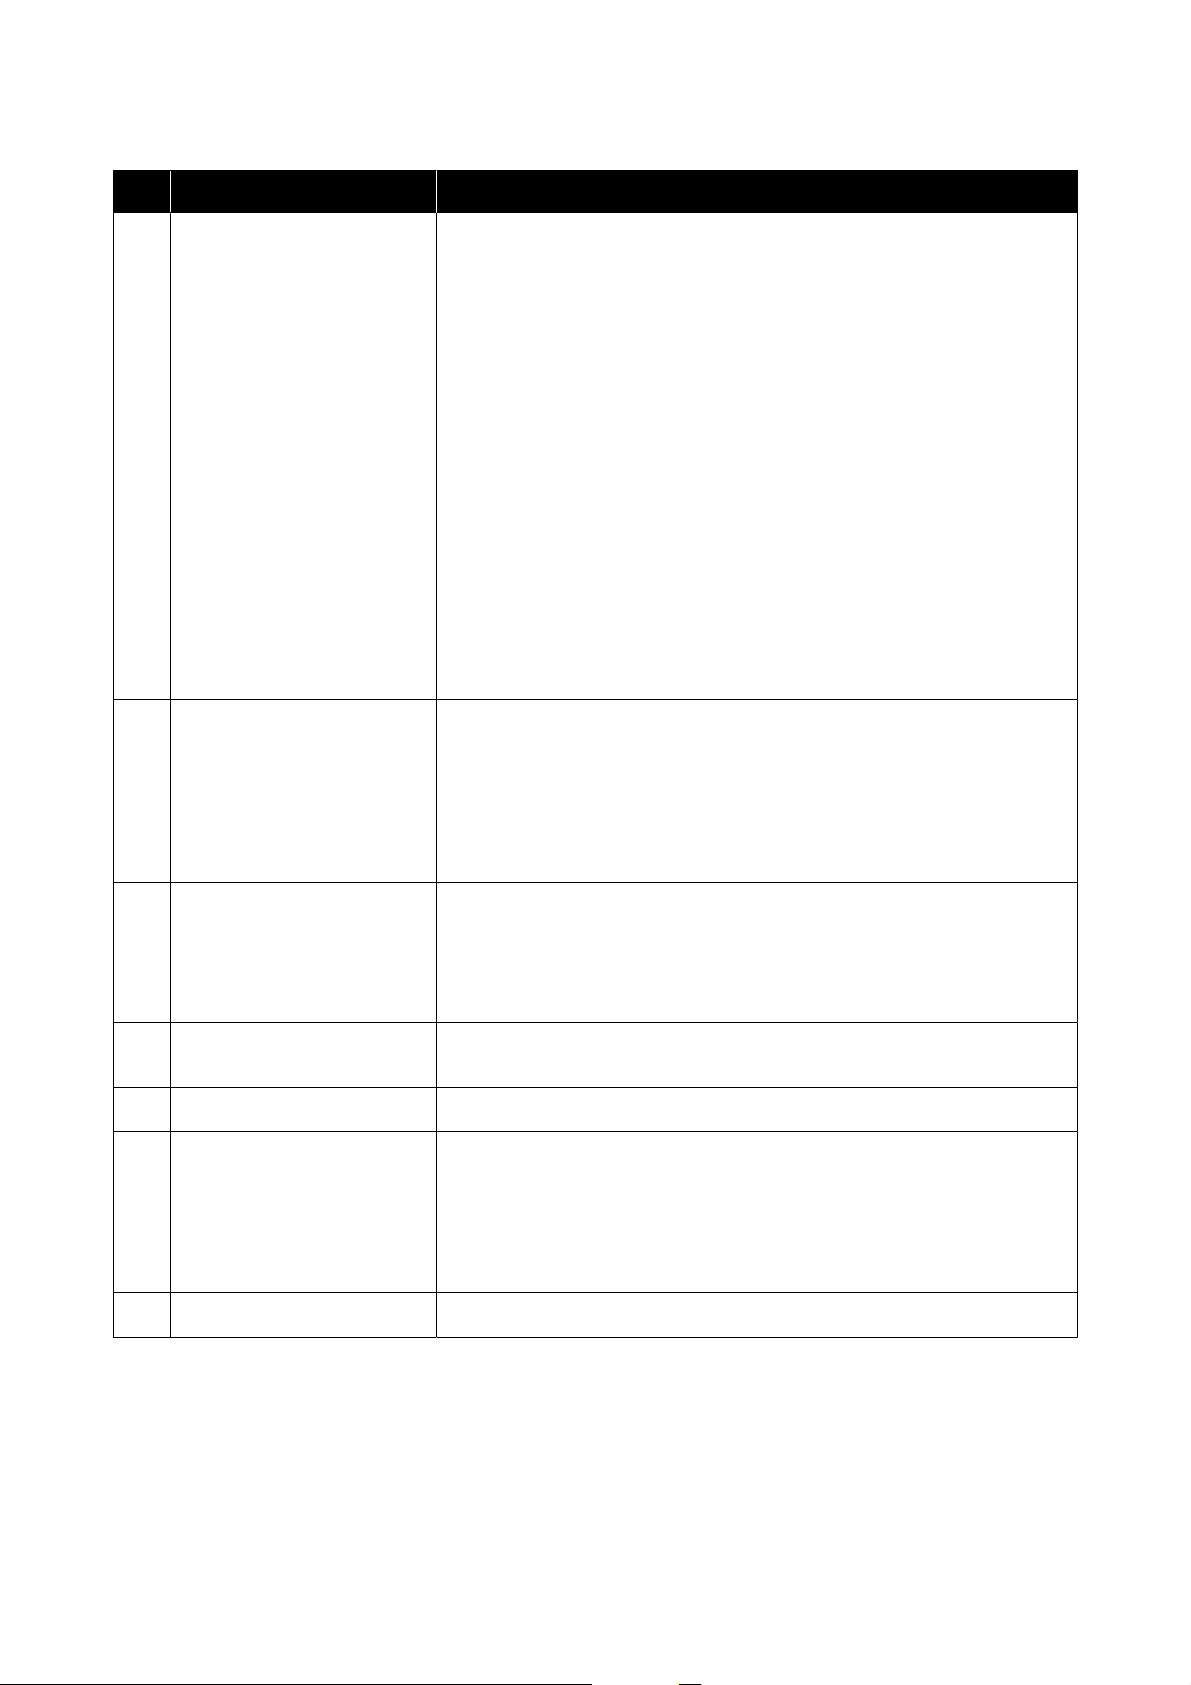
Item Functions
A
Auto Nozzle Check Set the conditions in which an automatic nozzle check is done. Select one of the
following.
❏ High quality
You can print at high print quality because you can execute a Nozzle Check
automatically before printing and stop printing if clogged nozzles are
detected while printing.
You can set all the items from B to F.
❏ Normal
Automatic nozzle check is done less frequently than when High quality is
set.
Nozzle Check before printing (B) and Action when printing trouble is
detected (F) are disabled. Also, you can set more sheets for executing
Periodic Check (C) than the number of sheets when High quality is set.
❏ Off
Nozzles are not checked automatically. Select his when you want to visually
confirm the printed check pattern to confirm the state of the nozzles.
❏ Default
Returns all the settings (A to F) in the Auto Nozzle Check Settings screen to
the manufacturer’s settings.
B
Nozzle Check before printing You can set this when High quality is selected in Auto Nozzle Check (A).
Set whether to execute auto nozzle check before printing.
When set to Auto, auto Nozzle Check is executed according to the state of the
printer, such as after changing the auto nozzle check settings, or after executing
nozzle cleaning.
When set to Every time, auto nozzle check is executed for each print job.
C
Periodic Check Set the time to execute auto nozzle check according to the number of sheets
printed.
If the number of sheets being printed for a single job exceeds the number of
printed sheets set for this item, then the number of sheets for that job is printed,
after which auto nozzle check is executed.
D
Nozzle Compensation Set the print quality for when normal nozzles compensate for the ink that could
not be ejected by clogged nozzles.
E
Auto Cleaning Sets the number of times to do auto cleaning when clogged nozzles are detected.
F
Action when printing trouble is
detected
You can set this when High quality is selected in Auto Nozzle Check (A).
Sets whether to stop printing when clogged nozzles are detected.
When set to Stop Immediately, printing is stopped when clogged nozzles are
detected.
When set to Ignore, printing is continued even if clogged nozzles are detected.
G
Set button Clicking this reflects the changes to each item A to F.
SL-D500 Series User's Guide
Using the Maintenance Tool (Mac)
83

Printer Maintenance
You need to perform print head maintenance if there
are problems in the printed results, such as streaks or
scrapes in the printouts or if printed colors are
different from usual.
Maintenance Operations
Maintenance Tool has the following functions to keep
the print head in good condition and to get the best
print results.
Carry out appropriate maintenance depending on the
print results and situation.
Auto Nozzle Check
By enabling this setting, an auto nozzle check function
checks the state of the nozzles at a specified interval
and automatically cleans the nozzles if they clog and
uses normal nozzles to compensate for clogged
nozzles while printing.
You can change the conditions to execute a nozzle
check and the timing for nozzle checks in Auto Nozzle
Check. You can also disable this setting so nozzles are
not checked automatically.
U “Explanation of the Auto Nozzle Check Settings
Screen” on page 82
c
Important:
When checking the state of the nozzles, 1 sheet of
paper is used because the printer prints a check
pattern on the paper that is loaded.
Also, the paper on which the check pattern is
printed could be mixed in with other printouts.
Manual Nozzle Check
You can check the state of the nozzles by executing a
nozzle check, such as before printing an important job,
or if the printer has not been used for an extended
period or if Auto Nozzle Check is disabled. The
printer automatically detects clogged nozzles.
Depending on the results of the check, you can do
Print Head Cleaning.
U “Nozzle Check Methods” on page 84
Print Nozzle Check Pattern
Print a nozzle check pattern when you want to
confirm whether clogged nozzles have been cleared
after cleaning the print head or when you want to
confirm the condition of nozzles visually with a
printed nozzle check pattern.
U “Print Nozzle Check Pattern Method” on
page 85
Print Head Cleaning
Do this when the nozzle Check Pattern has gaps, when
there are streaks or scrapes in the printouts, or if
printed colors are different from usual. This function
clears clogged nozzles.
There are two types, Forced Cleaning, which is
cleaning the print head manually, and Diagnostic
Cleaning, which detects clogged nozzles and cleans
the print head automatically.
U “Print Head Cleaning Method” on page 86
Print Head Alignment
If the print results appear grainy or out of focus,
perform Print Head Alignment. The Print Head
Alignment function corrects print head
misalignments when printing.
U “Print Head Alignment Method” on page 87
Paper Feed Adjustment
Execute this when streaks and unevenness that occur
in print results are not improved even though print
head cleaning was executed.
U “Paper Feed Adjustment Method” on page 88
Nozzle Check Methods
Prints a check pattern on the paper and automatically
checks the state of the nozzles. Paper must be loaded
in the printer.
A
Load paper in the paper cassette.
U “How to Load Paper” on page 25
B
Click Nozzle Check on the main screen.
The Nozzle Check screen is displayed.
SL-D500 Series User's Guide
Using the Maintenance Tool (Mac)
84
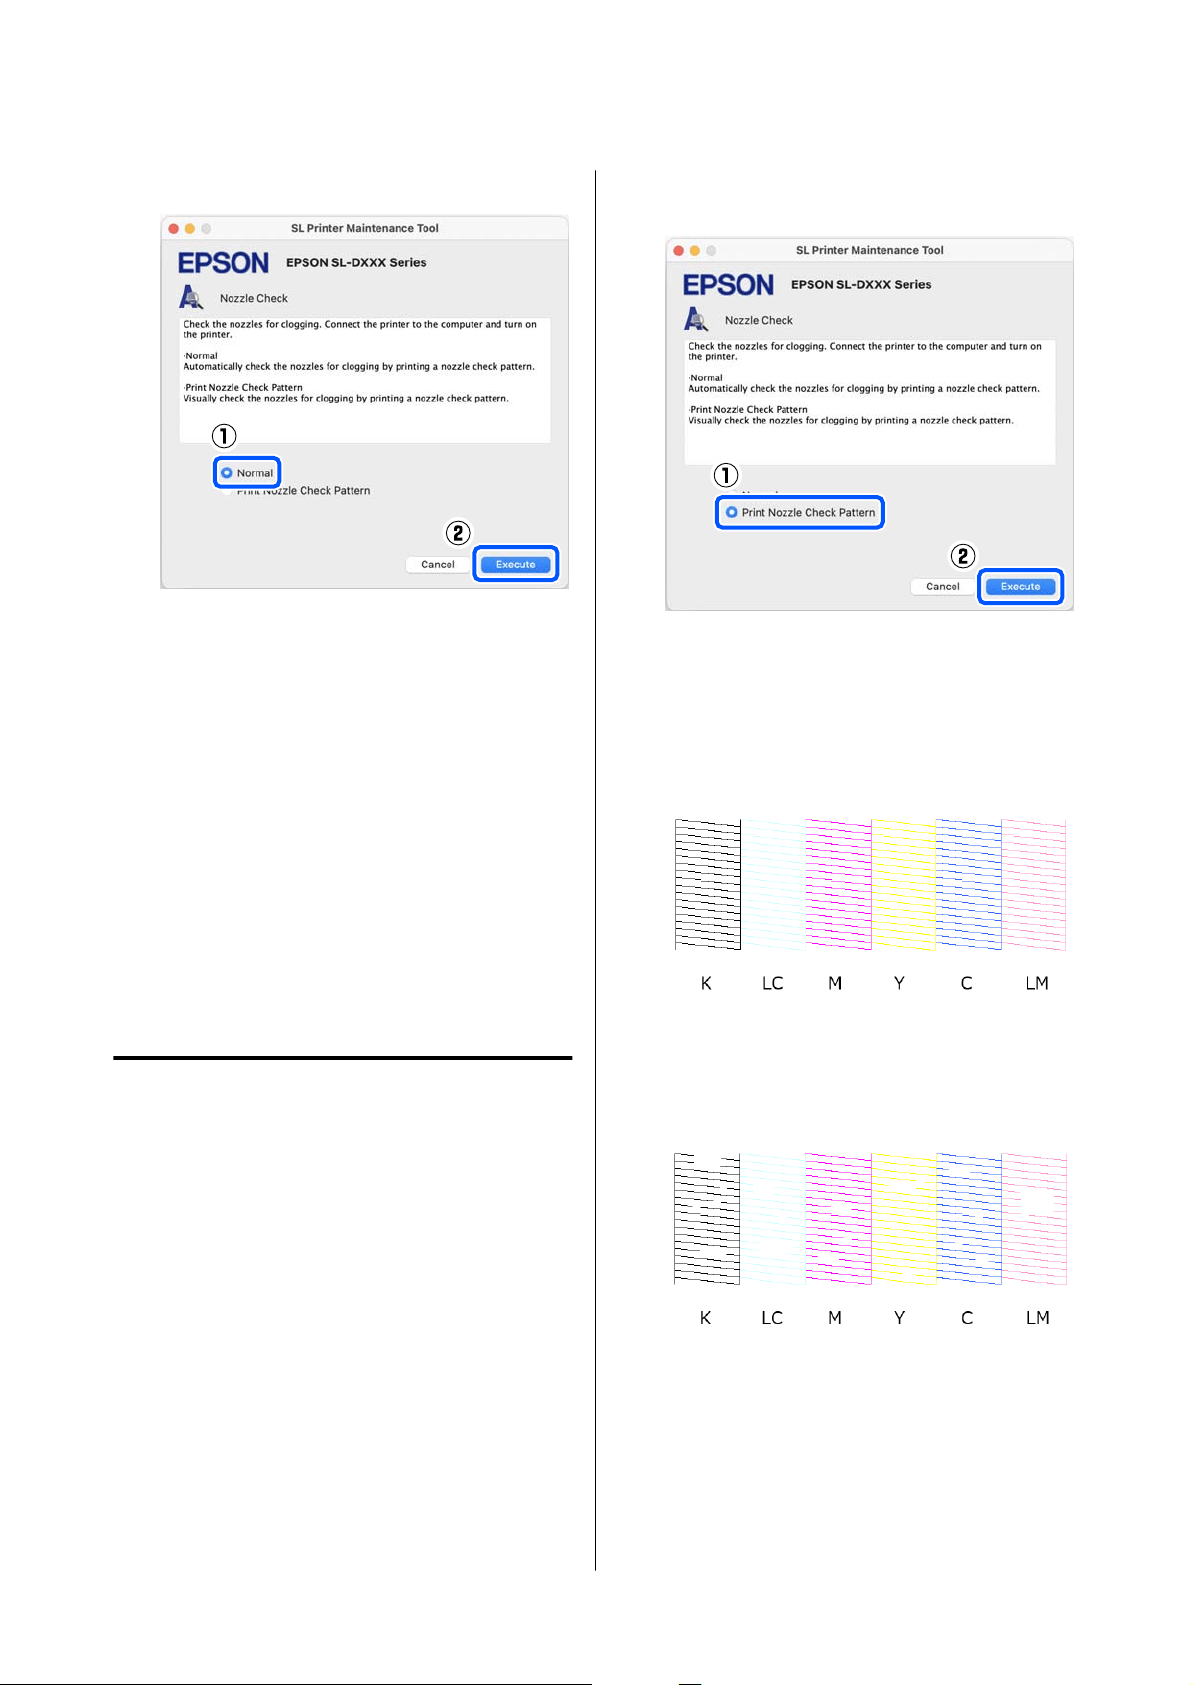
C
Select Normal, and then click Execute.
Nozzle check is executed.
D
Check the results of the nozzle check in the
message displayed on screen.
When “No clogged nozzles were detected.” is
displayed, the work is complete.
When “Clogged nozzles were found.” is
displayed, execute Diagnostic Cleaning.
U “Diagnostic Cleaning” on page 86
Perform Print Check Pattern to check the
condition of the nozzles.
U “Print Nozzle Check Pattern Method” on
page 85
Print Nozzle Check Pattern
Method
A
Load paper in the paper cassette.
U “How to Load Paper” on page 25
B
Click Nozzle Check on the main screen.
The Nozzle Check screen is displayed.
C
Select Print Nozzle Check Pattern, and then
click Execute.
The check pattern is printed.
D
Review the printed check pattern while
referring to the following section.
Example of clean nozzles
If none of the check pattern is missing, then the
print head nozzles are not clogged.
Example of clogged nozzles
If part of the pattern is missing, then the print
head nozzles are clogged. The print head needs
to be cleaned.
U “Print Head Cleaning Method” on
page 86
SL-D500 Series User's Guide
Using the Maintenance Tool (Mac)
85

Print Head Cleaning Method
Types of Cleaning and Order of
Implementation
There are two types of cleaning, Forced Cleaning,
which is cleaning the print head manually, and
Diagnostic Cleaning, which detects clogged nozzles
and cleans the print head automatically.
First, implement Diagnostic Cleaning.
After that, when “Diagnostic cleaning is finished.
Clogged nozzles detected. Perform diagnostic cleaning
again.” is displayed on screen, implement Diagnostic
Cleaning again.
If the clogged nozzles are not cleared after repeating
Diagnostic Cleaning three times, then do Forced
Cleaning set to Power.
Diagnostic Cleaning
Prints a check pattern on the paper and automatically
checks the state of the nozzles. Paper must be loaded
in the printer.
A
Load more than 2 sheets of paper in the paper
cassette.
U “How to Load Paper” on page 25
Note:
Diagnostic Cleaning uses 1 sheet of paper each
time for the following.
❏ During Nozzle Check immediately after
clicking Execute in step 3
❏ When checking nozzles after cleaning when
cleaning was executed
B
Click Diagnostic Cleaning on the main screen.
The Diagnostic Cleaning screen is displayed.
C
Click Execute.
The nozzle check starts and cleaning is
executed if necessary.
The time needed for cleaning varies according
to the status of the nozzles.
D
Check the results of Diagnostic Cleaning in the
message displayed on the screen.
When the message "Diagnostic cleaning
completed." is displayed, the work is complete.
When "Diagnostic cleaning is finished. Clogged
nozzles detected. Perform diagnostic cleaning
again.” is displayed, execute Diagnostic
Cleaning again.
If the clogged nozzles are not cleared after
repeating Diagnostic Cleaning three times,
then execute Forced Cleaning set to Power.
U “Forced Cleaning” on page 86
Forced Cleaning
A
Click Forced Cleaning on the main screen.
The Forced Cleaning screen is displayed.
B
Select Normal or Power, and then click
Execute.
Select Normal to clean the surface of the print
head and to clear clogged nozzles.
SL-D500 Series User's Guide
Using the Maintenance Tool (Mac)
86
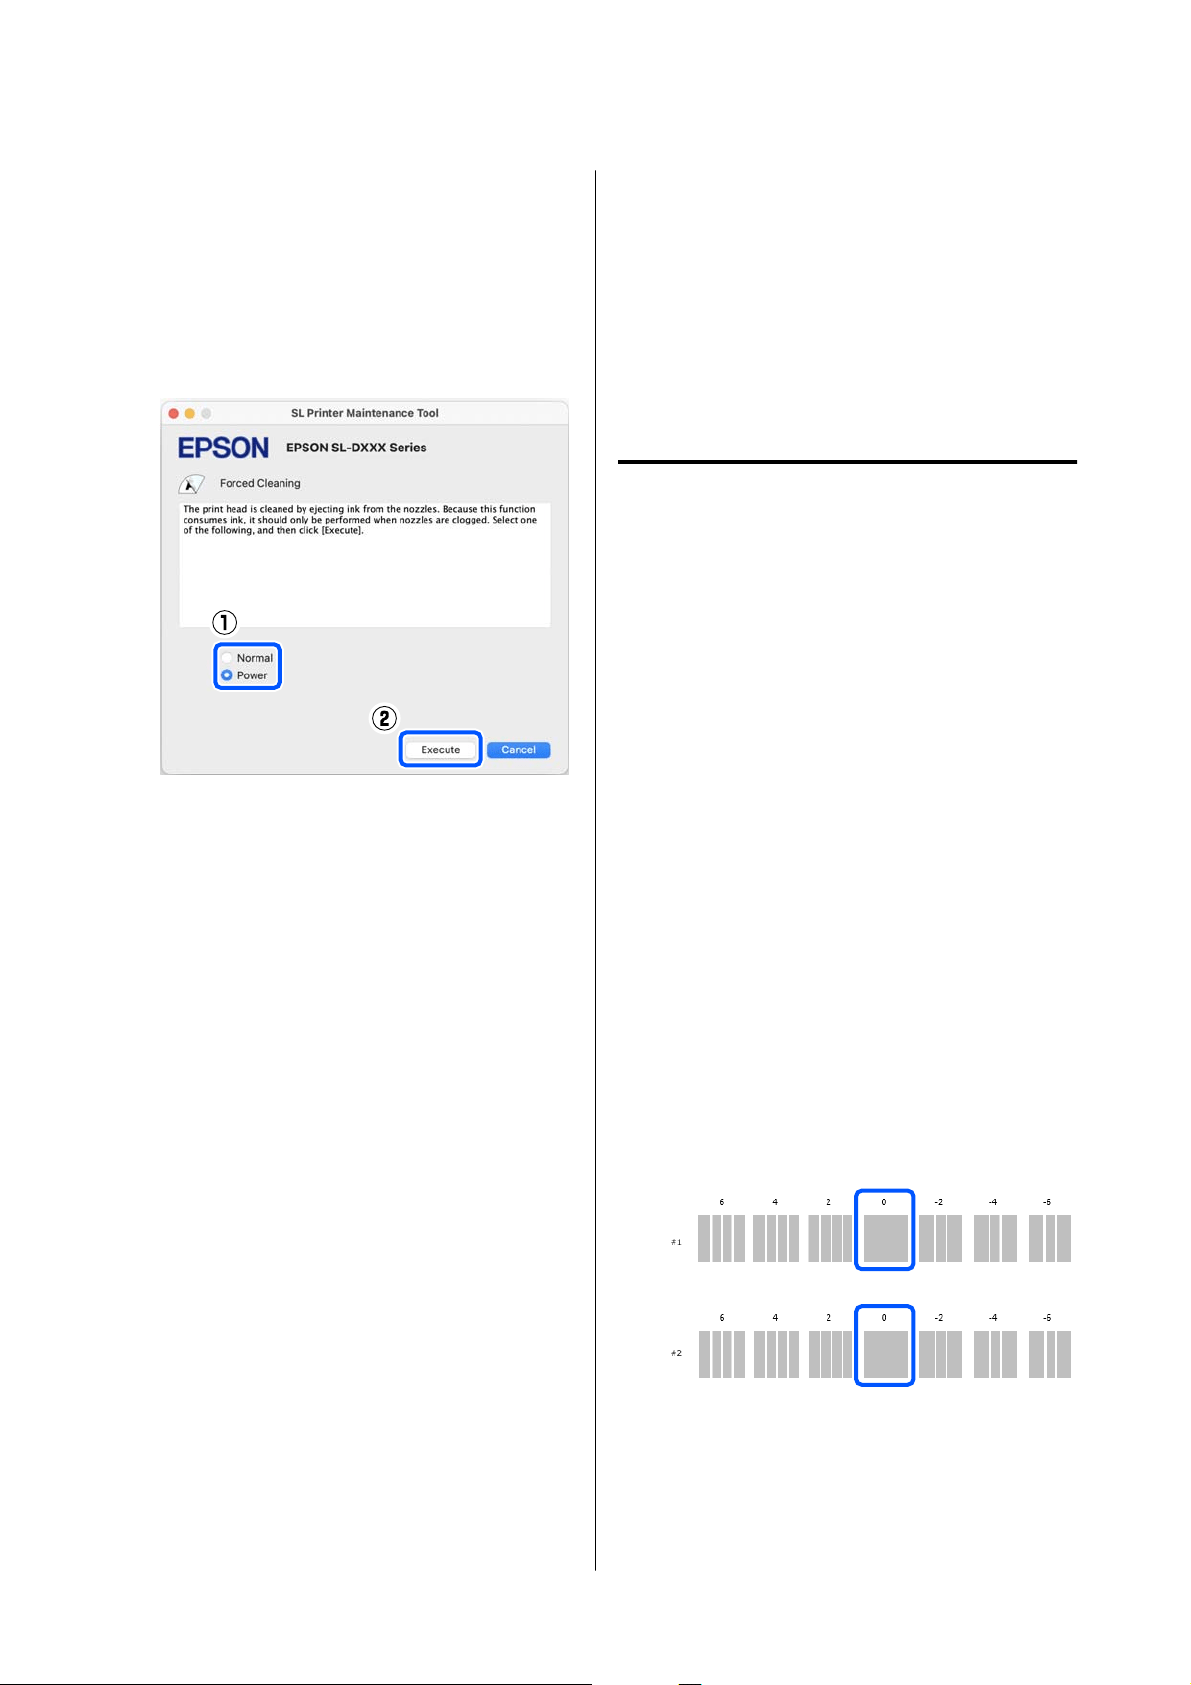
Power cleans more powerfully than Normal.
Use this setting if the nozzles are still clogged
even after repeating Normal cleaning several
times. Power consumes more ink than Normal
cleaning. If a message is displayed informing
you that here is not enough ink remaining,
refill the ink tank and then execute.
U “Refilling Ink” on page 51
Cleaning is executed.
Cleaning may take some time depending on the
selected cleaning level.
A message is displayed on screen when cleaning
is complete.
C
Check the results of Forced Cleaning.
There are the following two ways to check the
cleaning results.
❏ Execute a nozzle check to check for clogged
nozzles.
U “Nozzle Check Methods” on page 84
❏ Print a nozzle check pattern to check for
clogged nozzles.
U “Print Nozzle Check Pattern Method” on
page 85
If the clogged nozzles are not cleared by
executing Normal cleaning, execute Normal
cleaning again. If the clogged nozzles are not
cleared even by repeating this several times,
execute Power cleaning.
If the clogged nozzles are not cleared even after
executing cleaning at Power, then do not use
the printer for printing for at least 12 hours.
Waiting for this amount of time may allow the
clogged ink to dissolve.
If that does not improve the situation, execute
Power Ink Flushing from the printer’s control
panel.
U “Power Ink Flushing” on page 63
Print Head Alignment Method
If the print results appear grainy or out of focus,
perform Print Head Alignment. The Print Head
Alignment function corrects print head
misalignments when printing.
After executing Print Head Alignment, go on to
execute Paper Feed Adjustment.
A
Load 2 sheets of paper in the paper cassette.
U “How to Load Paper” on page 25
B
Click Print Head Alignment on the main
screen.
The Print Head Alignment screen is displayed.
C
Click Print.
2 sheets of adjustment patterns are printed. Two
groups of adjustment patterns, #1 and #2, are
printed on separate sheets of paper.
D
Check the printed adjustment pattern.
Confirm which of the print pattern numbers
has no gaps between the nozzles in each group.
SL-D500 Series User's Guide
Using the Maintenance Tool (Mac)
87
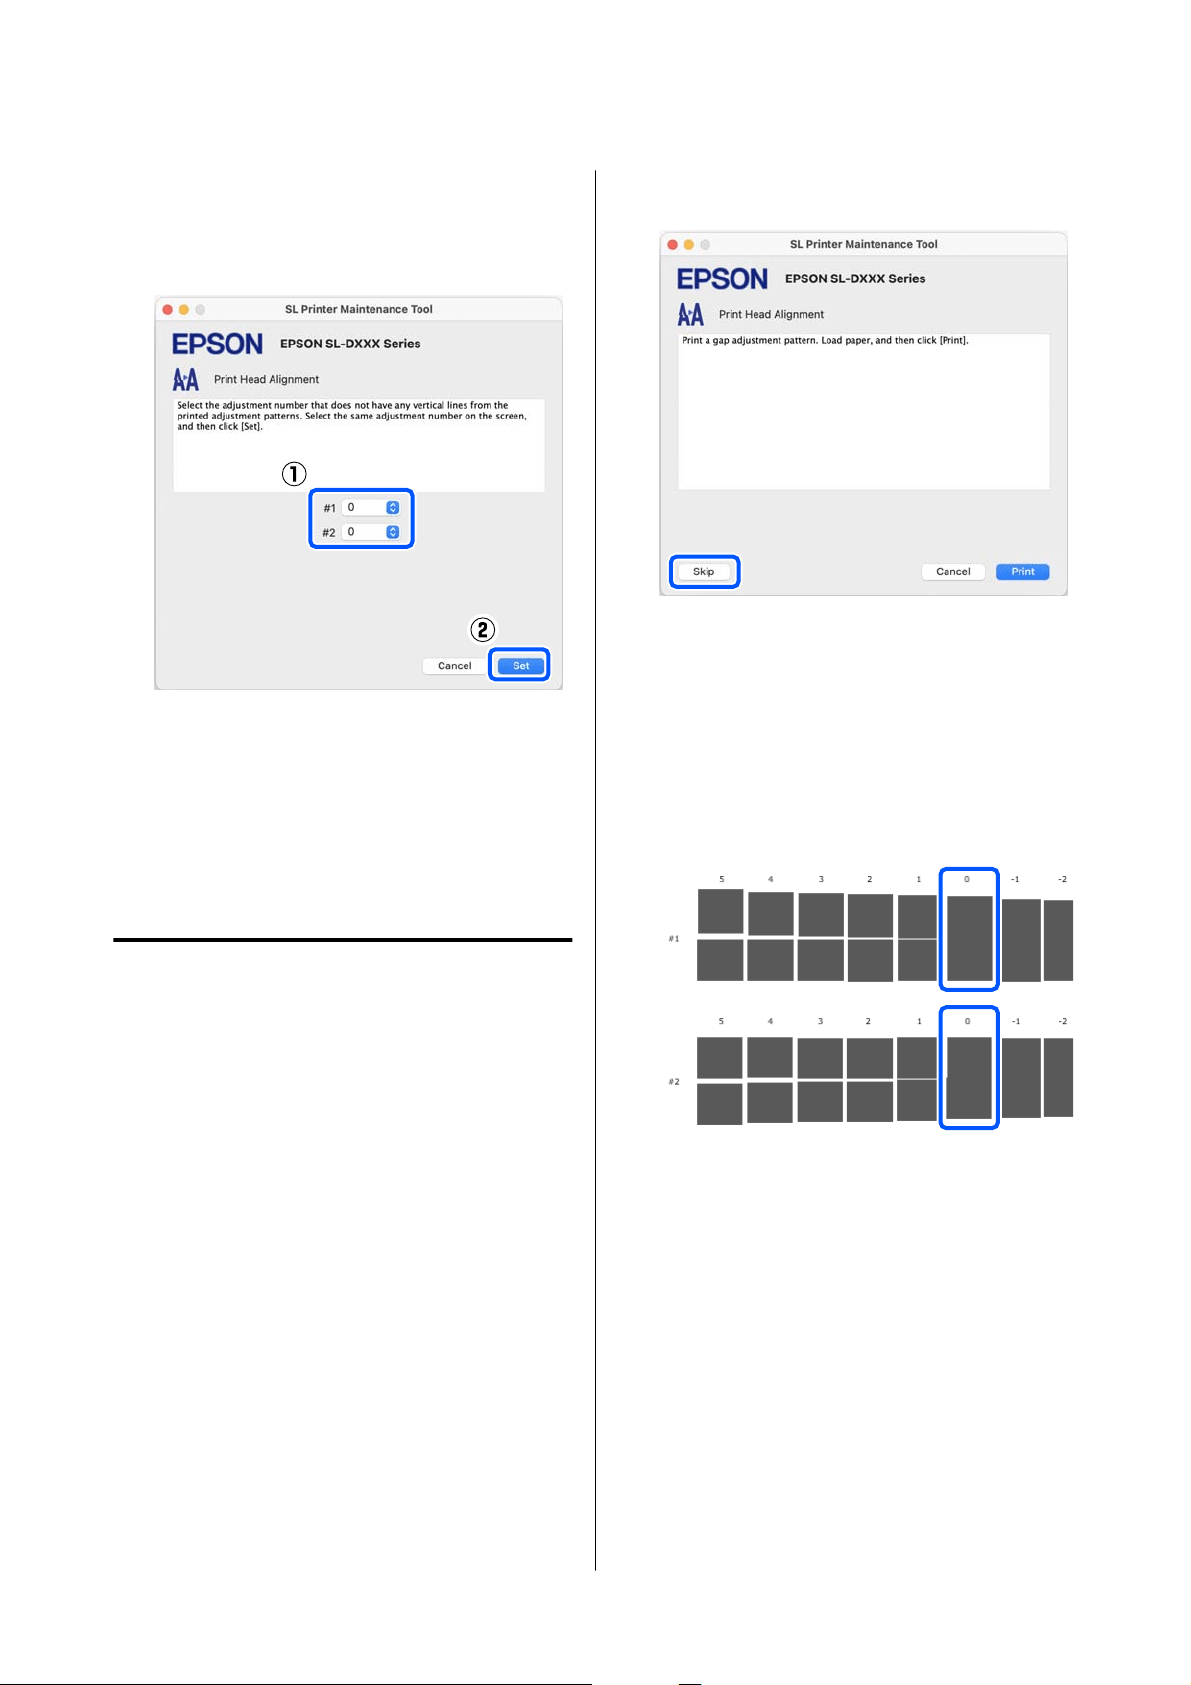
E
Select the number of the print pattern you
confirmed, and then click Set.
Select the number of the print pattern you
confirmed individually for both #1 and #2.
The adjustment values are applied.
If you are going to do Paper Feed Adjustment, then go
to step 4 in “Paper Feed Adjustment Method”.
U “Paper Feed Adjustment Method” on page 88
Paper Feed Adjustment Method
Execute this when streaks and unevenness that occur
in print results are not improved even though print
head cleaning was executed.
A
Load paper in the paper cassette.
U “How to Load Paper” on page 25
B
Click Print Head Alignment on the main
screen.
The Print Head Alignment screen is displayed.
C
Click Skip.
If you do not click Skip to do this from Print
Head Alignment, see the following.
U “Print Head Alignment Method” on
page 87
D
Click Print.
Adjustment patterns are printed.
E
Check the printed adjustment pattern.
Two groups of adjustment patterns, #1 and #2,
are printed. Confirm the number of the print
pattern with the least amount of overlapping or
gaps for each group.
If all of the adjustment patterns contain
overlaps or gaps, and you cannot narrow it
down to one, select the pattern with the least
overlap or gap.
SL-D500 Series User's Guide
Using the Maintenance Tool (Mac)
88
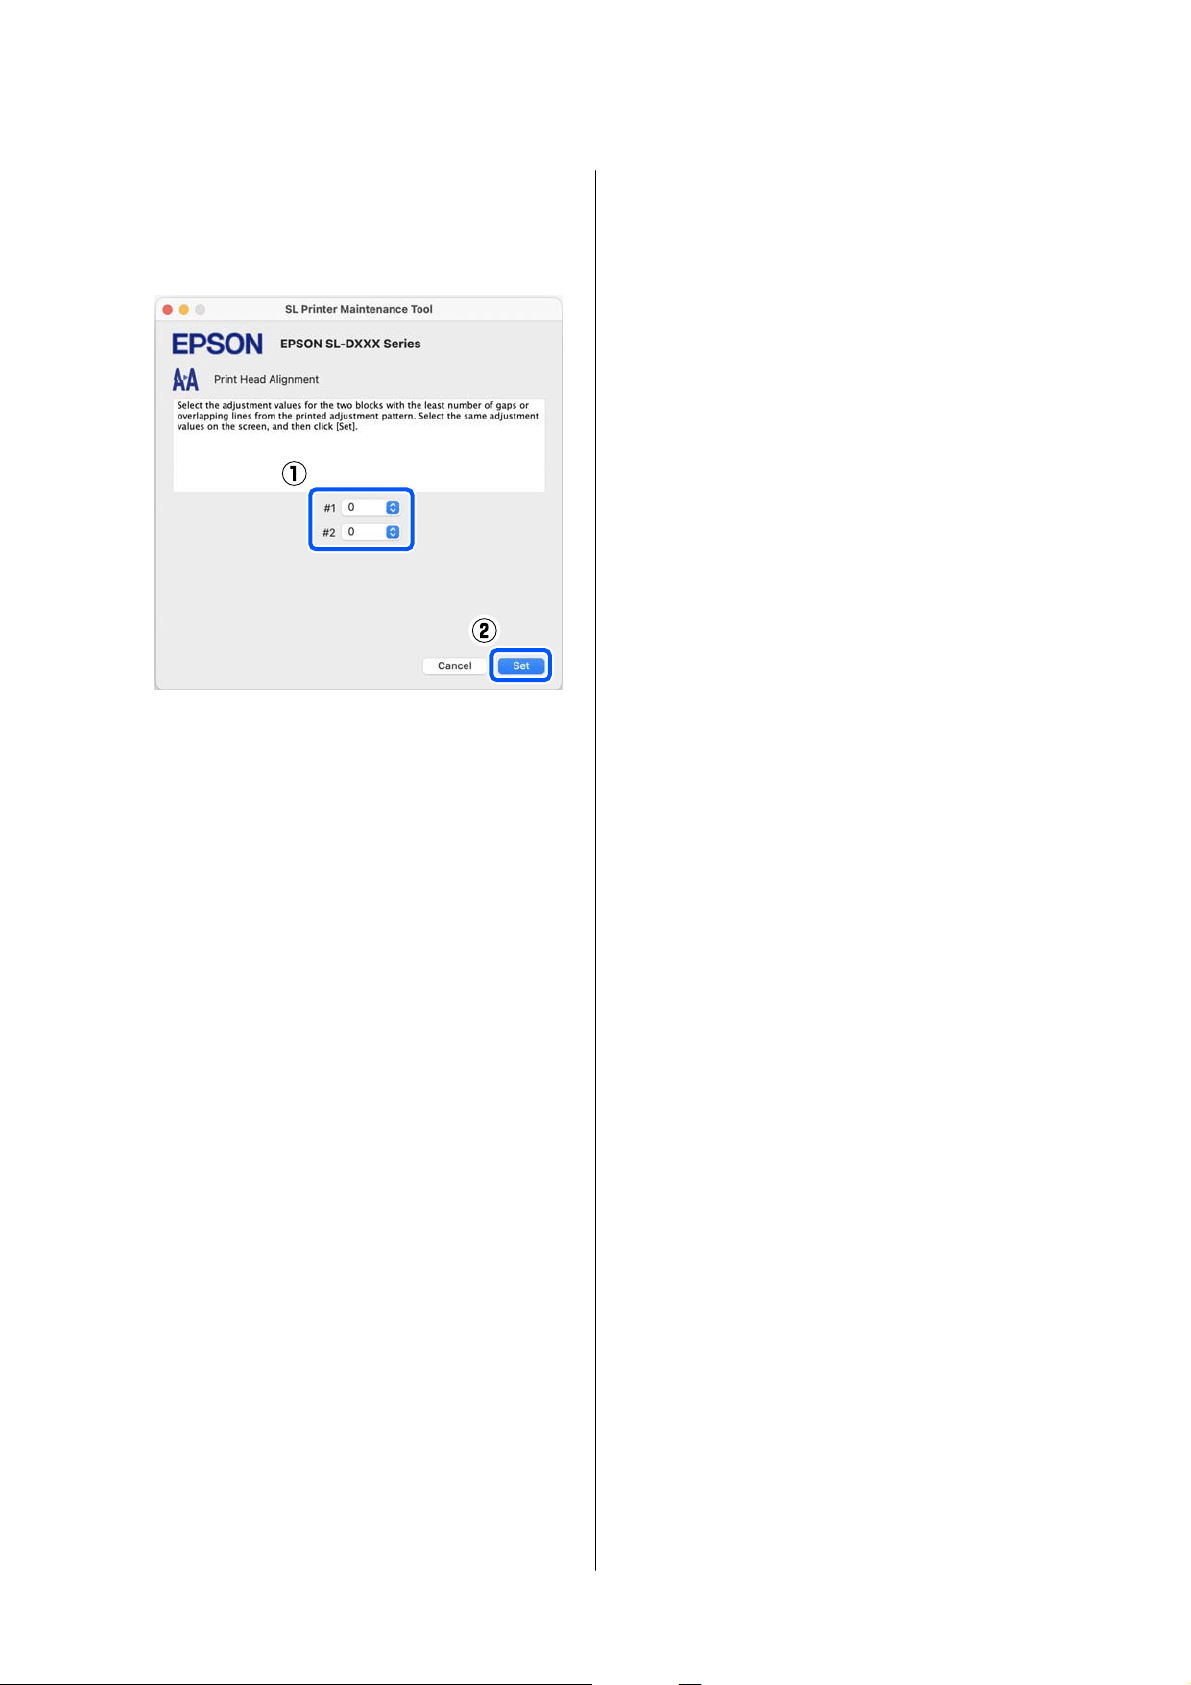
F
Select the number of the print pattern you
confirmed, and then click Set.
Select the number of the print pattern you
confirmed individually for both #1 and #2.
The adjustment values are applied.
SL-D500 Series User's Guide
Using the Maintenance Tool (Mac)
89
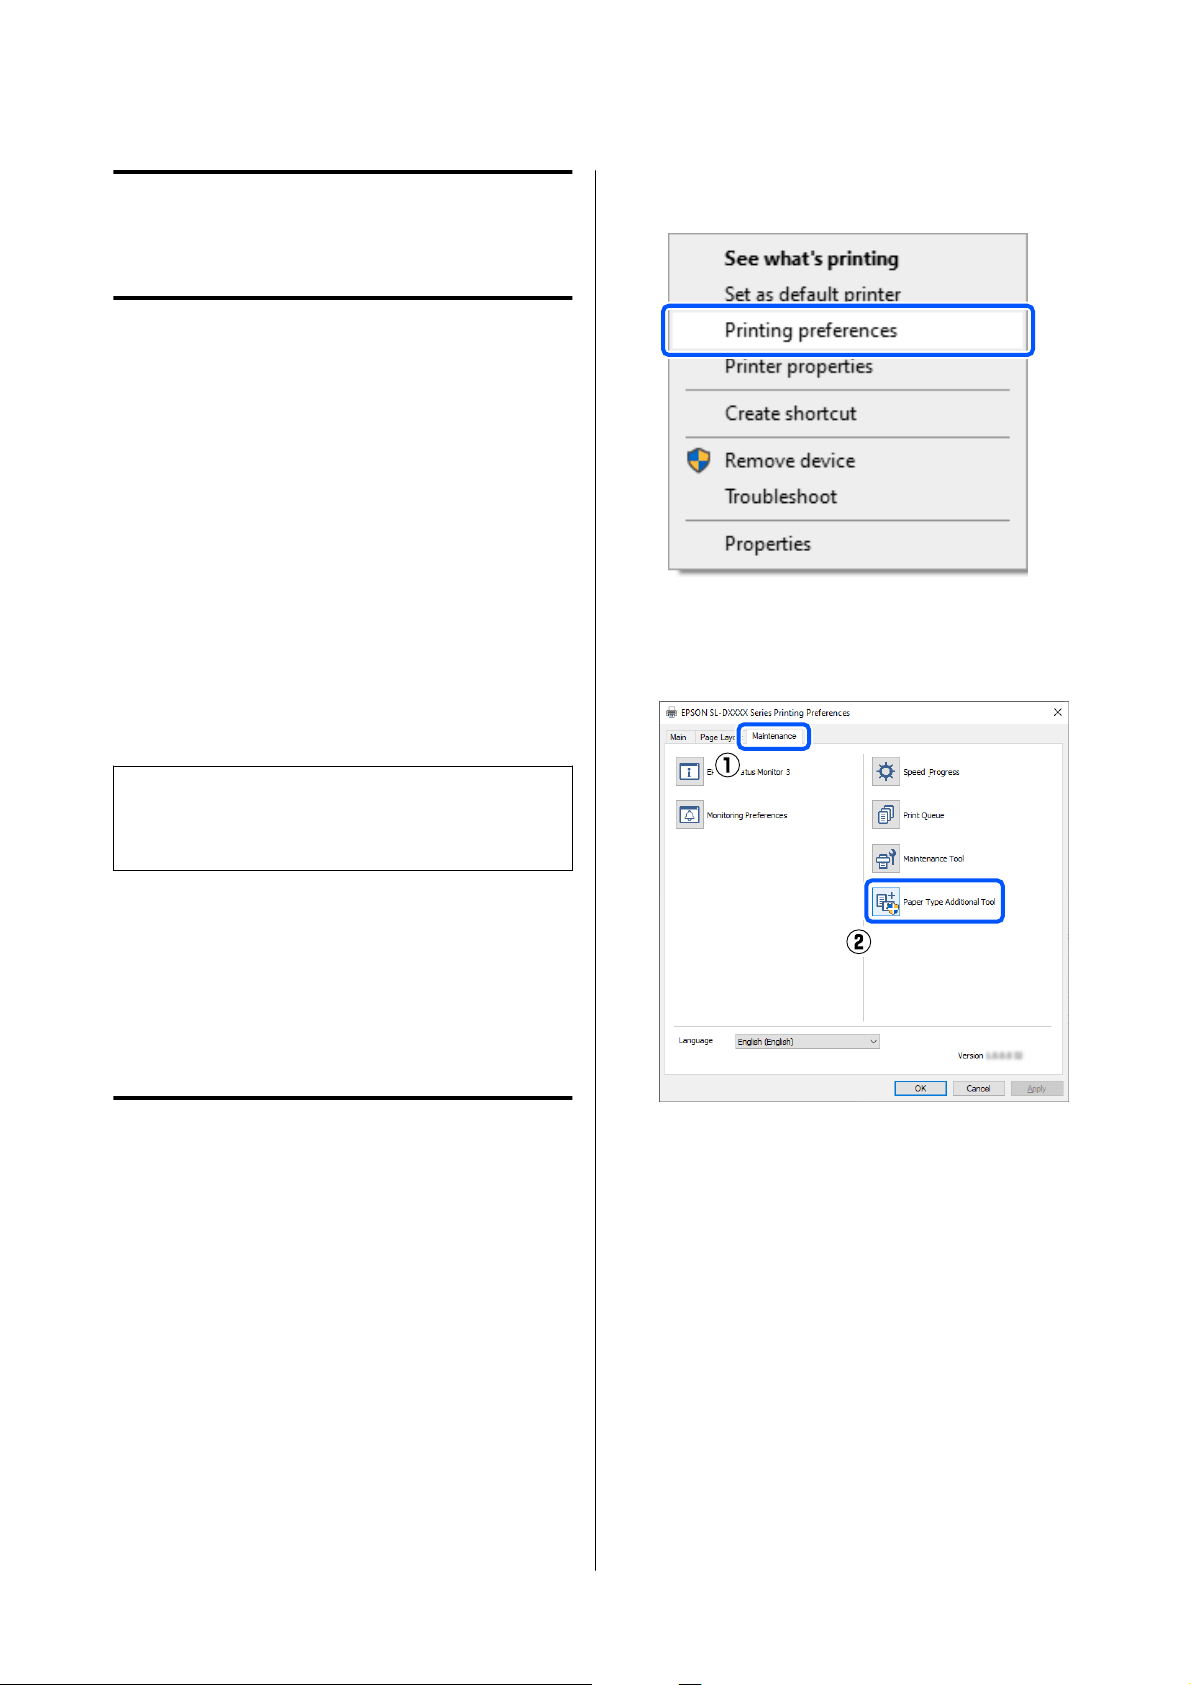
Adding Paper
Information
If the paper information for the paper you want to use
is not displayed on the control panel screen or in the
printer driver, you can add paper information. Adding
can be done by the following method.
❏ When you can acquire the Paper Type File of the
paper you want to use
U “Adding Paper Information by Using a Paper
Type File” on page 90
❏ When you cannot acquire the Paper Type File of
the paper you want to use, or when you want to
register color density adjusted to suit the paper
(Windows Only)
U “Adding Paper Information from Custom
Settings (Windows Only)” on page 92
Note:
Check with your dealer about how to acquire a Paper
Type File.
Adding Paper
Information by Using a
Paper Type File
Settings on Windows
A
Open the Control Panel, and click Hardware
and Sound - Devices and Printers, in this
order.
B
Right-click your printer icon, and select
Printing preferences.
C
Select Maintenance, and click Paper Type
Additional Tool.
Start Paper Type Additional Tool.
SL-D500 Series User's Guide
Adding Paper Information
90
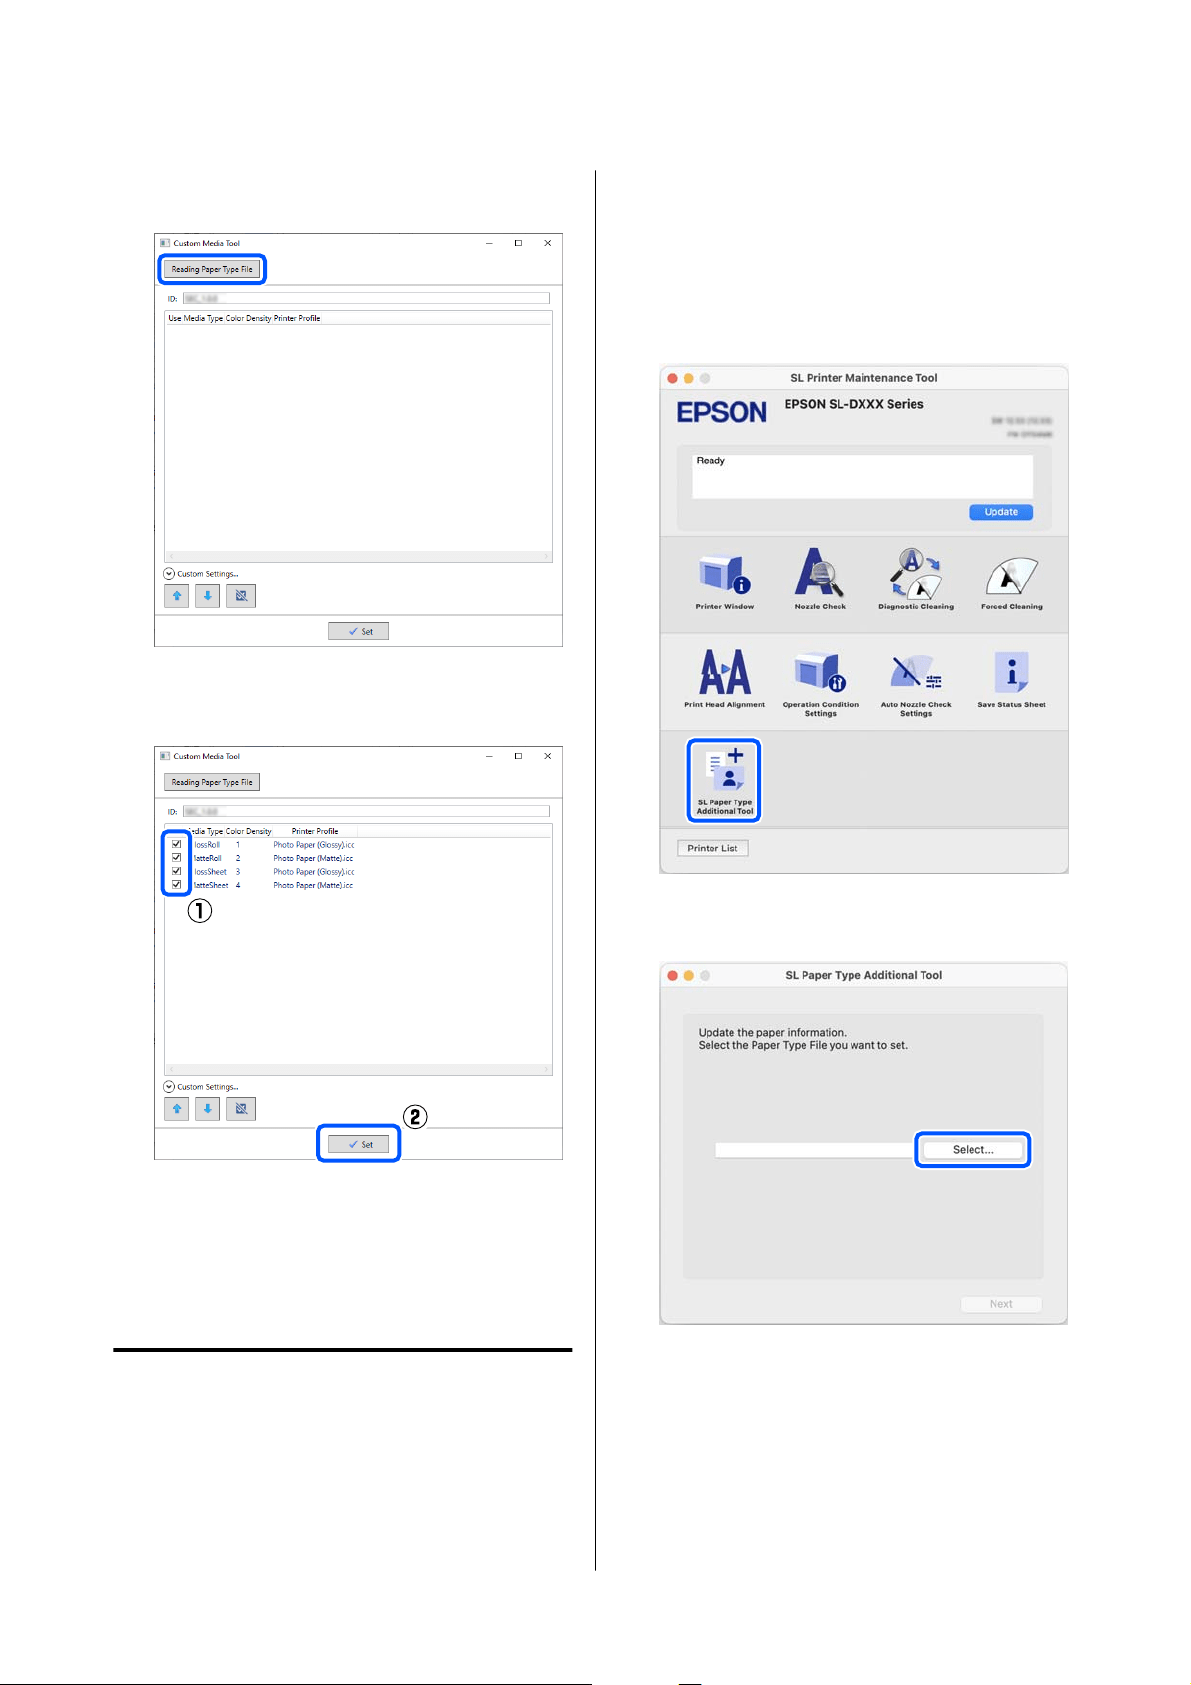
D
Click Reading Paper Type File, select a Paper
Type File, and then click Open.
E
Select the paper to use, and then click Set.
You can select up to 10 papers.
Follow the on-screen instructions to continue.
When the settings are complete, the paper
information appears in Media Type on the
control panel screen and in the printer driver.
Settings on Mac
A
Click the Apple menu - System Preferences -
Printers & Scanners, in this order.
B
Select the printer and click Options & Supplies
- Utility - Open Printer Utility.
Maintenance Tool starts.
C
Click SL Paper Type Additional Tool.
Start Paper Type Additional Tool.
D
Click Select, select a Paper Type File, and then
click Open.
SL-D500 Series User's Guide
Adding Paper Information
91
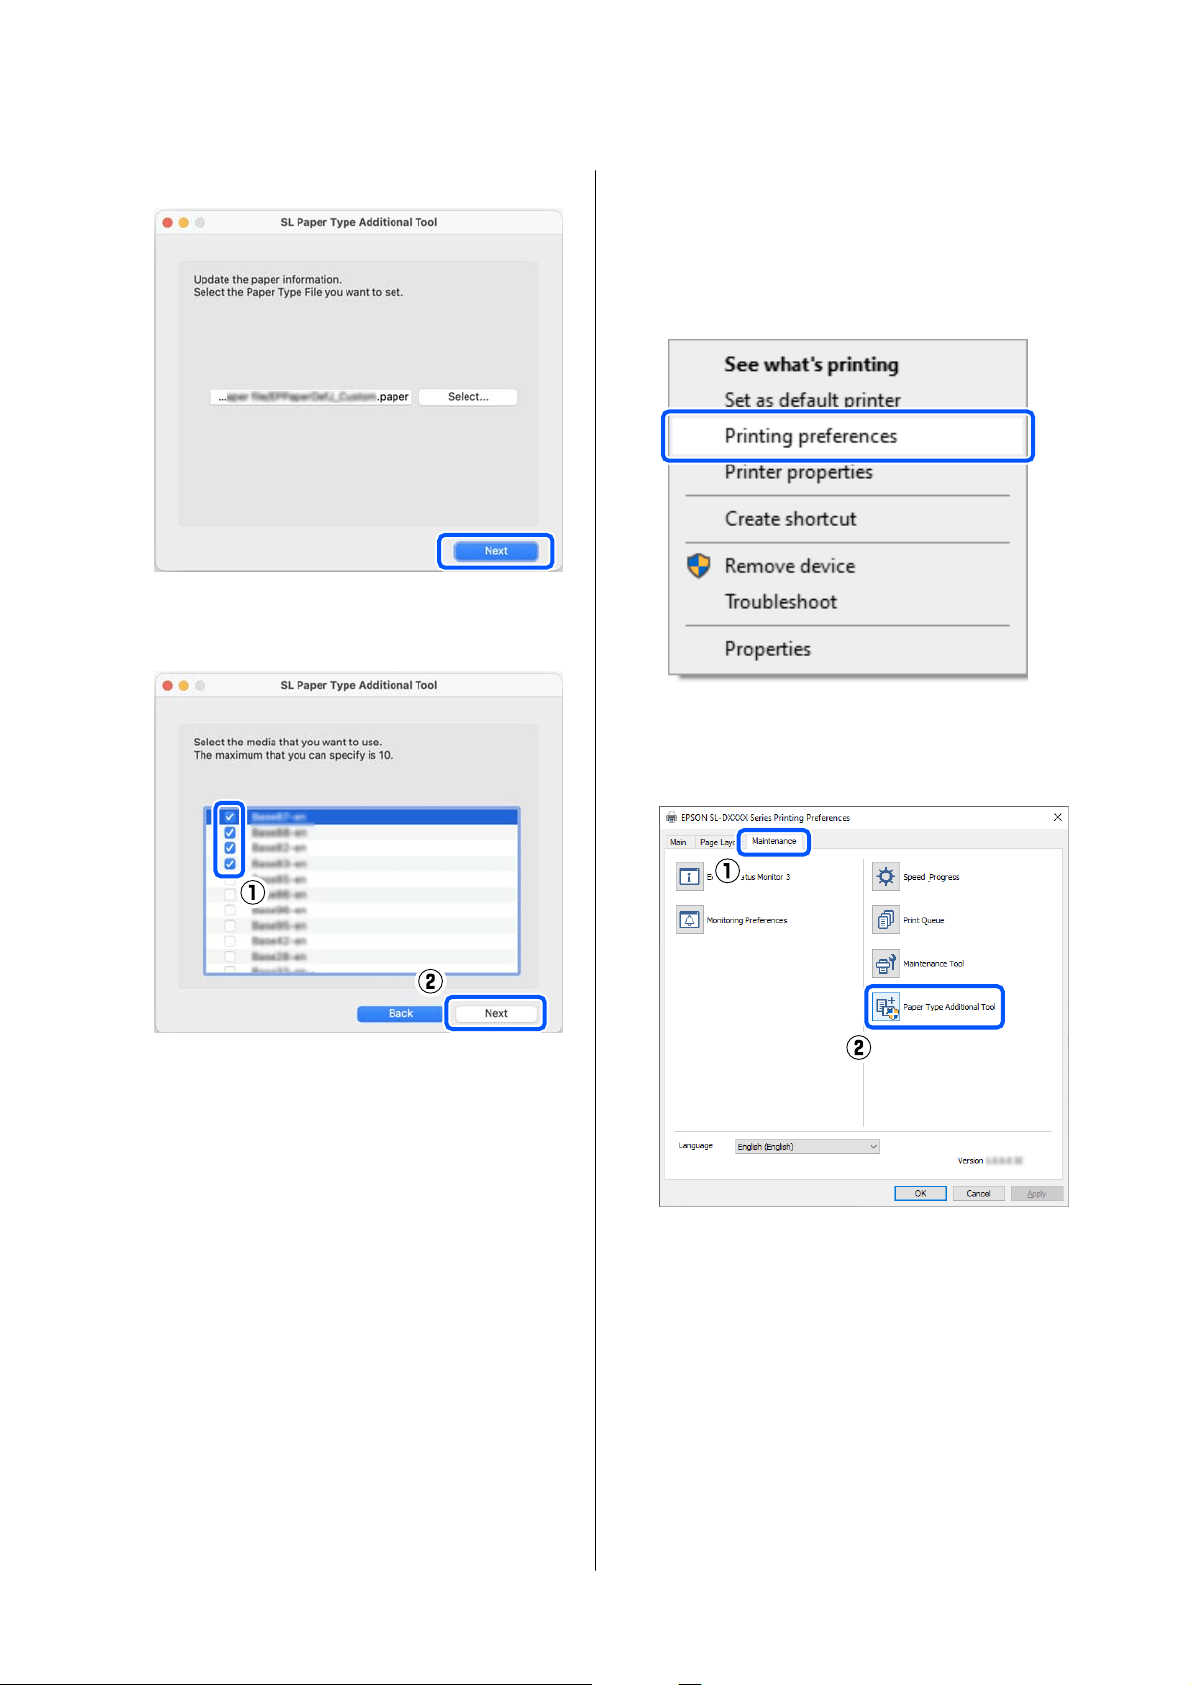
E
Click Next.
F
Select the paper to use, and then click Next.
You can select up to 10 papers.
Follow the on-screen instructions to continue.
When the settings are complete, the paper
information appears in Media Type on the
control panel screen and in the printer driver.
Adding Paper
Information from Custom
Settings (Windows Only)
If you cannot acquire the Paper Type File for the paper
you want to use, or when using commercially available
paper, add paper information by adjusting the color
density of paper information that has already been set.
A
Open the Control Panel, and click Hardware
and Sound - Devices and Printers, in this
order.
B
Right-click your printer icon, and select
Printing preferences.
C
Select Maintenance, and click Paper Type
Additional Tool.
Start Paper Type Additional Tool.
SL-D500 Series User's Guide
Adding Paper Information
92
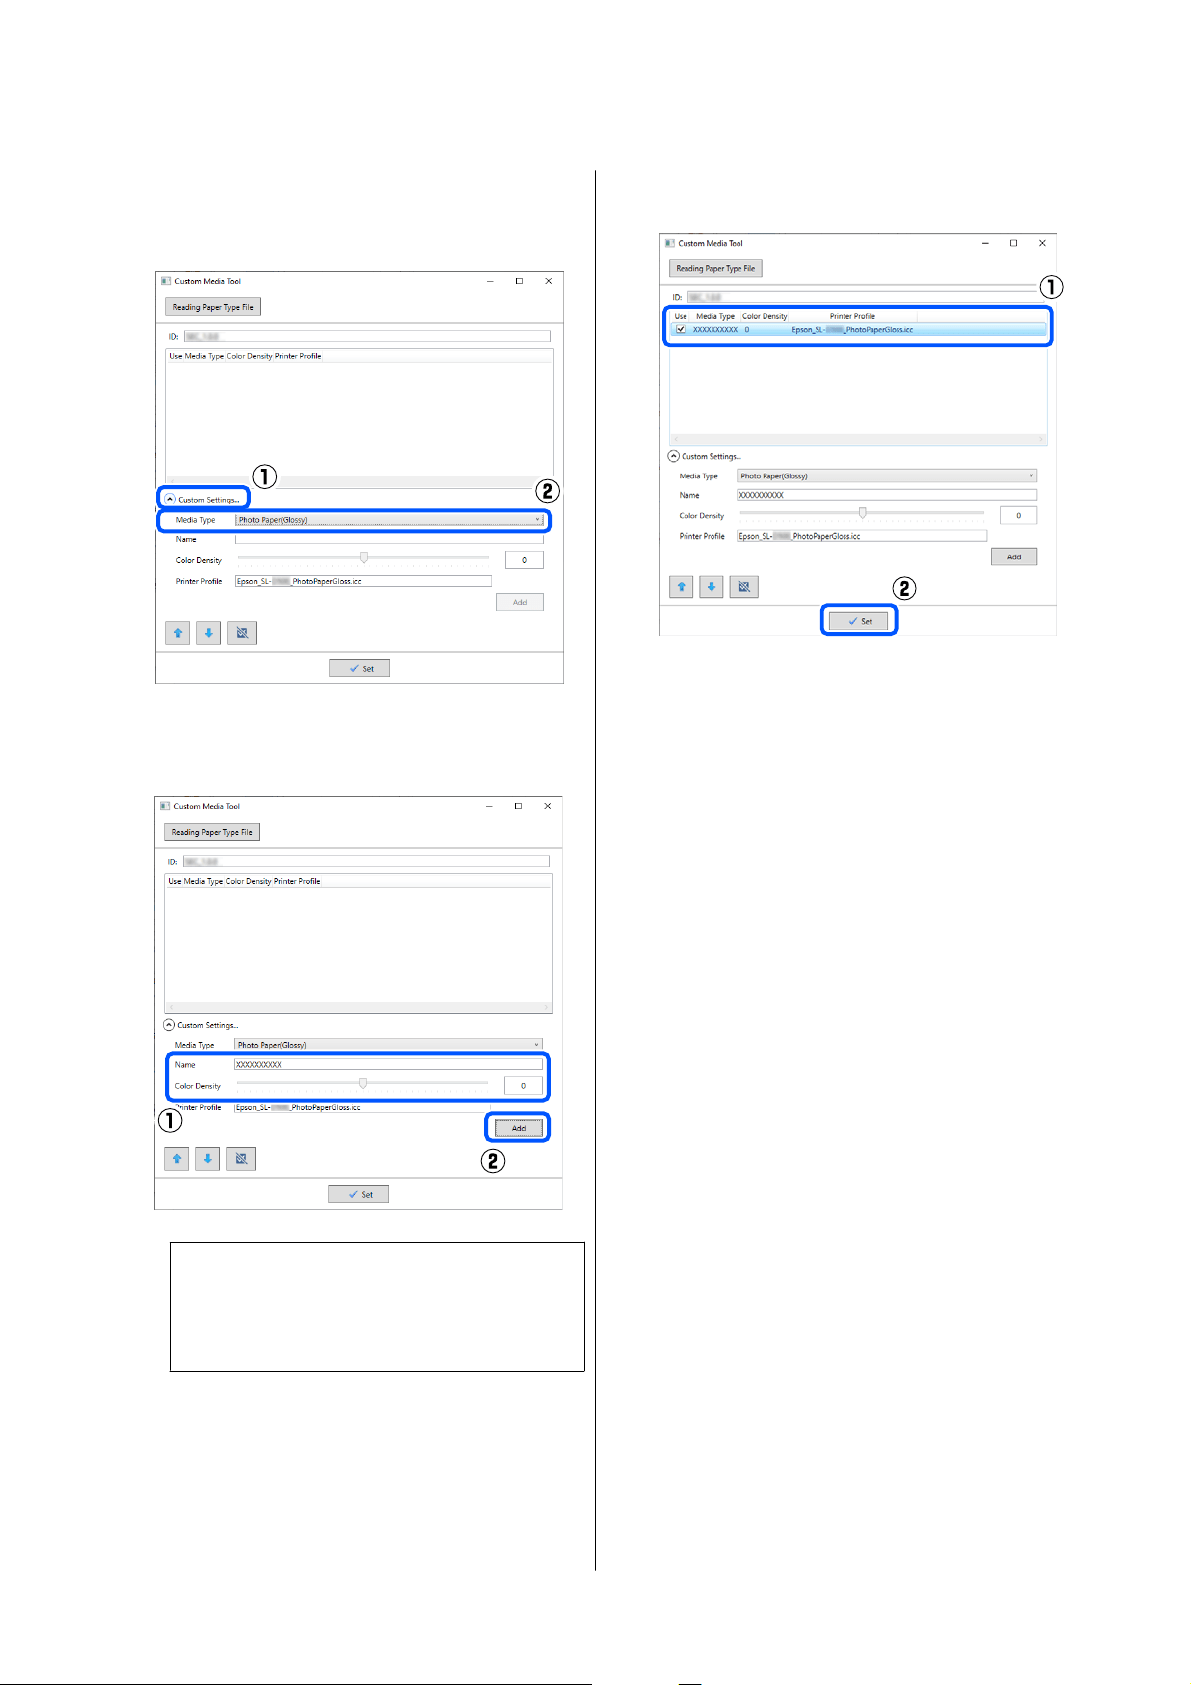
D
Click Custom Settings, and select Media Type.
Choose a paper type that is the closest match to
the paper to be used.
E
Input a name in Name, then set the Color
Density to match the paper, and then click
Add.
Note:
The added paper information appears in Media
Ty pe on the control panel screen and in the
printer driver using the name you input in Name.
F
Confirm that the paper information you added
in step 5 is selected, and then click Set.
Follow the on-screen instructions to continue.
When the settings are complete, the paper
information appears in Media Type on the
control panel screen and in the printer driver.
SL-D500 Series User's Guide
Adding Paper Information
93
Control Panel Menu
Menu List
The following items and parameters can be set and executed in the Menu. See the reference pages for more details
on each item.
Settings
For more information on these items, see U “Details of the Menu” on page 98
Item Parameter
Printer Status
Supply Status -
Message List -
Firmware Version -
Paper Setting
Paper Type Displays the supported paper types
Paper Size Displays the supported paper sizes
Maintenance
Print Head Nozzle Check -
Print Head Cleaning -
Powerful Cleaning -
Power Ink Flushing -
Fill Ink -
Set Ink Level -
Replace Maintenance Box -
Printer Setup
SL-D500 Series User's Guide
Control Panel Menu
94
Item Parameter
Paper Source Settings
Error Notice
Paper Size Notice On, Off
Paper Type Notice On, Off
Paper Setup Auto Display On, Off
Sound
Mute Off, On
Button Press Off, Low, Medium, High
Error Tone Off, Low, Medium, High
Thick Paper Off, On
Date/Time Settings
Date/Time
Date Format yyyy.mm.dd, mm.dd.yyyy, dd.mm.yyyy
Time Format 12h, 24h
Time Difference -12:45 to +13:45
Language Arabic, Czech, Danish, Dutch, English, Farsi, Finnish, French,
German, Greek, Hindi, Hungarian, Indonesian, Italian, Japanese,
Korean, Malay, Norwegian, Polish, Portuguese, Romanian,
Russian, Simplified Chinese, Spanish, Swedish, Thai, Traditional
Chinese, Turkish, Vietnamese
Keyboard QWERTY, ABC
Sleep Timer Set numerical values
PC Connection via USB Enable, Disable
Length Unit m, ft / in
Network Settings
SL-D500 Series User's Guide
Control Panel Menu
95
Item Parameter
Print Status Sheet -
Wi-Fi Setup
Wi-Fi (Recommended)
Wi-Fi Setup Wizard
Other SSIDs -
Push Button (WPS) -
Others
PIN Code (WPS) -
Wi-Fi Auto Connect -
Disable Wi-Fi -
Wi-Fi Direct
Other Methods
iOS -
Other OS Devices -
Modify
Change Network Name -
Change Password -
Disable Wi-Fi Direct -
Change Frequency Range 2.4GHz, 5GHz
Restore Default Settings -
Connection Check -
Advanced Setup
Device Name -
TCP/IP Auto, Manual
DNS Server Auto, Manual
Proxy Server Do Not Use, Use
IPv6 Address Enable, Disable
Link Speed & Duplex Auto, 10BASE-T Half Duplex, 10BASE-T Full Duplex, 100BASE-TX
Half Duplex, 100BASE-TX Full Duplex
Redirect HTTP to HTTPS Enable, Disable
Disable IPsec/IP Filtering -
Disable IEEE802.1X -
SL-D500 Series User's Guide
Control Panel Menu
96
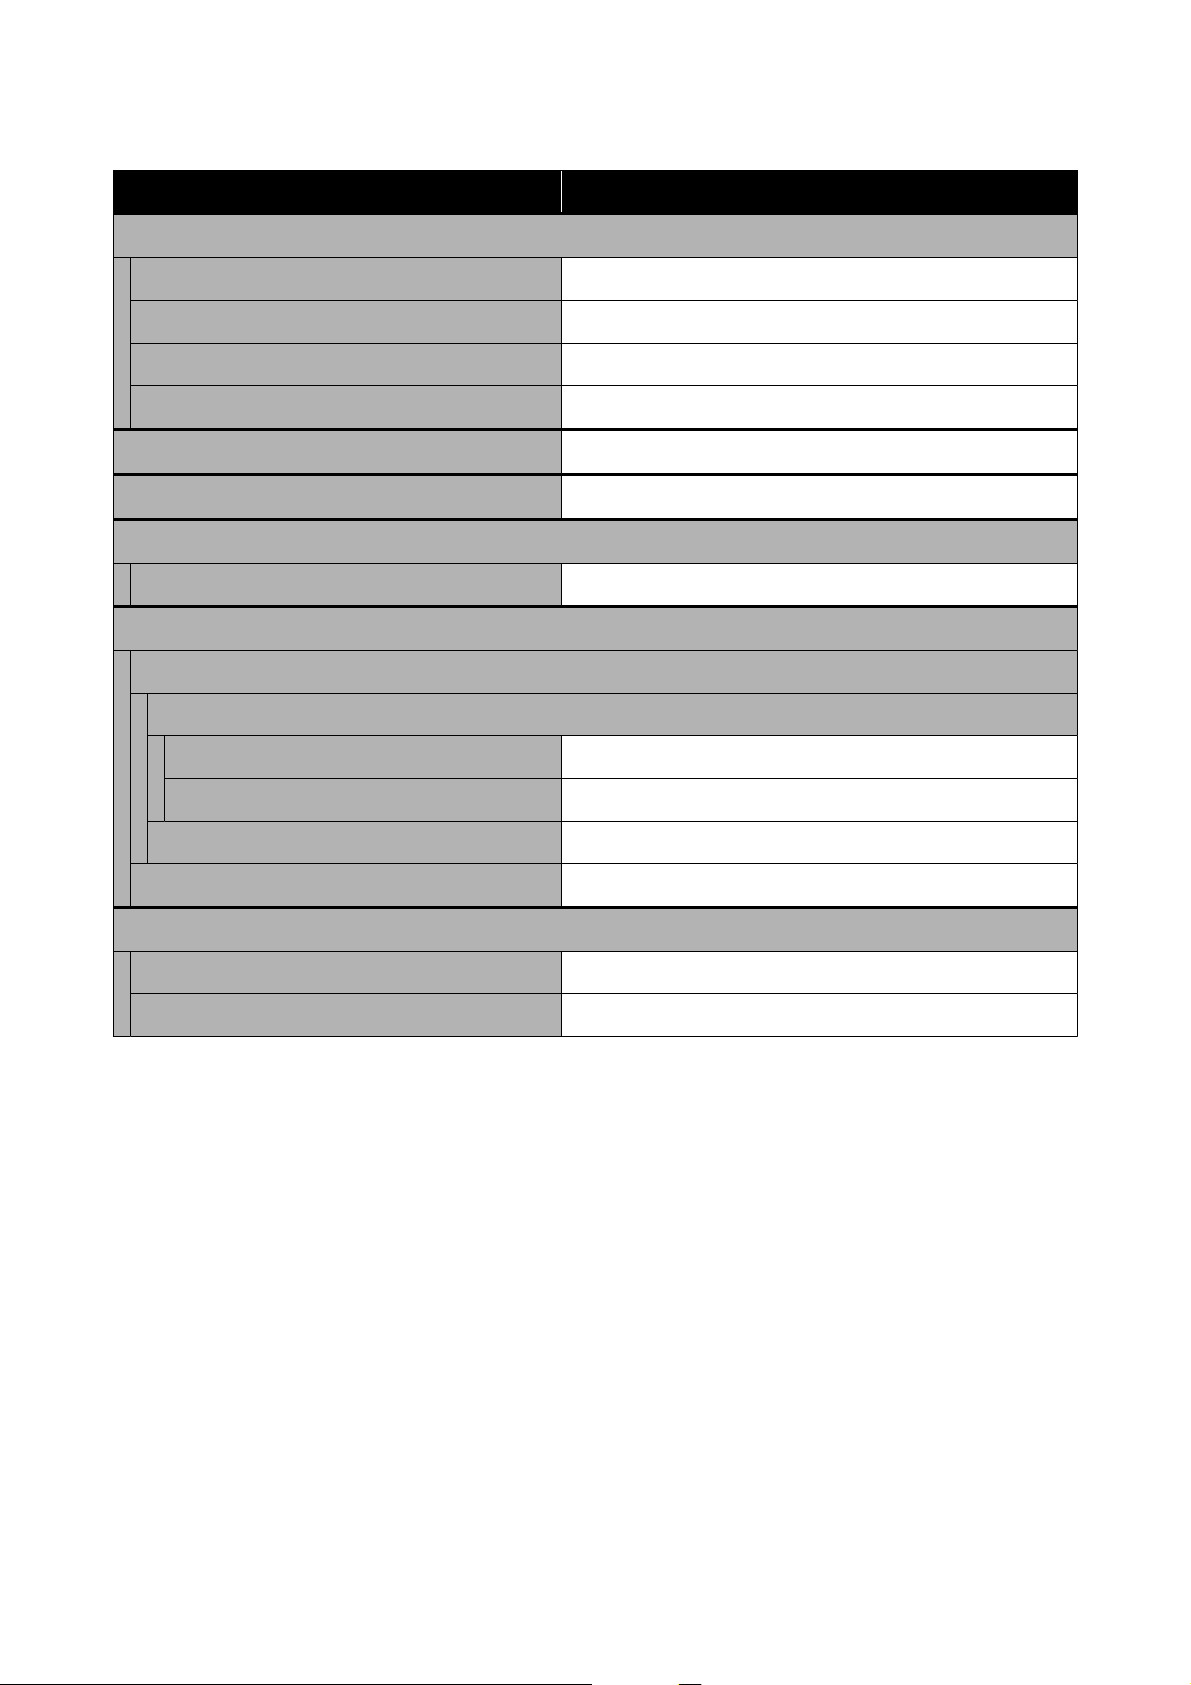
Item Parameter
Epson Connect Services
Register/Delete -
Suspend/Resume -
Email Address -
Status -
Print Network Status Sheet -
Print Counter -
Reports
Network -
Security Settings
Admin Settings
Admin Password
Change -
Restore Default Settings -
Lock Setting Off, On
Password Encryption Off, On
Restore Default Settings
Network Settings -
Clear All Data and Settings -
Wi-Fi Setup
Displays the same content as Settings - Network Settings - Wi-Fi Setup.
SL-D500 Series User's Guide
Control Panel Menu
97

Details of the Menu
* indicates default settings.
Item Parameter Explanation
Printer Status
Supply Status - You can confirm how to check the amount of ink remaining, the free
space in the maintenance box, and the product number of the
maintenance box. The
mark indicates the free space in the
maintenance box is low. The
mark indicates that there is no free
space in the maintenance box, so the maintenance box should be
replaced.
Message List - The printer’s current status and description of unresolved errors are
displayed in a list.
Firmware Version - Displays the firmware version of the printer.
Paper Setting
Paper Size 89 x 127 mm Select the size of the paper loaded in the paper cassette.
If the desired size is not in the options, then select User-Defined, and
enter the vertical length of the paper.
102 x 152 mm
*
User-Defined
Paper Type
Photo Gloss (250)
*
Select the type of the paper loaded in the paper cassette.
Photo Luster (250)
Photo Gloss DS
(225)
Photo Gloss DS
(190)
Photo Luster DS
(225)
Photo Luster DS
(190)
Photo Paper(Glossy)
Photo Paper(Matte)
Paper added by
using a Paper Type
File
Maintenance
SL-D500 Series User's Guide
Control Panel Menu
98
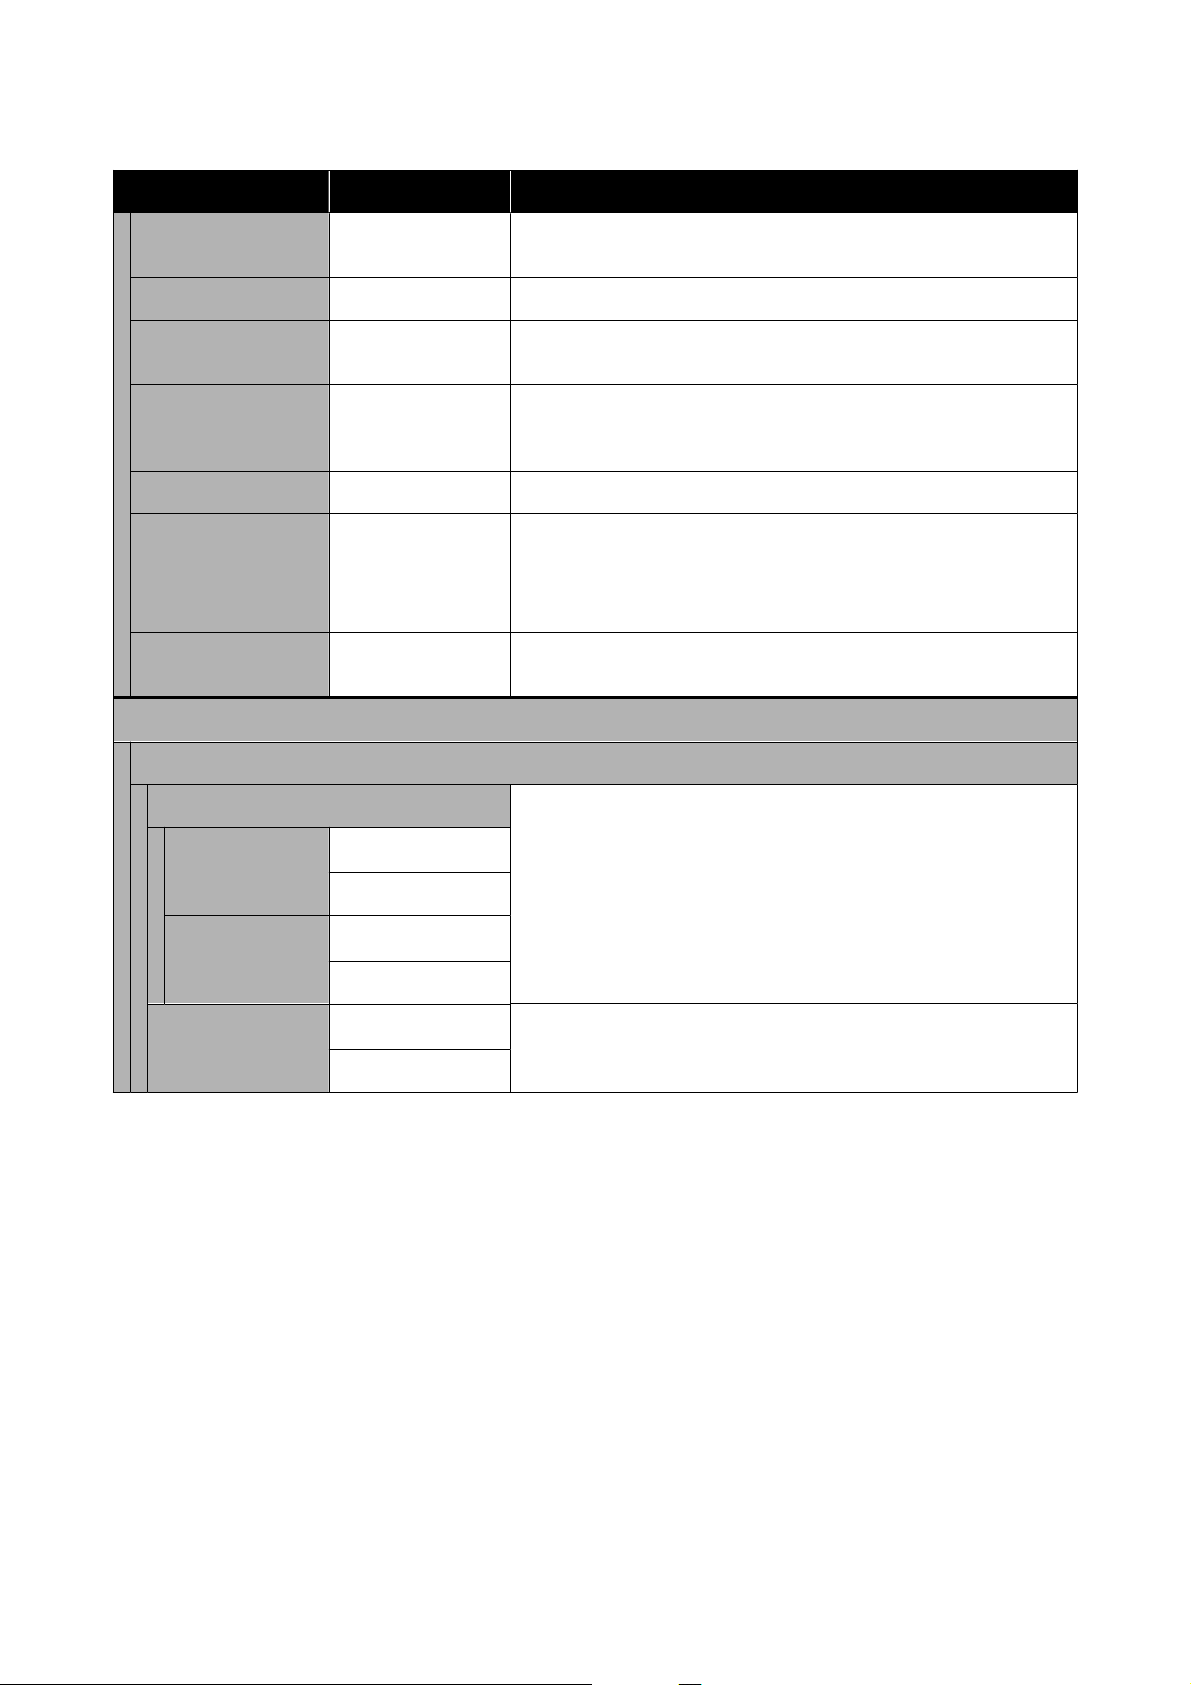
Item Parameter Explanation
Print Head Nozzle
Check
- Print a nozzle check pattern to check whether nozzles (holes that eject
ink) in the print head are clogged.
Print Head Cleaning - Clean the print head nozzles to clear the clogs.
Powerful Cleaning - This is powerful cleaning that is executed when clogged nozzles are not
cleared by doing Print Head Cleaning.
Power Ink Flushing - If clogs do not clear after executing Powerful Cleaning and then not
using the printer to print for more than 12 hours, executing this may
improve print quality.
Fill Ink - You can check the filling procedure and precautions when filling ink.
Set Ink Level - Set the level at which to refill ink for each color. If the correct level is not
set, then the ink level warning messages will not appear at the
appropriate time.
This can also be executed after performing Fill Ink.
Replace Maintenance
Box
- Execute this when replacing the maintenance box to watch an
explanation shown on screen while you replace the parts.
Printer Setup
Paper Source Settings
Error Notice When turned On, error messages are displayed when the paper type
and size set in Print Settings in the printer driver do not match the fed
Paper Setting.
Paper Size Notice
On
*
Off
Paper Type Notice
On
*
Off
Paper Setup Auto
Display
On
*
Turn this On to show the Paper Setting when the paper cassette is
inserted. If you disable this feature, you cannot print from an iPhone,
iPad, or iPod touch using AirPrint.
Off
SL-D500 Series User's Guide
Control Panel Menu
99
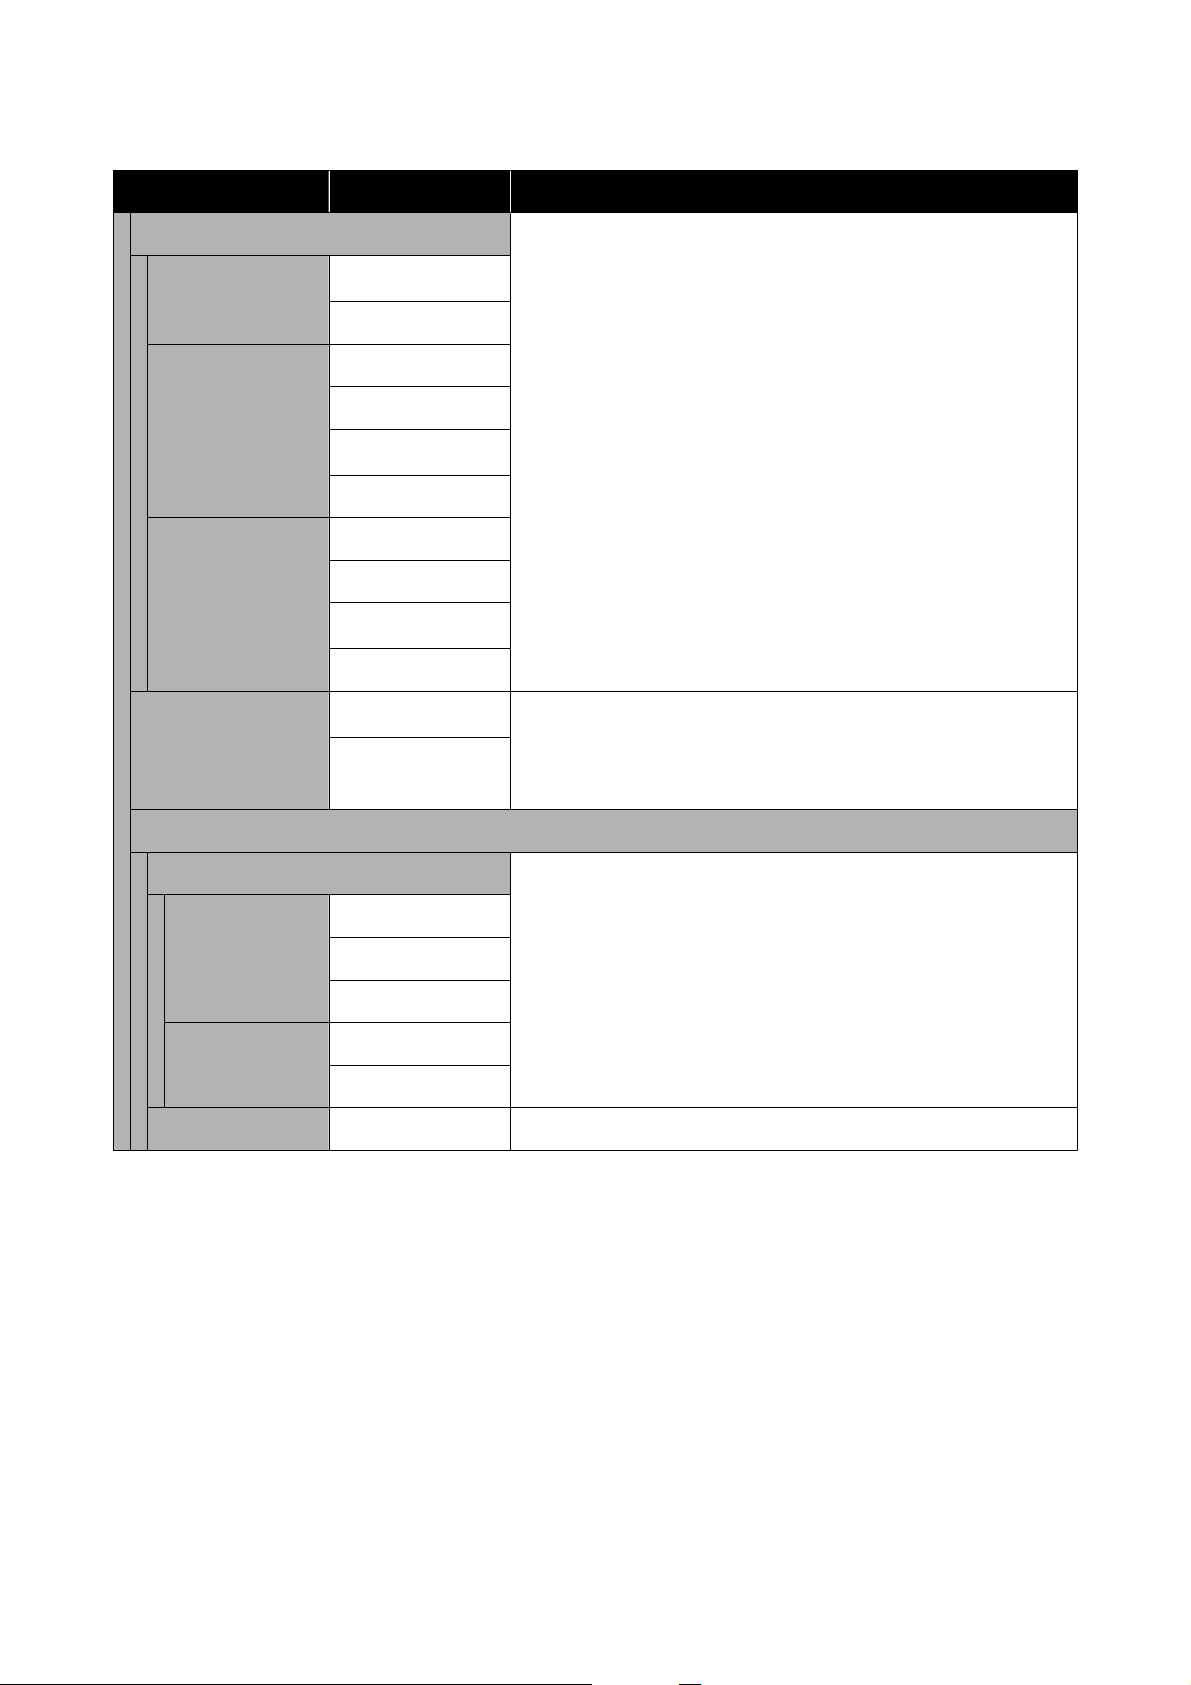
Item Parameter Explanation
Sound Sets volume of sounds produced by the printer.
When Mute is On, all sounds are muted.
Mute
Off
*
On
Button Press Off
Low
Medium
*
High
Error Tone Off
Low
Medium
*
High
Thick Paper
Off
*
Normally, leave this Off.
Set this to On to widen the gap between the print head and paper to
reduce rubbing if the print head and paper rub together causing print
results to be dirty.
On
Date/Time Settings
Date/Time Set the display format for the date and time.
You can set the display format for the date and time by deciding the
date.
Date Format yyyy.mm.dd
mm.dd.yyyy
dd.mm.yyyy
Time Format 12h
24h
Time Difference -12:45 to +13:45 Set the time difference with coordinated universal time (UTC).
SL-D500 Series User's Guide
Control Panel Menu
100
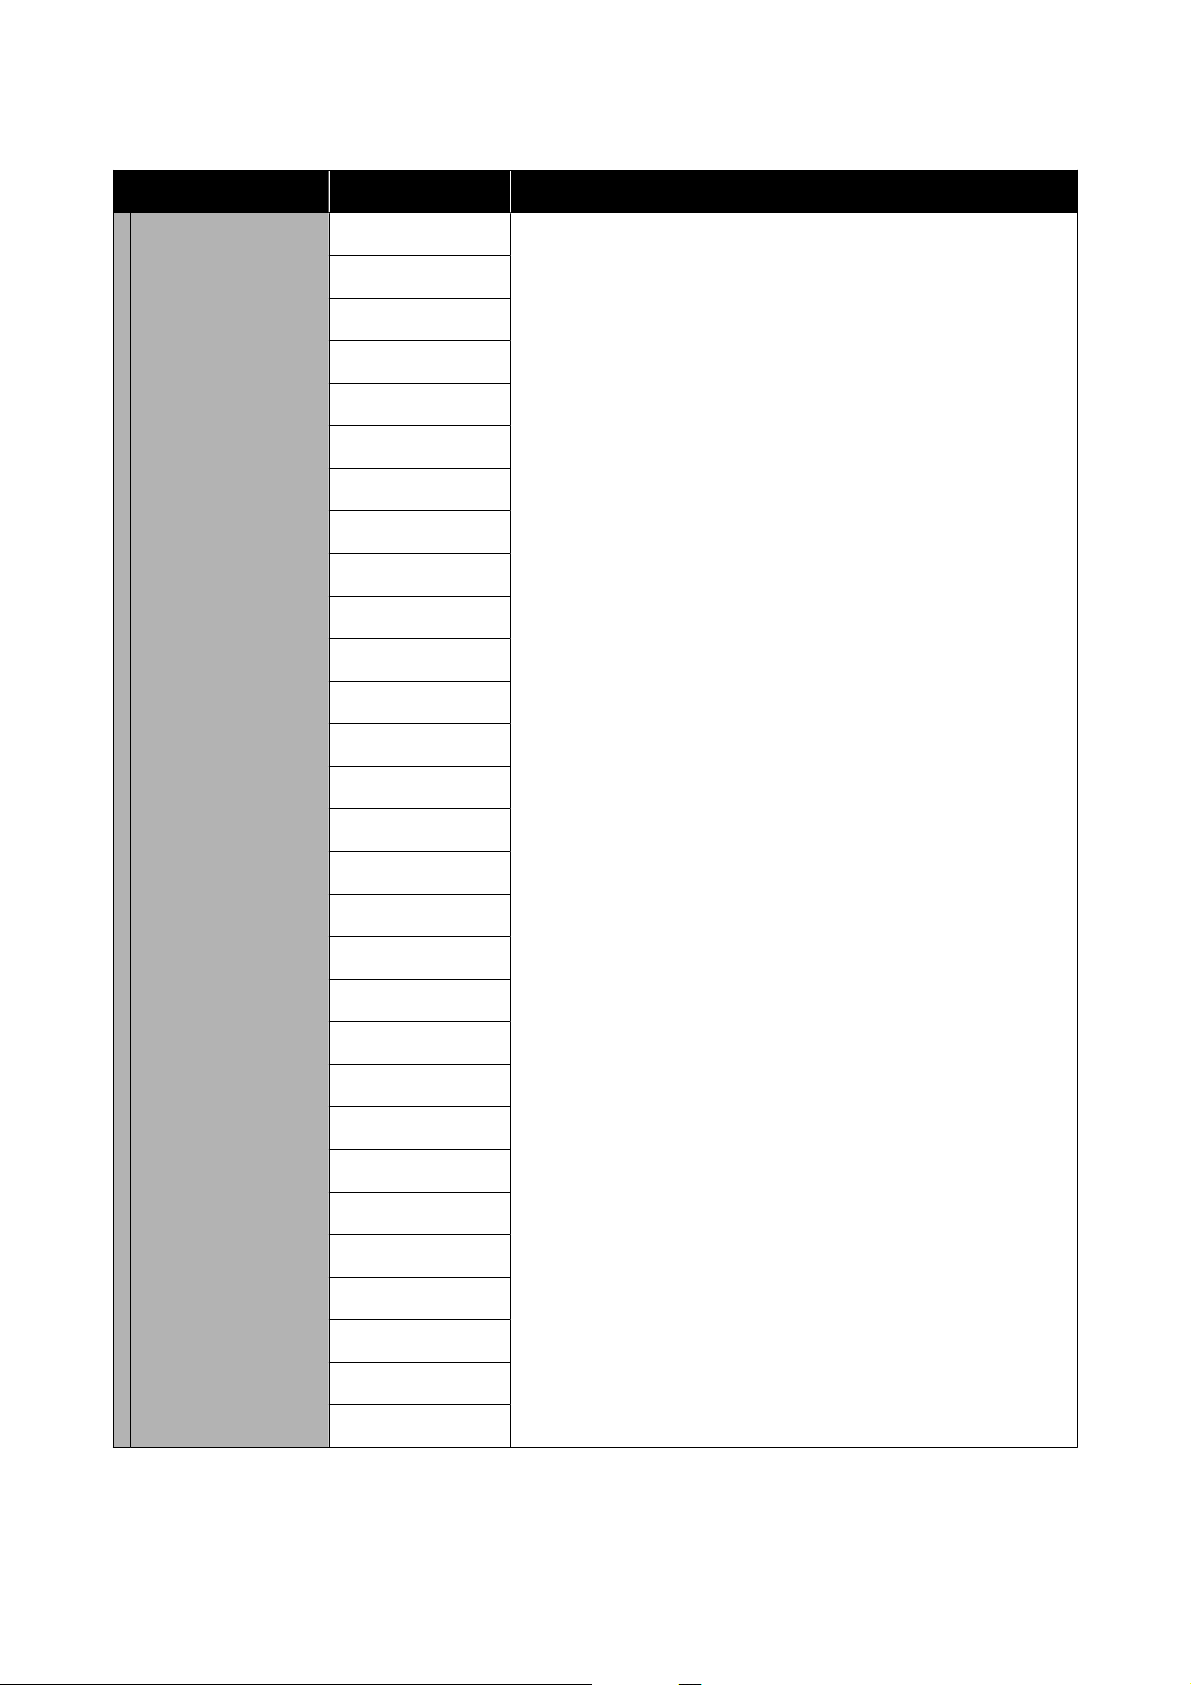
Item Parameter Explanation
Language Arabic Select the language that appears on screen.
Czech
Danish
Dutch
English
Farsi
Finnish
French
German
Greek
Hindi
Hungarian
Indonesian
Italian
Japanese
Korean
Malay
Norwegian
Polish
Portuguese
Romanian
Russian
Simplified Chinese
Spanish
Swedish
Thai
Traditional Chinese
Turkish
Vietnamese
SL-D500 Series User's Guide
Control Panel Menu
101
Item Parameter Explanation
Keyboard
QWERTY
*
Select the keyboard layout used in the control panel screens.
ABC
Sleep Timer 1 to 60 Set the time until the printer automatically goes into sleep (energy
saving) mode when the printer has continuously not been operated.
When the set time is exceeded, the screen becomes dark.
PC Connection via
USB
Enable
*
When Enable is set, access is allowed from computers connected via
USB. When Disable is set, you can prohibit printing that does not go
through the network.
Disable
Length Unit m Set the units of length to be displayed and input on the control panel.
ft / in
Network Settings
Print Status Sheet - Prints a network status sheet.
Wi-Fi Setup
Wi-Fi (Recommended) Connect the printer to a network through a wireless LAN router.
Select the connection method and follow the on-screen instructions to
do the settings.
Wi-Fi Setup Wizard
Other SSIDs -
Push Button
(WPS)
-
Others
PIN Code (WPS) -
Wi-Fi Auto Con-
nect
-
Disable Wi-Fi - Select to disable Wi-Fi.
SL-D500 Series User's Guide
Control Panel Menu
102
Item Parameter Explanation
Wi-Fi Direct Directly connect smart devices to the printer using a wireless LAN.
U “Connecting to a Smart Device” on page 107
Other Methods
iOS -
Other OS Devices -
Modify Change Network Name:
Change the connection name (SSID) of the Wi-Fi Direct (simple AP)
connected to the printer to any value. The connection name (SSID) can
be set using the characters on the keyboard displayed on the control
panel screen. Input up to 22 characters.
If the connection name (SSID) is changed, then all the connected
devices will be cut off. If you change the connection name, then
reconnect to connected devices using the new connection name (SSID).
Change Password:
Change the password of the Wi-Fi Direct (simple AP) connected to the
printer. The password can be set using the ASCII characters on the soft
keyboard displayed on the control panel. Input from 8 to 22 characters.
If the password is changed, then all the connected devices will be cut
off. If you change the password, then reconnect to connected devices
using the new password.
Disable Wi-Fi Direct:
Disable the Wi-Fi Direct (simple AP) connection. If this is disabled, then
all the connected devices will be cut off.
Change Frequency Range:
This setting may not be visible, depending on your region.
Change the frequency band of the Wi-Fi Direct (simple AP) connected
to the printer. This can be set to 2.4 GHz or 5 GHz.
If the frequency band is changed, then all the connected devices will be
cut off. Connect them again.
If the frequency band is set to 5 GHz, then devices that do not support 5
GHz cannot be reconnected.
Restore Default Settings:
Returns all the Wi-Fi Direct (simple AP) settings to the factory defaults.
This also deletes the registered connection information, which is used
by Wi-Fi Direct functions of smart devices, stored on the printer.
Change Net-
work Name
-
Change Pass-
word
-
Disable Wi-Fi
Direct
-
Change Fre-
quency Range
2.4GHz
*
5GHz
Restore Default
Settings
-
Connection Check - Checks the status of the printer’s network connection and prints a
network connection diagnosis report. If there is a problem with the
connection, use the results of the diagnosis to resolve it.
SL-D500 Series User's Guide
Control Panel Menu
103
Item Parameter Explanation
Advanced Setup Set various items related to the network.
Device Name -
TCP/IP Auto
Manual
DNS Server Auto
Manual
Proxy Server Do Not Use
Use
IPv6 Address
Enable
*
Disable
Link Speed & Du-
plex
Auto
*
10BASE-T Half
Duplex
10BASE-T Full
Duplex
100BASE-TX Half
Duplex
100BASE-TX Full
Duplex
Redirect HTTP to
HTTPS
Enable
*
Disable
Disable IPsec/IP Fil-
tering
- Settings are enabled in Web Config in the built-in software.
This can only switch them to disabled.
See the following for how to start Web Config.
U “How to Use Web Config” on page 23
Disable IEEE802.1X -
Epson Connect Services
Register/Delete - Register a printer to Epson Connect or delete a registered printer.
See the following portal site for details on using the Epson Connect
service.
https://www.epsonconnect.com/
Suspend/Resume - Temporarily stop using the Epson Connect service or restart using the
service after it was stopped.
Email Address - Check the email address of the printer that is registered in Epson
Connect.
Status - Confirm that the printer is registered and connected to Epson Connect.
SL-D500 Series User's Guide
Control Panel Menu
104
Item Parameter Explanation
Print Network Status
Sheet
- Prints a network status sheet.
Print Counter - Shows the amount of printing from when the printer was first used until
the present.
Reports Checks the status of the printer’s network connection and prints a
network connection diagnosis report. If there is a problem with the
connection, use the results of the diagnosis to resolve it.
Network -
Security Settings
Admin Settings
Admin Password Sets, changes, and initializes the administrator’s password.
The initial value for the administrator’s password is the product’s serial
number. Confirm the product serial number printed on a label on the
printer.
Change -
Restore Default
Settings
-
Lock Setting
Off
*
Uses the Admin Password to lock the control panel so it cannot be
used. See the Administrator’s Guide for information on the settings that
are locked.
On
Password Encryption
Off
*
Select On to encrypt the password, and then restart the printer. If the
power is cut off during a restart, the password data could be damaged
and the printer’s settings initialized. If this happens, reset the password
information.
On
Restore Default Settings
Network Settings - Return network related settings to factory defaults.
Clear All Data and Set-
tings
- Returns all settings to their defaults.
SL-D500 Series User's Guide
Control Panel Menu
105
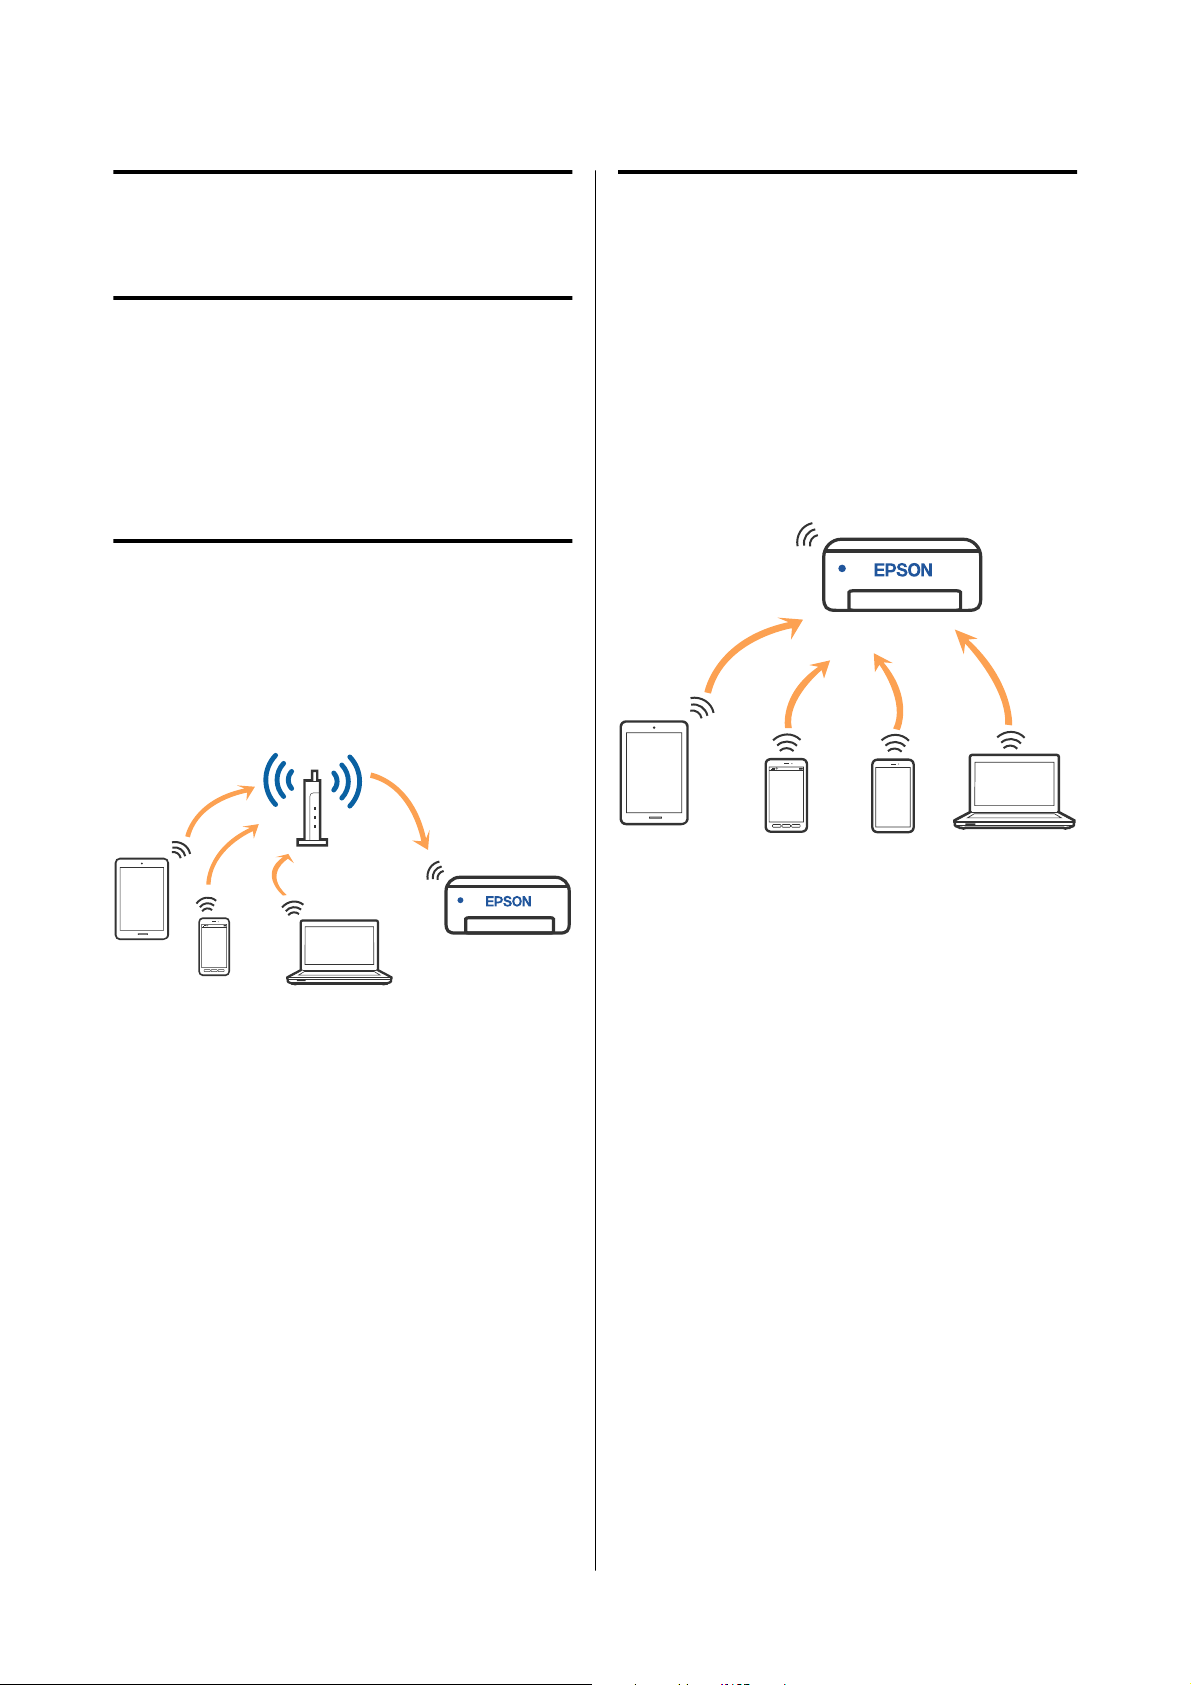
Wireless LAN
Connection
Types of Wireless LAN
Connection
You can use the following connection methods.
Wi-Fi Connection
Connect the printer and the computer or smart device
to the wireless router. This connection method is for
using smart devices and computers connected via
wireless LAN (Wi-Fi) through a wireless LAN router
(access point).
Related information
U “Connecting to a Computer” on page 106
U “Connecting to a Smart Device Over a Wireless
Router” on page 107
U “Selecting Wi-Fi Settings from the Printer” on
page 109
Wi-Fi Direct (Simple AP)
Connection
Use this connection method when you want to
connect the printer directly to a computer or smart
device without using wireless LAN (Wi-Fi) and a
wireless LAN router (access point). In this mode, the
printer acts as a wireless router and you can connect
the devices to the printer without having to use a
standard wireless router. However, devices directly
connected to the printer cannot communicate with
each other through the printer.
The printer can be connected by wireless LAN (Wi-Fi)
and Wi-Fi Direct (Simple AP) simultaneously.
However, if you start setting Wi-Fi Direct (Simple AP)
while connected by wireless LAN (Wi-Fi), the wireless
LAN (Wi-Fi) connection is temporarily disconnected.
Related information
U “Connecting to an iPhone, iPad, iPod touch Using
Wi-Fi Direct” on page 107
U “Connecting to Devices Other Than iOS Using
Wi-Fi Direct” on page 109
Connecting to a
Computer
We recommend using the installer to connect the
printer to a computer. You can run the installer using
one of the following methods.
SL-D500 Series User's Guide
Wireless LAN Connection
106
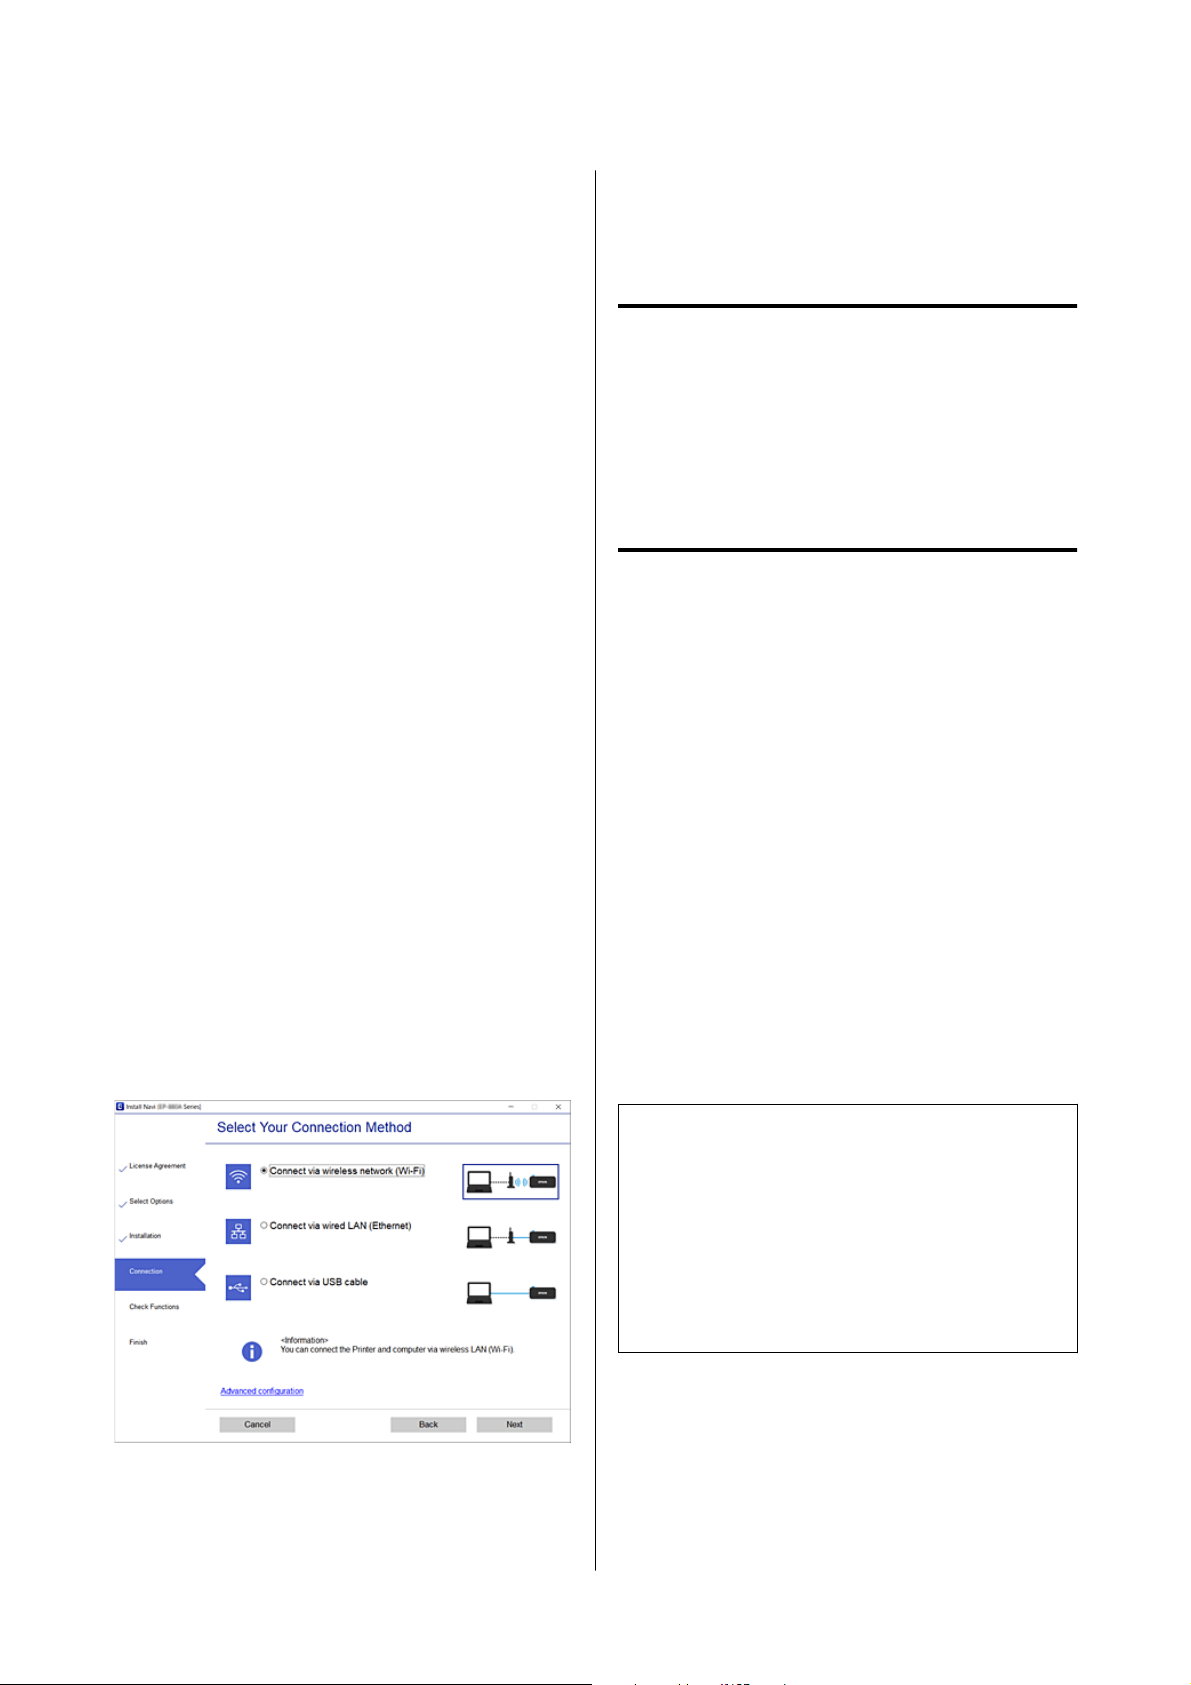
North America
Visit https://www.epson.com/support (U.S.) or https://
www.epson.ca/support (Canada) and search for your
product. Then download and run the installer and
follow the on-screen instructions.
Latin America
Visit https://www.latin.epson.com (Caribbean),
https://www.epson.com.br/suporte (Brazil), or https://
www.latin.epson.com/soporte (other regions) and
search for your product. Then download and run the
installer and follow the on-screen instructions.
Other Regions
❏ Setting up from the website
Access the following website, and then enter the
product name. Go to Setup, and then start setting
up.
https://epson.sn
❏ Setting up using the software disc (only for the
models that come with a software disc and users
with computers with disc drives)
Insert the software disc into the computer, and
then follow the on-screen instructions.
Selecting the Connection Methods
Follow the on-screen instructions until the following
screen is displayed, and then select the connection
method of the printer to the computer.
Select the connection method for the printer, and then
click Next.
Follow the on-screen instruction hereafter.
Connecting to a Smart
Device
Connecting to a Smart Device
Over a Wireless Router
If you are using iOS or Android, you may find it
convenient to do the settings from Epson Smart Panel.
Install and start up the latest version of Epson Smart
Panel. The Wi-Fi setup starts.
Connecting to an iPhone, iPad,
iPod touch Using Wi-Fi Direct
This method allows you to connect the printer directly
to an iPhone, iPad, or iPod touch without a wireless
router. The following conditions are required to
connect using this method. If your environment does
not match these conditions, you can connect by
selecting Other OS Devices. See "Related
Information" below for details on connecting.
❏ iOS 11 or later
❏ Using the standard camera application to scan the
QR code
Epson Smart Panel is used to print from a smart
device. Install an Epson printing app, such as Epson
Smart Panel, on the smart device in advance.
Note:
❏ If you are using iOS, you may find it convenient to
select the settings from Epson Smart Panel.
❏ You only need to make these settings for the printer
and the smart device that you want to connect to
once. Unless you disable Wi-Fi Direct or restore the
network settings to their defaults, you do not need
to make these settings again.
A
From the printer’s home screen, press the u/d/
l/r buttons to select Wi-Fi Setup - Wi-Fi
Direct.
B
Check the message, and then press the Z
button to proceed.
SL-D500 Series User's Guide
Wireless LAN Connection
107
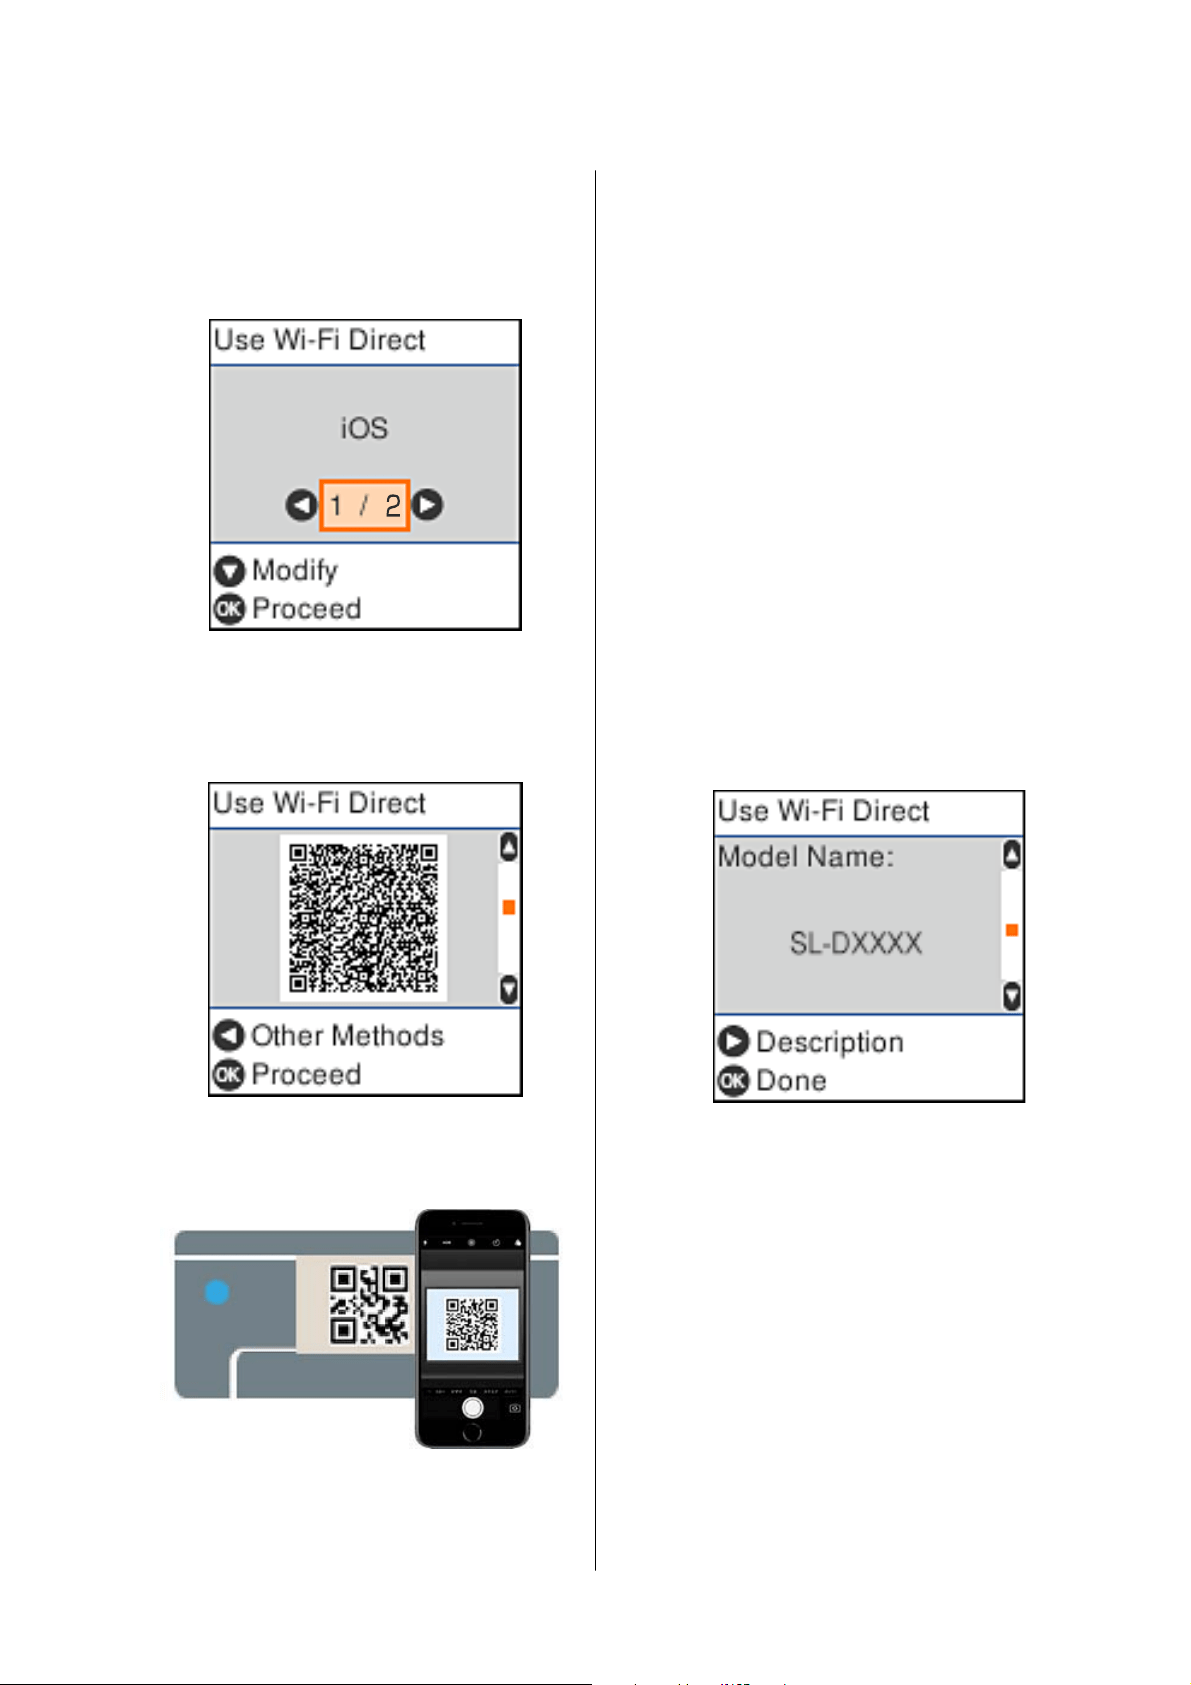
C
Check the message, and then press the Z
button to proceed.
D
Use the l/r buttons to select iOS, and then
press the Z button.
E
Check the message, and then press the Z
button to proceed.
The QR code is displayed on the printer’s
screen.
F
Open the standard camera app on iPhone, iPad,
iPod touch, and then use the photo mode to
scan the QR code on the printer’s screen.
Use the Camera app for iOS 11 or later. You
cannot connect to the printer using the
standard camera app for iOS 10 or earlier. Also,
you cannot connect to the printer using an app
for scanning codes. If you cannot connect, press
the l button. See "Related Information" below
for details on connecting.
G
Tap the notification for “DIRECT- XXXXX
Series” network connection displayed in the
iPhone, iPad, or iPod touch screen.
The model number is shown in XXXXX.
H
Check the message, and then tap Join.
I
Press the Z button on the printer.
J
Open the printing app you are using, and then
select the printer.
See the information displayed on the printer’s
screen to select the printer.
K
Press the Z button on the printer.
For smart devices that have been connected to the
printer before, select the network name (SSID) on the
smart device’s Wi-Fi screen to connect them again.
Related information
U “Connecting to Devices Other Than iOS Using
Wi-Fi Direct” on page 109
U “Printing from Smart Devices” on page 47
SL-D500 Series User's Guide
Wireless LAN Connection
108
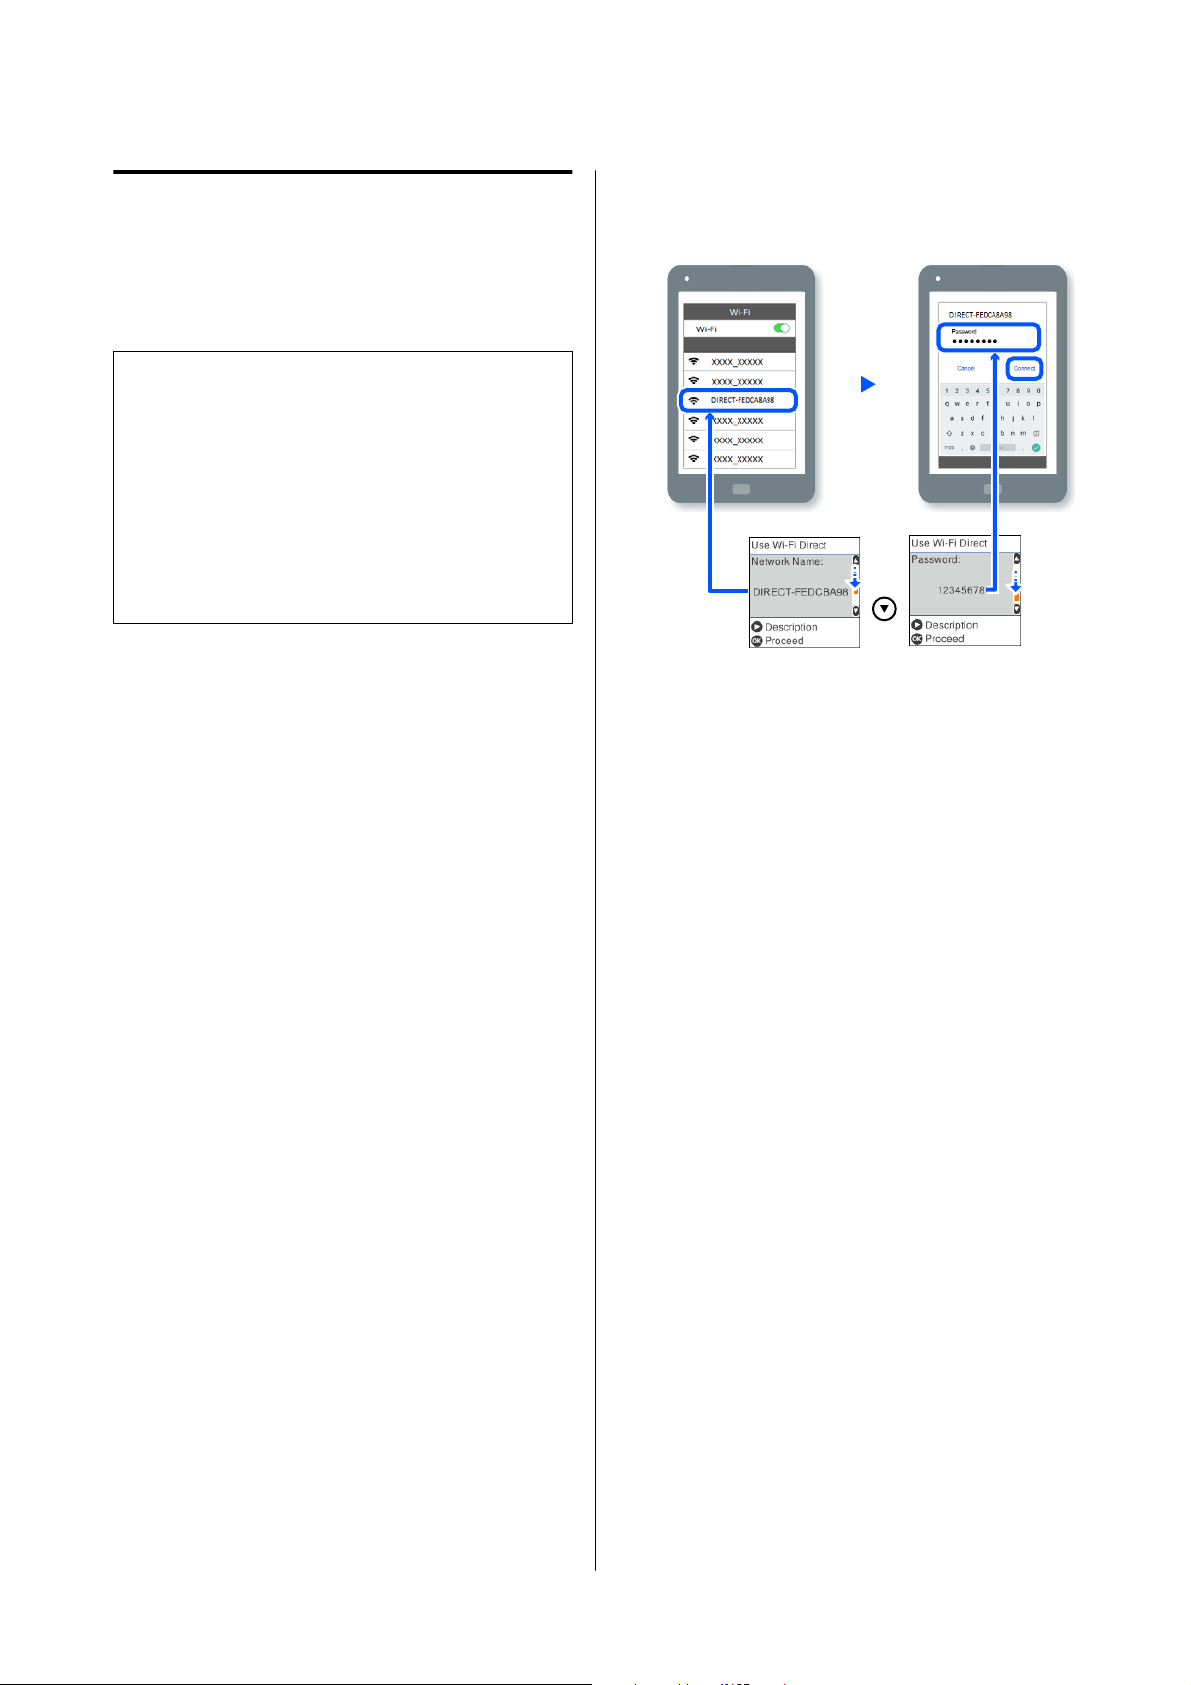
Connecting to Devices Other
Than iOS Using Wi-Fi Direct
This method allows you to connect the printer directly
to devices without a wireless router.
Note:
❏ If you are using Android, you may find it
convenient to select the settings from Epson Smart
Panel.
❏ You only need to make these settings for the printer
and the device that you want to connect to once.
Unless you disable Wi-Fi Direct or restore the
network settings to their defaults, you do not need
to make these settings again.
A
From the home screen, press the u/d/l/r
buttons to select Wi-Fi Setup - Wi-Fi Direct.
B
Check the message, and then press the Z
button.
C
Check the message, and then press the Z
button.
D
Press the l button.
E
Use the l/r buttons to select Other OS
Devices, and then press the Z button.
F
Scroll the screen with the d button, and check
the connection information for Wi-Fi Direct.
G
On the smart device’s Wi-Fi screen, select the
connection name shown on the printer’s control
panel, and then enter the password.
H
Press the Z button on the printer.
I
Open the printing app you are using, and then
select the printer.
For smart devices that have been connected to
the printer before, select the network name
(SSID) on the smart device’s Wi-Fi screen to
connect them again.
Selecting Wi-Fi Settings
from the Printer
You can select network settings from the printer’s
control panel in several ways. Choose the connection
method that matches the environment and conditions
that you are using.
If you know the information for the access point such
as SSID and password, you can make settings
manually.
If you are using a wireless LAN router (access point)
that supports WPS, then you automatically assign
settings by pressing a button.
After connecting the printer to the network, connect
to the printer from the device that you want to use
(computer, smart device, tablet, etc.).
SL-D500 Series User's Guide
Wireless LAN Connection
109
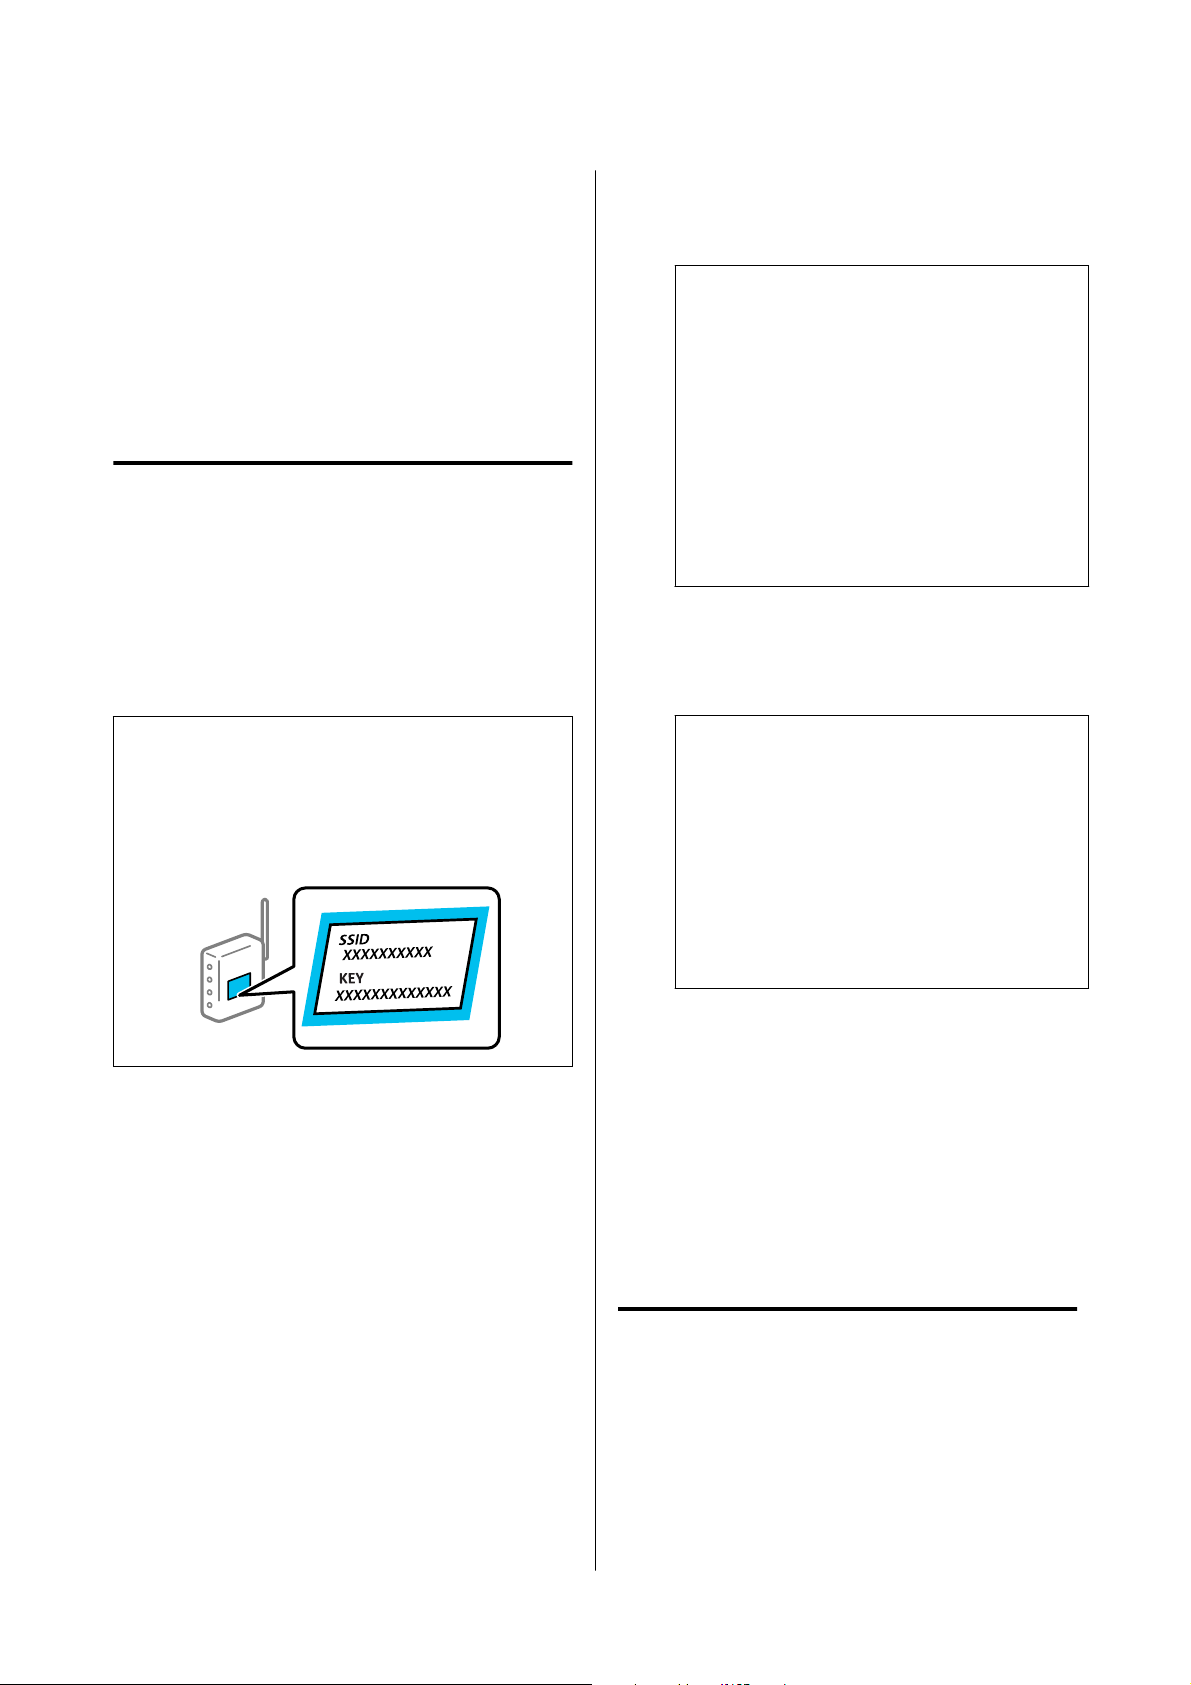
Related information
U “Selecting Wi-Fi Settings by Entering the SSID
and Password” on page 110
U “Selecting Wi-Fi Settings by Push Button Setup”
on page 110
U “Selecting Wi-Fi Settings by PIN Code Setup
(WPS)” on page 112
Selecting Wi-Fi Settings by
Entering the SSID and Password
You c a n s e t up a Wi-Fi netwo rk by ent er ing t h e
information necessary to connect to a wireless router
from the printer’s control panel. To set up using this
method, you need the SSID and password for a
wireless router.
Note:
If you are using a wireless router with its default
settings, the SSID and password are on the label. If you
do not know the SSID and password, contact the person
who set up the wireless router, or see the documentation
provided with the wireless router.
A
Select Wi-Fi Setup on the home screen.
To select an item, move the focus to the item
using the u/d/l/r buttons, and then press the
Z button.
B
Select Wi-Fi (Recommended).
C
Press the Z button to proceed.
D
Select Wi-Fi Setup Wizard.
E
Select the SSID for the wireless LAN router
(access point) from the printer’s control panel,
and then press the Z button.
Note:
❏ If the SSID you want to connect to is not
displayed on the printer’s control panel, select
Search Again to update the list. If it is still
not displayed, select Other SSIDs, and then
enter the SSID directly.
❏ If you do not know the SSID, check if it is
written on the label of the wireless router. If
you are using the wireless router with its
default settings, use the SSID written on the
label.
F
Enter the password.
Select whether or not you print a network
connection report after finishing the settings.
Note:
❏ The password is case-sensitive.
❏ If you do not know the password check if the
information is written on the label of the
wireless router. If you are using the wireless
router with its default settings, use the
password on the label. If you cannot find any
information, see the documentation provided
with the wireless router.
G
If connection is complete, print a network
connection diagnosis report if needed, and then
finish.
Related information
U “Text Input Screen” on page 15
U “Printing a Network Connection Report” on
page 112
Selecting Wi-Fi Settings by
Push Button Setup
You can automatically set up a Wi-Fi network by
pressing a button on the wireless router. If the
following conditions are met, you can set up by using
this method.
SL-D500 Series User's Guide
Wireless LAN Connection
110

❏ The wireless router is compatible with WPS
(Wi-Fi Protected Setup).
❏ The current Wi-Fi connection was established by
pressing a button on the wireless router.
A
Select Wi-Fi Setup on the home screen.
To select an item, move the focus to the item
using the u/d/l/r buttons, and then press the
Z button.
B
Select Wi-Fi (Recommended).
C
Press the Z button to proceed.
D
Select Push Button (WPS).
E
Hold down the [WPS] button on the wireless
router until the security light flashes.
If you do not know where the [WPS] button is,
or there are no buttons on the wireless router,
see the documentation provided with your
wireless router for details.
F
Press the Z button on the printer’s control
panel. Follow the on-screen instruction
hereafter.
Note:
If connection fails, restart the wireless LAN router
(access point), move it closer to the printer, and
repeat the process. If it still does not work, print a
network connection report and check the solution.
Related information
U “Printing a Network Connection Report” on
page 112
Setting Up Using Wi-Fi Auto
Connect
This is a method to set up connections when the
printer software is installed in the computer. Connects
the printer to a wireless (Wi-Fi) network using a
computer that is connected to the access point. Just do
operations according to the screens that appear on
your computer, without the trouble of inputting an
SSID or security key.
North America
Visit https://www.epson.com/support (U.S.) or https://
www.epson.ca/support (Canada) and search for your
product. Then download and run the installer and
follow the on-screen instructions.
Latin America
Visit https://www.latin.epson.com (Caribbean),
https://www.epson.com.br/suporte (Brazil), or https://
www.latin.epson.com/soporte (other regions) and
search for your product. Then download and run the
installer and follow the on-screen instructions.
Other Regions
Start the installer from the software disc or the
website, and then follow the on-screen instructions to
execute Wi-Fi Auto Connect from the printer’s
settings menus.
To install from the website, access the following
website, and then enter the product number.
Download the software from “Download and
Connect” on the Setup Page.
https://epson.sn
SL-D500 Series User's Guide
Wireless LAN Connection
111

Selecting Wi-Fi Settings by PIN
Code Setup (WPS)
You can automatically connect to a wireless router by
using a PIN code. You can use this method to set up if
the wireless router is capable of WPS (Wi-Fi Protected
Setup). Use a computer to enter a PIN code into the
wireless router.
A
Select Wi-Fi Setup on the home screen.
To select an item, move the focus to the item
using the u/d/l/r buttons, and then press the
Z button.
B
Select Wi-Fi (Recommended).
C
Press the Z button to proceed.
D
Select Others.
E
Select PIN Code (WPS).
F
Use your computer to enter the PIN code (an
eight digit number) displayed on the printer’s
control panel into the wireless router within
two minutes.
Note:
See the documentation provided with your
wireless router for details on entering a PIN code.
G
Press the Z button on the printer’s control
panel.
Setup is complete when the setup completion
message is displayed.
Note:
If connection fails, restart the wireless LAN router
(access point), move it closer to the printer, and
repeat the process. If it still does not work, print a
network connection report and check the solution.
Related information
U “Printing a Network Connection Report” on
page 112
Printing a Network
Connection Report
You can print a network connection report to check
the status between the printer and the wireless router.
A
Load paper in the paper cassette.
U “How to Load Paper” on page 25
B
Select Settings on the home screen, and then
press the Z button.
To select an item, move the focus to the item
using the u/d/l/r buttons, and then press the
Z button.
C
Select Network Settings - Connection Check.
The connection check starts.
D
Press the Z button to print the network
connection report.
If an error has occurred, check the network
connection report, and then follow the printed
solutions.
Related information
U “Messages and Solutions on the Network
Connection Report” on page 113
SL-D500 Series User's Guide
Wireless LAN Connection
112

Messages and Solutions on the
Network Connection Report
Check the messages and error codes on the network
connection report, and then follow the solutions.
a. Error code
b. Messages on the Network Environment
Related information
U “E-1” on page 113
U “E-2, E-3, E-7” on page 113
U “E-5” on page 114
U “E-6” on page 114
U “E-8” on page 115
U “E-9” on page 115
U “E-10” on page 115
U “E-11” on page 115
U “E-12” on page 115
U “E-13” on page 116
U “Message on the Network Environment” on
page 117
E-1
Solutions:
❏ Make sure the Ethernet cable is securely
connected to your printer and to your hub or
other network device.
❏ Make sure your hub or other network device is
turned on.
❏ If you want to connect the printer by Wi-Fi, select
Wi-Fi settings for the printer again because it is
disabled.
E-2, E-3, E-7
Solutions:
❏ Make sure your wireless router is turned on.
❏ Confirm that your computer or device is
connected correctly to the wireless router.
❏ Turn off the wireless router. Wait for about 10
seconds, and then turn it on.
❏ Place the printer closer to your wireless router and
remove any obstacles between them.
❏ If you have entered the SSID manually, check if it
is correct. Check the SSID from the Network
Status section in the network connection report.
❏ If a wireless router has multiple SSIDs, select the
SSID that is displayed. When the SSID is using a
noncompliant frequency, the printer does not
display them.
❏ If you are using push button setup to establish a
network connection, make sure your wireless
router supports WPS. You cannot use push button
setup if your wireless router does not support
WPS.
❏ Make sure your SSID uses only ASCII characters
(alphanumeric characters and symbols). The
printer cannot display an SSID that contains
non-ASCII characters.
SL-D500 Series User's Guide
Wireless LAN Connection
113

❏ Make sure you know your SSID and password
before connecting to the wireless router. If you are
using a wireless router with its default settings, the
SSID and password are located on a label on the
wireless router. If you do not know your SSID and
password, contact the person who set up the
wireless router, or see the documentation
provided with the wireless router.
❏ If you are connecting to an SSID generated from a
tethering smart device, check for the SSID and
password in the documentation provided with the
smart device.
❏ If your Wi-Fi connection suddenly disconnects,
check for the conditions below.
❏ Another smart device was added to the
network using push button setup.
❏ The Wi-Fi network was set up using any
method other than push button setup.
If any of these conditions are applicable, reset
your network settings by downloading and
running the software from the following website.
North America
Visit https://www.epson.com/support (U.S.) or
https://www.epson.ca/support (Canada) and
search for your product. Then download and run
the installer and follow the on-screen instructions.
Latin America
Visit https://www.latin.epson.com (Caribbean),
https://www.epson.com.br/suporte (Brazil), or
https://www.latin.epson.com/soporte (other
regions) and search for your product. Then
download and run the installer and follow the
on-screen instructions.
Other Regions
https://epson.sn- Setup
Related information
U “Connecting to a Computer” on page 106
U “Selecting Wi-Fi Settings from the Printer” on
page 109
E-5
Solutions:
Make sure the wireless router’s security type is set to
one of the following. If it is not, change the security
type on the wireless router, and then reset the printer’s
network settings.
❏ WEP-64 bit (40 bit)
❏ WEP-128 bit (104 bit)
❏ WPA PSK (TKIP/AES)*
❏ WPA2 PSK (TKIP/AES)*
❏ WPA (TKIP/AES)
❏ WPA2 (TKIP/AES)
❏ WPA3-SAE (AES)
❏ WPA2/WPA3-Enterprise
*: WPA PSK is also known as WPA Personal. WPA2
PSK is also known as WPA2 Personal.
E-6
Solutions:
❏ Check if MAC address filtering is disabled. If it is
enabled, register the printer’s MAC address so that
it is not filtered. See the documentation provided
with the wireless router for details. You can check
the printer’s MAC address from the Network
Status section in the network connection report.
❏ If your wireless router is using shared
authentication with WEP security, make sure the
authentication key and index are correct.
❏ If the number of connectable devices on the
wireless router is less than the number of network
devices that you want to connect, adjust settings
on the wireless router to increase the number of
connectable devices. See the documentation
provided with the wireless router to adjust
settings.
Related information
U “Connecting to a Computer” on page 106
SL-D500 Series User's Guide
Wireless LAN Connection
114

E-8
Solutions:
❏ Enable DHCP on the wireless router if the
printer’s Obtain IP Address setting is set to Auto.
❏ If the printer’s Obtain IP Address setting is set to
Manual, the IP address you manually set is invalid
because it is out of range (for example: 0.0.0.0).
Set a valid IP address from the printer’s control
panel or by using Web Config.
E-9
Solutions:
Check the following.
❏ Devices are turned on.
❏ You can access the Internet and other computers
or network devices on the same network from the
devices you want to connect to the printer.
If you still can't connect to the printer from other
devices on the network, turn off the wireless router.
Wait for about 10 seconds, and then turn it on. Then
reset your network settings by downloading and
running the installer from the following website.
https://epson.sn- Setup
Related information
U “Connecting to a Computer” on page 106
E-10
Solutions:
Check the following.
❏ Other devices on the network are turned on.
❏ Network addresses (IP address, subnet mask, and
default gateway) are correct if you have set the
printer’s Obtain IP Address to Manual.
Reset the network address if they are incorrect. You
can check the IP address, subnet mask, and default
gateway from the Network Status section in the
network connection report.
If DHCP is enabled, change the printer’s Obtain IP
Address setting to Auto. If you want to set the IP
address manually, check the printer’s IP address from
the Network Status section in the network connection
report, and then select Manual on the network settings
screen. Set the subnet mask to [255.255.255.0].
If you still can't connect to the printer from other
devices on the network, turn off the wireless router.
Wait for about 10 seconds, and then turn it on.
E-11
Solutions:
Check the following.
❏ The default gateway address is correct if you set
the printer’s TCP/IP Setup setting to Manual.
❏ The device that is set as the default gateway is
turned on.
Set the correct default gateway address. You can check
the default gateway address from the Network Status
section in the network connection report.
E-12
Solutions:
Check the following.
❏ Other devices on the network are turned on.
❏ The network addresses (IP address, subnet mask,
and default gateway) are correct if you are
entering them manually.
❏ The network addresses for other devices (subnet
mask and default gateway) are the same.
❏ The IP address does not conflict with other
devices.
SL-D500 Series User's Guide
Wireless LAN Connection
115

If you still can't connect to the printer from other
devices on the network, try the following.
❏ Turn off the wireless router. Wait for about 10
seconds, and then turn it on.
❏ Select network settings again using the installer.
You can run it from the following website.
https://epson.sn- Setup
❏ You can register several passwords on a wireless
router that uses the WEP security type. If several
passwords are registered, check if the first
registered password is set on the printer.
Related information
U “Connecting to a Computer” on page 106
E-13
Solutions:
Check the following.
❏ Network devices such as a wireless router, hub,
and router are turned on.
❏ The TCP/IP Setup for network devices has not
been set up manually. (If the printer’s TCP/IP
Setup is set automatically while the TCP/IP Setup
for other network devices is performed manually,
the printer’s network may differ from the network
for other devices.)
If it still does not work after checking the above, try
the following.
❏ Turn off the wireless router. Wait for about 10
seconds, and then turn it on.
❏ Reinstall the software on a computer connected to
the network you want to connect the printer to.
You can run it from the following website.
https://epson.sn- Setup
❏ You can register several passwords on a wireless
router that uses the WEP security type. If several
passwords are registered, check if the first
registered password is set on the printer.
Related information
U “Connecting to a Computer” on page 106
SL-D500 Series User's Guide
Wireless LAN Connection
116
Message on the Network Environment
Message Solution
The Wi-Fi environment needs to be
improved. Turn the wireless router off
and then turn it on. If the connection
does not improve, see the
documentation for the wireless router.
After moving the printer closer to the wireless router and removing any
obstacles between them, turn off the wireless router. Wait for about 10 seconds,
and then turn it on. If it still does not connect, see the documentation supplied
with the wireless router.
*No more devices can be connected.
Disconnect one of the connected devices
if you want to add another one.
Computer and smart devices that can be connected simultaneously are
connected in full in the Wi-Fi Direct (Simple AP) connection. To add another
computer or smart device, disconnect one of the connected devices or connect
it to the other network first.
You can confirm the number of wireless devices which can be connected
simultaneously and the number of connected devices by checking the network
status sheet or the printer’s control panel.
The same SSID as Wi-Fi Direct exists in the
environment. Change the Wi-Fi Direct
SSID if you cannot connect a smart
device to the printer.
On the printer’s control panel, go to Wi-Fi Direct Setup screen and select the
menu to change the setting. You can change the network name following after
DIRECT-XX-. Enter 32 characters or less.
SL-D500 Series User's Guide
Wireless LAN Connection
117

Replacing or Adding New
Wireless Routers
If the SSID changes due to the replacement of a
wireless router, or a wireless router is added and a new
network environment is established, reset the Wi-Fi
settings.
Related information
U “Selecting Settings for Connecting to the
Computer” on page 118
Selecting Settings for
Connecting to the Computer
We recommend using the installer to connect the
printer to a computer. You can run the installer using
one of the following methods.
North America
Visit https://www.epson.com/support (U.S.) or https://
www.epson.ca/support (Canada) and search for your
product. Then download and run the installer and
follow the on-screen instructions.
Latin America
Visit https://www.latin.epson.com (Caribbean),
https://www.epson.com.br/suporte (Brazil), or https://
www.latin.epson.com/soporte (other regions) and
search for your product. Then download and run the
installer and follow the on-screen instructions.
Other Regions
❏ Setting up from the website
Access the following website, and then enter the
product name. Go to Setup, and then start setting
up.
https://epson.sn
❏ Setting up using the software disc (only for the
models that come with a software disc and users
with computers with disc drives)
Insert the software disc into the computer, and
then follow the on-screen instructions.
Selecting Settings for
Connecting to the Smart Device
You can use the printer from a smart device when you
connect the printer to the same Wi-Fi network (SSID)
as the smart device. To use the printer from a smart
device, see the following.
U “Connecting to a Smart Device” on page 107
SL-D500 Series User's Guide
Wireless LAN Connection
118
Problem Solver
When a Message Is Displayed
Messages Displayed on the Printer
If one of the following messages is displayed, read and follow the instructions below.
Message What to do
There may be foreign material inside the
printer. Check and remove it.
Some protective tape or protective materials may have been left inside the
printer. Remove all the protective tape and protective materials, and then turn
the power on again.
Print head may require maintenance.
Perform a Print Head Nozzle Check.
Nozzles may be clogged because the print head unit was stopped for a long
period outside the specified position. We recommend doing a nozzle check to
check for clogged nozzles, and then to clean the heads if necessary.
U “Print Head Nozzle Check” on page 60
Printing may have been done while the
nozzles were clogged. Check the print
results.
The print head’s auto nozzle check function detected clogged nozzles.
Check the print results and clean the print head if needed, and then start
printing again.
U “Print Head Nozzle Check” on page 60
The nozzles may be clogged. Print quality
may decline.
Cannot check nozzle clogging. For
details, see your documentation.
Could not read the check pattern of the Auto Nozzle Check function because
the printer’s temperature was outside the required operating range. Turn the
printer’s power off and then on again to use it.
If you turn the power off and on several times and the same error occurs, then a
sensor may be malfunctioning.
Contact your dealer or Epson Support.
Failed to check nozzle clogging. For
details, see your documentation.
Could not read the check pattern of the Auto Nozzle Check function.
If necessary, do a nozzle check.
U “Print Head Nozzle Check” on page 60
If you repeat this and the same error occurs, then a sensor may be
malfunctioning.
Contact your dealer or Epson Support.
Turn the power off and on again. If the
problem persists, press Z.
Turn off the printer, disconnect the power cable from the outlet and from the
AC inlet on the printer, and then reconnect it. Turn the printer on again.
If the same error occurs repeatedly, press the Z button on the control panel to
clear paper jams, and then turn the power off and on again.
U “Paper is jammed in the paper cassette area” on page 128
If the situation is still not improved, then repairs are needed.
Contact your dealer or Epson Support.
SL-D500 Series User's Guide
Problem Solver
119

Message What to do
Adjustment canceled. There is a problem
with the print head nozzles. For details,
see documentation.
Clogs are not cleared even by repeatedly alternating nozzle checks and Print
Head Cleaning.
After leaving the printer alone and not printing for more than 12 hours, execute
a nozzle check and Print Head Cleaning again. We recommend turning off the
power and leaving the printer alone. If the situation does not improve, execute
Powerful Cleaning.
If the clogs are not cleared even after executing Powerful Cleaning, then after
not printing for more than 12 hours, print a nozzle check pattern. If that does
not clear the clogs, execute Power Ink Flushing.
If the situation is still not improved, then repairs are needed.
Contact your dealer or Epson Support.
It is nearly time to reset the ink level. The ink is low. Fill the ink tank with ink.
Be sure to update the ink levels after refilling the ink.
U “Refilling Ink” on page 51
The Maintenance Box is nearing the end
of its service life. You can continue
printing until replacement is required.
There is little available space in the maintenance box. Obtain a new
maintenance box. You can continue printing until the replacement notice
appears.
U “Consumables and Optional Items” on page 135
Cannot recognize the Maintenance Box. Reinstall the maintenance box. If the same error occurs even after reinstalling
the maintenance box, then replace it with a new one (do not install a faulty
maintenance box).
U “Replacing the Maintenance Box” on page 53
Cannot start cleaning because the
Maintenance Box is near full.
Cleaning cannot be executed because there is not enough available space in
the maintenance box for the waste ink that is ejected during print head
cleaning. To execute cleaning, replace the maintenance box with a new one.
The maintenance box that was removed can be reinstalled and used again after
cleaning is complete.
U “Replacing the Maintenance Box” on page 53
Printing speed is slow because the
printer’s internal temperature is too high.
For details, see your documentation.
Printing can continue even though the print speed is reduced. To recover the
print speed, pull out the interior of the printer and open the inner cover and
leave like that for 15 to 30 minutes. Leave the printer’s power on while it is
standing by.
See the following for more details on the solution.
U “Print speed suddenly slows down while printing continuously” on
page 134
Some features may not be available.
For details, see your documentation.
If Paper Setup Auto Display is disabled, you cannot use AirPrint.
The combination of IP address and
subnet mask is incorrect. For details, see
your documentation.
Input the correct value in the IP address or the default gateway.
If you do not know the correct value, check with your network administrator.
EPSON DEVICE
Recovery Mode
Update Firmware
The firmware update failed, so the printer has started in recovery mode. Use the
procedure below to update the firmware again.
1. Connect the printer to a computer by USB (updates during recovery mode
cannot use a wired or wireless network connection).
2. Download the latest firmware from the Epson website, and start the update.
SL-D500 Series User's Guide
Problem Solver
120
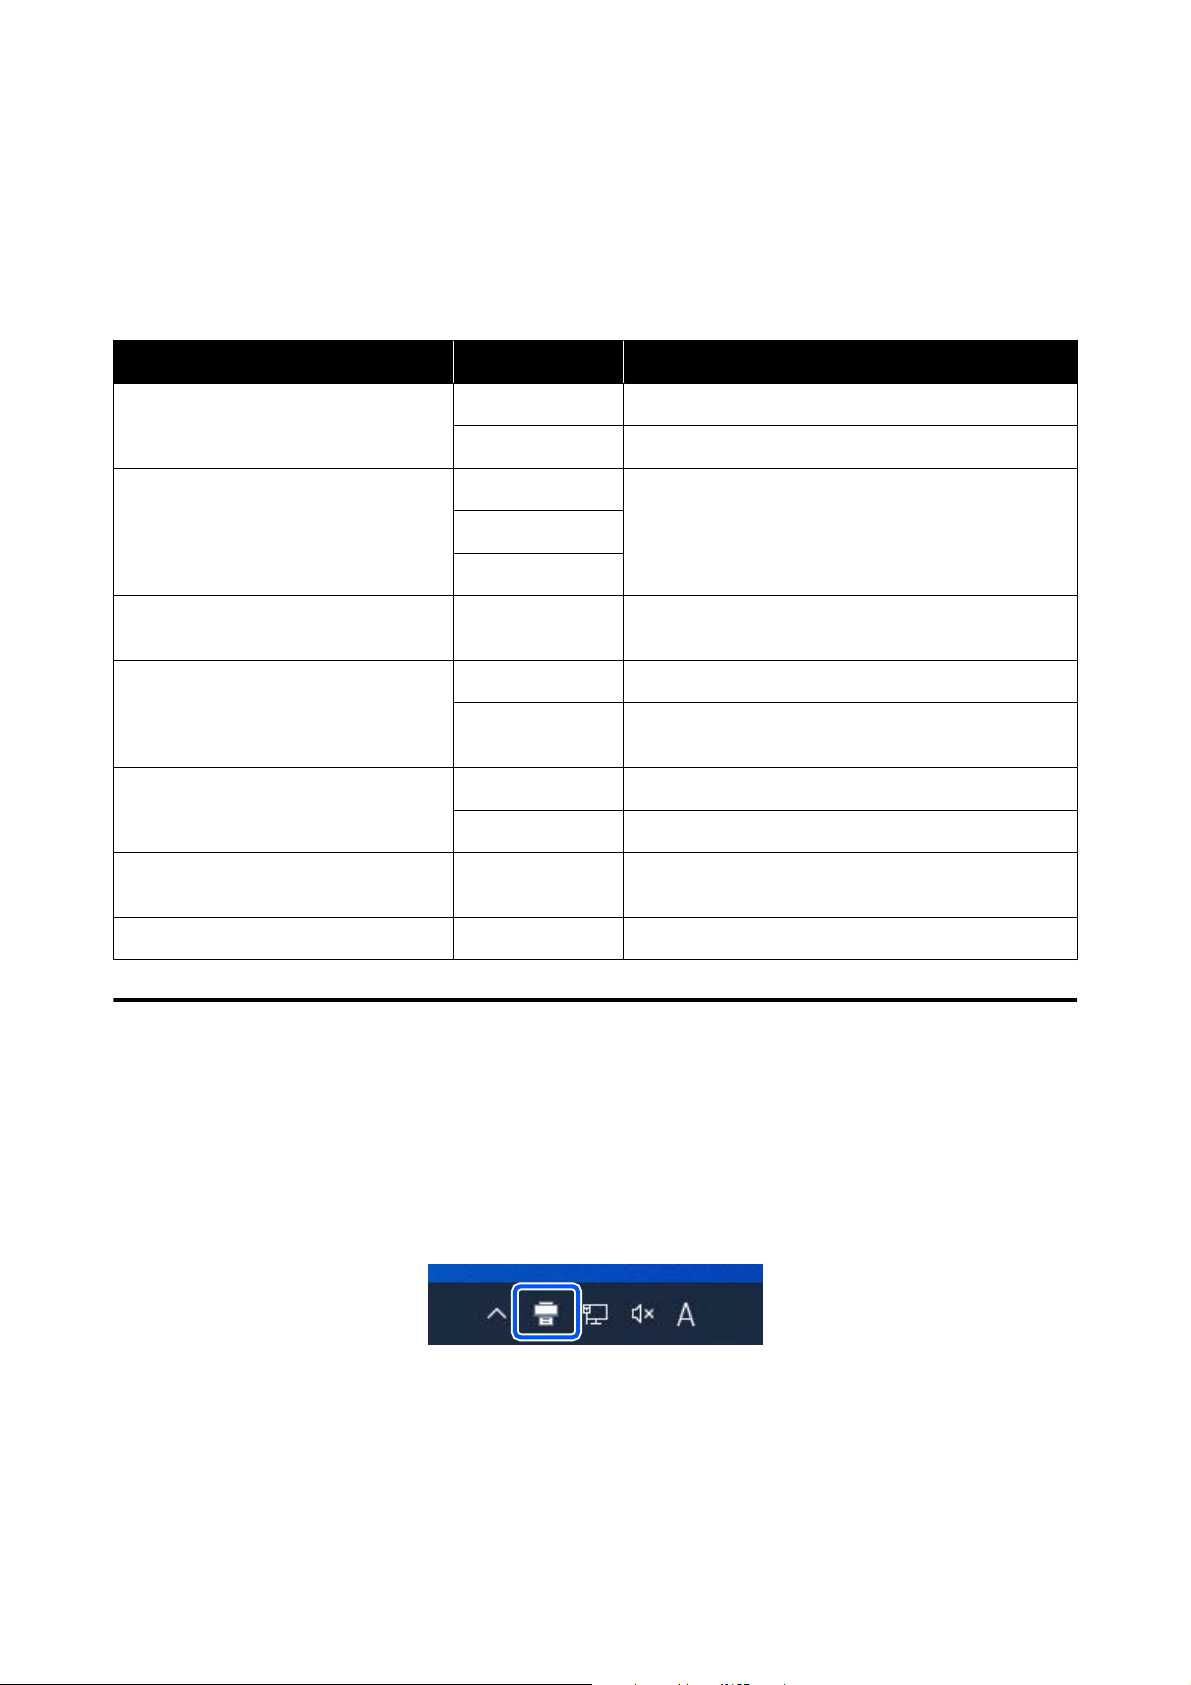
Message Codes Displayed on the Screen
Message codes are displayed in the upper right part of the screen when there are notices or errors on the printer.
Message codes are categorized as shown in the following table, and the various message codes appear when the
printer is in the following conditions. When a message is displayed on screen, resolve the problem according to the
message that appears.
Category Message code Status
Hardware related error at printer E-01 Printer fatal error
W-01 Paper jam error
Sensor related error W-41 Nozzle detection error
W-42
W-43
Image quality abnormality in sensor
detection results
W-51 Abnormality during analysis
Hardware related warning at printer I-01 Temperature warning during Auto Nozzle Check
I-02 Print speed reduction warning due to overheating of
printer interior
Network related information I-22 Wi-Fi Setup by Push Button (WPS)
I-23 Wi-Fi Setup by PIN Code (WPS)
Paper Source Settings related
information
I-41 Off setting for Paper Setup Auto Display
Sensor related warning I-51 Sensor module warning
Error Messages (Windows)
When an error occurs while printing, you can check error messages on the computer that is connected to the
printer.
To check error messages on the computer, open EPSON Status Monitor 3.
Click the utility icon in the Windows taskbar, and then click the printer’s name - EPSON Status Monitor 3, in this
order, to start EPSON Status Monitor 3.
EPSON Status Monitor 3
Error messages are displayed at the top of the screen. When an error message is displayed, check the solution on
the screen and take the required measures.
SL-D500 Series User's Guide
Problem Solver
121
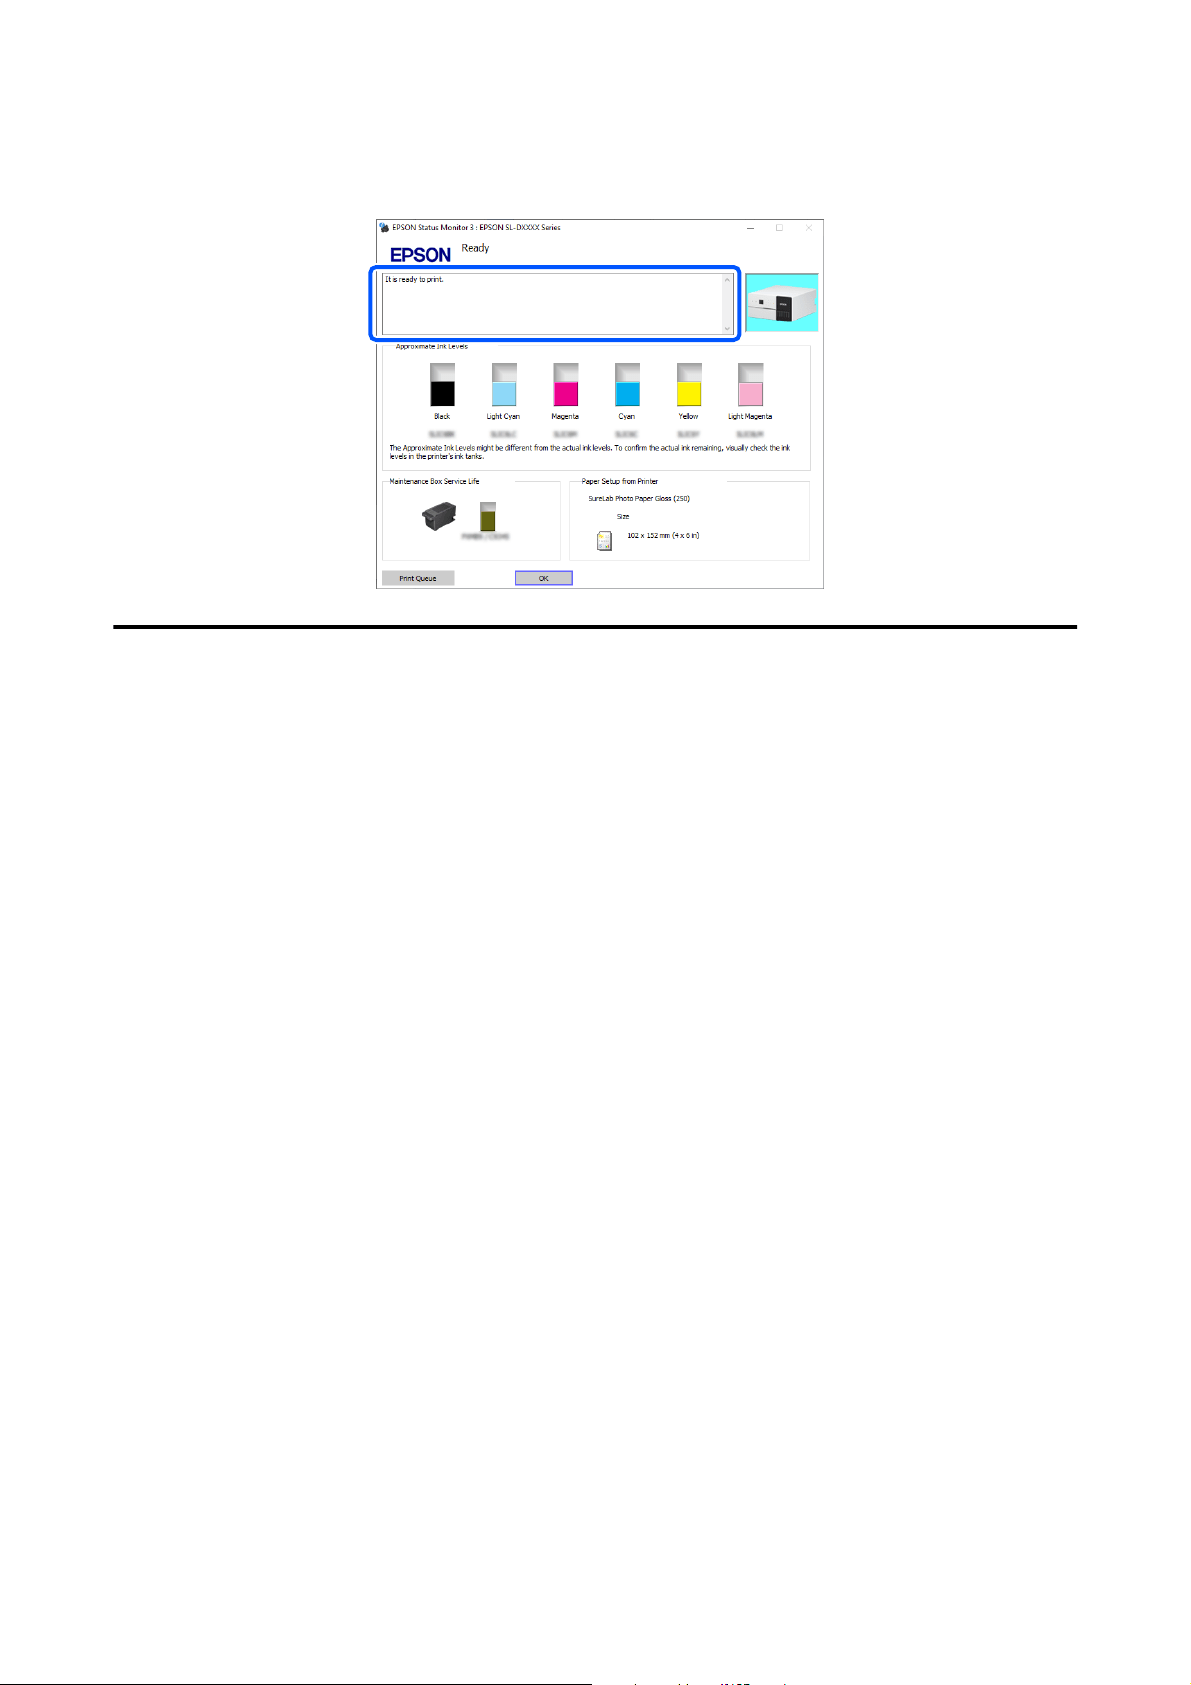
Check the printer’s status, such as the remaining amount of ink, also.
Error Messages (Mac)
When an error occurs while printing, you can check error messages on the computer that is connected to the
printer.
To check error messages on the computer, start Maintenance Tool.
See the following for the procedure to start Maintenance Tool.
A
Click the Apple menu - System Preferences - Printers & Scanners, in this order.
SL-D500 Series User's Guide
Problem Solver
122
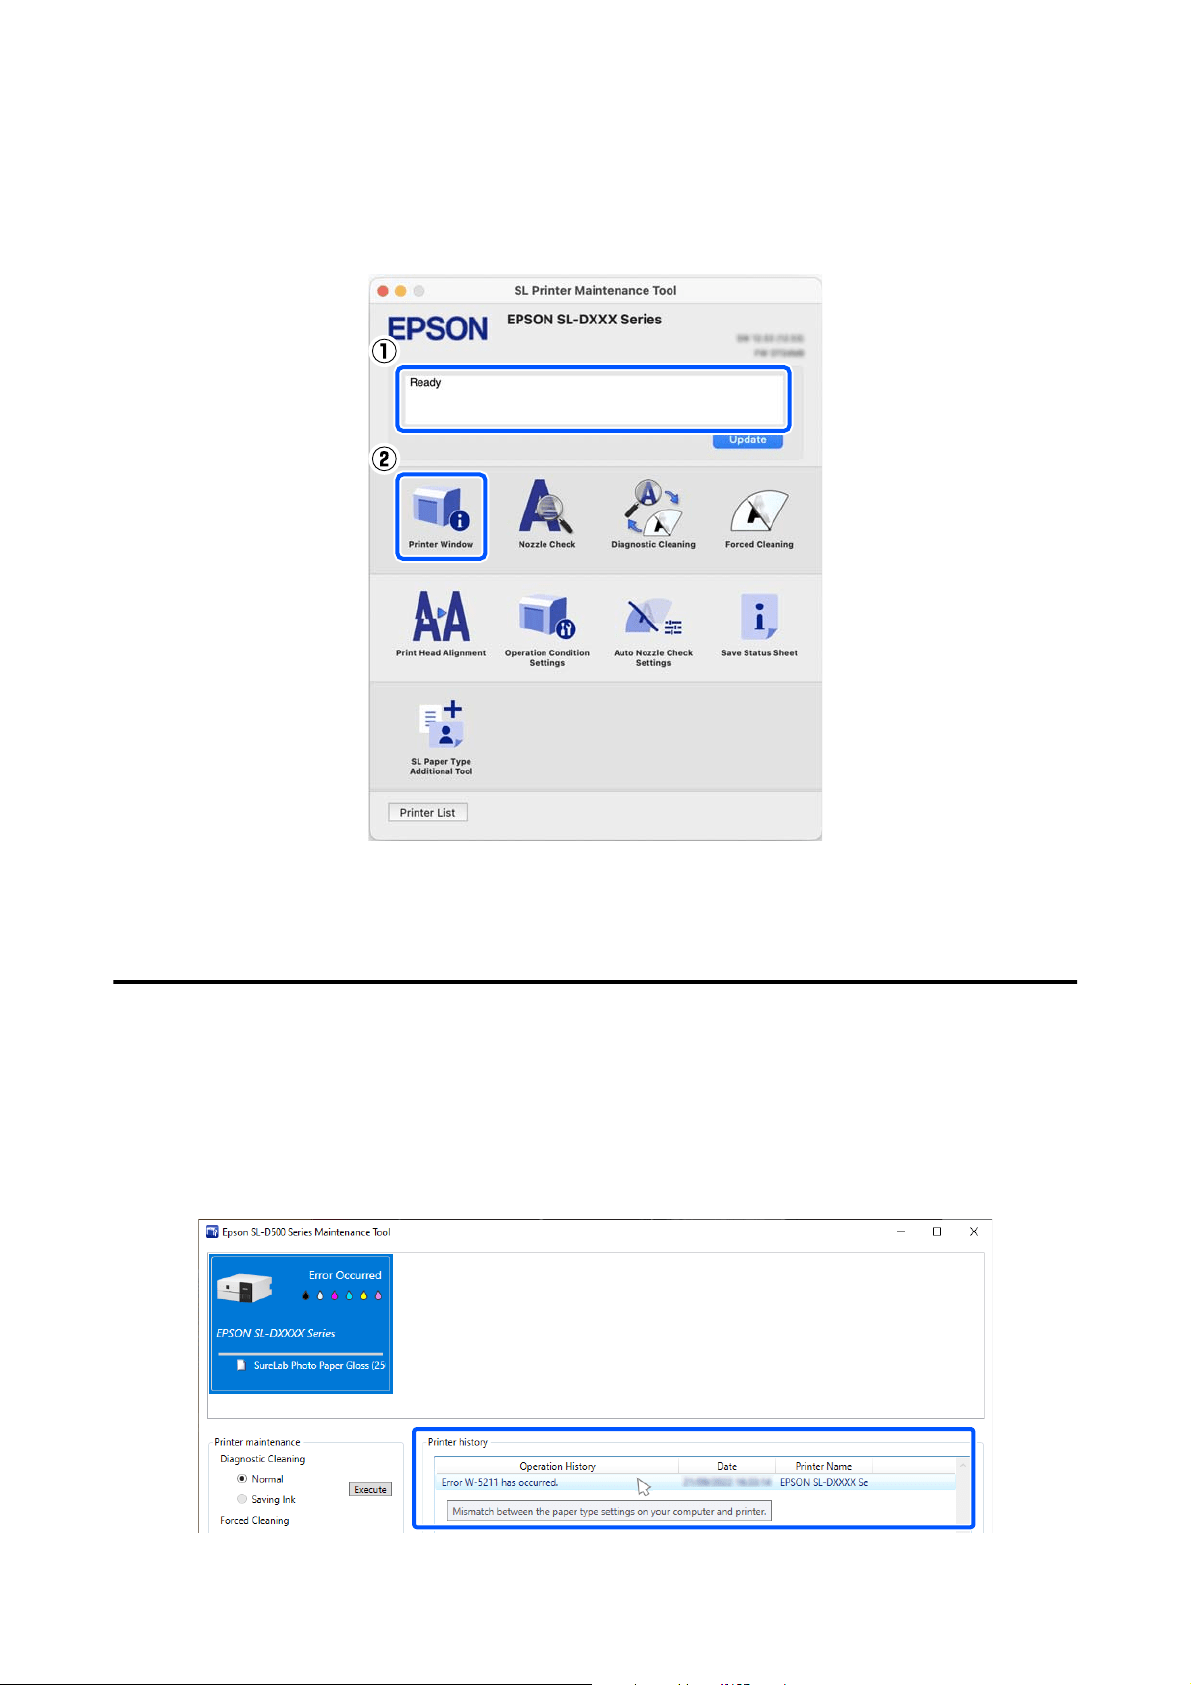
B
Select the printer and click Options & Supplies - Utility - Open Printer Utility.
Error messages are displayed at the top of the screen. When an error message is displayed, click the Printer
Window, then check the solution on the screen and take the required measures.
See the following for more details on Maintenance Tool.
U “Using the Maintenance Tool (Mac)” on page 78
Message Codes that Appear in Maintenance Tool (Windows Only)
When an error occurs on a printer that is connected to a computer, then a message code and message appear in the
Printer history of the Maintenance Tool.
If an error occurs, check the following screen and take the required measures.
Put the mouse cursor over the message code in Printer history to display the message.
SL-D500 Series User's Guide
Problem Solver
123
Note:
The information displayed in the Printer history is deleted automatically when you exit Maintenance Tool, so it does not
appear the next time you start it.
Message
code
Message Solution
I-2201 It is nearly time to reset the ink levels. The ink is low. Fill the ink tank with ink.
Be sure to update the ink levels after refilling the ink.
U “Refilling Ink” on page 51
I-2202 Head Cleaning can not be completed. There is not enough ink remaining to do Print Head
Cleaning, so cleaning cannot be executed. Fill the ink tank
with ink.
Be sure to update the ink levels after refilling the ink.
U “Refilling Ink” on page 51
I-2310 Cannot check nozzle for clogging. Could not read the check pattern of the Auto Nozzle Check
function because the printer’s temperature was outside the
required operating range. Turn the printer’s power off and
then on again to use it.
If you turn the power off and on several times and the same
error occurs, then a sensor may be malfunctioning.
Contact your dealer or Epson Support.
I-2401 Maintenance box is nearing the end of its
service life.
There is little available space in the maintenance box. Obtain
a new maintenance box. You can continue printing until the
replacement notice appears.
U “Consumables and Optional Items” on page 135
I-5101 Epson Firmware Updater is running. The Firmware Updater software was running when
Maintenance Tool was started, and the firmware update was
interrupted.
Close this software and then restart Firmware Updater.
I-5201 Amount of data in print jobs sent to
printer nearly at maximum limit.
Print job data is too large.
Delete all the print jobs, and then split up the print job to
print it.
W-1101 Paper jam Check the location of the paper jam on the screen on the
control panel of the printer, and then remove the jammed
paper.
U “When Paper Jams” on page 128
W-1102 Protective materials may be left in the
product.
Some protective tape or protective materials may have been
left inside the printer. Remove all the protective tape and
protective materials, and then turn the power on again.
W-1105 Paper out or incorrect loading Confirm that there is no paper left inside the printer, and
then reload the paper.
U “When Paper Jams” on page 128
U “Loading paper” on page 25
W-1305 Rear cover is not installed correctly. Install the rear cover according to the instructions on the
screen on the control panel of the printer.
SL-D500 Series User's Guide
Problem Solver
124
Message
code
Message Solution
W-1308 Front cover is closed. Open the front cover according to the instructions on the
screen on the control panel of the printer.
W-2202
W-2204
It is time to reset the ink levels. The ink is low. Fill the ink tank with ink.
Be sure to update the ink levels after refilling the ink.
U “Refilling Ink” on page 51
W-2205 Power Cleaning cannot be completed. There is not enough ink remaining to do Powerful Cleaning,
so cleaning cannot be executed.
Check the printer’s ink tank, and then fill it.
Be sure to update the ink levels after refilling the ink.
U “Refilling Ink” on page 51
W-2208 Ink initialization failed. There is not enough ink remaining to do initial charging, so
initial charging cannot be executed.
Confirm whether the ink tanks for all the colors of ink were
filled.
Repairs are needed if all the colors of ink were filled.
Contact your dealer or Epson Support.
W-2325
W-2326
W-2327
W-2349
Failed to check nozzle clogging. Could not read the check pattern of the Auto Nozzle Check
function.
If necessary, do a nozzle check.
U “Print Head Nozzle Check” on page 60
If you repeat this and the same error occurs, then a sensor
may be malfunctioning.
Contact your dealer or Epson Support.
W-2360
W-2361
W-2362
Nozzle check is recommended. The print head’s auto nozzle check function detected
clogged nozzles.
Check the print results and clean the print head if needed,
and then start printing again.
U “Print Head Nozzle Check” on page 60
W-2401 Maintenance box not installed Install the maintenance box.
U “Replacing the Maintenance Box” on page 53
W-2402 Maintenance box is at the end of its
service life
Replace the maintenance box with a new one.
U “Replacing the Maintenance Box” on page 53
W-2403 Maintenance box cannot be recognized Reinstall the maintenance box. If the same error occurs even
after reinstalling the maintenance box, then replace it with a
new one (do not install a faulty maintenance box).
U “Replacing the Maintenance Box” on page 53
W-2405 You cannot use a maintenance box that
has been installed in another printer.
Replace the maintenance box with a new one.
U “Replacing the Maintenance Box” on page 53
SL-D500 Series User's Guide
Problem Solver
125
Message
code
Message Solution
W-2404 Power Cleaning cannot be completed. Cleaning cannot be executed because there is not enough
available space in the maintenance box for the waste ink
that is ejected during Powerful Cleaning. To execute
cleaning, replace the maintenance box with a new one. The
maintenance box that was removed can be reinstalled and
used again after cleaning is complete.
U “Replacing the Maintenance Box” on page 53
W-5202 Amount of data in print jobs sent to
printer is at maximum limit.
Print job data is too large.
Delete all the print jobs, and then split up the print job to
print it.
W-5204 Nozzle check is recommended. Nozzles may be clogged because the print head unit was
stopped for a long period outside the specified position. We
recommend doing a nozzle check to check for clogged
nozzles, and then to clean the heads if necessary.
U “Print Head Nozzle Check” on page 60
W-5210 Mismatch between the paper size
settings on your computer and printer.
The paper settings set in the printer driver are different from
the paper settings set on the screen of the printer’s control
panel. Check the screen on the control panel of the printer.
W-5211 Mismatch between the paper type
settings on your computer and printer.
W-5212 Mismatch between the print settings on
your computer and printer.
W-5213 Paper size error or multi-page feed error
W-1401 The transportation lock is in the locked
(transporting) position.
You cannot print if the transportation lock is in the
transportation position.
Set the transportation lock to the print position according to
the instructions on the screen on the control panel of the
printer.
W-1309 The printer’s internal unit has been
pulled out.
You cannot print because the printer’s internal unit is pulled
out.
Return the printer’s internal unit back to its original position
according to the instructions on the screen on the control
panel of the printer.
I-2501 Printing speed is slow because the
printer’s internal temperature is too high.
Printing can continue even though the print speed is
reduced. To recover the print speed, pull out the interior of
the printer and open the inner cover and leave like that for
15 to 30 minutes. Leave the printer’s power on while it is
standing by.
See the following for more details on the solution.
U “Print speed suddenly slows down while printing
continuously” on page 134
E-5101 - Check the condition of the wireless LAN and communication
cables for the printer and computer, and then turn the
printer’s power off and on again.
If the situation is still not improved, then repairs are needed.
Contact your dealer or Epson Support.
SL-D500 Series User's Guide
Problem Solver
126
Message
code
Message Solution
E-9901 - Turn off the printer, disconnect the power cable from the
outlet and from the AC inlet on the printer, and then
reconnect it. Turn the printer on again.
If the same error occurs repeatedly, press the Z button on
the control panel to clear paper jams, and then turn the
power off and on again.
U “Paper is jammed in the paper cassette area” on
page 128
If the situation is still not improved, then repairs are needed.
Contact your dealer or Epson Support.
E-9902
SL-D500 Series User's Guide
Problem Solver
127
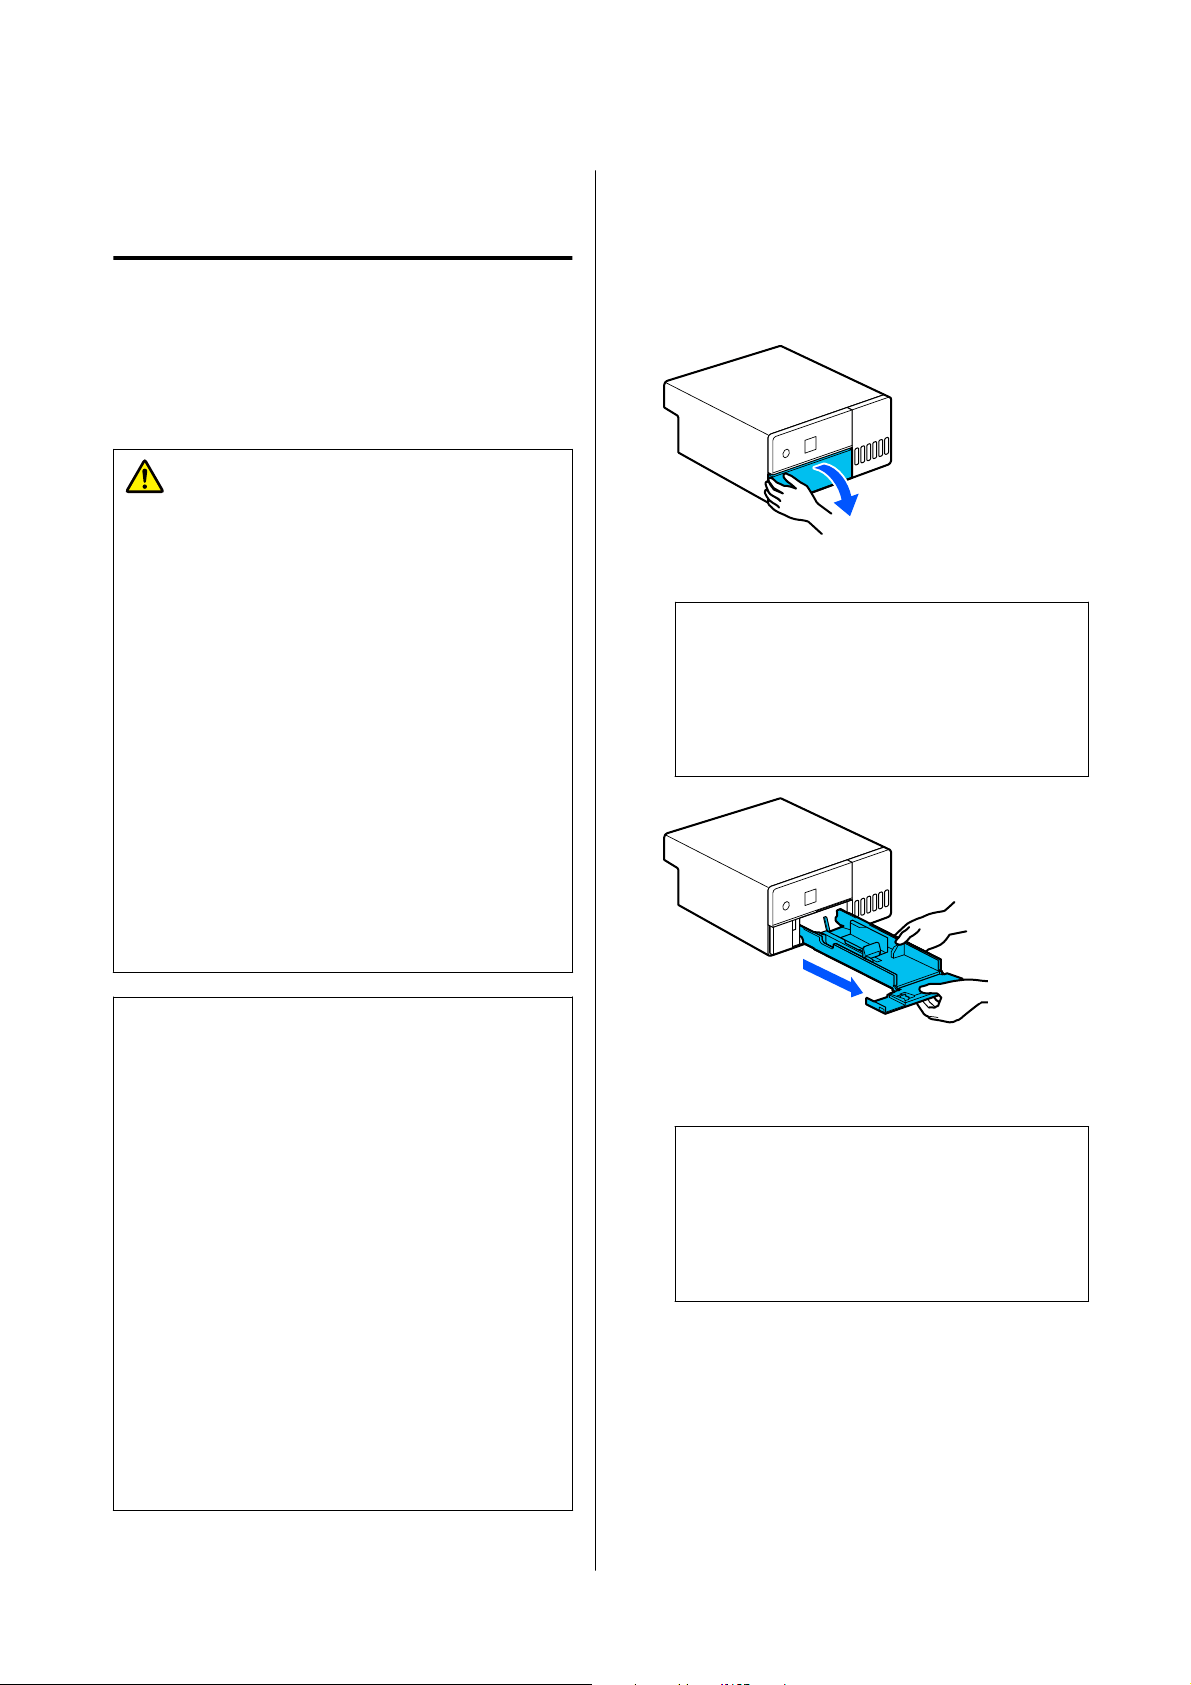
Troubleshooting
When Paper Jams
When paper jams, messages are displayed on the
screen of the control panel. Check the messages for the
location of the paper jam, and then remove the
jammed paper.
Caution:
❏ Do not touch any areas inside the printer
except for those indicated in the manual. An
electric shock or burn could occur.
❏ When opening and closing the covers, do not
place your hands near the points where the
main unit and the cover join. If your fingers or
hands are trapped, an injury could occur.
❏ Do not pull out the paper or paper cassette
forcibly when clearing out jammed paper.
Also, do not work in an awkward posture. The
paper or paper cassette could suddenly come
out and the sudden force could cause an
injury.
❏ Do not rub the edges of the paper with your
hands. The edges of the paper are thin and
sharp and could cause an injury.
c
Important:
❏ When the message “Then turn the power off
and on again.” appears on the screen, turn the
power off and then on again to confirm
whether the error reoccurs. If the same
message is displayed repeatedly, follow the
instructions on screen, press the Z button,
then follow the procedure below to clear the
paper jam, and then turn the power off and on
again.
❏ Do not remove paper forcibly when clearing
paper jams. Otherwise, the printer could be
damaged.
❏ If paper is jammed inside the printer where
you cannot reach it with your hands, do not
try to forcibly extract it yourself, contact your
dealer or Epson Support.
Paper is jammed in the paper
cassette area
To remove jammed paper, follow the steps below:
A
Open the front cover.
B
Pull the paper cassette out.
c
Important:
Use both hands to pull the paper cassette out.
If you use only one hand, the paper cassette
may fall and be damaged because the paper
cassette is heavy when it is pulled out.
C
Slowly pull out the paper and scraps of paper
jammed inside.
c
Important:
If you cannot pull out the paper jammed
inside, do not forcibly pull it out. Refer to the
next section to check for paper jams from the
rear cover and to pull out any jammed paper.
SL-D500 Series User's Guide
Problem Solver
128
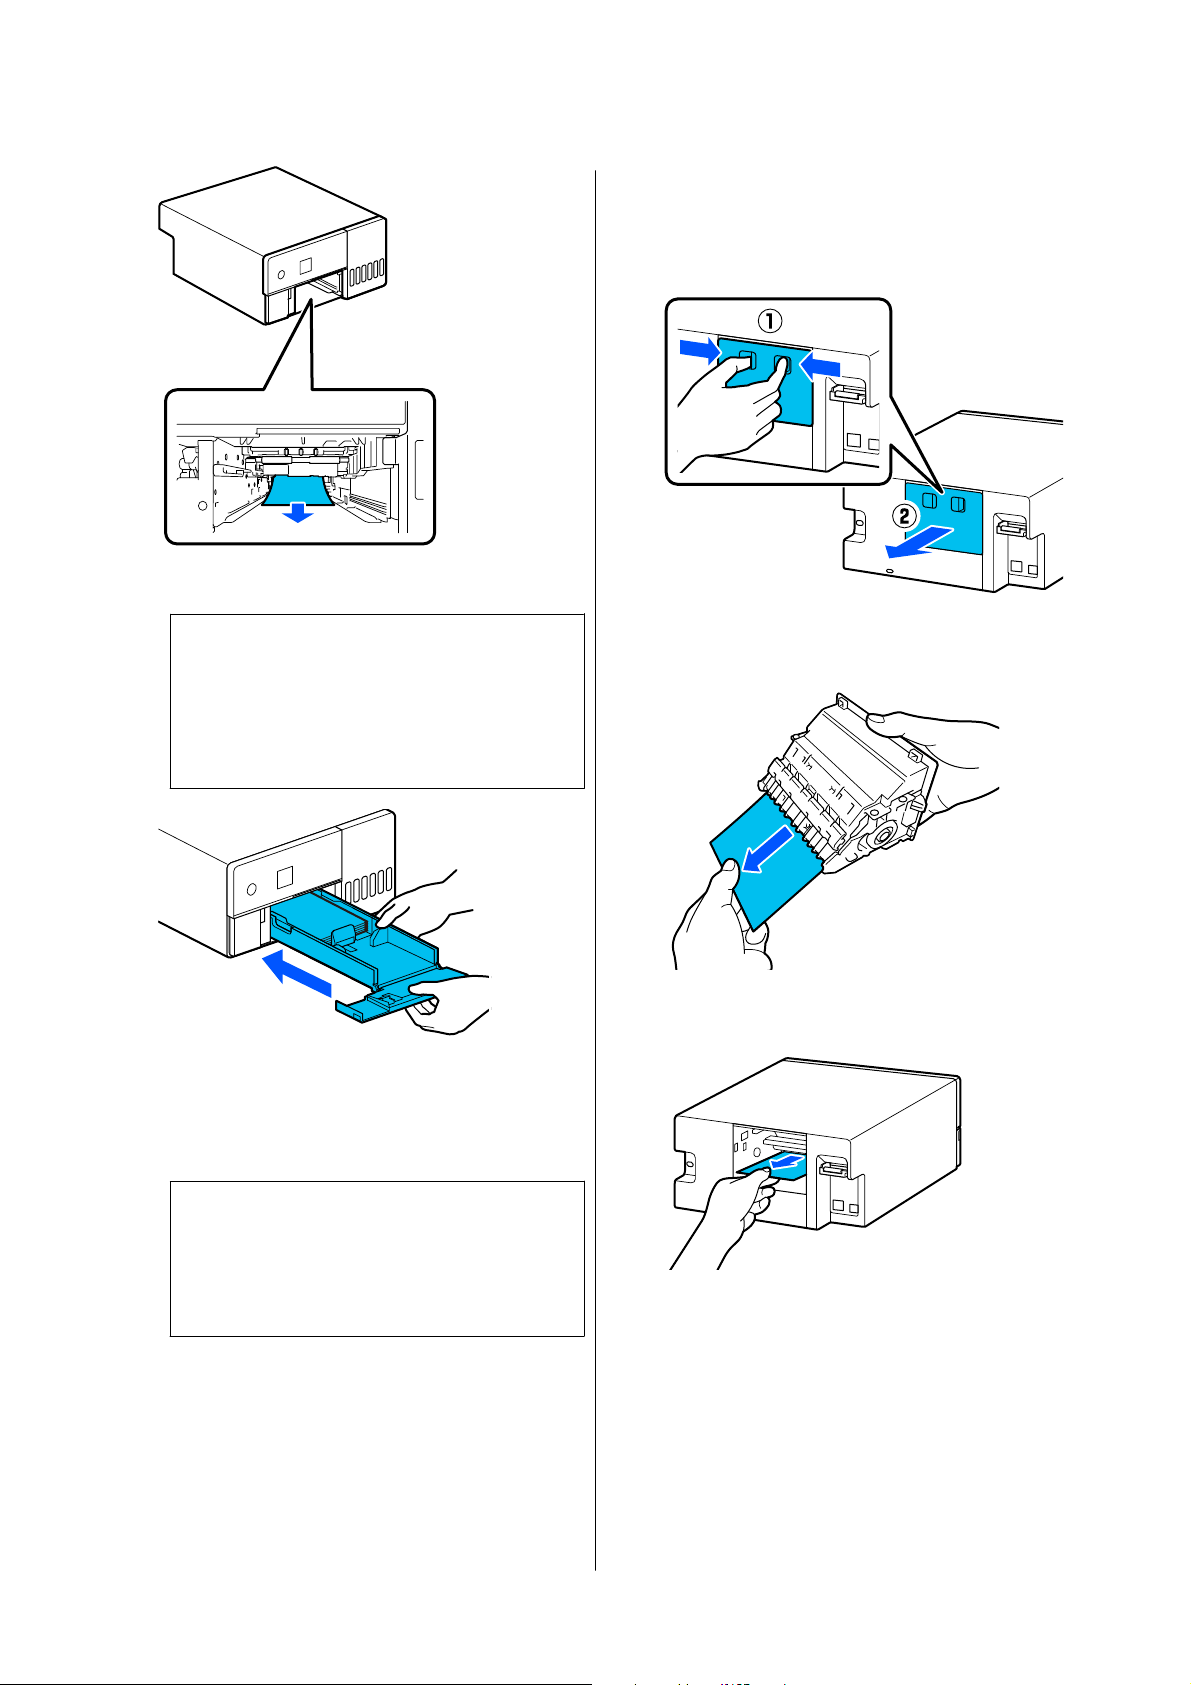
D
Insert the paper cassette.
c
Important:
Use both hands to insert the paper cassette. If
you use only one hand, the paper cassette
may fall and be damaged because the paper
loaded in it is heavy.
E
On the control panel, press the Z button.
The error is canceled and the home screen is
displayed.
Note:
If the error is not cleared, even if you press the Z
button on the control panel, then refer to the next
section to check for paper jams from the rear
cover and pull out any jammed paper.
F
Confirm that the status light is off.
Paper is jammed in the rear cover
To remove jammed paper, follow the steps below:
A
Remove the rear cover.
Remove the rear cover even if the paper
jammed inside the rear cover is left inside the
printer.
B
Slowly pull out the paper and scraps of paper
jammed inside the rear cover.
C
Slowly pull out the paper and scraps of paper
jammed inside the printer.
SL-D500 Series User's Guide
Problem Solver
129
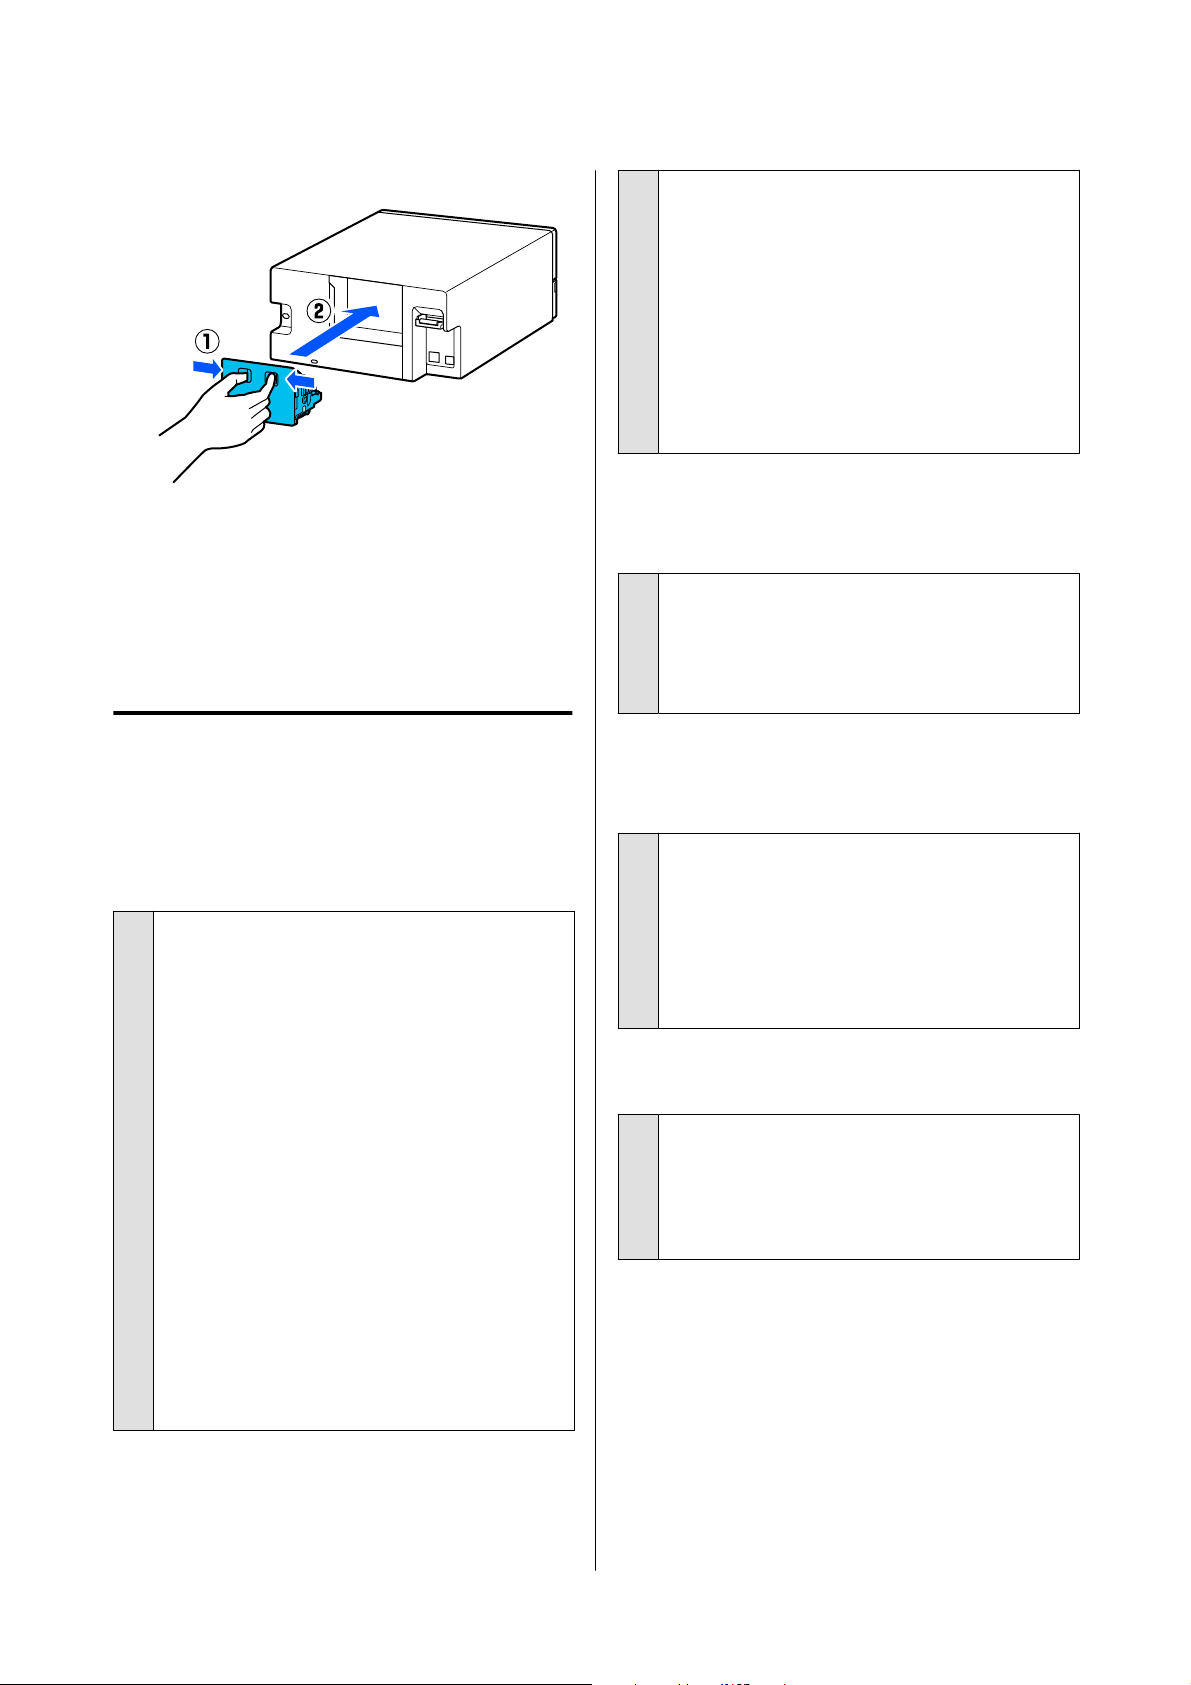
D
Install the rear cover.
E
On the control panel, press the Z button.
The error is canceled and the home screen is
displayed.
F
Confirm that the status light is off.
You Cannot Print (Because the
Printer Does Not Work)
The printer driver is not installed
properly (Windows).
o
Is the icon for this printer displayed in the
Devices and Printers folder?
❏ Yes
The printer driver is installed. See the following
item, "The printer is not connected correctly to
the computer".
❏ No (An icon is displayed under "Unspecified")
Do the following:
(1) Open the Control Panel, and click Hardware
and Sound - Device Manager - Other devices,
in this order.
(2) Right-click EPSON SL-D500 Series, and
then click Update Driver Software.
(3) Click Search automatically for updated
driver software.
(4) After the driver software is updated, click
Close.
If the printer driver is still not installed even
after taking the above measures, delete and
reinstall the printer driver.
U “Uninstalling Software” on page 23
o
Does the printer port setting match the
printer connection port?
Check the printer port.
Click the Port tab on the printer’s Properties screen,
and check if the printer name’s port is set.
If it is not indicated, the printer driver is not installed
correctly.
Delete and reinstall the printer driver.
U “Uninstalling Software” on page 23
The printer driver is not installed
properly (Mac).
o
Is the printer added to the printer list?
Click the Apple menu - System Preferences -
Printers & Scanners, in this order.
If the printer name is not displayed, add the printer.
The printer is not communicating
with the computer.
o
Is the cable plugged in properly?
If you are using a USB or Ethernet connection
confirm that the interface cable is securely
connected to both the printer port and the
computer. Also, make sure the cable is not broken
nor bent. If you have a spare cable, try connecting
with the spare cable.
The printer has an error.
o
View the message displayed in the control
panel.
U “Control Panel” on page 13
U “When a Message Is Displayed” on page 119
SL-D500 Series User's Guide
Problem Solver
130
The printer stops printing.
o
Is the status of print queue Pause?
(Windows)
If you stop printing or the printer stops printing
because of an error, the print queue enters a Pause
status. You cannot print in this status.
Double-click the printer icon in the Devices and
Printers folder; if printing is paused, open the
Printer menu and clear the Pause check box.
o
Does the current printer status show
Paused? (Mac)
Open the status dialog for your printer and check
whether printing is paused.
(1) Click the Apple menu - System Preferences -
Printers & Scanners, in this order.
(2) Double-click the icon for any printer that is
Paused.
(3) Click Resume Printer.
The printer is offline.
o
Has the computer entered sleep mode?
Do not allow the computer to enter sleep mode.
When the computer enters sleep mode, the printer
may go offline.
If the printer goes offline, reboot your computer. If
the printer is still offline even after rebooting your
computer, turn the printer off and then on again.
The Printer Sounds Like It Is
Printing, but Nothing Prints
The print head moves, but nothing
prints.
o
Confirm the printer operation.
Print a nozzle check pattern, and then check the
printer’s operations and print conditions.
❏ When printing from the printer
U “How to Print a Nozzle Check Pattern” on
page 61
❏ When printing from Maintenance Tool
(Windows)
U “Print Nozzle Check Pattern Method” on
page 73
❏ When printing from Maintenance Tool (Mac)
U “Print Nozzle Check Pattern Method” on
page 85
Check the next section if the nozzle check pattern is
not printed correctly.
The nozzle check pattern is not
printed correctly.
o
Perform head cleaning.
The nozzles may be clogged. Print a nozzle check
pattern again after performing head cleaning.
❏ When executing cleaning from the printer
U “Print Head Cleaning (Normal Cleaning)”
on page 62
❏ When executing cleaning from Maintenance
Tool (Windows)
U “Diagnostic Cleaning” on page 74
❏ When executing cleaning from Maintenance
Tool (Mac)
U “Diagnostic Cleaning” on page 86
Cannot Do Borderless Printing
o
Is the paper loaded correctly?
Follow the procedures below to load the paper in
the correct position. Borderless printing cannot be
done if paper is loaded in the wrong position.
U “Loading paper” on page 25
SL-D500 Series User's Guide
Problem Solver
131
o
Are you using paper that supports
borderless printing?
Borderless printing can only be done on the printer
with supported paper. See the following and use
paper that supports borderless printing.
U “Supported Media” on page 136
The Prints Are Not What You
Expected
Print quality is poor, uneven or
streaky, or too light or dark.
o
Are the print head nozzles clogged?
If the nozzles are clogged, specific nozzles do not
fire ink and the print quality declines. Execute a
Nozzle Check.
❏ When printing a nozzle check pattern from the
printer
U “How to Print a Nozzle Check Pattern” on
page 61
❏ When executing a Nozzle Check from
Maintenance Tool (Windows)
U “Nozzle Check Methods” on page 72
❏ When executing a Nozzle Check from
Maintenance Tool (Mac)
U “Nozzle Check Methods” on page 84
o
Are the Media Type settings correct?
Print quality can be affected if the media settings in
the printer driver/on the printer and the actual
paper do not match. Be sure to match the media
type setting with the paper that is loaded in the
printer.
o
Are you using a recommended (genuine) ink
bottle?
This printer is developed for use with genuine ink
bottles.
Using non-genuine products may cause a decline in
print quality.
o
Have you compared the printing result with
the image on the display monitor?
Since monitors and printers produce colors
differently, printed colors will not always match
on-screen colors perfectly.
The color is not exactly the same as
another printer.
o
Colors vary depending on the printer type
due to each printer’s characteristics.
Because inks, printer drivers, and printer profiles are
developed for each printer model, the colors printed
by different printer models are not exactly the same.
The print is not positioned properly
on the media.
o
Have you specified the print area?
Check the print area in the settings of the
application and the printer.
o
Are the Paper Size settings correct?
If the Paper Size in the printer driver and the size of
the paper loaded in the printer do not match, the
print position may misalign or some of the data may
not be printed. In this case, check the print settings.
The printed surface is scuffed or
soiled.
o
Is the paper too thick or too thin?
Check that the paper specifications are compatible
with this printer.
U “Supported Media” on page 136
SL-D500 Series User's Guide
Problem Solver
132
o
Is the print head scuffing the printed
surface?
When printing on thick paper, the print head may
scuff the print surface and make it dirty. If this
happens, enable the Thick Paper function. However,
printing speed and print quality may decline.
❏ When setting from the printer
In the home screen, select Settings - Printer
Setup - Thick Paper - On.
❏ When setting from the printer driver (Windows)
In the Maintenance screen of the printer
driver, click Speed & Progress, and then select
Thick Paper.
❏ When setting from the printer driver (Mac)
(1) Click the Apple menu - System Preferences
- Printers & Scanners, in this order.
(2) Select the printer and click Options &
Supplies - Options.
(3) Select On for Thick Paper.
The reverse side of the printed paper
is soiled.
o
Has paper dust collected on the platen?
Clean the platen.
U “Cleaning the Platen” on page 55
The paper is creased.
o
Are you using the printer at normal room
temperature?
Epson special media should be used at normal room
temperature (temperature: 15 to 25°C (59 to 77°F),
humidity: 40 to 60%). For information about paper,
such as thin paper from other manufacturers that
requires special handling, see the documentation
supplied with the paper.
Margins appear in borderless
printing.
o
Are the settings for the print data in the
application correct?
Make sure that the paper settings in the application
are correct as well as in the printer driver.
U “Borderless Printing on All Sides” on page 41
Feeding or Ejecting Problems
Paper does not feed.
o
Is the paper loaded correctly?
❏ Load paper that can be used on the printer.
❏ Follow the notes on handling paper.
❏ Do not load more than the allowable amount
of paper.
❏ Match the paper size and paper type settings
on the machine to the paper that is actually
loaded.
U “Supported Media” on page 136
U “Notes on Paper” on page 16
U “Loading paper” on page 25
o
Clean the Roller Assembly Kit.
Paper feed trouble may occur if the Roller Assembly
Kit is dirty, such as with paper dust. Clean the
surfaces of the rollers.
U “Cleaning the Roller Assembly Kit” on page 56
o
The Roller Assembly Kit needs to be
replaced with a new one.
When paper feed trouble repeatedly occurs even
though paper is loaded and the Roller Assembly Kit
has been cleaned appropriately, replace the Roller
Assembly Kit with a new one.
U “Consumables and Optional Items” on page 135
U “Replacing the Roller Assembly Kit” on page 60
Cannot Print from Smart Device
Even Though It Is Connected
(iOS)
o
Paper Setup Auto Display is disabled.
Enable Paper Setup Auto Display in the following
menu on the control panel.
Settings - Printer Setup - Paper Source Settings -
Paper Setup Auto Display
SL-D500 Series User's Guide
Problem Solver
133
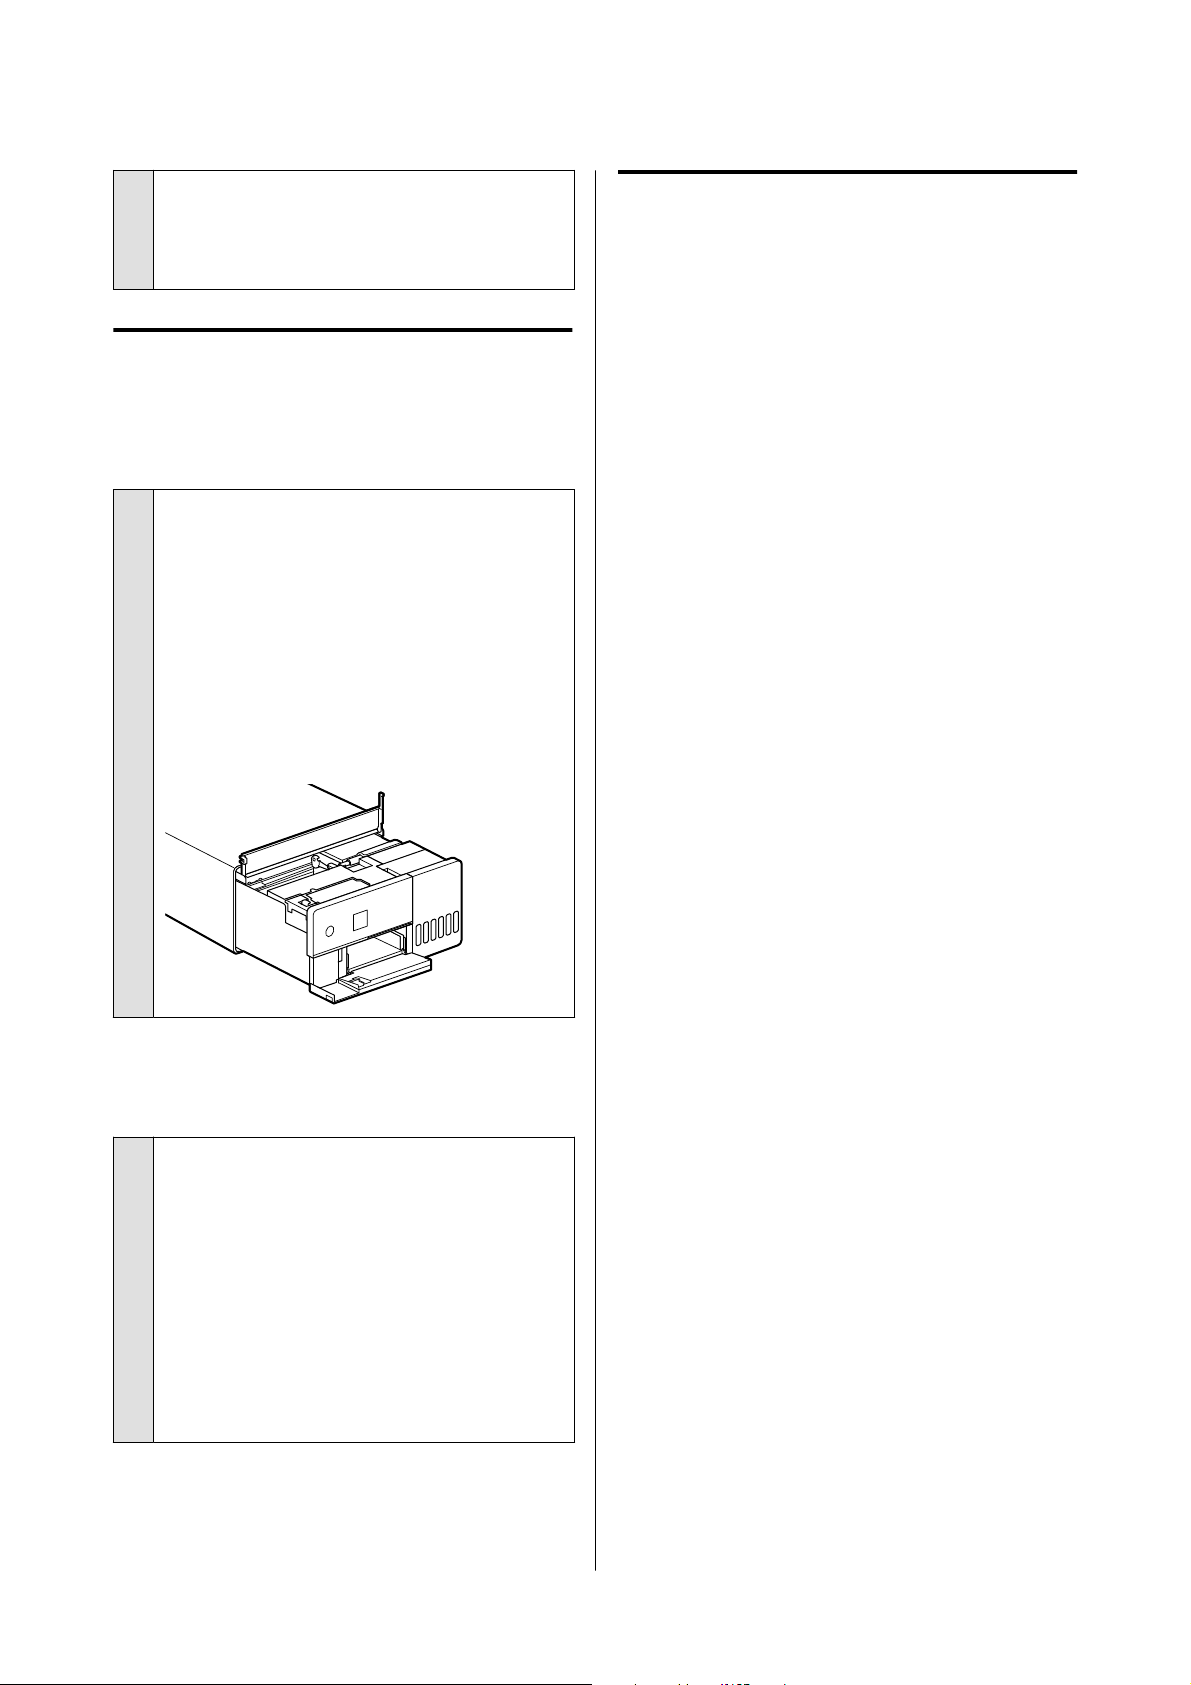
o
AirPrint is disabled.
Enable the AirPrint setting on Web Config.
U Administrator’s Guide
Others
Print speed suddenly slows down
while printing continuously
o
A function is operating that prevents
damage to the interior of the printer due to
high temperatures.
Printing can continue even though the print speed
is reduced.
To recover the print speed, after removing the rear
cover, pull out the interior of the printer until it
stops, and open the inner cover and leave it like that
for 15 to 30 minutes. When doing this, leave the
printer’s power on. Don’t turn off the printer’s
power.
The administrator password has
been lost.
o
Contact your dealer or Epson Support.
The initial value for the administrator’s password is
the product’s serial number. If you forget the
password after it was changed from the product
serial number, contact your dealer or Epson
Support.
If the Lock Setting is Off, then you can execute
Clear All Data and Settings without inputting the
admin password. Doing this returns all the settings,
including the admin password, to their initial values.
U “Control Panel Menu” on page 94
If Troubles Are Not Resolved
If you cannot resolve a problem after taking the
measures described in the "Troubleshooting" section,
contact your dealer or Epson Support.
SL-D500 Series User's Guide
Problem Solver
134
Appendix
Consumables and Optional Items
The following consumable products and optional items are available for use with the printer. (As of May 2022)
Ink bottle
Epson recommends the use of genuine Epson ink bottles.
Epson warranty does not cover damage caused by inks other than those specified, including any genuine Epson ink
not designed for this printer or any third party ink.
Other products not manufactured by Epson may cause damage that is not covered by Epson’s warranties, and
under certain circumstances, may cause erratic printer behavior.
Model name Ink color Product number
SL-D500
SL-D540
SL-D570
Black T54C1
Cyan T54C2
Magenta T54C3
Yellow T54C4
Light Cyan T54C5
Light Magenta T54C6
SL-D530
SL-D560
Black T54H1
Cyan T54H2
Magenta T54H3
Yellow T54H4
Light Cyan T54H5
Light Magenta T54H6
SL-D580
SL-D590
Black T54F1
Cyan T54F2
Magenta T54F3
Yellow T54F4
Light Cyan T54F5
Light Magenta T54F6
SL-D500 Series User's Guide
Appendix
135
Others
Product name Product number Explanation
Maintenance Box C12C934591/
C12C934601
This maintenance box is for replacing the maintenance
box when its available capacity is insufficient.
Model numbers vary depending on the country or
region in which you live.
U “Replacing the Maintenance Box” on page 53
Roller Assembly Kit C13S210138 This part is for replacing the roller in the base of the
printer.
Supported Media
We recommend that you use the following Epson special media for high-quality printing results.
The following paper can be used with the printer. (As of May 2022)
Epson Special Media
Name of paper Size
Number
of sheets
that can
be loaded
Two-sid
ed
Printing
Borderl
ess
Printing
ICC profile
SureLab Photo Paper
Gloss (250)
9 x 13 cm (3.5 x 5 in) 100 -
Epson_SL-D500_Photo
PaperGloss.icc
10 x 15 cm (4 x 6 in) 100 -
SureLab Photo Paper
Luster (250)
9 x 13 cm (3.5 x 5 in) 100 - Epson_SL-D500_Photo
PaperLuster.icc
10 x 15 cm (4 x 6 in) 100 -
SureLab Photo Paper
Gloss - DS(225)
10 x 15 cm (4 x 6 in) 100 Epson_SL-D500_Photo
PaperGloss_DS.icc
SureLab Photo Paper
Gloss - DS(190)
10 x 15 cm (4 x 6 in) 100
Epson_SL-D500_Photo
PaperGloss_DS.icc
SureLab Photo Paper
Luster - DS(225)
10 x 15 cm (4 x 6 in) 100
Epson_SL-D500_Photo
PaperLuster_DS.icc
SureLab Photo Paper
Luster - DS(190)
10 x 15 cm (4 x 6 in) 100
Epson_SL-D500_Photo
PaperLuster_DS.icc
Other Commercially Available Paper
Use other commercially available paper that meets the specifications of the printer.
U “Specifications Table” on page 143
SL-D500 Series User's Guide
Appendix
136
And, add these paper types before using them.
U “Adding Paper Information” on page 90
c
Important:
❏ Do not use paper that is wrinkled, scuffed, torn, or dirty.
❏ Paper types that are within the range of the printer’s specifications can be loaded, but paper feeding and
print quality are not guaranteed.
Glossy photo paper
Name of paper
*
Size
Two-sid
ed
Printing
Borderl
ess
Printing
ICC profile
Photo Paper(Glossy) 9 x 13 cm (3.5 x 5 in) -
Epson_SL-D500_PhotoPaperGloss.ic
c
10 x 15 cm (4 x 6 in) -
* Name selected in the paper type settings in the menus on the printer and the printer driver.
Matte photo paper
Name of paper
*
Size
Two-sid
ed
Printing
Borderl
ess
Printing
ICC profile
Photo Paper(Matte) 9 x 13 cm (3.5 x 5 in) -
Epson_SL-D500_PhotoPaperMatte.i
cc
10 x 15 cm (4 x 6 in)
* Name selected in the paper type settings in the menus on the printer and the printer driver.
Card stock
Name of paper
*
Size
Two-sid
ed
Printing
Borderl
ess
Printing
ICC profile
Card Stock(Plain) 102 x 152 mm (4 x 6 in)
Epson_SL-D500_Standard.icc
* Name selected in the paper type settings in the menus on the printer and the printer driver.
SL-D500 Series User's Guide
Appendix
137
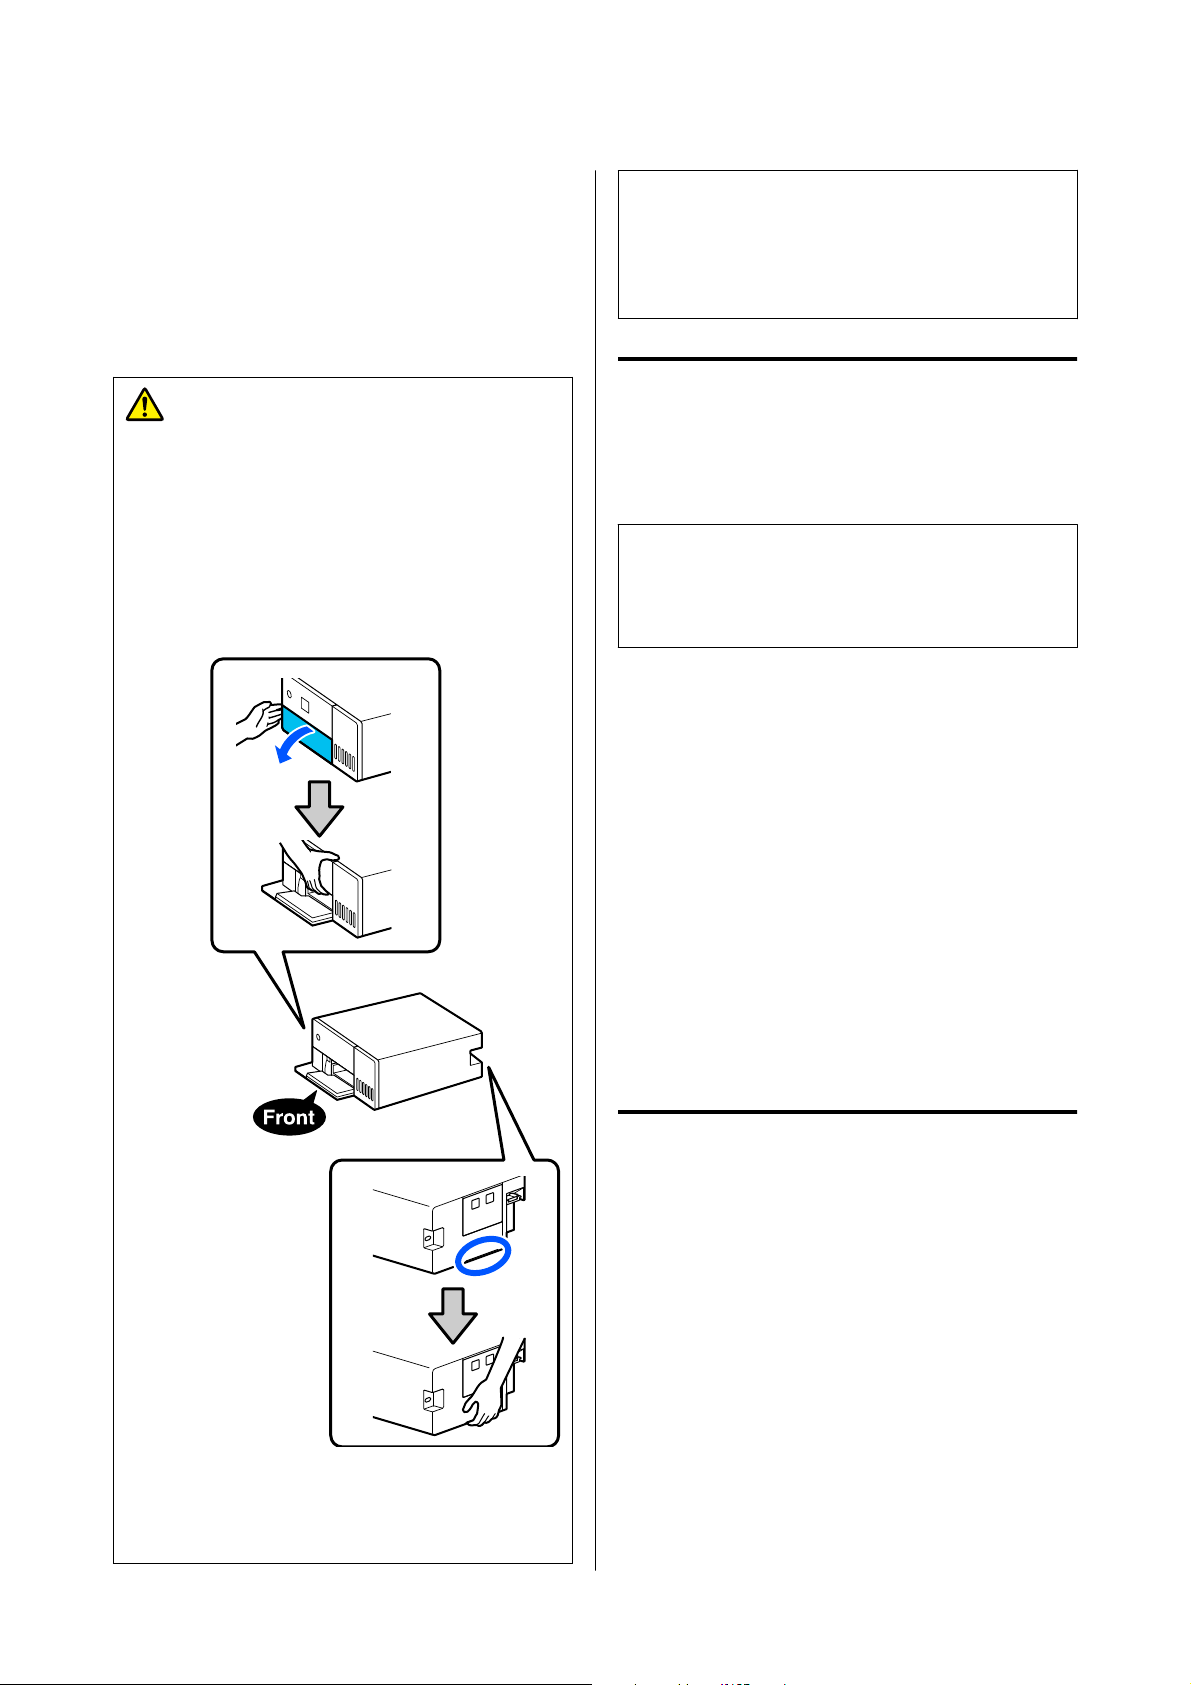
Moving and Transporting
the Printer
This section describes how to move and transport the
product.
Caution:
❏ When lifting this printer, make sure you use
the correct posture.
❏ When lifting the product, place your hands in
from the front of the printer as shown in the
illustration below.
If you hold any other areas, the printer may
fall or your fingers could be trapped and
damaged when placing the printer.
❏ Do not lift the product while its internal
components are pulled out. Dropping it could
cause an injury.
c
Important:
When moving or transporting the printer, be sure
that it is level; do not tilt it at an angle or place it
upside down. Otherwise, ink could leak out.
Moving the Printer
This section explains how to move the printer over
short distances, such as to a different location within
the same building.
c
Important:
Lift the printer up when moving it. Don’t slide it to
the side. Otherwise, it may break down.
Preparing to Move
Make the following preparations in advance before
moving the printer.
❏ Remove all paper from the paper cassette.
❏ Turn off the printer and remove all cables.
Operations after Moving
After moving, make sure that the print head is not
clogged before use.
U “Print Head Nozzle Check” on page 60
Transport
This section explains how to transport the printer.
Preparing to Transport
A
Remove all paper from the paper cassette.
SL-D500 Series User's Guide
Appendix
138
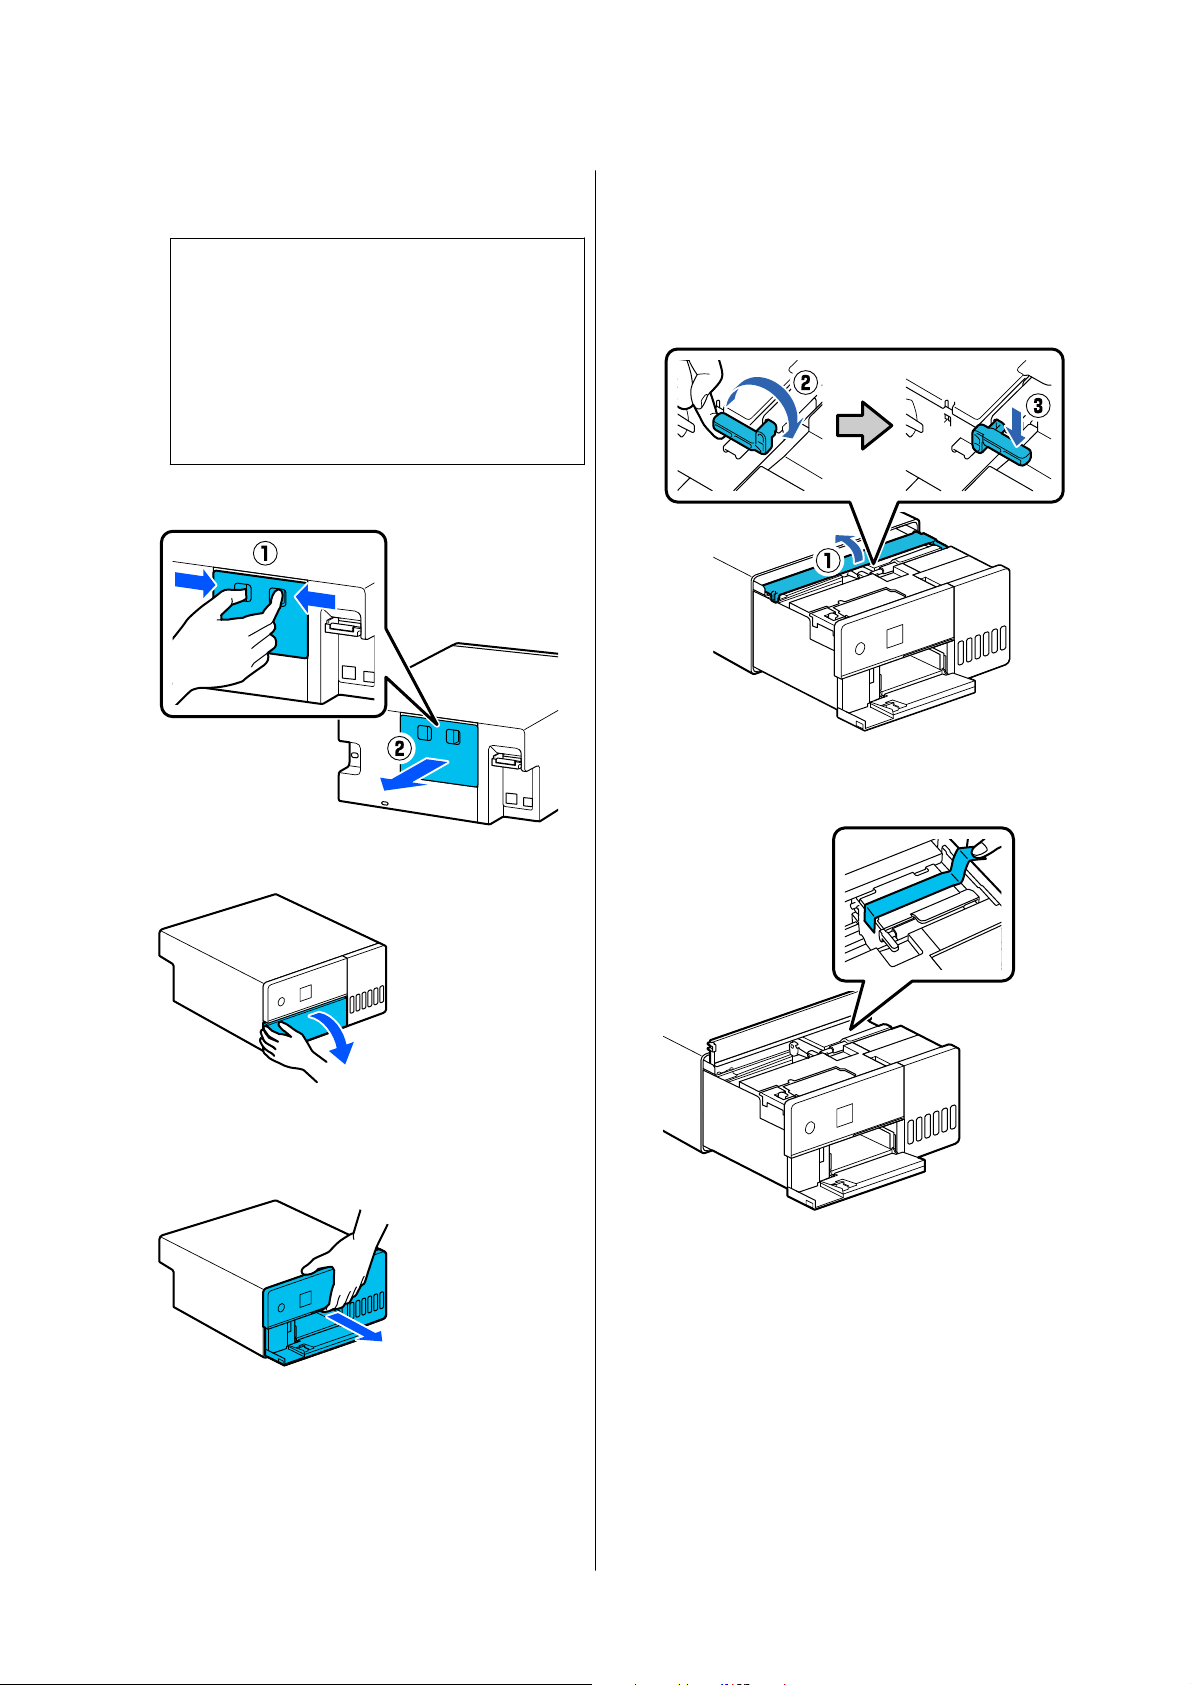
B
Turn off the printer and remove the power cord
and all cables from the printer.
c
Important:
After the power light turns off, unplug the
power plug from the electric outlet. The print
head may not be capped properly (the print
head is not positioned at the far right). If the
print head is left uncapped for a long time,
the print quality may decline.
C
Remove the rear cover.
D
Open the front cover.
E
Place your hand as shown in the illustration,
and pull out the interior of the printer until it
stops.
F
Open the inner cover and set the transportation
lock in the transportation position, as shown in
the illustration.
Putting the transportation lock in the
transportation position prevents the ink from
leaking.
G
Use commercially available tape to secure the
print head so it does not move.
SL-D500 Series User's Guide
Appendix
139
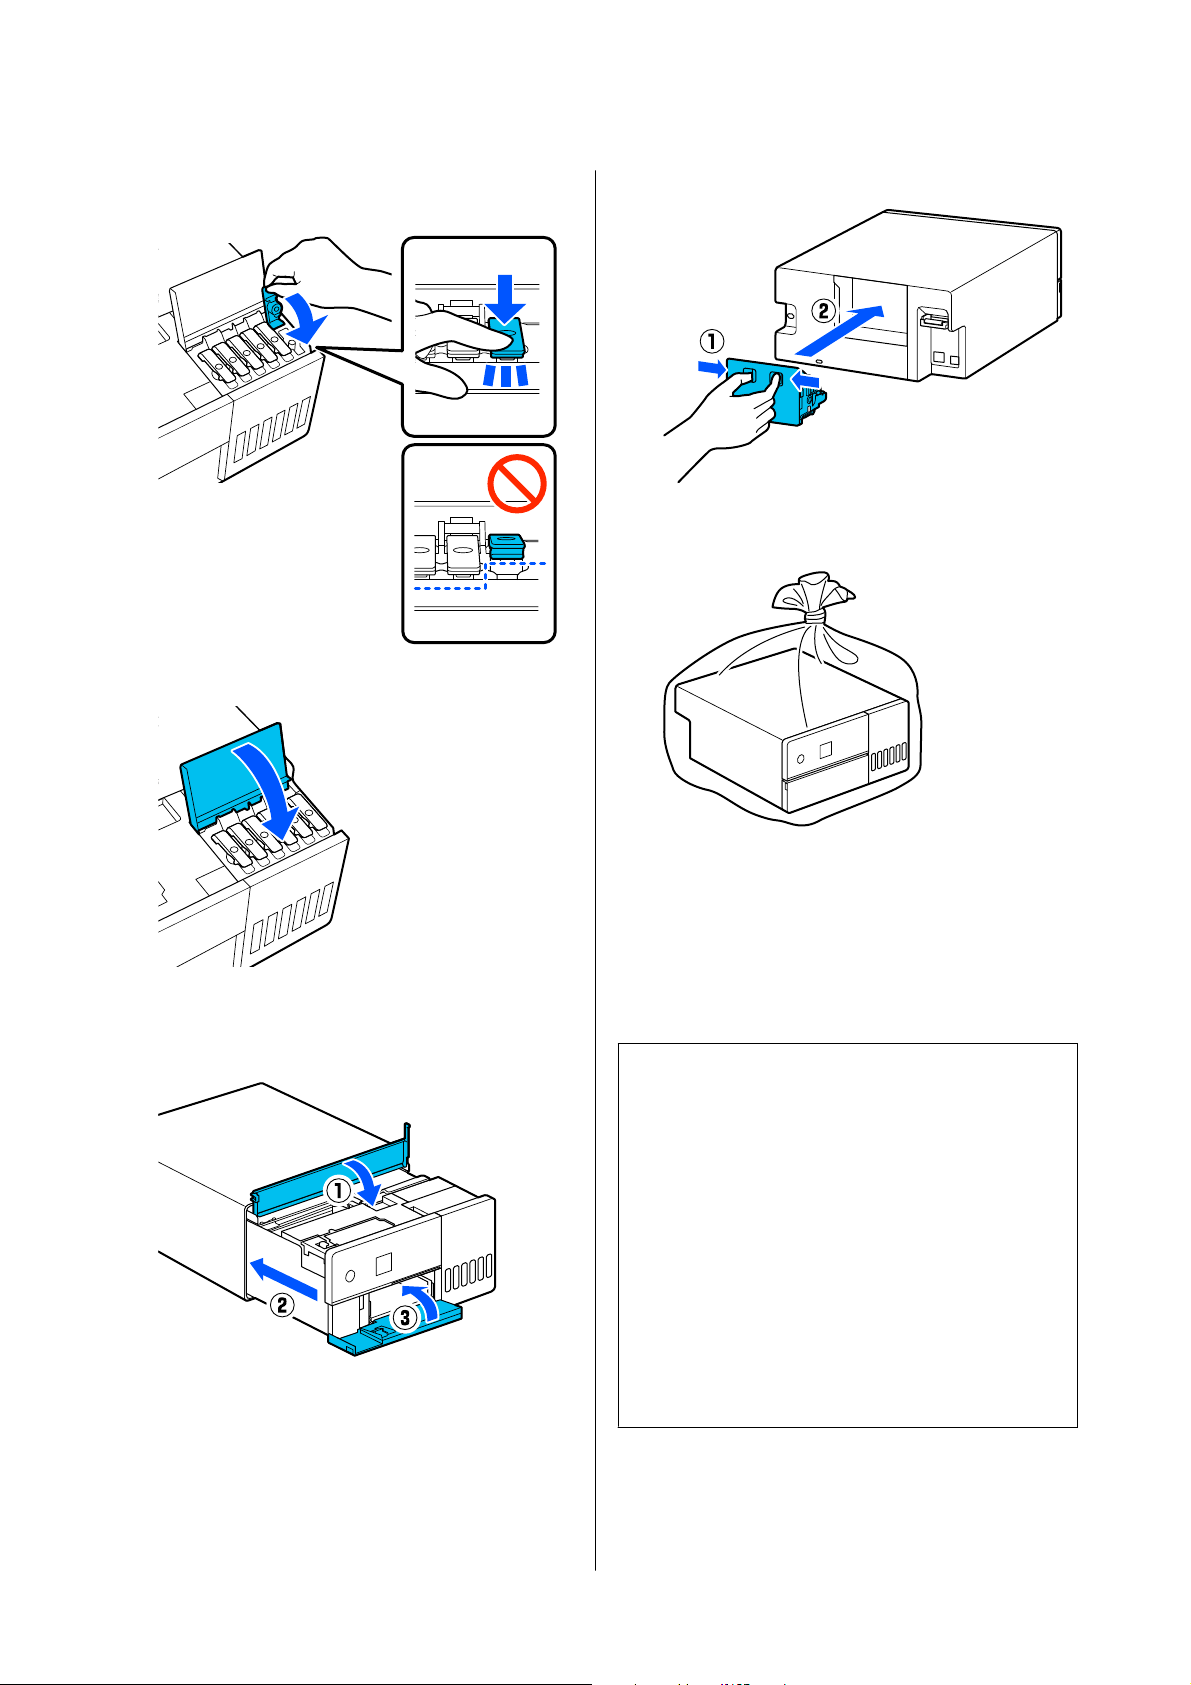
H
Confirm that all the ink tank caps are securely
closed.
I
Securely close the ink tank cover.
J
Close the inner cover, return the interior of the
printer to its original position, and then close
the front cover.
K
Install the rear cover.
L
Put the printer in the shipping bag provided,
and close it.
M
Put the printer in the box, and pack in the
protective materials from the time of purchase
or commercially available packaging materials.
The printer is a precision machine, so pack it to
prevent damage from the force of any shocks
during transportation.
c
Important:
About transporting the Ink bottles
Be careful of the following points when
transporting ink bottles.
❏ Put them in sealable bags for transporting.
❏ When transporting ink bottles, do not tilt
them or subject them to sudden changes in
temperature. Ink may leak even if the cap of
the ink bottle is firmly tightened.
❏ Do not put ink bottles that have been opened
in the same bag as the printer.
Operations after Transporting
After transporting the printer, follow the procedure
below to set it up to be used.
SL-D500 Series User's Guide
Appendix
140
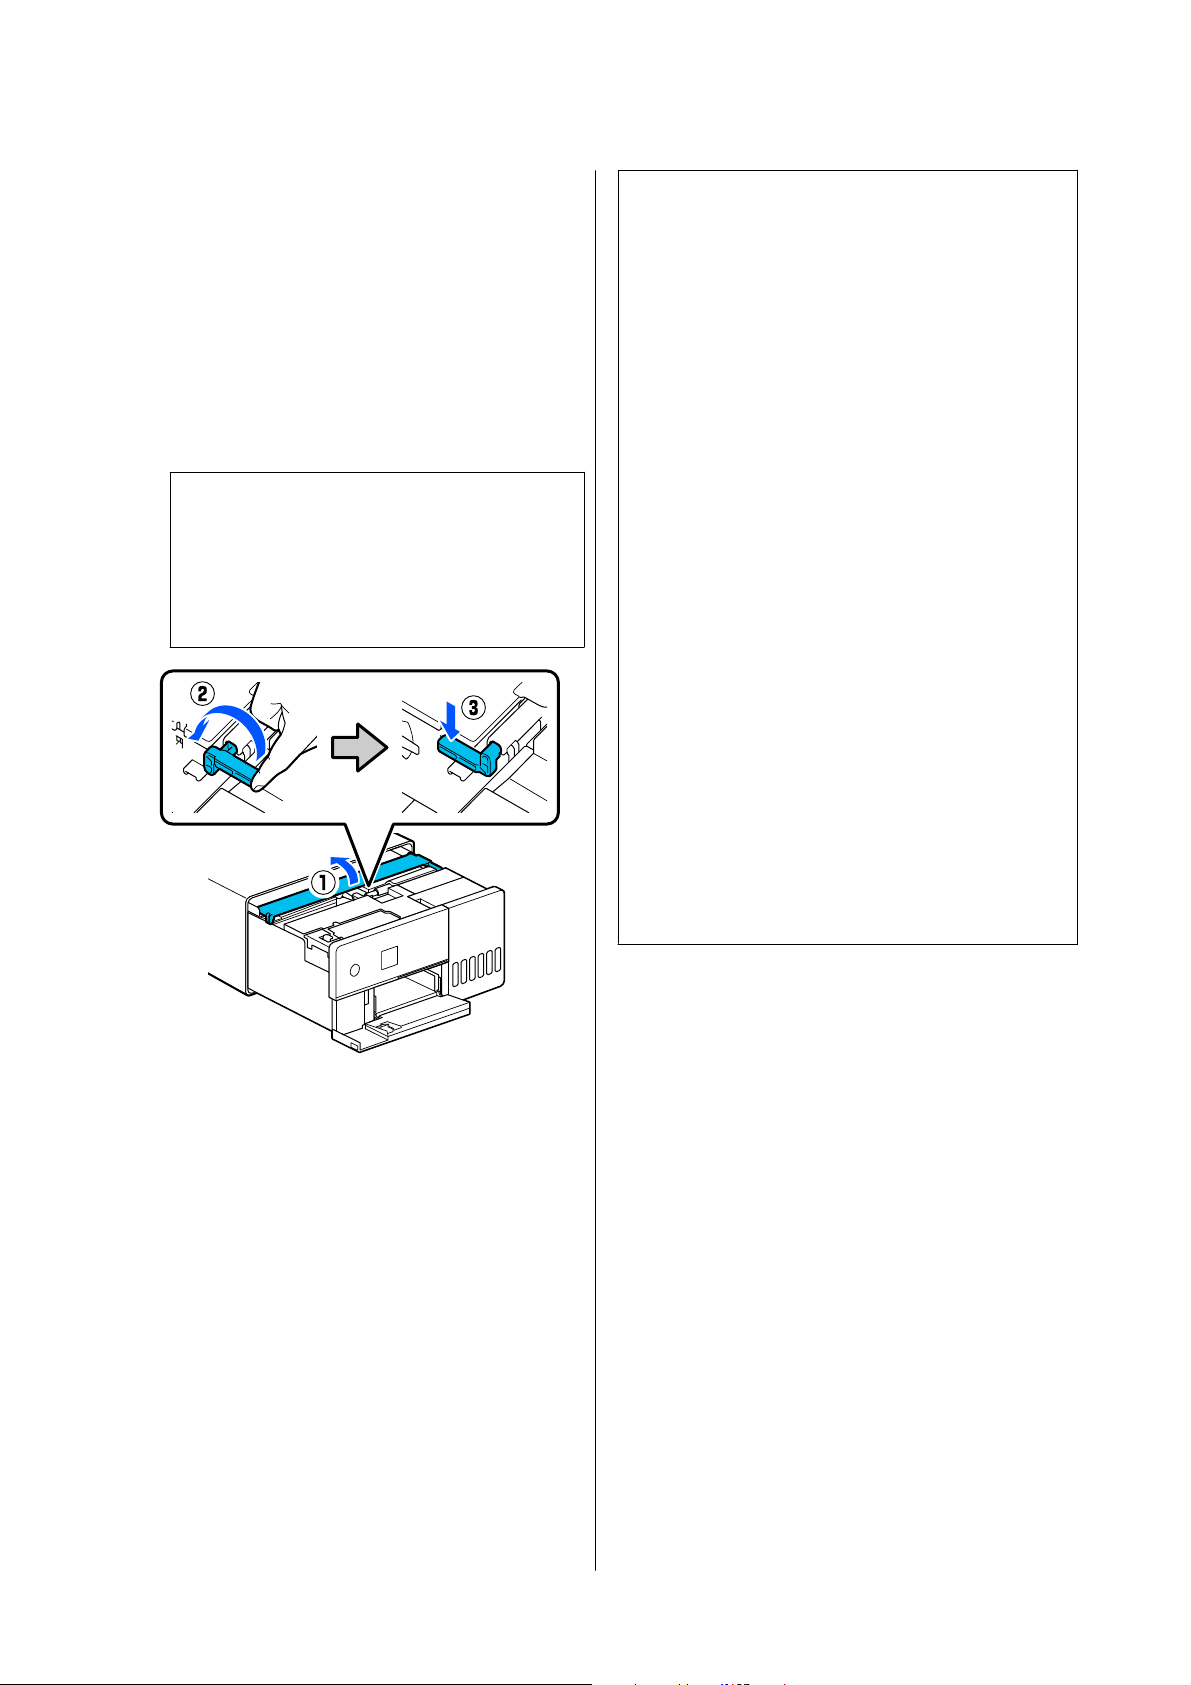
A
Remove the rear cover.
B
Open the front cover, and pull out the interior
of the printer until it stops.
C
Open the inner cover, peel off the tape that was
securing the print head.
D
Set the transportation lock in the print position,
as shown in the illustration.
c
Important:
After transporting the printer, return the
transportation lock to the printing position.
You cannot print if it is in the transportation
position.
E
Close the inner cover, return the interior of the
printer to its original position, and then close
the front cover.
F
Install the rear cover.
G
Connect the power cable, and turn the printer
on.
H
Execute a Print Head Nozzle Check to confirm
that the nozzles are not clogged.
U “Print Head Nozzle Check” on page 60
Note:
North America
See the Start Here sheet for the procedure to connect
LAN/USB cables to the printer.
If you do not have a Start Here sheet on hand, you can
go to https://www.epson.com/support (U.S.) or https://
www.epson.ca/support (Canada) and search for your
product to view it.
Latin America
See the Start Here sheet for the procedure to connect
LAN/USB cables to the printer.
If you do not have a Start Here sheet on hand, you can
go to https://www.latin.epson.com (Caribbean), https://
www.epson.com.br/suporte (Brazil), or https://
www.latin.epson.com/soporte (other regions) and
search for your product to view it.
Other Regions
See the Setup Guide for the procedure to connect
LAN/USB cables to the printer.
If you do not have a Setup Guide on hand, you can go
to https://epson.sn to select and view one for your
printer model.
You can watch the procedure on video also.
Epson Video Manuals
SL-D500 Series User's Guide
Appendix
141
System Requirements
Software for this printer can be used in the following environments. (As of May 2022)
Supported OS and other elements may change.
For the latest information, see the Epson website.
Printer Driver
Windows
Operating system Windows 11
Windows 10/Windows 10 x64
Windows 8.1/Windows 8.1 x64
CPU Intel Core2 Duo 3.0 GHz or better
Available memory space 1 GB or more
Hard disk (Available volume to install) 2 GB or more
Display resolution SXGA (1280×1080) or better
Connection method with the printer
*
USB connection, or wired or wireless LAN connection
* For details on the connection methods (interface specifications), see the following.
U “Specifications Table” on page 143
Mac
Operating system OS X 10.9.5 Mavericks or later
CPU Intel Core2 Duo 2.0 GHz or better
Memory 2 GB or more
Hard disk (Available volume to install) 2 GB or more
Display resolution WXGA+ (1440×900) or better
Connection method with the printer
*
USB connection, or wired or wireless LAN connection
* For details on the connection methods (interface specifications), see the following.
U “Specifications Table” on page 143
Maintenance Tool
Windows
Operating system Windows 11
Windows 10/Windows 10 x64
Windows 8.1/Windows 8.1 x64
SL-D500 Series User's Guide
Appendix
142
CPU Intel Core2 Duo 3.0 GHz or better
Available memory space 1 GB or more
Hard disk (Available volume to install) 2 GB or more
Display resolution SXGA (1280×1080) or better
Connection method with the printer
*
USB connection, or wired or wireless LAN connection
* For details on the connection methods (interface specifications), see the following.
U “Specifications Table” on page 143
Mac
Operating system OS X 10.9.5 Mavericks or later
CPU Intel Core2 Duo 2.0 GHz or better
Memory 2 GB or more
Hard disk (Available volume to install) 2 GB or more
Display resolution WXGA+ (1440×900) or better
Connection method with the printer
*
USB connection, or wired or wireless LAN connection
* For details on the connection methods (interface specifications), see the following.
U “Specifications Table” on page 143
Web Config
Use the latest version of browser.
Windows
Browser Internet Explorer 11, Microsoft Edge, Mozilla Firefox, Google Chrome
Mac
Browser Safari, Mozilla Firefox, Google Chrome
Specifications Table
Basic specifications
Printing method On-demand ink jet
Nozzle configuration 180 nozzles for each color
Highest resolution 1440 x 720 dpi
Paper feed method Friction feed
SL-D500 Series User's Guide
Appendix
143
c
Important:
Use this printer at an altitude of up to 2000 m (6562 ft.).
War ni ng :
This is a class A product. In a domestic environment this product may cause radio interference in which case
the user may be required to take adequate measures.
Electrical Specifications
Rated voltage AC 100 to 120 V AC 220 to 240 V
Rated frequency range 50 - 60 Hz 50 - 60 Hz
Rated current 0.9 A 0.5 A
Power consumption Operating: Approximately 18 W
When standing by: Approximately 3.8 W
Sleep mode: Approximately 1.4 W
Power off: Approximately 0.2 W
Operating: Approximately 18 W
When standing by: Approximately 3.8 W
Sleep mode: Approximately 1.4 W
Power off: Approximately 0.35 W
*1
/
Approximately 0.2 W
*2
*1 SL-D540, SL-D560, SL-D570 only
*2 Other than those noted above.
Interface Specifications
USB port Hi-Speed USB
Wired LAN compliance
standard
10BASE-T (IEEE802.3i)
100BASE-TX (IEEE802.3u)
Energy Efficient Ethernet (IEEE802.3az)
*1
Wireless LAN
SL-D500 Series User's Guide
Appendix
144
Interface Specifications
Standards SL-D500, SL-D530 (except for Taiwan): IEEE802.11b/g/n
Other than those noted above (including Taiwan): IEEE802.11b/g/n/a/ac
Frequency band IEEE802.11b/g/n: 2.4GHz
IEEE802.11a/n/ac: 5GHz
Maximum
radio-frequency
power transmitted
2.4GHz:
2400-2483.5 MHz: 20 dBm (EIRP)
5GHz:
5150-5250 MHz: 20 dBm (EIRP)
5250-5350 MHz: 20 dBm (EIRP)
5470-5725 MHz: 20 dBm (EIRP)
Wireless module SL-D500, SL-D530 (except for Taiwan): J26H006
Other than those noted above (including Taiwan): J26H005
Connection mode Infrastructure
Wi-Fi Direct (simple AP mode)
*2
Wireless security WEP (64/128bit)
WPA-PSK (TKIP)
WPA2-PSK (AES)
WPA3-SAE (AES)
WPA2-Enterprise (AES) (EAP-TLS/PEAPTLS/PEAPMSCHAPv2/EAP-TTLS)
WPA3-Enterprise
Network printing
protocols/functions
*3
EpsonNet Print (Windows)
Standard TCP/IP (Windows)
Bonjour (Mac)
IPP Printing (Windows, Mac)
Mopria Print (Mopria device)
Chromebook native printing
AirPrint (iOS, Mac)
Security standards/
protocols
SSL/TLS:
HTTPS Server/Client
IPPS Server
SMTPS Client
STARTTLS (SMTPS)
IEEE802.1X
IPsec/IP Filtering
SNMPv3
*1 The connected device must comply with IEEE802.3az standards.
*2 IEEE802.11b is not supported.
*3 EpsonNet Print supports IPv4 only. The others support both IPv4 and IPv6.
SL-D500 Series User's Guide
Appendix
145
War ni ng :
To prevent radio interference to the licensed service, this device is intended to be operated indoors and away
from windows to provide maximum shielding. Equipment (or its transmit antenna) that is installed outdoors
is subject to licensing.
For European users
Radio Equipment Information:
This product intentionally emit radio wave described as follows.
(a) frequency band in which the radio equipment operates; 2.4 to 2.4835GHz
(b) maximum radio-frequency power transmitted in the frequency band in which the radio equipment operates;
20dBm (eirp power)
Paper cassette (feed area) specifications
Paper Width 89 to 102 mm (3.5 to 4.02 in.)
Paper Height 127 to 152 mm (5 to 5.98 in.)
When doing auto double-sided printing: 148 to 152 mm (5.83 to 5.98 in.)
Paper Thickness 0.20 to 0.265 mm (.008 to .010 in.)
Paper cassette (output area) specifications
Capacity 100 sheets
Paper Size Standard size:
10 x 15 cm (4 x 6 in.)
Non-standard size:
Width: 89 to 102 mm (3.5 to 4 in.), Length: 127 to 152 mm (5 to 6 in.)
Ink Specifications
Type Ink bottle
Ink type Six color water-based dye
Use by date Five years after manufacture
Storage temperature Stored in packaging: -20 to 40 °C (-4 to 104°F) (4 days or less at −20 °C [-4°F], 1 month or less at
40 °C [104°F])
Transported in packaging: −20 to 60 °C (-4 to 140°F) (4 days or less at −20 °C [-4°F], 1 month or
less at 40 °C [104°F], 72 hours or less at 60 °C [140°F])
Capacity 70 ml
Dimensions Diameter: 37.8 mm (1.49 in.)
Height: 138.7 mm (5.46 in.)
SL-D500 Series User's Guide
Appendix
146
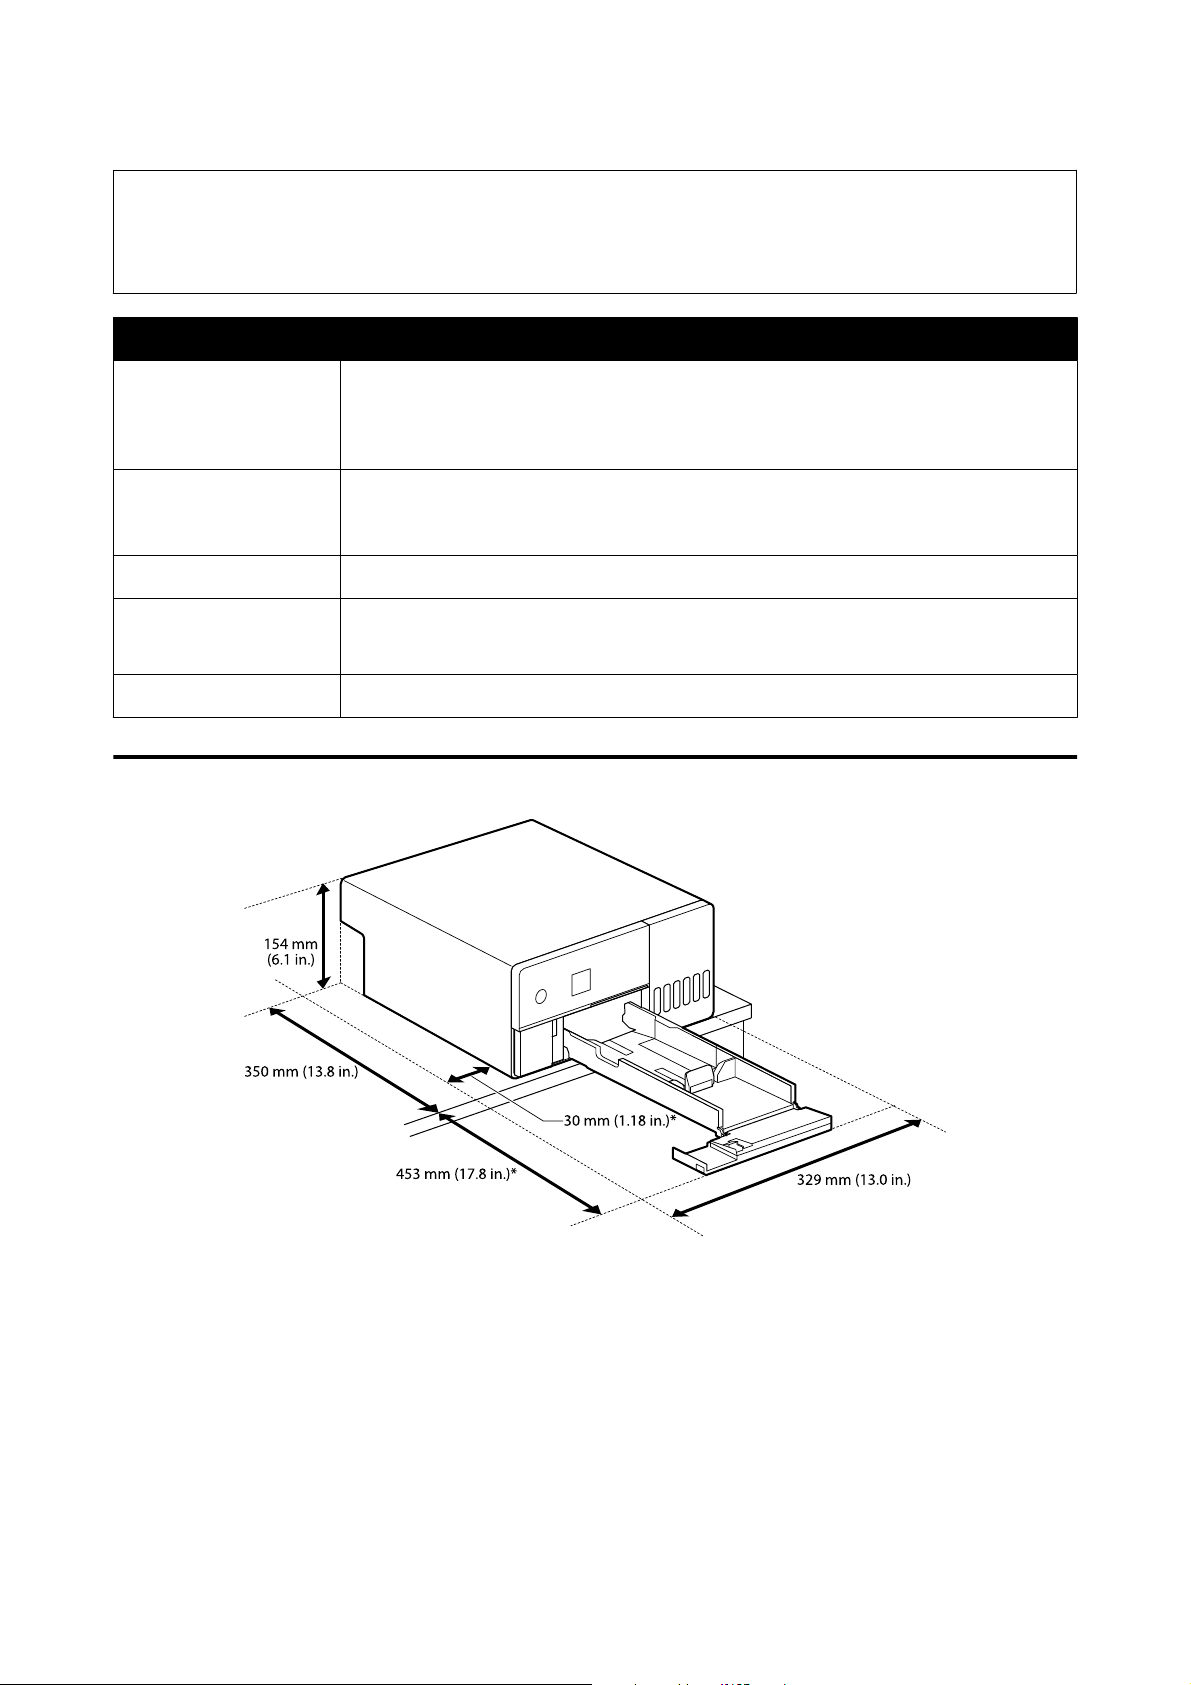
c
Important:
The ink inside the ink bottle will freeze if left at below -14 °C (6.8°F) for a long time. If it does freeze, leave it
at room temperature (25 °C [77°F]) for at least two hours until it has defrosted (without condensation).
General Specifications
Temperature Operating: 10 to 35 °C (50 to 95°F)
Storage (before unpacking): -20 to 60 °C (-4 to 140°F) (within 120 hours at 60 °C [140°F], one
month at 40 °C [104°F])
Storage (after unpacking): -20 to 40 °C (-4 to 104°F) (within one month at 40 °C [104°F])
Humidity Operating: 20 to 80% (without condensation)
Storage (before unpacking): 5 to 85% (without condensation)
Storage (after unpacking): 5 to 85% (without condensation)
Weight Main unit: 7.0 kg (15.4 lb.) (ink not included)
Dimensions Main unit: 299 (W) x 350 (D) x 154 (H) mm (11.8 [W] x 13.8 [D] x 6.1 [H] in.)
U “Necessary Space” on page 147
Installed software version E1.1930.0002
Necessary Space
*Space needed to do maintenance
OPEN SOURCE SOFTWARE LICENSE TERMS
This product uses open source software as well as software for which Epson owns the rights.
The entire texts of the license agreements of the open source software are shown below.
SL-D500 Series User's Guide
Appendix
147

Windows
64 bit: %ProgramFiles(x86)%\EPSON\SL-D500 Series\License\License.txt
32 bit: %ProgramFiles%\EPSON\SL-D500 Series\License\License.txt
Linux
/usr/share/doc/epson-inkjet-printer-sld500-series/COPYING.LIB
/usr/share/doc/epson-inkjet-printer-sld500-series/COPYING.EPSON
SL-D500 Series User's Guide
Appendix
148
