
Loading ...
Loading ...
Loading ...
- 6
DANGER
Risk of injury!
When reversing, there must not be any
risk for third parties, have somebody
marshal the driver if necessary.
Press slowly the accelerator pedal "re-
verse".
The accelerator pedal can be used to
vary the driving speed infinitely.
Avoid sudden operation of the pedal as
this may damage the hydraulic system.
In the event of power loss on inclined
surfaces, slightly reduce the pressure
on the accelerator pedal.
Release the accelerator pedal, the ma-
chine brakes automatically and stops.
Note: The braking effect can be supported
by pressing the brake pedal.
Driving over fixed obstacles which are 70
mm high or less:
Drive forwards slowly and carefully.
Driving over fixed obstacles which are
more than 70 mm high:
Only drive over these obstacles using a
suitable ramp.
ATTENTION
Do not sweep up packing strips, wire or
similar objects as this may damage the
sweeping mechanism.
Note: To achieve an optimum cleaning re-
sult, the driving speed should be adjusted
to take specific situations into account.
Note: During operation, the dust filter
should be shaken off and cleaned at regu-
lar intervals.
Note: When frequently working in areas
with fine dust, the filter must be cleaned
more often.
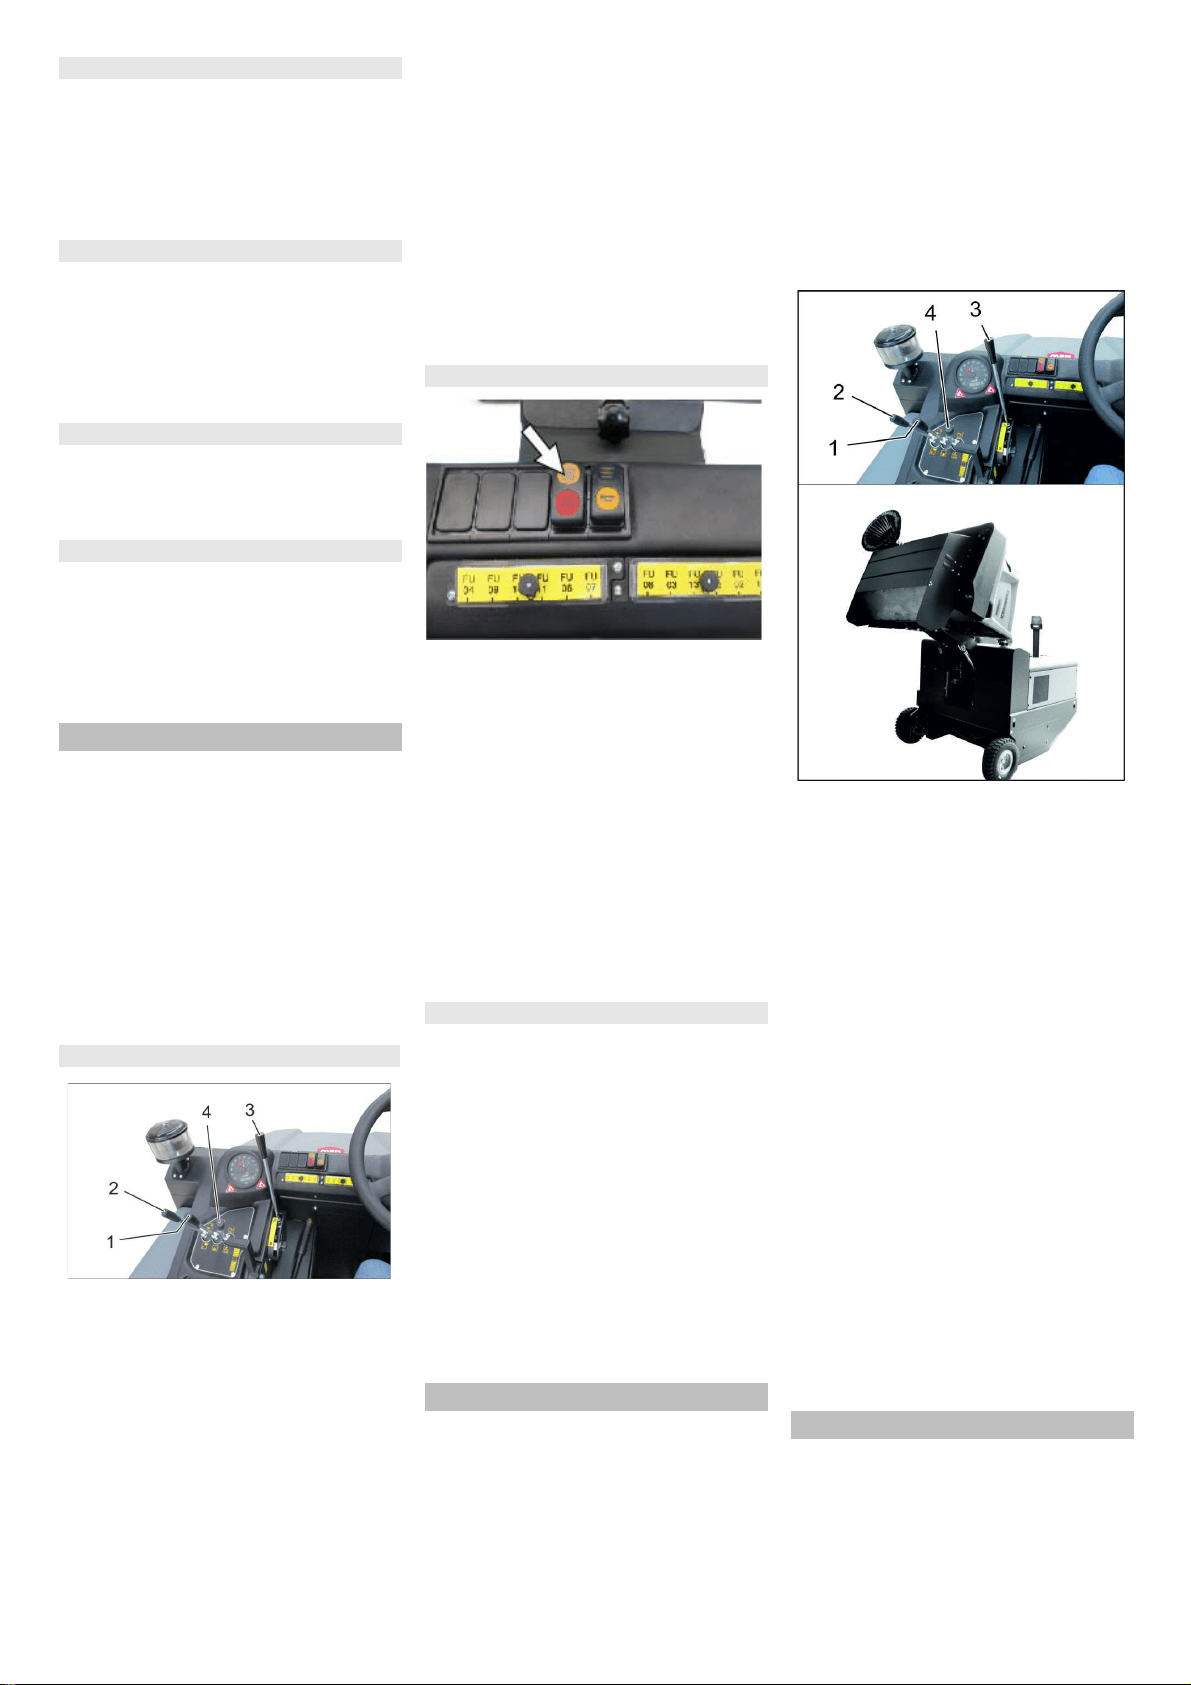
1 Roller brush and side brush control le-
ver
2 Control lever waste container
3 Roller brush control lever
4 Control lever container flap
Roller brush and side brush control le-
ver
Control lever (1) forwards: Switches the
roller brush on and lowers and switches
the side brushes on.
Control lever (1) backwards: Switches
the roller brush on.
Control lever waste container
Control lever waste container (2) to the
front: Waste container is lowered.
Control lever waste container (2) to the
back: Waste container is raised.
Control lever roller brush
Roller brush control lever (3) forwards:
Raises the roller brush.
Roller brush control lever (3) back-
wards: Lowers the roller brush.
Control lever container flap
Control lever container flap (4) to the
front: The container flap of the waste
container opens.
Control lever container flap (4) to the
back: The container flap of the waste
container closes.
Switch on the blower.
With surface cleaning:
Roller brush and side brush control le-
ver (1) backwards: Switches the roller
brush on.
Roller brush control lever (3) back-
wards: Lowers the roller brush.
Control lever container flap (4) to the
front: Container flap opens.
With cleaning of side edges:
Roller brush and side brush control le-
ver (1) forwards: Switches the roller
brush on, switches the side brushes on
and lowers them.
Roller brush control lever (3) back-
wards: Lowers the roller brush.
Switch off the blower.
With surface cleaning:
Roller brush and side brush control le-
ver (1) backwards: Switches the roller
brush on.
Roller brush control lever (3) back-
wards: Lowers the roller brush.
Control lever container flap (4) to the
front: Container flap opens.
With cleaning of side edges:
Roller brush and side brush control le-
ver (1) forwards: Switches the roller
brush on, switches the side brushes on
and lowers them.
Roller brush control lever (3) back-
wards: Lowers the roller brush.
DANGER
Risk of injury!
During the emptying process, persons
and animals must not stay within the
swivelling range of the waste container.
Danger of tipping!
Place the device on an even surface
during the emptying process.
몇 WARNING
Risk of crushing!
Never reach into the rod assembly for
the drainage mechanism. Do not stay
under the raised container.
ATTENTION
Risk of personal injury or damage!
Material of the rotating roller brush may
be catapulted off during the emptying
process. Keep an appropriate distance.
Raise the roller brush and side brushes
using the control levers: Control lever 1
to middle position and control lever 3
forwards.
Close the container flap, in order to do
so, move the control lever (4) to the
back:
Raise the container flap, in order to do
so, move the waste container control le-
ver (2) to the back:
Slowly drive towards the collection con-
tainer.
Lock parking brake.
Open the container flap, in order to do
so, push the container flap operating le-
ver (4) to the front and empty the waste
container.
Close the container flap, in order to do
so, push the container flap operating le-
ver (4) to the back until it is tipped in-
wards in the end position.
Release parking brake.
Drive away the collection container
slowly.
Lower the waste container into the end
position, in order to do so, move the
waste container control lever (2) to the
front
Raise the roller brush and side brushes
using the control levers: Control lever 1
to middle position and control lever 3
forwards.
Close the container flap, in order to do
so, move the control lever (4) to the
back:
Reverse drive
Driving method
Brakes
Driving over obstacles
Sweeping mode
Control lever
Sweeping dry floors
Sweeping damp or wet floors
Emptying waste container
Turn off the appliance
23EN
Loading ...
Loading ...
Loading ...