Loading ...
Loading ...
Loading ...
SAFETY RULES FOR JOINTER--PLANER
Safety is a combination of operator common senso and alertness at all times when the Jointer--Planer is being
used. Study these rules and general safety rules before operating and retain them for future use.
1, WEAR EYE PROTECTION
2 NEVER MAKE JOINTiNG OR PLANING CUT DEEPER THAN
1t8 iNCH -- PER PASS
3 FEED WORKPIECE AGAINST ROTATION OF CUTTER
4 KEEP FINGERS AWAY FROM REVOLVING CUTTER -- use
fixtures when necessary
5, NEVER PERFORM JOINTING OR PLANING OPERATION
WITH CUTTER HEAD GUARD REMOVED
6 NEVER FORCE CUTTING ACTION Stalttng or partial stalling
of motor can cause major damage. Allow motor to reach full
speed before cutting,
7. NEVER - Attempt to perform an abnormal or lJttte used
operation without study and the use of adequate hold down
/push blocks, jigs, fixtures, stops, etc
8 NEVER- Attempt to cut small pieces.
9 ALWAYS - Use hold downfpush blocks for jointing material
narrower than 3 inches, or planing material thinner than 3
inches
10 ALWAYS., Keep cutter sharp
11 NEVER- Use in an explosive atmosphere Normal sparking of
motor may ignite fumes
12 OUTDOOR EXTENSION CORD USE. When toot is used
outdoors, use only extension cords suitable for use outdoors
Outdoor approved cords are marked with the suffix W-A, for
example- SJTW,-A or SJOW-A
13. ALWAYS use identical replacement parts when servicing
14 This tool is intended for RESIDENTIAL USE ONLY,
WARNING: DO NOT ALLOW FAMILIARITY (GAINED FROM
FREQUENT USE OF YOUR JOfNTER--PLANER) TO BECOME
COMMONPLACE ALWAYS REMEMBER THAT A CARELESS
FRACTION OF A SECOND IS SUFFICIENT TO INFLICT SEVERE
INJURY,
WARNING: DO NOT AT ANY TIME LET BRAKE FLUIDS, GASOLINE, PENETRATING OILS, ETC
WITH PLASTIC PARTS. THEY CONTAIN CHEMICALS THAT CAN DAMAGE
COME tN CONTACT
AND/OR DESTROY PLASTICS.
ASSEMBLY
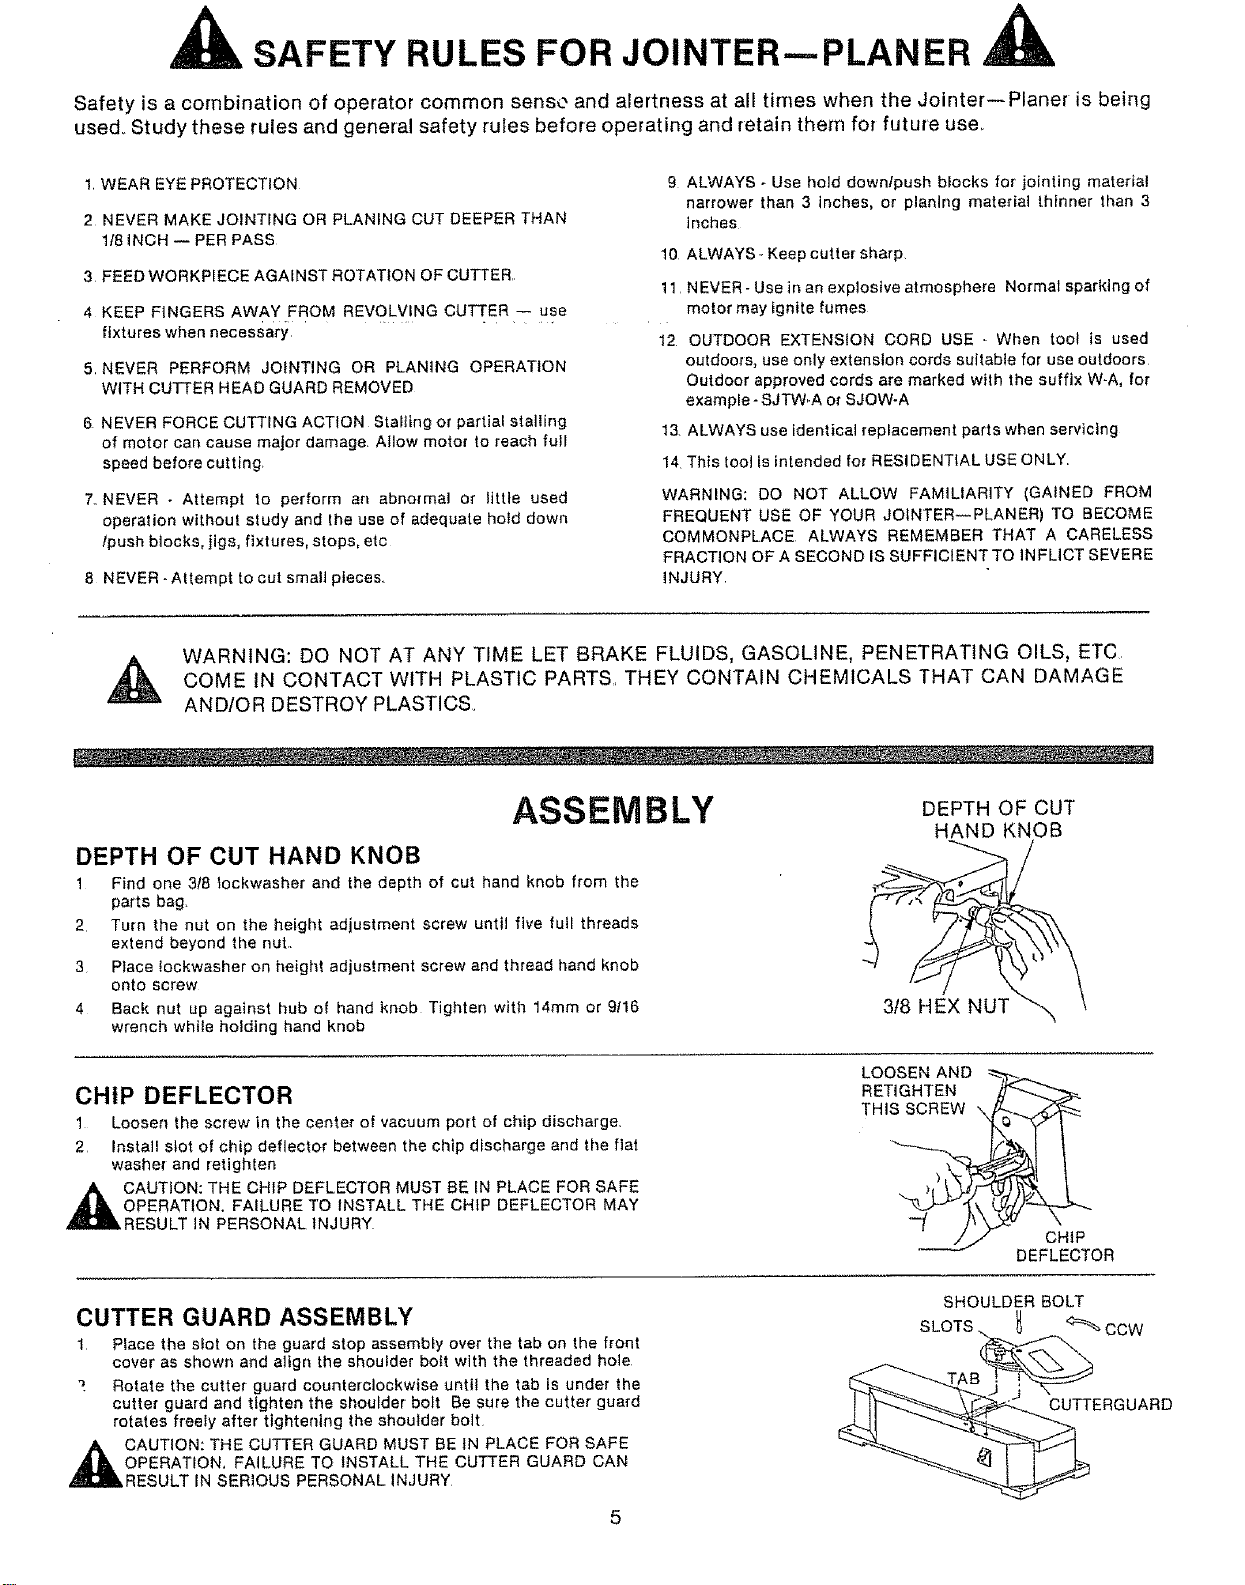
DEPTH OF CUT HAND KNOB
1 Find one 3f8 tockwasher and the depth of cut hand knob from the
parts bag.
2 Turn the nut on the height adjustment screw until five full threads
extend beyond the nut.,
3 Place !ockwasher on height adjustment screw and thread hand knob
onto screw
4 Back nut up against hub of hand knob Tighten with 14mm or 9/16
wrench while hotdtng hand knob
DEPTH OF CUT
HAND KNOB
3/8 HEX NUT
CHIP DEFLECTOR
1 Loosen the screw in the center of vacuum port of chip discharge,
2 Install slot of chip deflector between the chip discharge and the fiat
washer and retighten
,_ CAUTION: THE CHIP DEFLECTOR MUST BE IN PLACE FOR SAFE
OPERATION. FAILURE TO INSTALL THE CHIP DEFLECTOR MAY
RESULT iN PERSONAL INJURY
LOOSEN AND
RETIGHTEN
THiS SCREW \
CH1P
DEFLECTOR
CUTTER GUARD ASSEMBLY
1 Place the slot on the guard stop assembty over the tab on the front
cover as shown and a]ign the shoulder boff with the threaded hole
7 Rotate the cutter guard counterclockwise until the tab is under the
cutter guard and tighten the shoulder bolt Be sure the cutter guard
rotates freely after tightening the shoulder bolt
,_CAUTION: THE CUTTER GUARD MUST BE tN PLACE FOR SAFE
OPERATION, FAILURE TO INSTALL THE CUTTER GUARD CAN
RESULT IN SERIOUS PERSONAL INJURY
SHOULDER BOLT
SLOTS CCW
CUTTERGUARD
Loading ...
Loading ...
Loading ...