NORDICFLEX GLUTE HAM BENCH
READY,
SET, PRO
USER MANUAL
HELLO THERE.
Joel and I are athletes who suffered from
severe ACL injuries a few months apart.
We purchased multiple pieces of wellness
equipment for our in-home rehab but were
left disappointed and frustrated by wellness
and recovery devices that made big promises
but gave no support, no well-thought-out
plan to follow, and no results. And that’s how
Lifepro came about, and why the Strength
Training collection was created — we’ve set
out to change all of that. It’s why every piece
of equipment bearing our name not only
undergoes rigorous scrutiny to make sure it
delivers on power and efficacy, but comes with
built-in support from our ‘guiding angels’
and a built-in lifetime warranty so that
you’re never left hanging.
Welcome to Lifepro.
We’re in this together now.
Not everyone can afford to hire a personal trainer or a team of professionals
to help them feel and look their best. But the good news is: you don’t have
to. Lifepro brings the gym to you.
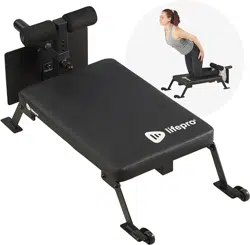
With the Lifepro NordicFlex Glute Ham Bench, there’s no need to pay for an
expensive gym membership or personal trainer. The NordicFlex provides a
safe and effective way to strengthen your hamstrings and gluteus muscles.
Strong glutes and hamstrings are vital to better squat and deadlift strength
as well as improved running speed and body mechanics. They also play a key
role in knee strength, possibly preventing future knee injuries. The specific
design of the NordicFlex and Nordic curl exercise ensures minimal spinal
loading, which is perfect for anyone who can’t hold or lift heavy weights.
Get stronger, healthier legs: build muscle and bone density, boost
metabolism, improve heart health, reduce stress, and lose weight—right
from the comfort of your own home. Strength training also helps manage
chronic conditions such as high blood pressure, back and joint pain, diabetes,
and depression.
Whether you’re getting back into strength training after starting a family or
career, a die-hard gym enthusiast, or someone who has never lifted before,
the compact Lifepro NordicFlex has everything you’ll need to build muscle
and stamina.
Redefine your workouts and experience the
transformative power of the Lifepro NordicFlex:
Increase strength and flexibility: builds and tones muscle.
Regulate weight: boosts your heart rate and burns calories.
Boost your metabolism: encourages your body to burn fat faster.
Decrease your stress: increases serotonin and decreases cortisol.
Reduce lower back pain: improves core strength and posture.
Improve stability: improves leg strength, knee stability, and posture.
Check out the information in this manual for ways to get started using
your NordicFlex Glute Ham Bench. Next, be sure to visit our website
nordicflex.lifeprofitness.com to access to our FREE library of workout
videos which demonstrate how to easily incorporate the NordicFlex into
your fitness routine.
FIRST STEPS
UNPACKING THE COMPONENTS
1. Remove the hardware and components from the shipping box. You will
need to remove the two bolts holding the footplate to the side of the
main frame. Save these bolts as spares.
2. Inspect all items for shipping damage.
3. Compare the parts and hardware to the items listed in WHAT’S IN
THE BOX on the next page.
4. Read carefully through this user manual and all safety instructions
before assembling and using the NordicFlex.
5. Follow the steps in the 15-MINUTE ASSEMBLY GUIDE on page 9 to
begin assembling your workout bench.
6. Go to nordicflex.lifeprofitness.com and register your product within
14 days of purchase to activate your lifetime warranty.
CAUTION
• Always use proper lifting techniques, the shipping box is quite heavy.
• Assemble on a flat, sturdy floor that’s free of obstructions.
CUSTOMER SUPPORT
If you have any questions about setting up or using your NordicFlex,
we’re here to help. Call or email us and an experienced customer
support representative will be happy to assist you: (800) 563-6604
or support@lifeprofitness.com.
NORDICFLEX
GLUTE HAM BENCH
STRENGTH TRAINING
4 NordicFlex User Manual Lifepro Strength Training Collection 5

Not everyone can afford to hire a personal trainer or a team of professionals
to help them feel and look their best. But the good news is: you don’t have
to. Lifepro brings the gym to you.
With the Lifepro NordicFlex Glute Ham Bench, there’s no need to pay for an
expensive gym membership or personal trainer. The NordicFlex provides a
safe and effective way to strengthen your hamstrings and gluteus muscles.
Strong glutes and hamstrings are vital to better squat and deadlift strength
as well as improved running speed and body mechanics. They also play a key
role in knee strength, possibly preventing future knee injuries. The specific
design of the NordicFlex and Nordic curl exercise ensures minimal spinal
loading, which is perfect for anyone who can’t hold or lift heavy weights.
Get stronger, healthier legs: build muscle and bone density, boost
metabolism, improve heart health, reduce stress, and lose weight—right
from the comfort of your own home. Strength training also helps manage
chronic conditions such as high blood pressure, back and joint pain, diabetes,
and depression.
Whether you’re getting back into strength training after starting a family or
career, a die-hard gym enthusiast, or someone who has never lifted before,
the compact Lifepro NordicFlex has everything you’ll need to build muscle
and stamina.
Redefine your workouts and experience the
transformative power of the Lifepro NordicFlex:
Increase strength and flexibility: builds and tones muscle.
Regulate weight: boosts your heart rate and burns calories.
Boost your metabolism: encourages your body to burn fat faster.
Decrease your stress: increases serotonin and decreases cortisol.
Reduce lower back pain: improves core strength and posture.
Improve stability: improves leg strength, knee stability, and posture.
Check out the information in this manual for ways to get started using
your NordicFlex Glute Ham Bench. Next, be sure to visit our website
nordicflex.lifeprofitness.com to access to our FREE library of workout
videos which demonstrate how to easily incorporate the NordicFlex into
your fitness routine.
FIRST STEPS
UNPACKING THE COMPONENTS
1. Remove the hardware and components from the shipping box. You will
need to remove the two bolts holding the footplate to the side of the
main frame. Save these bolts as spares.
2. Inspect all items for shipping damage.
3. Compare the parts and hardware to the items listed in WHAT’S IN
THE BOX on the next page.
4. Read carefully through this user manual and all safety instructions
before assembling and using the NordicFlex.
5. Follow the steps in the 15-MINUTE ASSEMBLY GUIDE on page 9 to
begin assembling your workout bench.
6. Go to nordicflex.lifeprofitness.com and register your product within
14 days of purchase to activate your lifetime warranty.
CAUTION
• Always use proper lifting techniques, the shipping box is quite heavy.
• Assemble on a flat, sturdy floor that’s free of obstructions.
CUSTOMER SUPPORT
If you have any questions about setting up or using your NordicFlex,
we’re here to help. Call or email us and an experienced customer
support representative will be happy to assist you: (800) 563-6604
or support@lifeprofitness.com.
NORDICFLEX
GLUTE HAM BENCH
STRENGTH TRAINING
4 NordicFlex User Manual Lifepro Strength Training Collection 5
G
H
K
D
E
A B
J
I
F
C
×12 ×2
×2
L
M
N O
×2 ×2
×2 ×2
×2
P
Q
G
H
K
D
E
A B
J
I
F
C
×12 ×2
×2
L
M
N O
×2 ×2
×2 ×2
×2
P
Q
G
H
K
D
E
A B
J
I
F
C
×12 ×2
×2
L
M
N O
×2 ×2
×2 ×2
×2
P
Q
G
H
K
D
E
A B
J
I
F
C
×12 ×2
×2
L
M
N O
×2 ×2
×2 ×2
×2
P
Q
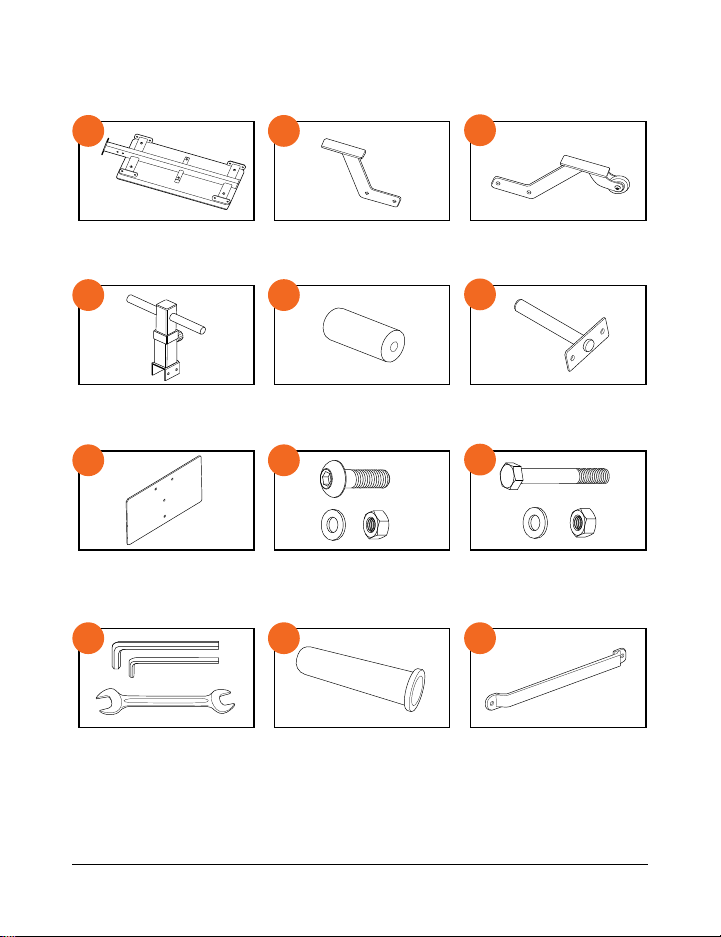
Main Frame
Ankle Pad Bar
Footplate
Olympic Adapter Sleeve
Front Legs
Padded Rollers
M10×70 mm Bolt +
Washer + Nut
Rack Bar
Rear Legs (with wheels)
Weight Plate Bar
M10×20 mm Bolt +
Washer + Nut
Wrenches (2 Allen, 1 Open)
WHAT’S IN THE BOX
6 NordicFlex User Manual Lifepro
NOTE: The bolts that attach the footplate to the side of the main frame for
shipping are spares and not needed for assembly.
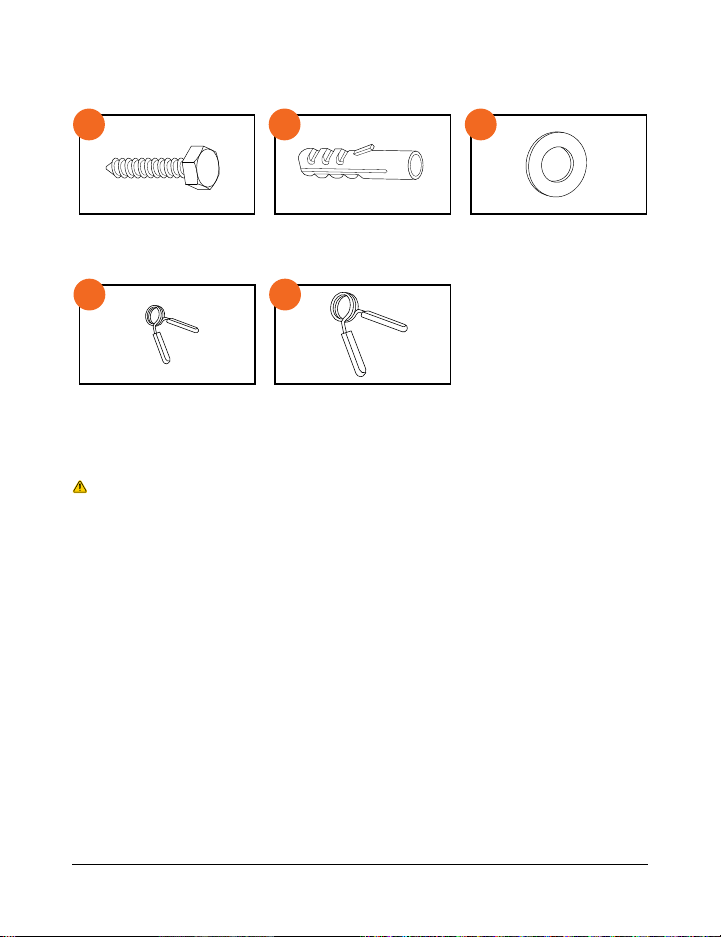
M8 Hex Head Screws M8 WashersM12 x 60 mm Plastic
Anchors
G
H
K
D
E
A B
J
I
F
C
×12 ×2
×2
L
M
N O
×2 ×2
×2 ×2
×2
P
Q
ASSEMBLY WARNING
• Adult assembly is required. Keep children away during assembly. This
product contains small parts that could present a choking hazard to
children.
• Properly dispose of all packaging, especially plastic bags which can
present a suffocation hazard to small children, before assembly.
1-Inch Clip
G
H
K
D
E
A B
J
I
F
C
×12 ×2
×2
L
M
N O
×2 ×2
×2 ×2
×2
P
Q
2-Inch (Olympic) Clip
Strength Training Collection 7
G
H
K
D
E
A B
J
I
F
C
×12 ×2
×2
L
M
N O
×2 ×2
×2 ×2
×2
P
Q
G
H
K
D
E
A B
J
I
F
C
×12 ×2
×2
L
M
N O
×2 ×2
×2 ×2
×2
P
Q
G
H
K
D
E
A B
J
I
F
C
×12 ×2
×2
L
M
N O
×2 ×2
×2 ×2
×2
P
Q
G
H
K
D
E
A B
J
I
F
C
×12 ×2
×2
L
M
N O
×2 ×2
×2 ×2
×2
P
Q
Main Frame
Ankle Pad Bar
Footplate
Olympic Adapter Sleeve
Front Legs
Padded Rollers
M10×70 mm Bolt +
Washer + Nut
Rack Bar
Rear Legs (with wheels)
Weight Plate Bar
M10×20 mm Bolt +
Washer + Nut
Wrenches (2 Allen, 1 Open)
WHAT’S IN THE BOX
6 NordicFlex User Manual Lifepro
NOTE: The bolts that attach the footplate to the side of the main frame for
shipping are spares and not needed for assembly.
M8 Hex Head Screws M8 WashersM12 x 60 mm Plastic
Anchors
G
H
K
D
E
A B
J
I
F
C
×12 ×2
×2
L
M
N O
×2 ×2
×2 ×2
×2
P
Q
ASSEMBLY WARNING
• Adult assembly is required. Keep children away during assembly. This
product contains small parts that could present a choking hazard to
children.
• Properly dispose of all packaging, especially plastic bags which can
present a suffocation hazard to small children, before assembly.
1-Inch Clip
G
H
K
D
E
A B
J
I
F
C
×12 ×2
×2
L
M
N O
×2 ×2
×2 ×2
×2
P
Q
2-Inch (Olympic) Clip
Strength Training Collection 7
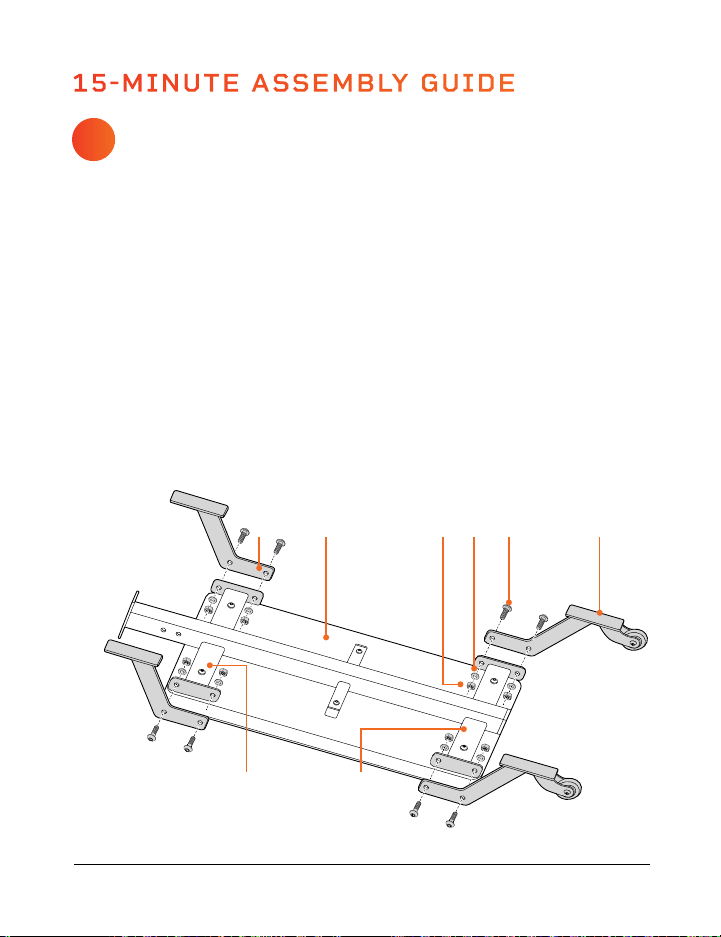
15-MINUTE ASSEMBLY GUIDE
ATTACH THE LEGS
TO THE SUPPORT BEAMS
1. Gather the main frame (A); two front legs (B); two rear legs (C), eight
sets of M10×20 mm bolts, washers, and nuts (H); and wrenches (J).
2. Remove the washer and nut from each bolt.
3. Lay the main frame on the floor upside down. Place a rear leg next to
the rear support beam such that the center holes align with the holes
on the support beam and the leg points away from the middle of the
main frame. See Figure 1.
4. Insert each bolt through the holes on the leg and the support-beam and
then through a washer. Screw on a lock nut loosely, but do not tighten.
5. Repeat steps 3 and 4 for the other three legs, ensuring the front legs
are attached to the front of the main frame with the wheels pointing
away from the main frame.
6. Use a wrench to fully tighten the nuts
Figure 1
1
FRONT
AB
REAR
CHHH
Front
Support
Beam
Rear
Support
Beam
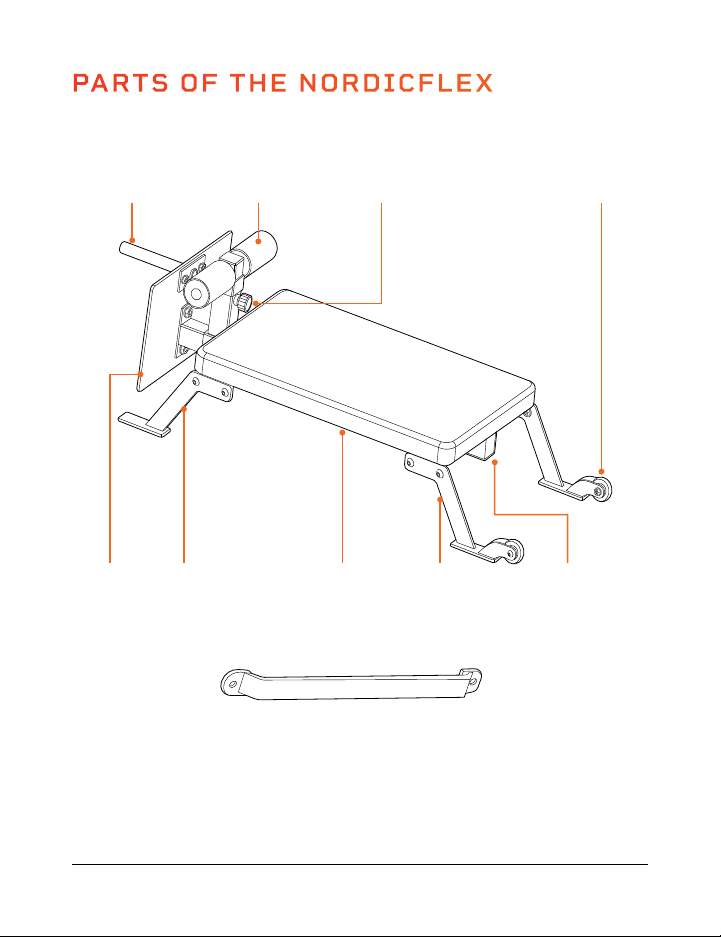
PARTS OF THE NORDICFLEX
Adjustment
Knob
Front
Legs (2)
Rear
Legs(2)
Padded
Rollers (2)
FRONT
Foot
Plate
Padded
Bench
Transport
Wheels (2)
Weight Plate
Bar with
Adapter Sleeve
Support
Beams (2)
G
H
K
D
E
A
B
J
I
F
C
×12 ×2
×2
L
M
N
O
×2 ×2
×2 ×2
×2
P
Q
Wall Rack
8 NordicFlex User Manual Lifepro Strength Training Collection 9
15-MINUTE ASSEMBLY GUIDE
ATTACH THE LEGS
TO THE SUPPORT BEAMS
1. Gather the main frame (A); two front legs (B); two rear legs (C), eight
sets of M10×20 mm bolts, washers, and nuts (H); and wrenches (J).
2. Remove the washer and nut from each bolt.
3. Lay the main frame on the floor upside down. Place a rear leg next to
the rear support beam such that the center holes align with the holes
on the support beam and the leg points away from the middle of the
main frame. See Figure 1.
4. Insert each bolt through the holes on the leg and the support-beam and
then through a washer. Screw on a lock nut loosely, but do not tighten.
5. Repeat steps 3 and 4 for the other three legs, ensuring the front legs
are attached to the front of the main frame with the wheels pointing
away from the main frame.
6. Use a wrench to fully tighten the nuts
Figure 1
1
FRONT
AB
REAR
CHHH
Front
Support
Beam
Rear
Support
Beam
PARTS OF THE NORDICFLEX
Adjustment
Knob
Front
Legs (2)
Rear
Legs(2)
Padded
Rollers (2)
FRONT
Foot
Plate
Padded
Bench
Transport
Wheels (2)
Weight Plate
Bar with
Adapter Sleeve
Support
Beams (2)
G
H
K
D
E
A
B
J
I
F
C
×12 ×2
×2
L
M
N
O
×2 ×2
×2 ×2
×2
P
Q
Wall Rack
8 NordicFlex User Manual Lifepro Strength Training Collection 9
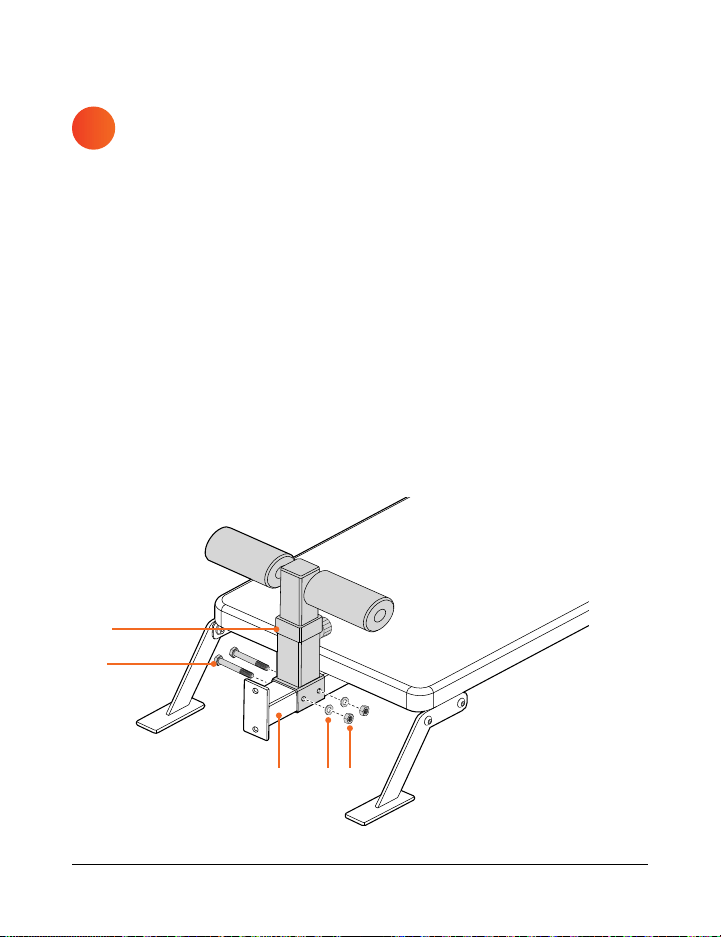
ATTACH THE ANKLE PAD BAR
TO THE MIDDLE SUPPORT BEAM
1. Gather the ankle pad bar (D); two M10×70 mm bolts, washers, nuts (I);
and wrenches (J).
2. Remove the washer and nut from each bolt.
3. Turn the NordicFlex over so the top of the padded bench is facing up.
4. Place the ankle pad bar over the middle support beam, lining up the
holes such that the two rollers are on the same side as the pad. See
Figure 3.
5. Insert each bolt through the holes on the ankle pad bar, middle support
beam, and other side of the ankle pad bar.
6. Place a washer and a nut onto the end of each bolt.
7. Use a wrench to fully tighten the nuts.
3
Figure 3
D
I
Middle
Support
Beam
I I
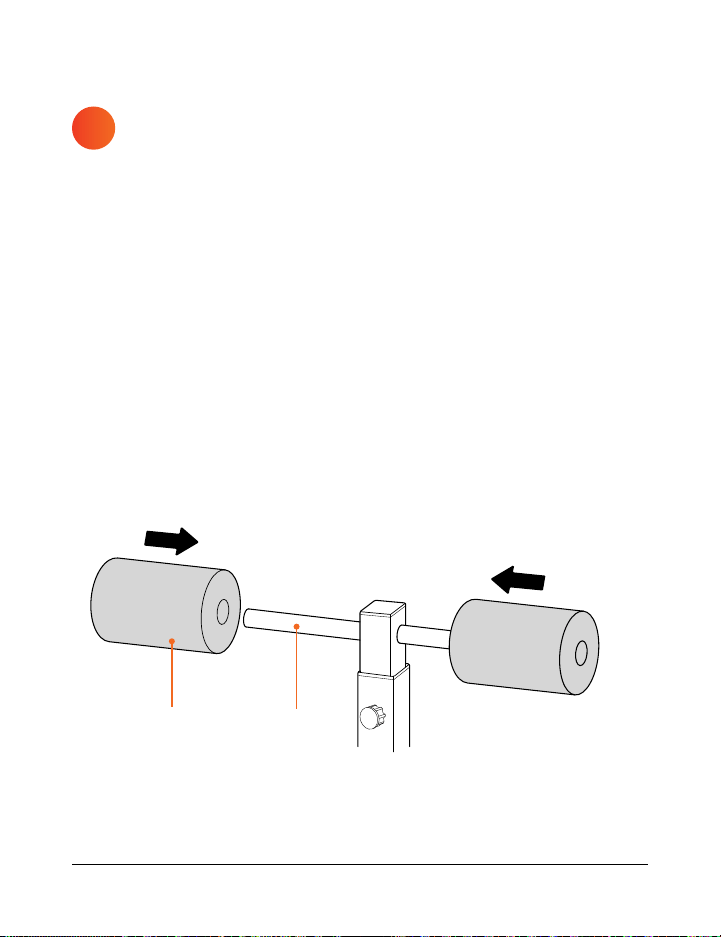
ATTACH THE PADDED ROLLERS
TO THE ROLLER TUBES
1. Gather the ankle pad bar (D) and two padded rollers (E).
2. Slide each padded roller over each roller bar. See Figure 2.
2
Figure 2
E
D
10 NordicFlex User Manual Lifepro Strength Training Collection 11
ATTACH THE ANKLE PAD BAR
TO THE MIDDLE SUPPORT BEAM
1. Gather the ankle pad bar (D); two M10×70 mm bolts, washers, nuts (I);
and wrenches (J).
2. Remove the washer and nut from each bolt.
3. Turn the NordicFlex over so the top of the padded bench is facing up.
4. Place the ankle pad bar over the middle support beam, lining up the
holes such that the two rollers are on the same side as the pad. See
Figure 3.
5. Insert each bolt through the holes on the ankle pad bar, middle support
beam, and other side of the ankle pad bar.
6. Place a washer and a nut onto the end of each bolt.
7. Use a wrench to fully tighten the nuts.
3
Figure 3
D
I
Middle
Support
Beam
I I
ATTACH THE PADDED ROLLERS
TO THE ROLLER TUBES
1. Gather the ankle pad bar (D) and two padded rollers (E).
2. Slide each padded roller over each roller bar. See Figure 2.
2
Figure 2
E
D
10 NordicFlex User Manual Lifepro Strength Training Collection 11
ATTACH THE FOOTPLATE
TO THE MAIN FRAME
1. Gather the footplate (G); two M10x20 mm bolts, washers, and nuts (H);
and wrenches (J).
2. Remove the washer and nut from each bolt.
3. Align the two holes on the footplate with the two holes on the middle
support beam. Orient the footplate such that the weight plate bar is on
the top and pointing towards the rear of the bench. See Figure 5.
4. Insert each bolt through the holes on the footplate and the middle
support beam.
5. Place a washer and a nut onto the end of each bolt.
6. Use a wrench to fully tighten the nuts.
NOTE: Two of the 14 M10x20 mm bolts will not be used. Keep them as
spares.
5
Figure 5
FRONT
REAR
Middle
Support Beam
G
H HH
ATTACH THE WEIGHT PLATE BAR
TO THE FOOTPLATE
1. Gather the weight plate bar (F); footplate (G); two M10×20 mm bolts,
washers, and nuts (H); and wrenches (J).
2. Remove the washer and nut from each bolt.
3. Insert the weight plate bar into the large hole on the footplate.
4. Align the holes on the weight plate bar with the holes on the footplate.
Insert the bolts through both sets of holes. Figure 4.
5. Place a washer and a nut on the end of each bolt.
6. Use a wrench to fully tighten the nuts.
NOTE: If desired, you may later slide the Olympic plate adapter sleeve
over the weight plate bar for Olympic weights with a 2-inch center-hole
diameter.
4
Figure 4
F
G
H
H H
12 NordicFlex User Manual Lifepro Strength Training Collection 13

each pilot hole. Use a hammer
or mallet to gently tap each
anchor until its collar is
flush with the surface of the
drywall.
9. Insert a screw into the each
of the pilot holes or wall
anchors.
10. Use the socket wrench to fully
tighten the screws.
N
L
M
CAUTION: Ensure you use a level and that the rack is not tilted, or the
NordicFlex could slide to one side of the rack, possibly causing the screws
to loosen.
WHAT EXERCISES CAN I DO?
You can do a wide variety of exercises with the NordicFlex,
including:
• Nordic curl
• Nordic curl with pushup
• Pushups
• Reverse Nordic curl
• Plio bench plank hold
• Glute bridge
• Elevated hip thrust
• Incline / decline side plank
• Single-leg squat to bench
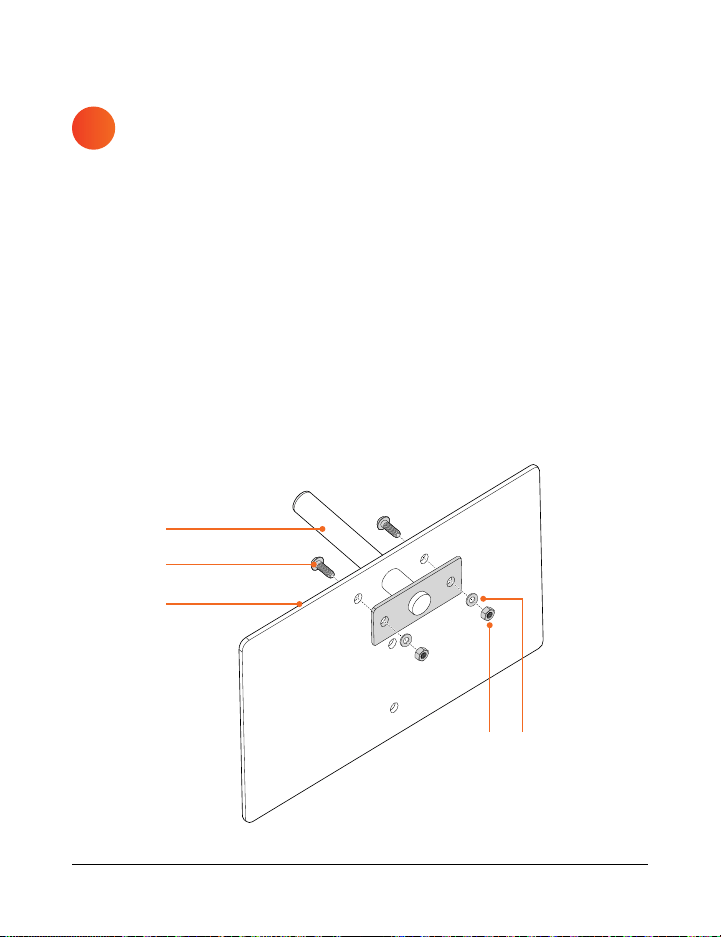
WALL RACK INSTALLATION GUIDE
The NordicFlex can be hung on the wall rack. Follow the instructions below
to install the rack.
WARNING
• Never hang on the wall rack. It is not meant to hold more than 30 lbs.
• Do not hang anything other than the NordicFlex on the wall rack.
• Follow and comply with all safety warnings found in the manual for your
drill.
• Wear eye protection during installation.
• Prior to installation, choose a wall that is capable of holding the weight
of the NordicFlex and has ample surrounding space.
1. Choose an appropriate wall to install the rack on. You must install the
rack at least 3 feet from the ground. The wall can be wood, drywall with
studs, or concrete, and it should be sturdy enough to hold the weight of
the NordicFlex (35 lbs).
2. Obtain 6 mm socket wrench, a level, a pencil, and a mallet or hammer.
If you are installing the rack on a concrete wall, you’ll need a hammer
drill. Otherwise, you’ll need a regular drill.
3. Gather the rack bar (L) and two M8 hex head screws (M). If you are
installing on a concrete wall, you’ll need two anchors (N). If you are
installing on wood or drywall, you’ll need two M8 Washers (O).
4. If you are installing on drywall, locate the studs. Typically, studs are 16
to 24 inches apart.
5. Place the level on the wall in the center of the mount location, level it,
and draw a line along the top edge to mark the location.
6. Position the wall rack as desired, parallel to your line, and mark the
location of the two holes.
7. Use the drill and appropriate drill bit to drill pilot holes for the screws.
The pilot holes should be as deep as the length of the entire screw,
including the head, if you are installing on a concrete wall.
8. If you are installing on a concrete wall, insert a plastic anchor into
14 NordicFlex User Manual Lifepro Strength Training Collection 15
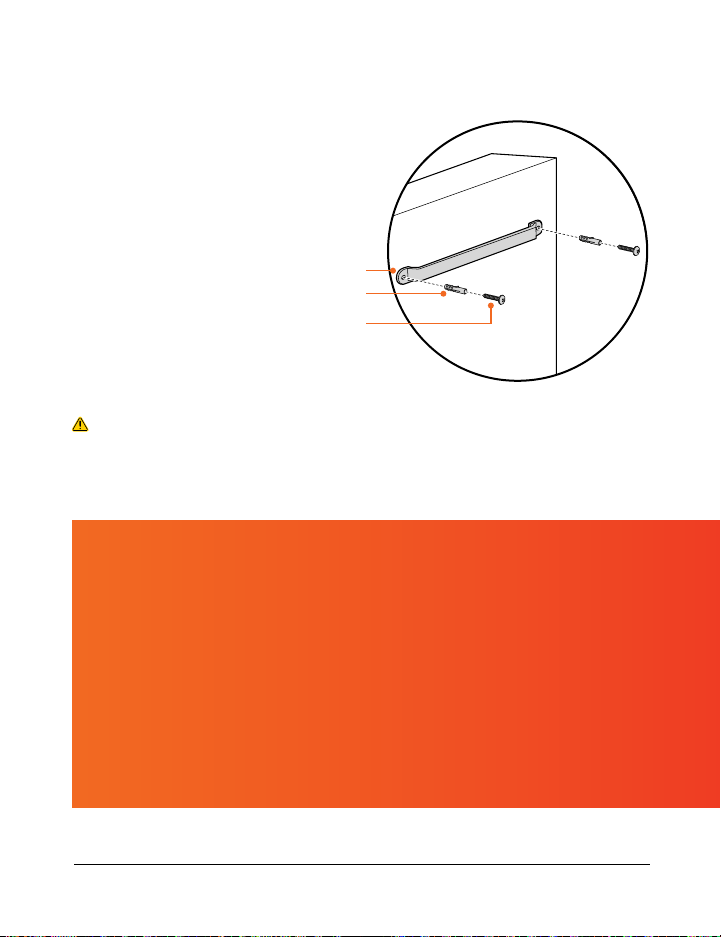
each pilot hole. Use a hammer
or mallet to gently tap each
anchor until its collar is
flush with the surface of the
drywall.
9. Insert a screw into the each
of the pilot holes or wall
anchors.
10. Use the socket wrench to fully
tighten the screws.
N
L
M
CAUTION: Ensure you use a level and that the rack is not tilted, or the
NordicFlex could slide to one side of the rack, possibly causing the screws
to loosen.
WHAT EXERCISES CAN I DO?
You can do a wide variety of exercises with the NordicFlex,
including:
• Nordic curl
• Nordic curl with pushup
• Pushups
• Reverse Nordic curl
• Plio bench plank hold
• Glute bridge
• Elevated hip thrust
• Incline / decline side plank
• Single-leg squat to bench
WALL RACK INSTALLATION GUIDE
The NordicFlex can be hung on the wall rack. Follow the instructions below
to install the rack.
WARNING
• Never hang on the wall rack. It is not meant to hold more than 30 lbs.
• Do not hang anything other than the NordicFlex on the wall rack.
• Follow and comply with all safety warnings found in the manual for your
drill.
• Wear eye protection during installation.
• Prior to installation, choose a wall that is capable of holding the weight
of the NordicFlex and has ample surrounding space.
1. Choose an appropriate wall to install the rack on. You must install the
rack at least 3 feet from the ground. The wall can be wood, drywall with
studs, or concrete, and it should be sturdy enough to hold the weight of
the NordicFlex (35 lbs).
2. Obtain 6 mm socket wrench, a level, a pencil, and a mallet or hammer.
If you are installing the rack on a concrete wall, you’ll need a hammer
drill. Otherwise, you’ll need a regular drill.
3. Gather the rack bar (L) and two M8 hex head screws (M). If you are
installing on a concrete wall, you’ll need two anchors (N). If you are
installing on wood or drywall, you’ll need two M8 Washers (O).
4. If you are installing on drywall, locate the studs. Typically, studs are 16
to 24 inches apart.
5. Place the level on the wall in the center of the mount location, level it,
and draw a line along the top edge to mark the location.
6. Position the wall rack as desired, parallel to your line, and mark the
location of the two holes.
7. Use the drill and appropriate drill bit to drill pilot holes for the screws.
The pilot holes should be as deep as the length of the entire screw,
including the head, if you are installing on a concrete wall.
8. If you are installing on a concrete wall, insert a plastic anchor into
14 NordicFlex User Manual Lifepro Strength Training Collection 15
3. There are 5 height-adjustment holes on the post. Choose the one that
enables your ankles to slide in but prevents your feet from slipping out
when you lean forward.
WARNING
• The post comes all the way out. To prevent it from striking you, pull up
on it gently during height adjustment.
• Always double check the height adjustment to make sure your feet will
not slip out when you lean forward during exercise.
EXERCISING WITH YOUR NORDICFLEX
1. Position yourself with your knees on the padded bench and facing the
front of the machine.
2. Slide your ankles beneath the padded rollers so they are firmly locked
into place. You may need to adjust the height of the rollers.
3. Place both hands at chest level, palms out, in case you fall.
4. Lean forward slightly to ensure your feet will not come out from under
the padded rollers. Keep leaning forward from the knees (not the waist)
gradually to get used to the movement. You should feel the back of
your legs (hamstrings and glutes) working.
OPERATING INSTRUCTIONS
Please read the operating instructions before using the NordicFlex.
Keep this manual for reference.
PREPARING TO USE YOUR NORDICFLEX
1. Place the bench on a flat floor with at least 7 feet of clearance on all
sides. Soft floors like rubber or carpet work best, or place a mat in front
of the NordicFlex for comfort and safety.
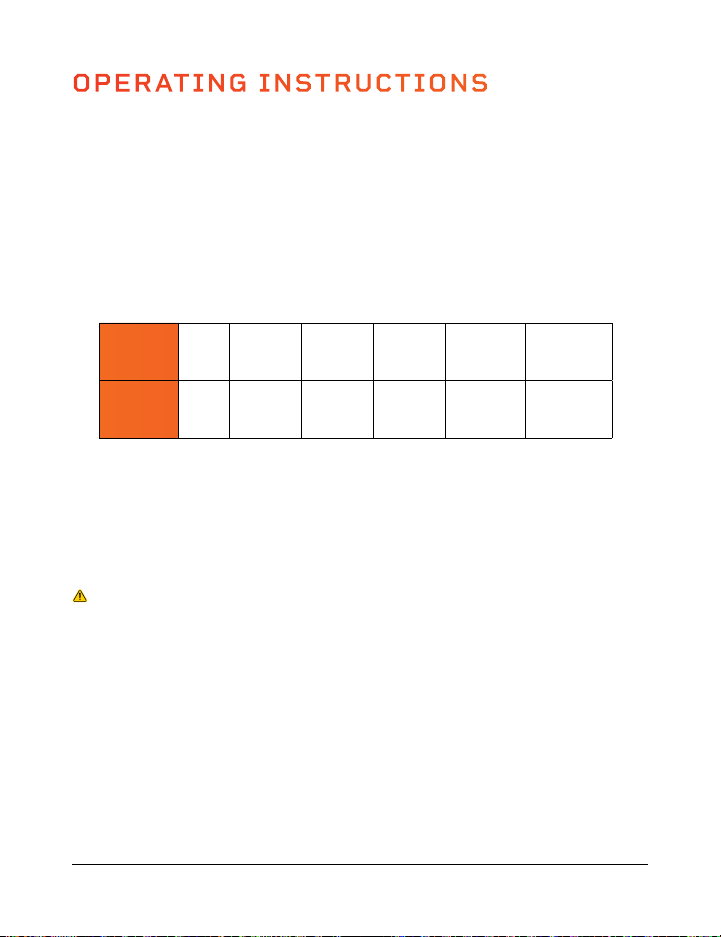
2. Add weight to the weight plate bar if needed. Refer to the table below.
YOUR
WEIGHT
< 150
lb
150 to
200 lb
200 to
250 lb
250 to
300 lb
300 to
350 lb
350 to
400 lb
WEIGHT
TO ADD
none 20–45 lb 45–65 lb 65–90 lb 90–110 lb 110–135 lb
NOTE: If you will be using large (Olympic) weight plates, slide the
Olympic plate adapter sleeve over the weight plate bar to accommodate
the 2-inch center-hole diameter. Then add weight.
3. Place the appropriate weight clip (P or Q) at the end of the weight plate
bar to prevent the weight plate from sliding off.
WARNING: Always use one of the included weight clips to secure any
weight plate(s).
ADJUSTING THE HEIGHT OF THE ROLLERS
The padded rollers may be adjusted to five different height levels. To
adjust the height of the rollers:
1. Twist the adjustment knob and pull it partially out. While holding the
knob in this position, use your other hand to slide the post up or down
gently to your desired height. You will hear a click when the knob clicks
into place.
2. Release the knob and turn to tighten it.
16 NordicFlex User Manual Lifepro Strength Training Collection 17
3. There are 5 height-adjustment holes on the post. Choose the one that
enables your ankles to slide in but prevents your feet from slipping out
when you lean forward.
WARNING
• The post comes all the way out. To prevent it from striking you, pull up
on it gently during height adjustment.
• Always double check the height adjustment to make sure your feet will
not slip out when you lean forward during exercise.
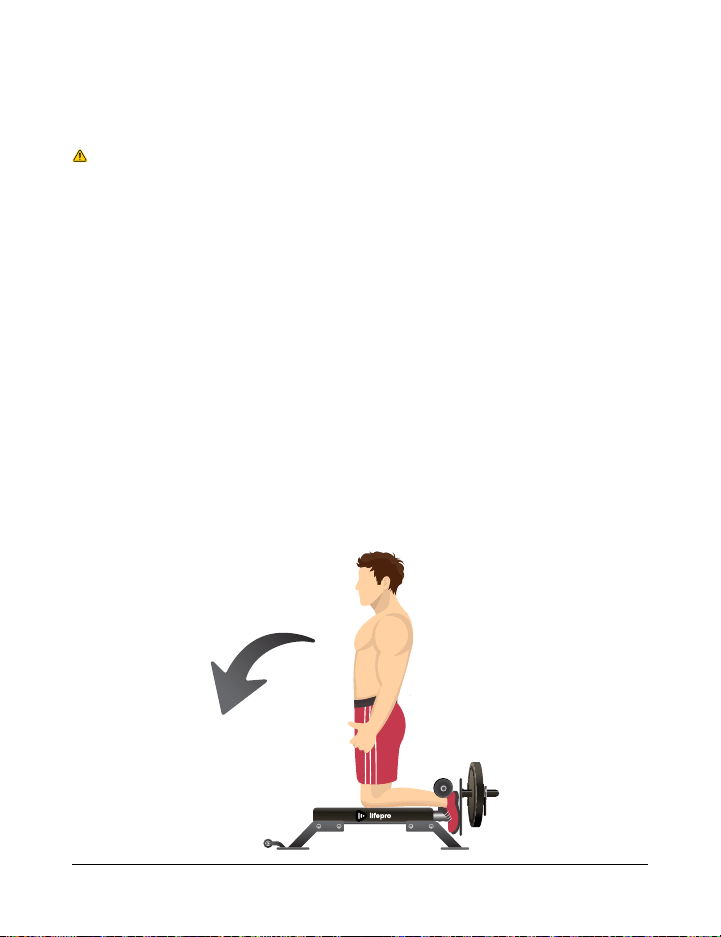
EXERCISING WITH YOUR NORDICFLEX
1. Position yourself with your knees on the padded bench and facing the
front of the machine.
2. Slide your ankles beneath the padded rollers so they are firmly locked
into place. You may need to adjust the height of the rollers.
3. Place both hands at chest level, palms out, in case you fall.
4. Lean forward slightly to ensure your feet will not come out from under
the padded rollers. Keep leaning forward from the knees (not the waist)
gradually to get used to the movement. You should feel the back of
your legs (hamstrings and glutes) working.
OPERATING INSTRUCTIONS
Please read the operating instructions before using the NordicFlex.
Keep this manual for reference.
PREPARING TO USE YOUR NORDICFLEX
1. Place the bench on a flat floor with at least 7 feet of clearance on all
sides. Soft floors like rubber or carpet work best, or place a mat in front
of the NordicFlex for comfort and safety.
2. Add weight to the weight plate bar if needed. Refer to the table below.
YOUR
WEIGHT
< 150
lb
150 to
200 lb
200 to
250 lb
250 to
300 lb
300 to
350 lb
350 to
400 lb
WEIGHT
TO ADD
none 20–45 lb 45–65 lb 65–90 lb 90–110 lb 110–135 lb
NOTE: If you will be using large (Olympic) weight plates, slide the
Olympic plate adapter sleeve over the weight plate bar to accommodate
the 2-inch center-hole diameter. Then add weight.
3. Place the appropriate weight clip (P or Q) at the end of the weight plate
bar to prevent the weight plate from sliding off.
WARNING: Always use one of the included weight clips to secure any
weight plate(s).
ADJUSTING THE HEIGHT OF THE ROLLERS
The padded rollers may be adjusted to five different height levels. To
adjust the height of the rollers:
1. Twist the adjustment knob and pull it partially out. While holding the
knob in this position, use your other hand to slide the post up or down
gently to your desired height. You will hear a click when the knob clicks
into place.
2. Release the knob and turn to tighten it.
16 NordicFlex User Manual Lifepro Strength Training Collection 17

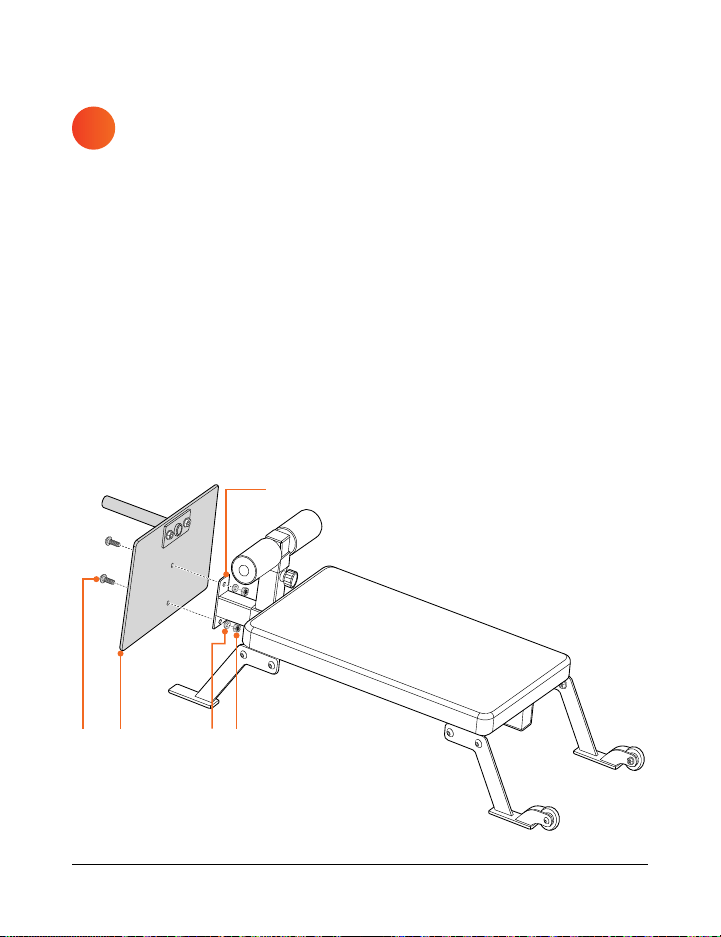
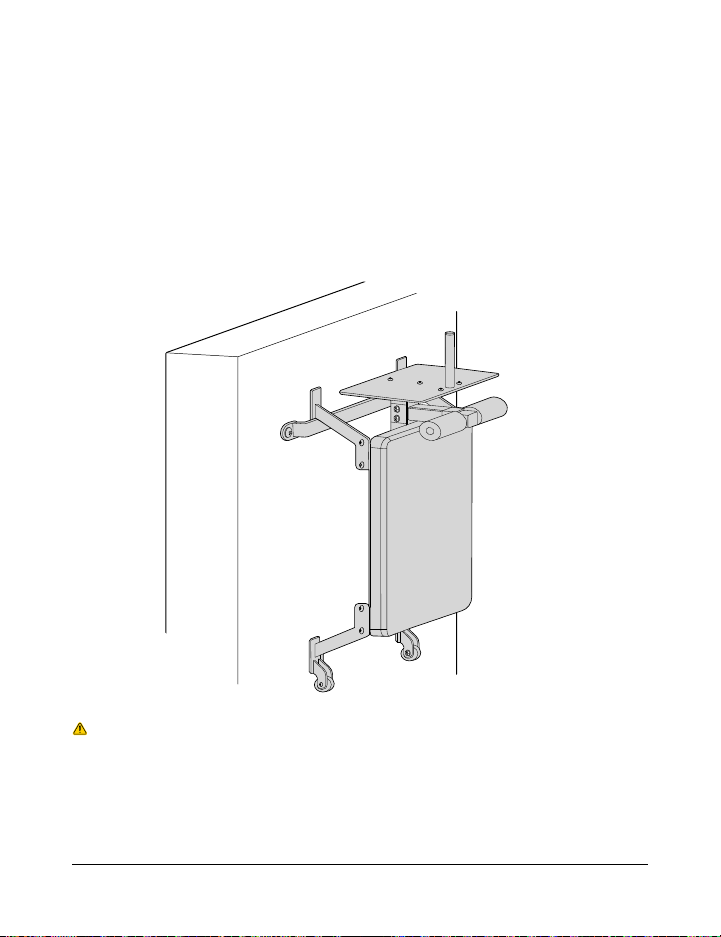
HANGING THE NORDICFLEX ON THE WALL RACK
The NordicFlex can be stored on the wall rack when not in use. To hang the
NordicFlex on the wall rack:
1. Remove the Olympic adapter sleeve and any weights that may be on
the weight plate bar.
2. Move the NordicFlex to the wall and orient it such that both wheels are
facing away from the wall.
3. Lift the NordicFlex up towards the wall rack. Hang the two rear feet on
the rack as shown.
WARNING
• Never hang on the wall rack. It is not meant to hold more than 30 lbs.
• Do not hang anything other than the NordicFlex on the wall rack.
• Remove all weights from the weight plate bar before hanging the
NordicFlex on the wall rack.
• Always use proper lifting technique.
5. Continue moving forward from the knees slowly and then begin to move
your body back to the original position.
6. After a few sessions with the NordicFlex, you may want to increase
your difficulty. Try to lean farther forward. Eventually you may go all
the way down, body parallel to the floor. You can push your body back
up using your hands to assist—much like a pushup—if desired.
WARNING: If you move too far forward and fall, always catch yourself
with both hands to avoid injury.
MOVING THE EQUIPMENT
The NordicFlex has wheels to make it easier to move. To move the
NordicFlex:
1. Remove any weights that may be on the weight plate bar and remove
the Olympic adapter sleeve.
2. Position yourself at the rear of the NordicFlex. Lift up on the rear
support beam with both hands.
3. Roll the NordicFlex to the desired destination on its wheels.
CAUTION: The NordicFlex should only be lifted and moved by adults.
18 NordicFlex User Manual Lifepro Strength Training Collection 19

SAFETY INSTRUCTIONS
Keep this manual in a safe place for future reference.
Before using this product, read all safety warnings and assembly and
operating instructions. Failure to do so may result in burns, fire, electric
shock, serious injury or death, or damage to the product or property.
CONTRAINDICATIONS
Users should consult with a medical professional before beginning a new
exercise program. Your physician should assist you in determining the level
of physical activity that is appropriate for your age and physical condition.
Your physician can help determine if you have any physical limitations that
could create a health risk or prevent you from properly using this product;
some exercise programs or fitness products may not be appropriate for all
people.
Consult your physician before using this product if you:
• Are over the age 35 or have pre-existing health conditions.
• Have orthopedic conditions, spinal injuries, osteoporosis, fractures,
herniated or slipped discs, chronic back pain, sciatica, or other conditions
or disorders affecting the back or spinal column.
• Have joint pain, disorders, or conditions, including arthritis, rheumatoid
arthritis, knee pain or previous knee injury or surgery
• Have a heart or vascular condition, hypertension, blood clots, or if you
are taking medication that affects heart rate.
• Have a pacemaker, artificial heart, or other medical implant.
• Are or may be pregnant, have recently had surgery, or have cancer or
malignant tumors.
• Experience dizziness or balance impairments or if you are taking drugs
that affect balance.
DISCLAIMER
• The health benefits suggested or implied in this manual, other product
literature, and company website are not certified or endorsed by any
regulatory authority or medical institute.
• It is the responsibility of the owner to ensure that all users of this
product are adequately informed of all warnings and cautions.
• Use this product only as instructed in this manual.
TIPS FOR USING THE NORDICFLEX
• Use proper form. Focus on only working the muscle groups intended for
the exercise you are performing. Maintain control through the entire
range of motion.
• Drink plenty of water before and after exercise.
• Make sure to adjust the height of the support pads according to your
height and the exercise you will be doing.
• Always maintain control and move slowly through exercises to avoid
injury.
• Be careful of doing exercises with explosive movements so that you do
not knock over the equipment or cause injury.
• Start slow and easy with shorter workouts. Work your way up to longer,
more challenging workouts over a period of several weeks.
• Breathe naturally during exercise. Never hold your breath. Exhale during
exertion and inhale after exertion. For example, during a Nordic curl,
inhale as you lower your body towards the floor, exhale as you bring
yourself up.
• Spend at least five minutes warming up, including stretching, before
exercise and at least five minutes cooling down after exercise to prevent
pulled muscles and other sports injuries.
• Make sure to take sufficient breaks between exercises. Also, take
sufficient time off between workout sessions.
• Always wear appropriate athletic clothing and shoes. Appropriate
clothing should be comfortable, loose, and allow you to move freely.
• Do not add weights/resistance to the body weight workouts until you
have become accustomed to the equipment.
• Use the equipment only on a flat, sturdy, non-slip floor.
• It’s best to place a mat in front of the NordicFlex for comfort and safety.
20 NordicFlex User Manual Lifepro Strength Training Collection 21

before use. Do not use if damaged, worn, rusty, malfunctioning, or
missing bolts, nuts, or knobs. Do not use product again until the problem
has been fixed.
• Do not allow more than one person to use the product at a time.
• Do not exceed the maximum weight-load capacity of 450 lbs.
• Do not hang on the wall rack.
• Do not hang anything other than the NordicFlex on the wall rack.
• Remove all weights from the weight plate bar before hanging the
NordicFlex on the wall rack.
• Remove items, especially sharp objects, from your pockets before using.
• Do not wear jewelry, belts, or other accessories that could get snagged
and cause injury or falling.
• Never use the product while under the influence of drugs or alcohol. Do
not use during or immediately after eating or when you feel tired. Do not
use if injured, ill, or if you have a fever.
• Ensure adequate clear space around the product during use (at least
seven feet on all sides). Remove any obstacles in the area, in case of
falls or accidents.
• Stop using the product immediately if you feel pain or discomfort.
• Only an adult may move, fold, or unfold the product.
• Always maintain control and move slowly through exercises to avoid
injury.
• Use the product only on a flat, sturdy, non-slip floor. Place in a location
away from traffic where it will not create a tripping hazard.
• Do not perform other activities while using the product to avoid
accidents or injury.
• Always properly warm up before exercise and cool down after exercise to
prevent sports injury.
• Do not add weights or resistance to workouts until you have become
accustomed to the product.
• Always wear appropriate athletic clothing and shoes. Appropriate
clothing should be comfortable and allow you to move freely.
• Do not wear baggy or loose clothing, or clothing with drawstrings or ties
that could get snagged and cause injury or falling.
• Make sure to adjust the height of the padded rollers according to your
height and the exercise you will be doing.
• Do not use accessories not approved by the manufacturer.
• Do not use outdoors. This product is intended for indoor-use only.
SAFETY INSTRUCTIONS (CONTINUED)
• The use of this product is entirely at the user’s discretion. Please
read all instructions and safety information carefully before using this
product. We assume no responsibility and expressly disclaim any and all
liability for personal injury, or property damage or loss sustained through
improper use, failure to follow the instructions and warnings in this
manual, improper assembly, or inadequate or improper maintenance or
neglect of this product.
WARNING: CHOKING HAZARD
Children under 3 years old can choke or suffocate on small parts required
for assembly of this product. Keep children away during assembly. Adult
assembly is required.
WARNING
To reduce the risk of serious injury or death:
• Incorrect or excessive exercise or overexertion can be damaging to your
health. Always exercise within intensity and time limits recommended by
your doctor.
• Stop exercising immediately and consult your doctor if you begin to
feel faint, dizzy, nauseous, or experience pain, irregular heartbeat, or
shortness of breath.
• Do not use the product near swimming pools or other bodies of water.
• Adult assembly required. Keep children away during assembly. Children
are forbidden from assembling, disassembling, folding, or moving the
product.
• This product is for adult-use only. Do not allow children to use; this
product is not a toy.
• Keep children and pets away from the product at all times. Never leave
children unattended in the same room with the product.
• This product is not intended for use by people with reduced physical,
sensory or mental capabilities, unless supervised by a responsible adult.
CAUTION
To reduce the risk of minor or moderate injury, or damage to the product or
property:
• Always inspect the product and rack for damaged, worn, or loose bolts,
nuts, or knobs before each use. Tighten any loose bolts, nuts, or knobs
22 NordicFlex User Manual Lifepro Strength Training Collection 23

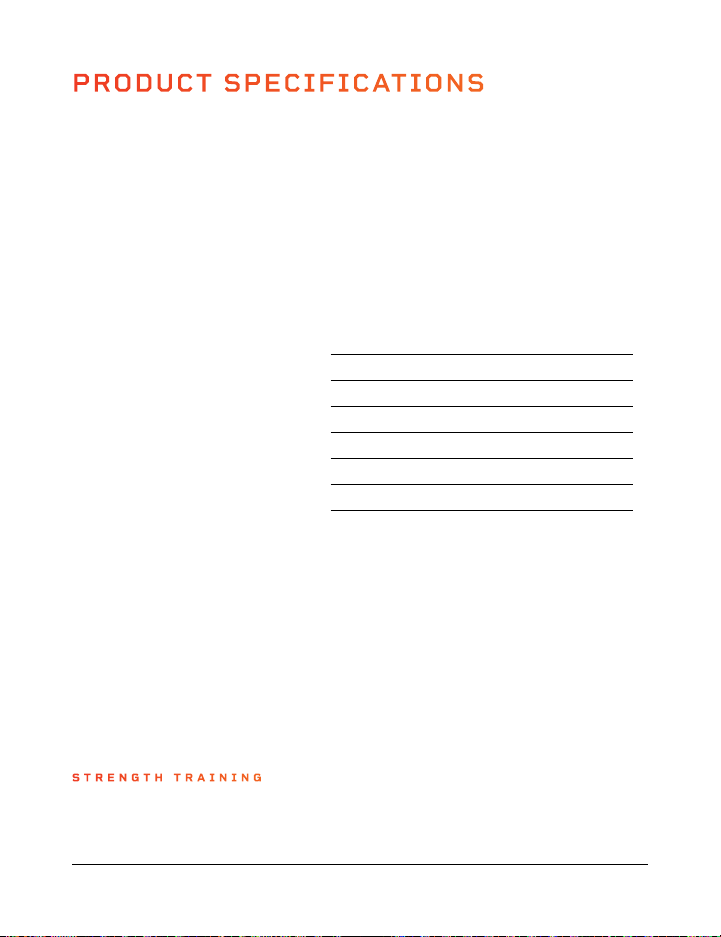
PRODUCT SPECIFICATIONS
UNIT SPECS
Assembled Size: 50.2” × 20.0” × 15.5”
Net Weight: 35.3 lb
Rack Size: 25.2” × 1.77” × 1.18”
Rack Weight: 1.76 lb
Maximum Weight Load: 450 lb
Frame Materials: Q235 Steel, Iron
Cushion Materials: PVC Leather, Foam
NORDICFLEX
GLUTE HAM BENCH
STRENGTH TRAINING
MADE IN CHINA
CLEANING, STORAGE & MAINTENANCE
• Use a slightly damp cloth or alcohol-based sanitizing wipe to clean any
dirt or moisture from the product after each use. You may use mild soap
to clean, as needed.
• Do not use abrasive, corrosive, solvent, or chemical cleaners or harsh
detergents to clean the product.
• Store product in a cool, dry, indoor location.
• Do not store in direct sunlight, in a high-temperature or high-moisture
environment, or near heat sources.
NOTICE
• The product is intended for in-home use only. Do not use the product in
any commercial, rental, institutional, or therapeutic setting.
• Dispose of the product and all parts according to local and federal
regulations.
• Keep sharp objects away from the product to avoid damaging it.
24 NordicFlex User Manual Lifepro Strength Training Collection 25
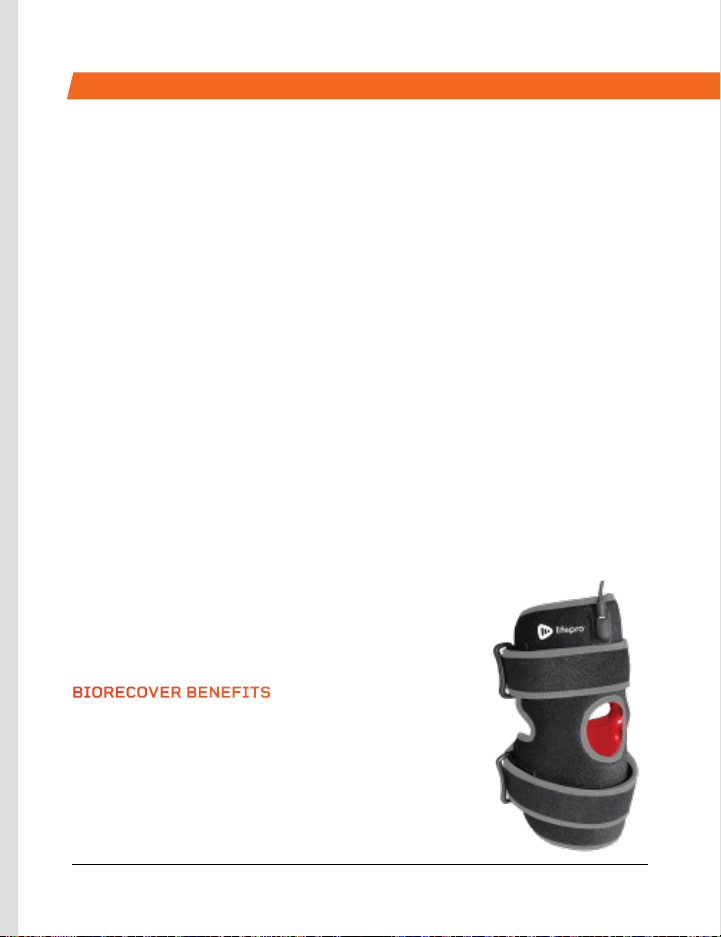
FROM OUR WELLNESS RECOVERY COLLECTION
With the Lifepro BioRecover Light Therapy Knee Brace, you can experience
therapeutic benefits from the comfort of your own home—no need for
expensive trips to the spa, or physical therapist's office. It’s perfect for
alleviating muscle or joint pain and stiffness and performance recovery.
The BioRecover has 60 LED chips, each of which contains one 660 nm
LED and two 850 nm LEDs, providing full coverage for your knees or
elbows. The BioRecover has 35-inch Velcro
®
straps so you can also use it
on your arms, legs, hands, and feet. Your pet can also take advantage of
the therapeutic benefits of the BioRecover. Help your pet find relief from
chronic joint pain, lose weight, and reduce inflammation.
The BioRecover offers a customizable treatment session, including pulsed
light therapy. Choose the perfect settings for each treatment session
with five light intensity levels, five vibration levels, and three light therapy
modes (red, near-infrared, and red + near-infrared).
660 nm red light therapy: 660 nm light is absorbed by the skin at a
high rate making it especially effective for pain relief, improving blood
circulation, and stimulating collagen and elastin production. Red light
therapy promotes injury or wound healing.
850 nm near-infrared (NIR) therapy: 850 nm light
penetrates deeply into tissue, organs, and joints to
decrease inflammation, relieve pain, and repair cells.
BIORECOVER BENEFITS
• Alleviate pain
• Reduce inflammation
• Reduce joint pain & stiffness
• Boost blood flow
• Rejuvenate skin
BIORECOVER
LIGHT THERAPY KNEE BRACE
LIFETIME WARRANTY
Lifepro creates quality, durable exercise
products, and we stand by that quality
with a lifetime warranty on all of our
products. If your NordicFlex ever breaks
(and we doubt it will), we’ll send you
replacement parts and show you how
to repair it. If your NordicFlex cannot
be repaired, we’ll replace it—free
of charge. Register your NordicFlex
at nordicflex.lifeprofitness.com to
activate your warranty within
14 days of purchase.
26 NordicFlex User Manual Lifepro Strength Training Collection 27