
VSD1801UK
Suzhou Cleva Electric Appliance Co., Ltd.
No.8 Ting Rong Street
Suzhou Industrial Park, Suzhou
Jiangsu Province, China
www.cleva-europe.com
Made in P.R.C

VSD1801UK
Suzhou Cleva Electric Appliance Co., Ltd.
No.8 Ting Rong Street
Suzhou Industrial Park, Suzhou
Jiangsu Province, China
www.cleva-europe.com
Made in P.R.C
1
2
3
4
5
6
7
8
9
10
11
13 14 15 16 17 18
12
4
GB
TABLE OF CONTENTS
SECTION PAGE
Symbols ........................................................................................................................................... 4
Safety Information ............................................................................................................................ 5
Unpacking and Product Features ..................................................................................................... 7
Assembly ......................................................................................................................................... 7
Operation ............................................................................................................................. ............ 8
Maintenance ................................................................................................................................... 10
Troubleshooting .............................................................................................................................. 12
Technical Data ................................................................................................................................ 14
Recycling and Disposal .................................................................................................................. 14
SYMBOLS
Caution.
Read instruction manual before any installation or operation.
For indoor use only.
Protection Class II.
Do not dispose of electrical equipment in domestic waste.
Batteries contain Lithium-ion. Do not dispose of batteries in
household waste.
Thank you for choosing our JOEY
TM
Compact cordless vacuum cleaner. This is a cordless vacuum
cleaner intended for domestic use only and suitable for indoor use within a normal household
environment for light, dry dust and debris.
FOR YOUR SAFETY: CAREFULLY READ AND UNDERSTAND ALL INSTRUCTIONS.
Li-ion

5
GB
SAFETY INFORMATION
This appliance can be used by children aged from 8 years
and above. Persons with reduced physical, sensory or mental
capabilities, or lack of experience and knowledge can operate this
appliance providing they have been given adequate supervision
or instruction concerning use of the appliance and understand
the hazards involved. Children should not play with the appliance.
Cleaning and user maintenance shall not be carried out by
children without supervision.
• This appliance should only be used for normal vacuuming in a
domestic household environment.
• Make sure the vacuum cleaner is stored in a cool, dry place.
• Unplug the vacuum cleaner from the charger before cleaning or
maintenance.
• Children should be supervised to ensure that they do not play
with the appliance.
• Packaging material, including plastic bags should not be
accessible to children to avoid suffocation.
• Check that your supply voltage is the same as that stated on the
rating plate on the charging adapter.
•Eachvacuumcleanerisdesignedforaspeciccharging
voltage, use only the original charging adapter supplied with this
vacuum cleaner.
• There is no shock hazard from electrical terminals located
on the vacuum. A burn could result from metal objects being
inserted into the terminal areas. Vacuum cleaner terminals
should always be kept free of hard or sharp objects, such as
glass, nails, screws or coins that could damage the vacuum.
• Leaks from battery cells can occur under extreme usage or
temperature conditions. If the liquid from the battery comes into
contact with skin, rinse immediately with water. If the liquid gets
intotheeyes,ushthemimmediatelywithcleanwaterfora
minimum of 10 minutes. Seek medical attention.
• Do not mutilate or incinerate batteries as they will explode at
high temperatures.

6
GB
WARNING:
For the purposes of recharging the battery, only
use the charging adapter (561047107) provided with this
appliance.
PROPER USE
• The appliance must only be stored and charged indoors.
• Do not leave the vacuum cleaner in direct sunlight.
• Avoid exposing the vacuum cleaner to excessive heat sources.
• Do not expose the appliance to temperatures below 4°C or
above 40°C.
• Keep the vacuum cleaner away from your body when using
nozzles and tubes.
•
Do not use a damaged charging adapter, charging base or cable.
• When disconnecting the charging cable from the charging base,
pull the plug itself to remove it; do not pull on the power cord.
• Do not pull the charging cable over sharp edges or allow it to
become trapped.
• For safety reasons, only manufacturer, its service agent or
suitablyqualiedpersonsarepermittedtocarryoutrepairs.
• Do not try to touch the brush roll while the vacuum cleaner is
switched on and the brush roll is spinning.
• Switch off the appliance when it is not in use.
• The battery packs must not be dismantled and short circuited.
NEVER USE THIS VACUUM CLEANER
• In wet areas.
• On building rubble.
•Closetoammablegases,etc.
• When the product shows visible signs of damage.
•Onsharpobjectsoruids.
• On hot or cold cinders, lighted cigarette butts, etc.
•Onnedust,forinstancefromplaster,concrete,our,hotor
cold ashes.
•Withoutitslters.
Using the vacuum cleaner in the above circumstances may cause
serious personal injury or damage to the product. Such injury or
damage is not covered by the warranty or by the manufacturer.
7
GB
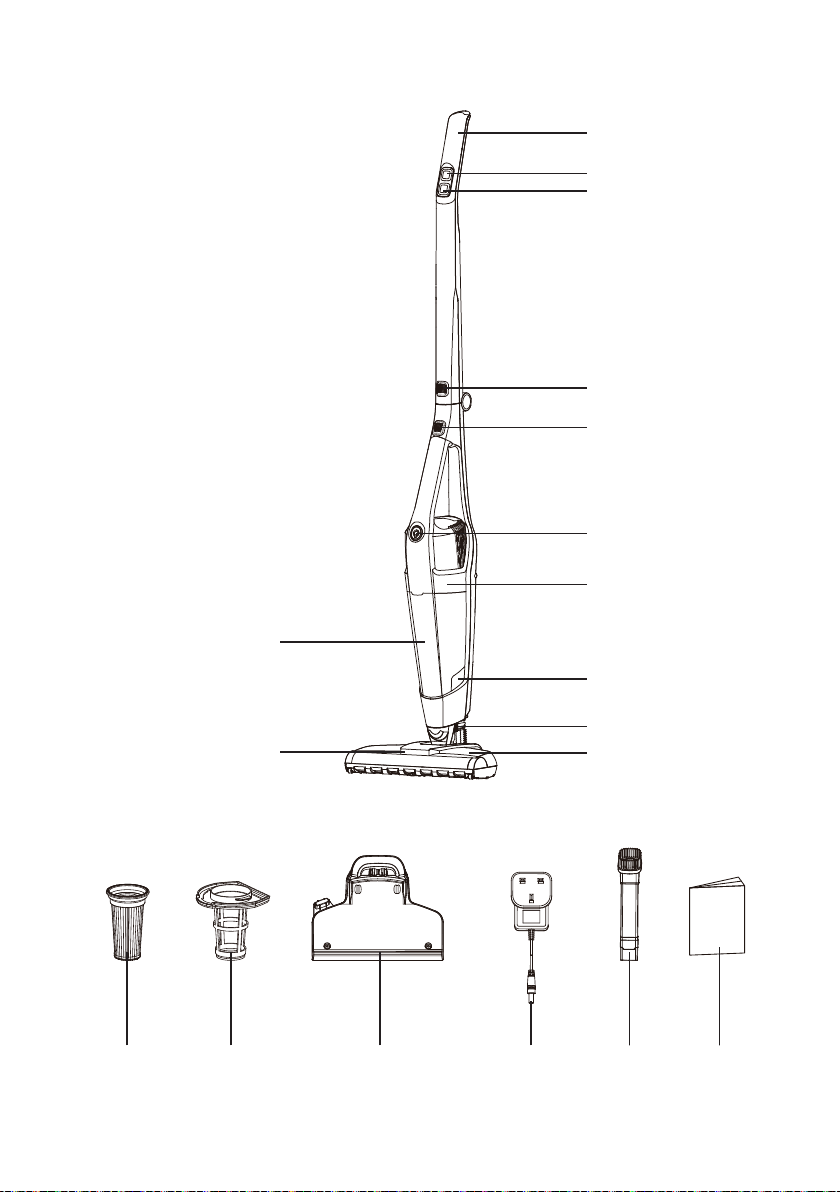
1 Handle 10 Motorised Floor Head
2 Power Switch 11 LED Task Lights
3 Speed Switch 12 Dust Bin
4 Folding Handle Release Button 13 Filter (x2) (x1 pre-installed)
5
Handheld Vacuum Cleaner
Release Button
14 Filter Basket (pre-installed)
6
Power Switch & Battery
Charging Indicator
15 Charging Base
7 Handheld Vacuum Cleaner 16 Charging Adapter
8 Dust Bin Release Button 17 Combination Tool
9
Motorised Floor Head
Release Button
18 Instruction Manual
UNPACKING AND PRODUCT FEATURES
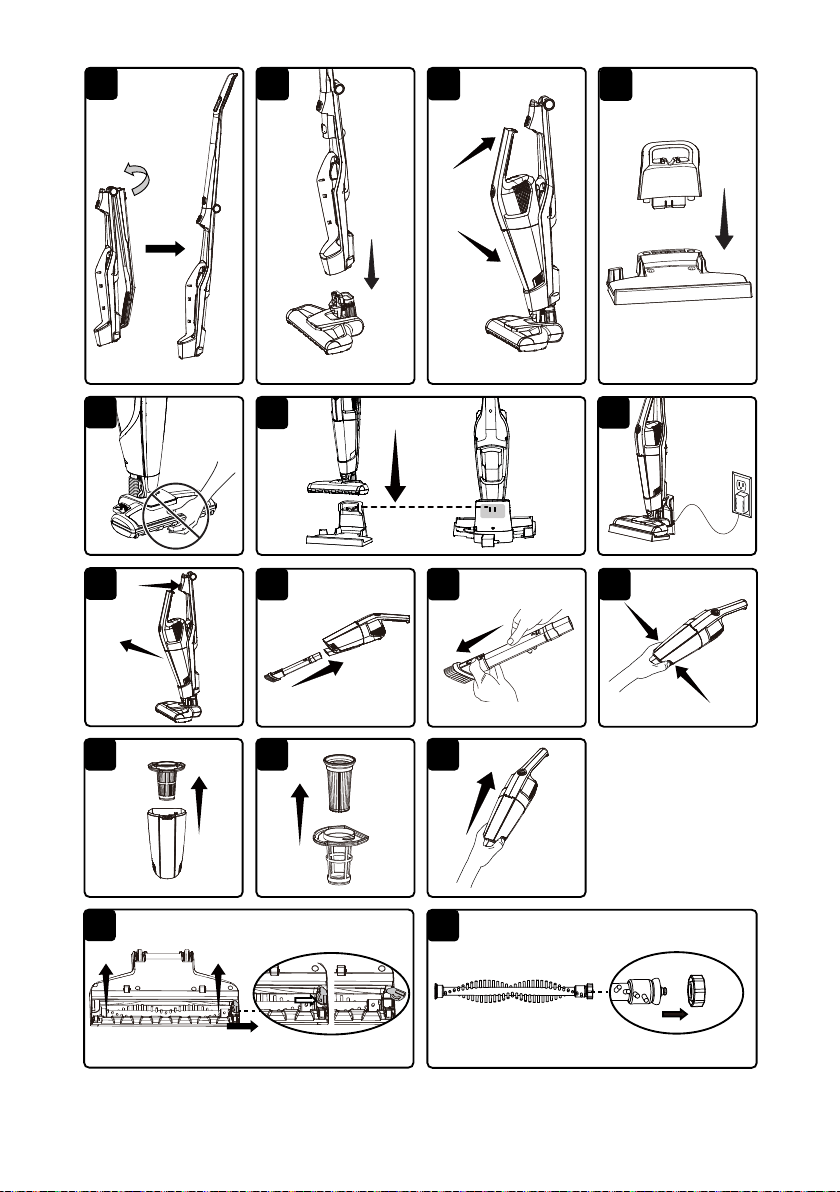
ASSEMBLY
1.
Remove all the contents from the packaging; make sure you have all contents as listed on page 7.
2. This vacuum cleaner features a foldable handle for easy storage. Unfold the upper section of
the handle until it securely clicks into position. Make sure the handle is locked into place (Fig. 1).
3. Positiontheneckoftheoorheadintotheuprightposition.Insertthecompletehandle
assemblyontotheneckofthemotorisedoorheadensuringthatthereisnothingtrapped
betweentheunitconnections.Checkthatbothsecuritylatchesonthemotorisedoorheadare
clicked into place (Fig. 2).
4. Place the handheld unit into the docking bay on the main body. Ensure the suction port of the
handheldunitispositionedintoplacerstandthatthedustbinissecurelyttedbeforepressing
the handle into the locking position (Fig. 3).
5. Insert the vacuum cleaner support onto the charging base and click into place (Fig. 4).
8
GB
OPERATION
CAUTION:
Moving parts!
To reduce the risk of personal injury, DO NOT touch the brush roll
when the vacuum cleaner is operating. Touching the brush roll while it is rotating can cause
personal injuries. Use caution when operating near children or pets (Fig. 5).
WARNING:
Donotoperatethevacuumcleanerwithoutalterinplace.
1. Charging
NOTE:
Tooptimisethebatterylongevity,ensurethevacuumcleanerisfullychargedbeforerst
use.Chargethevacuumcleanerforatleast5hoursbeforeusingforthersttime.Nevercharge
the batteries in temperatures above 40°C or below 4°C. It is normal for the charger to become
warm when charging.
NOTE:
Only recharge your vacuum cleaner with the supplied charger.
1) Before charging, make sure the cordless vacuum is turned OFF and the handheld vacuum
cleaner unit is installed in the main body.
2) Insert the charging adapter into the charging port located on the side of the charging base and
secure the cord.
3) Insert the vacuum cleaner onto the charging base. Ensure all connections are clean and free of
dirt (Fig. 6).
4) Plug the charging adapter into a suitable power supply (Fig. 7).
NOTE:
The vacuum cleaner sits against the charging pins on the base station to make the
vacuum always available for use. As a result, it does not lock into place during charging. Make
sure that there is nothing obstructing the connections which may prevent charging.
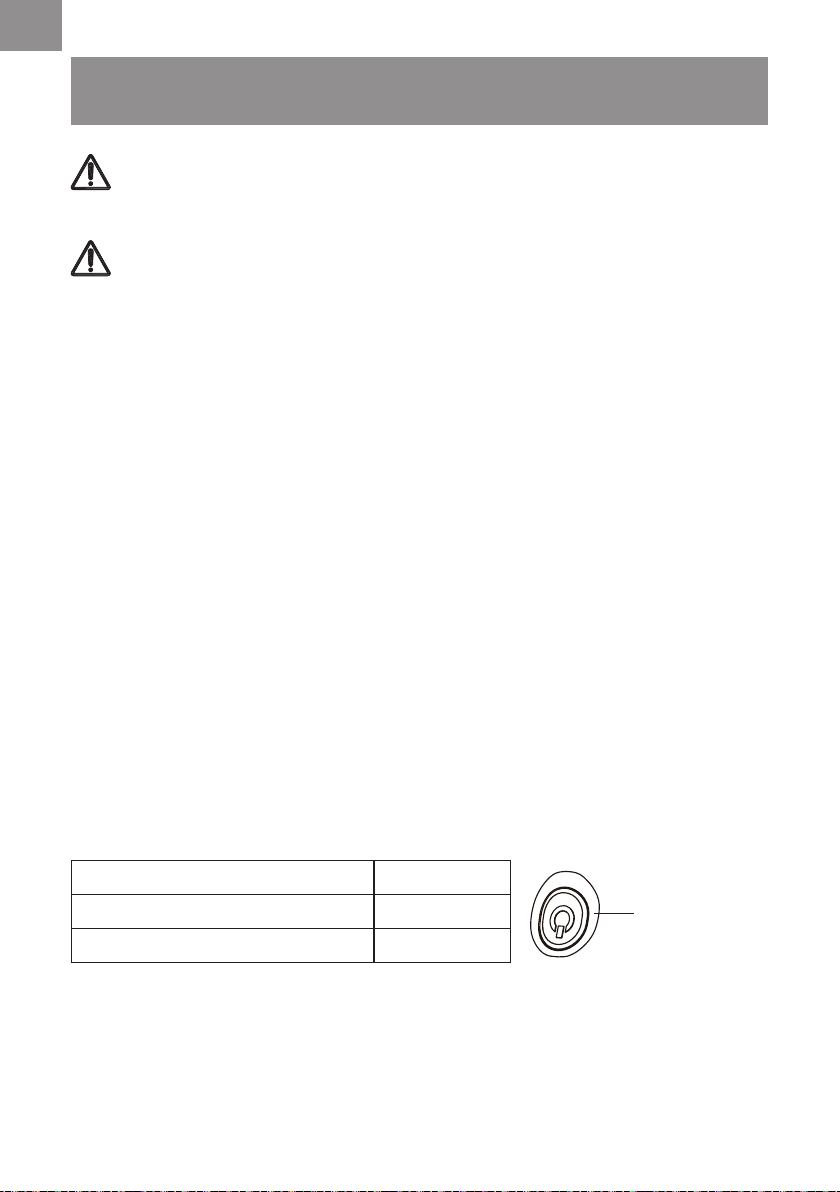
5) The handheld vacuum cleaner power switch will show the progress during charging. Whilst
thevacuumisbeingcharged,thebatterychargingindicatorwillash.Oncefullycharged,the
battery charging indicator will automatically turn off.
6) When fully charged, unplug the charging adapter from the power supply and remove the
vacuum cleaner from the charging base.
NOTE:
If the battery charging indicator does not illuminate when charging, ensure that:
• The vacuum cleaner is seated properly onto the charging base.
Battery charging indicator Status
Flashing light Charging
No light Fully charged
Power Switch
& Battery
Charging
Indicator
9
GB
• The charging plug is plugged into the power supply properly.
• The power supply is switched on.
• The charging connector is fully inserted in the charging base.
2. Using Your Vacuum Cleaner
Before vacuuming, check that the brush roll is clear from any obstructions such as hair or sharp
objectstoavoidscratchingoors,andthatthedustbinisempty.
NOTE:
Usethelow-speedsettingforcleaningofhardoors,andlowpilerugs,orwhenan
increased run time is needed. The high-speed setting should be used for cleaning plush rugs and
carpets or when additional cleaning power is required.
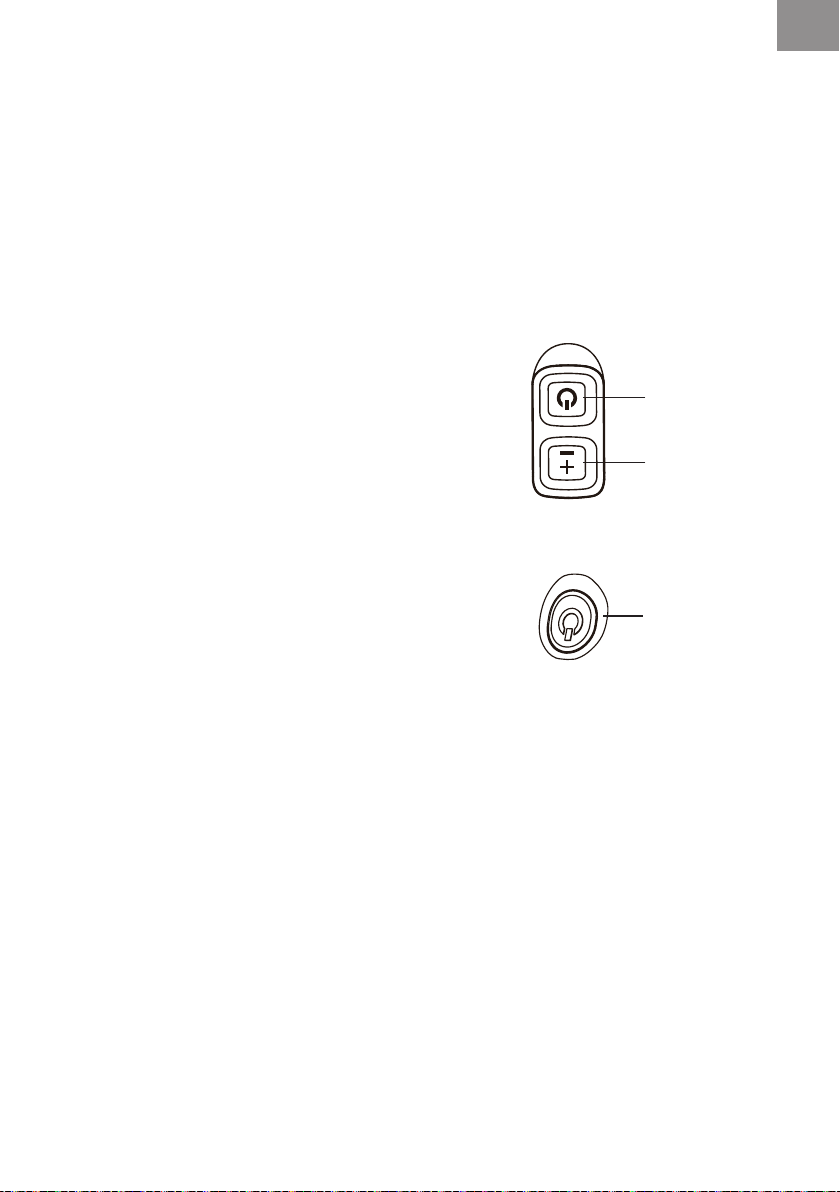
1) To start the vacuum cleaner, press the power switch. The
vacuum cleaner will start in the high speed mode.
2) To switch to the low-speed setting, press the speed switch
once. Press the speed switch again to switch back to high
speed.
3) To stop the vacuum, press the power switch once.
3. Using Your Handheld Vacuum Cleaner
1) To remove the handheld vacuum cleaner, press the handheld vacuum cleaner release button
and detach from the main body (Fig. 8).
2) To turn on, press the power switch located on the handle.
To turn off, press the power switch located on the handle
again.
3) Tocleanareasthataredifculttoreach,usethecombinationtoolprovidedbyinsertingoneend
of the tool into the handheld vacuum cleaner suction port (Fig. 9).
4) The combination tool can be used as a crevice tool or a dusting brush. To transition from
crevice tool to dusting brush, disengage the latch located on the back of the tool, and slide the
brush to the top. Ensure it clicks into place to secure for operation (Fig. 10).
5) To return the combination tool back to the crevice function, press the latch release button once
more and slide the brush back into the bottom position. Ensure it is securely locked into place.
4. Storing Your Vacuum
1) Fold the upper handle section by pressing the handle release button located on the main body
and pulling the handle backwards into the storage position.
2) Insert the combination tool onto the accessory storage slot on the charging base for convenient storage.
Power Switch
Speed Switch
Power Switch
& Battery
Charging
Indicator

10
GB
MAINTENANCE
CAUTION:
To reduce the risk of an electric shock, remove the vacuum cleaner from the
charging base, and ensure the machine is turned off before performing any maintenance.
1. Emptying the Dust Bin
NOTE:
For the best performance, empty the dust bin after every use. Never operate the vacuum
cleanerwithoutthedustbinandlterinplace.
1) Remove the handheld vacuum cleaner from the main body by pressing the handheld vacuum
cleaner release button and detaching the handheld unit.
2) Hold the unit over a suitable household waste bin, and use one hand to press the two dust bin
release buttons (Fig. 11).
3) Toseparatethedustbinfromthehandheldvacuumcleanerbody,liftthereleasedendrstand
pivotthedustbinupwardstodetachtheunitfromtheholdingclipatthelterendoftheunit.
4) Removethelterbasketfromthedustbin.Emptythecontentsintoawastebin(Fig.12).
2. Cleaning the Filter
NOTE:
Thekeytomaximumperformanceishavingacleanlter.Cleaningthelterfrequentlywill
helpyourvacuumcleaneroperateatpeakefciency.Asparelterisprovidedwithyourvacuum
cleanertoallowyoutodryonelterproperlywhileusingtheother.Additionallterscanbe
purchased from www.cleva-europe.com.
1)Removethelterfromthelterbasket.Withasoft,drybrush,cleananyaccumulateddebris
fromthesidescreensofthelterandthelterbasket(Fig.13).
2)Afterrepeateduse,itmaybenecessarytowashthelterbasketandlter.Handwashinwarm
water. After washing, set aside and allow to air dry for 24 hours.
IMPORTANT:
Ensurethelterandlterbasketarecompletelydrybeforereinstalling.
3)Insertthecleananddrylterintothebasketandtthebasketintothedustbinensuringanair
tight seal is formed around the dust bin opening.
4)Reconnectthedustbintothehandheldvacuumcleaner.Todoso,insertthelterendofthe
dustbinintotheholderrstandensuretheholdingclipissecurelylocatedintothedustbinlid.
Press the other end of the dust bin into position until you hear a ‘click’ (Fig. 14).
3. Cleaning the Motorised Floor Head and Removing Blockages
Thebrushrollmayaccumulatedebrissuchasstrings,hairandbres.Thistypeofdebriscanwrap
around the brush and diminish its ability to clean effectively.

11
GB
Remove Brush Roll for Cleaning
1) Make sure the vacuum cleaner is turned OFF, then remove the handheld vacuum cleaner and
set aside.
2) Youcanremovethemotorisedoorheadforeasymaintenancebypressingthetwomotorised
oorheadreleasebuttonslocatedoneithersideoftheunitneck.Pressthetworeleasebuttons
andsimultaneouslypullthemotorisedoorheadfromthemainbody.
3) Turn the unit over to access the brush roll.
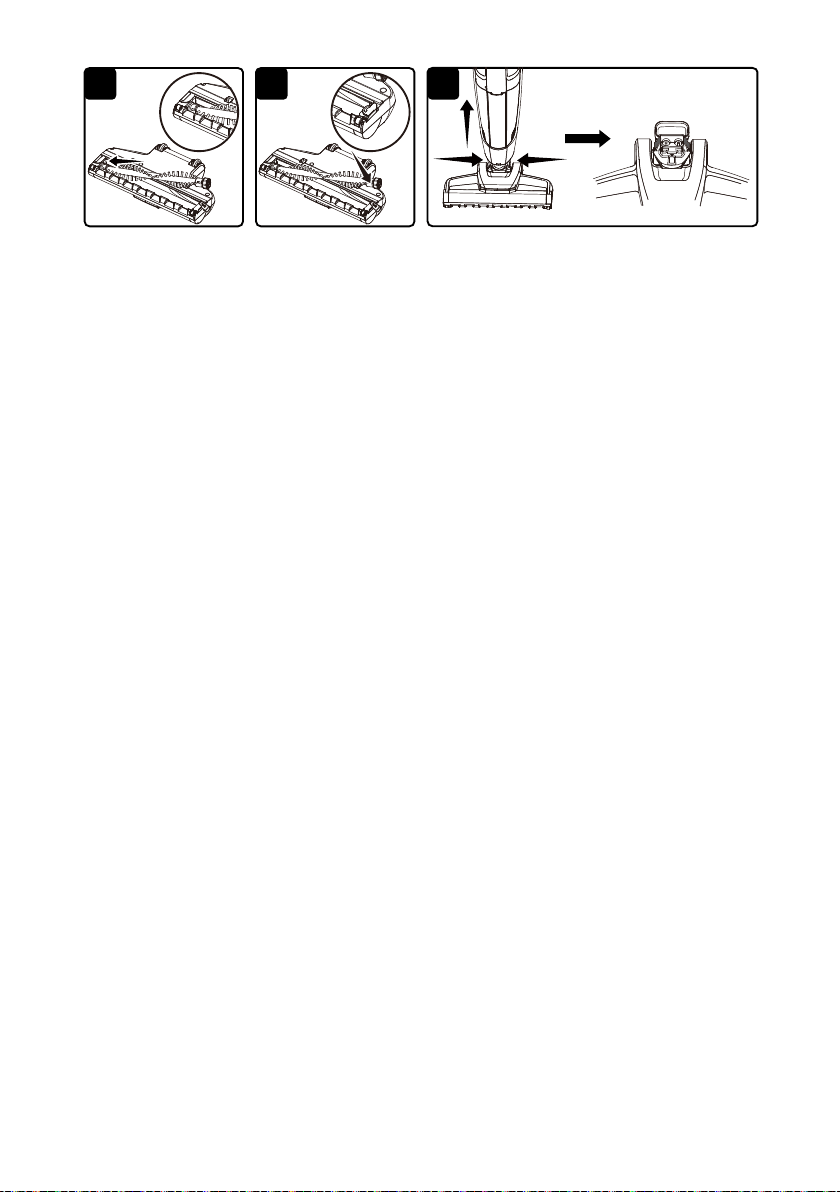
4) Locate the release lever on the right side of the brush roll. Apply pressure to the bottom of the
tab and slide the tab to the right to unlock. Lift the brush roll out of housing (Fig. 15).
5) Clean off debris and anything wrapped around the brush. Use a pair of scissors to remove
threads, hair etc. If you see any hair stuck in the end cap area, remove the end cap from the
brush roll to remove the hair (Fig. 16). Then reinstall the end cap.
6) Reinsert the brush roll back into the housing by aligning the hexagon end of the brush roll into
themotorisedoorheadunitrst,ensuringitisfullyandsecurelyplacedontothemounting
bracket. Then, insert the octagon end correctly into place and lock the securing tab back into
position (Fig. 17 & 18).
NOTE:
When inserted correctly the brush roll should be able to rotate.
Remove Motorised Floor Head Blockages
1)Tocleanoutthemotorisedoorhead,pressthetworeleasebuttons,andpulltheheadaway
from the main body (Fig. 19).
2) Flex the connection hose to ensure you can see straight through the other end. If you can see
any blockages in this area, carefully remove them.
3) Reattachthemotorisedoorheadontothevacuumbody.
NOTE:
Do not damage the connection pins; do not use scissors or other sharp objects to remove
a blockage from the head.
12
GB
TROUBLESHOOTING
WARNING
Disconnect electrical supply before performing maintenance to the vacuum cleaner. Failure to do
so could result in electrical shock or personal injury. Remove the handheld unit form the main body
ifperformingmaintenanceonthebrushrollormotorisedoorhead.
Cleaning Performance
Vacmaster vacuum cleaners are tested for endurance. If your motor is operating, then the most
likely cause for a loss in suction is a blockage or an opening in the vacuum.
To maintain a high cleaning performance from your machine, it is important to replace or clean
ltersasnecessary.Emptyfulldustbintopreventperformancedrops.Aperformancedropwith
cleanlterscanonlybecausedbyablockageinthetoolsorthehoseconnections.
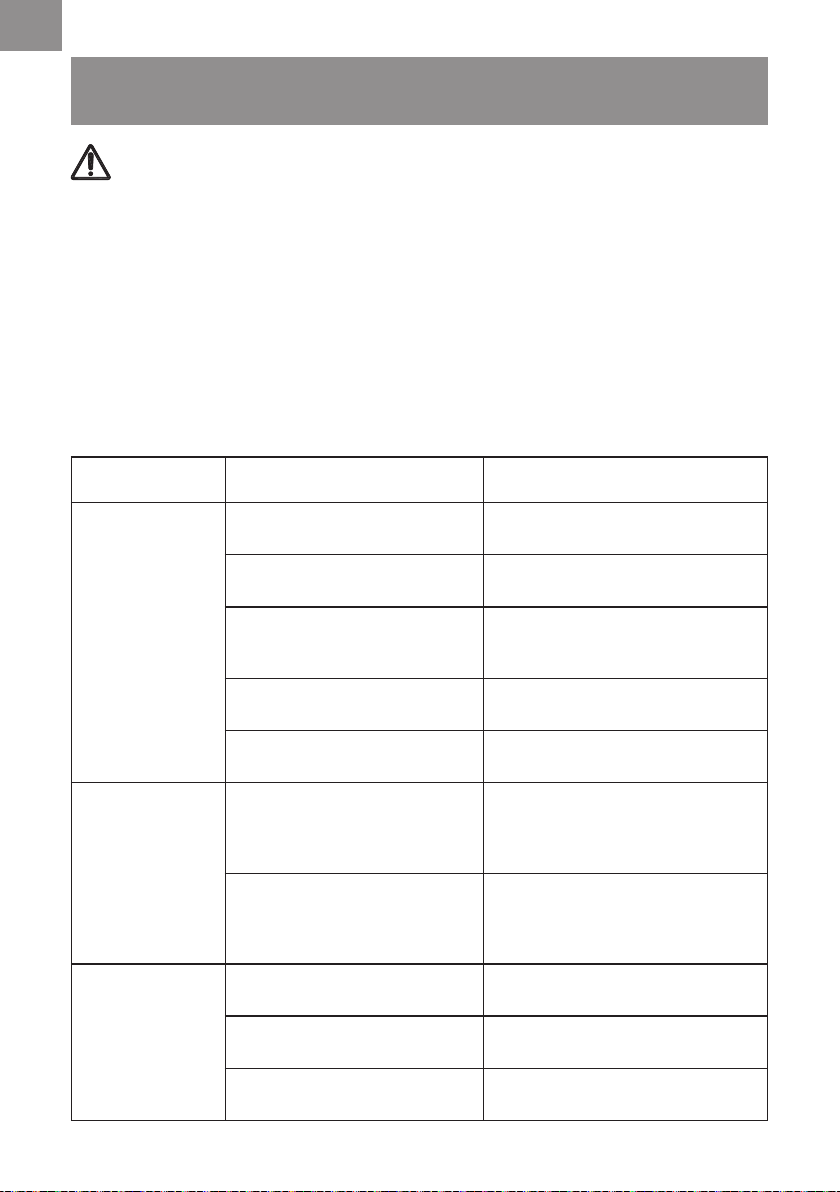
PROBLEM POSSIBLE CAUSE SOLUTION
Vacuum will not
power on.
Battery may be depleted.
Charge the battery as instructed on
page 8.
Wrong charger being used.
Be sure to use only the charger
supplied with your product.
Handheld vacuum cleaner is not
installed properly.
Remove handheld vacuum cleaner
and reattach ensuring that it is
securely in place.
Charging connector is not fully
plugged into the charging base.
Be sure the charging connector is
fully inserted in the charging base.
Charging plug is not fully plugged
into outlet.
Be sure charging plug is fully plugged
into outlet.
Battery charge
indicator does not
illuminate.
Charging adapter is not plugged
in.
Be sure the charging adapter is
plugged in properly to the power
supply and to the charging port on
the side of the charging base.
Debris accumulated on the metal
charge contacts on the handheld
vacuum cleaner, main body and
charging adapter.
Be sure no debris is accumulated on
the metal charger contacts on the
handheld vacuum cleaner, main body
and charging adapter.
Motorised brush
not turning.
Brush roll is jammed.
Remove obstruction. Follow
instructions on page 11.
Brush roll needs to be reset.
Turn the unit off and remove the
obstruction, then turn back on.
Brush roll is not installed correctly.
Remove brush roll and reinstall
following instructions on page 11.

13
GB
PROBLEM POSSIBLE CAUSE SOLUTION
Dirt pick-up is poor
or suction power is
weak.
Dust bin is full. Empty dust bin.
Filter needs cleaning.
Followltercleaninginstructionson
page 10.
Filter needs to be replaced.
Replacethelter.Topurchaseonline
at www.cleva-europe.com.
Battery may be depleted.
Charge the battery as instructed on
page 8.
Dust bin is not installed correctly.
Check dust bin for correct installation
andensureitissnappedrmlyin
place.
Dust escapes from
vacuum.
Filter is missing or installed
incorrectly.
Checklterforcorrectinstallation.
Filter is damaged and needs to be
replaced.
Replacethelter.Topurchaseonline
at www.cleva-europe.com.
Dust bin installed incorrectly.
Position dust bin correctly and snap
rmlyintoplace.
Vacuum turns off
on its own.
Battery may be depleted.
Charge the battery as instructed on
page 8.
Brush roll is jammed causing
motor protection system activated.
While off, remove obstruction and
then turn unit on.
14
GB
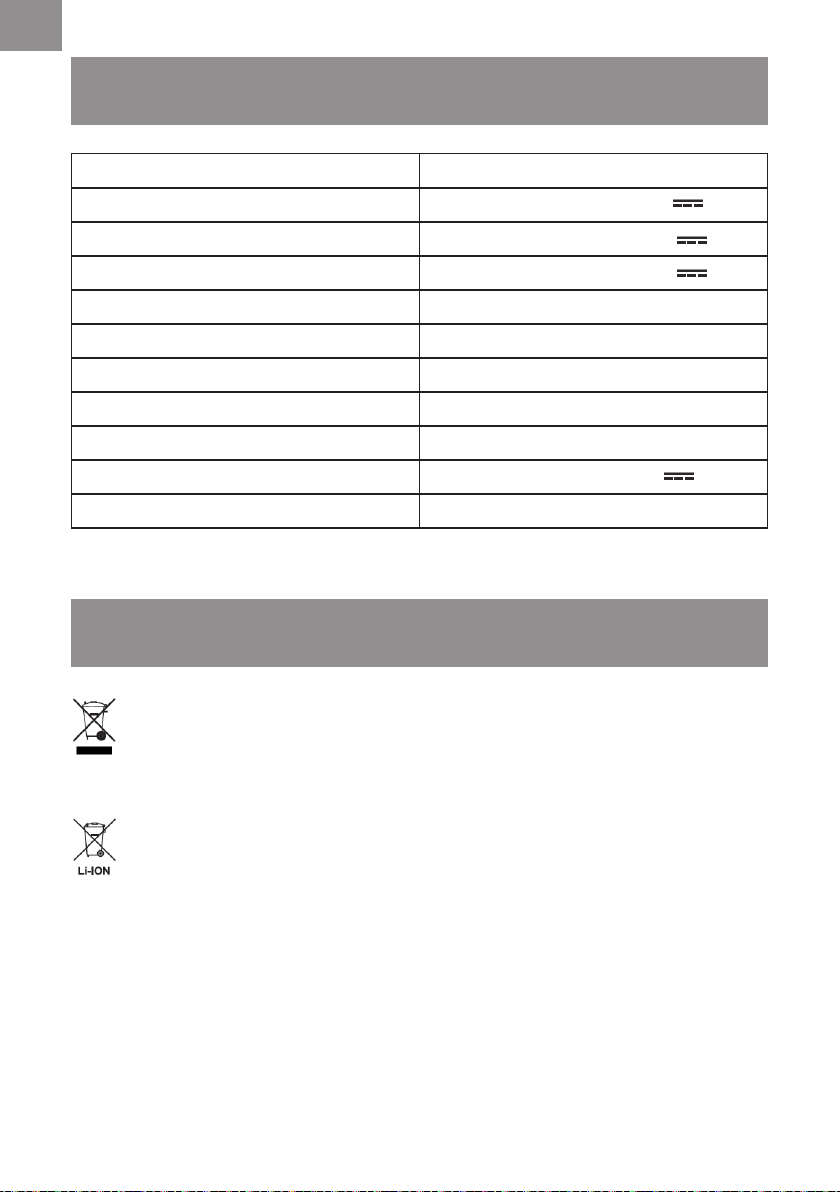
TECHNICAL DATA
RECYCLING AND DISPOSAL
Model Number VSD1801UK
Battery Power
18 V 2.2 Ah
Nominal Rated Voltage of Battery Pack 18 V Li-ion
Max Rated Voltage of Battery Pack 20 V MAX Li-ion
Max Running Time 30 mins
Speed Settings 2 speeds
Dust Capacity 0.5 L
The Whole Unit Weight 2.0 kg
Charger Input 100-240 V ~ 50/60 Hz
Charger Output
21.2 V 470 mA
Battery Full Charge Time 5 hours
This marking indicates that this product should not be disposed with other household
wastes throughout the EU. The machine must be delivered in rigid packaging to avoid
damage during transportation. The packaging and the machine itself are manufactured
from recyclable materials and should be disposed of accordingly.
This vacuum cleaner contains Lithium-ion battery. Do not dispose of batteries in household
waste,reorwater.Disposeofbatteriesinaccordancewiththelocalregulationswhere
they will be recycled in an environmentally friendly manner.


4
1
2 3
1
2
5
9 10 11
12
8
1
2
7
6
6
13 14
15
1
23
16
19
17 18

VSD1801UK
Suzhou Cleva Electric Appliance Co., Ltd.
No.8 Ting Rong Street
Suzhou Industrial Park, Suzhou
Jiangsu Province, China
www.cleva-europe.com
Made in P.R.C
