www.vacmaster.com
Cleva North America, Inc.
Greenville, SC 29607
Made in China
Use & Care Guide
MODEL NO. VSD1801
18V 2-in-1 Cordless Stick Vacuum
(866) 384-8432

-2-
SECTION
Important Safety Instructions................................................................................................................3-5
Warranty…………....................................................................................................................................6
Technical Data
........................................................................................................................................6
Getting To Know Your Vacuum................................................................................................................7
General Assembly Instructions............................................................................................................8-11
Operating Instructions.......................................................................................................................11-13
Maintaining Your Vacuum................................................................................................................ 14-17
Troubleshooting................................................................................................................................18-19
TABLE OF CONTENTS
PAGE
Thank you for purchasing this Vacmaster® vacuum cleaner. With it you are
obtaining a high quality product that is engineered for optimal performance.
FOR YOUR SAFETY
Read and understand this manual before use.
Keep this manual and your sales check (receipt) in a safe place for future
reference.

-3-
IMPORTANT SAFETY INSTRUCTIONS
When using an electrical appliance, basic precautions should always be
followed, including the following:
READ ALL INSTRUCTIONS BEFORE USING THIS VACUUM CLEANER.
)DLOXUHWRIROORZWKHZDUQLQJVDQGLQVWUXFWLRQVPD\UHVXOWLQHOHFWULFVKRFN¿UH
and/or serious injury.
WARNING -
To
UHGXFHWKHULVNRI¿UHHOHFWULFVKRFNRULQMXU\
• Do not use outdoors or on wet surfaces.
• Do not allow to be used as a toy. Close attention is necessary when used by
or near children, pets or plants.
• Use only as described in this manual. Use only manufacturer’s recommended
attachments.
• Do not charge if charging adapter is damaged. If appliance is not working as
it should, has been dropped, damaged, left outdoors, or dropped into water,
return it to a service center.
• Do not pull or carry the charging adapter by cord, use cord as a handle,
close a door on cord, or pull cord around sharp edges or corners. Do not run
appliance over cord. Keep cord away from heated surfaces.
• Do not unplug by pulling on charging cord.
• Do not handle charger, including charger plug, and charger terminals with wet
hands.
• Do not put any object into openings. Do not use with any opening blocked;
NHHSIUHHRIGXVWOLQWKDLUDQGDQ\WKLQJWKDWPD\UHGXFHDLUÀRZ
.HHSKDLUORRVHFORWKLQJ¿QJHUVDQGDOOSDUWVRIERG\DZD\IURPRSHQLQJV
and moving parts.
• Use extra care when cleaning on stairs.
'RQRWXVHWRSLFNXSÀDPPDEOHRUFRPEXVWLEOHOLTXLGVVXFKDVJDVROLQHRU
use in areas where they may be present.
• Do not pick up anything that is burning or smoking, such as cigarettes,
matches, or hot ashes.
'RQRWXVHZLWKRXWGXVWFXSRU¿OWHULQSODFH
• Prevent unintentional starting. Ensure the product does not operate before
connecting to hand vacuum, picking up or carrying the appliance. Carrying the
DSSOLDQFHZLWK\RXU¿QJHURQWKHVZLWFKLQYLWHVDFFLGHQWV

-4-
5HFKDUJHRQO\ZLWKWKHFKDUJHUVSHFL¿HGE\WKHPDQXIDFWXUHU$FKDUJHUWKDW
LVVXLWDEOHIRURQHW\SHRIEDWWHU\SDFNPD\FUHDWHDULVNRI¿UHZKHQXVHGZLWK
another battery pack.
• Under abusive conditions, liquid may be ejected from the battery; avoid contact.
,IFRQWDFWDFFLGHQWDOO\RFFXUVÀXVKDIIHFWHGDUHDZLWKZDWHU,IOLTXLGFRQWDFWV
eyes, additionally seek medical help. Liquid ejected from the battery may cause
irritation or burns.
'RQRWXVHDEDWWHU\SDFNRUDSSOLDQFHWKDWLVGDPDJHGRUPRGL¿HG'DPDJHG
RUPRGL¿HGEDWWHULHVPD\H[KLELWXQSUHGLFWDEOHEHKDYLRUUHVXOWLQJLQ¿UH
explosion or risk of injury.
'RQRWH[SRVHDEDWWHU\SDFNRUDSSOLDQFHWR¿UHRUH[FHVVLYHWHPSHUDWXUH
([SRVXUHWR¿UHRUWHPSHUDWXUHDERYH&PD\FDXVHH[SORVLRQ
• Follow all charging instructions and do not charge the battery pack or appliance
RXWVLGHRIWKHWHPSHUDWXUHUDQJHVSHFL¿HGLQWKHLQVWUXFWLRQV&KDUJLQJ
LPSURSHUO\RUDWWHPSHUDWXUHVRXWVLGHRIWKHVSHFL¿HGUDQJHPD\GDPDJHWKH
EDWWHU\DQGLQFUHDVHWKHULVNRI¿UH
+DYHVHUYLFLQJSHUIRUPHGE\DTXDOL¿HGUHSDLUSHUVRQXVLQJRQO\LGHQWLFDO
replacement parts. This will ensure that the safety of the product is maintained.
• Do not modify or attempt to repair the appliance or the battery pack except as
indicated in the instructions for use and care.
• Always turn off this appliance before connecting or disconnecting any
accessories.
• Do not charge the unit outdoors.
• Do not incinerate the appliance even if it is severely damaged. The batteries
FDQH[SORGHLQD¿UH
• For Household Use Only.
SAVE THESE INSTRUCTIONS

-5-
127(
This equipment has been tested and found to comply with the limits
for a Class B digital device, pursuant to Part 15 of the FCC Rules. These limits
are designed to provide reasonable protection against harmful interference in
a residential installation. This equipment generates, uses and can radiate radio
frequency energy and, if not installed and used in accordance with the instructions,
may cause harmful interference to radio communications. However, there is
no guarantee that interference will not occur in a particular installation. If this
equipment does cause harmful interference to radio or television reception, which
can be determined by turning the equipment off and on, the user is encouraged to
try to correct the interference by one or more of the following measures:
• Reorient or relocate the receiving antenna.
• Increase the separation between the equipment and receiver.
• Connect the equipment into an outlet on a circuit different from that to which the
receiver is connected.
• Consult the dealer or an experienced radio/TV technician for help.
3URGXFW'LVSRVDO
This product contains an internal Lithium-ion battery pack formulated from
environmentally sensitive materials. This product must be disposed of properly
with due care for the environment. Do not dispose of product with household
garbage. Consult your local waste authority for information regarding available
recycling or disposal options.
WARNING
$Q\FKDQJHVRUPRGL¿FDWLRQVWRWKLVXQLWQRWH[SUHVVO\DSSURYHGE\WKHSDUW\
responsible for compliance could void the user’s authority to operate the
equipment.

-6-
FOR ONE YEAR from the date of sale, this product is warranted against defects
in material or workmanship when it is assembled, operated and maintained
according to all supplied instructions.
WITH PROOF OF SALE, a defective appliance will be replaced free of charge.
For warranty coverage details to obtain free replacement, visit the web page:
www.vacmaster.com or call (866) 384-8432.
7KLVZDUUDQW\GRHVQRWFRYHU¿OWHUVZKLFKDUHH[SHQGDEOHSDUWVWKDW
can wear out from normal use within the warranty period.
• This warranty is void if this product is ever used for other than private
household purposes.
7KLVZDUUDQW\JLYHV\RXVSHFL¿FOHJDOULJKWVDQG\RXPD\DOVRKDYHRWKHU
rights which vary from state to state.
TECHNICAL DATA
Cordless Vacuum Cleaner
Voltage: 18VDC
Battery Charger:
Model: YLS0241A-T210050
Input: 100-240V~50/60Hz 0.8A
Output: 21.0V 500mA
WARRANTY

-7-
GETTING TO KNOW YOUR VACUUM
Handle
Power Button
Speed Control Button
Folding Handle Button
Hand Vacuum Release Button
Hand Vacuum On/Off Button
Hand Vacuum
Motorized Brush Powerhead
LED Headlights
Nozzle Release Button
2-In-1 Combination Tool
Combination Tool Storage
Charging Base
Charging Adapter
REPLACEMENT PARTS
Available online at www.vacmaster.com or call (866) 384-8432.
Item Part No.
Filter 561042108
Charging base 561042109
Combination Tool 561042111
Charging Adapter 561005107
Filter Basket 561042107
Brushroll 561042104
Hand Vacuum Handle
Filter
Filter Basket
Dust Cup
Dust Cup Release Button

-8-
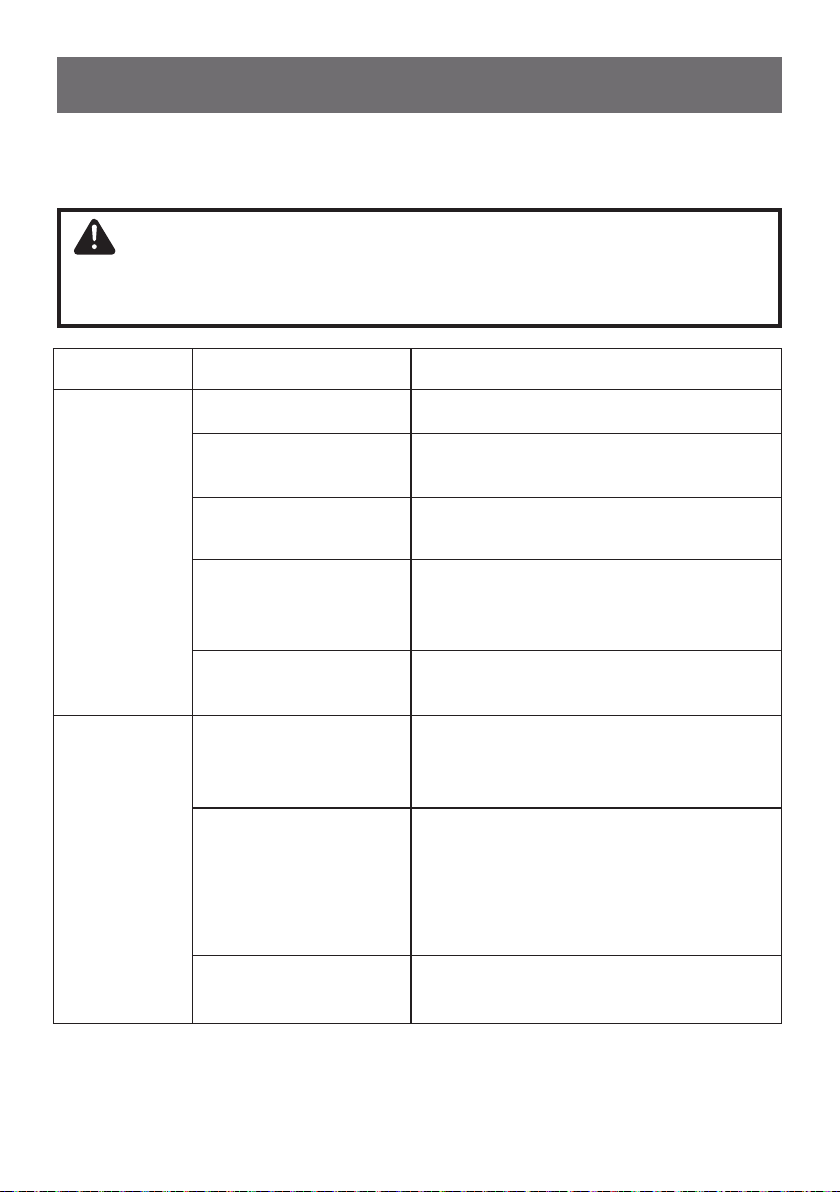
1. Unfold the vacuum folding handle.
Put the vacuum folding handle upward, until there is a click from the folding
handle button.
2. Fit the end of the main body onto the neck of the motorized powerhead and
click into place.
GENERAL ASSEMBLY INSTRUCTIONS
$VVHPEO\,QVWUXFWLRQV
Click

-9-
3. Insert the hand vacuum into the slot on the bottom of main body, then press
the handle into locked slot and click into place.
4. Insert the top of the charging base into the bottom of the charging base and
lock into place.
5. Insert the charging connector into the charging port on the side of charging
base.

-10-
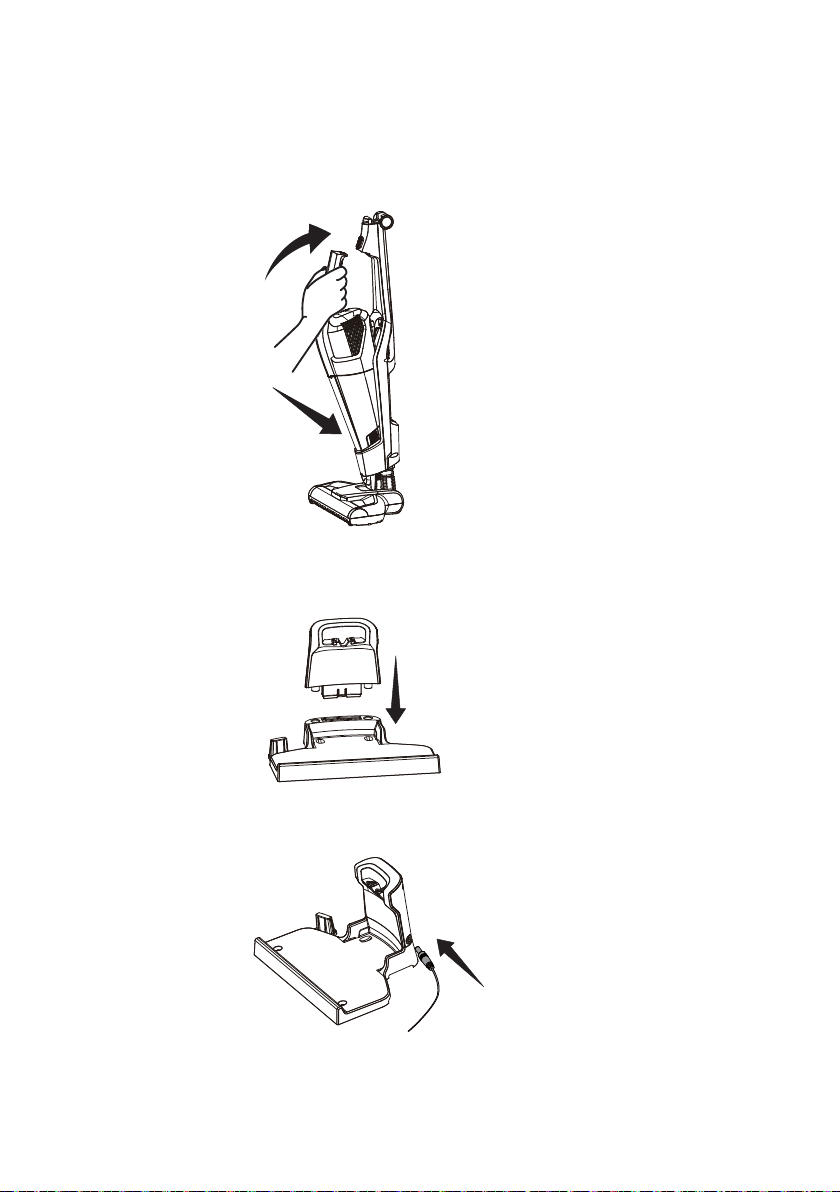
6. Plug the adapter into a wall outlet.
1RWH
Use only the charger supplied with your cleaner to recharge.
7. Insert the 2-in-1 combination tool into the slot on the charging base for
convenient storage.
&KDUJLQJ,QVWUXFWLRQV
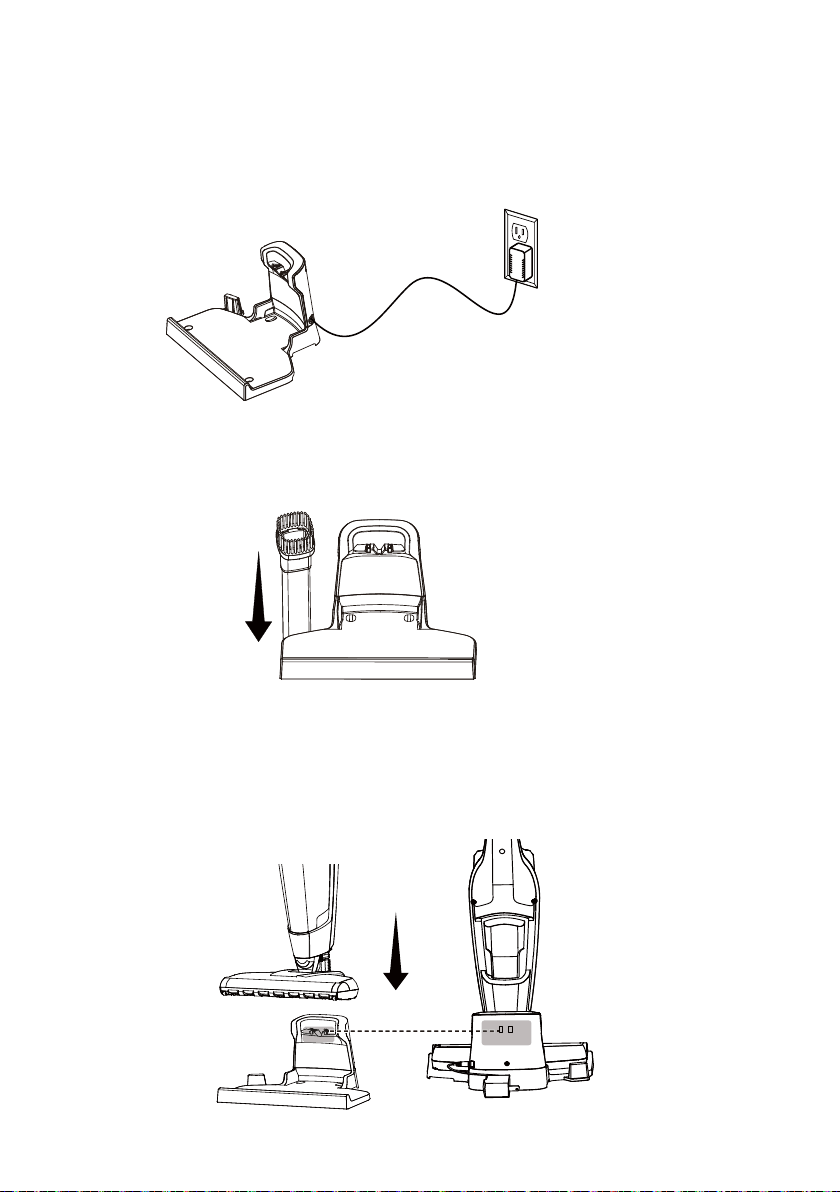
1. Before charging, make sure the cordless vacuum is turned OFF. With the
hand vacuum installed in the stick vacuum, insert the vacuum cleaner onto
the charger base as shown. Make sure the charging adapter is plugged into
an outlet.
-11-
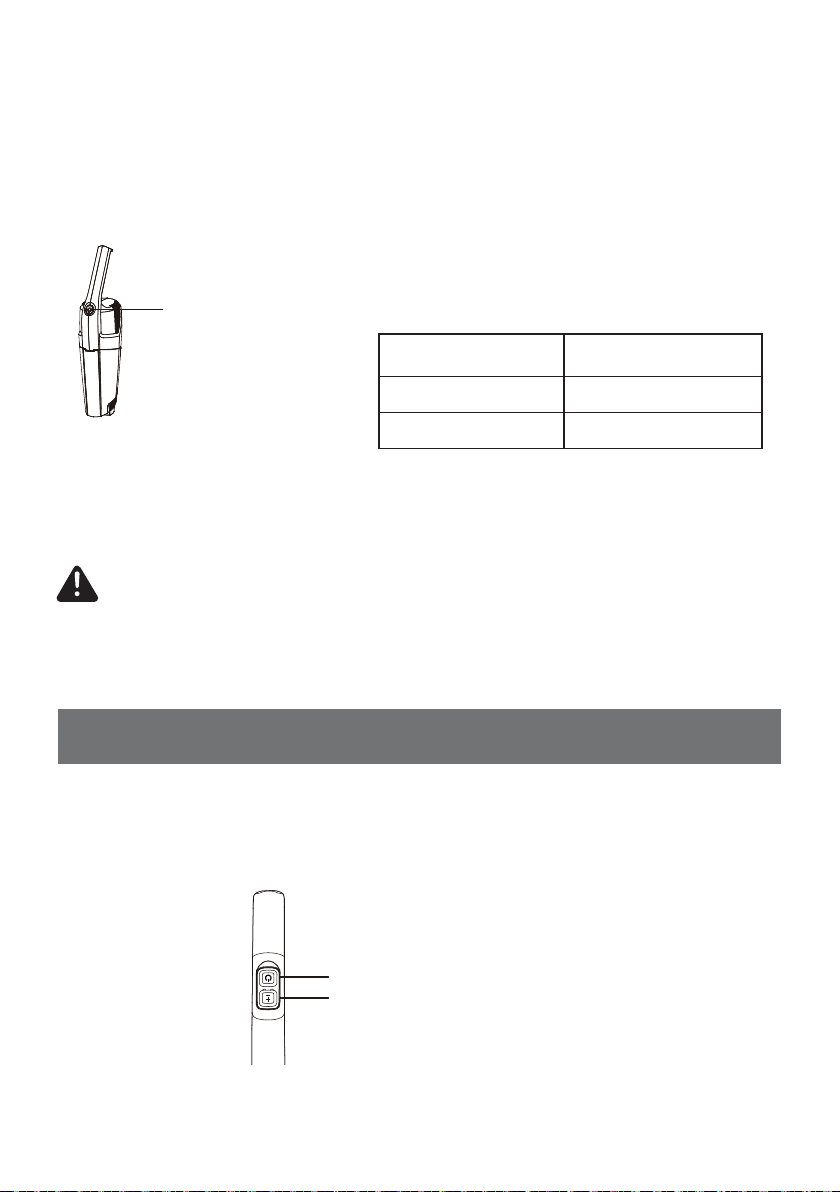
2. The Hand vacuum on/off button will show the progress of the charge. While the
YDFXXPLVEHLQJFKDUJHGWKHEDWWHU\FKDUJHLQGLFDWRUZLOOEHÀDVKLQJ2QFH
fully charged, the indicator will be off.
3. For improved battery performance, keep the vacuum cleaner on the charging
base while not in use. Do not start the vacuum cleaner while it is on the
charging base.
&DXWLRQ
: To optimize the battery longevity, charge the vacuum cleaner for
DWOHDVWKRXUVEHIRUHXVLQJIRUWKH¿UVWWLPH
1HYHUFKDUJHWKHEDWWHULHVLQWHPSHUDWXUHVDERYH)&RUEHORZ
)&,WLVQRUPDOIRUWKHFKDUJHUWREHFRPHZDUPZKHQFKDUJLQJ
%DWWHU\LQGLFDWRU Status
Flashing light Charging
No light Fully charged
OPERATING INSTRUCTIONS
8VLQJ<RXU9DFXXP&OHDQHU
When vacuum cleaner is fully charged, lift it off the charging base.
1. To start the vacuum, press the power button. The vacuum automatically starts
in the HIGH speed position.
On/Off Button & Battery Indicator
Power Button
Speed Control Button

-12-
8VLQJ<RXU+DQG9DFXXP
1. To remove the hand vacuum, press the hand vacuum button and detach from
the main body.
2. To switch the speed to LOW, press the speed control button. Press the
speed control button again to switch back to HIGH speed.
3. To stop the vacuum, press the power button.
2. To turn on, press the power button located on the handle.
7RFOHDQDUHDVWKDWDUHGLI¿FXOWWRUHDFKXVHWKHLQFRPELQDWLRQWRROE\
inserting one end of the tool into the hand vacuum.
Hand vacuum release button
Hand vacuum
-13-
CAUTION
Moving parts! To reduce the risk of personal injury, DO NOT touch the brush
roll when vacuum is on. Contacting the brush roll while it is rotating can cut
or cause other injuries. Always turn off before servicing. Use caution when
operating near children.
6WRULQJ<RXU9DFXXP
1. Fold handle by pressing handle release button and pulling handle backward.
2. To operate vacuum, unfold the handle by moving it upward until you hear a
click.
4. The combination tool can be used as a crevice tool or dusting brush. To
transition from crevice to dusting brush, depress the latch on the tool and slide
the part to the top of the tool.

-14-
MAINTAINING YOUR VACUUM
CAUTION
To reduce the risk of shock, remove vacuum cleaner from the charging base,
and turn off before performing any service or maintenance.
(PSW\LQJWKH'XVW&RQWDLQHU&OHDQLQJWKH)LOWHU
1. Remove the hand vacuum from the main body by pressing the hand vacuum
release button.
2. Hold the unit over a trash bin and use one hand to press the two dust cup
release buttons to separate the dust cup from the hand vacuum body.
5HPRYHWKH¿OWHUEDVNHWIURPWKHGXVWFXS(PSW\WKHFRQWHQWVRIWKHGXVWFXS
into a trash bin.
Hand vacuum release button
Hand vacuum
Dust Cup Release Buttons
Filter Basket

-15-
,03257$17
7KH¿OWHUDQGWKH¿OWHUEDVNHWPXVWEHFRPSOHWHO\GU\EHIRUHUHXVH
,QVHUWWKHFOHDQDQGGU\¿OWHULQWRWKHEDVNHW)LWWKHEDVNHWLQWRWKHGXVWFXSDQG
reconnect the dust cup to the hand vacuum.
WARNING
'RQRWRSHUDWHYDFXXPFOHDQHUZLWKRXW¿OWHULQVWDOOHG
5HPRYHWKH¿OWHUIURPWKH¿OWHUEDVNHW&OHDQWKHDFFXPXODWHGGHEULVIURPWKH
¿OWHUEDVNHWDQGWKH¿OWHUV
$IWHUUHSHDWHGXVHLWPD\EHQHFHVVDU\WRZDVKWKH¿OWHUEDVNHWDQG¿OWHU
Hand wash in lukewarm water. After washing, set aside and allow to air dry for
24 hours.
24hrs
Filter
Filter Basket

-16-
&OHDQLQJWKH0RWRUL]HG3RZHUKHDG%ORFNDJHV
7KHEUXVKUROOPD\DFFXPXODWHGHEULVVXFKDVVWULQJVKDLUDQG¿EHUV7KLVW\SHRI
debris can wrap around the brush and diminish its ability to clean effectively.
7R5HPRYH%UXVK5ROOIRU0DQXDO&OHDQLQJ
1. Make sure the vacuum cleaner is turned OFF then remove the hand vacuum
and set aside.
2. Turn the unit over to access the brush roll. As shown below,push and slide the
tab to the right to unlock, then lift the brush roll out of housing. Clean off debris
and anything wrapped around the brush. Use a pair of scissors to remove
threads, etc.
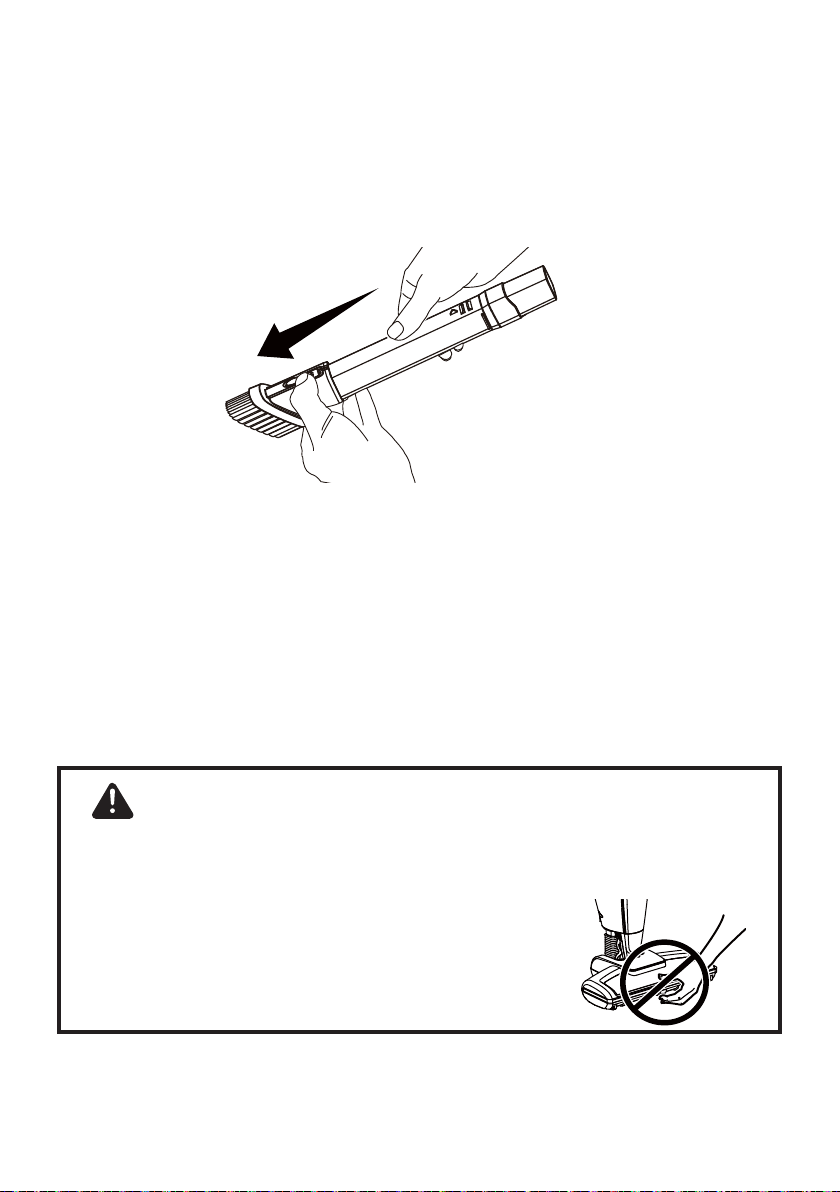
7R5HPRYH3RZHUKHDG%ORFNDJHV
1. To clean out the powerhead, press the two nozzle release buttons, and pull
the powerhead away from the main vacuum body.
3. Place the brush roll back into the housing by aligning the hexagon end to the
SRZHUKHDG¿UVWWKHQLQVHUWLQJWKHRWKHUHQGFRUUHFWO\LQWRSODFHDQGORFNWKH
tab.
Nozzle Release Button

-17-
TROUBLESHOOTING
2. Carefully remove any debris or blockage from the inside of the powerhead.
3. Reattach the powerhead onto the vacuum body.
1RWH
Do not damage pins; do not use scissors or other sharp objects to
remove a blockage from the powerhead as these may damage the powerhead.
Pins
-18-
TROUBLESHOOTING
Should you have any problem(s) with your vacuum cleaner, review the table
below for solutions to minor performance issues.
WARNING
Disconnect electrical supply before performing maintenance to the vacuum
cleaner. Failure to do so could result in electrical shock or personal injury.
PROBLEM POSSIBLE CAUSE SOLUTION
Vacuum will not
power on.
Battery may be depleted. Charge the battery as instructed.
Wrong charger being
used.
Be sure to use only the charger supplied with
your product.
Hand vacuum is
not installed properly.
Remove hand vacuum and reattach ensuring
that it is securely in place.
Charging connector is
not fully plugged into the
charging base.
Be sure the charging connector is fully
inserted in the charging base.
Charging plug is not
fully plugged into outlet.
Be sure charging plug is fully plugged into
outlet.
Battery charge
indicator does
not illuminate.
Charging adapter is not
plugged in.
Be sure the charging adapter is plugged in
properly to the outlet and to the charging port
on the bottom of the charging adapter.
Debris accumulated on
the metal charge contacts
on the hand vacuum, main
body and charging
adapter.
Be sure no debris is accumulated on the
metal charger contacts on the hand vacuum,
main body and charging adapter.
The electrical outlet is out
of power.
Ensure that the outlet is supplying power to
the charger.

-19-
Motorized brush
not turning.
Brush roll is jammed. Remove obstruction. Follow instructions.
Brush roll needs to be
reset.
Turn the unit off and remove the obstruction,
then turn back on.
Brush roll is not
installed well.
Remove brush roll and reinstall following
instructions.
Vacuum not
picking up or
suction power is
weak.
Dust cup is full. Empty dust cup.
Filter needs cleaning. )ROORZ¿OWHUFOHDQLQJLQVWUXFWLRQV
Filter needs to be
replaced.
To purchase online at www.vacmaster.com or
call (866) 384-8432.
Battery may be depleted. Charge the battery as instructed.
Dust cup is not installed
well.
Check dust cup for correct installation and
HQVXUHLWLVVQDSSHG¿UPO\LQSODFH
Dust escapes
from vacuum.
Filter is missing or
installed incorrectly.
&KHFN¿OWHUIRUFRUUHFWLQVWDOODWLRQ
Filter is damaged and
needs to be replaced.
To purchase online at www.vacmaster.com or
call (866) 384-8432.
Dust cup installed
incorrectly.
3RVLWLRQGXVWFXSFRUUHFWO\DQGVQDS¿UPO\
into place.
Vacuum turns off
on its own.
Battery may be depleted. Charge the battery as instructed.
Brush roll is jammed
causing motor protection
system activated.
While off, remove obstruction and then turn
unit on.
For further questions, call our support team at (866) 384-8432.

www.vacmaster.com
Cleva North America, Inc.
Greenville, SC 29607
Made in China
Guía de uso y cuidado
MODELO N.O VSD1801
Aspiradora de varilla inalámbrica de 18 V 2-en-1
(866) 384-8432

-2-
SECCIÓN
Instrucciones de seguridad importantes...............................................................................................3-5
Garantía………….....................................................................................................................................6
(VSHFL¿FDFLRQHVWpFQLFDV
......................................................................................................................6
Conozca su aspiradora............................................................................................................................7
Instrucciones de ensamblaje generales..............................................................................................8-11
Instrucciones de uso.........................................................................................................................11-13
Mantenimiento para su aspiradora.................................................................................................. 14-17
Resolución de problemas..................................................................................................................17-19
TABLA DE CONTENIDOS
PÁGINA
Gracias por comprar la aspiradora Vacmaster®. Con ella obtendrá un producto
de alta calidad diseñado para un rendimiento óptimo.
POR SU SEGURIDAD
Lea y comprenda este manual antes de usar el producto.
Guarde este manual y su recibo de compra en un lugar seguro para futuras
referencias.

-3-
INSTRUCCIONES DE SEGURIDAD IMPORTANTES
$OXWLOL]DUXQSURGXFWRHOpFWULFRVHGHEHQWRPDUVLHPSUHSUHFDXFLRQHVEiVLFDV
incluyendo las siguientes:
LEA TODAS LAS INSTRUCCIONES ANTES DE UTILIZAR ESTA
ASPIRADORA.
El incumplimiento de las instrucciones indicadas a continuación puede producir
GHVFDUJDVHOpFWULFDVLQFHQGLRVROHVLRQHVJUDYHV
ADVERTENCIA -
para reducir el riesgo de incendio, explosión
o lesión:
1RXVHHODSDUDWRDODLUHOLEUHRHQVXSHU¿FLHVPRMDGDV
• No permita que se utilice como un juguete. Se debe prestar estricta atención
cuando es usado por niños o cuando se use cerca de ellos, de mascotas o de
plantas.
• Utilice el producto solo como se describe en este manual. Utilice solo los
aditamentos recomendados por el fabricante.
• No lo ponga a cargar si el adaptador de carga está dañado. Si la herramienta
no funciona como debería o se ha caído, está dañada, se ha dejado en
XQHVSDFLRH[WHULRURKDFDtGRHQDJXDOOpYHODDXQFHQWURGHVHUYLFLR
autorizado.
• No jale ni mueva el adaptador de carga por el cable, no use el cable como
DVDQRFLHUUHODSXHUWDGHOFDEOHQLMDOHHOFDEOHHQERUGHVD¿ODGRVR
esquinas. No utilice el producto sobre el cable. Mantenga el cable alejado de
VXSHU¿FLHVFDOLHQWHV
• No desenchufe jalando del cable de carga.
• No manipule el cargador, incluido el enchufe, ni las terminales de carga con
las manos mojadas.
• No ponga objetos sobre las aberturas. No la utilice si las aberturas están
bloqueadas; mantenga las aberturas libres de polvo, cabellos, pelusas y
FXDOTXLHUFRVDTXHSXHGDUHGXFLUHOÀXMRGHDLUH
• Mantenga su cabello, ropas holgadas, dedos y partes de su cuerpo lejos de
las aberturas y piezas móviles del producto.
• Tenga precaución adicional al limpiar en escaleras.
1RXVHHOSURGXFWRSDUDDVSLUDUOtTXLGRVFRPEXVWLEOHVRLQÀDPDEOHVFRPR
gasolina, ni lo use en áreas donde tales elementos puedan estar presentes.
1RDVSLUHHOHPHQWRVTXHHVWpQHQOODPDVRKXPHDQGRWDOHVFRPRFLJDUULOORV
fósforos o cenizas calientes.

-4-
1RODXVHVLQFRORFDUODWD]DGHSROYRR¿OWURHQVXOXJDU
(YLWHORVDUUDQTXHVDFFLGHQWDOHV$VHJ~UHVHGHTXHHOSURGXFWRHVWpDSDJDGR
antes de conectarlo a la aspiradora de mano, recoger o llevar el aparato.
Cargar el aparato teniendo el dedo en el interruptor podría propiciar accidentes.
5HFiUJXHODVRORFRQHOFDUJDGRUTXHHVSHFL¿TXHHOIDEULFDQWH8QFDUJDGRU
que es adecuado para un tipo de paquete de batería puede crear riesgo de
incendio si se utiliza con otro paquete de batería diferente.
• En condiciones adversas puede salir líquido de la batería, evite entrar en
FRQWDFWRFRQpO6LRFXUUHXQFRQWDFWRDFFLGHQWDOPHQWHHQMXDJXHHOiUHD
afectada con agua. Si los ojos entran en contacto con el líquido, busque
DGHPiVD\XGDPpGLFD(OOtTXLGRTXHVDOHGHODEDWHUtDSXHGHFDXVDULUULWDFLyQ
o quemaduras.
1RXVHXQDEDWHUtDQLHOHFWURGRPpVWLFRGDxDGRVRPRGL¿FDGRV/DVEDWHUtDV
GDxDGDVRPRGL¿FDGDVSXHGHQSUHVHQWDUXQFRPSRUWDPLHQWRLPSUHGHFLEOH
provocando incendios, explosiones o riesgo de lesiones.
1RH[SRQJDODEDWHUtDRHOHOHFWURGRPpVWLFRDOIXHJRRWHPSHUDWXUDVH[FHVLYDV
La exposición al fuego o a temperaturas sobre los 130 °C (265 °F) puede
provocar una explosión.
• Siga todas las instrucciones de carga y no cargue la batería o el aparato fuera
GHOUDQJRGHWHPSHUDWXUDHVSHFL¿FDGRHQODVLQVWUXFFLRQHV8QDUHFDUJD
LQDGHFXDGDRDWHPSHUDWXUDVIXHUDGHOUDQJRHVSHFL¿FDGRSRGUtDGDxDUOD
batería y aumentar el riesgo de incendio.
+DJDTXHODVUHSDUDFLRQHVODVUHDOLFHXQWpFQLFRHVSHFLDOL]DGRXVDQGRSLH]DV
GHUHSXHVWRLGpQWLFDV(VWRJDUDQWL]DTXHVHPDQWHQJDODVHJXULGDGGHO
producto.
1RPRGL¿TXHQLLQWHQWHUHSDUDUHODSDUDWRRHOSDTXHWHGHEDWHUtDVH[FHSWRSRU
lo indicado en las Instrucciones de uso y cuidado.
• Recuerde apagar el aparato siempre antes de conectar o desconectar los
accesorios.
• No cargue la unidad en exteriores.
• No incinere el aparato ni siquiera si está muy dañado. La batería puede
explotar al entrar en contacto con fuego.
6RORSDUDXVRGRPpVWLFR
GUARDE ESTAS INSTRUCCIONES

-5-
NOTA:
Este equipo ha sido probado por cuanto a su cumplimiento con los
límites de un dispositivo digital Clase B, según el inciso 15 de las Regulaciones
FCC. Estos límites están diseñados para proporcionar una protección razonable
contra interferencias dañinas en instalaciones residenciales. Este equipo
genera, usa y puede irradiar energía de radiofrecuencias y, de no instalarse y
usarse según las instrucciones, puede provocar interferencia dañina sobre las
comunicaciones por radio. Sin embargo, no hay garantía alguna de que no pueda
ocurrir interferencia en una instalación en particular. Si este equipo provoca una
interferencia dañina a la recepción de radio o televisión, lo cual puede determinar
con tan solo apagar y encender el equipo, se recomienda corregir tal interferencia
PHGLDQWHXQRRPiVGHORVVLJXLHQWHVPpWRGRV
• Reoriente o reubique la antena de recepción.
• Incremente la separación entre el equipo y el receptor.
• Conecte el equipo a un enchufe de corriente en un circuito diferente al que está
conectado el receptor.
&RQVXOWHDOUHSUHVHQWDQWHGHYHQWDVRDXQWpFQLFRGHUDGLR79H[SHULPHQWDGR
para obtener ayuda.
Desecho del producto
Este producto contiene un paquete interno de baterías de iones de litio formulado
a partir de materiales que pueden causar daño ecológico. Este producto se
debe desechar adecuadamente, cuidando correctamente del medioambiente.
1RGHVHFKHHOSURGXFWRMXQWRFRQODEDVXUDGRPpVWLFDFRUULHQWH&RQVXOWHDVX
autoridad de eliminación local para obtener información sobre la disponibilidad de
opciones de reciclaje o eliminación.
Advertencia
&XDOTXLHUFDPELRRPRGL¿FDFLyQDHVWDXQLGDGTXHQRHVWpH[SUHVDPHQWH
aprobada por la parte responsable del cumplimiento podría anular la autoridad
del usuario para utilizar el equipo.

-6-
DURANTE UN AÑO a contar de la fecha de venta, este producto está
garantizado contra defectos en sus materiales o fabricación cuando se ensambla,
opera y mantiene siguiendo todas las instrucciones proporcionadas.
Un producto defectuoso puede reemplazarse por uno nuevo, de manera gratuita,
considerando que se presente una PRUEBA DE VENTA. Para conocer la
cobertura de la garantía y obtener un reemplazo gratuito, visite el sitio web www.
vacmaster.com o en el (866) 384-8432.
(VWDJDUDQWtDQRFXEUHORV¿OWURVQLFRUUHDVODVFXDOHVVRQSLH]DVGHVHFKDEOHV
que pueden desgastarse debido al uso normal dentro del periodo de garantía.
• Esta garantía queda nula si el producto llega a usarse para algún propósito
TXHQRVHDHOXVRSULYDGRGRPpVWLFR
(VWDJDUDQWtDOHHQWUHJDGHUHFKRVOHJDOHVHVSHFt¿FRVTXHSXHGHQYDULDUVHJ~Q
su estado (podría tener otros derechos adicionales).
Aspiradora inalámbrica
Voltaje: 18 VDC
Cargador de batería:
Modelo: YLS0241A-T210050
(QWUDGD9a+]$
Salida: 21.0V 500mA
GARANTÍA
ESPECIFICACIONES TÉCNICAS

-7-
CONOZCA SU ASPIRADORA
Manilla
Botón de Encendido
Botón de Control de velocidad
Botón para Doblar el asa
Botón de Liberación de la aspiradora de mano
%RWyQSDUD(QFHQGHU$SDJDUODDVSLUDGRUD Aspiradora de mano
Cabezal de cepillo motorizado
Faros LED
Botón de Liberación de la boquilla
Herramienta combinada 2 en 1
Almacenamiento de herramientas combinadas
Base de carga
Adaptador de carga
PIEZAS DE REPUESTO
Disponible en línea en www.vacmaster.com o llamando al (866) 384-8432.
Artículo N° de pieza
Filtro 561042108
Base de carga 561042109
Herramientas combinadas 561042111
Adaptador de carga 561005107
&DQDVWRGHO¿OWUR 561042107
Rodillo de cepillo 561042104
Asa de aspiradora
Filtro
&DQDVWRGHO¿OWUR
Taza para polvo
Botón de Liberación de taza para polvo

-8-
1. Despliegue el asa plegable de la aspiradora.
Coloque el asa plegable de la aspiradora hacia arriba, hasta que oiga un clic
en el botón del asa plegable.
2. Coloque el extremo del cuerpo principal en el cuello del cabezal motorizado
hasta que haga clic en su lugar.
INSTRUCCIONES DE ENSAMBLAJE GENERALES
Instrucciones de montaje
Clic
-9-
3. Inserte la aspiradora de mano en la ranura en la parte inferior del cuerpo
principal, luego presione el asa en la ranura bloqueada hasta que haga clic en
su lugar.
4. Inserte la parte superior de la base de carga en la parte inferior de la base de
carga y afírmela en su lugar.
5. Inserte el conector de carga en el puerto de carga en el costado de la base de
carga.
-10-
6. Enchufe el adaptador a una toma de pared.
Nota:
Solo use el cargador suministrado con su aspiradora.
7. Para guardar inserte la herramienta de combinación 2 en 1 en la ranura de
la base de carga.
Instrucciones de carga
$QWHVGHFDUJDUDVHJ~UHVHGHTXHODDVSLUDGRUDLQDOiPEULFDHVWp$3$*$'$
Con la aspiradora de mano instalada en la aspiradora de varilla, inserte la
aspiradora en la base del cargador como se muestra. Asegúrese de que el
DGDSWDGRUGHFDUJDHVWpHQFKXIDGRDXQDWRPDGHFRUULHQWH

-11-
(OERWyQGH(QFHQGLGR$SDJDGRGHODDVSLUDGRUDGHPDQRPRVWUDUiHODYDQFH
de la carga. Mientras se carga la aspiradora, el indicador de carga de la
EDWHUtDSDUSDGHDUi8QDYH]TXHHVWpFRPSOHWDPHQWHFDUJDGDHOLQGLFDGRUVH
apagará.
3. Para un mejor rendimiento de la batería, coloque la aspiradora en la base de
FDUJDPLHQWUDVQRHVWpHQXVR1RHQFLHQGDODDVSLUDGRUDPLHQWUDVHVWiHQOD
base de carga.
Precaución
: Para optimizar la vida útil de la batería, cargue la aspiradora
durante al menos 5 horas antes de usarla por primera vez.
Nunca cargue las baterías a temperaturas superiores a 98,6 ° (37°) o por debajo
de 32 ° (0 °). Es normal que el cargador se caliente durante la carga.
Indicador de la
batería
Estado
Luz parpadeante Cargando
No iluminada Completamente cargada
INSTRUCCIONES DE USO
Usar su aspiradora
&XDQGRODDVSLUDGRUDHVWpFRPSOHWDPHQWHFDUJDGDOHYiQWHODGHODEDVHGH
carga.
1. Para arrancar la aspiradora, presione el botón de encendido. El aspirado
comienza automáticamente en la posición de ALTA velocidad.
%RWyQGH(QFHQGLGR$SDJDGRH
indicador de la batería
Botón de Encendido
Botón de Cambio de velocidad

-12-
Usar su aspiradora de mano
1. Para desacoplar la aspiradora de mano, presione el botón de Liberación de la
aspiradora de mano y sepárela del cuerpo principal.
2. Para cambiar la velocidad a BAJA, presione el botón de cambio de velocidad.
Presione el botón de cambio de velocidad nuevamente para volver a la
velocidad ALTA.
3. Para parar el funcionamiento de la aspiradora, presione el botón de Encendido.
2. Para encenderla, presione el botón de encendido ubicado en el asa.
3. Para limpiar áreas que son difíciles de alcanzar, use la herramienta de
combinación 2 en 1 insertando un extremo de la herramienta en la aspiradora
de mano.
Botón de Liberación de la aspiradora de mano
Aspiradora de mano

-13-
PRECAUCIÓN
¡Piezas móviles! Para reducir el riesgo de lesiones personales, NO toque el
FHSLOORJLUDWRULRPLHQWUDVODDVSLUDGRUDHVWpHQXVR&RORFDUHOURGLOORGHFHSLOOR
mientras gira podría cortarle o causarle otras lesiones. Apague siempre el
producto antes de repararlo. Preste cuidado al usar el aparato cerca de niños.
Cómo almacenar su aspiradora
1. Debe doblar la manija, para esto presione el botón de liberación de la misma
y tire de ella hacia atrás.
&XDQGRXWLOLFHODDVSLUDGRUDYXHOYDDSRQHUODPDQLMDHQVXOXJDUPRYLpQGROD
hacia arriba hasta que escuche un clic.
4. La herramienta de combinación puede ser la herramienta para aspirar grietas
o un cepillo para quitar el polvo. Para cambiar entre una herramienta para
grietas a un cepillo, presione el pestillo de la herramienta y deslice la pieza
hacia la parte superior de la herramienta.

-14-
MANTENIMIENTO PARA SU ASPIRADORA
PRECAUCIÓN
3DUDUHGXFLUHOULHVJRGHXQDGHVFDUJDHOpFWULFDTXLWHODDVSLUDGRUDGHOD
base de carga y apáguela antes de realizar cualquier trabajo de servicio o
mantenimiento.
9DFLDGRGHOFRQWHQHGRUGHSROYR\OLPSLH]DGHO¿OWUR
1. Retire la aspiradora de mano del cuerpo principal presionando el botón de
Liberación de la aspiradora manual.
2. Sujete la unidad sobre un contenedor de basura y con una mano presione los
dos botones de liberación de la taza para polvo para separarla del cuerpo de la
aspiradora de mano.
5HWLUHHOFDQDVWRGHO¿OWURGHODWD]DSDUDSROYR9DFtHHOFRQWHQLGRGHODWD]D
para polvo en un contenedor de basura.
Botón de Liberación del asa de la aspiradora
Botones de liberación
de la taza de polvo
Aspiradora de mano
&DQDVWRGHO¿OWUR

-15-
IMPORTANTE:
(O¿OWUR\HOFDQDVWRGHO¿OWURGHEHQHVWDUFRPSOHWDPHQWHVHFRV
antes de volver a usarlos.
,QVHUWHHO¿OWUROLPSLR\VHFRHQHOFDQDVWR&RORTXHHOFDQDVWRHQHOUHFLSLHQWHSDUD
polvo y vuelva a conectar el recipiente para el polvo a la aspiradora de mano.
ADVERTENCIA
1RXVHODDVSLUDGRUDVLQ¿OWURLQVWDODGR
5HWLUHHO¿OWURGHOFDQDVWRGHO¿OWUR/LPSLHORVUHVWRVDFXPXODGRVHQHOFDQDVWR
GHO¿OWUR\ORV¿OWURV
'HVSXpVGHXQXVRUHSHWLGRSXHGHVHUQHFHVDULRODYDUHOFDQDVWRGHO¿OWUR\
HO¿OWUR/iYHORFRQODPDQRHQDJXDWLELD'HVSXpVGHOODYDGRUHVHUYH\GHMH
secar al aire durante 24 horas.
24hrs
Filtro
&DQDVWRGHO¿OWUR

-16-
Limpieza del cabezal motorizado y bloqueos
(OURGLOORGHOFHSLOORSXHGHDFXPXODUUHVLGXRVFRPRKLORVSHORV\¿EUDV(VWHWLSR
de sedimentos puede enrollarse en el cepillo y reducir su capacidad de limpiar
efectivamente.
Quitar el rodillo de cepillo para la limpieza manual:
$VHJ~UHVHGHTXHODDVSLUDGRUDHVWp$3$*$'$OXHJRH[WUDLJDODDVSLUDGRUD
de mano y póngala a un lado.
2. Voltee la unidad para acceder al rodillo del cepillo. Como se muestra
a continuación, empuje y deslice la pestaña hacia la derecha para
desbloquearla, levante el rodillo del cepillo de la carcasa. Quite los sedimentos
\FXDOTXLHUFRVDTXHHVWpHQUROODGDHQHOFHSLOOR8VHXQDVWLMHUDVSDUDTXLWDU
los hilos, etc.
Eliminar bloqueos del cabezal motorizado:
1. Para limpiar el cabezal motor, presione los dos botones de liberación de la
boquilla y jale el cabezal motorizado del cuerpo principal de la aspiradora.
3. Coloque el rodillo del cepillo de nuevo en la carcasa alineando primero el
extremo hexagonal con el cabezal motorizado y luego inserte el otro extremo
correctamente en su lugar y bloquee la pestaña.
Botón de Liberación de la boquilla

-17-
TROUBLESHOOTING
2. Quite con cuidado cualquier escombro o suciedad del interior del cabezal
motorizado.
3. Vuelva a conectar el cabezal motorizado con el cuerpo de la aspiradora.
Nota:
1RGDxHORVSDVDGRUHVQRXVHWLMHUDVXRWURVREMHWRVD¿ODGRVSDUD
eliminar un bloqueo en el cabezal motorizado ya que podrían causar daños a la
pieza.
Si tiene algún problema con su aspiradora, revise la tabla a continuación para
encontrar soluciones a problemas de rendimiento no críticos.
ADVERTENCIA
'HVFRQHFWHHOVXPLQLVWURHOpFWULFRDQWHVGHUHDOL]DUPDQWHQLPLHQWRDOD
aspiradora. El no seguir estas indicaciones puede provocar lesiones personales
RGHVFDUJDVHOpFWULFDV
RESOLUCIÓN DE PROBLEMAS
Pasadores

-18-
PROBLEMA POSIBLE CAUSA SOLUCIÓN
La aspiradora no
enciende.
La batería puede estar agotada.
Recargue la batería de acuerdo a las
instrucciones.
Está usando el cargador
incorrecto.
Asegúrese de usar solo el cargador
incluido con su producto.
La aspiradora de mano no está
instalada correctamente.
Retire la aspiradora de mano y vuelva
DFRORFDUODDVHJXUiQGRVHGHTXHHVWp
bien colocada.
El conector de carga no está
completamente enchufado a la
base de carga.
Asegúrese de que el conector de carga
HVWpFRPSOHWDPHQWHLQVHUWDGRHQOD
base de carga.
El enchufe de carga no está
completamente enchufado a la
toma de corriente.
Asegúrese de que el enchufe de carga
HVWpFRPSOHWDPHQWHHQFKXIDGRDOD
toma de corriente.
El indicador
de carga de la
batería no se
enciende.
El adaptador de carga no está
enchufado.
Cerciórese de que el adaptador de
FDUJDHVWpHQFKXIDGRFRUUHFWDPHQWHHQ
la toma de pared y al puerto de carga en
la parte inferior del adaptador de carga.
Hay escombros acumulados en
los contactos de carga de metal
en la aspiradora manual, el
cuerpo principal y el adaptador
de carga.
Asegúrese de que no se acumulen
residuos en los contactos del cargador
de metal en la aspiradora manual,
el cuerpo principal y el adaptador de
carga.
La toma de pared no está
conectada a la red.
$VHJ~UHVHGHTXHODWRPDHVWp
suministrando energía al cargador.

-19-
El cepillo
motorizado no
gira.
El rodillo está atascado.
Quite la obstrucción. Siga las
instrucciones.
Se necesita restablecer el rodillo
del cepillo.
Apague la unidad y retire la obstrucción,
OXHJRHQFLpQGDODQXHYDPHQWH
El rodillo del cepillo no está bien
instalado.
Retire el rodillo del cepillo y vuelva a
instalarlo siguiendo las instrucciones.
La aspiradora
no succiona o lo
hace con muy
poca fuerza.
La taza para polvo está lleno. Vacíe la taza para polvo.
6HGHEHOLPSLDUHO¿OWUR
Siga las instrucciones de limpieza del
¿OWUR
(O¿OWURGHEHFDPELDUVH
Puede comprar en línea en www.
vacmaster.com o llamando al (866) 384-
8432.
La batería puede estar agotada.
Recargue la batería de acuerdo a las
instrucciones.
La taza para polvo no está bien
instalada.
5HYLVHTXHODWD]DSDUDSROYRHVWpELHQ
instalada y bien ajustada en su lugar.
Hay un escape
para polvo desde
la aspiradora.
(O¿OWURQRHVWiLQVWDODGRRHVWi
instalado de forma incorrecta.
5HYLVHTXHHO¿OWURHVWpELHQLQVWDODGR
(O¿OWURHVWiGDxDGR\GHEH
cambiarse.
Puede comprar en línea en www.
vacmaster.com o llamando al (866) 384-
8432.
Taza para polvo instalada
incorrectamente.
Coloque la taza para polvo
FRUUHFWDPHQWH\DM~VWHOD¿UPHPHQWHHQ
su lugar.
La aspiradora se
apaga sola.
La batería puede estar agotada.
Recargue la batería de acuerdo a las
instrucciones.
El rodillo del cepillo está atascado
y el sistema de protección del
motor está activado.
Mientras está apagado, elimine la
obstrucción y luego encienda la unidad
nuevamente.
Si tiene más preguntas, llame a nuestro equipo de soporte al (866) 384-8432.
