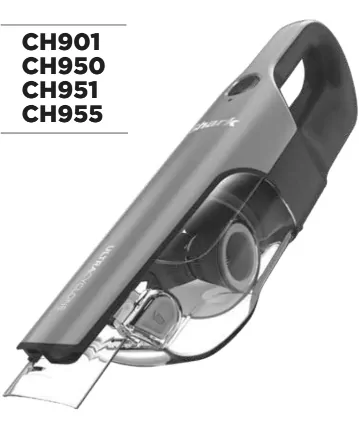
Shark ULTRACYCLONETM
CH901, CH950, CH951, CH955
WARNING
To reduce the risk of injury, fire, electric shock and property damage resulting from improper use of the appliance, carefully observe the following instructions. This unit contains electrical connections and moving parts that potentially present risk to the user. POWER SUPPLY, CHARGING ADAPTER AND VACUUM CONTAIN ELECTRICAL CONNECTIONS. WHEN USING AN ELECTRICAL APPLIANCE, BASIC PRECAUTIONS SHOULD ALWAYS BE FOLLOWED, INCLUDING THE FOLLOWING:
- There are NO serviceable parts.
- DO NOT use to vacuum any liquids.
- DO NOT immerse in water or other liquids.
- If vacuum is damaged, discontinue use. To avoid fire, explosion, or injury, inspect vacuum and charging dock for any damage before use. DO NOT use damaged vacuum or charging dock.
- DO NOT use outdoors or on wet surfaces. Use only on dry surfaces.
- If vacuum cleaner is not working as it should, or has been dropped, damaged, left outdoors, or immersed in water, return it to SharkNinja for examination, repair, or adjustment.
- DO NOT handle charger or vacuum cleaner with wet hands.
- DO NOT leave vacuum cleaner unattended while powered on.
- Keep vacuum away from heated surfaces.
- Always turn off vacuum before connecting charging adapter.
- For CH901 use only E-TEK ZD006C096050USE OR DK12-096045A-U charger and Shark batteries. Other types of batteries may burst, causing injury and damage.
- For CH950, CH951, CH955 use only E-TEK ZD012S133075USD OR DK12-133075A-U charger and Shark batteries. Other types of batteries may burst, causing injury and damage.
- Use charging dock on flat and stable surfaces only.
- DO NOT incinerate appliance, even if it is severely damaged, as lithium-ion battery may explode in a fire.
GENERAL USE
- DO NOT carry the charger by the cord or yank to disconnect from an outlet; instead, grasp the plug and pull to disconnect.
- Keep charger cord away from heated surfaces.
- Use only as described in this manual.
- Keep your work area well lit.
- To avoid unintentional starting, always turn off the vacuum cleaner before picking it up or carrying it, and before attaching or detaching the charger, dust cup, filter, or any accessories.
- DO NOT put any objects into openings.
- DO NOT use if any opening is blocked; keep free of dust, lint, hair, or anything that may reduce airflow.
- DO NOT use without dust cup and filter in place.
- Persons with reduced physical, sensory, or mental capabilities may only use the vacuum with supervision or prior safety instruction and an understanding of the hazards involved. Children may not clean or maintain the vacuum without supervision. This vacuum is not a toy.
- DO NOT use if airflow is restricted; if the air paths become blocked, turn off the vacuum cleaner. Clear all obstructions and power on again.
- Keep nozzle away from hair, face, fingers, uncovered feet, or loose clothing.
- Only use manufacturer's recommended attachments.
- DO NOT charge at temperatures below 50°F (10°C) or above 104°F (40°C). Charging improperly or at temperatures outside of the specified range may damage the battery and increase the risk of fire.
- Store the appliance indoors. DO NOT use or store it below 37.4°F (3°C). Ensure the appliance is at room temperature before operating.
DUST CUP/FILTERS/ACCESSORIES
Before turning on the vacuum:
- Make sure filter is thoroughly dry after routine cleaning.
- Make sure dust cup and filter are in place after routine maintenance.
- Make sure accessories are free of blockages and keep openings away from face and body.
- Use only Shark brand filters and accessories.
GENERAL CLEANING
- DO NOT vacuum up hard or sharp objects such as glass, nails, screws, or coins that could damage the vacuum cleaner.
- DO NOT vacuum up drywall dust, fireplace ash or embers.
- DO NOT use as an attachment to power tools for dust collection.
- DO NOT vacuum up smoking or burning objects such as hot coals, cigarette butts, or matches.
- DO NOT vacuum up flammable or combustible materials (e.g., lighter fluid, gasoline, or kerosene) or use vacuum in areas where they may be present.
- DO NOT vacuum up toxic solutions (e.g., chlorine bleach, ammonia, or drain cleaner).
- DO NOT use in an enclosed space where vapors are present from paint, paint thinner, moth-proofing substances, flammable dust, or other explosive or toxic materials.
- DO NOT immerse vacuum cleaner in water or other liquids.
- Use extra care when cleaning on stairs.
LITHIUM-ION BATTERY
The battery is the power source for the appliance.
- DO NOT carry the appliance with your finger on the power button.
- DO NOT charge appliance with the power on.
- Use only the included charging dock to charge. Use of incorrect charger may create a risk of fire.
- Use appliance only with included lithium-ion battery. Use of any other battery may create a risk of injury and fire.
- Under abusive conditions, liquid may be ejected from the battery. Avoid contact with liquid as it may cause irritation or burns. If contact occurs, flush with water. If liquid contacts eyes, seek medical help.
- Store the appliance indoors. To maintain battery life, DO NOT use or store battery at temperatures below 37.4°F (3°C) or above 104°F (40°C).
- DO NOT expose appliance to fire or temperature above 266°F (130°C) as it may cause explosion.
- There are NO serviceable parts. To ensure safety, DO NOT modify or attempt to repair the appliance.
- DO NOT use a battery pack or appliance that is damaged or modified. Damaged or modified batteries may exhibit unpredictable behavior resulting in fire, explosion, or risk of injury.
IMPORTANT SAFETY INSTRUCTIONS
FOR HOUSEHOLD USE ONLY
READ CAREFULLY BEFORE USE
SAVE THESE INSTRUCTIONS
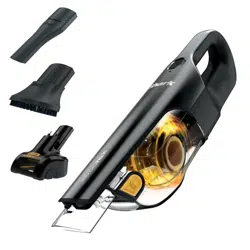
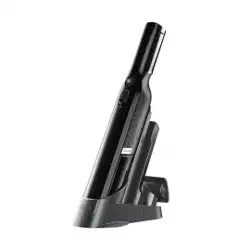
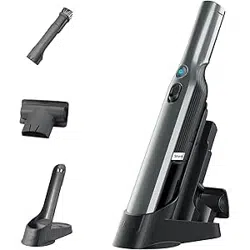
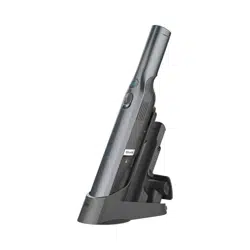
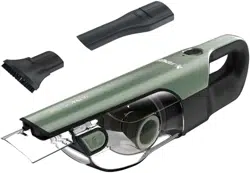
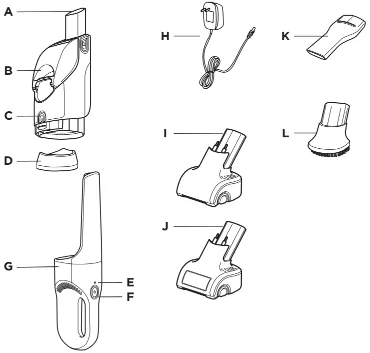
FEATURES
A Air-Intake Nozzle
B Dust Cup
C Dust Cup Release Button
D Washable Filter
E Charging Indicator Light
F On/Off Switch
G Vacuum Body
H Charging Adapter
I Motorized Brush
J Self-Cleaning Motorized Brush
K Crevice Tool
L Scrubbing Brush
Accessories vary by model.
USING YOUR SHARK VACUUM
NOTE: For maintenance, see reverse side.
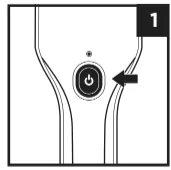
- Press Power button.
- Run the nozzle over the surface to be cleaned.

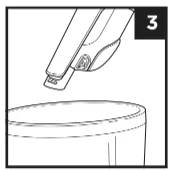
- To empty dust cup, hold your vacuum over the trash.
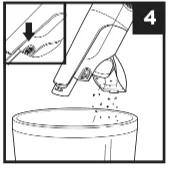
- Press the CleanTouch Dirt Eject button to open and empty the dust cup.
CHARGING YOUR SHARK VACUUM
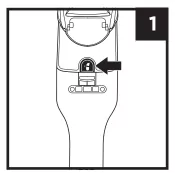
- Insert the charging adapter plug into the port on the handle.
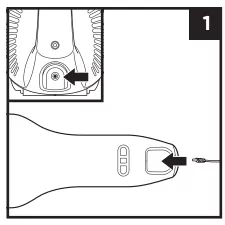
- Plug the charging adapter into a wall outlet. The charging indicator light will blink. Light will go out when fully charged.
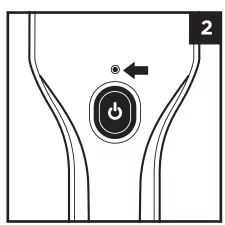
NOTE: Lithium-ion battery takes approximately 6 hours to charge completely.
MAINTENANCE/ACCESSORIES/TROUBLESHOOTING
CLEANING THE DUST CUP
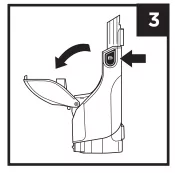
- Press the dust cup release button and pull out the dust cup.
- Carefully remove the dust cup filter.
- To open and empty the dust cup, hold it over the trash, then press the CleanTouch Dirt Eject button. (Complete instructions on reverse side.)
- Hand-rinse the filter in cold water and let it air-dry for at least 24 hours before reinstalling. Air-dry only. DO NOT use a hair dryer or clothes dryer.
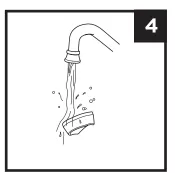
- To clean the interior of the dust cup, rinse it with water. Place it on its side with the lid open to air-dry for at least 24 hours before reinstalling.
- When the filter is dry, reinstall it in the dust cup, then reattach the dust cup. DO NOT wash any parts or accessories in a dishwasher.
NOTE: For best results, replace the filter every 6 to 9 months.
INSERTION AND REMOVAL OF ACCESSORIES
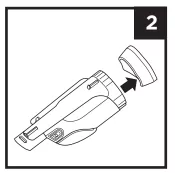
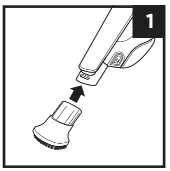
- To install an accessory, align it with the nozzle, then slide it on.
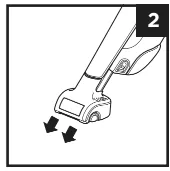
- To remove an accessory, slide it straight off the nozzle.
TROUBLESHOOTING
Problem: The vacuum will not operate.
Solution: Battery needs to be recharged. Lithium-ion battery takes approximately 6 hours to charge completely. Try using a different electrical outlet to charge.
Problem: Motorized brush will not work.
Solution: The metal contact pins on the motorized brush are not in contact with the connector slots on the vacuum. Remove the motorized brush and reinsert firmly into the air-intake nozzle. The motorized brush is blocked. Carefully remove all lint, hair, or other debris from the motorized brush.
Problem: Vacuum will not pick up or suction is weak.
Solution: Dust cup is full. Empty the dust cup. Dust cup filter needs cleaning or replacement. Clean or replace the dust cup filter. Vacuum needs to be recharged.
Problem: Dust is escaping from the vacuum.
Solution: Empty the dust cup. The dust cup filter is not installed correctly. Remove it and reinsert it. The dust cup filter has a hole or a puncture and needs to be replaced. An obstruction may be blocking the door from closing correctly. Clear any obstructions and ensure the dust cup door is completely closed.
BATTERY INDICATOR
- No Light (Low Battery): Press the power button. If the unit doesn't turn on then the battery power is too low. Please charge before use.
- Slow Flashing Light while plugged in (Vacuum Charging): To charge the vacuum, connect charging cord to unit and plug into wall outlet. The light will fade in and out slowly as the vacuum charges.
- Fast Flashing Light in use (Low Battery): If the light flashes quickly while the unit is in use, the battery power is low. Recharge the unit.
- Solid Light (Fully Charged): When the vacuum is fully charged, the indicator light will illuminate steadily then turn off. It takes approximately 6 hours for a full charge.
- Five Flashes after plugging in (Not Charging): If the wrong charger is used, the light will blink five times and then stop. Use the included charger.
TWO-YEAR LIMITED WARRANTY
The Two (2) Year Limited Warranty applies to purchases made from authorized retailers of SharkNinja Operating LLC. Warranty coverage applies to the original owner and to the original product only and is not transferable.
SharkNinja warrants that the unit shall be free from defects in material and workmanship for a period of two (2) years from the date of purchase when it is used under normal household conditions and maintained according to the requirements outlined in the Owner's Guide, subject to the following conditions and exclusions.
What is covered by this warranty?
- The original unit and/or non-wearable components deemed defective, in SharkNinja's sole discretion, will be repaired or replaced up to two (2) years from the original purchase date.
- In the event a replacement unit is issued, the warranty coverage ends six (6) months following the receipt date of the replacement unit or the remainder of the existing warranty, whichever is later. SharkNinja reserves the right to replace the unit with one of equal or greater value.
What is not covered by this warranty?
- Normal wear and tear of wearable parts (such as foam filters, HEPA filters, pads, etc.), which require regular maintenance and/or replacement to ensure the proper functioning of your unit, are not covered by this warranty. Replacement parts are available for purchase at sharkaccessories.com.
- Any unit that has been tampered with or used for commercial purposes.
- Damage caused by misuse (e.g., vacuuming up water or other liquids), abuse, negligent handling, failure to perform required maintenance (e.g., not cleaning the filters), or damage due to mishandling in transit.
- Consequential and incidental damages.
- Defects caused by repair persons not authorized by SharkNinja. These defects include damages caused in the process of shipping, altering, or repairing the SharkNinja product (or any of its parts) when the repair is performed by a repair person not authorized by SharkNinja.
- Products purchased, used, or operated outside North America.
How to get service
If your appliance fails to operate properly while in use under normal household conditions within the warranty period, visit sharkclean.com/support for product care and maintenance self-help. Our Customer Service Specialists are also available at 1-800-798-7398 to assist with product support and warranty service options, including the possibility of upgrading to our VIP warranty service options for select product categories.
SharkNinja will cover the cost for the customer to send in the unit to us for repair or replacement. A fee of $24.95 (subject to change) will be charged when SharkNinja ships the repaired or replacement unit.
How to initiate a warranty claim
You must call 1-800-798-7398 to initiate a warranty claim. You will need the receipt as proof of purchase. A Customer Service Specialist will provide you with return and packing instruction information.
How state law applies
This warranty gives you specific legal rights, and you also may have other rights that vary from state to state. Some states do not permit the exclusion or limitation of incidental or consequential damages, so the above may not apply to you.
To better assist you, we ask that you register the product and have it with you when you call.
BATTERY REMOVAL AND DISPOSAL
This product uses a rechargeable and reusable lithium-ion battery. When the battery no longer holds a charge, it should be removed from the vacuum and recycled. DO NOT incinerate or compost the battery.
When your lithium-ion battery needs to be replaced, dispose of it or recycle it in accordance with local ordinances or regulations. In some areas, it is illegal to place spent lithium-ion batteries in the trash or in a municipal solid waste stream. Return spent battery to an authorized recycling center or to retailer for recycling. Contact your local recycling center for information on where to drop off the spent battery.
For more information on battery removal for disposal, please visit sharkclean.com/batterysupport.
The RBRC (Rechargeable Battery Recycling Corporation) seal on the lithium-ion battery indicates that the costs to recycle the battery at the end of its useful life have already been paid by SharkNinja. In some areas, it is illegal to place spent lithium-ion batteries in the trash or municipal solid waste stream, and the RBRC program provides an environmentally conscious alternative.
LITHIUM-ION BATTERY MUST BE RECYCLED OR DISPOSED OF PROPERLY.
REGISTER YOUR PURCHASE
registeryourshark.com
Scan QR code using mobile device.
TECHNICAL SPECIFICATIONS
- CH901: 7.2V Charging Adapter part number E-TEK ZD006C096050USE or DK12-096045A-U
- CH950, CH951, CH955: 10.8V Charging Adapter part number E-TEK ZD012S133075USD or DK12-133075A-U
© 2020 SharkNinja Operating LLC. Needham, MA 02494 / Ville St. Laurent, Québec H4S 1A7. 1-800-798-7398. sharkclean.com
SHARK is a registered trademark of SharkNinja Operating LLC. CLEANTOUCH and SHARK ULTRACYCLONE are trademarks of SharkNinja Operating LLC. RBRC is a trademark of Rechargeable Battery Recycling Corporation.
For Shark | Ninja U.S. Patent information, visit sharkninja.com/uspatents. Printed in China. Illustrations may differ from actual product.