PRETTYCARE Robot Vacuum Cleaner
User Manual
Thank you for choosing PRETTYCARE robot vacuum cleaner
R1 MAX
Contents
01: Important Safety Instructions
04: Product List
05: Product Introduction
09: Installaton & Start
12: Connect to the APP
13: Instructions
17: Maintenance
20: Product parameters
21: Troubleshooting
1
Warning
Important Safety Instructions
• This product is only used for floor cleaning in the home environment, do not use it outdoors (such as open balconies), non-floor (such as sofas), commercial or
industrial environments
• Do not use it in a suspended environment (such as duplex floors, open balconies, furniture tops) without guardrails
• Do not use or deposit in environments above 40°C, below 0°C, or in environments with any liquid and sticky substances on the ground
• Please hang up the ground cables at home before use to avoid dragging the cables when the vacuum cleaner is running.
• Please put away fragile items and sundries (such as vases, plastic bags, etc.) placed on the ground to avoid damage to valuables at home when the vacuum cleaner
is blocked or slightly collided during operation
• Do not allow persons with physical, mental or sensory disabilities, including children, to use or operate this product.
• Do not use with damaged cord or plug. Do not use any other power supply cord. For replacement cords, please contact Customer Care to ensure proper selection of
country specific power supply cord.
• Do not let children use the robot as a toy. Please supervise children and pets to keep them away when the it is working.
• Do not place the main brush cleaning tool in an area that can be touched by children.
• Do not place any objects (including children, pets) on the stationary or moving main unit.
• Do not sit or stand on the vacuum cleaner.
• Do not let human or pet hair, fingers and other parts close to the vacuum port of the machine when the it is working.
• Do not use to sweep any burning objects (such as unextinguished cigarette butts)
• Do not use for cleaning long-haired carpets (some dark-colored carpets may not be cleaned properly)
• Do not let the vacuum cleaner pick up foreign objects or sharp objects (such as decoration waste, glass, iron nails, etc.)
• Do not use the protective cover of the laser ranging sensor, the upper cover of the main unit and the collision buffer as a handle to carry the machine.
• Do not clean or maintain the main unit and the charging stand when the power is turned off or off.
• Use only manufacturer's recommended attachments.
• Do not wipe any part of this product with a damp cloth or any liquid.
• Please let all filters air-dry completely before reinstalling them to prevent liquid from being drawn into electric parts.
• Do not put any object into openings. Do not use with any opening blocked; keep free of dust, lint, hair, and anything that may reduce air flow.
• Prevent unintentional staring. Ensure the switch is the off-position before connecting to battery pack, picking up or carrying the application.Carrying the application
with your finger on the switch or energizing application that have the switch on invites accidents.
•Do not handle charger, including charger plug, and charger terminals with wet hands.
• Do not use without dust bag.

2
Warning
Important Safety Instructions
• For use only with PRETTYCARE R1 MAX charger. Recharge only with the charger specified by the manufacturer.A charger that is suitable for one type of battery
pack may create a risk of fire when used with another battery pack.
• Use appliances only with specifically designated battery packs. Use of any other battery packs may create a risk of injury and fire.
• Turn off the appliance before making any adjustments, changing accessories, or storing appliance. Such preventive safety measures reduce the risk of starting the
appliance accidentally.
• When battery pack is not in use, keep it away from other metal objects, like paper clips, coins, keys, nails, screws or other small metal objects, that can make a
connection from one terminal to another. Shorting the battery terminals together may cause burns or a fire.
•Under abusive conditions, liquid may be ejected from the battery; avoid contact. If contact accidentally occurs, flush with water. If liquid contacts eyes, additionally
seek medical help. Liquid ejected from the battery may cause irritation or burns.
•DO NOT use in the following areas: a) Wet or damp surfaces.
b) Outdoor areas near fireplaces with unobstructed entrances.
c) Spaces that are enclosed and may contain explosive or toxic fumes or vapors (lighter fluid, gasoline, kerosene, paint, paint thinners, mothproofing substances, or.
flammable dust).
d) In an area with a space heater.
e) Near fireplaces with unobstructed entrances.
• DO NOT use if robotic vacuum cleaner not working as it should, or has been dropped, damaged, left outdoors, or dropped into water.
Do not use a battery pack or appliance that is damaged or modified. Damaged or modified batteries may exhibit unpredictable behavior resulting in fire, explosion or
risk of injury.
Do not expose a battery pack or appliance to fire or excessive temperature. Exposure to fire or temperature above 130°C (266°F) may cause explosion.
• Follow all charging instructions and do not charge the battery pack or appliance outside of the temperature range specified in the instructions. Charging improperly or
at temperatures outside of the specified range may damage the battery and increase the risk of fire.
• Have servicing performed by a qualified repair person using only identical replacement parts. This will ensure that the safety of the product is maintained.
• Do not modify or attempt to repair the appliance or the battery pack except as indicated in the instructions for use and care.
• Place the cords from other appliances out of the area to be cleaned.
• LASER WARNING: THIS PRODUCT HAS A CLASS 1 LASER. IT IS SAFE UNDER REASONABLY FORESEEABLE CONDITIONS (AS DEFINED IN THESE
INSTRUCTIONS.) ALWAYS TURN OFF THE POWER BEFORE LIFTING THE ROBOTIC VACUUM CLEANER OR PERFORMING ANY MAINTENANCE ON IT. DO
NOT LOOK DIRECTLY INTO LASER.
• Please use this product in accordance with the instructions in the manual, any loss and injury caused by improper use shall be borne by the user.
3
Warning
Important Safety Instructions
1. Battery
Important: batteries and products containing batteries are subject to strict transport regulations. If the product (including batteries) needs to be transported for
long-term storage, travel, or any other reason, the following shipping instructions must be followed:
• Remove the battery from the robot.
• Apply a piece of insulating tape to the electrodes of the battery.
• Reinsert the battery with the tape and close the battery cover.
• When shipping, pack the product in its original packaging or suitable packaging.
• Can only be shipped by land, not by air.
2. Storage battery
• If the product needs to be stored for a long time, please remove the battery first.
• Battery removal steps:
① Turn the machine over to the back.
② Use a screwdriver or other suitable tool to remove the two battery cover screws.
③ Take out the battery cover.
④ Take out the battery.
• Store the product and battery in a cool, dry place.
3. Remove the battery
• Before disposing of the appliance, the battery must be removed from the appliance.
• The appliance must be switched off when removing the battery.
• Batteries should be disposed of safely.
4
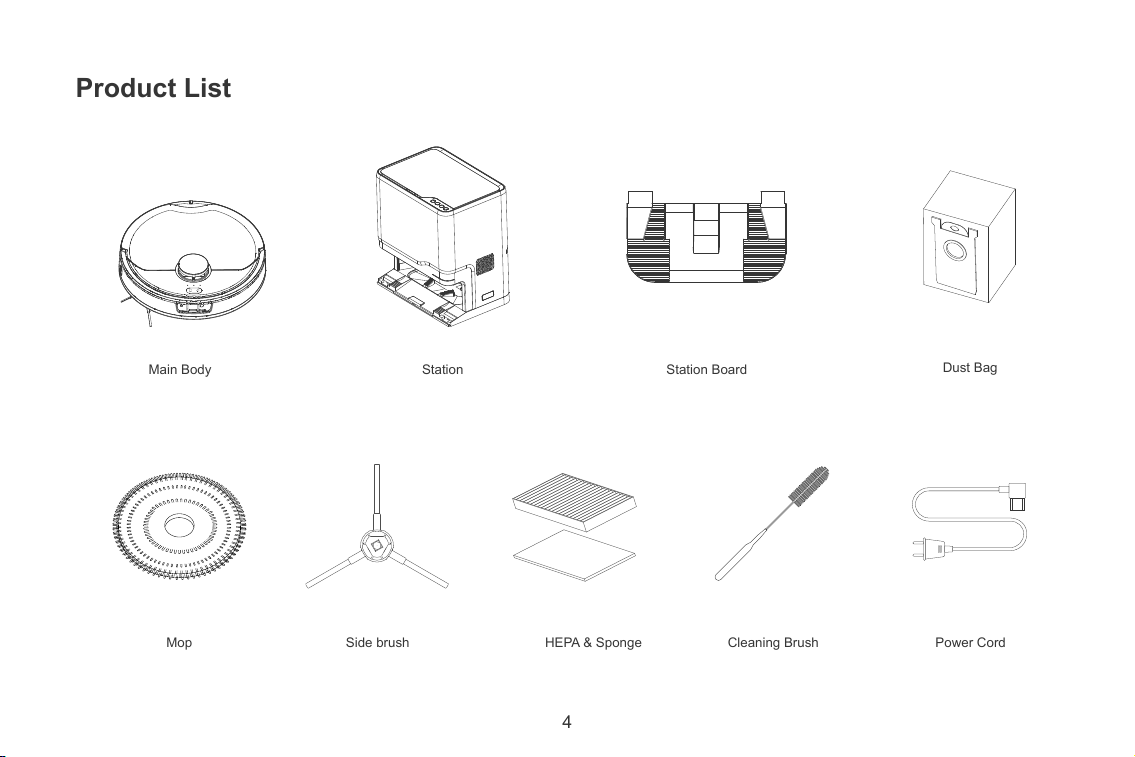
Product List
Main Body Station Station Board
Cleaning Brush
Dust Bag
Power CordMop Side brush HEPA & Sponge

5
Collision Sensor
Microphone
Side brush
WiFi connection
Press and hold 3S at the same time
· blue light flashed slowly: Wi-Fi reset in progress
Recharge
· Short press to start/stop recharging
Cleaning/Booting
· Short press to start cleaning
· Long press to turn on or off
Laser Radar
Cover
Note: Press any key to stop during cleaning or recharging.
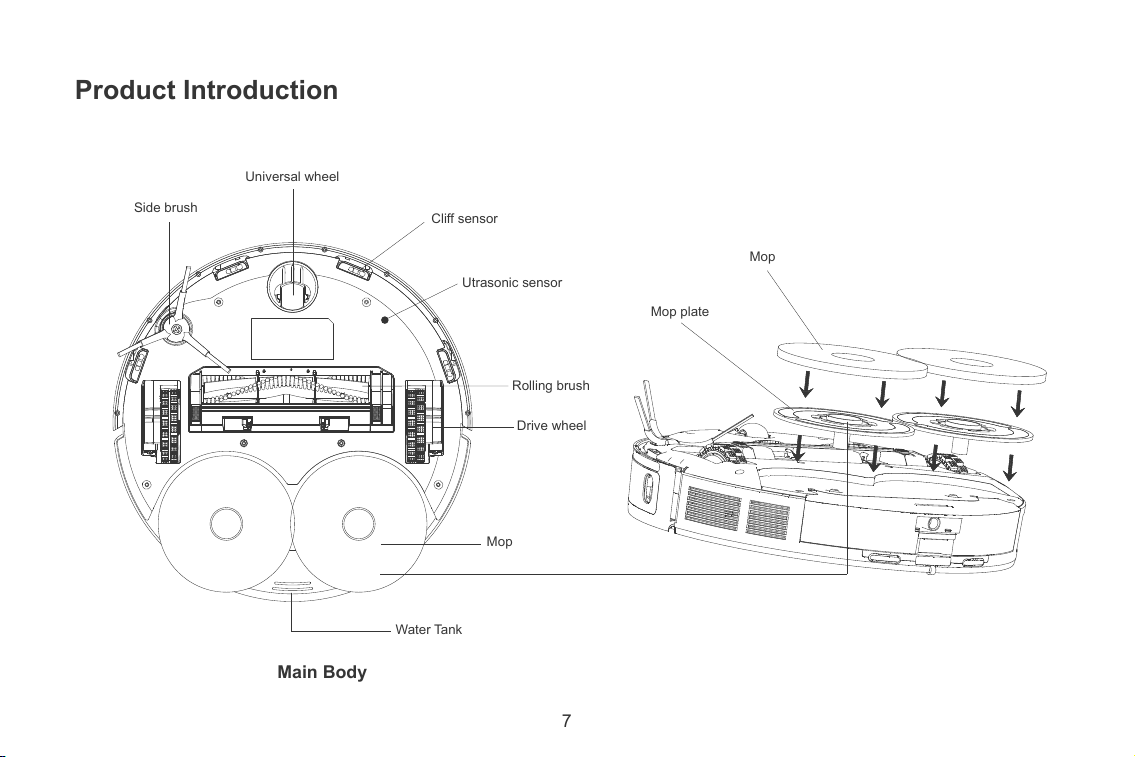
Main Body
Product Introduction
State
WiFi connection
Booting
Standby
Fault
Recharging
Charging
Full charging
Updating
Turning off
Dormant
Recharging light
blue light flashed slowly
blue light breathing
blue light always on
red light flashing
blue light always on
blue light always on
blue light always on
light off
light off
light off
Starting light
blue light flashed slowly
blue light breathing
blue light always on
red light flashing
Light off
light off
blue light always on
blue light flashing
light off
light off
6
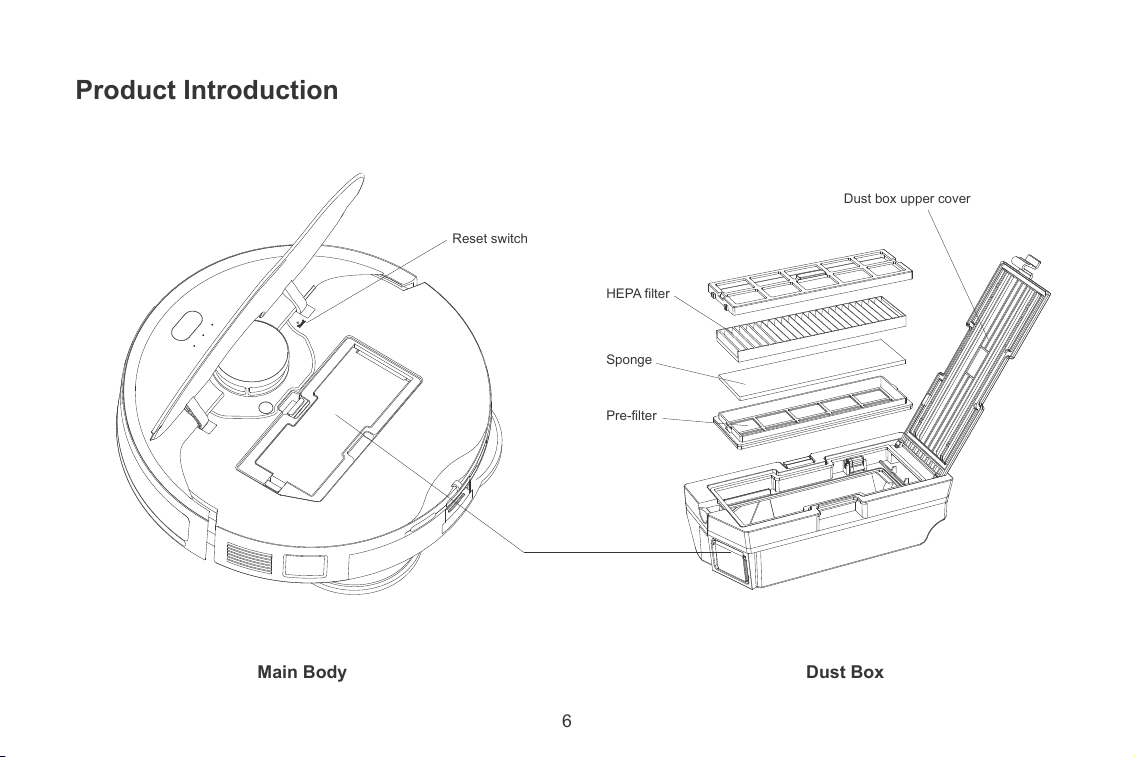
Main Body Dust Box
Dust box upper cover
Reset switch
Pre-filter
HEPA filter
Sponge
Product Introduction
7
Main Body
Universal wheel
Side brush
Cliff sensor
Utrasonic sensor
Rolling brush
Drive wheel
Mop
Water Tank
Mop plate
Mop
Product Introduction
• For use only with PRETTYCARE R1 MAX charger. Recharge only with the charger specified by the manufacturer.A charger that is suitable for one type of battery
pack may create a risk of fire when used with another battery pack.
• Use appliances only with specifically designated battery packs. Use of any other battery packs may create a risk of injury and fire.
• Turn off the appliance before making any adjustments, changing accessories, or storing appliance. Such preventive safety measures reduce the risk of starting the
appliance accidentally.
• When battery pack is not in use, keep it away from other metal objects, like paper clips, coins, keys, nails, screws or other small metal objects, that can make a
connection from one terminal to another. Shorting the battery terminals together may cause burns or a fire.
•Under abusive conditions, liquid may be ejected from the battery; avoid contact. If contact accidentally occurs, flush with water. If liquid contacts eyes, additionally
seek medical help. Liquid ejected from the battery may cause irritation or burns.
•DO NOT use in the following areas: a) Wet or damp surfaces.
b) Outdoor areas near fireplaces with unobstructed entrances.
c) Spaces that are enclosed and may contain explosive or toxic fumes or vapors (lighter fluid, gasoline, kerosene, paint, paint thinners, mothproofing substances, or.
flammable dust).
d) In an area with a space heater.
e) Near fireplaces with unobstructed entrances.
• DO NOT use if robotic vacuum cleaner not working as it should, or has been dropped, damaged, left outdoors, or dropped into water.
Do not use a battery pack or appliance that is damaged or modified. Damaged or modified batteries may exhibit unpredictable behavior resulting in fire, explosion or
risk of injury.
Do not expose a battery pack or appliance to fire or excessive temperature. Exposure to fire or temperature above 130°C (266°F) may cause explosion.
• Follow all charging instructions and do not charge the battery pack or appliance outside of the temperature range specified in the instructions. Charging improperly or
at temperatures outside of the specified range may damage the battery and increase the risk of fire.
• Have servicing performed by a qualified repair person using only identical replacement parts. This will ensure that the safety of the product is maintained.
• Do not modify or attempt to repair the appliance or the battery pack except as indicated in the instructions for use and care.
• Place the cords from other appliances out of the area to be cleaned.
• LASER WARNING: THIS PRODUCT HAS A CLASS 1 LASER. IT IS SAFE UNDER REASONABLY FORESEEABLE CONDITIONS (AS DEFINED IN THESE
INSTRUCTIONS.) ALWAYS TURN OFF THE POWER BEFORE LIFTING THE ROBOTIC VACUUM CLEANER OR PERFORMING ANY MAINTENANCE ON IT. DO
NOT LOOK DIRECTLY INTO LASER.
• Please use this product in accordance with the instructions in the manual, any loss and injury caused by improper use shall be borne by the user.
8
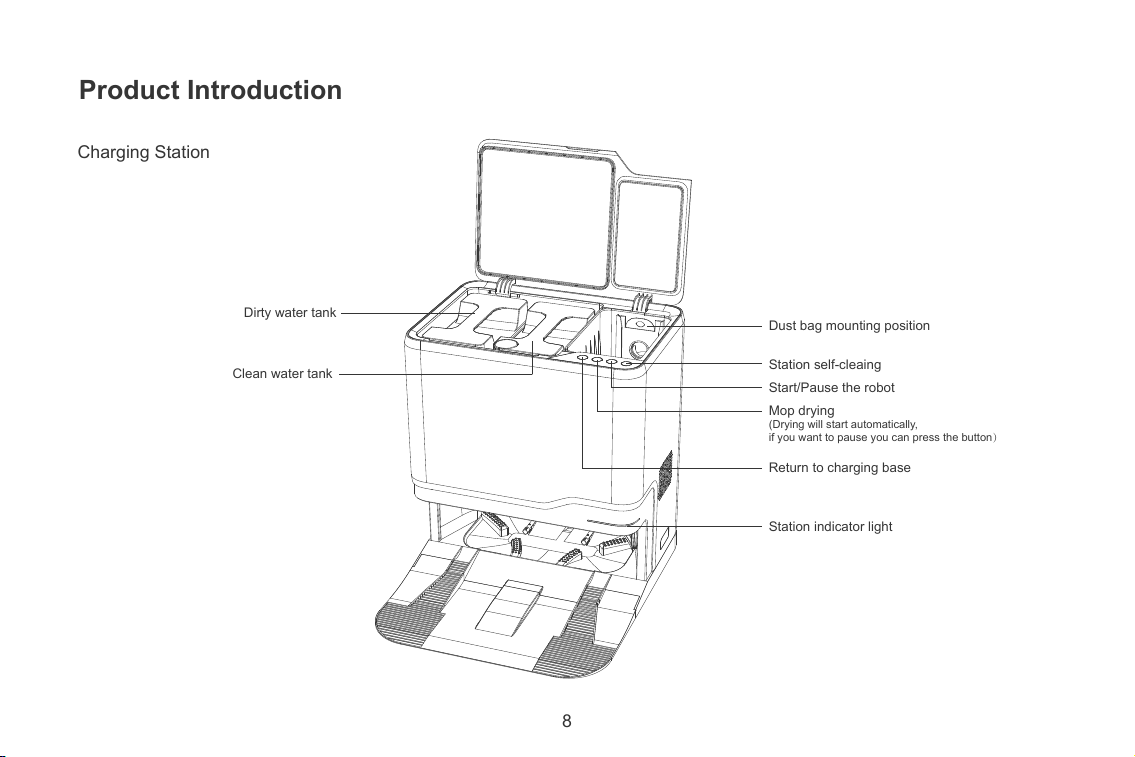
Charging Station
Dust bag mounting position
Station self-cleaing
Start/Pause the robot
Mop drying
(Drying will start automatically,
if you want to pause you can press the button)
Return to charging base
Clean water tank
Dirty water tank
Station indicator light
Product Introduction
9
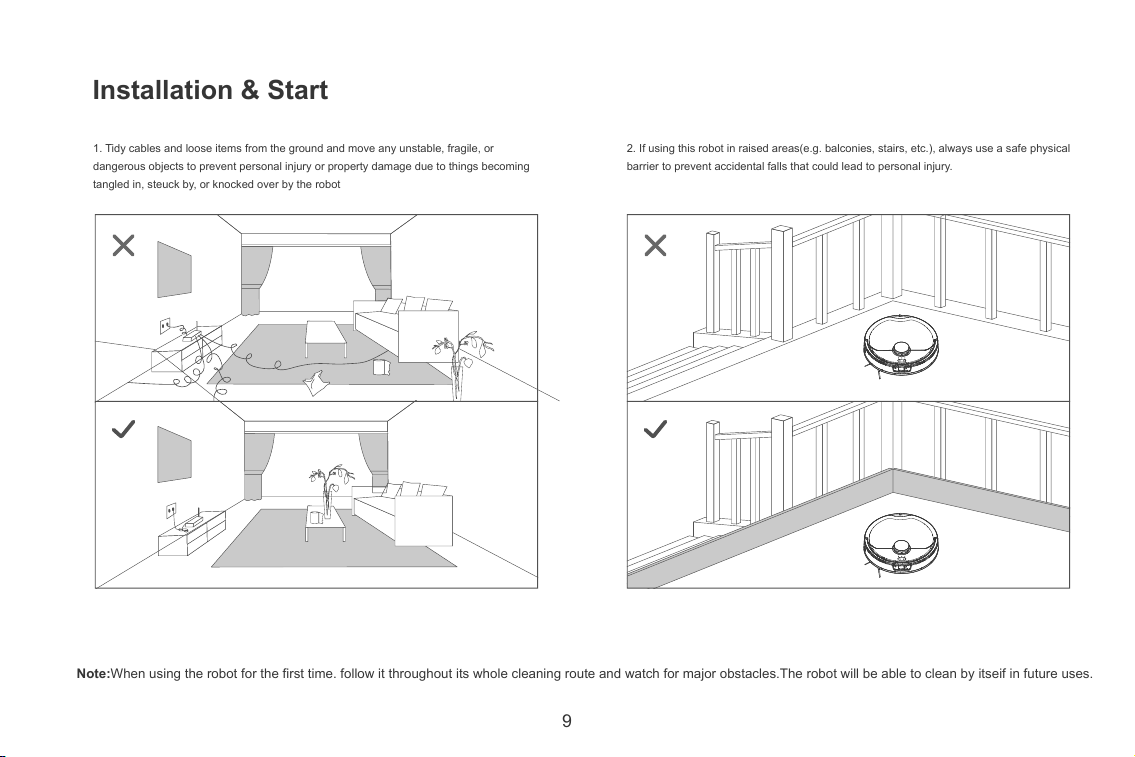
2. If using this robot in raised areas(e.g. balconies, stairs, etc.), always use a safe physical
barrier to prevent accidental falls that could lead to personal injury.
1. Tidy cables and loose items from the ground and move any unstable, fragile, or
dangerous objects to prevent personal injury or property damage due to things becoming
tangled in, steuck by, or knocked over by the robot
Installation & Start
Note:When using the robot for the first time. follow it throughout its whole cleaning route and watch for major obstacles.The robot will be able to clean by itseif in future uses.
10
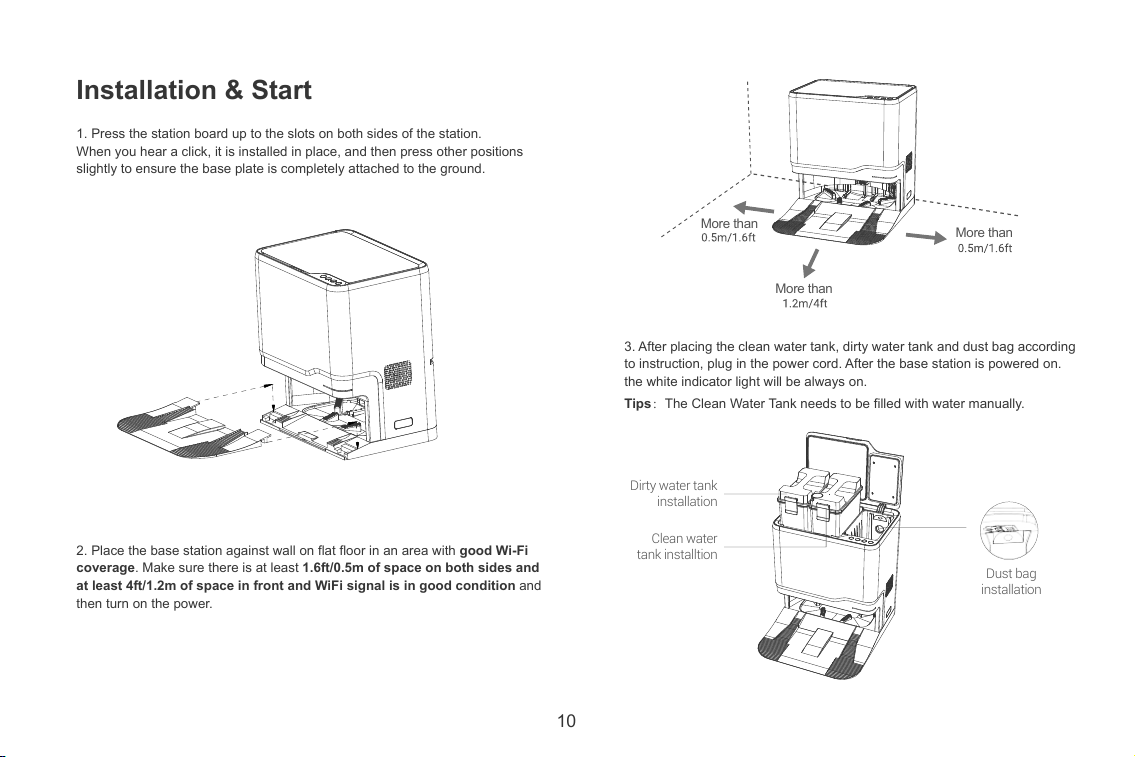
2. Place the base station against wall on flat floor in an area with good Wi-Fi
coverage. Make sure there is at least 1.6ft/0.5m of space on both sides and
at least 4ft/1.2m of space in front and WiFi signal is in good condition and
then turn on the power.
1. Press the station board up to the slots on both sides of the station.
When you hear a click, it is installed in place, and then press other positions
slightly to ensure the base plate is completely attached to the ground.
3. After placing the clean water tank, dirty water tank and dust bag according
to instruction, plug in the power cord. After the base station is powered on.
the white indicator light will be always on.
Tips:The Clean Water Tank needs to be filled with water manually.
Installation & Start
More than
More than
More than
Dust bag
installation
Clean water
tank installtion
Dirty water tank
installation
11
Charging
Installation & Start
Method 1: Manually put the robot back to the base station for charging,
and the robot will prompt "charging".
Method 2: Press the button on the robot to activate the automatic
recharging mode, and the robot will automatically return to the base
station for charging.
Method 3: Press the button on the Base Station to activate the
automatic recharging mode, and the robot will automatically return to the
base station for charging.
Method 4: Click the recharge button on the APP to activate the automatic
recharge mode, and the robot will automatically return to the base station
for charging.
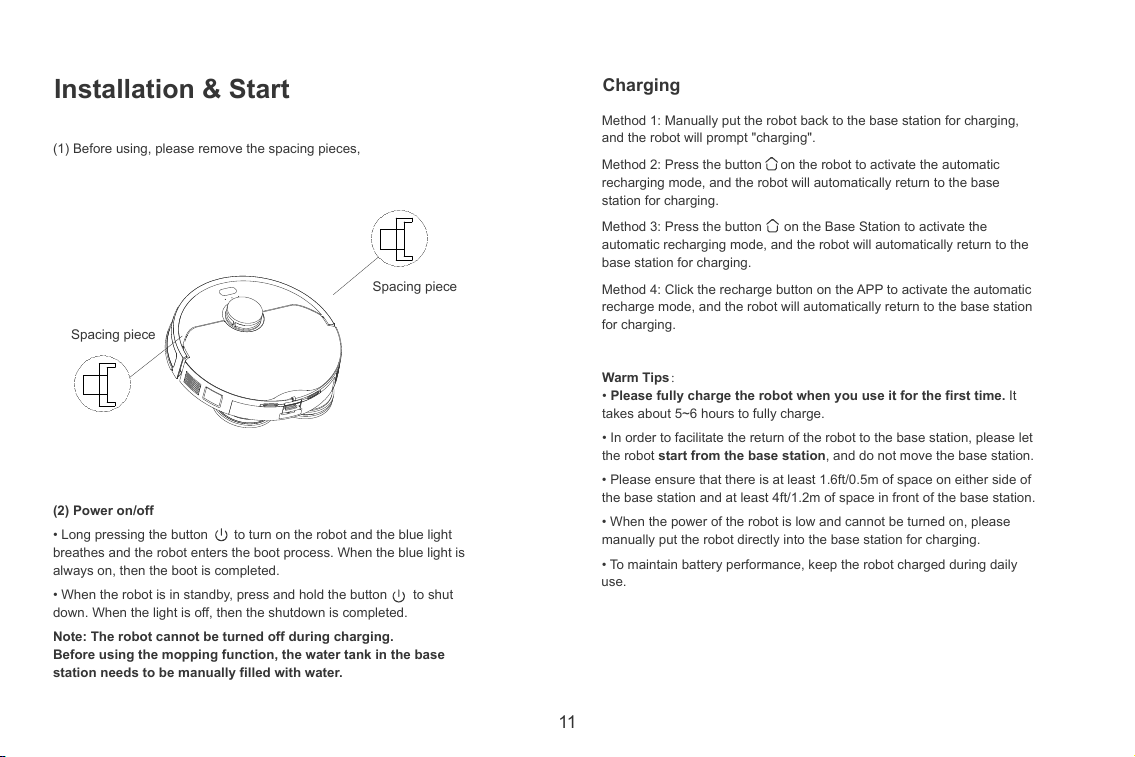
(1) Before using, please remove the spacing pieces,
(2) Power on/off
• Long pressing the button to turn on the robot and the blue light
breathes and the robot enters the boot process. When the blue light is
always on, then the boot is completed.
• When the robot is in standby, press and hold the button to shut
down. When the light is off, then the shutdown is completed.
Note: The robot cannot be turned off during charging.
Before using the mopping function, the water tank in the base
station needs to be manually filled with water.
Spacing piece
Spacing piece
Warm Tips:
• Please fully charge the robot when you use it for the first time. It
takes about 5~6 hours to fully charge.
• In order to facilitate the return of the robot to the base station, please let
the robot start from the base station, and do not move the base station.
• Please ensure that there is at least 1.6ft/0.5m of space on either side of
the base station and at least 4ft/1.2m of space in front of the base station.
• When the power of the robot is low and cannot be turned on, please
manually put the robot directly into the base station for charging.
• To maintain battery performance, keep the robot charged during daily
use.
12
Download the APP
Connect to the App
(1)Scan the QR code or search for "PE HOME" in "APP Store" or "google play" to download the APP.
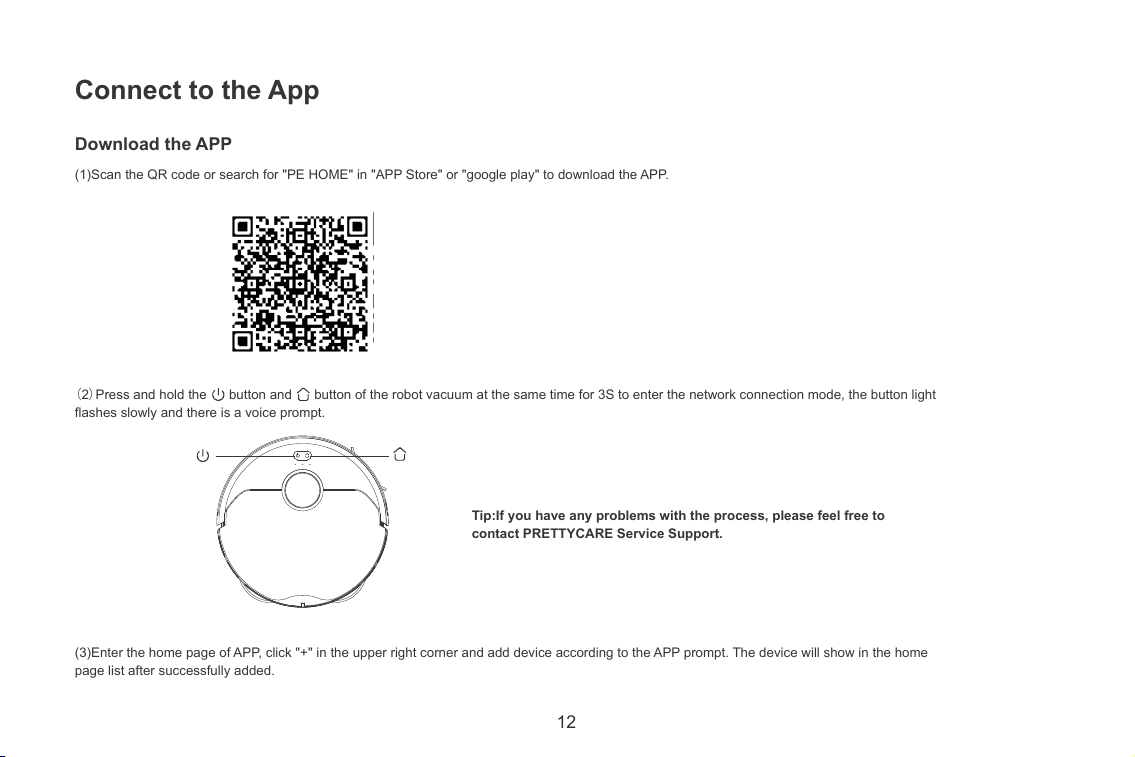
(2)Press and hold the button and button of the robot vacuum at the same time for 3S to enter the network connection mode, the button light
flashes slowly and there is a voice prompt.
(3)Enter the home page of APP, click "+" in the upper right corner and add device according to the APP prompt. The device will show in the home
page list after successfully added.
Tip:If you have any problems with the process, please feel free to
contact PRETTYCARE Service Support.
13
Instructions
Press and hold the button for a few seconds, the robot button light will
turn on, and wait for the completion of the startup voice prompt, then you
can control the robot to work.
(1)Auto Cleaning
① Press the button of the robot vacuum to start the cleaning mode,
and the robot starts to clean.
② Press the button of the charging base lightly, and the robot starts to
clean.
③ There are three cleaning modes available for the APP :
• Sweeping mode: the robot enters sweeping mode, automatically returns
to the base station to empty dust after cleaning.
• Mopping mode: the robot enters mopping mode, automatically returns
to the base station after the mopping.
• Sweeping and Mopping mode: the robot enters sweeping and mopping
mode, automatically returns to the base station to empty dust and then
clean the mop.
Note:
The robot will enter drying mode after each cleaning.(The drying time
takes about two hours,and if you want to pause or abort the drying,
press the Drying Button on the base station)
Note:
• If the power is too low, the cleaning task cannot be performed,
please charge it before starting the cleaning;
• If the power is too low during cleaning, the robot returns to the charging
dock for recharge and resumes cleaning where it left off.
(2)Scheduled Cleaning
Set the scheduled cleaning time on APP. The robot will automatically start
cleaning at the time you set and return to the charging base after
cleaning.
Note:
During the scheduled cleaning period, the robot will not automatically
renew the cleaning and prompt.
(3)Smart Area
① Area Cleaning
After Smart Map generated successfully, you can add an adjustable size
and location cleaning area. The robot will only clean the selected area.
② Designated Room Cleaning
After Smart Map generated successfully, you can divide the map into
different areas according the cleaning needs. You can set one or more
cleaning areas. The robot will only clean the selected area.
③ No-go Zone
You can set areas you don't need to clean or don't want it to enter as
"no-go areas" via the app (e.g. bathrooms, areas you don't want to
disturb, areas with wires and fragile items on the floor, etc.) and the
vacuum robot won't enter the no-go areas.
Note:
• Please make sure the robot has generated the smart map. The No-go
zone will be lost when the map is rebuilt.
• The No-go zone may be lost due to changes in the location of the
self-empty station or furniture. So please try not to move or interfere with
the Robot while it is working.
*Due to the continuous development and upgrade of APP, there may be
slight adjustment of functions and details, please refer to the actual
version.
14
(4)Pause
When the robot is in the cleaning mode, press any key to pause the
cleaning, press the key and the robot will continue to clean, press
the key and the robot will return to the base station and end the
cleaning.
(5)Docking Mode
Auto mode:When the battery power is low, the robot will prompt“Low
power, start docking mode”, and returns to the base station for recharge.
Manual mode: In standby mode, press the back button on the robot or
the base station, or click the back button on the APP. After the voice
prompt“Start docking mode”, the robot will automatically return to the
base station to charge.
(6)Troubleshooting
When an abnormality occurs during the operation of the robot, the
indicator light flashes red quickly and there is a voice prompt. It is in the
fault state. For the solution, please refer to "Troubleshooting"
Note: If you cannot resolve the problem yourself, please feel free to
contact PRETTYCARE service support.
(10)Cleaning mode
Through the APP control, you can choose quiet, standard, strong and
super strong modes, and the default is the standard mode.
(11)Dormant mode
No operation for more than 10 minutes, the robot will automatically enter
hibernation state to save energy. In dormant state, the indicator lights off,
and you can press any key to wake up the robot.
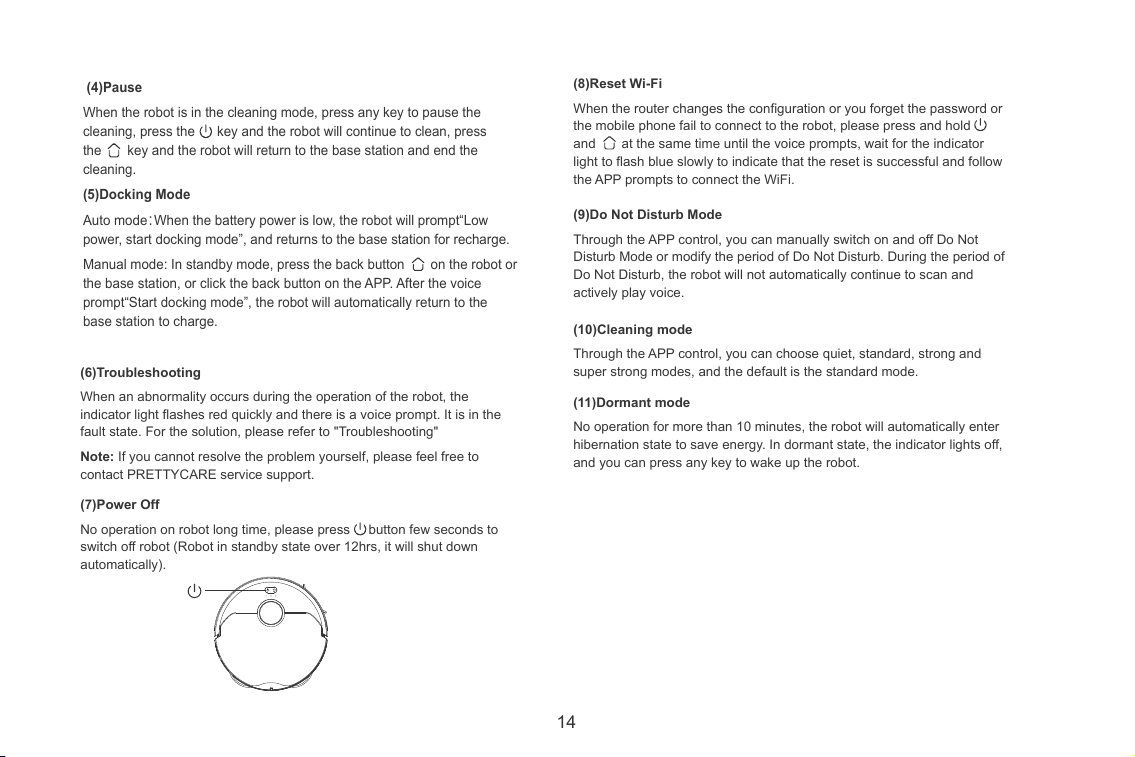
(7)Power Off
No operation on robot long time, please press button few seconds to
switch off robot (Robot in standby state over 12hrs, it will shut down
automatically).
(8)Reset Wi-Fi
When the router changes the configuration or you forget the password or
the mobile phone fail to connect to the robot, please press and hold
and at the same time until the voice prompts, wait for the indicator
light to flash blue slowly to indicate that the reset is successful and follow
the APP prompts to connect the WiFi.
(9)Do Not Disturb Mode
Through the APP control, you can manually switch on and off Do Not
Disturb Mode or modify the period of Do Not Disturb. During the period of
Do Not Disturb, the robot will not automatically continue to scan and
actively play voice.
15
Instructions
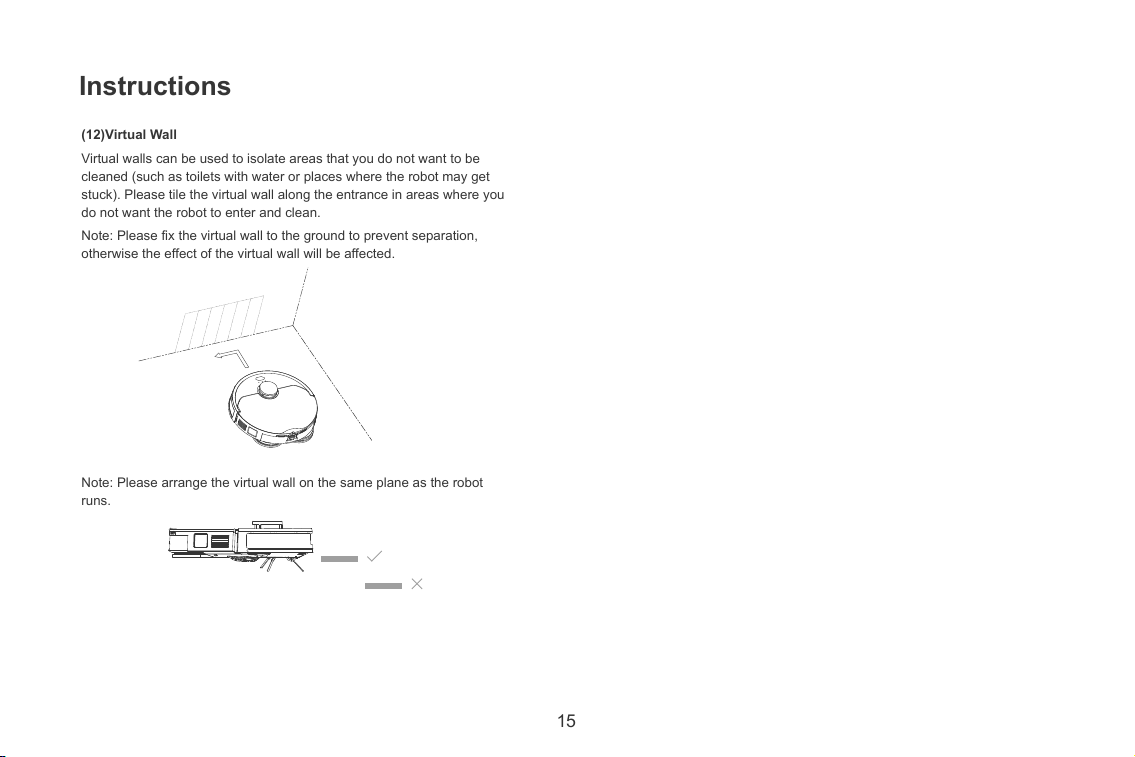
(12)Virtual Wall
Virtual walls can be used to isolate areas that you do not want to be
cleaned (such as toilets with water or places where the robot may get
stuck). Please tile the virtual wall along the entrance in areas where you
do not want the robot to enter and clean.
Note: Please fix the virtual wall to the ground to prevent separation,
otherwise the effect of the virtual wall will be affected.
Note: Please arrange the virtual wall on the same plane as the robot
runs.
16
Clean Mode
Instructions
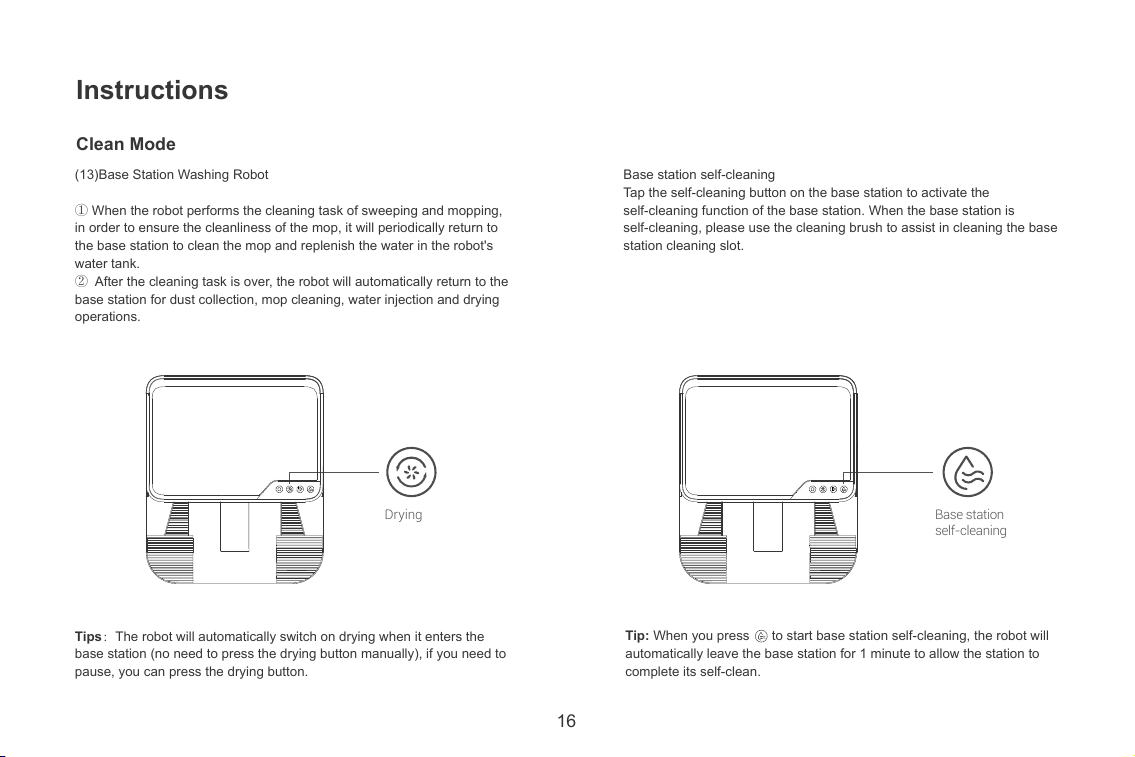
(13)Base Station Washing Robot
① When the robot performs the cleaning task of sweeping and mopping,
in order to ensure the cleanliness of the mop, it will periodically return to
the base station to clean the mop and replenish the water in the robot's
water tank.
② After the cleaning task is over, the robot will automatically return to the
base station for dust collection, mop cleaning, water injection and drying
operations.
Tips:The robot will automatically switch on drying when it enters the
base station (no need to press the drying button manually), if you need to
pause, you can press the drying button.
Tip: When you press to start base station self-cleaning, the robot will
automatically leave the base station for 1 minute to allow the station to
complete its self-clean.
Base station self-cleaning
Tap the self-cleaning button on the base station to activate the
self-cleaning function of the base station. When the base station is
self-cleaning, please use the cleaning brush to assist in cleaning the base
station cleaning slot.
Drying
Base station
self-cleaning

17
Accessories
Mop
Side brush
Main brush
High efficiency filter
Dust Box
Base station dirty water tank
Base station cleaning tan
Universal wheel
Driving wheel
Anti-fall sensor
Lidar
Cleaning Frequency
Every 3-6 months
Every 3-6 months
Every 3-6 months
Every 3-6 months
/
/
/
/
/
/
/
Cleaning Frequency
Every 2 weeks
Every week
Every week
Every week
Every week
Every week
Every week
Every week
Every week
Every week
Automatic cleaning after
returning to base station
Maintenance
Accessories Cleaning and Maintenance
In order to maintain the normal operation of the robot vacuum, it's
recommended to clean and maintain the robot vacuum regularly. Please
turn off the power of the robot vacuum during cleaning and maintenance.
Refer to the table below for the frequency of cleaning and maintenance of
accessories:
Maintenance Dust Box
Take out the dust box, open the dust box cover, and dump the garbage.
Cleaning Filters
( 1 )Take the filters out from the dust box.
18
Maintenance
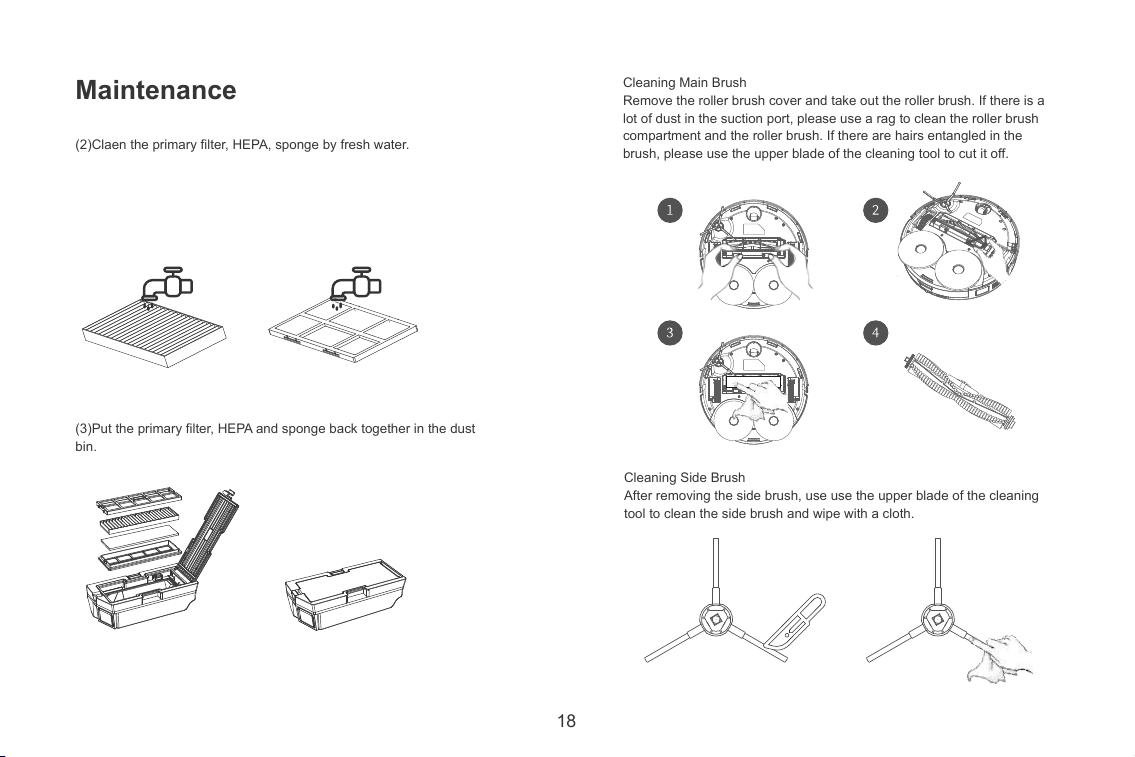
(2)Claen the primary filter, HEPA, sponge by fresh water.
Cleaning Main Brush
Remove the roller brush cover and take out the roller brush. If there is a
lot of dust in the suction port, please use a rag to clean the roller brush
compartment and the roller brush. If there are hairs entangled in the
brush, please use the upper blade of the cleaning tool to cut it off.
Cleaning Side Brush
After removing the side brush, use use the upper blade of the cleaning
tool to clean the side brush and wipe with a cloth.
(3)Put the primary filter, HEPA and sponge back together in the dust
bin.
19
Maintenance
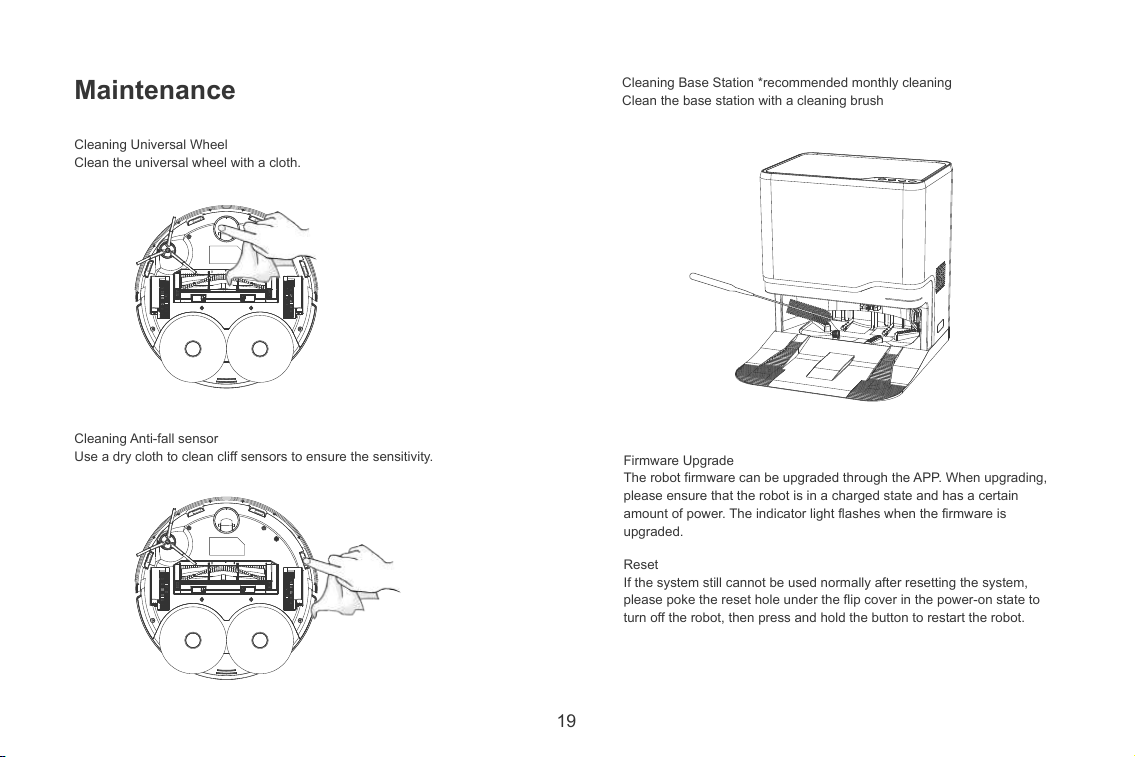
Cleaning Universal Wheel
Clean the universal wheel with a cloth.
Cleaning Anti-fall sensor
Use a dry cloth to clean cliff sensors to ensure the sensitivity.
Cleaning Base Station *recommended monthly cleaning
Clean the base station with a cleaning brush
Firmware Upgrade
The robot firmware can be upgraded through the APP. When upgrading,
please ensure that the robot is in a charged state and has a certain
amount of power. The indicator light flashes when the firmware is
upgraded.
Reset
If the system still cannot be used normally after resetting the system,
please poke the reset hole under the flip cover in the power-on state to
turn off the robot, then press and hold the button to restart the robot.
20
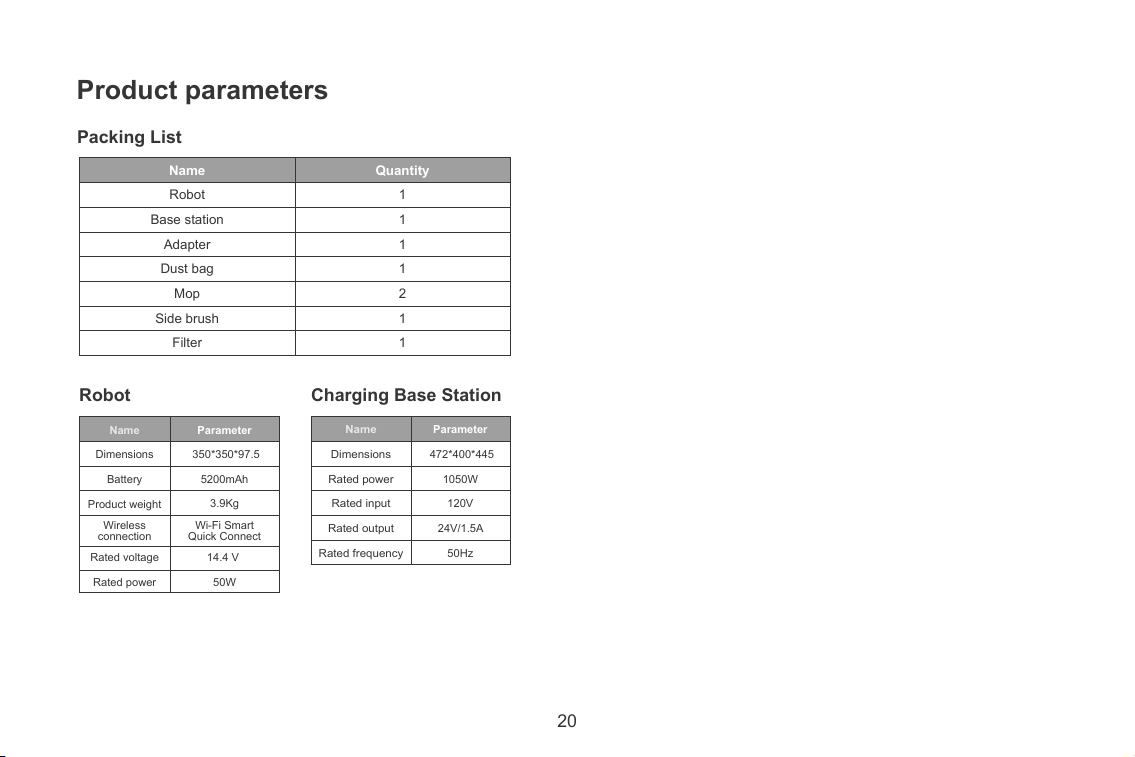
Name
Robot
Base station
Adapter
Dust bag
Mop
Side brush
Filter
Quantity
1
1
1
1
2
1
1
Name
Dimensions
Battery
Product weight
Rated voltage
Rated power
Parameter
350*350*97.5
5200mAh
3.9Kg
14.4 V
50W
Wi-Fi Smart
Quick Connect
Wireless
connection
Name
Dimensions
Rated power
Rated input
Rated output
Rated frequency
Parameter
472*400*445
1050W
120V
24V/1.5A
50Hz
Packing List
Product parameters
Robot Charging Base Station
21
Tips:The robot will automatically switch on drying when it enters the
base station (no need to press the drying button manually), if you need to
pause, you can press the drying button.
Tip: When you press to start base station self-cleaning, the robot will
automatically leave the base station for 1 minute to allow the station to
complete its self-clean.
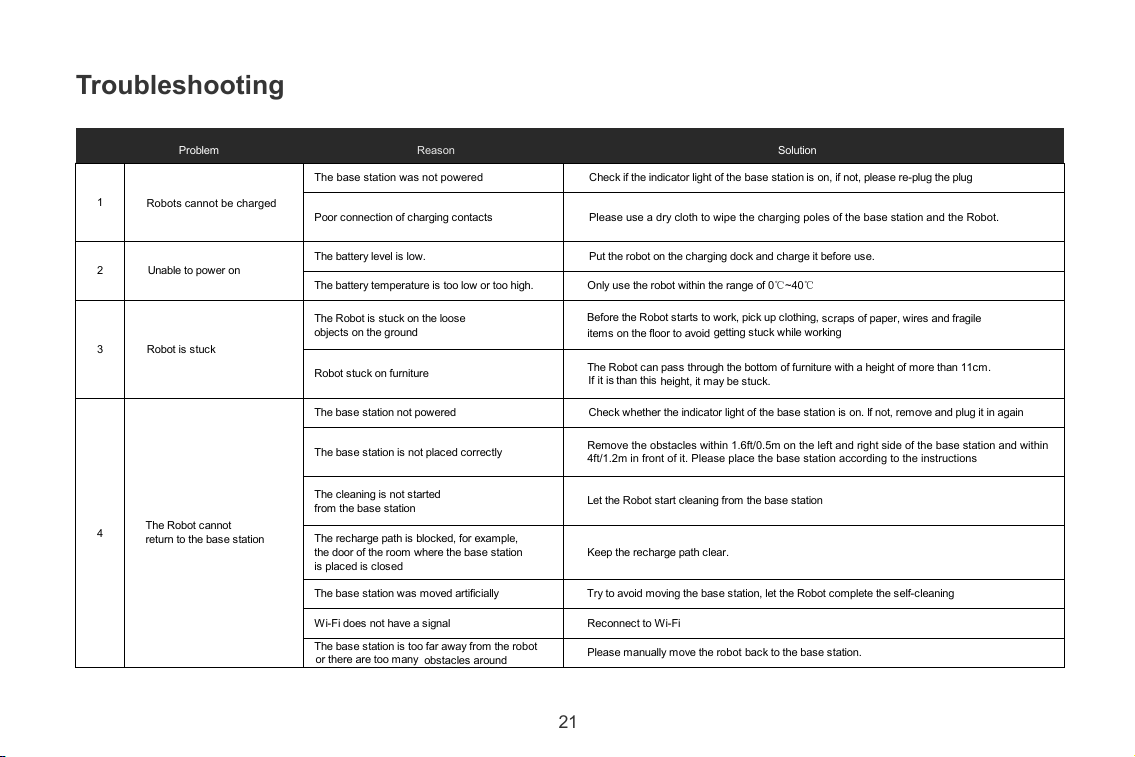
Troubleshooting
Problem Reason Solution
Robots cannot be charged
The base station was not powered Check if the indicator light of the base station is on, if not, please re-plug the plug
Poor connection of charging contacts
Please use a dry cloth to wipe the charging poles of the base station and the Robot.
2 Unable to power on
The battery level is low. Put the robot on the charging dock and charge it before use.
The battery temperature is too low or too high. Only use the robot within the range of 0 ~40
Robot is stuck
The Robot is stuck on the loose
objects on the g
round
Before the Robot starts to work, pick up clothing,
scraps of paper, wires and fragile
items on the floor to avoid
getting stuck while working
Robot stuck on furniture
The Robot can pass through the bottom of furniture with a height of more than 11cm.
If it is than this
height, it may be stuck.
The Robot cannot
return to the base station
The base station not powered Check whether the indicator light of
the base station is on. If not, remove and plug it in again
The base station is not placed correctly
Remove the obstacles within 1.6ft/0.5m on the left and right side of the base station and within
4ft/1.2m in front of it. Please place the base station according to the instructions
The cleaning is not started
from the base station
Let the Robot start cleaning from the base station
The recharge path is blocked, for example,
the door of the room where the base station
is placed is closed
Keep the recharge path clear.
The base station was moved artificially Try to avoid moving the
base station, let the Robot complete the self-cleaning
Wi-Fi does not have a signal Reconnect to Wi-Fi
The base station is too far away from the robot
or there are too many
obstacles around
Please manually move the robot back to the base station.
1
3
4
℃ ℃
22
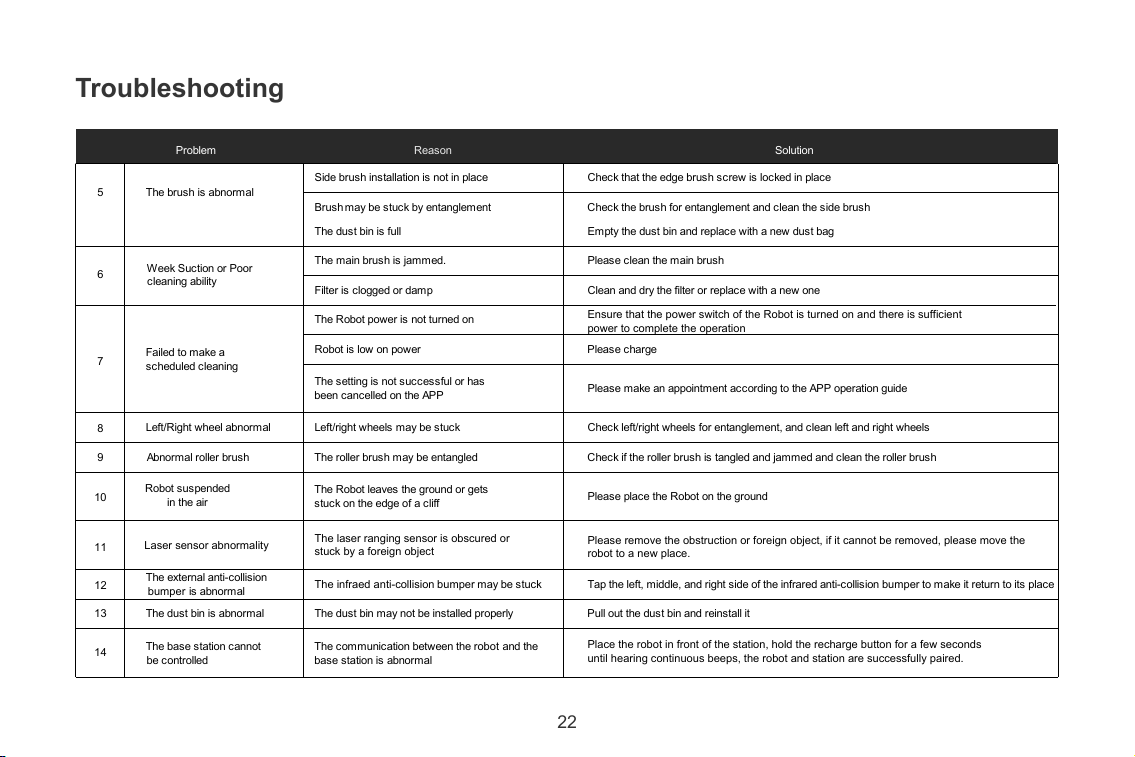
Troubleshooting
Problem Reason Solution
The brush is abnormal
Side brush installation is not in place Check that the edge brush screw is locked in place
Brush may be stuck by entanglement Check the brush for entanglement and clean the side brush
5
Week Suction or Poor
cleaning ability
The dust bin is full Empty the dust bin and replace with a new dust bag
The main brush is jammed. Please clean the main brush
Filter is clogged or damp Clean
Ensure that the power switch of the Robot is turned on and there is sufficient
power to complete the operation
and dry the filter or replace with a new one
Failed to make a
scheduled cleaning
The Robot power is not turned on
Robot is low on power Please charge
8
The setting is not successful or has
been cancelled on the APP
Please make an appointment according to the APP operation guide
Left/Right wheel abnormal Left/right wheels may be stuck Check left/right wheels for entanglement, and clean left and right wheels
Abnormal roller brush The roller brush may be entangled Check if the roller brush is tangled and jammed and clean the roller brush
Robot
suspended
in
the
air
The Robot leaves the ground or gets
stuck on the edge o
f a cliff
Please place the Robot on the ground
Laser sensor abnormality
The laser ranging sensor is obscured or
stuck by a foreign object
Please remove the obstruction or foreign object, if it cannot be removed, please move the
robot to a new place.
The external anti-collision
bumper is abnormal
The infraed anti-collision bumper may be stuck Tap the left, middle, and right side of the infrared anti-collision bumper to make it return to its place
The dust bin is abnormal The dust bin may not be installed properly Pull out the dust bin and reinstall it
The base station cannot
be controlled
The communication between the robot and the
base sta
tion is abnormal
Place the robot in front of the station, hold the recharge button for a few seconds
until hearing continuous beeps, the robot and station are successfully paired.
6
7
9
10
11
12
13
14
23
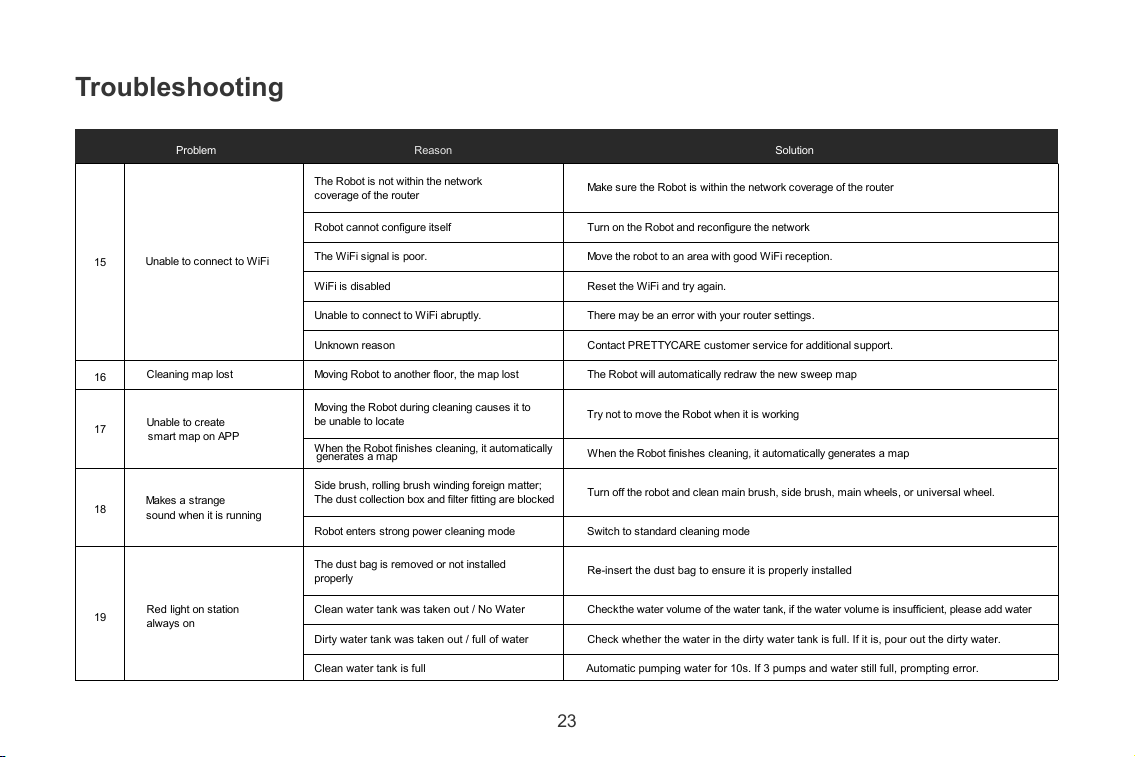
Troubleshooting
Problem Reason Solution
Unable to connect to WiFi
The Robot is not within the network
coverage of the router
Make sure the Robot is within the network coverage of the router
Robot cannot configure itself Turn on the Robot and reconfigure the network
The WiFi signal is poor. Move the robot to an area with good WiFi reception.
WiFi is disabled Reset the WiFi and try again.
Unable to connect to WiFi abruptl
y. There may be an error with your router settings.
Unknown reason Contact PRETTYCARE customer service for additional support.
Cleaning map lost Moving Robot to another floor, the map lost The Robot will automatically redraw the new sweep map
Unable to create
smart map on APP
Moving the Robot during cleaning causes it to
be unable to locate
Try not to move the Robot when it is working
When the Robot finishe
s cleaning, it automatically
generates a map
When the Robot finishes cleaning, it automatically generates a map
Makes a
strange
sound when it is
running
Side brush, rolling brush winding foreign matter;
The dust collection box and filter fitting are blocked
Turn off the robot and clean main brush, side brush, main wheels, or universal wheel.
Robot enters strong power cleaning mode Switch to standard cleaning mo
de
Red light on station
always on
The dust bag is removed or not installed
properly
Re-insert the dust bag to ensure it is properly installed-
Clean water tank was taken out / No Water Check the water volume of the water tank, if the water volume is insufficient, please add water
Dirty water tank was taken out / full of water Check whether the water in the dirty water tank is full. If it is, pour out the dirty water.
Clean water tank is full Automatic pumping water for 10s. If 3 pumps and water still full, prompting error.
15
16
17
18
19
24
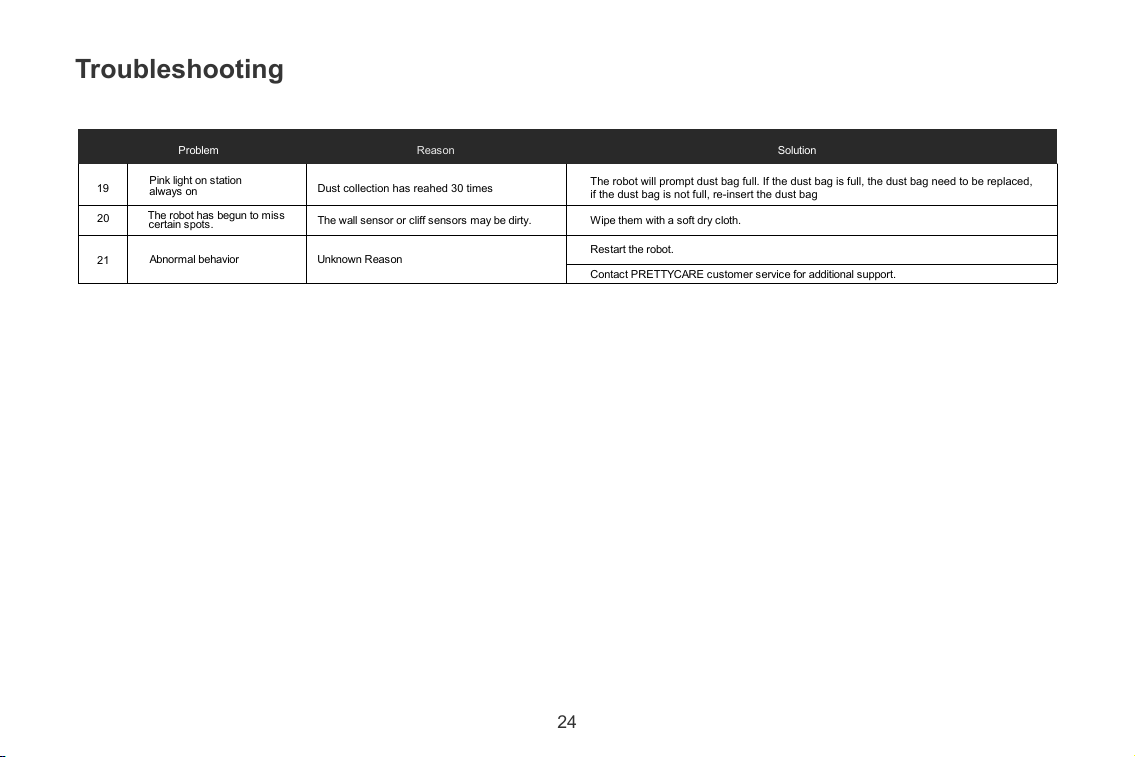
Troubleshooting
Problem Reason Solution
The robot has begun to miss
certain spots.
The wall sensor or cliff sensors may be dirty. Wipe them with a soft dry cloth.
Abnormal behavior Unknown Reason
Restart the robot.
Contact PRETTYCARE customer service for additional support.
20
21
Dust collection has reahed 30 times
The robot will prompt dust bag full. If the dust bag is full, the dust bag need to be replaced,
if the dust bag is not full, re-insert the dust bag
Pink light on station
always
on
19

FCC Caution:
This device complies with part 15 of the FCC Rules. Operation is subject to the following two conditions:(1
) this device may not cause harmful interference, and (2) this device must accept any interference
received, including interference that may cause undesired operation.
Any changes or modifications not expressly approved by the party responsible for compliance could void
the user's authority to operate the equipment.
NOTE: This equipment has been tested and found to comply with the limits for a Class B digital device,
pursuant to Part 15 of the FCC Rules. These limits are designed to provide reasonable protection against
harmful interference in a residential installation. This equipment generates, uses and can radiate radio
frequency energy and, if not installed and used in accordance with the instructions, may cause harmful
interference to radio communications. However, there is no guarantee that interference will not occur in a
particular installation.
If this equipment does cause harmful interference to radio or television reception,which can be
determined by turning the equipment off and on, the user is encouraged to try to correct the interference
by one or more of the following measures:
-- Reorient or relocate the receiving antenna.
-- Increase the separation between the equipment and receiver.
-- Connect the equipment into an outlet on a circuit different
from that to which the receiver is connected.
-- Consult the dealer or an experienced radio/TV technician for help.
To maintain compliance with FCC’s RF Exposure guidelines, This equipment should be installed and
operated with minimum distance between 20cm the radiator your body: Use only the supplied antenna.