PRETTYCARE Intelligent Vacuum Cleaner C2 | User Manual
Please read the operating instructions carefully before using this unit and keep it properly.
1. Important Safety Instructions
- The robot must be used in accordance with the directions in this User Manual. Our company cannot be held liable or responsible for any damages or injuries caused by improper use.
- Do not allow to be used as a toy. Close attention is necessary when used by or near children. Do not allow children to sit on the vacuum. Children should be supervised to ensure they do not play with this device. Do not place any objects on top of this device.
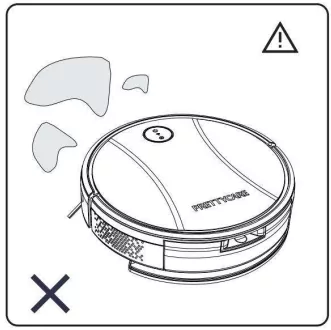
- Please remove the mop when the robot is cleaning carpets or charging on the base.
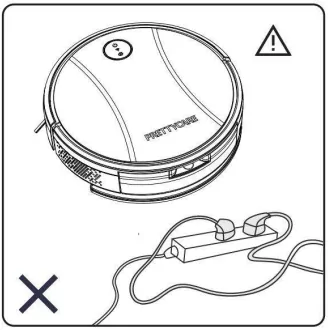
- Clear the area to be cleaned. Remove power cords and small objects from the floor that could entangle the Robot. Tuck rug fringe under the rug base, and lift items such as curtains and table cloths off the floor.
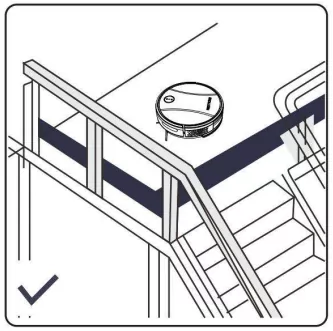
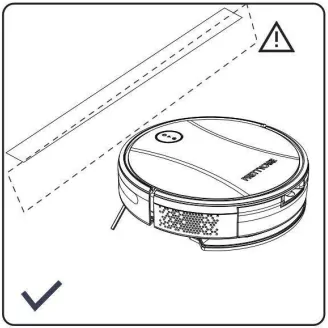
- If there is a drop off in the cleaning area due to a step or stairs, you should operate the Robot to ensure that it can detect the step necessary to place a physical barrier at the edge to keep the unit from falling. Make sure the physical barrier is not a trip hazard.
- Only use as described in this manual. Only use attachments recommended or sold by the manufacturer. This device is only to be used with the power supply unit provided. For the purposes of recharging the battery, only use the detachable power supply unit provided with this device.
- Please make sure your power supply voltage matches the power voltage marked on the Docking Station.
- Do not handle or plug appliance with wet hands.
- Non-rechargeable batteries are prohibited.
- Do not use without dust bin and/or filters in place.
- Do not operate the robot in an area where there are lit candles or fragile objects on the floor to be cleaned.
- 12. Do not use and store in extremely hot or cold environments (below -5°C/23°F or above 40°C/104°F). Please charge the robot in temperature above 0°C/32°F and below 40°C/104°F. Follow all charging instructions and do not charge the battery pack or appliance outside of the temperature range specified in the instructions. Charging improperly or at temperatures outside of the specified range may damage the battery and increase the risk of fire.
- Keep hair, loose clothing, fingers, and all parts of body away from any openings and moving parts.
- Do not operate the robot in a room where an infant or child is sleeping.
- For INDOOR use ONLY. Do not use the robot in outdoor, commercial or industrial environments. Do not use Appliance on wet surfaces or surfaces with standing water. If the room to be cleaned has a balcony, a physical barrier should be used to prevent access to the balcony and to ensure safe operation.
- Do not allow the robot to pick up large objects like stones, large pieces of paper or any item that may clog the robot.
- Do not use the robot to pick up flammable or combustible materials such as gasoline, printer or copier toner, or use in areas where they may be present.
- Do not use the robot to pick up anything that is burning or smoking, such as cigarettes, matches, hot ashes, or anything that could cause a fire.
- Do not put any object into openings. Do not use with any opening blocked; keep free of dust, lint, hair, and anything that may reduce air flow.
- Take care not to damage the power cord. Do not pull on or carry the robot or the Docking Station by the power cord, use the power cord as a handle, close a door on the power cord, or pull power cord around sharp edges or corners. Do not run the robot over the power cord. Keep power cord away from hot surfaces. Do not unplug by pulling on cord, to unplug, grasp the plug, not the cord.
- If the power cord is damaged, it must be replaced by the manufacturer or its service agent in order to avoid a hazard. (The user cannot replace the power cord without authorization)
- Do not use the Docking Station if it is damaged.
- Do not use the robot or the Docking Station if it is not working properly, has been dropped, damaged, left outdoors, or come in contact with water. It must be repaired by the manufacturer or its service agent in order to avoid a hazard.
- Turn OFF the power switch before cleaning or maintaining the robot. Turn off all controls.
- The plug must be removed from the receptacle before cleaning or maintaining the Docking Station.
- Remove the robot from the Docking Station, and turn OFF the power switch to the Appliance before removing the battery for disposal of the robot.
- The battery must be removed and discarded according to local laws and regulations before disposal of the robot. Any accessories and robots must comply with local policies when they are disposed of.
- Please dispose of used batteries according to local laws and regulations.
- Do not incinerate the robot even if it is severely damaged. The batteries can explode in a fire.
- When not using the Docking Station for a long period of time, please unplug it.
- Prevent unintentional starting. Ensure the switch is in the off position before connecting to battery pack, picking up or carrying the appliance.
- Carrying the robot with your finger on the switch or energizing the robot that have the switch on invites accidents.
- When battery pack is not in use, keep it away from other metal objects, like paper clips, coins, keys, nails, screws, etc, that can make a connection from one terminal to another. Shorting the battery terminals together may cause burns or a fire. Under abusive conditions, liquid may be ejected from the battery; avoid contact. If contact accidentally occurs, flush with water. If liquid contacts eyes, additionally seek medical help. Liquid ejected from the battery may cause irritation or burns.
- Do not use a battery pack that is damaged or modified. Damaged or modified batteries may exhibit unpredictable behavior resulting in fire, explosion or risk of injury.
- Do not expose a battery pack or appliance to fire or excessive temperature. Exposure to fire or temperature above 130°C / 265°F may cause explosion.
- Have servicing performed by a qualified repair person using only identical replacement parts.
- Do not modify or attempt to repair the robot or the battery pack (as applicable) except as indicated in the instructions.
- Do not operate the robot in a room that has lit candles on furniture that the vacuum may accidentally hit or bump into.
- Recharge only with the charger specified by the manufacturer. A charger that is suitable for one type of battery pack may create a risk of fire when used with another battery pack.
- Use the robot only with specifically designated battery packs. Use of any other battery packs may create a risk of injury and fire.
- We assume no liability or responsibility for any fire, explosion or electrical shock cause improper operation.
- The Li-ion battery in the robot should be serviced or recycled by an authorized service provider, and must be recycled or disposed of separately from household waste. Dispose of the battery according to your local environmental laws and regulations.
- The robot contains batteries that are only replaceable by skilled persons. To replace the robot's battery, please contact Customer Service.
- If the robot is not going to be used for a long time, fully charge the robot, power it OFF, and unplug the Docking Station.
- Be aware that this device moves around on its own. Take care when walking in the area where this device is operating to avoid stepping on it.
- Do not operate this device in areas with exposed electrical outlets on the floor.
- Do not expose the electronics of this device, its battery, or the integrated Charging Base. There are no user-serviceable parts inside.
2. About Your Robot
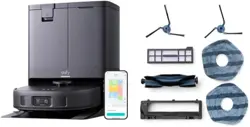
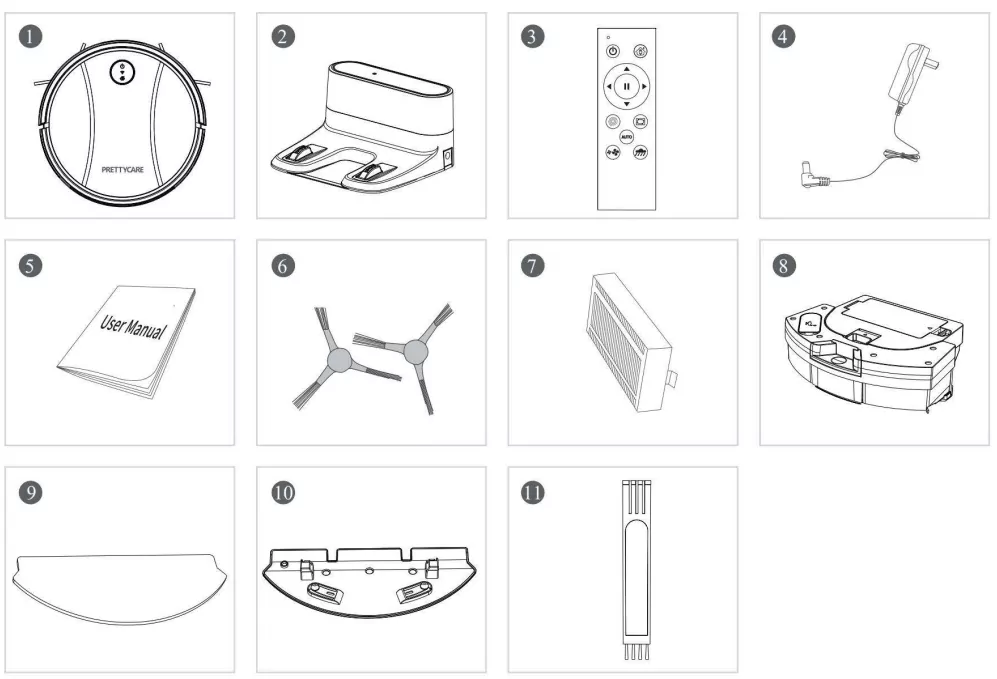
2.1 What's In the Box
| Serial number |
Description |
Quantity |
| 1 |
Robotic Vacuum and Mop Cleaner (including battery) |
1 |
| 2 |
Charging Base |
1 |
| 3 |
Remote Control |
1 |
| 4 |
Power Adapter |
1 |
| 5 |
User's Manual |
1 |
| 6 |
Side Brushes |
2 |
| 7 |
HEPA filter (extra) |
1 |
| 8 |
Electrically Controlled Water Tank |
1 |
| 9 |
Mopping Cloth |
1 |
| 10 |
Mop Pad Holder |
1 |
| 11 |
Cleaning Brush |
1 |
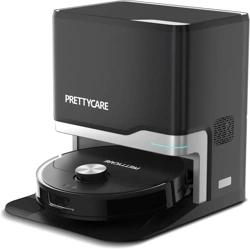
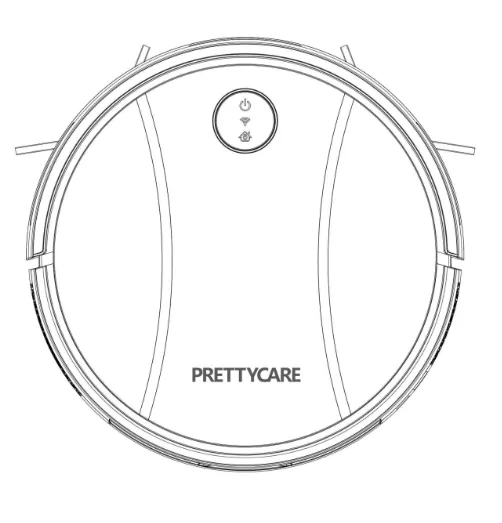
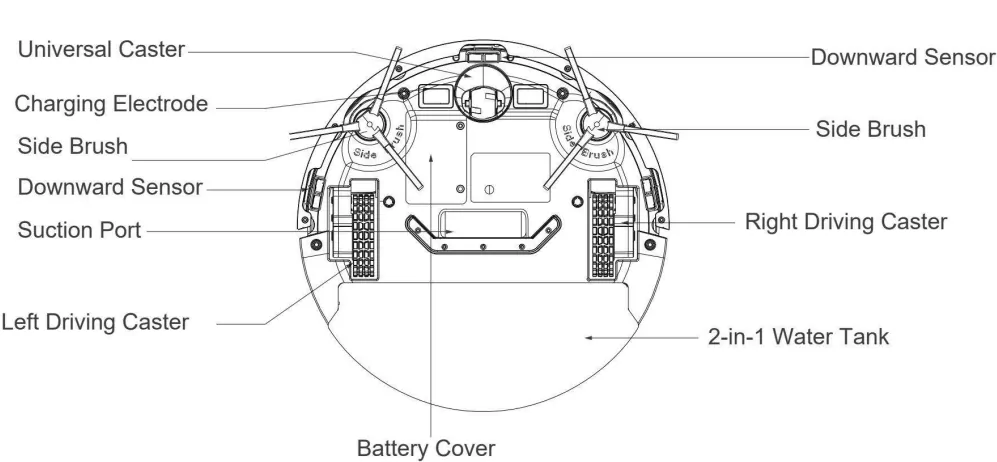
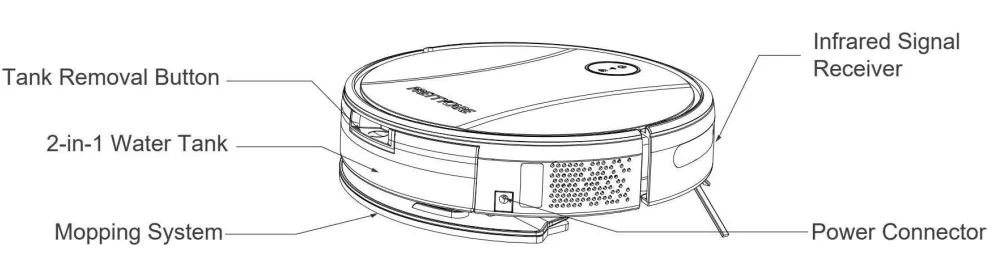
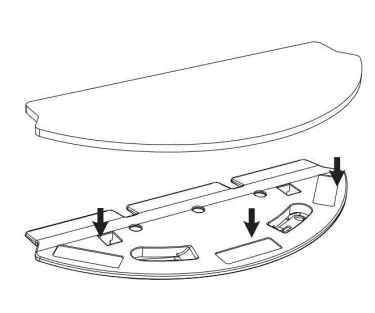
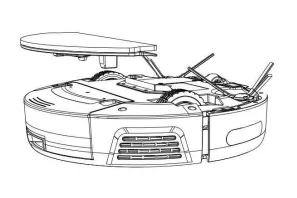
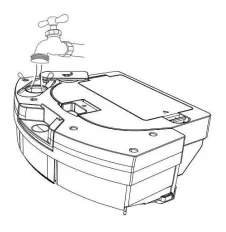
Robot Cleaner Diagram

Main Machine
Dust Collector Diagram
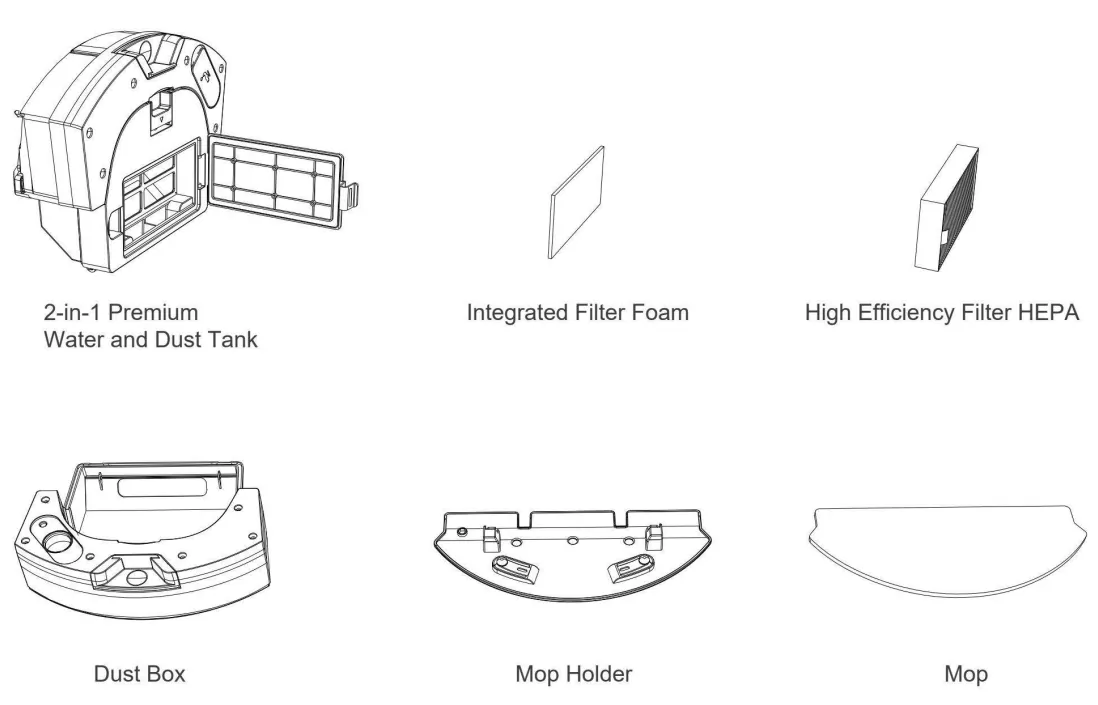
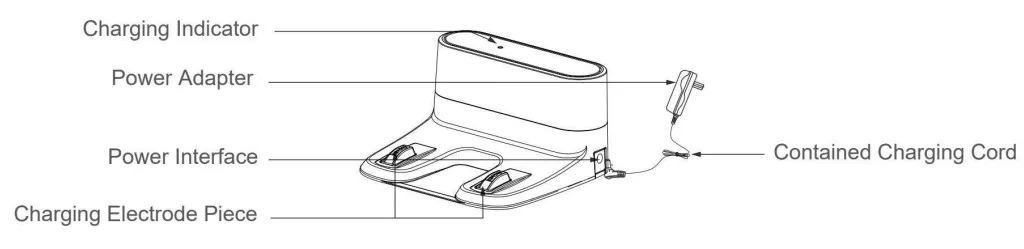
Diagram of Charging Dock
Remote Control

3. Using Your Robot
3.1 Important Tips Before Use
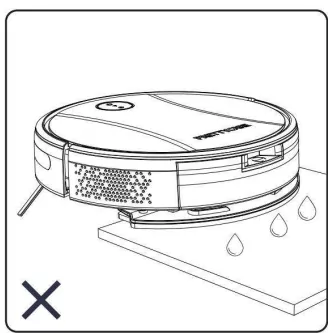
When cleaning carpets, remove the robot's mop or stow the carpet while mopping to avoid getting it wet.
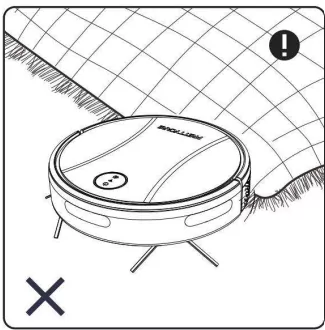
Fold tasseled edges of area rugs underneath to prevent tangling the robot. Robots may climb on top of objects less than 0.63 inch in height.
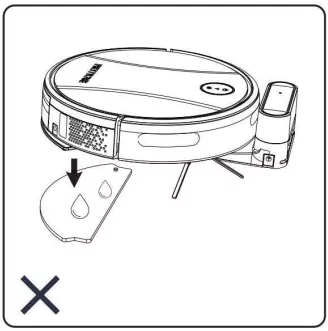
Keep robot away from wet areas, such as kitchen or bathing room.
When the robot returns to the base, remove the mop so as not to wet the charging base.
Keep robot away from wet areas, such as kitchen or bathing room.
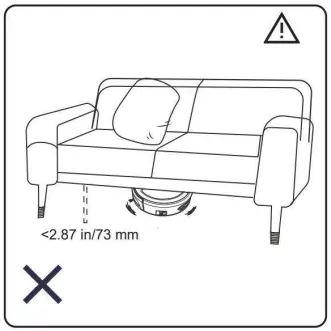
Keep robot away from spaces lower than 2.87 in/73 mm to prevent robot from getting stuck.
Remove power cords and small objects from the floor that may entangle robot.
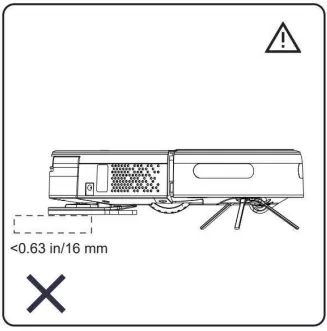
Robot may climb on top of objects less than 0.63 in/16 mm in height. Remove these objects if possible.
They may work less effectively if dirty or used on reflective/very dark-colored floors.
3.2 How to Start
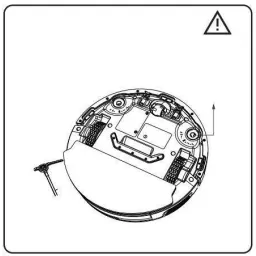
1. Before use, Please remove the protective bolt.

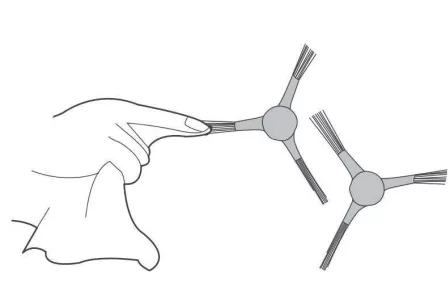
2. Side Brush Installation: Press down the side brush after aligning square hole with the square axis. Installation is done after hearing the sound.
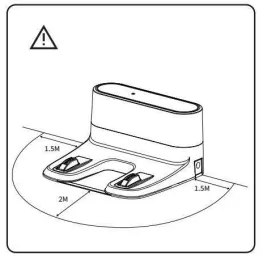
3. Place the Charging Base (Location Is Important):
Place the Charging base on a level surface and against a wall and remove objects or make sure no objects within 3 ft/1.5 m of the left and right side and within 6 ft/2 m of the front of the Charging Base. If you cannot remove the objects, check whether the robot return to the Charging Base normally; if not, contact customer service for help.
4. Connect the power adapter directly to the dock and connect the other side to the power supply (A) or use the DC plug to charge the robot directly (B)
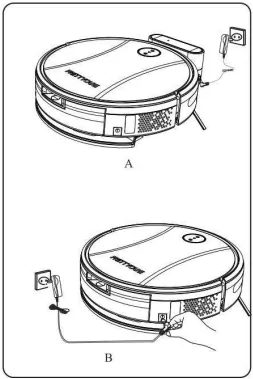
- When charging for the first time, please charge for 12 hours
- Move the robot to a place about 1 meter in front of the charging dock, turn on the power switch on the side of the robot, and then press recharge button on the robot, The robot will automatically climb onto the charging dock to charge. (It is recommended not to manually push the robot onto the charging dock, which will easily cause poor contact between the charging pole pieces.)
- When the robot is completely out of power, please use the DC plug to charge it directly.
3.2 How to Start (continued)
- Installing the Mop Pad:
Attach the washable rag to the mop pad holder attachment area.
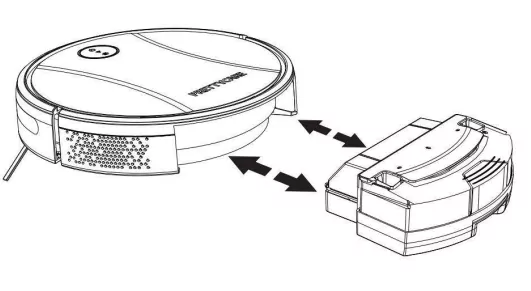
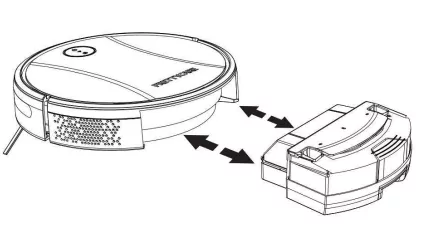
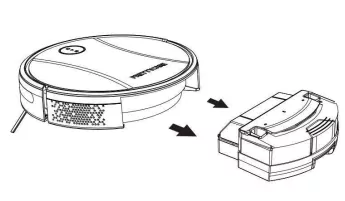
- Remove or install the water tank:
Removal: Press and hold the red dot on the back and pull back to take out the water tank.
Installation: Push the water tank horizontally along the host card slot until you hear a "click" sound.
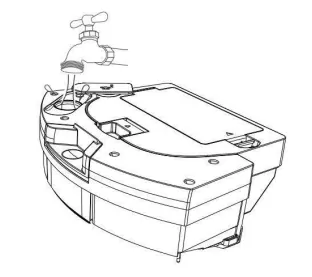
- Fill with water:
Open the lid of water tank, fill it with water and close it.
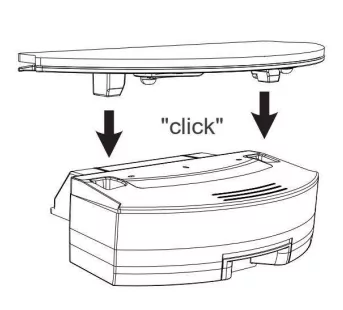
- Installing The Mop Pad Holder:
Install the mop pad holder to the bottom of the water tank until you hear a "click".
3.3 Power On/Off
Power on:
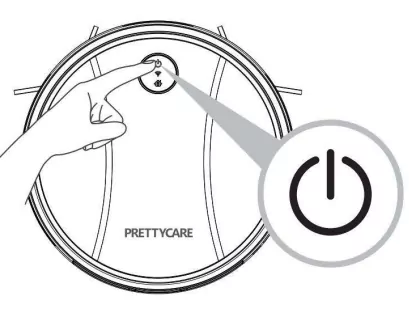
Press and hold the power button for 3 seconds until you hear the sound of Bi and the green light comes on, the robot turns on. Then the Wi-Fi light blinks and it enters the networking mode.
(Specifically, you need to refer to the APP guide for APP connection)
Power off:

Long press the power button for 3 seconds, the green light goes off and the robot turns off.
3.4 Working Mode
Standby mode & Sleep Mode: After the robot is powered on, it enters the standby mode (the green light above is always on). When the robot is cleaning, press any button on the robot (switching the cleaning mode will not enter the standby mode) to pause and enter the standby mode. After 10 minutes of no operation in standby mode, the robot enters sleep mode (press any button to wake up from sleep).
Auto Cleaning Mode:
- When in the standby mode that the robot has been powered on, short press the Auto Cleaning Mode button, the buzzer will alarm once and the robot will enter the auto cleaning mode.
- When in the standby mode that the robot has been powered on, click the Auto Cleaning Mode button in the APP, the buzzer will alarm once, and the robot will enter the auto cleaning mode.
- When in the standby mode that the robot has been powered on, press the Auto Cleaning Mode button on the remote, the buzzer will alarm once, and the robot will enter the auto cleaning mode.
When the robot is in auto cleaning state, the robot starts to clean. The automatic cleaning mode is suitable for cleaning the entire home environment. The robot works according to the detect and auto cleaning, and it avoids obstacles and steps.
The robot can perform the following operations in this working mode: 1. Press any button on the robot, the buzzer will alarm once, stop working and enter the standby mode. 2. If the battery power is low, the buzzer alarms 3 times, then the robot will enter the automatic recharge mode. 3. When a fault is detected, it enters the error mode and the robot alarms (see the fault mode details).
Edge Cleaning Mode:
- When in the standby mode that the robot has been powered on, click the Edge Cleaning Mode button in the APP, the buzzer will alarm once, and the robot will enter Edge Cleaning Mode.
- When in the standby mode that the robot has been powered on, press the Edge Cleaning Mode button on the remote, the buzzer will alarm once, and the robot will enter Edge Cleaning Mode.
In Edge Cleaning Mode, the robot reduces its speed when it detects a wall and then follows the wall to ensure the edge is cleaned thoroughly.
Bow-shaped Path Mode:
When in the standby mode that the robot has been powered on, long press the Recharge button on the robot for 3 seconds and two green indicators light up on the robot at the same time. The robot enters the bow-shaped cleaning, and the robot walks in a bow-shaped path. Bow-shaped Path Mode is suitable for wide environments (no obstructions) for efficient cleaning.
Recharge Mode:
When in the recharging mode, the recharging indicator of the robot remains red and always on.
- The robot will automatically go back charging dock to recharge when power is lower than 10%.
- Short press the recharge button on the robot, the buzzer will alarm once, and the robot will go back charging dock to recharge.
- Click the recharge button in the APP, and the robot will go back charging dock to recharge.
- Press the recharge button on the remote, and the robot will go back charging dock to recharge. (It is necessary to let the robot start from the charging base, and remove objects within 3 ft/1 m of the left and right side and within 6 ft/2 m of the front of the Charging Base, so that the robot can go back successfully.)
When the robot is in charging, the LED light of the two indicators on the robot flash red at the same time, indicating that it is charging.
When the robot is fully charged, the green light on the robot is keep on.
4. Maintenance
4.1 Clean Brush
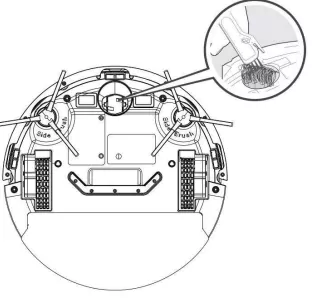
- Clean Side Brush: Remove the side brush and wipe with a clean cloth. If it is damaged, it can be replaced (Use the manufacturer's original side brush).
- Clean the Universal Wheel: Clean the universal wheel to reduce hair entanglement.
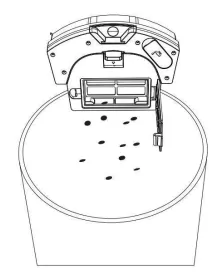
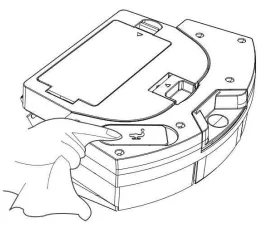
4.2 Clean Dust Box and Filter
- Take out the dust box.
- Open the dust box and clean up the garbage.
4.3 Clean The Mopping System
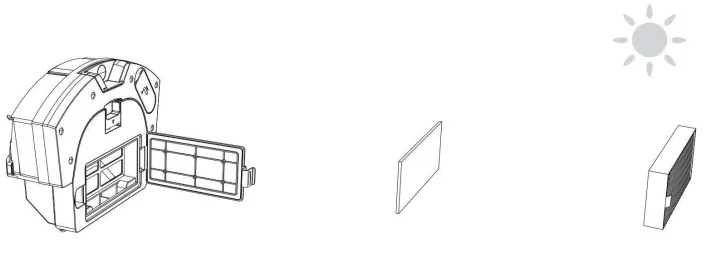
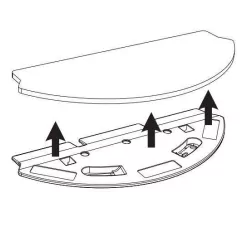
- Disassemble the filter system.
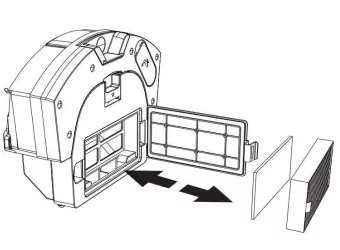
- Clean the filtration system. (High Efficiency Filter HEPA can be washed or tapped to remove dust, after washing, please air dry before use.)
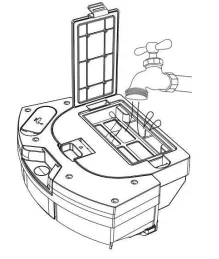
- Wipe the filtration system with a dry cloth and dry it in an airy or sunny place. It is important to ensure that it remains dry before putting it back together.
- Remove the holder from the bottom.
- Separate the mop from the holder.
4.4 Clean Dust Box and Filter
- Wash the mop with water.
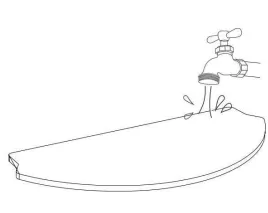
- Dry the mop.
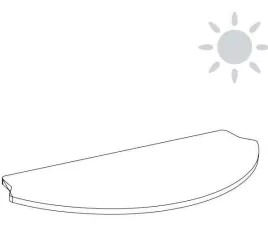
- Disassemble the water tank.
- Clean the tank to avoid mold.
- Clean the tank to avoid mold.

- Wipe with a dry cloth.
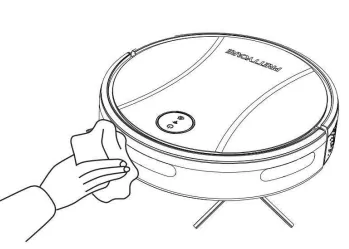
4.5 Clean Other Parts
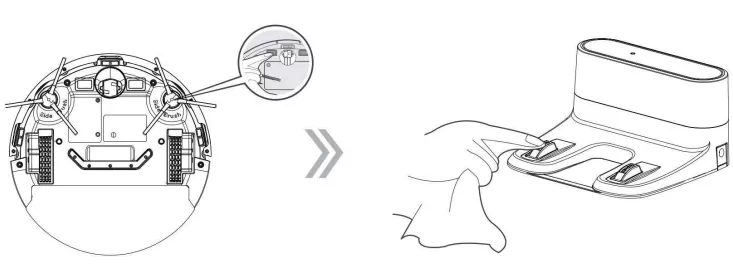
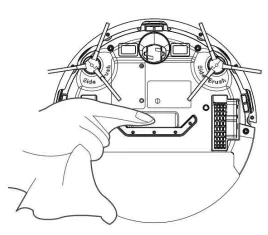
- Clean the charging electrode:
Gently wipe the bottom of the machine and the charging electrode of the charging base with a soft cloth.
- Clean the suction port:
If there is a lot of dust in the suction port, please clean it with a cloth.
- Clean the sensor window.
5. Abnormal symptoms
5.1 Symptom prompts
Robot will emit a series of beeps when it is in trouble, and the red light will flash or keep on.
| Situation |
Reason |
Recommendation |
| Beep once and the red light stays on. |
Wheel is stuck. |
Please check if there are anything in the wheel gap and clean it up. |
| Beep once and the red light keeps flashing. |
Front bumper is stuck. |
Please check bumper whether stuck and clean foreign matter in it. |
| Beeps twice and the red light keeps flashing. |
Side brush abnormal |
Please check whether the side brush is entangled with hair and clean it up. |
| Beeps three times and the red light keeps flashing. |
Ground sensor abnormal. |
Please check whether the ground sensor is covered by dirt and wipe it clean. |
| Beeps four times and the red light keeps flashing. |
Power run out. |
Please charge it as soon as possible. |
Please refer to the maintenance section of the user manual for more information.
Warm tips: If the above method does not solve the problem, please try the following:
- Restart the power of the robot.
- If the problem cannot be solved by restarting the robot, please contact service support.
5.2 Troubleshooting
| Failure Phenomena |
Analysis of causes |
| The robot cannot be activated. |
Make sure the main power switch is in the ON position. |
| Make sure the battery is fully charged. |
| Make sure the remote control is within range (16 ft/5 m) of the robot. |
| Batteries need to be installed in the remote control first. (Batteries are not included for safety reasons.) |
| If you still have trouble, turn off the main power switch and then turn it back on. |
| Abnormal cleaning |
Cleaning components blockage. It is recommended to replace consumables regularly, such as high-efficiency filters (HEPA), pre-filter, side brushes, etc. |
| Check for foreign matter on wheels, side brushes and suction holes; if so, remove foreign matter. |
| Dust on sensors and other components, please clean. |
| Battery life is short |
The robot automatically goes back to recharge when it has 30% of its battery left, so sometimes it has interrupted its work before it has fully consumed the battery. |
| Cold weather or low temperatures can sometimes affect battery activity. |
| If, for reasons other than those mentioned above, the battery may have beeen affected by bumps or shocks during sea transportation of FBA delivery, please contact us and we will take responsibility for this. |
| Unable to connect to App |
Make sure you entered the Wi-Fi password correctly. |
| Make sure your robot, router, and mobile phone are close enough to ensure a strong signal strength. |
| Not entered Wi-Fi pairing mode. |
| Make sure your Wi-Fi router supports the 2.4GHz band and the 5GHz band is not supported. |
| Unable to connect to App |
Batteries need to be installed in the remote control first. (Batteries are not included for safety reasons.) |
| The robot stops working suddenly. |
Check if the robot is trapped or stuck on an obstacle. |
| Check if the battery level is too low. If you still have trouble, turn off the main power switch, wait for 2 seconds, and then turn it back on. |
| Difficult to return and charge. |
Remove objects within 3 ft/1 m to the left and right side and within 6 ft/2 m of the front of the Charging Base. |
| Please check whether the charging base is connected to the power supply. Do not move. |
| Let the robot start from the docking station. If not, it cannot go back. |
| If the Charging Base is located far away, Robot will need more time to return. |
| Clean the charging contact pins. |
| Weak Suction |
Check if the suction hole is blocked by barrier. |
| Clean dust box. |
| Clean or replace HEPA. |
| Check if strainer is wet and ensure it has been fully dry prior to use. |
| No or little water during mopping. |
Please check whether there is water in the water tank. |
| Please make sure that the water tank and mopping cloth are properly installed in place, and adjust the water volume switch to high on app. |
| Too much water during mopping. |
Please make sure that the water tank and mopping cloth are properly installed in place, and adjust the water volume switch to low in app. |
6. Specifications
Robot
| Item |
Parameters |
| Product Model |
C2 |
| Input |
12V/1A |
| Battery Voltage |
7.4V |
| Power Consumption |
≤15 W |
| Battery |
Li-ion 4400 mAh |
| Dust Box |
400ml |
| Water Tank |
250ml |
| Cleaning Time |
Max. 150 mins |
| Charging Time |
240 - 360 mins |
Charge Base
| Input |
AC100~240V 50/60Hz |
| Output |
12V/1A |