Loading ...
Loading ...
Loading ...
Rinnai 13 ES_FT_OIM
ADVANCED HEATER OPERATION
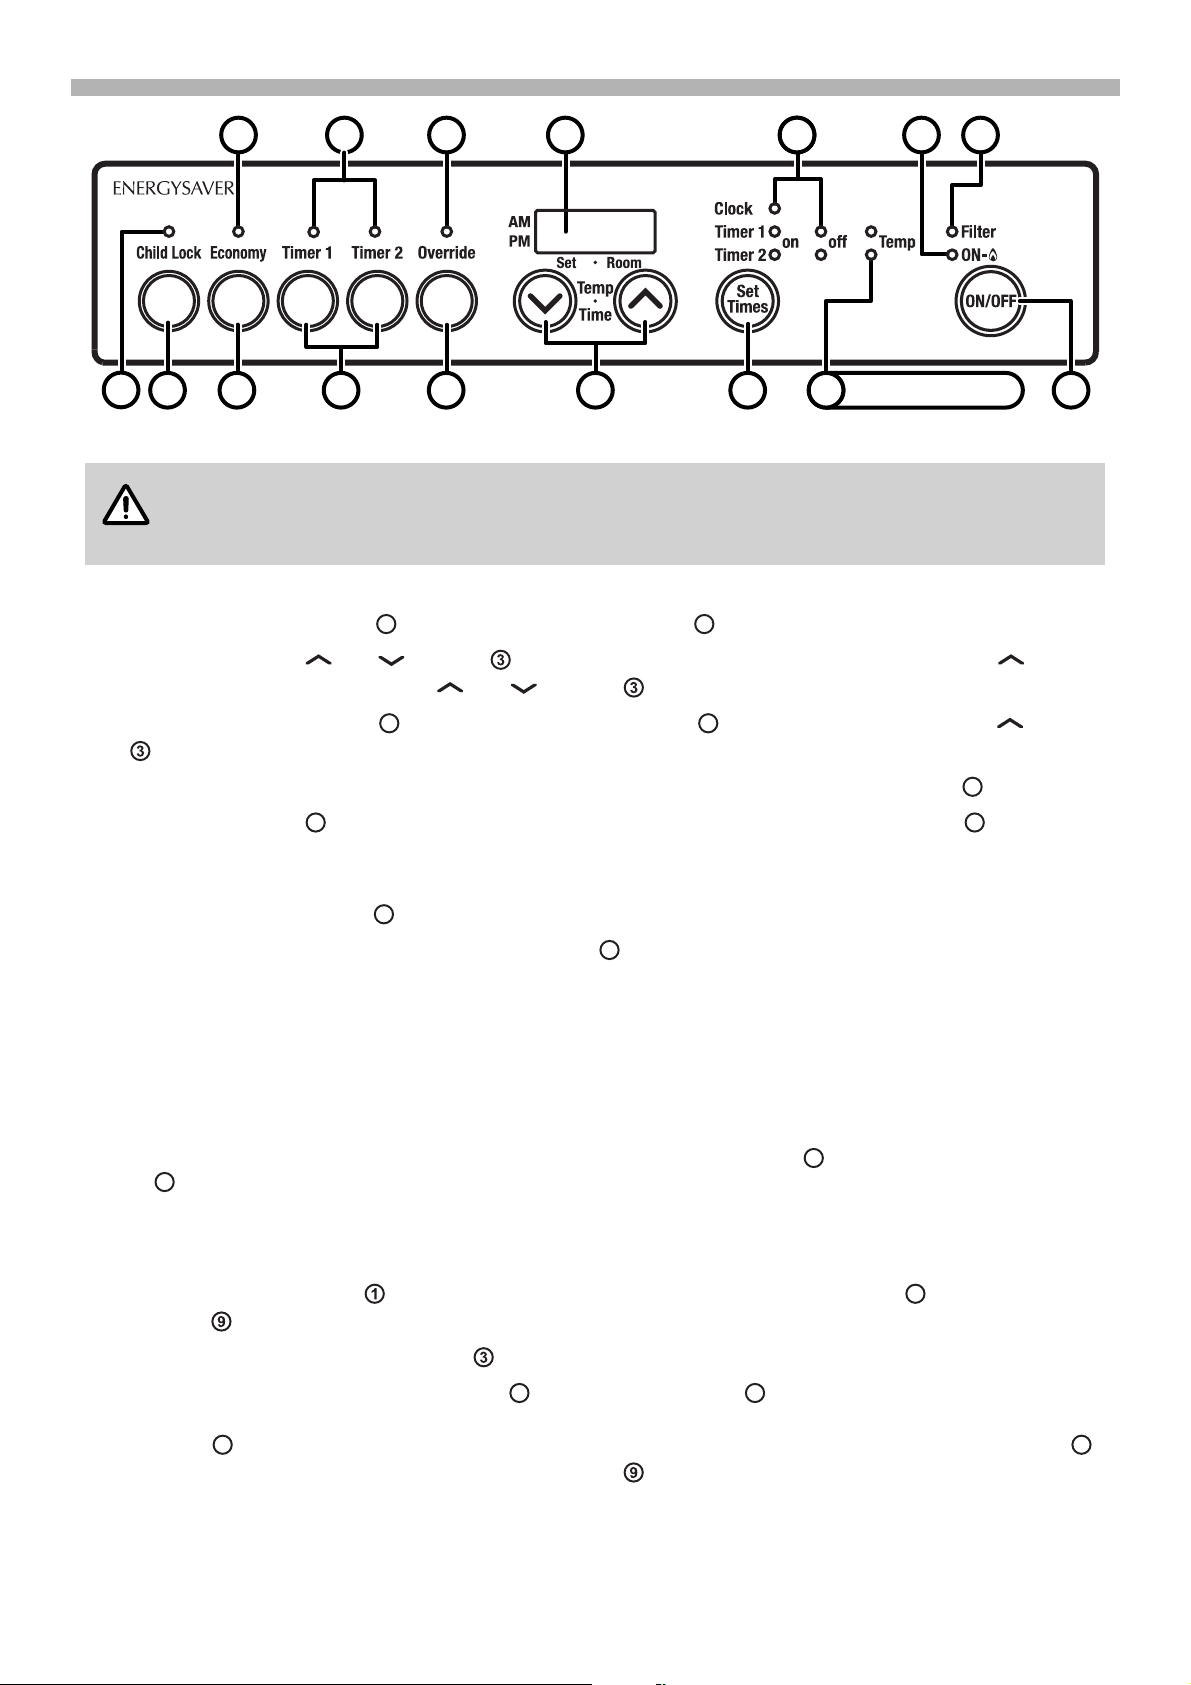
SETTING THE ON / OFF TIMERS - RHFE-309FT / 559FT / 561FT
In the following example: Timer 1 will be programmed to heat the room by 7:10 am and finish heating the at 9:00 am.
1. Press the Set Times button twice. The Timer 1 ‘on’ indicator will flash.
2. Press and hold the “ ” or “ ” buttons until AM 7:00 appears, release the button, then press “ ” button
until AM 7:10 appears. (Press the “ ” or “ ” buttons if you go past).
3. Press the Set Times button again, the Timer 1 ‘off’ indicator will flash. Press and hold the “ ” button
until AM 9:00 appears.
4. To bypass Timer 2 and lock in the time and the settings for Timer 1, press the Set Times button three times.
5. The Digital Display will show the current time and a small indicator on the Digital Display will flash to
show that Timer setting has been exited and the display is in clock mode.
OR
6. Press the Set Times button again to proceed to Timer 2, programming for which is the same as for Timer 1.
Remember to ensure that the correct Timer indicator is flashing when you program in the desired settings.
OPERATING THE TIMERS - RHFE-309FT / 559FT / 561FT
The timers can be programmed to operate for any two time periods in any 24 hours. Before operating the Timer(s),
the clock time must be correct and a starting time and finishing time for the Timer(s) must be programmed. The two
Timers operate in the same way. This heater uses Pre-Heat to heat a room by the programmed starting time, see
the following section “PRE-HEAT” on page 15 for details about pre-heat operation.
Refer to ‘Setting the Clock’ and ‘Setting the ON / OFF Timers’ sections to confirm that the correct time and timers
have been set. Alternatively if the heater is already on press Set Times button , each press of the Set Times
button will cycle through the time/timer settings as follows:
Clock (current set time) > Timer 1 ‘on’ > Timer 1 ‘off’ > Timer 2 ‘on’ > Timer 2 ‘off’
To select the set Timer(s) to commence heating:
1. Press the ON/OFF button to operate the heater without The Clock / Timer indicator flashing. The ‘ON’
indicator will glow green.
2. Select the desired temperature setting.
3. Press the Timer 1 and/or Timer 2 button(s) . The Timer indicator(s) will glow. The heater will now remain
on standby until up to one hour prior to the time programmed into the selected Timer(s) is reached. Timer
indicator will also flash during Pre-heat (Combustion). When this time is reached, the Timer indicator
will flash and the heater will operate. The ‘ON’ indicator glows red when the heater commences operation.
Actual start time will depend on temperature selected and current room temperature. (Refer to “PRE-HEAT”
on page 15 for details).
Before programming the Timers you must ensure that the clock has been set to the correct time.
If during setting no buttons are pressed for 1 minute the setting sequence will automatically cancel
and the display will revert to the normal display.
9
13 1214 11 8
10
1
27 5
15 6 4 (RHFE-1005FT ONLY)
16
3
N OT E
2
10
2
10
2
11
11
2
10
2
2
10
5
13
13
13
Loading ...
Loading ...
Loading ...