1
A Division of Snow Joe
®
, LLC
SJBLZD-LED
Form No. SJ-SJBLZD-LED-880E-MR1
OPERATOR’S MANUAL
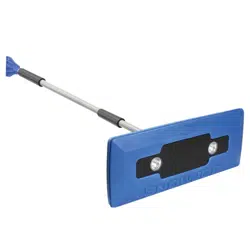
LED LIGHTED 4-IN-1 ICE SCRAPER +
SNOW BROOM
© 2020 by Snow Joe
®
, LLC
All rights reserved. Original instructions.
SAVE THESE INSTRUCTIONS
R
If you have any questions or comments, please call the Snow Joe
®
+ Sun Joe
®
Customer Service
department at: 1-866-SNOWJOE (1-866-766-9563)
C
L
O
S
E
O
P
E
N
A.
B. C. D.
m Battery Caution + Disposal Information
1. Batteries vary according to device. Use the correct size and type of battery specied by the manufacturer of
your device.
2. Install only new batteries of the same type in your product (where applicable).
3. Failure to insert batteries in the correct polarity, as indicated in the battery compartment or manual, may shorten
the life of the batteries or cause batteries to leak.
4. Do not mix old and new batteries.
5. Do not mix Alkaline, Standard (Carbon-Zinc) or Rechargeable (Nickel Cadmium, Nickel Metal Hydride,
or Lithium-Ion) batteries.
6. Do not dispose of batteries in re.
7. Batteries should be recycled or disposed of as per state and local guidelines.
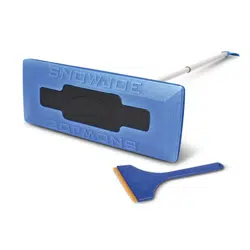
Battery Installation + Operation
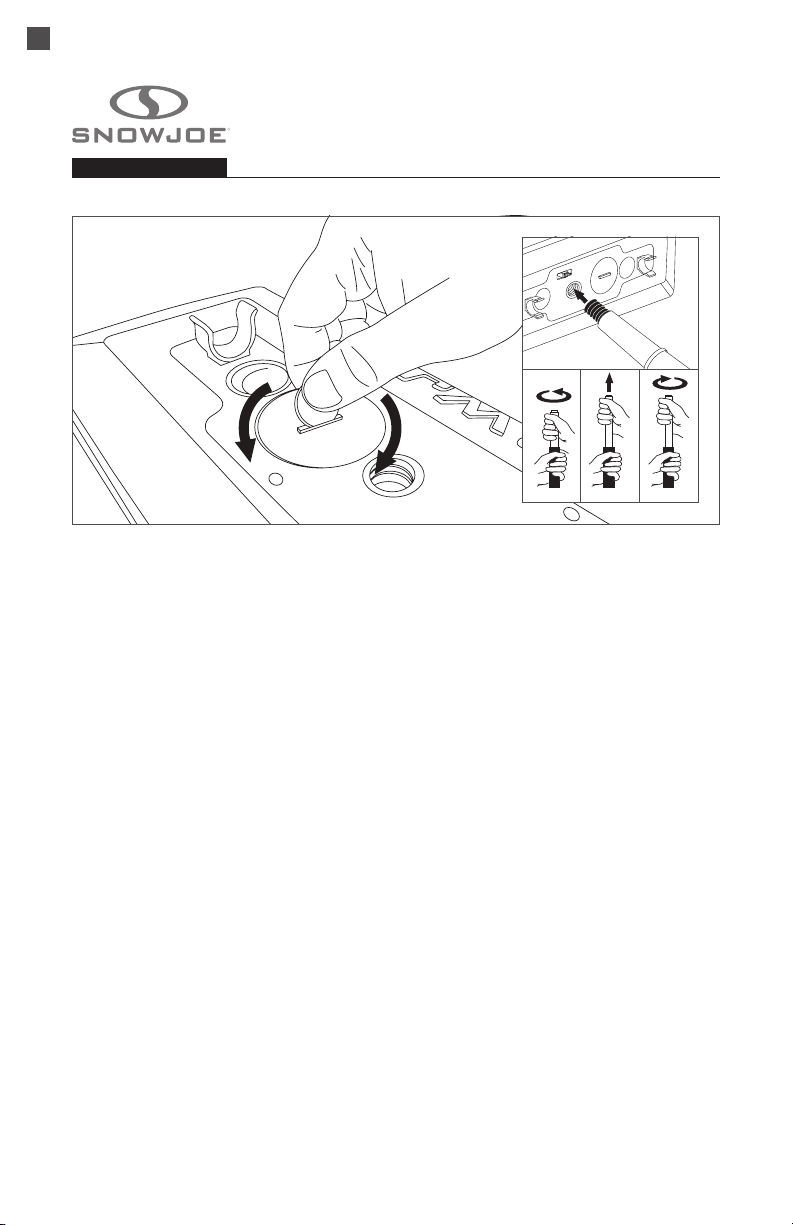
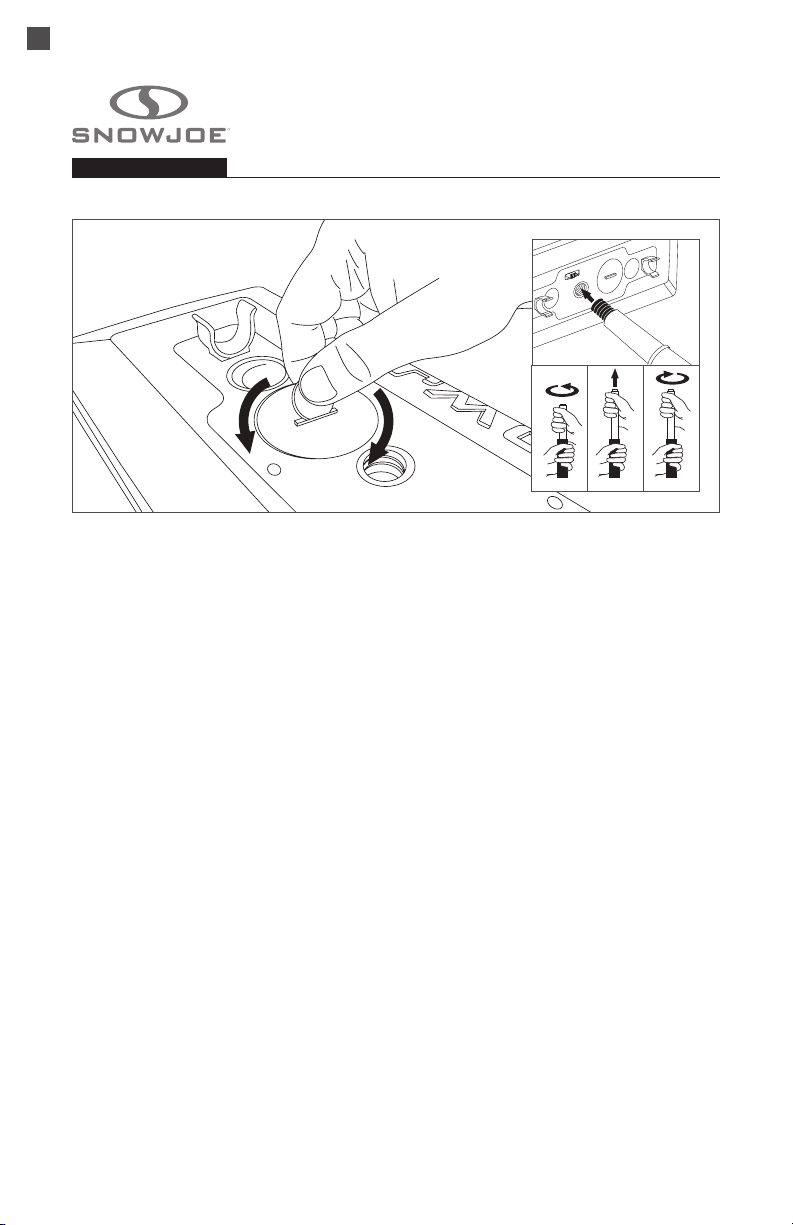
1. Make sure the unit is turned o and switch is in center position.
2. Locate battery compartment on the back panel of illum-n-broom. Loosen and remove
battery cover using a coin or slotted screwdriver. Your hand works pretty good, too.
NOTE: The battery compartment cover must be properly aligned to maintain a
watertight seal, and for easy removal later. To reinstall and properly realign the cover
threads, rst place the broom head on a at surface. Next, twist the cover two full
turns to the left, then twist right until tight.
3. Insert two AAA batteries as indicated in the battery compartment, ensuring proper
alignment.
4. Close battery compartment door and tighten to ensure watertight seal. Do not over-tighten.
NOTE: Slide on/o switch right to activate lights. Slide switch left to activate safety blinkers.
Attaching the Pole
A. Secure handle to head.
B. Twist pole to loosen.
C. Extend to desired length.
D. Twist to lock.
EN

2
HAVE A QUESTION? WE’RE HERE TO HELP! 1-866-766-9563 OR
VISIT US ONLINE AT SNOWJOE.COM
R4_01282020
SNOW JOE
®
+ SUN JOE
®
CUSTOMER PROMISE
OUR WARRANTY:
Snow Joe
warrants new, genuine, powered and non-powered Products to be free from defects in
material or workmanship when used for ordinary household use for a period of two years from the date
of purchase by the original, end-user purchaser when purchased from Snow Joe or from one of Snow
Joe’s authorized sellers with proof of purchase. Because Snow Joe is unable to control the quality of its
Products sold by unauthorized sellers, unless otherwise prohibited by law, this Warranty does not cover
Products purchased from unauthorized sellers. If your Product does not work or there’s an issue with a
specic part that is covered by the terms of this Warranty, Snow Joe will elect to either (1) send you a free
replacement part, (2) replace the Product with a new or comparable product at no charge, or (3) repair
the Product. How cool is that!
This Warranty gives you specific legal rights, and you may also have other rights which vary from
State to State.
PRODUCT REGISTRATION:
Snow Joe strongly encourages you to register your Product. You can register online at snowjoe.
com/register, or by printing and mailing in a registration card available online from our website, or
calling our Customer Service Department at 1-866-SNOWJOE (1-866-766-9563), or by e-mailing us
at [email protected]. Failure to register your Product will not diminish your warranty rights. However,
registering your Product will allow Snow Joe to better serve you with any of your customer service needs.
WHO CAN SEEK LIMITED WARRANTY COVERAGE:
This Warranty is extended by Snow Joe to the original purchaser and original owner of the Product.
WHAT IS NOT COVERED?
This Warranty does not apply if the Product has been used commercially or for non-household or rental
applications. This Warranty also does not apply if the Product was purchased from an unauthorized
seller. This Warranty also does not cover cosmetic changes that do not aect performance. Wearing
parts like belts, augers, chains and tines are not covered under this Warranty, and can be purchased at
snowjoe.com or by calling 1-866-SNOWJOE (1-866-766-9563).
ABOVE ALL ELSE, Snow Joe, LLC (“Snow Joe”) is dedicated to you, our customer. We strive to make
your experience as pleasant as possible. Unfortunately, there are times when a Snow Joe
®
, Sun Joe
®
,
or Aqua Joe
®
product (“Product”) does not work or breaks under normal operating conditions. We think
it’s important that you know what you can expect from us. That’s why we have a Limited Warranty
(“Warranty”) for our Products.

3
Una división de Snow Joe
®
, LLC
SJBLZD-LED
Forma Nº SJ-SJBLZD-LED-880S-MR1
MANUAL DEL OPERADOR
RASPA-HIELOS Y CEPILLO
QUITANIEVE 4-EN-1 CON LUCES LED
©2020 Snow Joe
®
, LLC
Derechos reservados. Instrucciones originales.
SAVE THESE INSTRUCTIONS
R
Si tiene preguntas o comentarios, comuníquese con la central de servicio al cliente Snow Joe
®
+
Sun Joe
®
llamando al: 1-866-SNOWJOE (1-866-766-9563).
C
E
R
R
A
R
A
B
R
I
R
A.
B. C. D.
m Precaución y e información sobre eliminación de las baterías
1. Las baterías varían de acuerdo al dispositivo. Use el tamaño y tipo correctos de baterías especicadas por el
fabricante de su dispositivo.
2. Instale solo nuevas baterías del mismo tipo en su producto (donde corresponda).
3. No insertar las baterías con la polaridad correcta, tal como se indica en el compartimiento de la batería o en el
manual, puede reducir el ciclo de vida útil de las baterías o causar fugas en estas.
4. No combine baterías nuevas con antiguas.
5. No combine baterías alcalinas, estándar (de zinc-carbono) o recargables (de níquel-cadmio, de níquel-hidruro
metálico o de iones de litio).
6. No arroje las baterías al fuego.
7. Las baterías deben ser recicladas o desechadas según los reglamentos locales y estatales.
Instalación + operación de las baterías
1. Asegúrese de que la unidad esté apagada y el interruptor se encuentre en el centro.
2. Ubique el compartimiento de las baterías en el panel trasero del Illum-N-Broom. Aoje y retire la cubierta de
las baterías usando una moneda o destornillador plano. Puede también usar su mano.
NOTA: la cubierta del compartimiento de las baterías debe estar alineada correctamente para
mantener un sellado hermético y para un fácil retiro posteriormente. Para reinstalar y realinear
correctamente las roscas de la cubierta, primero coloque el cabezal del cepillo en una supercie
plana. Luego, gire la cubierta dos vueltas completas hacia la izquierda, y luego gírela a la derecha
hasta que esté ajustada.
3. Inserte dos baterías AAA tal como se indica en el compartimiento de baterías. Asegúrese de colocarlas
correctamente.
4. Cierre el compartimiento de baterías y apriete para asegurar un sellado hermético. No lo apriete demasiado.
NOTA: deslice el interruptor a la derecha para activar las luces. Deslice el interruptor hacia la izquierda para
activar las luces intermitentes de seguridad.
Conexión del tubo
A.
Asegure el mango al cabezal.
B.
Gire el tubo para aojar.
C. Extienda a la longitud deseada.
D. Gire para trabar.
ES

4
LA PROMESA DE SNOW JOE
®
+ SUN JOE
®
AL CLIENTE
¿TIENE PREGUNTAS? ¡ESTAMOS PARA AYUDARLE! LLÁMENOS AL 1-866-766-9563
O VISÍTENOS EN SNOWJOE.COM
NUESTRA GARANTÍA:
Snow Joe
garantiza que sus Productos motorizados y no motorizados, nuevos y genuinos, están libres
de defectos materiales o de mano de obra al ser usados en tareas domésticas normales durante un
periodo de dos (2) años a partir de la fecha de compra por parte del comprador original y usuario
nal, cuando este último los compra a través de Snow Joe o un vendedor autorizado por Snow Joe
y ha obtenido un comprobante de compra. Ya que Snow Joe no puede controlar la calidad de sus
Productos vendidos por vendedores no autorizados, a menos que la ley lo prohíba esta Garantía no
cubre Productos adquiridos a través de vendedores no autorizados. Si su Producto no funciona, o hay
un problema con una parte especíca que está cubierta por los términos de esta Garantía, Snow Joe
elegirá entre: (1) enviarle una parte de repuesto gratuita; (2) reemplazar el Producto con uno nuevo o
similar sin costo alguno; o (3) reparar el Producto. ¡Un excelente soporte!
Esta Garantía le da derechos legales específicos, y usted puede también tener otros derechos
según el Estado.
REGISTRO DEL PRODUCTO:
Snow Joe le recomienda enfáticamente registrar su Producto. Usted puede registrar su Producto en línea
visitando snowjoe.com/register, imprimiendo y enviando por correo una tarjeta de registro disponible
en línea en nuestro sitio Web, llamando a nuestra central de servicio al cliente al 1-866-SNOWJOE
sus derechos de garantía no disminuirán; sin embargo, registrar su Producto permitirá que Snow Joe le
pueda atender mejor si usted tiene alguna necesidad como cliente.
¿QUIÉN PUEDE SOLICITAR COBERTURA DE GARANTÍA LIMITADA?
Esta Garantía es otorgada por Snow Joe al comprador original y propietario original del Producto.
¿QUÉ NO ESTÁ CUBIERTO?
Esta Garantía no se aplica si el Producto ha sido usado de forma comercial o en aplicaciones no
domésticas o de alquiler. Esta Garantía tampoco se aplica si el Producto fue adquirido desde un vendedor
no autorizado. Esta garantía tampoco cubre cambios cosméticos que no afecten el funcionamiento
del Producto. Las partes desgastables como correas, brocas y cuchillas no están cubiertas por
esta Garantía, y pueden ser compradas visitando snowjoe.com o llamando al 1-866-SNOWJOE
(1-866-766-9563).
POR SOBRE TODO, en Snow Joe, LLC (“Snow Joe”) estamos dedicados a usted, nuestro cliente. Nos
esforzamos por hacer que su experiencia sea lo más placentera posible. Desafortunadamente, hay
veces en que un producto Snow Joe
®
, Sun Joe
®
, o Aqua Joe
®
(el “Producto”) no funciona o sufre un
desperfecto bajo condiciones normales de operación. Creemos que es importante que usted sepa que
puede conar en nosotros. Es por eso que tenemos esta Garantía Limitada (la “Garantía”) para nuestros
Productos.
R4_01282020
5
Une division de Snow Joe
®
, LLC
SJBLZD-LED
Formulaire n° SJ-SJBLZD-LED-880F-MR1
MANUEL D’UTILISATION
BALAI À NEIGE + GRATTOIR À
GLACE 4 EN 1 À ÉCLAIRAGE DEL
© 2020 by Snow Joe
®
, LLC
Tous droits réservés. Instructions d’origine.
SAVE THESE INSTRUCTIONS
R
Si vous avez des questions ou des commentaires, veuillez appeler le service clientèle
Snow Joe
®
+ Sun Joe
®
au : 1-866-766-9563
C
L
O
S
E
O
P
E
N
A.
B. C. D.
m Mise en garde concernant les batteries et informations sur leur élimination
1. Les batteries varient selon le type d’outils ou de machines. Utiliser la taille et le type de batteries spéciés par le
fabricant de l’outil ou de la machine.
2. Le cas échéant, insérer uniquement des batteries neuves de même type dans l’outil ou la machine.
3. Si, en l’insérant, la polarité de la batterie n’est pas respectée, comme indiqué dans le compartiment à batterie ou
dans le manuel, sa durée de vie pourrait être réduite ou elle pourrait fuir.
4. Ne pas mélanger des batteries anciennes et des neuves.
5. Ne pas mélanger des batteries alcalines, standard (carbone/zinc) ou rechargeables (au nickel-cadmium, au
nickel-métal-hydrure ou au lithium-ion).
6. Ne jeter aucune batterie au feu.
7. Les batteries doivent être recyclées ou éliminées en observant les directives provinciales, territoriales ou locales.
Insertion des piles et utilisation
1. Assurez-vous que la machine est éteinte et que l’interrupteur est sur la position centrale.
2. Repérez le compartiment à piles au dos du balai illum-n-broom. Desserrez et retirez le couvercle
du compartiment à piles à l’aide d’une pièce de monnaie ou d’un tournevis pour écrous à fente.
Vous pouvez également utiliser vos doigts.
REMARQUE : le couvercle du compartiment à piles doit être convenablement aligné pour
que la fermeture soit étanche et pour pouvoir le retirer plus facilement plus tard. Pour
replacer et réaligner de façon appropriée les lets du couvercle, posez d’abord la tête du
balai sur une surface plate. Ensuite, faites tourner le couvercle sur deux tours complets
vers la gauche, puis faites le tourner vers la droite jusqu’à ce qu’il soit serré.
3. Insérez comme indiqué deux piles AAA dans le compartiment à piles en vous assurant qu’elles
soient dans le bon sens.
4. Fermez le compartiment à piles et serrez pour assurer l’étanchéité. Ne serrez pas trop fort.
REMARQUE : pour allumer le phare, faites glisser l’interrupteur marche-arrêt vers la droite.
Pour allumer le clignotant d’urgence, faites glisser l’interrupteur vers la gauche.
Attache du manche
A. Vissez le manche dans la tête.
B. Tournez le manche pour le desserrer.
C. Allongez à la longueur désirée.
D. Tournez pour verrouiller.
FR

6
LA PROMESSE DE SNOW JOE
®
+ SUN JOE
®
À SES CLIENTS
VOUS AVEZ UNE QUESTION? NOUS SOMMES LÀ POUR VOUS AIDER! APPELEZ
LE 1-866-766-9563 OU RENDEZ-VOUS SUR NOTRE SITE SNOWJOE.COM.
NOTRE GARANTIE :
Snow Joe
déclare et garantit que les Produits neufs, d’origine, électriques ou non électriques sont
exempts de vices de matière ou de fabrication et, lorsqu’ils font l’objet d’une utilisation résidentielle
et ménagère ordinaire, les garantit pendant une période de deux ans à compter de la date d’achat au
détail par l’acheteur primitif auprès de Snow Joe ou d’un des revendeurs agréés de Snow Joe, preuve
d’achat à l’appui. Étant donné que Snow Joe ne peut pas contrôler la qualité de ses Produits vendus
par des revendeurs non agréés, sauf stipulation contraire de la loi, la présente Garantie ne couvre pas
les Produits achetés auprès de vendeurs non agréés. Si votre Produit ne fonctionne pas ou si une pièce
spécique couverte par les modalités de la présente Garantie fait l’objet d’un problème quelconque,
Snow Joe choisira (1) de vous envoyer une pièce de rechange gratuite, (2) de remplacer le Produit par
un produit neuf ou comparable, gratuitement, ou (3) de réparer le Produit. Génial, n’est-ce pas?
La présente Garantie vous donne des droits judiciaires spécifiques, et vous pouvez également
avoir d’autres droits qui peuvent varier d’une province ou d’un territoire à l’autre.
ENREGISTREMENT DU PRODUIT :
Snow Joe vous recommande vivement d’enregistrer votre Produit. Vous pouvez l’enregistrer
en ligne sur le site
snowjoe.com/register, ou en imprimant et en envoyant par courrier une carte
d’enregistrement oerte en ligne sur notre site Web, ou par téléphone en appelant notre Service à
la clientèle au 1-866-SNOWJOE (1-866-766-9563), ou encore en nous envoyant un courriel à
conséquence sur vos droits concernant la garantie. Toutefois, l’enregistrement de votre Produit
permettra à Snow Joe de mieux répondre au moindre besoin que vous pourriez avoir en matière de
service à la clientèle.
QUI PEUT REVENDIQUER LA COUVERTURE DE LA GARANTIE?
La présente Garantie est étendue par Snow Joe à l’acheteur et propriétaire primitif du Produit.
QU’EST-CE QUI N’EST PAS COUVERT?
La présente Garantie ne s’applique pas si le Produit a été utilisé commercialement, pour des travaux
non résidentiels ou s’il fait l’objet d’une location. La présente Garantie ne s’applique pas non plus si le
Produit a été acheté auprès d’un revendeur non agréé. La présente garantie ne couvre pas non plus les
changements cosmétiques qui n’aectent pas le rendement. Les pièces d’usure comme les courroies,
les tarières, les chaînes et les dents ne sont pas couvertes au titre de la présente Garantie et peuvent
être achetées en ligne sur le site snowjoe.com ou en appelant le 1-866-SNOWJOE (1-866-766-9563).
Vous êtes notre client et Snow Joe, LLC (« Snow Joe ») SE MET EN QUATRE pour vous servir. Nous nous
eorçons de vous rendre l’utilisation de nos produits aussi plaisante que possible. Malheureusement, il
peut arriver qu’un produit Snow Joe
®
, Sun Joe
®
ou Aqua Joe (« Produit ») ne fonctionne pas ou se casse
dans des conditions d’utilisation normales. Nous pensons qu’il est important que vous sachiez ce que vous
pouvez attendre de nous. C’est pourquoi nous avons une garantie limitée (« Garantie ») pour nos Produits.
R4_01282020

7
NOTES | NOTAS

snowjoe.com