Loading ...
Loading ...
Loading ...
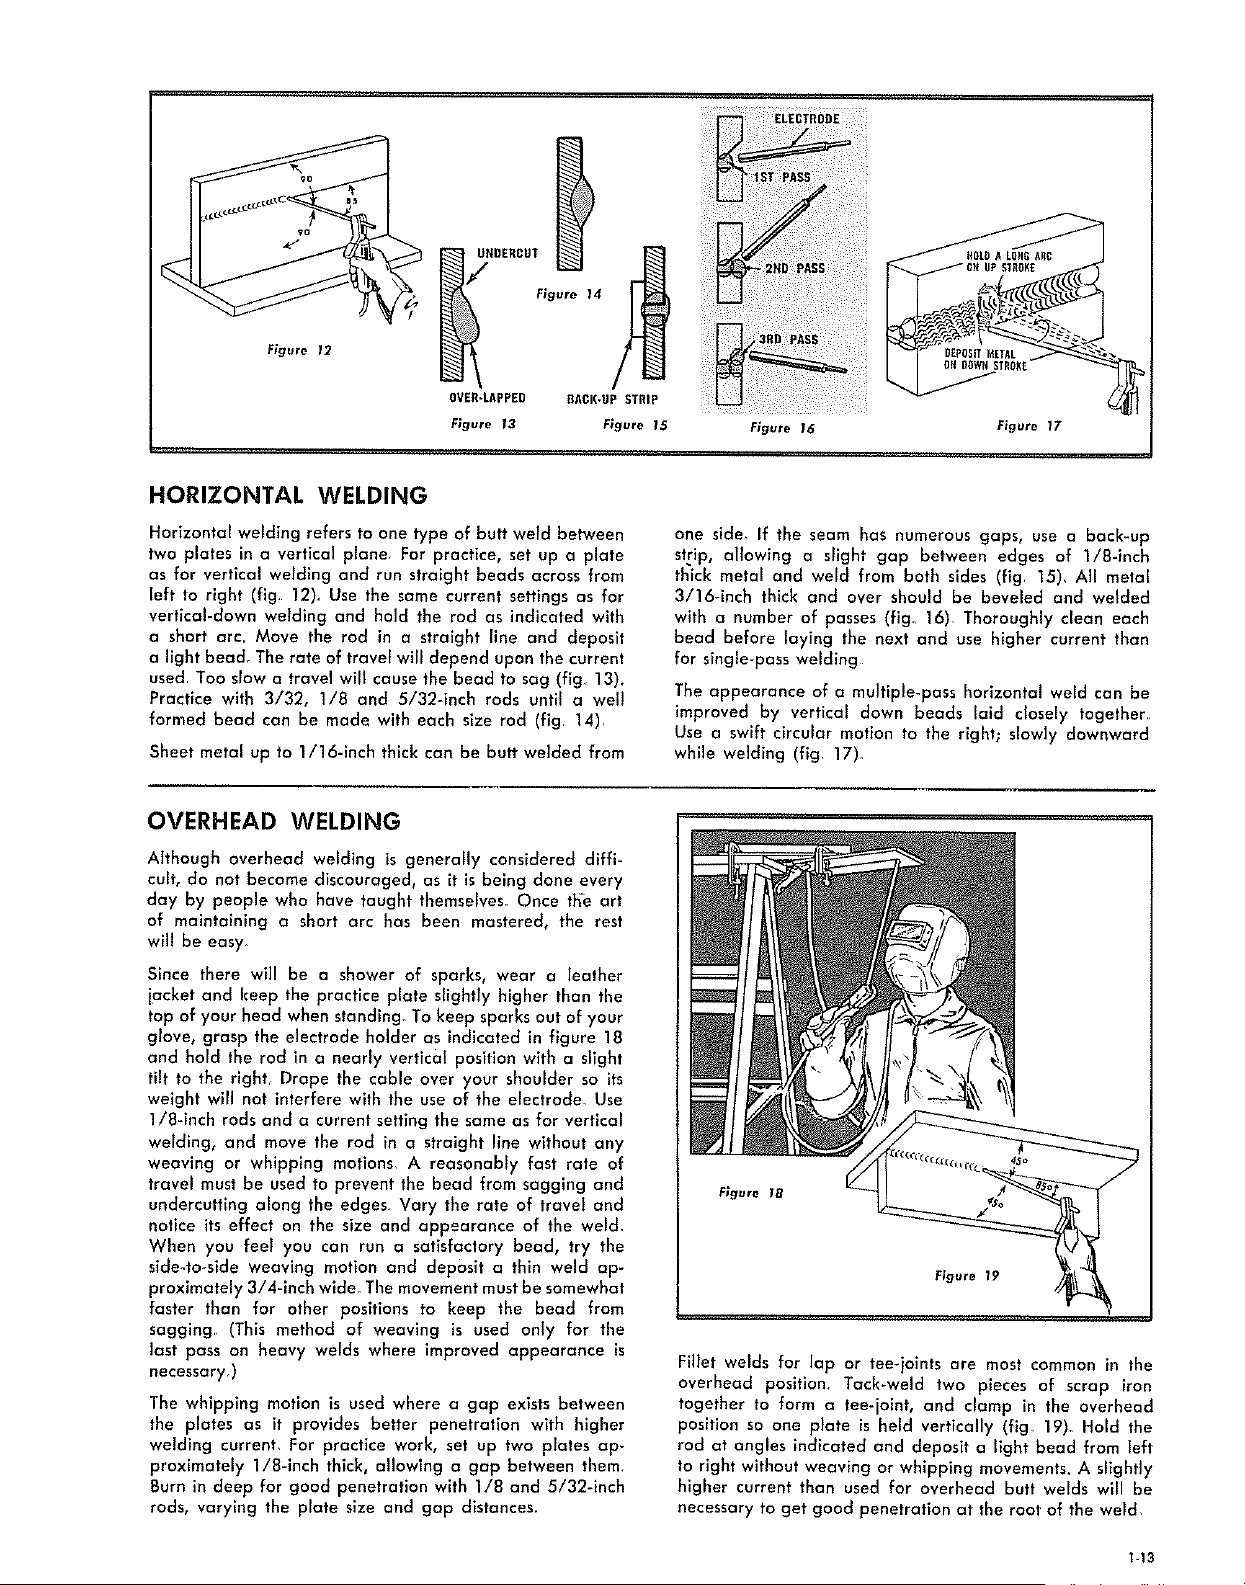
Figure 12
_/_ UHRERCUTFigure 14
OVER-LAPPED I]ACI(-Up STRIP
Figure 13 Figure 15
DEPOSITMETAL
OH GOWHSTROKE
HORIZONTAL WELDING
Horlzontal welding refers to one type of butt weld between
two plates in a vertlcal plane. For practice, set up a plate
as for vertical welding and run straight beads across from
left to right (fig 12)_ Use the same current settings as for
vertlcal-down welding and hold the rod as indicated with
a short arc. Move the rod in a straight line and deposit
a light bead. The rate of travel will depend upon the current
used Too slow a travel will cause the bead to sag (fig 13).
Practice with 3/32, 1/8 and 5/32-inch rods untll a wel!
formed bead can be made with each size rod (fig 14).
Sheet metal up to 1/16-inch thick can be butt welded from
one side_ if the seam has numerous gaps, use a back-up
strip, albwlng a slight gap between edges of 1/8-inch
thick metal and weld from both sides (fig 15), All metal
3/16-1nch thick and over should be beveled and welded
with a number of passes (fig_ 16) Thoroughly clean each
bead before laying the next and use higher current than
for single-pass welding
The appearance of a multlple-pass horizontal weld can be
improved by vertical down beads laid closely together.
Use a swift circular motion to the right; slowly downward
while welding (fig 17)
OVERHEAD WELDING
Although overhead welding is generally considered diffl-
celt, do not become discouraged, as it is being done every
day by people who have taught themselves_ Once theeart
of maintaining a short arc has been mastered, the rest
will be easy
Since there will be a shower of sparks, wear a leather
jacket and keep the practice plate slightly higher than the
top of your head when standing To keep sparks out of your
glove, grasp the electrode holder as indicated in figure 18
and hold the rod in a nearly vertlcal position with a slight
tilt to the right_ Drape the cable over your shoulder so its
weight will not interfere with the use of the electrode_ Use
1/8-1nch rods and a current setting the same as for vertical
welding, and move the rod in a straight llne without any
weaving or whipping motions A reasonably fast rate of
travel must be used to prevent the bead from sagging and
undercutting along the edges. Vary the rate of travel and
notice its effect on the size and appearance of the weld.
When you feel you can run a satisfactory bead, try the
slde_to-side weaving motion and deposit a thin weld ap-
proximately 3/4-inch wlde_ The movement must be somewhat
faster than for other positions to keep the bead from
sagging (This method of weaving is used only for the
last pass on heavy welds where improved appearance is
necessary)
The whipping motion is used where a gap exists between
the plates as it provides better penetration with higher
we]dlng current, For practice work, set up two plates ap-
proximately 1/8-inch thick, allowing a gap between them
Burn in deep for good penetration with 1/8 and 5/32-inch
rods, varying the plate size and gap distances.
Figure 19
Fillet welds for lap or tee-joints are most common in the
overhead position. Tacbweld two pieces of scrap iron
together to form a tee-jolnt, and clamp in the overhead
position so one plate is held vertically (fig. 19)_ Hold the
rod at angles indicated and deposit a light bead from left
to right without weaving or whipping movements. A slightly
higher current than used for overhead butt welds will be
necessary to get good penetration at the root of the weld
t-13
Loading ...
Loading ...
Loading ...