Loading ...
Loading ...
Loading ...
English - 14
English - 13
SETTING UP
CONNECT THE WATER LINE
TO THE FRIDGE
• Connect the plastic line on the back of your
fridge to the cartridge holder outlet (fully insert
the plastic line to the cartridge holder outlet).
• Insert plastic clip to the cartridge holder inlet
and outlet.
• Turn water on and check for any leakage.
• You can purchase the necessary fi lter
cartridge at the retailer where you
purchased this refrigerator.
• The water line must be connected to
drinkable water only
• A compression fi tting and nut kit is
supplied with the unit and it is inside the
fridge drawer.
• When pushing the Refrigerator back,
make sure you don’t roll over the power
cord or water line(Icemaker supply line)
Cartridge
Holder
Clip
Filter
cartridge
Plastic line
(Provided)
TO USE WITHOUT THE WATER
FILTER
Connecting to the water supply line
• Shut off the main water supply line and turn
the Ice maker to the off position.
• Locate the nearest cold water drinking line.
1
2
3
456
7
1. Cold Water line
2. Pipe Clamp.
3. Plastic line
4. Compression Nut
5. Compression Sleeve
6. Packing Nut.
7. Shut Off Valve
Connect the water line to the fridge
Compression
Nut (1/4”)
(Provided)
Ferrule
(Purchased)
Plastic Tubing
(Provided)
Compression
Fitting
(Provided)
Compression
nut (1/4”)
(Purchased)
Bulb
or
Copper tubing
(Not supplied)
Plastic tubing
(Not supplied)
Household water line
Refrigerator
1. Slip the compression nut through the plastic
tubing.
2. After inserting the compression nut into plastic
tubing, tighten the compression nut onto 1/4”
compression fi tting(Provided).
DA68-02601C-00.indb 13
English - 12
ASSEMBLE THE FREEZER
DRAWER
To reattach the drawer after you have moved
the fridge to its fi nal location, assemble parts in
reverse order.
LEVEL EHT GN I TSUJDA
Make sure the refrigerator is level so that you can
make fi nal adjustments. Use a level to test if the
refrigerator is level both side to side and back to
front. If the refrigerator is not level, it will not be
possible to get the doors perfectly even, which
may cause moisture condensation and increased
energy bills. Below is an example of how to level
the refrigerator if the left side of the refrigerator is
lower than the right side.
How to adjust the level
1.
r ewo l eh t evome r dna r ewa r d r ezee r f eh t nepO
basket.
2. hcton a otni ) - ( revi rdwercs edalb-ta fl a t resnI
on the left control lever, and turn it count
clockwise to level the refrigerator. (You turn the
lever clockwise to lower the refrigerator and
counterclockwise to raise it.)
fl at-blade screwdriver(-)
Control Lever
Both control levers must be touching the
fl oor to avoid possible personal injury or
property damage because of tipping.
If the right side is lower, perform the same
procedure, but with the right control lever.
It is diffi cult to remove the cover leg front
from the refrigerator, so we do not
recommend making small adjustments
with the control lever. Instead, refer to the
next page for the best way to make minor
adjustments to the doors.
CAUTION
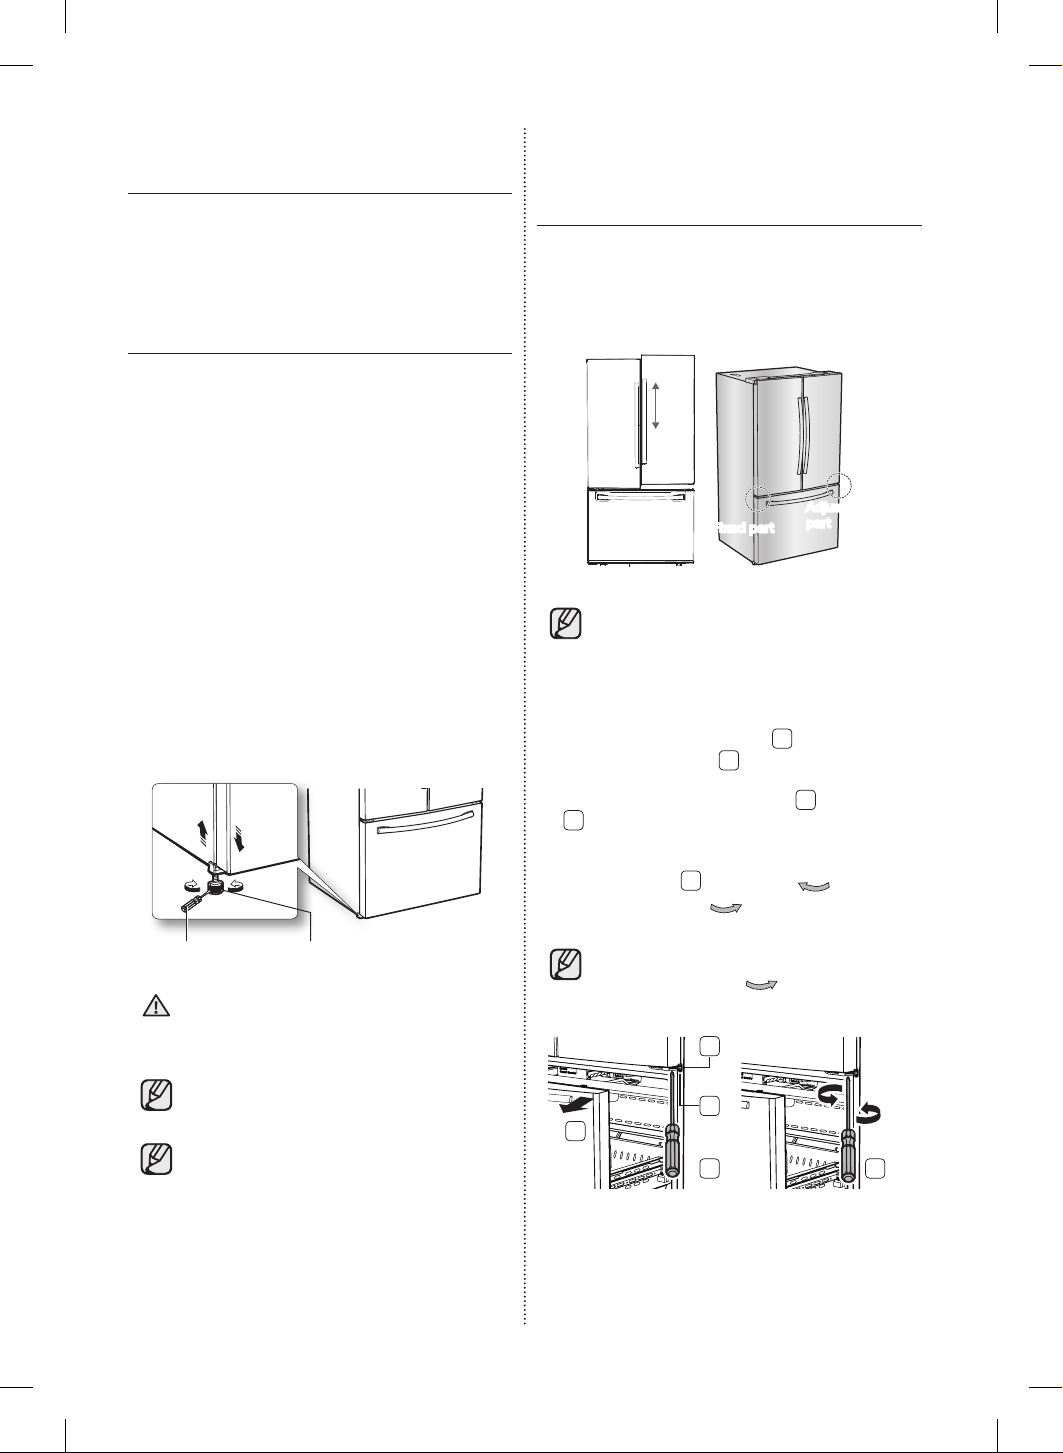
MAKING MINOR
ADJUSTMENTS BETWEEN
DOORS
Remember, a leveled refrigerator is necessary
for getting the doors perfectly even. If you need
help, review the previous section on leveling the
refrigerator.
Adjustment
part
Fixed part
The left door is fi xed. To make minor
adjustments between doors, adjust only
the right door.
DA68-02601C-00.indb 12
1. Pull out the freezer drawer ,then you can
see the lower hinge .
2.
3. Adjust the height by turning a philips
screwdriver (+) clockwise ( ) or
counterclockwise ( ).
1
2
3
4
Insert a philips screwdriver (+) into the shaft
of the lower hinge.
DOWN
UP
3
When you turn a philips screwdriver (+)
counterclockwise ( ), the door will
move up.
UP
1
2
3
4
3
DA68-02601C-06-(EN+ES+FR).indd 14 2018-09-04 10:46:26
English - 15
English - 13
SETTING UP
CONNECT THE WATER LINE
TO THE FRIDGE
• Connect the plastic line on the back of your
fridge to the cartridge holder outlet (fully insert
the plastic line to the cartridge holder outlet).
• Insert plastic clip to the cartridge holder inlet
and outlet.
• Turn water on and check for any leakage.
• You can purchase the necessary fi lter
cartridge at the retailer where you
purchased this refrigerator.
• The water line must be connected to
drinkable water only
• A compression fi tting and nut kit is
supplied with the unit and it is inside the
fridge drawer.
• When pushing the Refrigerator back,
• Use the new hose-sets supplied with the
appliance only. Do not re-use an old
hose set.
make sure you don’t roll over the power
cord or water line(Icemaker supply line)
Cartridge
Holder
Clip
Filter
cartridge
Plastic line
(Provided)
TO USE WITHOUT THE WATER
FILTER
Connecting to the water supply line
• Shut off the main water supply line and turn
the Ice maker to the off position.
• Locate the nearest cold water drinking line.
1
2
3
456
7
1. Cold Water line
2. Pipe Clamp.
3. Plastic line
4. Compression Nut
5. Compression Sleeve
6. Packing Nut.
7. Shut Off Valve
Connect the water line to the fridge
Compression
Nut (1/4”)
(Provided)
Ferrule
(Purchased)
Plastic Tubing
(Provided)
Compression
Fitting
(Provided)
Compression
nut (1/4”)
(Purchased)
Bulb
or
Copper tubing
(Not supplied)
Plastic tubing
(Not supplied)
Household water line
Refrigerator
1. Slip the compression nut through the plastic
tubing.
2. After inserting the compression nut into plastic
tubing, tighten the compression nut onto 1/4”
compression fi tting(Provided).
DA68-02601C-00.indb 13
DA68-02601C-06-(EN+ES+FR).indd 15
WARNING
Keep ventilation openings, in the appliance
enclosure or in the built-in structure, clear of
obstruction. Connect to potable water supply
only.
English - 14
DA68-02601C-06-(EN+ES+FR).indd 14 2018-09-05 10:48:58
Loading ...
Loading ...
Loading ...