Loading ...
Loading ...
Loading ...
13
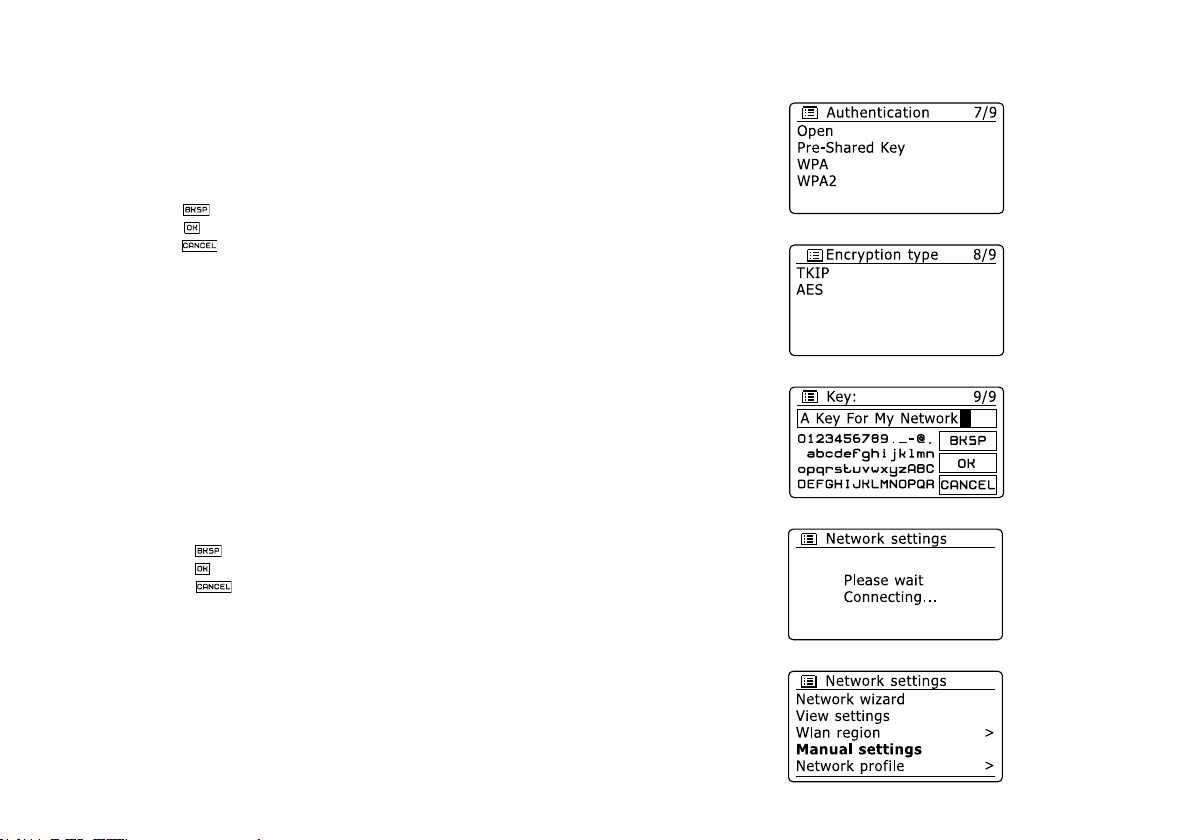
8.
9.
10.
11.
If you chose ‘Pre-Shared Key’ in step 7, you should then choose the WEP option. The key
should be entered using only the numbers 0-9 and the letters A-F. The key will be 10 charac-
ters long for 64-bit encryption and 26 characters long for 128-bit encryption. The radio will
accept lower-case letters a-f as equivalent to upper-case A-F. Spaces or special symbols are
not permitted in WEP keys.
The three controls on the right-hand side of the screen have special functions:
select ‘ ’ to erase a character just entered (long press to clear); Info again to continue
select ‘ ’ when the complete encryption key has been entered
select ‘ ’ to cancel and go back to the SSID settings screen
Once the key is entered the radio should connect to your network. Please skip to step 11.
WPA and WPA2 are similar, although WPA2 offers a higher level of security. Whichever
you selected in step 7, you then have to specify the variant used. They are TKIP (Temporal
Key Integrity Protocol) and AES (Advanced Encryption Standard). As previously, the setting
should match that used by your router. Some routers allow both to be specied, and the rou-
ter will use whichever variant is supported by the connected device. AES is regarded as the
more secure option if it is available.
The radio will then require you to enter the encryption key. This must be a string of between 8
and 63 characters and must be identical to the key which has been entered into your router.
Note – the encryption key is sensitive to the use of upper and lower case letters and symbols.
Take care to enter the key exactly, or the radio will not be able to connect to your router. The
three controls on the right-hand side of the screen have special functions. You can access
these by rotating the Tuning Control Rotary and then press the Tuning Control Rotary to
select as you needed:
select ‘ ’ to erase a character just entered (long press to clear ); Info again to continue
select ‘ ’ when the complete encryption key has been entered
select ‘ ’ to cancel and go back to the TKIP / AES options screen
Once the key is entered the radio should connect to the network.
While the radio is trying to connect to the network, it will display ‘Processing…’ when chec-
king the encryption key and then ‘Connecting…’.
If the connection is made successfully, the radio will return to the Network settings menu.
If the unit cannot connect, then it will display a ‘Failed to connect’ message and will return to
the SSID entry screen (step 6).
Once connected, the network settings are stored in the radio. The settings are retained when
the radio is disconnected from the mains.
You may now use the Back and Mode buttons to access the functions of your radio.
Loading ...
Loading ...
Loading ...