Loading ...
Loading ...
Loading ...
10
Custom Panel Dimensions
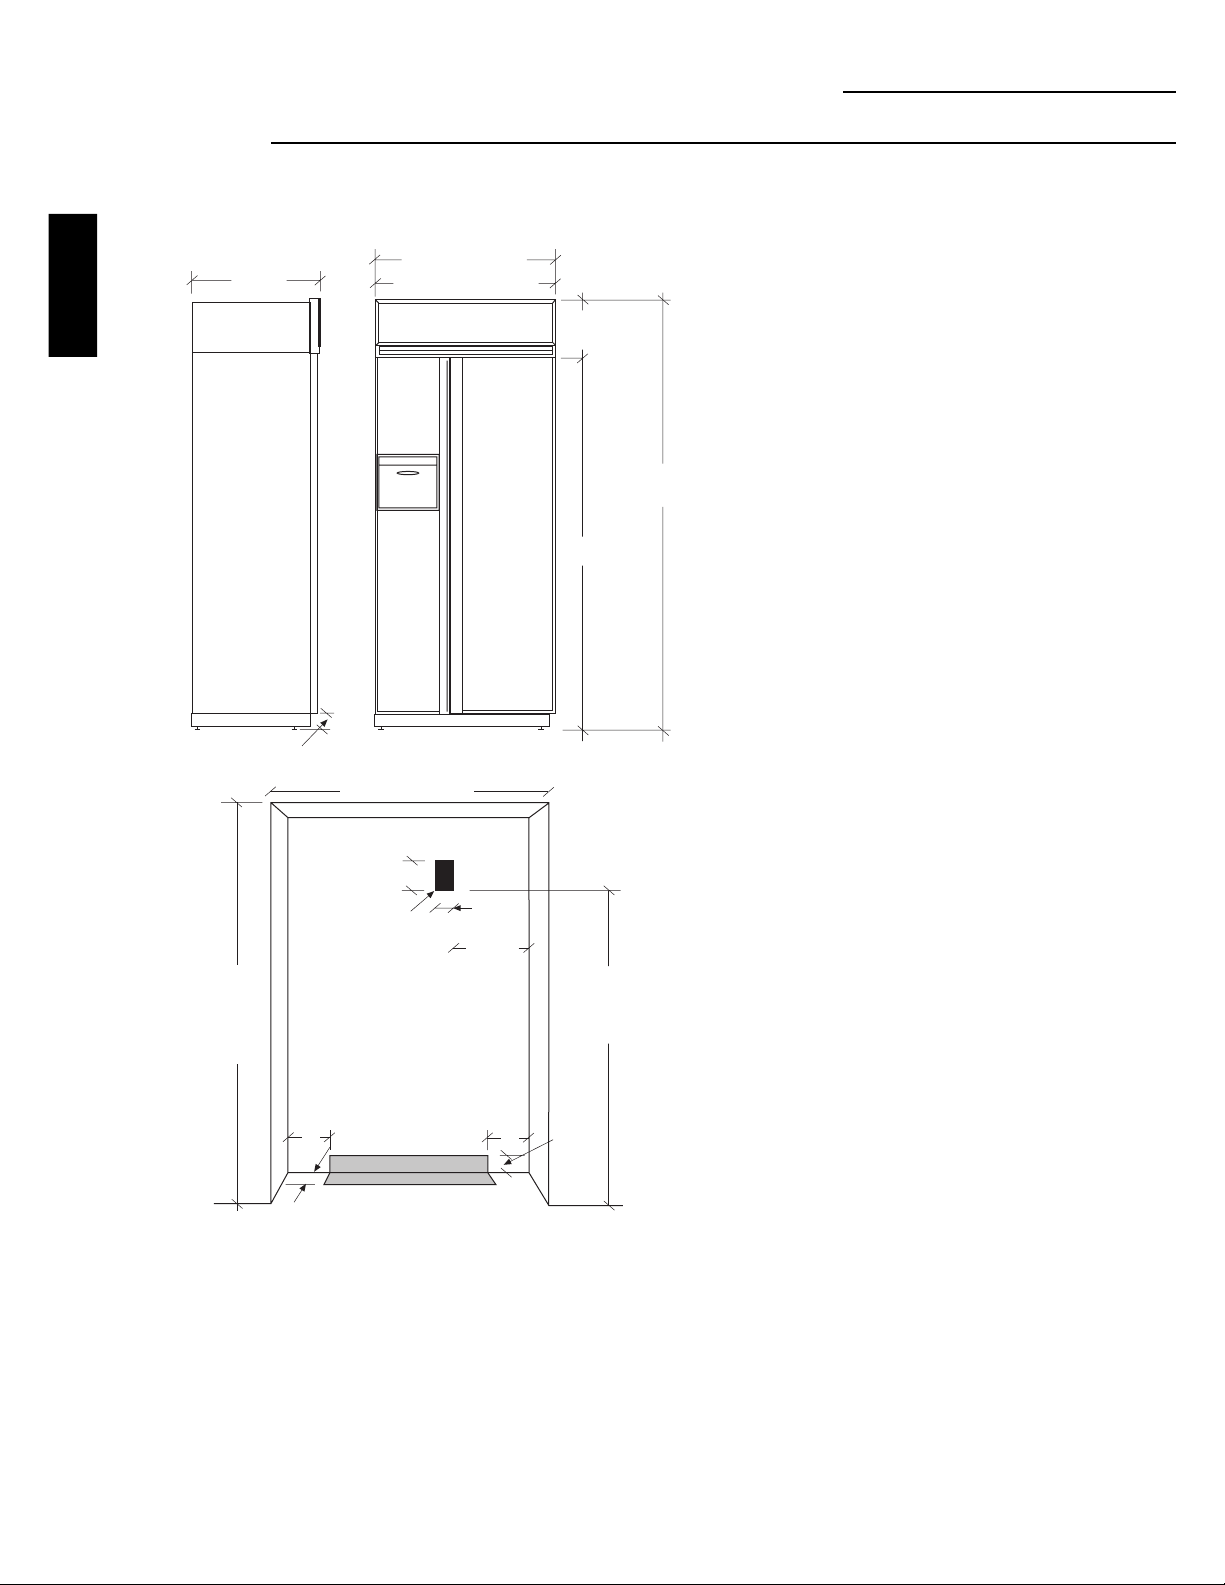
48" Built-In Refrigerator
*48" Min. for a flush installation into an enclosure.
*47-1/2" Min. for a semi-flush installation into an enclosure.
Note: Additional cutout width may be required when side panels are
used. Add side panel thickness to the finished cutout to calculate
rough-in width. See installation examples on page 4.
ZISW48D (white dispenser)
ZISB48D (black dispenser)
Design Information
Cutout dimensions, clearances and side panel sizes are
determined by the many installation options available. Side
panels must be used whenever the sides of the refrigerator
will be exposed. Side panels are not required when
refrigerator is installed into an enclosure or between pantry
and oven cabinets. IMPORTANT–Side panels, 1/2" min.
thick, are required for FRAMELESS CABINETS.
• Field installed custom panels, Lexan
or stainless steel
panels are required. Custom door panels and grille panel
sizes vary to accommodate the kit being used.
• A custom toekick can be installed to match or comple-
ment the surrounding cabinetry. Use supplied toekick as
a template to cut notches for hinges and water lines.
Optional Kits:
• ZWBP48D: Black Lexan
Panel Kit (no trim kit required).
• ZWWP48D: White Lexan
Panel Kit (no trim kit required).
• ZWSP48D: Stainless Steel Panel Kit (no trim kit required).
• ZKH1: For installation of custom handles on 1/4" panels.
• ZKT48: For installation of 3/4" custom panels.
• ZKHT1: For installation of custom handles on 3/4" panels.
(This kit must be used in combination with ZKT48.)
• ZWCD2: For installation of a custom collar trim on the
dispenser for one continuous custom panel
on the freezer door.
• ZKHSS1: Tubular Stainless Steel handles on 1/4" panels.
• ZKHTSS1: Tubular Stainless Steel handles on 3/4" panels.
(This kit must be used in combination with ZKT48.)
• ZG2: 1/4" grille panel frame side pieces for 83", 83-1/2" and
84-1/2" installation heights. Factory set height is 84".
Additional Specifications
• A 115 volt 60 Hz., 15 or 20 amp power supply is required.
An individual properly grounded branch circuit or circuit
breaker is recommended. Install a properly grounded
3-prong electrical receptacle recessed into the back wall.
Electrical must be located on rear wall.
• Water line can enter opening through the floor or back
wall. The water line should be 1/4" O.D. copper tubing
between the cold water line and water connection
location, long enough to extend to the front of the
refrigerator. Installation of an easily accessible shut off
valve in the water line is recommended.
Clearances
If the refrigerator is to be installed in a corner:
• A 4" min. clearance between the case trim and adjacent
wall on both sides of the refrigerator will assure a 90°
door opening and access to all drawers. A 10" clearance
is required on both sides for removal of pans.
Side View
(not to scale)
24 3/4"
4"
Front View
(not to scale)
48" Overall Width
47" Case Width
12 1/4" max
10-3/4" min
84 1/2" max
83" min
72 1/4"
CUSTOM PANEL
DIMENSIONS
*Finished Width
7"
Wall View
(not to Scale)
Locate Grounded
Electrical outlet
Within Solid
Area Above
84 1/2" max
83-1/4" min
Finished
Opening
74" From
Floor to
Bottom of
Electrical Area
5"
20 3/8"
5"
3 1/2"
5"
3 1/2"
Locate Water
Supply Within
the Shaded
Area Below
Loading ...
Loading ...
Loading ...