Loading ...
Loading ...
Loading ...
Operation
1) Do not use the rear assist system in the fol-
lowing cases:
– If the position and installation angle of the camera
have been changed, e.g. in a rear-end collision. Have a
specialised workshop check the system.
2) Optical illusions of the camera (examples)
The rear assist camera produces two-dimensional im-
ages. Any cracks in or objects protruding from the
ground or from other vehicles are more difficult to spot
or cannot be seen due to a lack of depth in the image
displayed.
Objects or other vehicles may seem to be closer or fur-
ther away than what they really are:
– On changing from a flat surface to a slope or gradient.
– On changing from a slope or gradient to a flat surface.
– If the vehicle has been overloaded at the rear.
– On approaching protruding objects. These objects
may be outside the angle of vision of the camera when
reversing.
Cleaning the camera lens
Keep the camera lens clean and clear of snow
and ice:
●
Moisten the lens using a commercially
available, alcohol-based glass cleaning
agent and clean the lens with a dry cloth
››› .
●
Remove snow using a small brush.
●
Use de-icing spray to remove any ice ››› .
CAUTION
●
Never use abrasive cleaners to clean the
camera lens.
●
Never remove snow or ice from the camera
lens using warm or hot water. This could
damage the lens.
Note
●
SEAT recommends that you practise park-
ing with the rear assist system in a quiet lo-
cation or in a car park to become familiar with
the system, including the orientation lines
and their function.
●
The orientation lines will not be displayed
on the screen if the rear lid is open or the fac-
tory-fitted towing bracket is electrically con-
nected to a trailer.
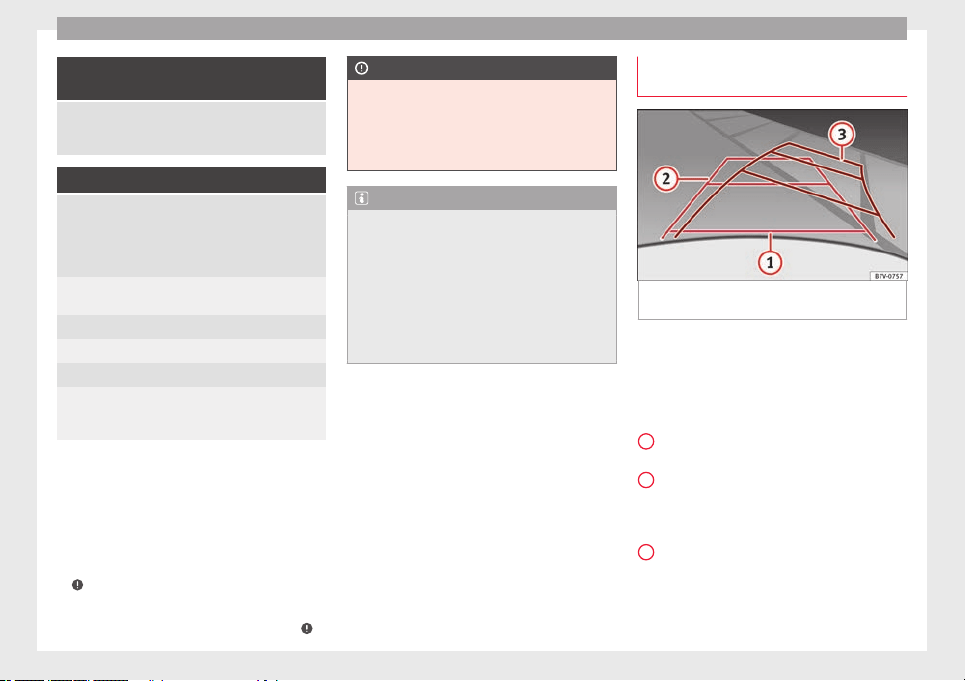
Parking perpendicular to the road
(mode 1)
Fig. 145 Display: orientation lines for the
parking space behind the vehicle
Summary of the orientation points
Meaning of orientation lines displayed on the
screen ››› Fig. 145
. All of the lengths of the
orient
ation line
s use a vehicle located on a
horizontal surface as reference.
Red: safety distance, i.e. road area loca-
ted up to 40 cm behind the vehicle.
Green: prolongation of the rear of the ve-
hicle (somewhat enlarged). The area dis-
played green ends around 2 metres be-
hind the vehicle, on the road.
Yellow: prolongation of the rear of the ve-
hicle as the steering wheel turns. The
area displayed yellow ends around 3 me-
tres behind the vehicle, on the road.
1
2
3
168
Loading ...
Loading ...
Loading ...