User Manual Panasonic NN-TK932SS 30" Trim Kit For Select Microwaves

Panasonic NN-TK932SS 30" Trim Kit For Select Microwaves - Use Manual - Use Guide PDF.
Documents: Go to download!
  • Owner's manual - (English, French, Spanish)


User Manual Trim Kit

CAUTION Read and follow all instructions completely.

  1. This Trim Kit is designed for use only with the Panasonic Microwave Oven listed in the table below, for installation into a cabinet.
  2. The dimensions and ground clearance of the cabinet opening must be as indicated in Figure 1 on page 6 to 9.
  3. For safe use of your microwave oven, do not alter or modify any part of this kit or the microwave oven.
  4. The microwave oven must be used with a properly grounded 3-prong receptacle in compliance with the National Electrical code, as well as any applicable local regulations. Refer also to the microwave operating instructions for other safety and electrical requirements.
  5. The microwave oven must be unplugged from the wall receptacle before attempting the installation of this kit.
  6. Save these instructions for local inspection and relocation of the microwave oven.
  7. Use caution so that the power cord is not pinched during installation.
  8. The diagrams in these instructions may vary from the actual unit and is only for reference.

1. Parts List

Tools Needed: Measuring tape, pencil, Phillips screwdriver, Ø 2 ( 5 /64") mm drill

Parts Supplied

2. Installation Diagram

Trim Kit Dimensions

TK932S

TK922S

TK732S

TK722S

Width

30" (760 mm)

27" (684 mm)

30" (760 mm)

27" (684 mm)

Height

18 V (472 mm)

18 %;" (472 mm)

16 1/2" (419 mm)

16 'A" (419 mm)

Depth (Thickness)

%" (20 mm)

%" (20 mm)

%" (20 mm)

%" (20 mm)

3. Cabinet Diagram and Dimensions (For TK932S)

4. Left Duct Preparation

Note: All folding must be done at a 90° angle. Otherwise, it won’t fit well.

5. Microwave Oven Preparation

Align the screw hole and tighten the screw.

Put a piece of the tape on the top of oven and put a piece of the tape on left of oven and left duct.

6. Lower Duct Installation

1. Aligning the base bracket assembly

Position Base Bracket Assembly on cabinet shelf. The front end of Base Bracket Assembly should align flush with the front edge of the shelf.

2. Attaching the base bracket assembly

7. Cabinet Preparation

  1. Bracket assembly
  2. Attaching the bracket

8. Trim Kit Preparation

Trim Frame

1. Inserting strikes

9. Microwave Oven Installation

Complete the assembly

1. Oven placement

10. Trim Kit/Finishing Installation

Complete the assembly

1. Trim frame installation

Note: Place the trim frame with the extended lip at the bottom


See other models: KX-HNC500W ES-LV65-S KX-TGC364B ES-LV61-A KX-TGD564M

Panasonic NN-TK932SS | File type: PDF | Filename: 417300_nn-tk922ss.pdf | Size: 1.98 MB | Language: English, French, Spanish

Download User Manual

Product Infomation and Reviews - NN-TK932SS photo

NN TK932SS Photo

Panasonic in United States

Panasonic NN-TK932SS Questions and Answers


#1 Will this kit work to mount the microwave underneath a cabinet, or must both the top and bottom be supported?
As far as I know this kit will not work to support a microwave underneath a cabinet. It is only a trim kit to dress up a microwave inserted into a pre-configured cabinet hole.

#2 Is this trim kit brushed stainless steel or shiny?
The trim kit is shiny and matches the oven perfectly.

#3 My microwave is white. Is this the correct kit for it?
The trim kit has a stainless steel finish. It is made for microwaves with a stainless steel finish

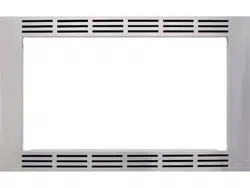
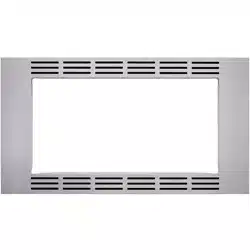
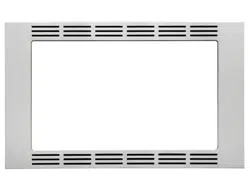
#4 The picture above shows no gap between the sides and the microwave, but everything I read says that there's a sizable one. False advertising?
The gap is inbetween the Microwave and the frame that you can see in the picture. The microwave will stand on a little metal pedestral that is connected with the front cover (only part shown in this picture). I personally had to improvise a lot to fit the cabinet opening, since my cabinet had another from from a previous door. In the end, I was able to position the microwave pretty centered and started to ignore the at first surprisingly sizable gap. Now it serves me well and in elegant style.

#5 What are the steps to remove the trim kit for servicing microwave or replace microwave but use same trim kit?
There are hidden screws around the perimeter which need to be removed.