Loading ...
Loading ...
Loading ...
25
COFFEE MAKING TIPS & PREPARATION
• When the auto grind, dose & tamp function
is complete, rotate the portafilter handle to
the INSERT position and lower to remove.
• Wipe any excess coffee from the rim
of the filter basket to ensure a proper seal
in the group head is achieved..
PURGING THE GROUP HEAD
Before placing the portafilter into the
group head, run a short flow of water
through the group head by pressing the
1 CUP button. Allow water to flow for
5 seconds, then press the 1 CUP button
again to stop the flow of water. This will
purge any ground coffee residue from
the group head and stabilise the water
temperature prior to extraction.
INSERTING THE PORTAFILTER
Align portafilter handle with the INSERT
position on the group head. Lift to insert
portafilter into the group head and rotate
towards the LOCK TIGHT position until
resistance is felt.
EXTRACTING ESPRESSO
• Place pre-warmed cup(s) beneath the
portafilter spouts and press the 1 CUP
or 2 CUP button.
• As a guide, the espresso will start
to flow after 7–12 seconds (this includes
pre-infusion time) and should be the
consistency of warm dripping honey.
• If the espresso starts to flow before
7 seconds, the grind is too coarse. This is
an UNDER EXTRACTED shot. Adjust the
grind size slightly finer.
• If the espresso starts to drip or flow after
12 seconds, then the grind is too fine. This
is an OVER EXTRACTED shot. Adjust the
grind size slightly coarser.
A great espresso is about achieving the perfect
balance between sweetness, acidity and
bitterness.
The flavour of your coffee will depend on many
factors, such as the type of coffee beans, degree
of roast, freshness, coarseness or fineness of the
grind. Experiment by adjusting these factors
just one at a time to achieve the taste
of your preference.
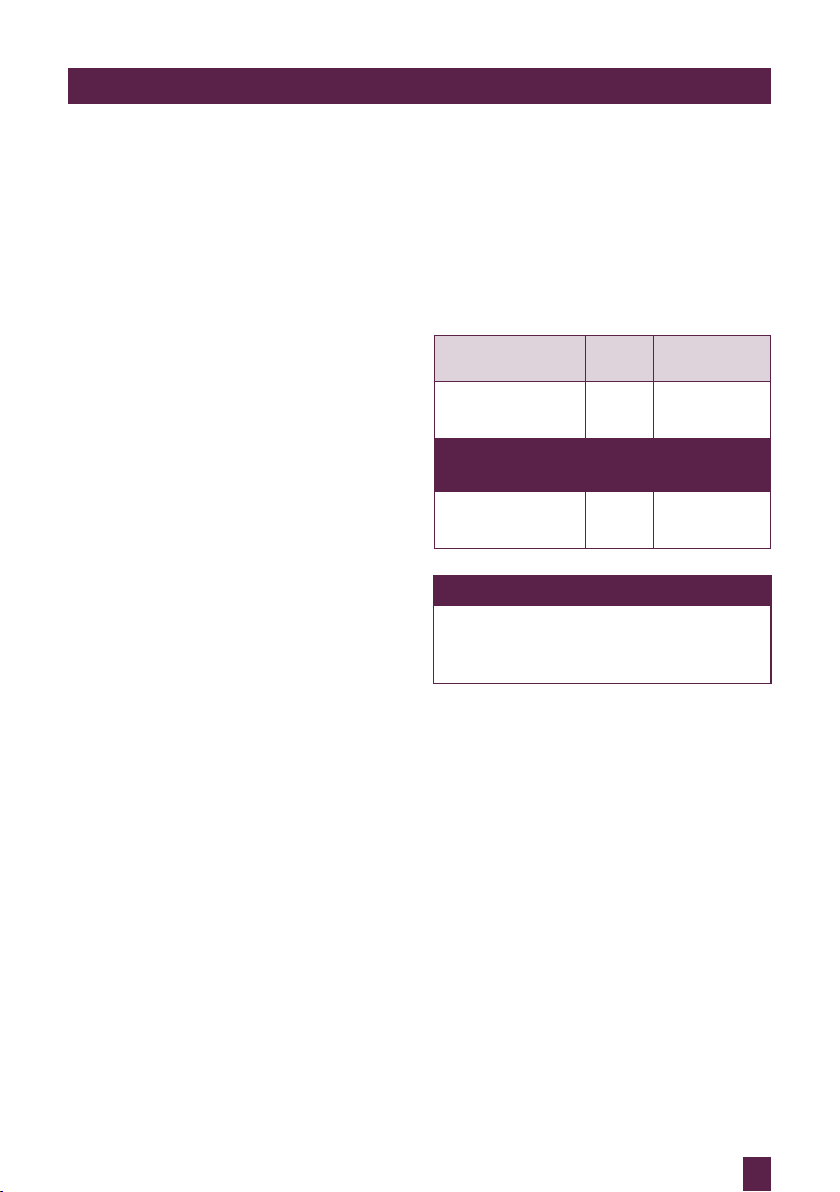
EXTRACTION GUIDE
EXTRACTION
TYPES
GRIND SHOT
DURATION
OVER-EXTRACTED
(bitter • astringent)
Too
Fine
Over
45secs
BALANCED
Optimum
Between
15-40secs
UNDER-EXTRACTED
(underdeveloped • sour)
Too
Coarse
Less than
15secs
HINTS & TIPS
If machine is run continuously for
30 minutes, allow machine to cool for
3 minutes before each use.
TEXTURING MILK
The machine allows you to texture milk both
automatically and manually.
Automatic Hands-Free Milk Texturing:
• Set Milk Temperature: Press the SELECT
dial to toggle to the milk temperature
function, as indicated by the flashing
milk temperature. Rotate SELECT dial to
the desired milk temperature, then press
the dial to select.
• Set Milk Texture: Press the SELECT dial
to toggle to the milk texture function, as
indicated by the flashing milk texture
triangle. Rotate SELECT dial towards
'CAPP' for more texture or 'LATTE' for
less texture, then press the dial to select.
Loading ...
Loading ...
Loading ...