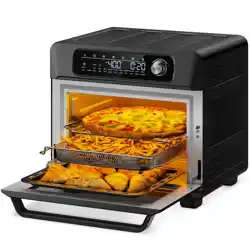
USER MANUAL Digital Toaster Oven with Air Frying
Getting started
If this is your first time using this appliance, be sure to:
- Read this manual carefully before using your toaster oven.
- Remove the protective film and sticker from the surface of the oven.
- Open the oven door and remove all printed documents and papers from inside.
- Check and clean all accessories before using.
- Dry all accessories thoroughly before inserting them back into the oven.
- Plug the power cord into a wall outlet.
- Before using the oven for the first time, preheat it at its maximum temperature setting for 15 minutes to eliminate any manufacturing residue that may remain after shipping.
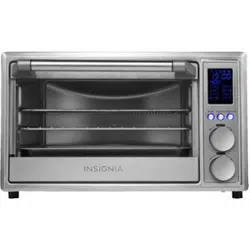
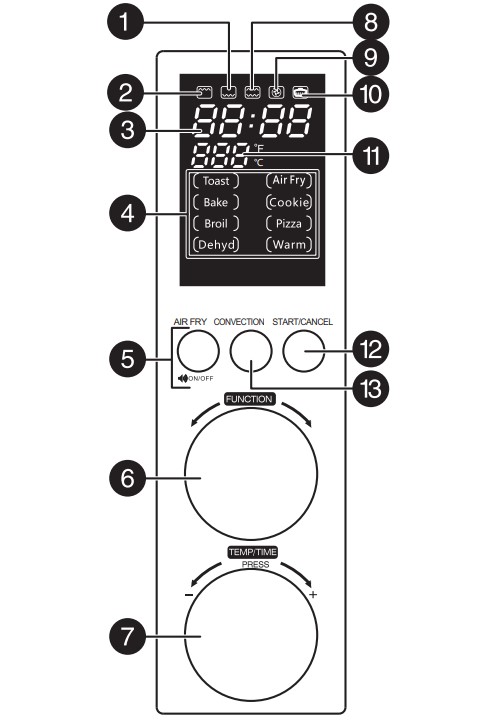
Control panel
| Item |
Description |
| 1 |
Bottom heating element indicator. |
| 2 |
Top heating element indicator. |
| 3 |
Time display. Shows current time and cooking time. |
| 4 |
Preset function indicators (light when selected). |
| 5 |
AIR FRY button. Turns on the air fry function. Press and hold (for 3 seconds) to turn the sound for the Function and Temp/Time control knobs on or off (in standby mode only). |
| 6 |
FUNCTION knob. Turn to select the preset function you want. |
| 7 |
TEMP/TIME knob. Turn right (+) to increase or left (-) to decrease. Press to switch between temperature and time settings. Press and hold to change from °F to °C or from °C to °F. |
| 8 |
Top and bottom heating elements indicator. |
| 9 |
Convection heat and air fry indicator. |
| 10 |
Warming indicator (the warming indicator and the (Warm) light go on when Warm is selected). |
| 11 |
Temperature display. Shows the temperature of the oven in °F or °C. |
| 12 |
START/CANCEL button. Press to start or stop cooking. |
| 13 |
CONVECTION button. Turns on the convection function.
Note: When using the convection setting, the oven automatically adjusts the internal cooking temperature to account for the convection setting.
|
Using your toaster oven
Note: When using the convection setting, the oven automatically adjusts the internal cooking temperature to account for the convection setting.
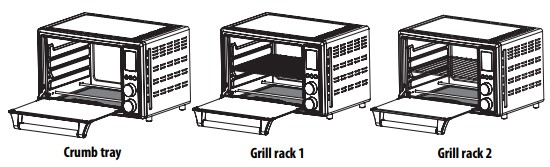
Using your toaster oven’s trays and grill racks
- Crumb tray: Place the crumb tray under the heating elements on the bottom of the oven.
- Grill racks (1 & 2): Place the grill rack in either the upper or lower position in the oven. They are interchangeable and can be used together or alone.
- Food tray: Place the food tray on top of one of the grill racks.
Making toast in your toaster oven (top element)
- Turn the FUNCTION knob until the “Toast” indicator lights
- Rotate the TEMP/TIME knob to change the baking level shown on the flashing display. You can select one of six levels (L1 to L6 - lightest to darkest).
- Press the TEMP/TIME knob to set the number of slices of toast you plan to cook, then turn the knob to select the number of slices (1 to 6).
- Press the START/CANCEL button to begin toasting. Press the START/CANCEL button to cancel.
Air frying in your toaster oven (both elements and fan)
- Select the air fry function by pushing the AIR FRY button or by turning the Function knob.
- Turn the TEMP/TIME knob to set the cooking temperature.
- Press the TEMP/TIME knob, then turn the knob to set the cooking time
- Press the START/CANCEL button to begin cooking. Press the START/CANCEL button again to cancel.
Baking in your toaster oven (both elements and fan)
- Turn the FUNCTION knob until the “Bake” indicator lights.
- Turn the TEMP/TIME knob to set the cooking temperature.
- Press the TEMP/TIME knob, then turn the knob to set the cooking time.
- Press the START/CANCEL button to begin cooking. Press the START/CANCEL button again to cancel.
Broiling in your toaster oven (both elements)
- Turn the FUNCTION knob until the “Broil” indicator lights.
- Turn the TEMP/TIME knob to set the broiling time.
- Press the START/CANCEL button to begin cooking. Press the START/CANCEL button again to cancel.
Cooking pizza in your toaster oven (both elements and fan)
- Turn the FUNCTION knob until the “Pizza” indicator lights.
- Turn the TEMP/TIME knob to set the cooking temperature.
- Press the TEMP/TIME knob, then turn the knob to set the cooking time.
- Press the START/CANCEL button to begin cooking. Press the START/CANCEL button again to cancel.
Warming in your toaster oven (bottom elements and fan)
- Turn the FUNCTION knob until the “Warm” indicator lights.
- Turn the TEMP/TIME knob to set the cooking temperature.
- Press the TEMP/TIME knob, then turn the knob to set the cooking time.
- Press the START/CANCEL button to begin cooking. Press the START/CANCEL button again to cancel.
Dehydrating in your toaster oven (top element and fan)
- Turn the FUNCTION knob until the “Dehyd” indicator lights.
- Press the TEMP/TIME knob, then turn the knob to set the time.
- Press the START/CANCEL button to begin cooking. Press the START/CANCEL button again to cancel.
Baking cookies in your toaster oven (both elements and fan)
- Turn the FUNCTION knob until the “Cookie” indicator lights.
- Turn the TEMP/TIME knob to set the cooking temperature.
- Press the TEMP/TIME knob, then turn the knob to set the cooking time.
- Press the START/CANCEL button to begin cooking. Press the START/CANCEL button again to cancel.
Using convection in your toaster oven (both elements and fan)
- Select the convection function by pushing the CONVECTION button.
- Turn the TEMP/TIME knob to set the cooking temperature.
- Press the TEMP/TIME knob, then turn the knob to set the cooking time.
- Press the START/CANCEL button to begin cooking. Press the START/CANCEL button again to cancel.
Turning off your toaster oven’s sound
- In standby mode only, press and hold AIR FRY for 3 seconds to turn the sound for the Function and Temp/Time control knobs on or off.
Maintaining your toaster oven
1 Always unplug the oven and wait until it cools down before cleaning.
2 Move your oven to a solid, well ventilated place and remove the trays/racks from the oven.
3 Wipe the surfaces of your oven and the trays/racks with a damp sponge or soft cloth dipped in mild soapy water.
CAUTION:
- Do not use hard brushes or abrasive cleaners, polishes, or pads which may damage the surfaces of your oven.
- Do not use poisonous or corrosive materials such as gasoline or paint thinner.
4 Dry everything thoroughly before replacing the trays/racks in the oven.
5 Move the oven back to its original position and plug it in.
Storing your toaster oven
- Before storing your toaster oven, position the power cord in its storage position at the back of the oven.
- To avoid damaging or breaking of the power cord, do not apply pressure on it when putting it into a box.
- Do not store the oven when it is still hot/warm.
- Do not wrap the power cord around the unit.
Troubleshooting
Check this list for a possible solution before calling for service.
| Problem |
Solution |
| Overcooked /Undercooked foods |
You may have to adjust the time and temperature to the desired cooking level. |
| Because your toaster oven is smaller than your regular oven, it heats up faster and generally cooks quicker. |
| You may need to adjust the racks/trays to achieve the cooking level. |
| If you use your toaster oven several times in a row, the additional items may be browner because your toaster oven is already hot. Adjust the toaster oven settings. |
| Burnt food smell |
Prior to using your oven for the first time, we recommend that you heat it to 450° for 15 minutes to eliminate any manufacturing residue that may remain after shipping. |
| You may have food build-up inside the oven, on heating elements, or in the crumb tray. See “Maintaining your toaster oven” on page 12. |
| Your oven does not turn on or stay on |
Your oven may be unplugged. Plug the oven into a 120-volt AC electrical outlet. |
| If the electrical circuit is overloaded with other appliances, your toaster oven may not operate properly. Your toaster oven should be operated on an electrical circuit that is separate from other operating appliances. |
| Only one heating element is heating up |
Function setting selection determines which heating elements will operate. Make sure that you have selected the correct function. |
| Heating elements do not stay on |
Heating elements turn on and off to maintain the temperature you selected. This is normal. Function setting selection determines which heating elements will operate. Make sure that you have selected the correct function. Heating elements may not glow when heating. |
| My toaster oven smokes |
A small amount of smoke is normal for the first couple of times your toaster oven is used. If your toaster oven continues to smoke, unplug it, let it cool, then empty the crumb tray. Stop using your toaster oven and contact an authorized service representative if your toaster still continues to smoke. |
Any other servicing should be performed by an authorized service representative.
Specifications
| External dimensions (H x W x D) |
11.2 × 16.3 × 18.3 in. (28.5 × 41.4 × 46.4 cm) |
| Internal dimensions (H x W x D) |
9.6 × 13.0 × 13.2 in. (24.3 × 32.9 × 33.5 cm) |
| Rated power |
1,800 W |
| Rated voltage |
120 V |
| Volume (dry) |
5.7 gallons (25 Liters) |
| Power cord length |
31.5 in. (.8m), at least 23.6 in. (.6m) would expose outside |
| Certifications |
UL-certified |
| Temperature range |
130 to 450°F |