WARNING: Before installing, make sure there are rubber gaskets inside the fittings at both ends of the water supply hoses. If there are no water inlet hoses packed with the washer or if the hoses are damaged, Call hOme Service Center at 1-(800)-898-3002. Installing the water supply hoses without rubber gaskets can cause water leakage.
When it's the first time you install the washer, be sure to use new hoses. If a hose is too short, replace the hose with a longer, high pressure hose.
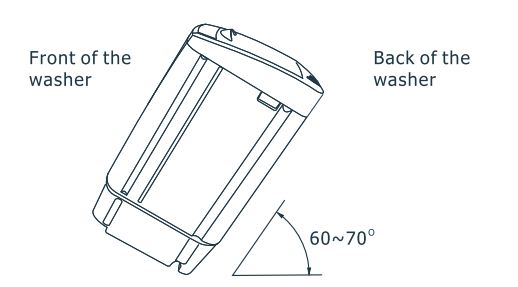
Step 1: Move your washer to the selected location
Tilt the washer back onto its rear rollers and push it forward as shown in the figure below. Move the unit to a location as described in the previous sections.
WARNING: Make sure the location has a hard, level surface without carpeting. There should be no direct sunlight. Do not expose the washer to freezing temperatures (under 32°F).
Step 2: Install the Bottom Cover
Slide the bottom cover into the slots on bottom surface of the unit as in the following figure, and fix it with one screw attached with the washer.
Step 3: Connect the water hose
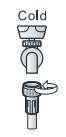
1. The Quick Connection Adaptor is primarily for quick connection to a single faucet, such as a typical kitchen sink. In cases where the washer is stored in a different place than where it is used, skip this step if you are connecting the washer to a sink with separate hot and cold faucets. The adaptor consists of two parts that quickly connect or disconnect. One part, the faucet fitting, is for connection to the faucet and the other part, the hose fitting, connects to the cold water hose of the washer.
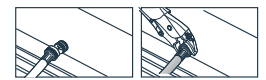
- Pull back on the white ring to free the faucet fitting from the adaptor for installation into the faucet.
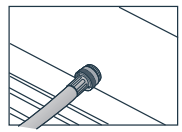
- Screw the end of the cold water hose onto the base of the hose fitting.
- If the faucet has internal screw threads, unscrew the aerator if present from the tip of the faucet. Then screw the faucet fitting into the faucet. Make sure that the black rubber gasket is on the top of the adaptor before screwing it in.
- If the faucet has external screw threads, remove the gasket from the top of the faucet fitting, and screw the fitting over the external threads.
- Pull back on the white ring to connect the two parts of the adaptor back together
2. Connect the ends of the water supply hoses to the faucets. For convenience, use the Quick Connection Adapter for connection to the cold water faucet. See instructions for Quick Connection Adaptor use in previous sections.
3. Tighten the fittings by hand until they are snug, and then tighten them an additional two-thirds of a turn with a wrench.
4. Place the unconnected ends of the hoses into a bucket and open the faucets connected to the two water supply hoses for 10 or 15 seconds to remove any substances from the hoses. Close the faucets before continuing.
5. Connect the ends of the water supply to the water supply intake connections at the top of the washer.
WARNING: The water hose connected to the COLD faucet must be connected to the cold water supply intake.
6. Tighten the fittings by hand until they are snug, and then tighten them an additional two-thirds of a turn with a wrench.
WARNING: Ensure that the water supply hoses are not twisted or bent. If the hoses are twisted or bent, the hoses can leak and cause electric shock due to the water leakage.To ensure the correct water usage, connect to the COLD water faucet.
7. Turn on the COLD water supplies and check all the water supply intake connections and the faucets for water leaks.
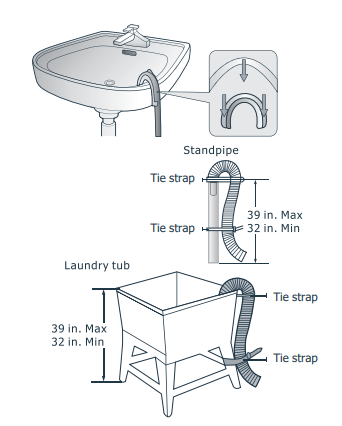
Step 4: Connect the drain hose
Position the other end of the drain hose. It can be positioned in three ways.
A. Over the edge of a wash basin Secure the guide to the side of the basin wall with a hook or to the tap with a piece of string to prevent the drain hose from moving.
B. In a stand pipe The stand pipe must be no shorter than 32 inch and no longer than 39 inch.
C. In a laundry tub
The laundry tub must be no shorter than 32 inch and no higher than 39 inch.
IMPORTANT: Lower drain hose will lead to water leakage and no washing function.
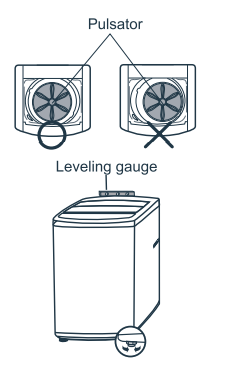
Step 5: Level your washer
See if the washer is leveled by checking the position of the tub or using a leveling gauge.
1. Slide the washer into position.
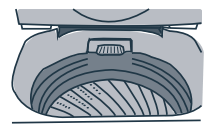
2. Open the lid of the washer, and pour the water into the tub to just below the pulsator level.
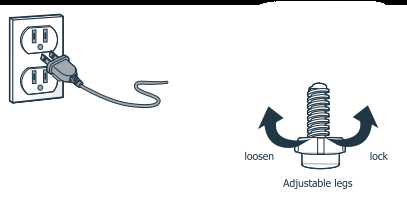
3. If the washer is leveled, the pulsator is positioned at the center of the washer as shown in the figure. If not, level your washer by turning the front leveling feet clockwise or counterclockwise as necessary.
NOTE: There is ONLY ONE adjustable leg on this washer.
Step 6: Power on your washer
Plug the power cord into a 3-prong, well grounded 120V 60Hz approved electrical outlet protected by a 15-amp fuse or comparable circuit breaker. Your washer is grounded through the third prong of the power cord when plugged into a 3-prong grounded electrical outlet.
Step 7: Run a test cycle
Run a test cycle as follows to check if your washer is properly installed.
Load about 3.5 pounds of laundry into the tub.
Press the ON/OFF button to turn on your washer.
Select the Rinse+Spin cycle.
Press the Start/Pause button to start the test cycle.
The washer should not rock or vibrate excessively when water is supplied, washing or spinning, and should drain well during the spin cycle.
WARNING: If there is a water leak while filling or draining, check the water connections. If the washer rocks and vibrates excessively, level your washer again.
Step 8: Store your washer
If you want to store your washer in another location, unplug it, drain any remaining water from the drain pipe and hook the pipe onto the back of the washer.
Disconnect the water inlet hoses from the faucets and move the washer to a new location.
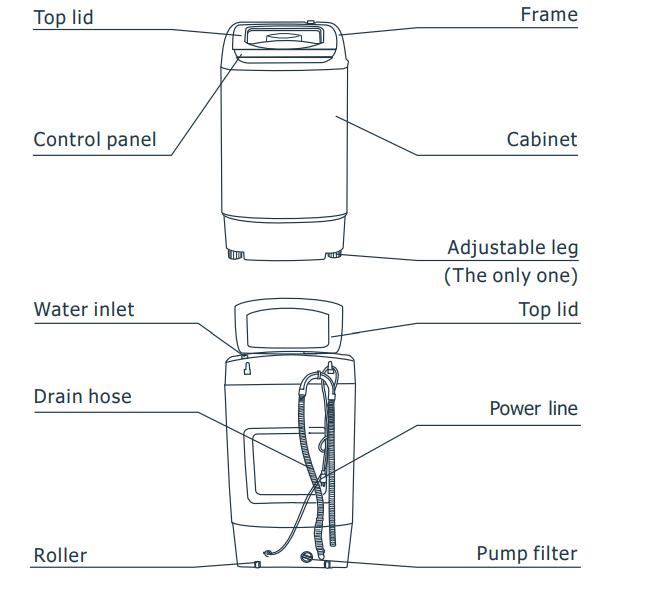
OPERATION
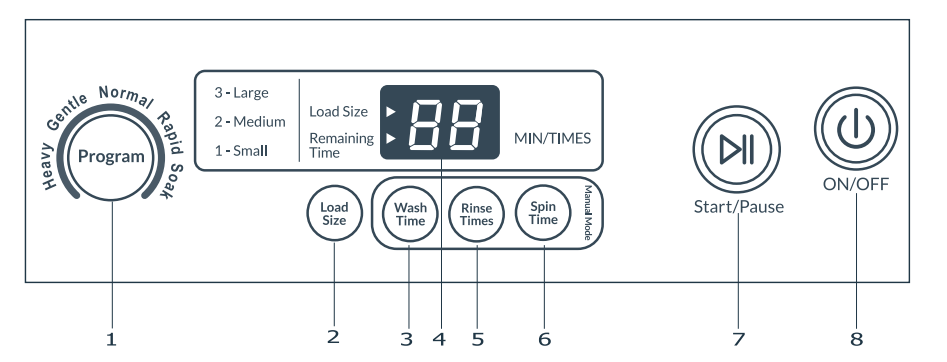
Control Panel
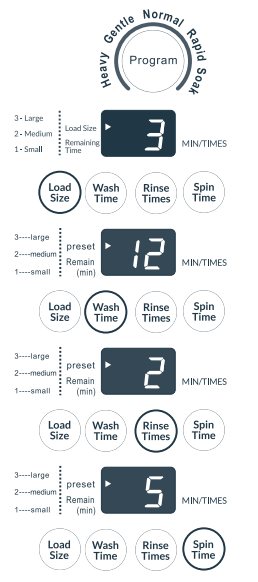
1 Program
Press this button to select your desired washing program: Heavy (light), Gentle (light), Normal (light), Rapid (light) and Soak (light).
2 Load Size
Press this button to set your washing load size. Your setting will decide the water level throughout all steps.
3 Wash
Press the button to select the washing time.
4 Digital display
The digital display will show and count down the estimated minutes for the wash cycle selected.
5 Rinse
Press the button to select the times of rinse.
6 Spin
Press the button to select the time of spin.
7 START/PAUSE
Press the START/PAUSE button once to the start the wash cycle. Press the button during operation to pause the cycle. Press again to continue the cycle.
8 ON/OFF
Press the button once to turn ON the power. Press again to turn OFF. Washing a load of laundry
Step 1: Power on your washer
Press the ON/OFF button to power on.
Step 2: Load your washer
WARNING: Before loading your laundry, be sure to take out coins, keys and other hard objects, and close all zippers to prevent the clothes from damage.
Sort laundry by fabric type, soil level, color and load size as needed. Refer to the Fabric Care Chart. Fill the tub with dry, unfolded clothes, but DO NOT OVERLOAD the tub. Load the tub no more than 3/4 full.
To ensure good cleaning results do not overload the tub, especially when washing heavily soiled loads. Never load the tub more than 3/4 full.
WARNING: Overloading may reduce washing efficiency, cause excess wear, and possibly cause creasing or wrinkling of items in the load.
Note: To add a forgotten item:
Press the START/PAUSE button to pause the washer
Wait for the tub to stop running. Then open the lid.
Add the items, close the lid, and then press the START/PAUSE button. The cycle will resume.
Step 3: Add detergent
This washer is designed for high efficiency (HE) powder detergent only. Add the recommended amount of detergent directly into the tub before starting your washer. The normal amount of detergent to use is 1/4 to 1/2 of the maximum amount recommended by the detergent manufacturer.
Always reduce the amount of detergent if the load is small or light, or if your water is very soft. Never use more than the maximum amount recommended by the detergent manufacturer.
WARNING: Never pour any liquid bleach directly onto the load. It can cause fabric damage, such as weakening of cloth fibers or color loss.
Step 4: Select your desired cycle and options
1. Select your desired washing program.
2. Select the water level based on a High, Medium or Low. Press the Load Size button to change the water level setting (3-Large, 2-Medium, 1-Small)
3. Select any combination among WASH, RINSE and SPIN modes according to the dirty degree. Refer to the detailed operation methods as following:
Continuously press the washing button to select washing time.(1~15 minutes, or no wash process)
Continuously press the rinse button to select rinse times.(1~3 times, or no rinse process)
Continuously press the spin button to select the spin time.(1~9 minutes or no spin process)
Step 5: Start the cycle
Press the START/PAUSE button to start the washing cycle. When the washing cycle begins, the Estimated Time in minutes for the cycle to complete will show and count down in the digital display.
WARNING: When the washer is running, you should pause the program and wait for it to stop completely before you open the lid.
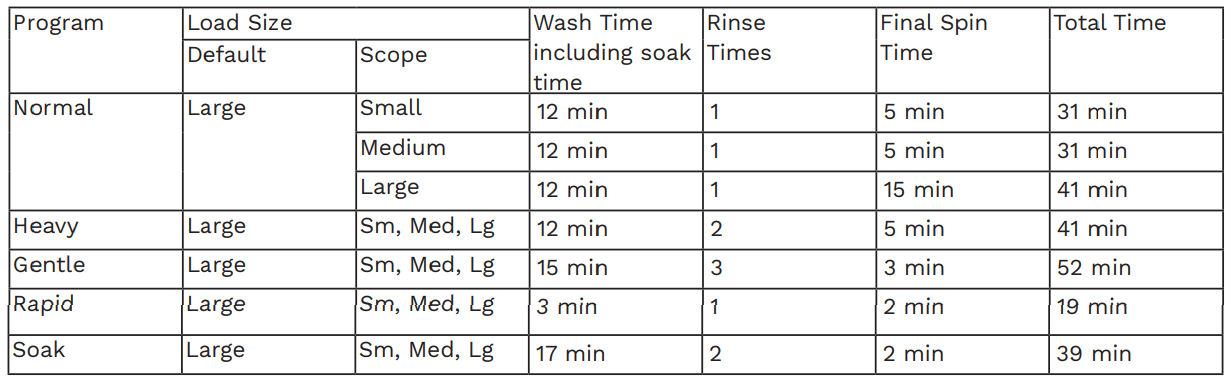
Cycle Guide
Energy efficiency test program:
"Normal" program is the most suitable program to wash normally soiled cotton or linen clothes and is the most efficient program in terms of combined energy and water consumption for washing that type of laundry.
CLEANING AND MAINTENANCE
Turn off the water faucets after washing is completed. This will shut off the water supply to your washer and prevent the possibility of damage from leaking water.
Leave the lid open to allow the inside of your washer to dry out.
Use a soft cloth to wipe up all detergent, bleach or other pills as they occur.
Control Panel: Clean with a soft, damp cloth. Do not use abrasive powders or pads. Do not spray cleaners directly onto the panel.
Interior of your washer : Clean periodically to remove any dirt, soil, odor, mold, mildew, or bacterial residue that may remain in your washer as a result of washing clothes. Use cleaners labeled “Washer safe”.
Tub: Run an Rapid cycle with some bleach every month to clean the tub. This will also help to remove mold which may occur inside the washer.
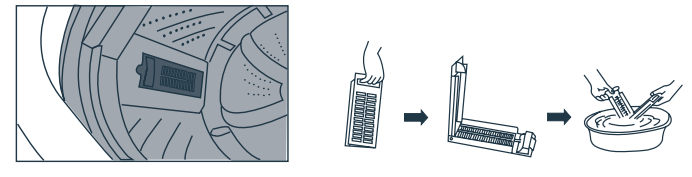
Lint filter: There is a built-in Lint filter in your washer. It can help to collect lint during washing cycle.
It is suggested to clean the lint filter every 10 cycles.
Take it out and clean the filter with water. Then place it back into the washer.
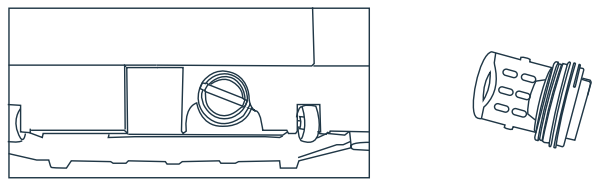
Pump filter: There is a built-in Pump filter in your washer. It can help to protect the pump during washing cycle.
It is suggested to clean the Pump filter once every month.
Take it out and clean the filter with water. Then place it back into the washer.
TROUBLESHOOTING
Your washing machine is equipped with an automatic error-monitoring system to detect and diagnose problems at an early stage. If your washer does not function properly or does not function at all, check the following before you call for service.
PROBLEM
POSSIBLE CAUSES
SOLUTION
Washer will not turn ON
The power cord is not properly plugged in.
The fuse is blown, circuit breaker hastripped, or power outage has occurred.House fuse is blown or circuit breaker has tripped, due to multiple appliances on one outlet.
Make sure that the plug is plugged securely into a grounded,3-prong, 120V/60-Hz outlet.
Reset circuit breaker or replace fuse. Do not increase fuse capacity. If the problem is a circuit overload, have it corrected by a qualified electrician. Reset circuit breaker or replace fuse. If more than one appliance is connected to the outlet, call an electrician to have an additional circuit installed.
Water leaks
Over sudsing of detergent.
Over sudsing may create leaks. This might be caused by the type and amount of detergent. High-Efficiency detergent is the only detergent recommended. Make sure that detergent and any additives are put into the correct dispenser compartments. The normal amount of detergent to use is 1/4 to 1/2 of the maximum amount recommended by the detergent manufacturer. Always reduce the amount of detergent if the load is small or lightly soiled, or if your water is very soft. Never use more than the maximum amount recommended by the detergent manufacturer.
Thumping sound
Heavy wash loads may produce a thumping sound. Washer load may be out of balance.
This is normal. If the issue continues, the washer is probably out of balance. Stop/pause the operation and redistribute wash load.
Vibrating noise
Packaging materials were not removed. Wash load may be unevenly distributed in the tub. Not all leveling feet are resting firmly and evenly on the floor. Floor not rigid enough.
See Unpacking and Removing Shipping Material in the Installation Instructions.
Pause the cycle and redistribute the load. See Level your washer in the Installation Instructions. Make sure that the floor is solid and does not flex.
Washer will not operate
Water supply is turned off. Control panel has powered off due to inactivity.
Washer is unplugged. Controls are not set properly.
Lid is open. Circuit breaker/fuse is tripped/blown.
Control needs to be reset. START/PAUSE was not pressed after a cycle was set.
Extremely low water pressure. Washer is too cold.
Washer is running under Delay start program.
This is normal. Press the ON/OFF button to turn the washer on. Make sure cord is plugged securely into a working outlet.
Turn both hot and cold faucets fully on.
Make sure the cycle was set correctly. Close the lid and press the START/PAUSE button.
The washer will not operate if the lid is open. Close the lid and make sure that nothing is caught under the lid preventing it from closing completely.
Check house circuit breakers/fuses. Replace fuses or reset the breaker. The washer should be on a dedicated branch circuit. The washer will resume the cycle where it stopped once power is restored.
Press the ON/OFF button, then re-select the desired cycle and press the START/PAUSE button. Press the ON/OFF button then re-select the desired cycle and press the START/PAUSE button. The washer will shut off if the START/PAUSE button is not pressed within ten minutes.
Check another faucet in the house to make sure that household water pressure is adequate.
Allow it to warm up before pressing the ON/OFF button. Otherwise, the display will notcome on. It’s normal if the unit doesn’t operate under Delay start function. It will start automatically after the delay time is out.
Washer will not drain water
Kinked drain hose. Drain hose is located higher than 48 in. above the floor.
Ensure that the drain hose is not kinked.
Make sure that the drain hose is no higher than 4 ft. above the bottom of the washer and is no more than 5 ft. away from the washer.
Rattling and clanking noise
There might be objects, such as keys, coins, or safety pins, in the tub or pump.
Stop the washer. Check the tub and drain filter for foreign objects. If noise continues after the washer is restarted, call the service center for help.
Staining
Washer was not unloaded promptly.
Clothes were not properly sorted.
Always remove items from the washer as soon as possible after the cycle is completed.
Always wash dark colored clothese separately from light colors and whites to prevent discoloration. Never wash heavily soiled items in the washer.
Wash cycle time is longer than usual
The washer automatically adjusts the wash time for the amount of laundry, water pressure and other operating conditions.
This is normal. The time remaining shown in the display is only an estimate. Actual time may vary
Musty or mildewy odor in the washer
Incorrect or too much detergent has been used. Inside of tub was not cleaned properly
Use only High-Efficiency (HE) detergent in accordance with the manufacturer’s instructions. Run an Express cycle with bleach once a month to clean tub and remove any mold from inside washer. Disassemble the water inlet hose and clean the inlet point. Check that inlet hoses are not kinked or clogged.
Washer will not fill properly
Filter clogged.
Inlet hoses may be kinked Insufficient water supply.
The washer lid is open.
Hot and cold inlet hoses are reversed.
Water level is too low.
Water inlet valve damaged.
Make sure that both hot and cold water faucets are turned on all the way.
The washer will not operate if the lid is open. Close the lid completely.
Check inlet hose connections. Make sure the hot water supply is connected to the hot inlet valve, and the cold water supply is connected to the cold inlet valve.
Water will not cover the clothes completely. The fill level is optimized for the wash motion to achieve the best wash performance.
Call the service center for help.
Water leaks every load
Hoses not installed correctly.
Check all filling and draining hose connections to ensure that they are tight and secure.
ERROR CODES
POSSIBLE CAUSES
SOLUTION
E1
It takes over 30 minutes to fill water but cannot achieve its preset water level.
Check for Washer not filling properly and Water leakage.
E2
The top lid is open.
Close the lid completely.
E3
The washer runs out of balance for three times.
Redistribute the laundry load in the tub.
E4
It takes over 10 minutes to drain but cannot drain the washer completely.
Check "Washer will not drain water" in toubleshooting section.
E5
Water has exceeded its preset level.
Call the service center for help.
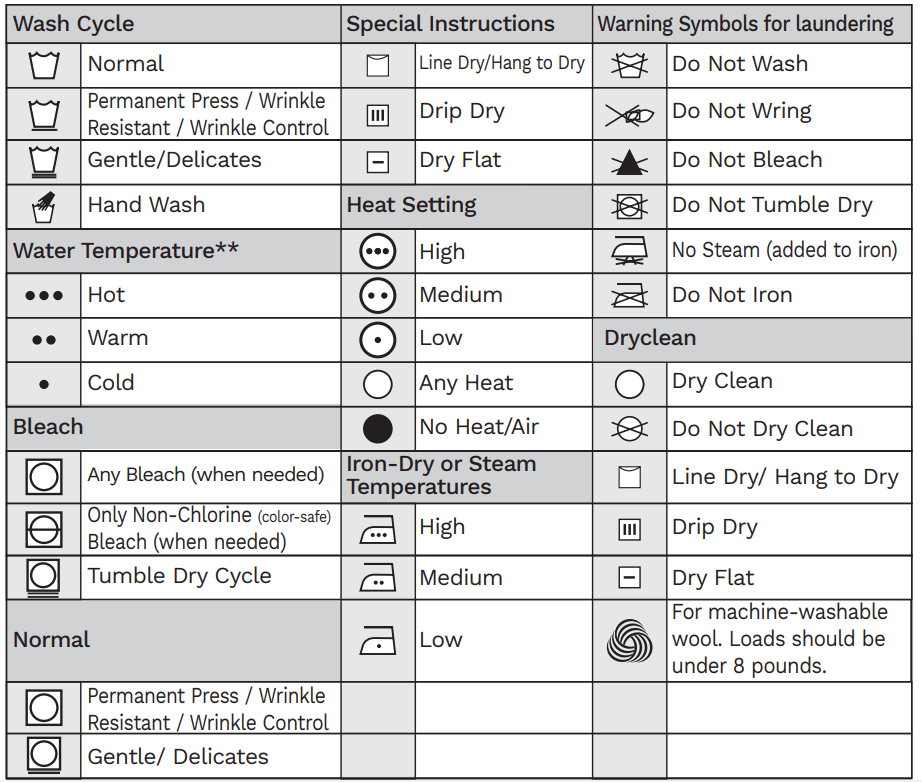
FABRIC CARE CHART
The following symbols provide garment care direction. The clothing care labels include symbols for washing, bleaching, drying and ironing, or dry cleaning when necessary. The use of symbols ensures consistency among garment manufacturers of domestic and imported items. Follow care label directions to maximize garment life and reduce laundering problems.
The number of dots represent appropriate wash water temperatures for various items. The temperature range for Hot is 105°-125°F/41°-52°C, for Warm 85°-105°F/29°-41°C and for Cold 60°-85°F/16°-29°C. (Water temperature must be at least 60°F/16°C for detergent activation and effective cleaning.)
#1 Can you just dump water into the top or do you have to use the hose attachment?
I tried to put water in manually and it wouldn't run. There's a sensor that times the water through the fill valve. Since the water didn't go through there it wouldn't run the cycle. Once I hooked it up and used the fill valve it worked fine.
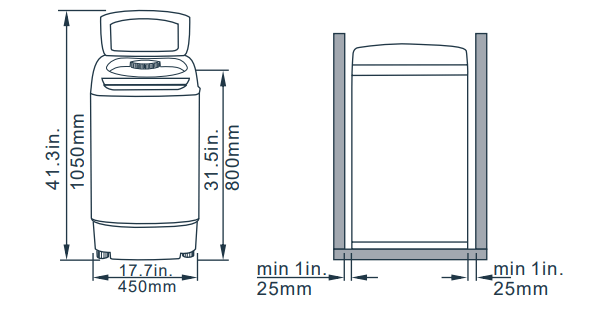
#2 What are the measurements of the box ? I need to know to see if it fits in my car since the delivery is at my work.
The machine measures about 31 in tall, 17 in wide and 16 in depth so box is a bit larger. I threw the box away along time ago as I have had the washer and loved it for about a year. This is a great little machine.
#3 can you drain water into bathtub instead of sink?
Yes, just make sure the tubing that directs the water is placed securely in the tub so it doesn't move around as it does what it needs while washing