Remove all accessories and shipping materials packed inside the appliance. Keep all packaging material out of the reach of children as there is danger of asphyxiation or injury.
Wash the baking rack and baking tray in warm soapy water. Wipe the inside of the appliance with a damp cloth or sponge. Blot dry with paper towels to be sure the unit is dry before using.
Place appliance on a flat counter or other stable surface. DO NOT OPERATE ON THE SAME CIRCUIT WITH ANOTHER APPLIANCE.
Make sure the crumb tray is properly installed before using.
To burn off any oils still on the appliance, set the appliance to convection at its highest temperature for 15 minutes.
NOTE: The oven may smoke during this process. This is normal for a new appliance and will not last more than 10-15 minutes.
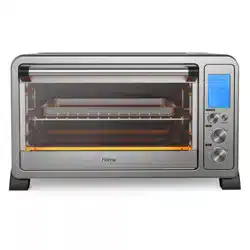
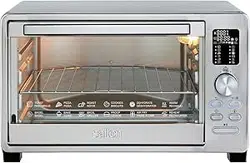
Control Panel
HOW TO USE
CAUTION: THE OVEN SURFACES ARE HOT DURING AND AFTER USE
GENERAL INSTRUCTIONS
When using electrical appliances basic safety precautions should be followed, including the following:
WARNING - To reduce the risk of burns, electric shock, fire, or injury to persons:
Read all instructions before using.
To protect against any electrical hazards, DO NOT place appliance or cord in water or any other liquids.
Do not touch any hot surfaces with hands. Use oven mitts for removing or touching any hot parts. Always place appliance on heat protected surface.
Leave about 4-6 inches of open space all around the exterior of this appliance. Place the appliance on a dry, horizontal surface.
Unplug the appliance from outlet when not in use and before cleaning. Always allow to cool before attaching or removing any parts.
OPERATION
When the appliance is electrified, the buzzer will ring once. The default function is TOAST. In the process of cooking, pressing “Stop/Start” can stop cooking.
TOAST FUNCTION
Use the toast function for foods such as corn, bread, cookies and heating food.
Place the baking rack to the desired height.
Rotate the FUNCTION knob until the screen display “TOAST”.
Rotate the TEMP. knob to set the power level from 1-6.
Rotate the TIME knob to set the quantity of bread from 1-6. The default quantity is 4 slices.
Press “Stop/Start” button to start cooking. The default temperature is 450OF and cannot be changed.
The buzzer will sound 3 times to signal when cooking is finished.
Always remove food with oven mitts as the food and appliance are very hot.
BAKE FUNCTION
Use the bake function for foods such as less tender cuts of meat, soups, and stews.
Place the baking rack to the desired height.
Rotate the FUNCTION knob until the screen display “BAKE”.
Rotate the TIME knob to set the length of cooking time. The default time is 30 minutes.
Rotate the TEMP. knob to set temperature. The default temperature is 450OF.
Press “Stop/Start” button to start cooking.
The buzzer will sound 3 times to signal when cooking is finished. The appliance will return to TOAST function.
Always remove food with oven mitts as the food and appliance are very hot.
BROIL FUNCTION
NOTE: Do not preheat when using this function.
The broil function is ideal for fish, beef, steak, vegetables, etc.
Place the baking rack to the desired height.
Rotate the FUNCTION knob until the screen display “BROIL”.
Rotate the TIME knob to set the length of cooking time. The default time is 30 minutes.
Rotate the TEMP. knob to set temperature. The default temperature is 350OF.
Press “Stop/Start” button to start cooking.
The buzzer will sound 3 times to signal when cooking is finished. The appliance will return to TOAST function.
Always remove food with oven mitts as the food and appliance are very hot.
PIZZA FUNCTION
NOTE: Preheating is not necessary. If you prefer to preheat the oven, turn on the convection function for 5 minutes prior.
The pizza function is ideal for pizza up to 12 inches in diameter.
Place the baking rack to the desired height.
Rotate the FUNCTION knob until the screen display “PIZZA”.
Rotate the TIME knob to set the cooking time according to the size of pizza. A 6 inch pizza will bake for 6 minutes, a 9 inch pizza for 8 minutes and 30 seconds, and a 12 inch pizza for 9 minutes. The default size is a 9 inch pizza.
Rotate the TEMP. knob to set temperature. The default temperature is 450OF.
Press “Stop/Start” button to start cooking. The cooking time you have selected will then be displayed. The default time is minutes and 30 seconds, appropriate for a 9 inch pizza.
The buzzer will sound 3 times to signal when cooking is finished. If needed, repeat steps 3-5 to heat pizza more thoroughly.
Always remove food with oven mitts as the food and appliance are very hot.
COOKIES FUNCTION
NOTE: Preheating is not necessary for this function.
The cookies function is ideal for baking cookies.
Place the baking rack to the desired height.
Rotate the FUNCTION knob until the screen display “COOKIES”.
Rotate the TIME knob to set the length of cooking time. The default time is 30 minutes.
Rotate the TEMP. knob to set temperature. The default temperature is 350OF.
Press “Stop/Start” button to start cooking.
The buzzer will sound 3 times to signal when cooking is finished.
Always remove food with oven mitts as the food and appliance are very hot.
DEFROST FUNCTION
The defrost function is ideal for defrosting food.
Place the baking rack to the desired height.
Rotate the FUNCTION knob until the screen display “DEFROST”.
Rotate the TIME knob to set the length of cooking time. The default time is 30 minutes.
Rotate the TEMP. knob to set temperature. The default temperature is 180OF.
Press “Stop/Start” button to start cooking.
The buzzer will sound 3 times to signal when cooking is finished.
Always remove food with oven mitts as the food and appliance are very hot.
REHEAT FUNCTION
The reheat function is ideal for reheating food.
Place the baking rack to the desired height.
Rotate the FUNCTION knob until the screen display “REHEAT”.
Rotate the TIME knob to set the length of cooking time. The default time is 1 hour and 30 minutes.
Rotate the TEMP. knob to set temperature. The default temperature is 350OF.
Press “Stop/Start” button to start cooking.
The buzzer will sound 3 times to signal when cooking is finished.
Always remove food with oven mitts as the food and appliance are very hot.
ROTISSERIE FUNCTION
The rotisserie function is ideal for roasting chicken.
Place the baking rack to the desired height.
Rotate the FUNCTION knob until the screen display “ROTISSERIE”.
Rotate the TIME knob to set the length of cooking time. The default time is 1 hour.
Rotate the TEMP. knob to set temperature. The default temperature is 350OF.
Press “Stop/Start” button to start cooking.
The buzzer will sound 3 times to signal when cooking is finished.
Always remove food with oven mitts as the food and appliance are very hot.
KEEP WARM FUNCTION
Use the keep warm function for keeping food warm.
Place the baking rack to the desired height.
Rotate the FUNCTION knob until the screen display “KEEP WARM”.
Rotate the TIME knob to set the length of cooking time. The default time is 1 hour and 30 minutes.
Rotate the TEMP. knob to set temperature from 100OF to 180OF. The default temperature is 180OF.
Press “Stop/Start” button to start cooking.
The buzzer will sound 3 times to signal when cooking is finished.
Always remove food with oven mitts as the food and appliance are very hot.
CONVECTION FUNCTION
Use the convection function for preheating, or for making toast, steaks, and bread.
Place the baking rack to the desired height.
Rotate the FUNCTION knob until the screen display “CONVECTION”.
Rotate the TIME knob to set the length of cooking time. The default time is 30 minutes.
Rotate the TEMP. knob to set temperature. The default temperature is 450OF.
Press “Stop/Start” button to start cooking.
The buzzer will sound 3 times to signal when cooking is finished.
Always remove food with oven mitts, as the food and appliance are very hot.
ROTISSERIE FUNCTION
Remove the baking rack from the appliance and set aside.
Place the baking pan in the lowest level of the appliance. This will catch food drippings from the rotisserie forks during cooking. DO NOT attempt to use the rotisserie function without placing the baking pan in the correct position of the appliance.
Set the function knob to “ROTIS”.
Select the length of time you want to cook the food.
Rotate the temperature knob clockwise to desired temperature.
THE ROTISSERIE FORKS
Secure the food with its weight centered on the forks.
Slide the holding forks onto each of the forks and press firmly into the food, piercing it to hold in place. Insert the forks at different angles to create a more secure hold. Tighten the screws by turning them clockwise so the holding forks will stay in place during the rotisserie cooking session.
Insert the pointed end of the rotisserie forks into the rotisserie socket on the inner right side of the appliance.
Lift the rotisserie forks to the inner left side of the appliance to allow the notch to fit into the rotisserie bracket located on that side.
Set the temperature knob and the time knob to your desired level to begin operating the appliance.
Once the cooking time has been completed and you have checked the internal temperature of the food to ensure that it has cooked properly, remove the rotisserie forks with the rotisserie removal handle.
Hold the rotisserie removal handle in one hand and support it with the other.
Place the hooks on the handle underneath the rotisserie forks.
First, lift the left side of the rotisserie forks out of the bracket, pulling slightly towards yourself.
Then, gently remove the right pointed side of the rotisserie forks from the rotisserie socket and remove the food on the forks out of the appliance.
Place the food on a heat safe plate or dish when you have removed from the appliance. Let it cool slightly before attempting to remove the rotisserie forks from the food.
To remove the forks, turn the screws counterclockwise and pull.
WARNING: HOT SURFACE
CARE AND CLEANING
Before cleaning, unplug the appliance and allow it to cool completely.
Wash all the attachments, including the baking rack and baking tray, with mild, soapy water.
Do not use abrasive cleansers, scrubbing brushes and chemical cleaner as this will cause damage to the non-stick coating of the baking tray.
Use a wet cloth to wipe the inner of the appliance.
Clean the door with a cloth in hot, soapy water.
Never immerse the appliance in water or other liquid.
IMPORTANT SAFETY INSTRUCTIONS
SAVE THESE INSTRUCTIONS / FOR HOUSEHOLD USE ONLY
WARNING - To reduce the risk of burns, electric shock, fire, or injury when using electrical appliances, basic safety precautions should be followed, including the following:
Read all instructions before using the Digital Convection Toaster Oven (“appliance”).
To protect against any electrical hazards, DO NOT place the unit or the cord in water or any other liquids.
Do not touch any hot surfaces. Use oven mitts for removing or touching any hot parts. Always place appliance on heat protected surface.
Leave about 4-6 inches of open space all around the exterior of this appliance. Place the appliance on a dry, horizontal surface.
Unplug the appliance from outlet when not in use and before cleaning. Always allow to cool before attaching or removing any parts.
The use of accessory attachments is not recommended by hOme® and may cause injuries.
Plug cord into the wall outlet. To disconnect, turn all controls to “off”, then remove plug from wall outlet.
Do not let cord hang over edge of table or counter, or touch a hot surface.
Do not place the appliance inside a heated oven or near a hot gas or electric burner.
Do not use outdoors.
If the electric circuit is overloaded with other appliances, this appliance may not operate properly. The appliance should operate on a separate electrical circuit from other operating appliances.
Surfaces may be hot to the touch when the appliance is operating.
Do not operate any appliance with a damaged cord or plug or after the appliance malfunctions or has been damaged in any manner. Return appliance to hOme® customer service for examination, repair, or adjustment.
Store only the accessories provided with this appliance inside the oven when not in use. Do not store any other materials.
A fire may occur if the appliance is covered or touching flammable material, including items like curtains, draperies, and walls when in operation. Do not put any items on top of the appliance when in operation.
Do not place any cardboard, paper, or plastic inside the appliance.
Do not place airtight containers inside the appliance. They should have enough room to allow for expansion of fluids.
Clean this appliance regularly as buildup of grease may cause a fire. Make sure that this appliance is not placed near curtains, any drapery, or other flammable material.
Do not clean with metal scouring pads. Pieces can break off the pad and touch electrical parts, causing a risk of electric shock.
In order to prevent accidental burns, always use the handle and knobs to operate this appliance. Do not touch other areas of the appliance when in operation.
The door or outer surface of the appliance may be hot when the appliance operating.
Oversize foods or metal utensils must not be inserted in this appliance as they may create a fire or risk of electric shock.
Do not cover crumb tray or any part of the oven with metal foil. This will cause overheating of the oven.
Use extreme caution when moving anything containing hot oil or other hot liquids, such as when removing crumb tray or disposing of hot grease.
This appliance is not intended for use by persons (including children) with reduced physical, sensory, or mental capabilities, including anyone who lacks operating experience and knowledge, unless they are supervised or given operating instructions by a person responsible for their safety.
Children should be supervised to ensure that they do not play with the appliance.
The appliance is not intended to be operated by means of an external timer or separate remote-control system.
The rear surface of appliance should be placed against a wall.
a) A short power-supply cord (or detachable power-supply cord) should be used to reduce the risk of persons becoming entangled in or tripping over a long cord.
b) Longer detachable power-supply cords or extension cords are available and may be used with care.
c) If a longer detachable power-supply cord or extension cord is used:
The marked electrical rating of the cord set or extension cord should be at least as great as the electrical rating of the appliance;
The cord should be arranged so that it will not drape over the countertop or tabletop where it can be pulled on by children or tripped over; and
If the appliance is grounded, the cord set or extension cord should be a grounded 3-wire cord.
29. Do not use appliance for any use other than the intended use.
30. Use extreme caution when using containers of any material other than metal or heat-resistant glass.
31. hOme is not responsible for any damage or harm caused by improper use or care.