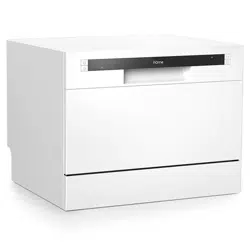
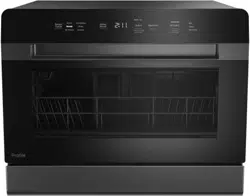
HomLabs Compact Dishwasher 6 Place Settings Capacity

Congratulations on bringing home your new appliance!
Don’t forget to register your product at homelabs.com/reg for updates, coupons, and other relevant information.
Although greatly appreciated, product registration is not required to activate any warranty.
IMPORTANT SAFETY INSTRUCTIONS
SAVE THESE INSTRUCTIONS/HOUSEHOLD USE ONLY
WHEN USING YOUR COMPACT DISHWASHER, BASIC SAFETY PRECAUTIONS SHOULD BE FOLLOWED TO REDUCE THE RISK OF FIRE, ELECTRIC HAZARD, AND INJURY TO PERSONS, INCLUDING THE FOLLOWING:
GROUNDING INSTRUCTIONS
+ This dishwasher must be grounded. In the event of a malfunction or breakdown, grounding will reduce the risk of electric shock by providing a path of least resistance for the electric current. This dishwasher is equipped with a cord with grounding conductor and a grounding plug.
+ The plug must be plugged into an outlet that has been installed and grounded in accordance with all local codes and ordinances.
+ Improper connection of the grounding conductor can result in a risk of electric shock.
+ Check with a qualified electrician or service representative if you are unsure whether the dishwasher is properly grounded. Do not modify the plug provided with the dishwasher. If it does not fit the outlet, have a qualified electrician install a proper outlet.
WARNING! PROPER USE
+ Do not misuse, sit on, or stand on the door or dish rack of the dishwasher.
+ Do not operate your dishwasher unless all enclosure panels are properly in place. Open the door very carefully if the dishwasher is operating, as there is risk of water squirting out.
+ Do not place any heavy objects on the door when it is open. The dishwasher could tip forward.
+ When loading items to be washed:
1. Locate sharp items so that they do not damage the door seal.
2. WARNING: Knives and other utensils with sharp points must be loaded in the basket with their points down or placed in a horizontal position.
+ When using your dishwasher, do not let plastic items come into contact with the heating element. (This is only applicable to machines with a visual heating element.)
+ Check that the detergent receptible is empty after each wash cycle.
+ Do not wash plastic items unless they are marked dishwasher safe or equivalent. For plastic items not marked, check their manufacturer's recommendations.
+ Only use detergent and rinse aids designed for an automatic dishwasher.
+ The door should not be left in the open position as this could present a tripping hazard.
+ if the supply cord is damaged, it must be replaced by the manufacturer, service agent, or a similarly qualified person in order to avoid a hazard.
+ Remove the door to the washing compartment when removing an old dishwasher from service or discarding it.
+ Dispose of packing materials properly.
+ Only use the dishwasher for its intended function.
+ During installation, the power supply must not be excessively or dangerously bent or flattened.
+ Do not tamper with controls.
+ The dishwasher is to be connected to the water mains using new hose sets. Old hose sets should not be reused.
+ The maximum number of place settings to be washed is 6.
+ The maximum permissible inlet water pressure is Mpa.
+ The minimum permissible inlet water pressure is 0.04Mpa.
CHILD WARNING:
+ Children should be supervised to ensure that they do not play with the dishwasher.
+ Keep children away from detergent, rinse aid, and the open door of the dishwasher, as there could be some detergent left inside.
+ Never use soap, laundry detergent, or hand washing soap in your dishwasher. Keep these products out of reach of children.
+ Dishwasher detergents are strongly alkaline, and can be extremely dangerous if swallowed. Avoid contact with skin and eyes and keep children away from the dishwasher when the door is open.
+ This dishwasher is not intended for use by persons (including children) with reduced physical, sensory, or mental capabilities — or lack of experience and knowledge — unless they have been given supervision or instruction for use of the dishwasher by a person responsible for their safety. Do not operate your dishwasher unless all enclosure panels are properly in place. Open the door very carefully if the dishwasher is in use, as there is risk of water squirting out.
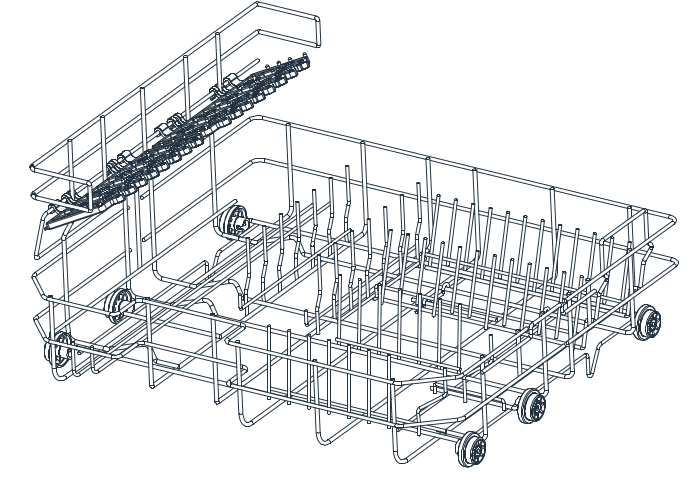
PARTS DESCRIPTION
GETTING TO KNOW YOUR DISHWASHER
IMPORTANT: to get the best performance from your dishwasher, read all operating instructions for the dishwasher prior to first use.
CONTROL PANEL

1. Power button turn dishwasher on or off
2. Delay button light to postpone wash cycle
3. Rinse aid indicator
4. Program ending indicator to signal that the wash cycle is almost complete
5. Water failure indicator light to signal you to check the faucet
6. Program indicator light
7. Program selector to chose your wash cycle
8. Start/pause button to start the program or momentarily pause it
DISHWASHER FEATURES
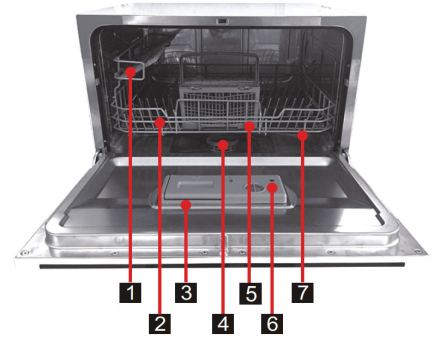
1. Cup Shelf
2. Basket
2. Detergent Dispenser
4. Filter
5. Cutlery Basket
6. Rinse Aid
7. Spray Arms
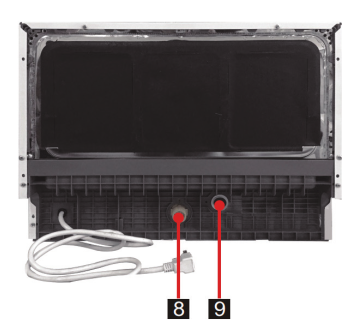
8. Dispenser inlet Pipe Connector
9. Drain Pipe Connector
OPERATING INSTRUCTIONS
HOW TO USE THE RINSE AID DISPENSER
What is the Rinse Aid Dispenser?
The rinse aid dispenser holds and releases a special liquid during your dishwasher's final rinse cycle to help dishes dry quickly and without any streaks. You can find the rinse aid dispenser inside your dishwasher next to the detergent dispenser.
How to Fill the Rinse Aid Dispenser
1. Locate the dispenser on the inside door of your dishwasher.
2. Open the cap.
3. Pour liquid rinse aid into the dispenser until the level indicator turns completely black, around 3.7 fluid ounces.
WARNING
Only use branded rinse aid for the dishwasher. Never fill the rinse aid aid dispenser with any other substances, not even a cleaning agent or detergent. This will damage your dishwasher.
When to Refill the Rinse Aid Dispenser
The rinse aid indicator light should turn on to let you know when to refill the dispenser. However, you can also check on the level of rinse aid by using the rinse aid indicator located next to the dispenser’s cap. When the dispenser is full, the indicator will show a completely dark dot. As the rinse aid level decreases, the dot will shrink. as illustrated below.
WARNING: DO NOT LET THE RINSE AID LEVEL GO BELOW 1/4 FULL.
To open the dispenser, turn the cap towards the Left, aligning it with the arrow on the left side. Lift it up.
To close, realign the cap with the left arrow and place on the dispenser. Turn towards the right until it lines up with the right-sided arrow.
ADJUSTING THE RINSE AID DISPENSER
NOTE: Increase the level if there are water droplets or lime spots on your dishes after a wash cycle. Reduce it if there are white spots on your dishes, or a blue film on glassware and cutlery.

HOW TO USE DETERGENT
Why is Detergent Important?
Detergent is necessary to clean your dishes. It’s important to only use detergent specifically made for dishwashers with your dishwasher. Store the detergent in a dry place, and only put it in the dispenser when you're ready to wash dishes.
What Type of Detergent Can I Use?
You can use three types of detergents:
1. Those with phosphate and chlorine
2. Those with phosphate and without chlorine
3. Those without phosphate or chlorine
Note that detergents with chlorine can remove some stains when used with a high temperature program.
Can I Use Concentrated Detergent?
Yes. Concentrated detergents, or those that contain natural enzymes and are low in alkalinity, are gentler on your dishes and the environment. You can achieve the same cleaning results with these types of detergents on a “normal” wash cycle as you can with conventional detergents on a “heavy” wash cycle. This is because the water facilitates the dirt-dissolving properties of the enzymes in concentrated detergents.
Can I Use Detergent Tablets?
Yes, but different tablet brands dissolve at different speeds. For this reason, select long wash programs to ensure that the tablets have fully dissolved and reached their full cleaning potential.
HOW TO USE DETERGENT DISPENSER
How Do I Use the Detergent Dispenser?
Refill the dispenser before the start of each wash cycle, following the instructions provided in the Wash Cycle Table. Your dishwasher uses less detergent than a conventional dishwasher, so you generally only need one tablespoon of detergent for a normal load. Note that dirtier dishes will need more detergent. Always add the detergent just before starting the dishwasher. Otherwise, the detergent could get damp before use and not dissolve properly.
How Do I Fill the Detergent Dispenser?
NOTE: Only use branded detergent for this dishwasher.
WARNING: Dishwasher detergent is corrosive! Keep out of reach of children.
The markings indicate detergent levels and dosing levels (as illustrated on the right). Fill the detergent dispenser with detergent. Please observe the manufacturer's dosing and storage recommendations as stated on your detergent packaging. Close the lid and press down until it locks into place. If the dishes are dirtier than normal, place an additional detergent dose in the pre-wash chamber to use during the pre-wash phase of your wash cycle.
Find information on detergent amount for the single program on the last page of this manual.
Please be aware that you may experience different results due to water properties and the dirtiness of your dishes. Please follow the manufacturer's recommendations on the detergent packaging.
HOW TO LOAD THE DISHWASHER BASKETS
Recommendations
• Buy dishwasher-proof utensils.
• Use a mild detergent. If necessary, check your detergent manufacturer to make sure it is safe for all dishware.
• For delicate items, choose a low temperature program.
• To prevent damage, do not take glass and cutlery out of the dishwasher immediately after the program has ended.
What Can I Put in the Dishwasher?
NEVER
+ Cutlery with wooden, horn china, or mother of pearl handles
+ Older cutlery with glued parts that are not heat resistant
+ Cutlery or dishes bonded with glue
+ Pewter or copper items
+ Crystal
+ Steel items that can rust
+ Wooden platters
+ Items made from synthetic fibers
SOMETIMES
+ Glasses — certain types can become dull after many washes
+ Silver and aluminium items — these can discolor during washing
+ Glazed or painted item — colors and patterns may fade after frequent washing
How Do I Load the Dishwasher Baskets?
For best performance, follow these loading guidelines. Features and appearance of shelves and cutlery baskets may vary from your model. Scrape off any large amounts of leftover food. Soften any burnt food left in pans. It is not necessary to rinse the dishes under running water.
Place objects into the dishwasher in the following way:
1. Items such as cups, glasses, pots, pans, etc. go face down.
2. Curved items should be loaded at a slant so water can run off of them.
3. Utensils should be stacked securely so they cannot tip over.
4. Utensils should be placed away from spray arms so they can rotate freely during washing.
NOTE: Do not place small items that may fall out of the basket into the dishwasher.
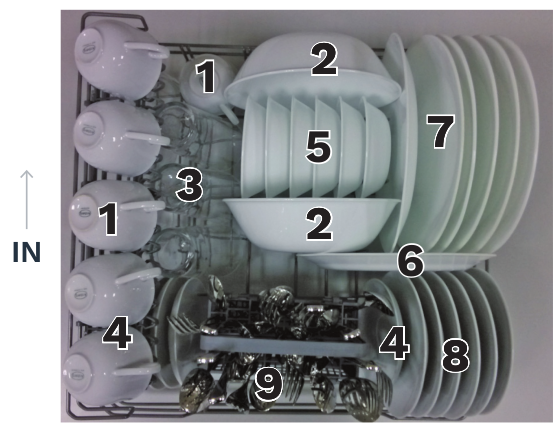
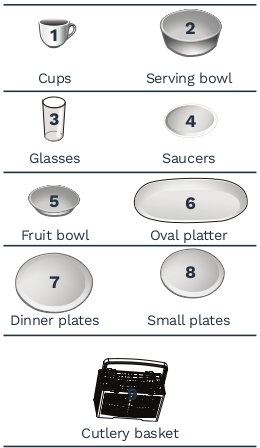
Basket Plate Racks
The basket is fitted with plate racks that can be stowed horizontally if required.
How Do I Load the Cutlery Basket?
Cutlery should be placed in the basket with their handles facing downward towards the bottom. If there are side baskets. use them to load spoons individually into the appropriate slots. It's important that long utensils are placed horizontally at the front of the basket.
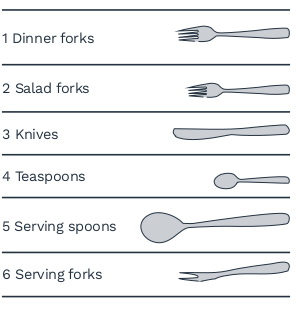

WARNING: Do not let any item extend through bottom. Always load sharp utensils with the sharp point down!
For safety purposes and best performance, place cutlery in the basket so that:
+ They do not nest together.
+ Their handles face downwards.
+ Sharp points and blades are facing downwards.
HOW TO SELECT A WASH CYCLE
NOTE:  THIS MEANS YOU NEED TO FILL THE RINSE AID DISPENSER.
  THIS IS THE TEST CYCLE. THE RINSE AID DISPENSER LEVEL IS RECOMMENDED AT “3.”
How Do I Turn on the Dishwasher?
To start the wash cycle:
1. Pull out the basket. See “How Do | Load the Dishwasher?” for instructions.
2. Load detergent. See “How to Use Detergent” for instructions.
3. Plug in the dishwasher. The power supply is 120V/60Hz.
4. Check that the water supply is turned on to full pressure.
5. Push the basket in and close the dishwasher door. Press the power button to turn on.
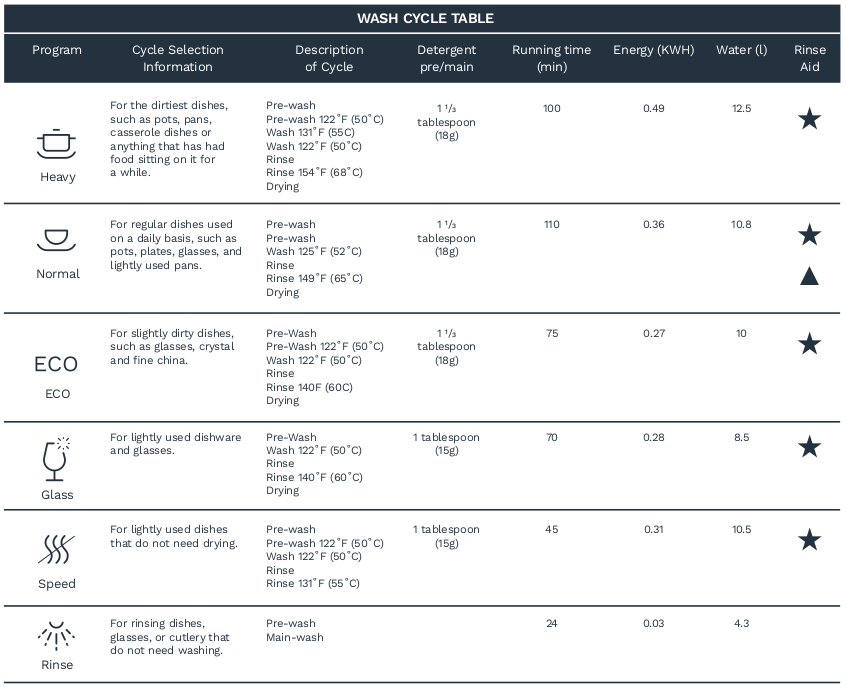
6. Press the program button to select your wash cycle. The options are: heavy, normal, ECO, glass, speed, and rinse.Refer to the wash cycle table for details.
7. Press the start/pause button to start the cycle.
NOTE: To pause the dishwasher while washing, press the start/pause button. The dishwasher will pause and the program light is steady. It will remain like this until you start it again.
HOW TO SELECT A WASH PROGRAM
How Do I Change the Wash Program?
You can change your wash cycle only if it has been running for a short time and the detergent has not yet been dispensed. If the detergent has already been dispensed, you will need to refill the dispenser again. See "How Do I Use
Detergent" for instructions.
To change the wash program, press and hold the program button for more than three seconds. The machine will enter standby mode where you can then change the setting. See “How Do I Select a Wash Cycle?” for instructions.
The lights will show the state of the dishwasher:
a) All phase lights off - On stand by
b) The display light steady (not blinking) - Paused
c) The display light blinking - Running
You can add a dish at any time before the detergent is dispensed. To do so:
1. Press the start/pause button.
2. Crack the door open to stop the wash cycle.
3. Once the spray arms stop moving, open the door completely.
4. Add your dishes to the basket.
5. Close the door.
6. Press the start/pause button again and the dishwasher will run after ten seconds.
What Do I Do After the End of the Cycle?
When the cycle is finished, the buzzer will sound for eight seconds before shutting off. Press the power button to turn the dishwasher off. Shut off the water supply and open the door. Wait a few minutes before handling your dishes to allow them to dry and become less susceptible to damage. The dishwasher will automatically enter standby mode, then turn off after 30 minutes.
How to Turn off the Dishwasher?
The program has ended when all ofthe phase lights are off. Then:
1. Press the power button to turn the dishwasher off.
2. Turn off your water tap.
Note: Open the Door Carefully
Hot dishware is senstive and can break easily. Allow to cool for at least 15 minutes before removing from the dishwasher to prevent damage. To do this, crack open the dishwasher’s door open and leave it ajar for a few minutes. This will allow your dishware to cool and dry.
How to Unload the Dishwasher
Note that it is normal for the dishwasher to be wet inside.
WARNING! It is dangerous to open the door when washing, because hot water may scald you.
FILTERING SYSTEM INSTRUCTIONS
How Does the Filtering System Work?
The filter prevents larger remnants of food and other objects from getting inside the pump.

WARNING! Never run the dishwasher without the filters in place. Improper placement of the filter may reduce the performance level of the dishwasher and damage dishes and utensils.
How to Assemble the Filter
The filter efficiently removes food particles so that the water can be recycled during the wash cycle. For best performance, regularly check the filters. Remove larger food items trapped in the filter after each wash cycle by rinsing the filter under running water. To remove the filter assembly, pull upwards on the filter assembly's handle.
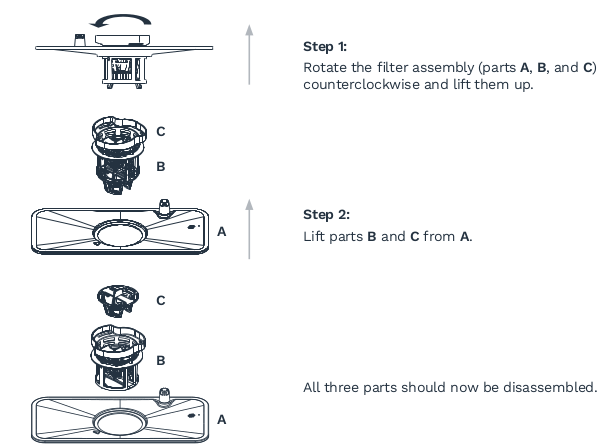
NOTE: To reinstall the filter system, place all three parts back together, rotate clockwise and push downwards.
CLEANING THE FILTERING SYSTEM
Remember:
+ Inspect the filters for blockage after each wash cycle.
+ To remove blockages, unscrew the coarse filter to remove the filter system. Remove any food and clean the filters under running water.
+ Clean the entire filter assembly once a week.
How to Clean the Filter
Use a cleaning brush to clean the coarse and fine filter.
WARNING! When cleaning the filters, do not knock them against surfaces. This can contort the filters and affect and the performance of your dishwasher.
CARING FOR THE DISHWASHER
+ Use a lightly dampened cloth to clean the control panel. Dry thoroughly.
+ Use a dishwasher polish wax on the exterior.
+ Never use sharp objects, scouring pads, or harsh cleaners on any part of the dishwasher.
How to Clean the Door
To clean the edge around the door, use a soft, warm, damp cloth. Do not use a spray cleaner of any kind to avoid getting liquid on the door lock and electrical components.

WARNING! Do not use abrasive cleaning agents or rough paper towels to prevent scratching or marring the stainless steel surface.
How to Protect Against Freezing
Please take frost protection measures on dishwasher in winter. After each wash cycle, do the following:
1. Turn off the power to the dishwasher.
2. Turn off the water supply and disconnect the water inlet pipe from the water valve.
3. Drain water from the inlet pipe and water valve. Use a pan to catch the water.
4. Reconnect the water inlet pipe to the water valve.
5. Remove the filter at the bottom of the tub and use a sponge to soak up the water in the sump.
MAINTENANCE
CARING FOR THE DISHWASHER
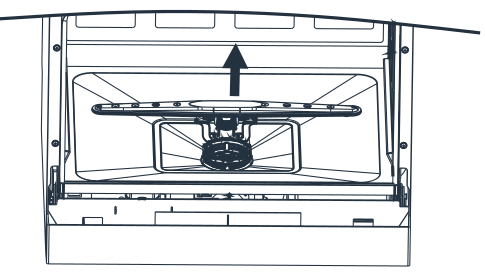
How Do I Clean the Spray Arms?
The spray arms can be easily removed for periodic cleaning to prevent possible clogging.
Wash them under running water and carefully replace them in their holders, checking that their rotary movement is in no way impeded.
To remove the spray arm, pull the middle of the arm upwards. Wash them under running water and carefully place them in their positions in the dishwasher. Double check that they rotate properly after cleaning.
HOW TO MAINTAIN YOUR DISHWASHER
Tum Off Water
After every wash, turn off the water supply and leave the door slightly open so that moisture and odors are not trapped inside.
Store Properly
When not in use for a longer period of time, we recommend that you run a wash cycle while the dishwasher is empty. Then, remove the plug, turn off the water supply, and crack the door open slightly. This will help maintain the quality of the door seal and prevent odors from forming in the dishwasher.
Unplug the Dishwasher
Always unplug your dishwasher from the socket before cleaning or performing maintenance checks.
Keep in a Vertical Position
If you need to move the dishwasher, try to keep it in a vertical position. if necessary, it can be positioned on its back, but this is not ideal.
Do Not Use Abrasive Cleaners
Do not use abrasive cleaning products on the exterior and rubber parts of the dishwasher. Instead, use a cloth with warm water and soap. To remove stains from the interior surface, use a cloth with vinegar. or a cleaning product specially designed for dishwashers.
Clean the Seal (Odors may form in the dishwasher if food becomes trapped in the seals. To prevent this, periodically clean the seals with a damp sponge.
INSTALLATION
POSITIONING THE DISHWASHER
ATTENTION! The installation of the pipes and electrical equipments should be done by professionals.
WARNING! ELECTRICAL SHOCK HAZARD
Disconnect electrical power before installing dishwasher.
Failure to do so can result in death or electrical shock. w
Position your dishwasher in your desired location with its back resting against a wall and the sides adjacent to cabinets or walls. The dishwasher is equipped with water supply and drain hoses that can be positioned to the right or the left of it to facilitate proper installation. Position your dishwasher on counter top, do not place the unit on the ground or other position that much lower than counter top while using.
Warning: For personal safety: DO NOT USE AN EXTENSION CORD OR AN ADAPTER PLUG WITH THIS DISHWASHER. DO NOT, UNDER ANY CIRCUMSTANCES, CUT OR REMOVE THE GROUNDING CONNECTION FROM THE POWER CORD.
THE POWER CONNECTION
Electrical Requirements
Please look at the rating label to understand the rating voltage and connect the dishwasher to the appropriate power supply. Use the required fuse 10 amp, time delay fuse, or circuit breaker recommended and provide a separate circuit for this dishwasher.
INSURE PROPER GROUND EXISTS BEFORE USE
Electrical Connection
Ensure the voltage and frequency of the power outlet corresponds to those on the rating plate. Only insert the plug into an electrical socket that has been grounded properly. If the socket is not appropriate for the dishwasher, replace the socket. Do not use adapters, as they may cause overheating or burns.
GROUNDING INSTRUCTIONS
This dishwasher must be grounded. In the event of a malfunction or breakdown, grounding will reduce the risk of electrical shock by providing a path of least resistance for the electrical current.
Your dishwasher is equipped with a cord with a grounding conductor and plug. The plug must be used in an outlet that is grounded in accordance with all local standards and requirements.
WARNING!
Improper connection of the grounding conductor can result in the risk of an electrical shock.
Check with a qualified electrician or service representative if you are unsure whether the dishwasher is. properly grounded.
Do not modify your dishwasher's plug. If it does not fit properly in your outlet, have a qualified electrician install a different outlet.
WATER CONNECTION
Back of Dishwasher:
1. Drain Port
2. Power Cord
3. Inlet Port
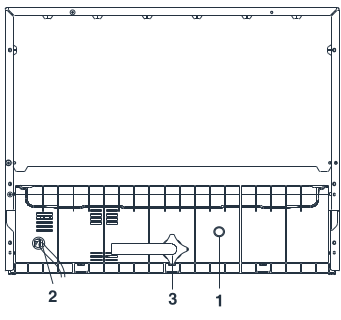
Your dishwasher comes equipped with a quick connect’ assembly that includes an inlet and drain hose.
The faucet adapter must be installed on the faucet before you can connect the dishwasher. This adapter is included inside your dishwasher. The faucet adapter is compatible with either male (outside) or female (inside) threaded faucet connections.
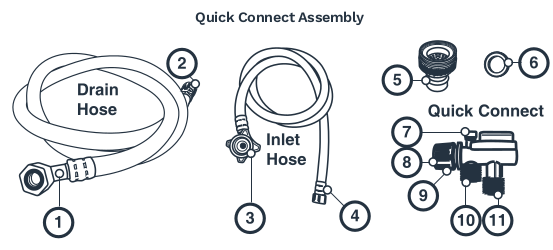
Quick Connect Assembly
Drain Hose:
1. Drain port connection
2. Quick connect connection
Inlet Hose:
3. Inlet port connection
4. Quick conect connection
Faucet Adapter
5. Faucet adapter
6. Faucet washer
Quick Connect:
7. Pressure relief valve
8, Faucet adapter connection
9. Locking collar
10. inlet hose connection
11. Drain hose connection
WARNING! To avoid water buildup in the inlet hose, close the faucet after use.
WATER CONNECTION
1. Screw the faucet adapter onto or into the faucet tap. Check for leaks. If there are any, use Teflon tape to seal them if necessary. Faucet adapter has thread size of 56/64'-27 female or 15/16'-27 male threads, if our faucet adapter is not fitting with your faucet, please find another adapter in local hardware store.
2. Connect the six-sided connection of the drain hose to the drain port connection on the back of the dishwasher. Do not over tighten to avoid damage to its threads.
3. Connect the star-shaped connection of the inlet hose to the inlet port on the back of the dishwasher. Do not over tighten to avoid damage to its threads.
4. Connect the circular connection of the drain hose onto the longer (bottom) male connection on the quick connect.
5. Connect the circular connection of the inlet hose onto the shorter (top) male connection on the quick connect.
6. Attach the quick connect onto the faucet adapter, by pulling down the outer locking collar on the quick connect. while pushing the quick connect upward onto the faucet adapter.
7. When the quick connect snaps onto the faucet adapter, release the locking collar. Check that the connection is secure.
8. Slowly open the hot water line and check for any sign of water leaks at all hose connections. If leaks are located. immediately close the water supply and repair the hose connections.
IMPORTANT
1. Once you open the water supply line, (even if it is closed immediately thereafter), the inlet hose will be pressurized.
2. To relieve water pressure from inside the inlet hose, make sure the water line faucet is closed. Then, press and hold the red pressure relief button on the quick connect until the flow of water stops.
WARNING! FAILURE TO RELIEVE WATER PRESSURE BEFORE DISCONNECTING THE QUICK-CONNECT FROM THE FAUCET. WILL RESULT IN BACK-PRESSURE OVER-SPRAY. THE TEMPERATURE OF INCOMING WATER CAN BE VERY HOT, AND BACK-PRESSURE OVER-SPRAY COULD CAUSE SEVERE BURNS AND/OR SCALDING.
DANGER! DO NOT LET CHILDREN DISCONNECT THE DISHWASHER; CLOSE SUPERVISION OF CHILDREN IS ALWAYS. IMPORTANT AROUND DISHWASHERS.
NOTE: Hard water conditions will negatively affect the performance of your dishwasher. Hard water conditions will also contribute to lime desposits (white film substance) and/or scaling on the stainless steel surface of the dishwasher and heating element, located in the sump underneath the removable filter screen. To minimize this, operate/rinse the inside of the dishwasher once a week while it is empty, using 1 cup of white vinegar.
How to Disconnect the Dishwasher
1. Shut off the water supply at the faucet.
2. Disconnect the power supply cord.
How to Start the Dishwasher
The following things should be checked before starting the dishwasher.
1. The dishwasher is level and fixed properly
2. The inlet valve is open
3. There is no leakage at the conductor connections
4, The wires are tightly connected
5. The power is switched on
6. The inlet and drain hoses are knotted
7. All packing materials and printings are taken out from the dishwasher.
ATTENTION: The content of this manual can be very helpful to the users. After installation, please make sure to keep this manual.
TROUBLESHOOTING
TECHNICAL PROBLEMS
Dishwasher doesn't start
Fuse blown, or the circuit breaker tripped
Replace fuse or reset circuit breaker. Remove any other appliances sharing the same circuit with the dishwasher.
Power supply is not turned on.
Make sure the dishwasher is turned on and the door is closed securely. Make sure the power cord is properly plugged into the wall socket.
Door of dishwasher is not properly closed
Close the dishwasher door making sure that door latches. Make sure the power cord is properly plugged into the wall socket.
Water not pumped from dishwasher
Kink in the drain hose Filter is clogged
Check the coarse filter. Gee section titled "Cleaning The Filter"
Kitchen sink is clogged
Check your kitchen sink to make sure it is draining well.
Check the drain hose.
If the kitchen sink is not draining, contact a plumber rather than a serviceman for this dishwasher.
GENERAL PROBLEMS
Suds in the tub
Improper detergent used
Only use special dishwasher detergent to avoid suds. If suds do occur, open the dishwasher and let suds evaporate. Add 1 gallon of cold water to the tub. Close and latch the dishwasher, then start the soak wash. cycle to drain out the water. Repeat if necessary.
Spilled rinse aid
Always wipe up rinse-aid spills immediately.
Stained tub interior
Detergent with colorant was used
Make sure that the detergent does not have colorant.
White film on inside surface
Hard minerals in water
To clean the interior, use a damp sponge with dishwasher detergent, wearing rubber gloves. Never use any cleaner other than dishwasher detergent, as there is risk of foaming or suds.
There are rust stains on cutlery
The affected items are not corrosion resistant. The soft part of the lid is loose
Check the lip. Ensure the fix is secure.
NOISE
Knocking noise in the wash cabinet
The spray arm is knocking against an item in a basket
Interrupt the program and rearrange items obstructing the spray arm.
Rattling noise in the wash cabinet
The spray arm is knocking against an item in a basket
Interrupt the program and rearrange items obstructing the spray arm.
Knocking noise in the water pipes
May be caused by on-site installation or the cross-section of the piping
This has no influence on dishwasher function. If unsure, contact a qualified plumber.
UNSATISFACTORY WASHING RESULT
The dishes are not clean
The dishes were not loaded correctly
Refer to the section on how to load the dishwasher.
The program was not powerful enough
Select a more intensive program. See "Wash Cycle Table".
Not enough detergent was dispensed
Use more detergent, or change your detergent.
Item are blocking the path of spray arms
Rearrange the items so that the spray can rotate freely.
Cloudiness on glassware
The filter combination in the base of wash cabinet is not clean or is not correctly fitted
Clean and/or fit the filter assembly correctly. Clean the spray arm jets. See "Cleaning the Spray Arms".
Combination of soft water and too much detergent
Use less detergent if you have soft water and select a shortest cycle to wash the glassware and to get them clean.
Black or gray marks on dishes
Aluminum utensils rubbed against dishes
Use a mild abrasive cleaner to eliminate any marks.
Detergent left in dispenser cups
Dishes block detergent cups
Reload the dishes properly.
UNSATISFACTORY DRYING RESULT
The dishes are not drying
Improper loading
Load the dishwasher as suggested in the directions.
Too little rinse-aid
Increase the amount of rinse-aid and/or refill the rinse-aid dispenser.
Dishes are removed too soon
Do not empty your dishwasher immediately after washing. Open the door slightly so that the steam can escape. Begin unloading the dishwasher once the dishes are barely warm to the touch. Empty the low basket first to prevent water from dripping off dishes in the upper basket.
Wrong program selected
Short programs run at a lower temperature, which may lower cleaning performance. Choose a program with a long washing time.
Cutlery has low-quality coating
Water drainage is more difficult with these types of items items. These types of cutlery and dishware are not suitable for washing in the dishwasher.
ERROR CODES:
EI: Longer inlet time. Faucets are not opened, water intake is restricted, or water pressure is too low.
E4 Overflow Some part of the dishwasher is leaking.
WARNING! If overflow occurs, turn off the main water supply before calling hOme Customer Service. If there is water in the base pan because of an overfill or small leak, the water should be removed before restarting the dishwasher.
SPECIFICATIONS
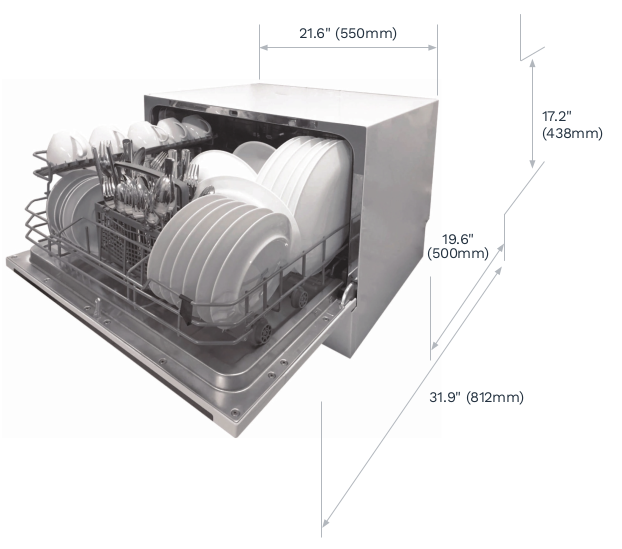
Height: 17.2" (438mm)
Width: 21.6" (650mm)
Depth: 19.6" (500mm)
Voltage Connected Load: See Rating Label
Water Pressure: 6-145 PSI (0.04-1.0MPa)
Hot Water Connection: 120°F (49°C)
Power Supply:See Rating Label
Capacity:6 Place Settings
WARRANTY
HomeTM offers a limited two-year warranty ("warranty period”) on all of our products purchased new and unused from hOme Technologies, LLC or an authorized reseller, with an original proof of purchase and where a defect has arisen, wholly or substantially, as a result of faulty manufacturing, parts or workmanship during the warranty period.
The warranty does not apply where damage is caused by other factors, including but without limitation:
(a) normal wear and tear;
(b) abuse, mishandling, accident, or failure to follow operating instructions;
(c) exposure to liquid or infitration of foreign particles;
(d) servicing or modifications of the product other than by home";
(e) commercial or non-household use.
The home” warranty covers all costs related to restoring the proven defective product through repair or replacement of any defective part and necessary labor so that it conforms to its original specifications. A receipt indicating the purchase date is required for any claim, so please keep all receipts in a safe place.
We recommend that you register your product on our website, homelabs.com/reg. Although greatly appreciated, the product registration is not required to activate any warranty and product registration does not eliminate the need for the original proof of purchase. The warranty becomes wid if attempts at repair are made by non-authorized third parties and/or if spare parts, other than those provided by home”, are used.
You may also arrange for service after the warranty expires at an additional cost. These are our general terms for warranty service, but we always urge our customers to reach out to us with any issue. regardless of warranty terms. If you have an issue with a hOme” product, please contact us at 1-800-898-3002, and we will do our best to resolve it for you
This warranty gives you specific legal rights, and you may have other Legal rights which vary from state to state, country to country or province to province. The customer may assert any such rights at their sole discretion.
MANUFACTURING INFO
This manual is to be used with all items with the model number
HMEO10033N SKU# : HME010033N
PART#: HMEO10033MINL
WARNING
Keep all plastic bags away from children.