Documents: Go to download!
User Manual
- User Manual - (English)
- Quick Reference Guide - (English)
- Embroidery Design Guide - (English)
- Notification about included accessories - (English)
- Open Source Licensing Remarks - (English)
- USB media compatibility list - (English)
- Accessories catalog - (English)
- GETTING READY
- SEWING BASICS
- Care and Maintenance
- Troubleshooting
Table of contents
User manual Embroidery and Sewing Machine
GETTING READY
Names of Machine Parts
Main parts
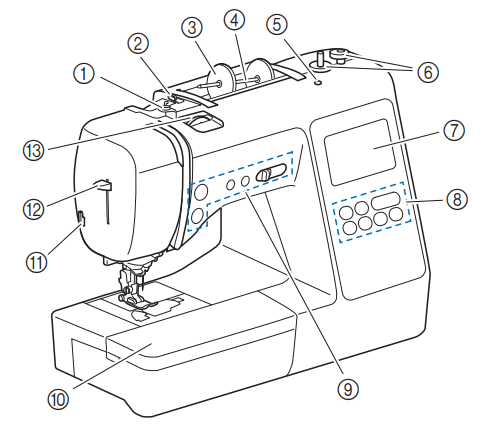
- Bobbin winding thread guide and pretension disk (page 15)
- Thread guide (page 14)
- Spool cap (page 13)
- Spool pin (page 13)
- Hole for extra spool pin
- This holds an extra spool pin for sewing with twin needle. (page 52) This is not a hole for lubrication. Do not insert oil into this hole.
- Bobbin winder (page 13)
- LCD (liquid crystal display) (page 10)
- Operation panel (page 6)
- Operation buttons and sewing speed controller (page 6)
- Flat bed attachment (page 7, 31)
- Thread cutter (page 19)
- Needle threader lever (page 19)
- Thread tension dial (page 29, 67)
- Handwheel
- Turn the handwheel toward you (counterclockwise) to raise and lower the needle to sew one stitch.
- Thread guide cover (page 14)
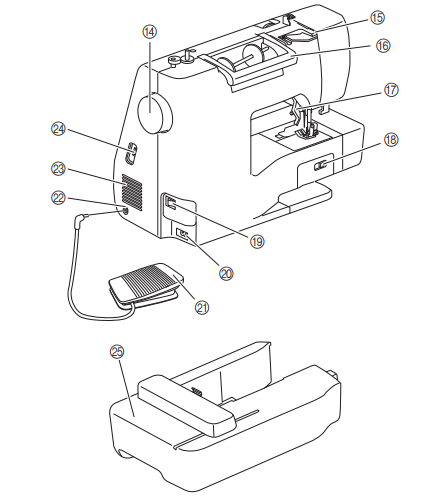
- Handle
- Carry the machine by its handle when transporting.
- Presser foot lever
- Raise and lower the presser foot lever to raise and lower the presser foot.
- Feed dog position switch
- Use the feed dog position switch to raise and lower the feed dogs. (page 47)
- Main power switch (page 9)
- Power supply jack (page 9)
- Foot controller (page 26)
- Foot controller jack (page 26)
- Air vent
- The air vent allows the air surrounding the motor to circulate. Do not cover the air vent while the machine is being used.
- USB port (for a USB flash drive) (page 55, 75)
- Embroidery unit (page 58)
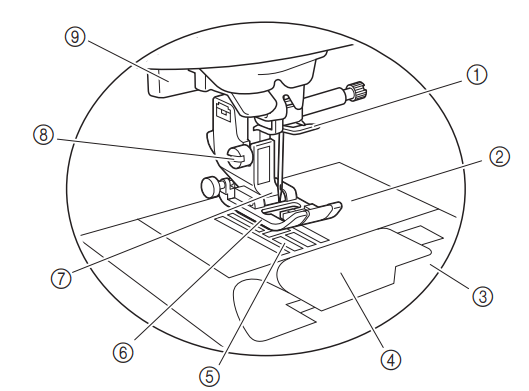
Needle and presser foot section
Operation buttons
1 “Start/Stop” button
Press the “Start/Stop” button to start or stop sewing. The button changes color according to the machine’s operation mode.
Green: The machine is ready to sew or is sewing.
Red: The machine cannot sew.
Orange: The machine is winding the bobbin thread, or the bobbin winder shaft is moved to the right side.
2. Reverse/Reinforcement stitch button
Press the reverse/reinforcement button to sew reverse/ reinforcement stitches. (page 27)
3. Needle position button
Press the needle position button to raise or lower the needle. Pressing the button twice sews one stitch.
4. Thread cutter button
Press the thread cutter button after sewing is stopped to cut both the upper and the bobbin threads.
5. Sewing speed controller
Slide the sewing speed controller to adjust the sewing speed. The sewing speed cannot be adjusted while sewing decorative stitches or embroidering.
Operation panel and operation keys

1. LCD (liquid crystal display) (touch panel)
Selected pattern settings and messages are displayed. Touch the keys displayed on the LCD to perform operations. For details, refer to “LCD Operation” on page 10.
2. Previous page key 
Displays the previous screen when there are items that are not displayed on the LCD.
3. Next page key 
Displays the next screen when there are items that are not displayed on the LCD.
4. Help key
Press to get help on using the machine.
5. Settings key
Press to set the needle stop position, the buzzer sound, and more.
6. Embroidery key
Press this key to embroider.
7. Utility stitch key
Press this key to sew a utility stitch or decorative stitch.
8. Back key
Press to return to the previous screen.
9. Presser foot/Needle exchange key
Press this key before changing the needle, the presser foot, etc. This key locks all key and button functions to prevent operation of the machine.
Note
•The operation keys of this machine are capacitive touch sensors. Operate the keys by directly touching them with your finger.
The response of the keys varies according to the user. The pressure exerted on the keys does not affect the response of the keys.
•Since the operation keys react differently depending on the user, adjust the setting for “Adjusting input sensitivity for operation keys” on page 13.
•When using an electrostatic touch pen, make sure that its point is 8 mm or more. Do not use a touch pen with a thin point or a unique shape.
Included accessories
Included accessories may differ from the table below depending on the machine model you purchased. For more details on included accessories and their part codes of your machine, refer to the additional sheet “Included Accessories”.
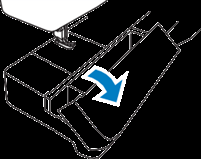
Pull the top of the flat bed attachment to open the accessory compartment.
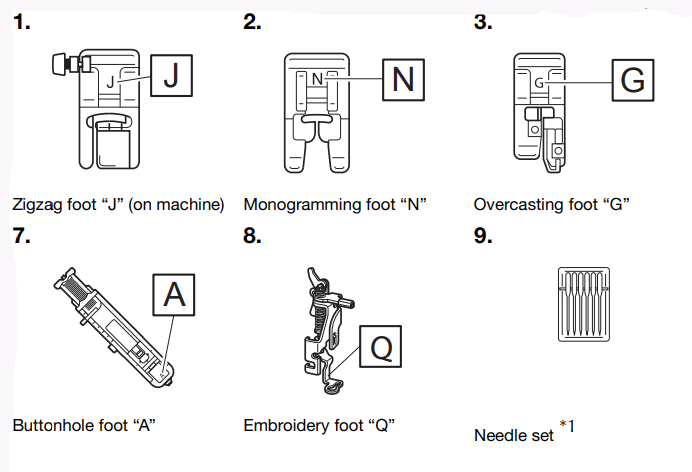
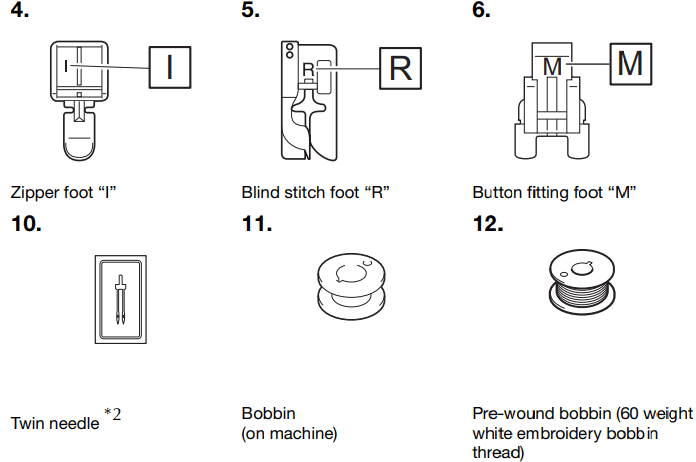
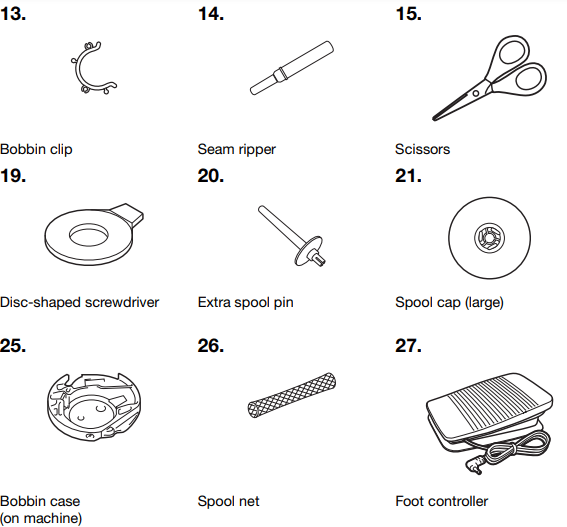
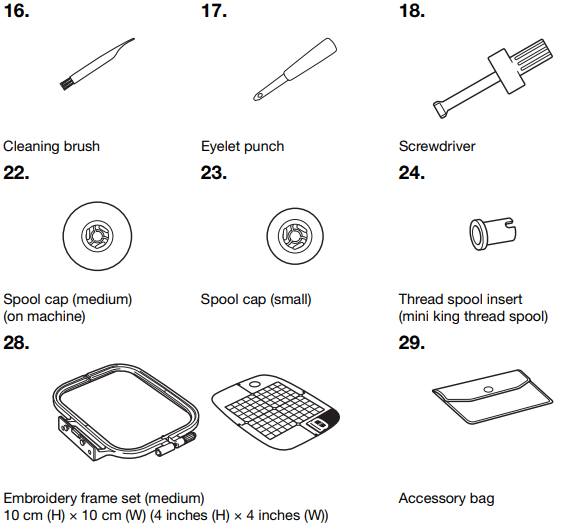

*1 75/11 2 needles,
90/14 2 needles
90/14 2 needles: Ball point needle (gold colored)
*2 2/11 needle
Optional accessories
The following are available as optional accessories to be purchased separately.


No. |
Part Name | Part Code | ||
Americas | Europe | Others | ||
1. | Free motion open toe quilting foot “O” | SA187 | F061: XE1097-001 | F061 F061CN |
2. | Quilting foot | SA129 | F005N: XC1948-052 | F005N |
3. | Walking foot | SA140 | F033N: XG6623-001 | F033N F033CN |
4. | 1/4" Piecing foot with guide | SA185 | F057: XC7416-252 | F057 |
5. | Quilting guide | SA132 | F016N: XC2215-052 | F016N F016CN |
6. | Side cutter “S” | SA177 | F054: XC3879-152 | F054 F054CN |
7. | Non stick foot | SA114 | F007N: XC1949-052 | F007N F007CN |
8. | Roller foot | SA190 | F066: XG6751-001 | F066 F066CN |
9. | Wide table | *1 | WT15: XG8750-001 | WT15AP |
10. | Circular attachment | SACIRC1 SACIRC1C | CIRC1: XG6705-001 | CIRC1 CIRC1CN |
11. | Embroidery frame set (large)*2 17 cm (H) × 10 cm (W) (6-7/10 inches (H) × 4 inches (W)) | SA434 | EF71: XF2410-001 | EF71 EF71CN |
12. | Embroidery frame set (small) 2 cm (H) × 6 cm (W) (1 inch (H) × 2- 1/2 inches (W)) | SA431 | EF61: XF2419-001 | EF61 EF61CN |
13. | Stabilizer material for embroidery | SA519 | BM3: XG6683-001 | BM3 BM3CN |
14. | Water soluble stabilizer | SA520 | BM5: XG6681-001 | BM5 BM5CN |
15. | Embroidery bobbin thread (60 weight, white/ black) | SA-EBT (white)/ SAEBT999 (black) | EBT-CEN (white): X81164-001/ EBT-CEBN (black): XG6643-001 | EBT-CEN (white)/ EBT-CEBN (black) |
*1 Contact your authorized Brother dealer.
*2 By changing the attaching position of the frame, 17 cm × 10 cm (6-7/10 inches × 4 inches) area can be embroidered without hooping the fabric again. The embroidery area is 10 cm × 10 cm (4 inches × 4 inches).
SEWING BASICS
SEWING
Stitch types
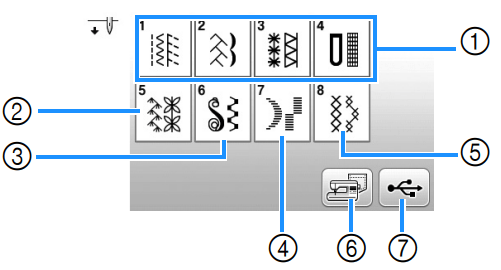
- Utility stitches (page 35) You can select from utility stitches, including straight line stitching, overcasting, buttonhole and basic decorative stitches.
- Decorative stitches
- Decorative satin stitches
- Satin stitches
- Cross stitch stitches
- Stitch patterns stored in the machine's memory (page 55)
- Stitch patterns stored in USB flash drive (page 55)
Basic sewing
Note
•First, perform a trial sewing, using a piece of fabric and thread that are the same as those used for your project.
1. Prepare the appropriate needle and thread for the type of fabric. (page 21)
If necessary, replace the needle. (page 22)
2. Wind thread onto a bobbin, and then install it into the machine. (page 13)
3. Thread the upper thread. (page 17)
4. Press  on the operation panel and select the stitch
5. Select a stitch.
 displays the previous screen, and
  displays the next screen.
•For details on the key functions, refer to “Viewing the LCD” on page 10.
•If necessary, change to the desired stitch width or stitch length. (page 29)

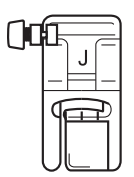
6. Check which presser foot is indicated in the upper-left corner of the screen, and then attach it.
Attach zigzag foot “J” in this procedure. (It is on the machine when purchased.)
•For details on changing the presser foot, refer to “Replacing the Presser Foot” on page 23.
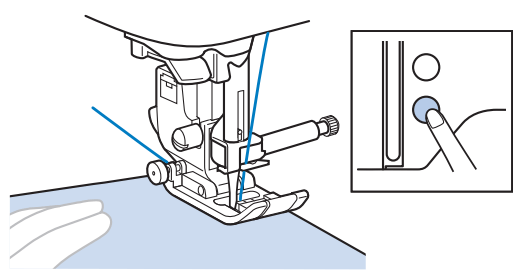
7. Set the fabric under the presser foot. Hold the fabric and thread with your left hand, and rotate the handwheel counterclockwise or press  (Needle position button) to set the needle in the sewing start position.

8. Lower the presser foot lever.
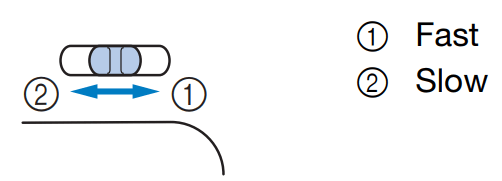
9. Adjust the sewing speed with the sewing speed controller. (when using utility stitches)
You can use this controller to adjust sewing speed during sewing.
10. Press the “Start/Stop” button to start sewing. (When the foot controller is plugged in, slowly press down on the foot controller.)
Guide the fabric lightly by hand.
Memo
•When the foot controller is being used, you cannot start sewing by pressing the “Start/Stop” button.
11. Press the “Start/Stop” button again to stop sewing. (When the foot controller is plugged in, remove your foot from the foot controller.)
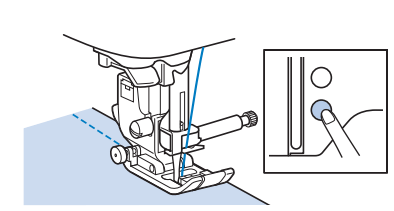
12. Press  (Thread cutter button) to trim the upper and bobbin threads.
→The needle will return to the up position automatically.
Note
•When cutting thread such as nylon monofilament thread, or other decorative threads, use the thread cutter on the left side of the machine.
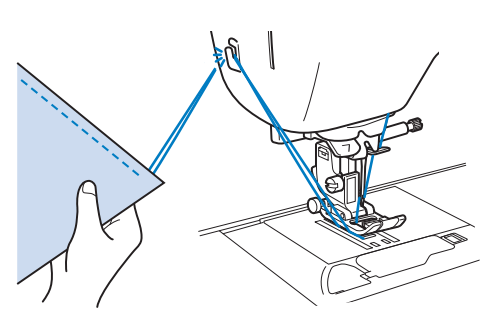
13. When the needle has stopped moving, raise the presser foot lever and remove the fabric.
14. Check the sewing finish. If necessary, adjust the thread tension. (page 29)
Using the foot controller
You can also use the foot controller to start and stop sewing.
- Turn off the machine.
- Insert the foot controller plug into the foot controller jack on the machine.

- Turn on the machine.
- Slowly depress the foot controller to start sewing.
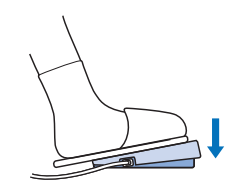
- Release the foot controller to stop the machine.
Sewing reverse/reinforcement stitches
Reverse/reinforcement stitches are generally necessary at the beginning and end of sewing. Depending on the selected stitch, reverse or reinforcement stitches are sewn while  (Reverse/Reinforcement stitch button) is kept pressed. With reinforcement stitches, 3 to 5 stitches are sewn at the same place. With reverse stitches, the stitching is sewn in the opposite direction.
Memo
•When any of the following stitches is selected, pressing  (Reverse/Reinforcement stitch button) will sew reverse stitches

When any other stitch is selected, pressing (Reverse/Reinforcement stitch button) will sew reinforcement stitches.
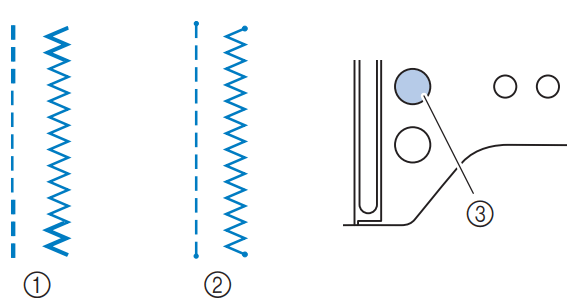
1. Reverse stitch
2. Reinforcement stitch
3.  (Reverse/Reinforcement stitch button)
Combining Stitch Patterns
Stitch patterns from the following categories can be combined.
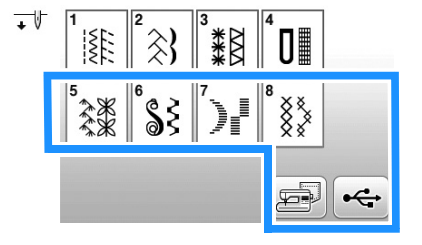
Example:

- Press
 .
.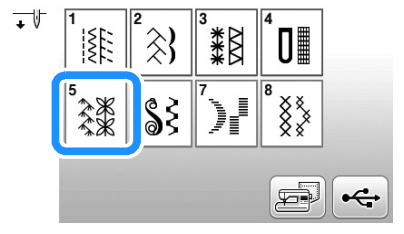
- Select the following stitch pattern
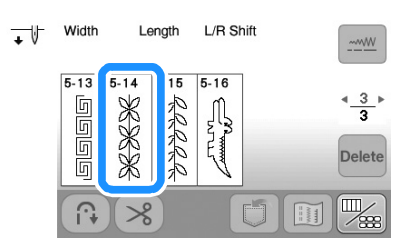
- Press

- →The display returns to the stitch selection screen.
- Press

- Select the following stitch pattern.
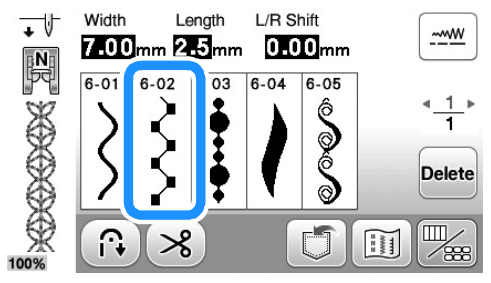
- If you want to sew the stitch pattern continuously, press
 to display editing screen, and then press
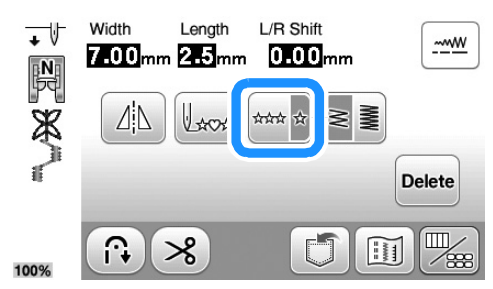
→ The stitch pattern turns continuous
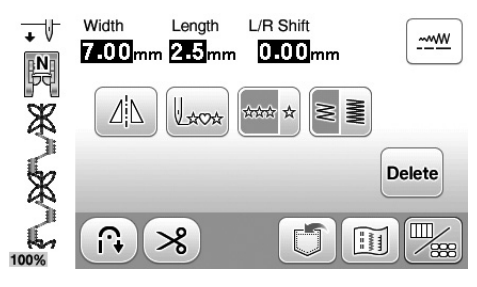
Automatic reverse/reinforcement stitching
After selecting a stitch pattern, turn on the automatic reverse/ reinforcement stitching function before sewing, and the machine will automatically sew reinforcement stitches (or reverse stitches, depending on the stitch pattern) at the beginning and end of sewing.
1. Select a stitch.
•For details on selecting a stitch, refer to “Basic sewing” on page 25.
2. Press  to set the automatic reverse/reinforcement stitching function.

→The key will display as  .
.
3. Set the fabric in the start position and begin sewing.
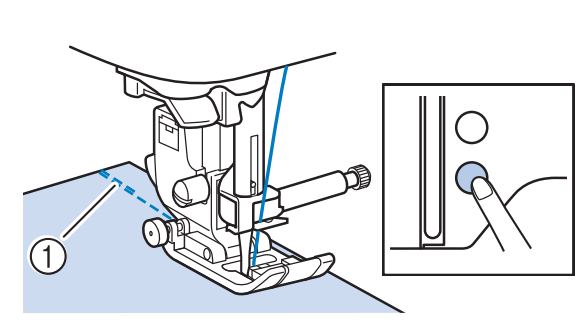
1 Reverse stitches (or reinforcement stitches)
→ The machine will automatically sew reverse stitches (or reinforcement stitches) and then continue sewing.
4. Once you have reached the end of the stitching, press  (Reverse/Reinforcement stitch button).
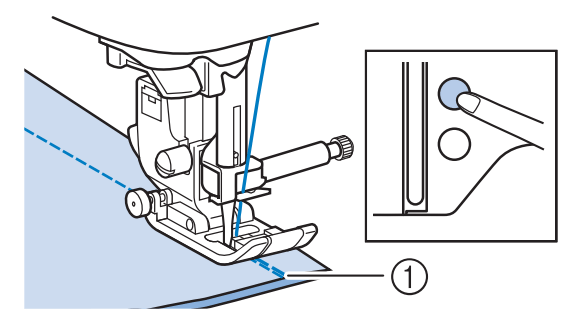
1 Reverse stitches (or reinforcement stitches)
→ The machine will sew reverse stitches (or reinforcement stitches) and stop.
Care and Maintenance
If the surface of the machine is dirty, lightly soak a cloth in neutral detergent, squeeze it out firmly, and then wipe the surface of the machine. After cleaning it once with a damp cloth, wipe it again with a dry cloth.
If the screen is dirty, gently wipe it with a soft, dry cloth. Do not wipe the LCD screen with a damp cloth. Do not use organic solvents or detergents.
Restrictions on oiling
In order to prevent damaging this machine, it must not be oiled by the user.
This machine was manufactured with the necessary amount of oil applied to ensure correct operation, making periodic oiling unnecessary.
If problems occur, such as difficulty turning the handwheel or an unusual noise, immediately stop using the machine, and contact your authorized Brother dealer or the nearest Brother authorized service center.
Precautions on storing the machine
Do not store the machine in any of the locations described below, otherwise damage to the machine may result, for example, rust caused by condensation.
•Exposed to extremely high temperatures
•Exposed to extremely low temperatures
•Exposed to extreme temperature changes
•Exposed to high humidity or steam
•Near a flame, heater or air conditioner
•Outdoors or exposed to direct sunlight
•Exposed to extremely dusty or oily environments
Note
•In order to extend the life of this machine, periodically turn it on and use it.
Storing this machine for an extended period of time without using it may reduce its efficiency.
Cleaning the race
Sewing performance will suffer if lint and dust collects in the bobbin case, therefore, it should be cleaned regularly.
1. Press (Needle position button) to raise the needle.
2. Turn off the machine.
3. Unplug the power cord from the power supply jack on the right side of the machine.
4. Raise the presser foot to remove the needle, presser foot and presser foot holder.
•For details, refer to “Replacing the Needle” on page 22 and “Replacing the Presser Foot” on page 23.
5. Remove the flat bed attachment or the embroidery unit if either is attached.
6. Remove the bobbin cover.
7. Place the index finger of your right hand near the bottom of the latch on the needle plate cover.
Insert the tip of the index finger of your left hand into the notch at the back of the needle plate cover.
Place the thumb of your left hand at the front of the needle plate cover.
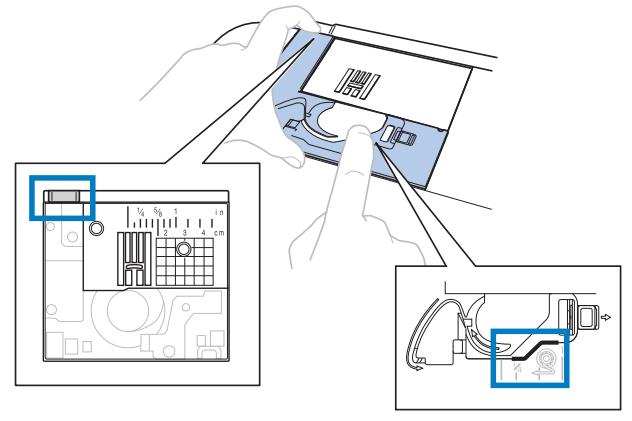
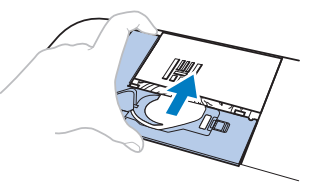
8. Slide the needle plate cover toward you to remove it.
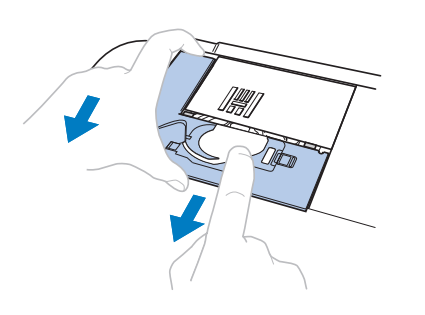
9. Grasp the bobbin case, and then pull it out.
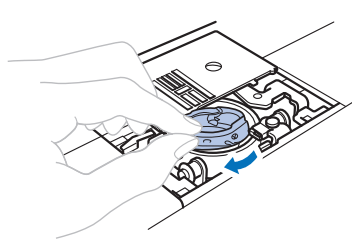
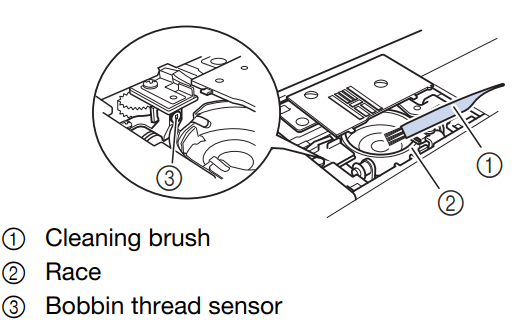
10. Use the cleaning brush or a vacuum cleaner to remove any lint and dust from the race and bobbin thread sensor and the surrounding area.
11. Insert the bobbin case so that the  mark on the bobbin case aligns with the
  mark on the machine.
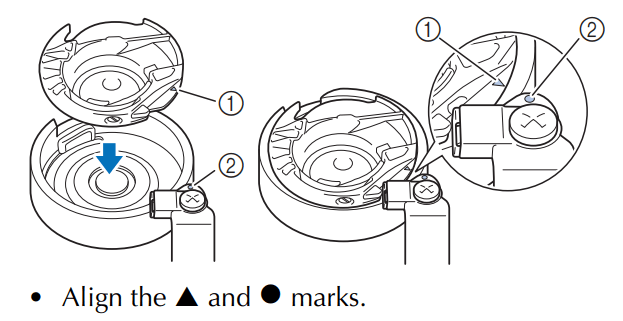
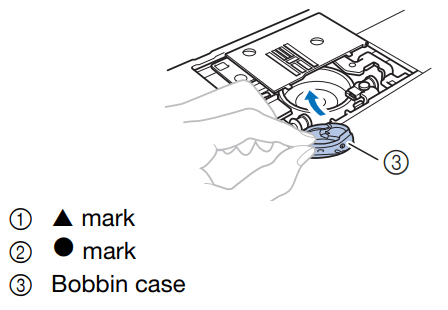
•Make sure that the indicated points are aligned before installing the bobbin case.
Insert the tabs on the needle plate cover into the needle plate, and then slide the cover back on. Reattach the bobbin cover.
Touch panel is malfunctioning
If the screen does not respond correctly when you touch a key (the machine does not perform the operation or performs a different operation), follow the steps below to make the proper adjustments.
1. Holding your finger on the screen, turn the main power switch to OFF and back to ON.
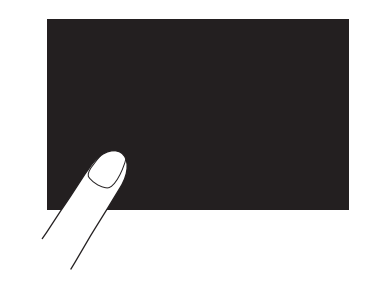
=>The touch panel adjustment screen is displayed.
2. Lightly touch the center of each +, in order from 1 to 5.

3. Turn the main power to OFF, then turn it back to ON.
Troubleshooting
If the machine stops operating correctly, check the following possible problems before requesting service. You can solve most problems by yourself. If you need additional help, the Brother Solutions Center offers the latest FAQs and troubleshooting tips.
If the problem persists, contact your Brother dealer or the nearest Brother authorized service center.
Frequent troubleshooting topics
Detailed causes and remedies for common troubleshooting topics are described below. Be sure to refer to this before contacting us.
Upper thread tightened up | page 79 |
Tangled thread on wrong side of fabric | page 79 |
Incorrect thread tension | page 79 |
Fabric is caught in the machine and cannot be removed | page 80 |
If the thread becomes tangled under the bobbin winder seat | page 82 |
Upper thread tightened up
Symptom
•The upper thread appears as a single continuous line.
•The bobbin thread is visible from the right side of the fabric. (Refer to the illustration below.)
•The upper thread has tightened up, and comes out when pulled.
•The upper thread has tightened up, and wrinkles appear in the fabric.
•The upper thread tension is tight, and the results do not change even after the thread tension is adjusted.
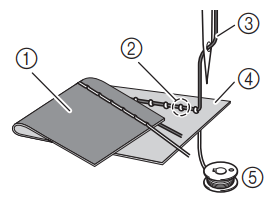
1. Wrong side of fabric
2. Bobbin thread visible from right side of fabric
3. Upper thread
4. Right side of fabric
5. Bobbin thread
Cause
Incorrect bobbin threading
If the bobbin thread is incorrectly threaded, instead of the appropriate tension being applied to the bobbin thread, it is pulled through the fabric when the upper thread is pulled up. For this reason, the thread is visible from the right side of the fabric.
Remedy/check details
Correctly install the bobbin thread. (page 16)
Tangled thread on wrong side of fabric
Symptom
•The thread becomes tangled on the wrong side of the fabric.
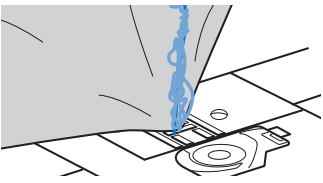
•After starting sewing, a rattling noise is made and sewing cannot continue.
•Looking under the fabric, there is tangled thread in the bobbin case.
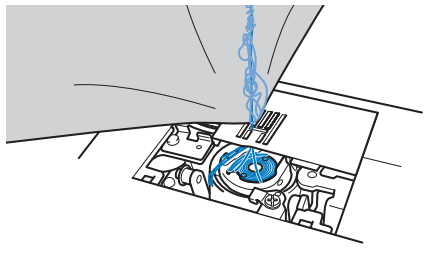
Cause
Incorrect upper threading
If the upper thread is incorrectly threaded, the upper thread passed through the fabric cannot be firmly pulled up and the upper thread becomes tangled in the bobbin case, causing a rattling noise.
Remedy/check details
Remove the tangled thread, and then correct the upper threading.
1. Remove the tangled thread. If it cannot be removed, cut the thread with scissors.
•For details, refer to “Cleaning the race” on page 77.
2. Remove the upper thread from the machine.
3. Correct the upper threading by following the instructions in “Threading the upper thread” on page 17.
•If the bobbin was removed from the bobbin case, refer to “Installing the bobbin” on page 16 to correctly install the bobbin.
Incorrect thread tension
Symptoms
•Symptom 1: The bobbin thread is visible from the right side of the fabric. (Refer to illustration below)
•Symptom 2: The upper thread appears as a straight line on the right side of the fabric.
•Symptom 3: The upper thread is visible from the wrong side of the fabric. (Refer to illustration below)
•Symptom 4: The bobbin thread appears as a straight line on the wrong side of the fabric.
•Symptom 5: The stitching on the wrong side of the fabric is loose or has slack.
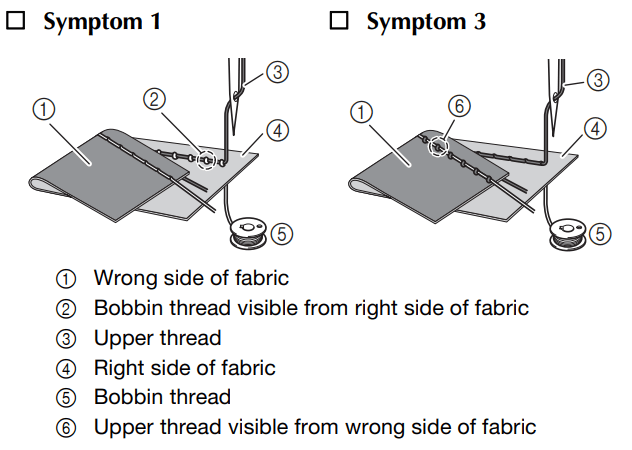
Cause/remedy/check details
Cause 1
The machine is not correctly threaded.
<With symptoms 1 and 2 described above> The bobbin threading is incorrect.
Return the thread tension dial to “4”, and then refer to “Upper thread tightened up” on page 79 to correct the threading.
<With symptoms 3 and 5 described above> The upper threading is incorrect.
Return the thread tension dial to “4”, and then refer to “Tangled thread on wrong side of fabric” on page 79 to correct the upper threading.
Cause 2
A needle and thread appropriate for the fabric are not being used.
The machine needle that should be used depends on the type of fabric sewn and the thread thickness.
If a needle and thread appropriate for the fabric are not being used, the thread tension will not be adjusted
correctly, causing wrinkles in the fabric or skipped stitches.
•Refer to “Fabric/Thread/Needle Combinations” on page 21 to check that a needle and thread appropriate for the fabric are being used.
Cause 3
An appropriate upper tension is not selected.
Select an appropriate thread tension.
Refer to “Adjusting the thread tension” on page 29.
The appropriate thread tension differs depending on the type of fabric and thread being used.
* Adjust the thread tension while test sewing on a piece of scrap fabric that is the same as that used in your project.
Note
•If the upper threading and bobbin threading are incorrect, the thread tension cannot be adjusted correctly. Check the upper threading and bobbin threading first, and then adjust the thread tension.
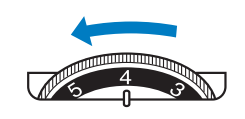
•If the bobbin thread is visible from the right side of the fabric
Turn the thread tension dial counterclockwise to loosen the upper thread tension.
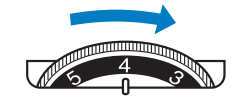
•If the upper thread is visible from the wrong side of the fabric
Turn the thread tension dial clockwise to tighten the upper thread tension
Fabric is caught in the machine and cannot be removed
If the fabric is caught in the machine and cannot be removed, the thread may have become tangled under the needle plate. Follow the procedure described below to remove the fabric from the machine. If the operation cannot be completed according to this procedure, instead of attempting to remove it forcefully, contact your nearest Brother authorized service center.
Removing the fabric from the machine
1. Immediately stop the machine.
2. Turn off the machine.
3. Remove the needle.
If the needle is lowered into the fabric, turn the handwheel away from you (clockwise) to raise the needle out of the fabric, and then remove the needle.
•Refer to “Replacing the Needle” on page 22.
4. Remove the presser foot and presser foot holder.
If the thread is entangled on the presser foot, remove the entangled thread, and then raise the presser foot lever to remove the presser foot. Otherwise, the presser foot may be damaged.
•Refer to “Replacing the Presser Foot” on page 23.
5. Lift up the fabric and cut the threads below it.
If the fabric can be removed, remove it. Continue with the following steps to clean the race.
6. Remove the needle plate cover.
•Refer to “Cleaning the race” on page 77.
7. Cut out the tangled threads, and then remove the bobbin.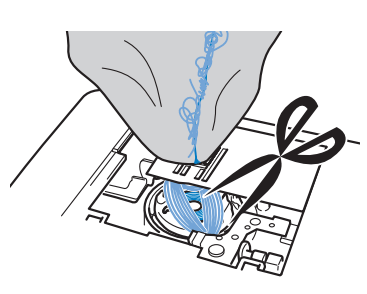
8. Remove the bobbin case.
If threads remain in the bobbin case, remove them. 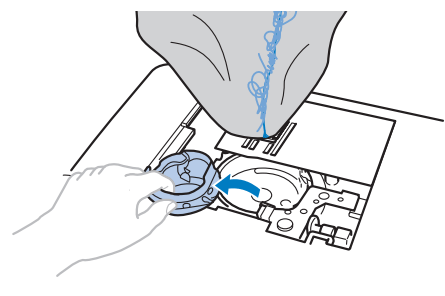
9. Use the cleaning brush or a vacuum cleaner mini attachment to remove any lint or dust from the race and its surrounding area.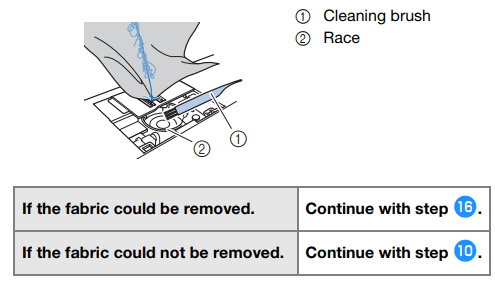
Note: Compressed can air is not recommended to be used
10. Use the included disc-shaped screwdriver to loosen the two screws on the needle plate.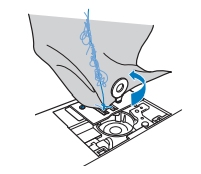
Note: Be careful not to drop the removed screws in the machine.
11. Sightly lift up the needle plate, cut any tangled threads, and then remove the needle plate.
Remove the fabric and threads from the needle plate. 
If the fabric cannot be removed, even after completing these steps, contact your nearest Brother authorized service center.
12. Remove any threads in the race and around the feed dogs.
13. Turn the handwheel to raise the feed dogs.
14. Align the two screw holes in the needle plate with the two holes at the needle plate mounting base, and then fit the needle plate onto the machine.
15. Lightly finger-tighten the screw on the right side of the needle plate. Then, use the disc-shaped screwdriver to firmly tighten the screw on the left side. Finally, firmly tighten the screw on the right side.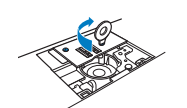
Turn the handwheel to check that the feed dogs move smoothly and do not contact the edges of the slots in the needle plate.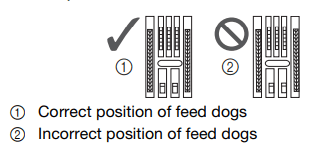
16. Insert the bobbin case by following step 11 in “Cleaning the race” on page 77.
17. Attach the needle plate cover according to step 12 in “Cleaning the race” on page 77.
18. Check the condition of the needle, and then install it.
If the needle is in a poor condition, for example, if it is bent, be sure to install a new needle.
- Refer to “Checking the needle” on page 22 and “Replacing the needle” on page 22.
Checking machine operations
If the needle plate has been removed, check machine operations to confirm that installation has been completed correctly.
- Turn on the machine.
- Select stitch
 .
.
Note: Do not yet install the presser foot and thread. - Slowly turn the handwheel toward you (counterclockwise), and look from all sides to check that the needle falls at the center of the opening in the needle plate.
If the needle contacts the needle plate, remove the needle plate, and then install it again, starting with step m in “Removing the fabric from the machine” on page 80.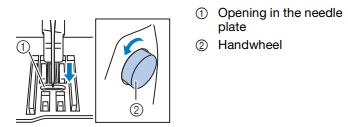
- Select stitch
 . At this time, increase the stitch length and width to their maximum settings.
- For details on changing the settings, refer to “Setting the stitch width” on page 29 and “Setting the stitch length” on page 29.
- Slowly turn the handwheel toward you (counterclockwise) and check that the needle bar and feed dogs operate correctly.
If the needle or feed dogs contact the needle plate, the machine may be malfunctioning; therefore, contact your nearest Brother authorized service center. - Turn off the machine, and then install the bobbin and presser foot.
Never use a scratched or damaged presser foot. Otherwise, the needle may break, or sewing performance may suffer.- Refer to “Installing the bobbin” on page 16 and “Replacing the presser foot” on page 23.
- Correctly thread the machine.
- For details on threading the machine, refer to “Upper Threading” on page 17.
- Perform trial sewing with cotton fabric.
Note: Incorrect sewing may be the result of incorrect upper threading or sewing thin fabrics. If there are poor results from the trial sewing, check the upper threading or the type of fabric being used.
If the thread becomes tangled under the bobbin winder seat
If the bobbin winding starts when the thread is not passed under the pretension disk of the bobbin-winding thread guide correctly, the thread may become tangled under the bobbin winder seat.
CAUTION:
- Do not remove the bobbin winder seat even if the thread become tangled under the bobbin winder seat. Otherwise, the cutter in the bobbin winder seat may be damaged.
- Do not remove the screw on the bobbin winder guide post, otherwise the machine may be damaged; you cannot wind off the thread by removing the screw.

- Stop the bobbin winding.
- Cut the thread with scissors beside the bobbin-winding thread guide.
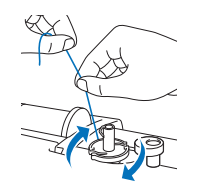
- Slide the bobbin winder shaft to the left, and then remove the bobbin from the shaft and cut the thread leading to the bobbin in order to be able to completely remove the bobbin from shaft.
- Hold the thread end with your left hand, and wind off the thread clockwise from under the bobbin winder seat with your right hand as shown below.
See other models: INNOV-IS 40 MFC-L6800DW MFC-9120CN PT-1950 PT-1010
