Operating & Installation Manual for Microwave Oven
Modes of Operation
In a microwave oven there is a high-frequency tube called a magnetron. This converts electrical energy into microwaves. These microwaves are distributed evenly throughout the oven interior and rebound off the metal sides of the oven interior to reach the food from all sides. Microwave distribution is improved with the turntable engaged. In order for microwaves to reach the food, they must be able to penetrate the cooking utensil being used. Microwaves can penetrate porcelain, glass, cardboard and plastics, but not metal. Do not, therefore, use utensils made of metal, or which contain metal, for example in the form of gold or silver trim. The metal reflects the microwaves and this could lead to the creation of sparks. The microwaves cannot be absorbed. Microwaves pass through a suitable container and find their way directly into the food. All food contains moisture molecules which, when subjected to microwave energy, start to oscillate 2.5 thousand million times a second.
The friction caused by this vibration creates heat, which first starts developing around the outside of the food and then slowly penetrates towards centre. The moisture, fat and sugar content of food will affect the speed at which it is cooked.
As heat is produced directly in the food,
– food can generally be cooked without adding much liquid or cooking oil.
– cooking, reheating and defrosting in a microwave oven is quicker than using conventional methods.
– nutrients, such as vitamins and minerals, are generally retained.
– the colour, texture and taste of food are not impaired. Microwaves stop being produced as soon as the cooking process is interrupted or the appliance door is opened. When the appliance is in operation, the closed, sealed door prevents microwaves escaping from the appliance.
Suitable Containers for Microwave Ovens
Microwaves
– are reflected by metal,
– pass through glass, porcelain, plastic and card,
– and are absorbed by food.
Material and shape
The material and shape of containers used affect cooking results and times. Heat distribution is more even in round and oval shaped flat containers than in rectangular containers, providing better results.
Metal
Metal containers, aluminium foil and metal cutlery, or china with metallic decoration, such as gold rims or cobalt blue must not be used in an oven being used in microwave mode. The metal reflects the microwaves, hindering the cooking process.
Exceptions:
– Ready-meals in aluminium foil dishes.
These can be defrosted and reheated in the microwave oven, if recommended by the manufacturer. However, as food is only heated from the top, it is better to remove the food from the aluminium foil container and transfer it to a dish suitable for a microwave oven. The heat distribution will be more even. If sparks and arcing occur when using an aluminium container, stop and transfer the food to a microwave safe container.
– Pieces of aluminium foil
For even defrosting and to avoid overcooking unevenly shaped cuts of meat, poultry or fish, small pieces of aluminium foil may be used to mask wingtips or other thin parts for the last few minutes of the programme. Make sure that the aluminium foil is at least 2 cm from the oven walls at all times. It must not touch the walls.
– Metal meat skewers or clamps.
These should only be used if they are very small in comparison to the size of the cut of meat.
– Glassware
Heat-resistant glass or ceramic glass are ideal for use in the microwave oven. Crystal glass contains lead which could cause the glass to crack. Glass dishes with a milled rim are also subject to this risk. Both are unsuitable.
Porcelain
Porcelain is a suitable material. Do not use porcelain with gold or silver edging or items with hollow knobs or handles, as insufficient ventilation may cause pressure.
Earthenware
Decorated earthenware is only suitable if the decoration is beneath an all-over glaze. Earthenware can get very hot, and may crack.
Glazes and colours
Some glazes and colours contain metals which make them unsuitable for use in a microwave oven.
Plastics
When purchasing plasticware, make sure that it is suitable for use in a microwave oven. Plastic containers must only be used in microwave mode alone. Plastics must be heat-resistant to a minimum of 110 °C. Otherwise the plastic may melt and fuse with the food. Special plastic utensils designed for use in microwave ovens are available from good retail outlets. Melamine is not suitable as it absorbs energy and heats up. Disposable containers, such as trays made from polystyrene, can only be used for very short timed warming and reheating of food. Plastic boiling bags can be used for cooking and reheating. They should be pierced beforehand so that steam can escape. This prevents a build-up of pressure and reduces the risk of the bag bursting. Roasting bags and tubes can also be used. Roasting tubes should be about 40 cm longer and roasting bags about 20 cm longer than the food being roasted, and carefully tied with string. Turn the ends over and secure them. The bag should be pierced according to the manufacturer’s instructions. Do not use metal clips, plastic clips containing metal parts or paper ties containing wire. There is a danger that they will ignite when heated.
Wood
Wooden dishes are not suitable. Moisture contained in the wood evaporates when exposed to microwave energy, causing the wood to dry and crack.
Disposable containers
Only those plastic disposable containers which are specified by the manufacturer as suitable for use in a microwave oven may be used. Do not leave the oven unattended when reheating or cooking food in disposable containers made of plastic, paper or other inflammable materials. Disposable containers are not always recyclable or bio-degradable.
Testing dishes for their suitability
If in doubt as to whether glass, earthenware or porcelain plates or dishes are suitable for use in a microwave oven, a simple test can be performed:
Place the item you wish to test in the centre of the oven, fill a suitable glass with water and also place this in the oven.
- Close the door.
- Turn the power selector to 900 W.
- Enter a time of 30 seconds with the time selector.
- Press the Start button.
At the end of the test, the water in the glass should be warm and the dish cool. If the dish is hot the water cold it would be unwise to use the dish. If a crackling noise is heard accompanied by sparks during the test, switch the appliance off immediately (press button Stop/C twice).
Any crockery which causes this reaction is unsuitable for use with microwave power. If any doubt exists about the suitability of containers, please contact the supplier. This test cannot be used to check whether items with hollow knobs or handles are suitable for use with microwave power.
Operation
Interior and Accessories
1- Oven door
2- Door locking mechanism
3- Grill/browning element
4- Control panel
5- Turntable
6- Grilling rack
7- Turntable support
Control Panel
8- Display screen
9- Time/weight knob
10- Function knob
11- Auto menu/timer
12- Stop/cancel
13- Confirm/start
14- Door release button
Function Lock
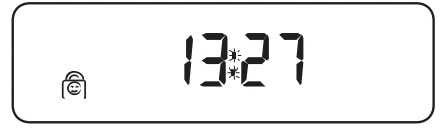
The function lock prevents the function being used by children, for example. To activate the function lock press button 12 for 3 seconds until the screen display’s the below.
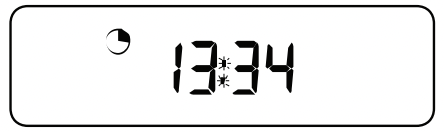
To cancel the system lock:
Press button 12 for 3 seconds until the screen display’s the below:
Time Setting
Press button 11 for 3 seconds to adjust the hours by turning knob 9. Press button 11 once again to adjust minutes. Press button 11 once more to confirm time.
Defrost
Turn knob 10 to select ‘Defrost’, then turn knob 9 to set time, and press button 13 to confirm.
Microwave Cooking
Turn knob 10 to select microwave power,
Turn knob 9 to select cooking time.
Press button 13 to confirm and start cooking
Grilling
Turn knob 10 to ‘grill’ position, turn knob 9 to set cooking time, press button 13 to confirm and start cooking.
IMPORTANT: When using the grill function do not use the quick start button to set the cooking time as this will trigger the microwave function. Operating the microwave function with the grill rack in the unit can cause sparking and potentially irreparable damage.
Warm
Turn knob 10 to ‘warm’ position, turn knob 9 to set cooking time, press button 13 to confirm and start cooking.
Sterilize
Turn knob 10 to ‘sterilize’ position, press button 13 to confirm and start sterilize. Warning: The sterilize is to be used as part of the Microwave’s disinfection program. This function is not suitable for metal utensils or anything that has metal or any item that is not of a thermolabile material.
Combination Cooking
Turn knob 10 to ‘COMB’ position. There are 3 combination program as below:
COMB 1: (30% micro+70% grill)
COMB 2: (55% micro+45% grill)
COMB 3: (70% micro+30% grill) turn knob 9 to set cooking time, press button 13 to confirm and start cooking.
IMPORTANT: do not use the grilling rack in microwave or combination grilling modes. Operating the microwave function with the grill rack in the unit can cause sparking and potentially irreparable damage.
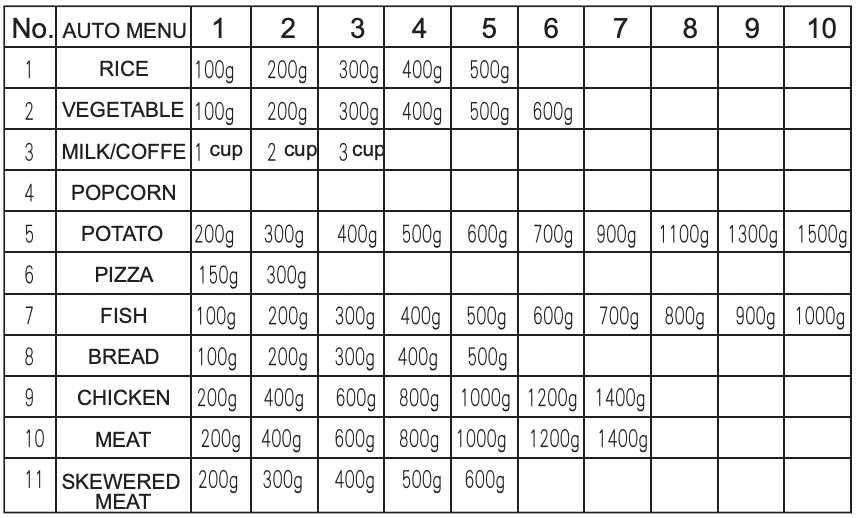
Automatic programmers
Press button 11 to select cooking program according to below table:
Turn knob 9 to select weight, and press button 13 to confirm and start cooking.
Cleaning and Care
Turn the oven off and remove the power plug from the wall socket before cleaning.
Keep the inside of the oven clean. When food splatters or spilled liquids adhere to oven walls, wipe with a damp cloth. The use of harsh detergent or abrasives is not recommended.
The outside oven surface should be cleaned with a damp cloth. To prevent damage to the operating parts inside the oven, water should not be allowed to seep into the ventilation openings.
Do not allow the Control Panel to become wet. Clean with a soft, damp cloth and mild non abbraisive detergent. Do not use abrasives or spray-on cleaners on the control Panel.
If steam accumulates inside or around the outside of the oven door, wipe with a soft cloth. This may occur when the microwave oven is operated under high humidity conditions and in no way indicates malfunction of the unit.
It is occasionally necessary to remove the glass tray for cleaning. Wash the tray in warm sudsy water or in a dishwasher.
The roller ring and oven cavity floor should be cleaned regularly to avoid excessive noise. Simply wipe the bottom surface of the oven with mild detergent, water or window cleaner and dry. The roller ring may be washed in mild sudsy water or dish washer. Cooking vapour collect during repeated use but in no way affect the bottom surface or roller ring wheels. When removing the roller ring from cavity floor for cleaning, be sure to replace it in the proper position.
Remove odors from your oven by combining a cup of water with the juice and skin of one lemon in a deep microwaveable bowl. Microwave for 5 minutes, wipe thoroughly and dry with a soft cloth.
When it becomes necessary to replace the oven light, please consult a dealer to have it replaced.
Installation
When installing the appliance, ensure that the vent outlets at the front of the appliance are not hindered, and that there is adequate ventilation to the rear of the housing unit by leaving a large enough gap (see diagram: 50 mm x unit width). Do not block the ventilation gaps with any objects. The appliance is designed to be built into a tall unit. To transport the appliance, make sure that you lift it by the appliance housing and not by the frame. The frame is not sturdy enough to bear the weight of the appliance when it is being carried. Building-in dimensions:
The appliance must be built in before it can be used. Otherwise it poses an electric shock hazard.
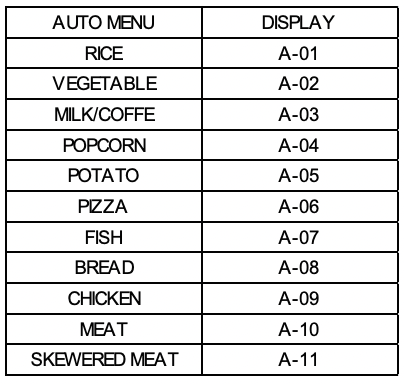
Draw a line inside the housing unit to mark the middle of the unit as illustrated.
Position the fitting bracket on this middle line.
Use the indented mark on the bracket to guide you.
Fit one screw 4*10 into the centre of the first long slot.
Check the alignment with the front edge of the unit and with the middle line, and then fit another screw 4*10 into the other long slot.
Then tighten both of these screws.
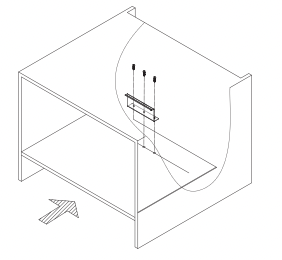
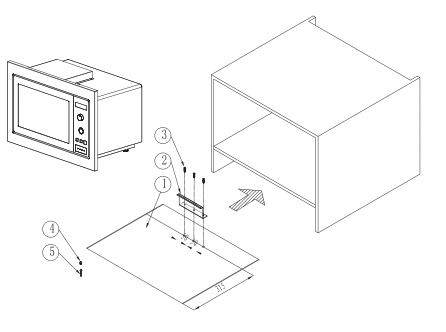
Place the appliance in the housing unit and using your hands push on both sides of the back of the oven interior to move the appliance into position. It will engage in position when it is correctly installed.
Check that it is correctly aligned.
If it is not aligned correctly, carefully pull it back out of the niche and realign it by slightly adjusting the position of the bracket on the long slots.
When correctly aligned, insert the third screw 4*10 into the middle of the bracket to prevent the bracket moving out of position.
• Slide the appliance into the housing unit, and pull the cable with the plug* through the back of the unit. • Insert one screw 4*35 into the middle of the frame and put on the screw cap. * Plug shown is for illustration purposes only. • Connect the appliance to the electricity supply. • Then push the appliance right back into the housing unit as described above.