Documents: Go to download!
User Manual
- User Manual - (English)
- Ilve 900SKMPI 900mm/90cm Electric Wall Oven Specifications Sheet - (English)
- THE FIRST TIME YOU USE THE OVEN
- SELF-CLEANING CATALYTIC PANELS
- CONTROL PANEL FUNCTIONS
- INSTRUCTIONS FOR USE
- REPLACING THE OVEN LIGHT IMPORTANT:
Table of contents
User manual Oven
THE FIRST TIME YOU USE THE OVEN
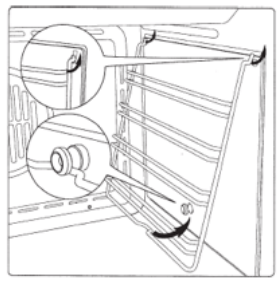
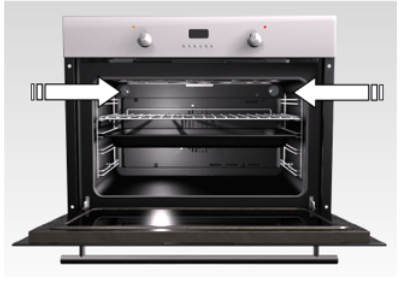
Clean the oven thoroughly with soapy water and rinse well. To remove the lateral frames from smooth walled ovens, proceed as shown in the figure. Operate the oven for about 30 minutes at maximum temperature to burn off all traces of grease which might otherwise create unpleasant smells when cooking.
Important: As a safety precaution, before cleaning the oven, always disconnect the plug from the power socket or the power cable from the oven. Do not use acid or alkaline substances to clean the oven (lemon juice, vinegar, salt, tomatoes etc.). Do not use chlorine based products, acids or abrasive products to clean the painted surfaces of the oven.
DO NOT USE STEAM CLEANERS TO CLEAN THE OVEN.
SELF-CLEANING CATALYTIC PANELS
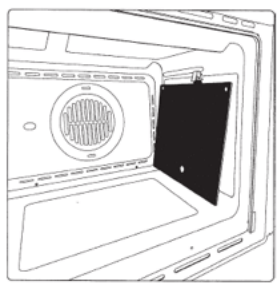
Our smooth walled ovens can be fitted with self-cleaning panels to cover the inside walls. These special panels are simply hooked on to the walls before the side frames are fitted. They are coated in a special, micro porous catalytic enamel which oxidises and gradually vaporises splashes of grease and oil at cooking temperatures above 200° C. If the oven is not clean after cooking fatty foods, operate the empty oven for 60 minutes (max.) at maximum temperature. Never wash or clean self-cleaning panels with abrasive, acid, or alkaline products.
CONTROL PANEL FUNCTIONS
FUNCTION SYMBOL SON THE SELECTOR
 Oven light (stays on while oven is in use).
 Bottom heating element. Thermostat setting from 50°C to MAX.
 Top and bottom heating elements. Thermostat setting from 50°C to MAX.
 Top and bottom heating elements with fan. Thermostat setting from 50°C to MAX.
 Circular heating element with fan. Thermostat setting from 50°C to MAX.
 Fan for defrosting. Thermostat setting at 0°C.
 Bottom heating element with fan. Thermostat setting from 50°C to MAX.
 Double top heating element with fan (large area grill). Thermostat setting from 50°C to 200°C.
 Double top heating element (large area grill). Thermostat setting from 50°C to 200°C.
 Top heating element (small, low power grill). Thermostat setting from 50°C to 200°C.
 Bottom heating element + Circular heating element with fan. Thermostat setting from 50°C to MAX.
INSTRUCTIONS FOR USE
INSTRUCTIONS FOR USE
 Conventional cooking use stop and bottom heat to cook a single dish. Place the food in the oven only once cooking temperature has been reached, i.e.when the heating indicator goes out. If you want to increase top or bottom temperature towards the end of the cooking cycle, set the temperature control to the right position. It is advisable to open the oven door as little as possible during cooking.
FAN COOKING
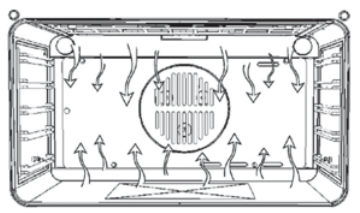
 For this type of cooking a fan positioned at the back allows the circulation of hot air inside the oven, creating uniform heat. In this way cooking is more rapid than conventional cooking. It is a suitable method for cooking dishes on more than one shelf, especially when the food is of different types (fish, meat etc.)
DEFROSTING
 By selecting one of the fan cooking functions and setting the thermostat to zero, the fan allows cold air to circulate inside the oven. In this way frozen food can be rapidly defrosted.
It is not essential to pre-heat the oven, but you are advised to do so when cooking pastries.
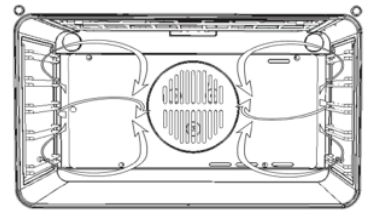
GRILL COOKING
 Use the grill to grill or brown foods. Some ovens may be equipped with an electric motor, spit and skewers for turning on the spit. Place the shelf with the food to be cooked in the 1 st or 2nd position from the top. Pre-heat the oven for 5 minutes. Turn the thermostat to a temperature between 50° and 200°.
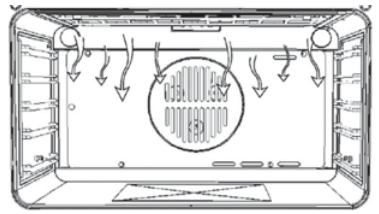
COOLING FAN
The fan is positioned on the upper part of the oven and create a circle of cooling air on the inside of the furniture and through the door of the oven.It is turned on when the temperature of the outer shell of the oven reaches 60°C. By switching on the oven with the thermostat at 200°C the fan starts working after approx.10 min.It is turned off when the temperature of the outer shell of the oven descends under 60°C. By switching off the oven with the thermostat at 200°C the fan stops working after approx. 30 min.
THERMOSTAT
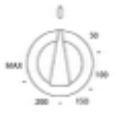
Use the thermostat to set the cooking temperature you need. The thermostat can be adjusted from 50° to 250° C.
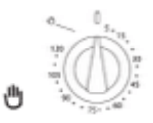
ALARM TIMER
You can set this timer to sound a buzzer after 0 to 60 minutes of cooking. First turn the knob fully clockwise, then turn it back to the desired alarm time.

COOKING TIMER
First, turn the cooking selector to the required cooking function, and the thermostat to the desired cooking temperature. Then, to set end of cooking time, turn the cooking timer to the right and to the desired time. First turn the knob fully clockwise, then turn it back to the desired alarm time. A buzzer sounds at the end of the timed cooking period, and the oven switches itself off. To set only the start of cooking, turn the cooking timer to the left to the symbol.
TIMER TOUCH CONTROL
Setting the clock

“Auto” and “0:00” will start flashing when the unit is switched on for the first time. To set the clock, press the central button for about 3 seconds. When  appears, press “+” or to set the correct time.
Wait until a beep tells you that the clock has been set (figure 1).
To set the time at a later stage, press “+” and “-” together for 3 seconds and then adjust the clock as described above.
Minute counter

As this minute counter does not control the oven, when it finishes counting the oven will continue to work.
To set, press the central button for 3 seconds until  appears (figure 2). Press “+” and “-” to set the required time.
To set the minute counter at a later stage, press the central button for 3 seconds and adjust as described above.
The minute counter beeps when it finishes counting. To disable it, press any button.
Cooking time

This is a semi-automatic cooking function. It can be used to set cooking times.
Press the central button for 3 seconds. Then press it again until “dur” appears (figure 3). Press “+” and “-” to set the required cooking time.
End of cooking time

The end of cooking time can also be set.
Press the central button for 3 seconds. Press the central button twice consecutively and wait for “End” to appear (figure 4). Press “+” and “-” to set the required end of cooking time.
The oven will work in the set mode and at the set temperature until the end of cooking time.
Programming automatic cooking

Cooking function with set times.
Press the central button for 3 seconds. Then press it again until “dur” appears. Press “+” and “-” to set the required cooking time. Wait a few seconds for the setting to be memorised.
Press the central button for 3 seconds. Press it another two times and wait for “End” to appear (figure 4). Press “+” and “-” to set the required end of cooking time.
E.g.:
Current time: 12.30 Cooking time: 10 minutes End of cooking time: 14.00
The oven will start cooking at 13.50 (14.00 less 00.10) at the set temperature and in the set mode and will stop at 14.00
The oven will beep when it stops cooking. To disable it, press any button.
Adjusting beep volume

To adjust beep volume, press “+” and “-” together. Then press the central button and wait for “ton1” (high volume) to flash. Press “-” to select “ton2” (medium volume) or “ton3” (low volume).
Press the central button to set the selected volume.
REPLACING THE OVEN LIGHT IMPORTANT:
The oven light must have these precise features:
a) it must be able to resist high temperatures (up to 300°C)
b) power supply: see V/Hz indicated on data plate.
c) power 25W.
d) E 14 connection.
Before proceeding, disconnect the appliance from the power line to avoid the possibility of electric shock.
- to prevent damage, place a tea cloth in the oven
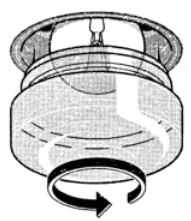
-unscrew the glass cover of the light
- unscrew the old light bulb and replace it with the new one
- put back the glass cover and remove the tea cloth
- connect the appliance to the main electricity supply
REMOVING THE OVEN DOOR
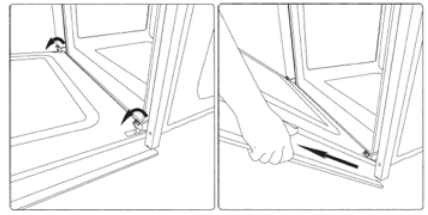
The oven door can be removed quickly and easily. To do so, proceed as follows:
- Open the door fully.
- Lift the two levers shown in fig.
- Close the door as far as the first stop (caused by the raised levers).
- Lift the door upwards and outwards to remove it from its mountings. To replace fit the door, fit the hinges in their mountings and lower the two levers.
INSTALLATION INSTRUCTIONS
Flush fitting
The oven can be installed under a work top or in a cooking column. Figure shows the installation dimensions. Make sure that surrounding materials are heat resistant. Align the oven centrally with respect to the sidewalls of the units surrounding it and fix it in place with the screws and Allen screws provided.
ELECTRICAL CONNECTIONS
Before connecting the oven to the mains power supply, make sure that:
- The supply voltage corresponds to the specifications on the data plate on the front of the oven.
- The mains supply has an efficient earth (ground) connection complying with all applicable laws and regulations. Correct earthing (grounding) is a legal requirement. The power cable should never reach a temperature 50° C above ambient temperature at any point along its length. If a fixed appliance is not provided with a power cable and plug, or some other device permitting it to be disconnected from the mains electricity supply, with a gap between the contacts big enough to guarantee class over voltage protection, then such a device must be fitted to the power supply in compliance with the regulations governing electrical installations. The socket or switch must be easily reachable with the oven fully installed.

N.B. The manufacturer declines all responsibility for damage or injury if the above instructions and normal safety precautions are not respected.
The manufacturer declines all responsibility for possible inaccuracies contained in this pamphlet, due to printing or copying errors. We reserve the right to make on our own products those changes to be considered necessary or useful, without jeopardising the essential characteristics.
See other models: SRTSPLASHSILVER IVFSM34X IVDBI458 NTE90WMPI CS90
