USER MANUAL
900mm COOKING APPLIANCES
WFE912SA
WFE914SA
WFE916SA
WFE946SA
WVE916SA
2
CONTENTS
Important safety instructions .............................................................. 3
Description of your appliance ............................................................. 5
WFE912SA .................................................................................. 5
WFE914SA .................................................................................. 6
WFE916SA .................................................................................. 7
WFE946SA .................................................................................. 8
WVE916SA .................................................................................. 9
Before operating your appliance for the first time ............................. 10
Installing your oven accessories ....................................................... 11
Getting to know your cooktop ............................................................ 13
Using your ceramic cooktop .............................................................. 16
Using your oven ................................................................................ 20
Cooking test ...................................................................................... 26
Cooking guide ................................................................................... 27
Dealing with cooking problems ......................................................... 30
Cleaning your appliance .................................................................... 31
Cleaning oven accessories ................................................................ 32
Catalytic liners .................................................................................. 34
Storage ............................................................................................. 34
Solving problems .............................................................................. 35
Installing your appliance ................................................................... 36
Warranty ............................................................................................ 47
ENVIRONMENTAL TIPS
INFORMATION ON DISPOSAL FOR USERS
Record model and serial number here:
Model:.................................................
Serial No:.............................................
TIPS & INFORMATION
IMPORTANT –CHECK FOR ANY DAMAGE OR MARKS.
CONTENTSCONGRATULATIONS
3
SAFETY
WARNING
This symbol indicates information concerning your personal safety
TIPS & INFORMATION
This symbol indicates tips and information about use of the appliance
E
VIRONMENTAL TIPS
This symbol indicates tips and information about economical and
ecological use of the appliance
This symbol indicates never to do this
This symbol indicates to always do this
WARNING
GENERAL WARNINGS
IMPORTANT SAFETY INSTRUCTIONS
NSTALLATION, CLEANING AND SERVICING
4
WARNING
OVEN
GAS COOKTOPS
CERAMIC COOKTOPS
WARNING
CHILD SAFETY
IMPORTANT SAFETY INSTRUCTIONS
SAFETY
5
H
L
O
I
O
F
F
O
F
F
H
L
O
I
O
F
F
H
L
O
I
O
F
F
H
L
O
I
O
F
F
H
L
O
I
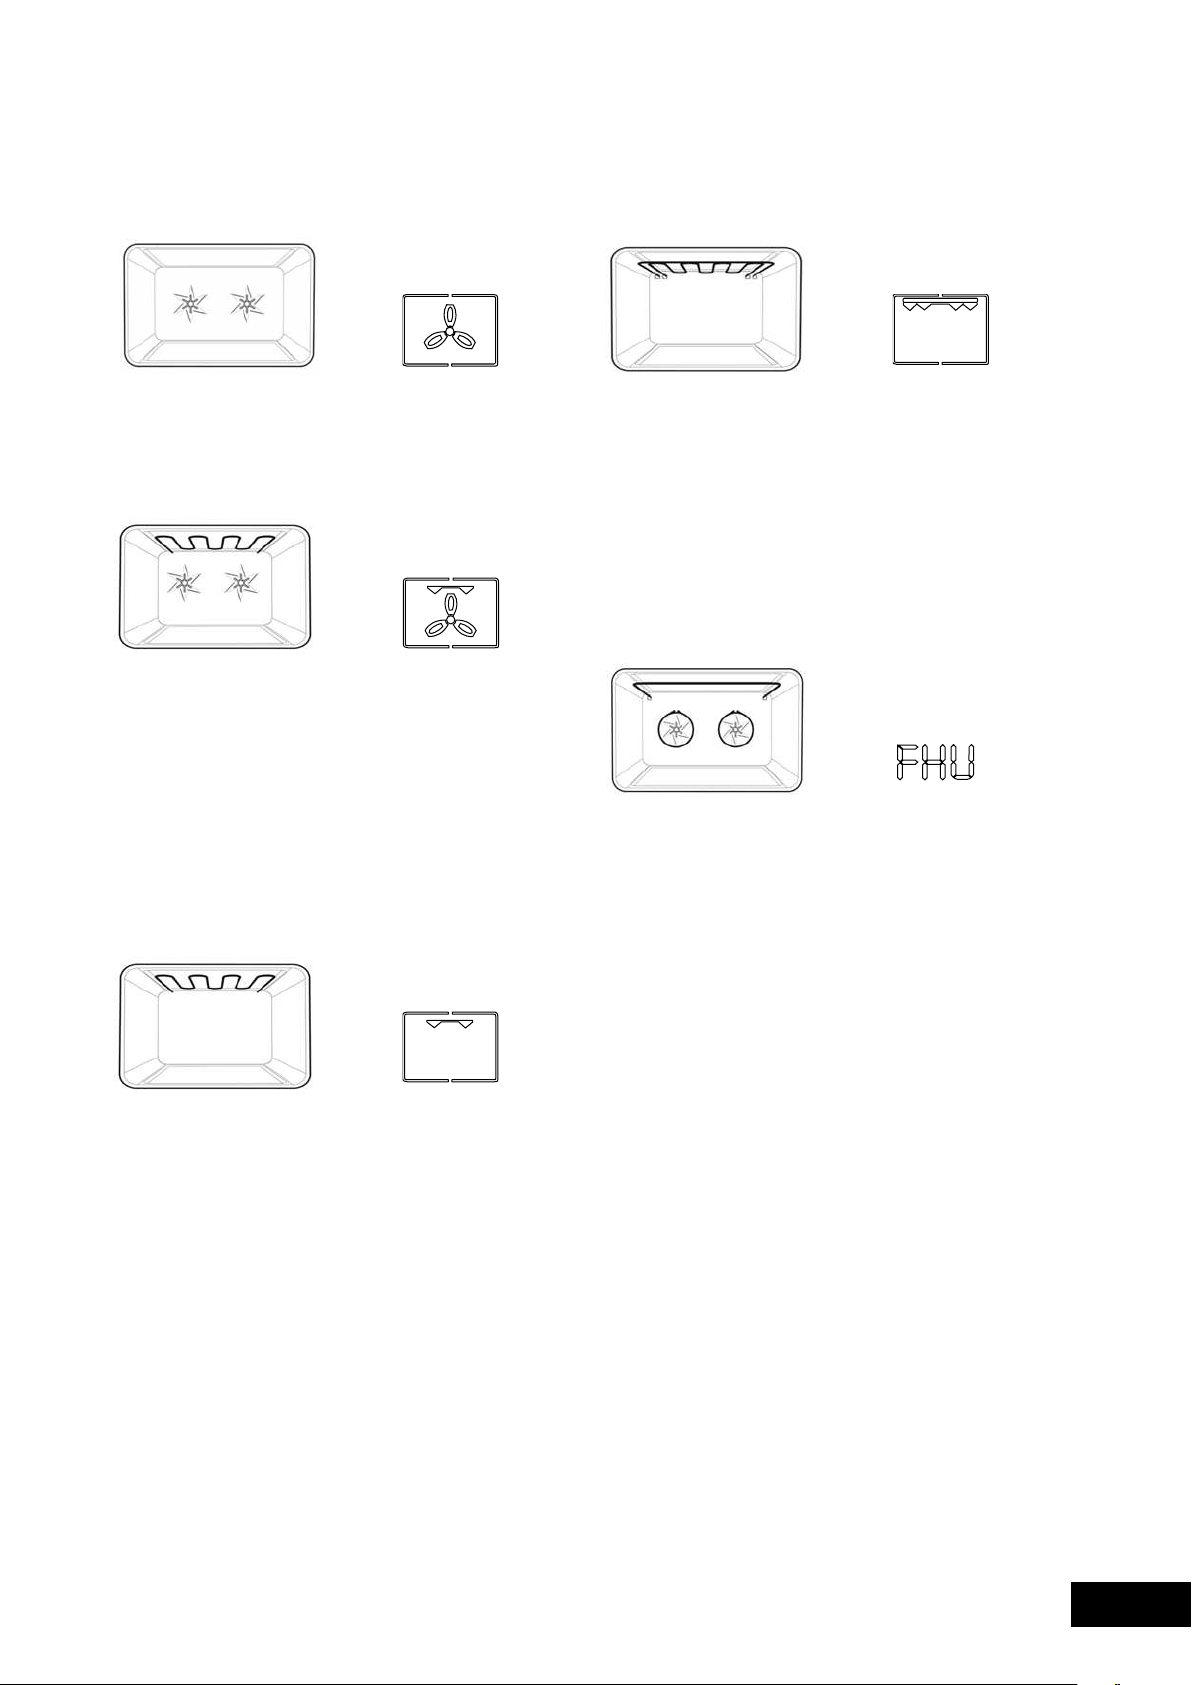
COOK
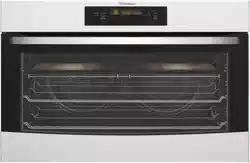
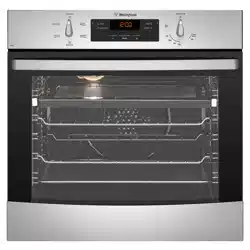
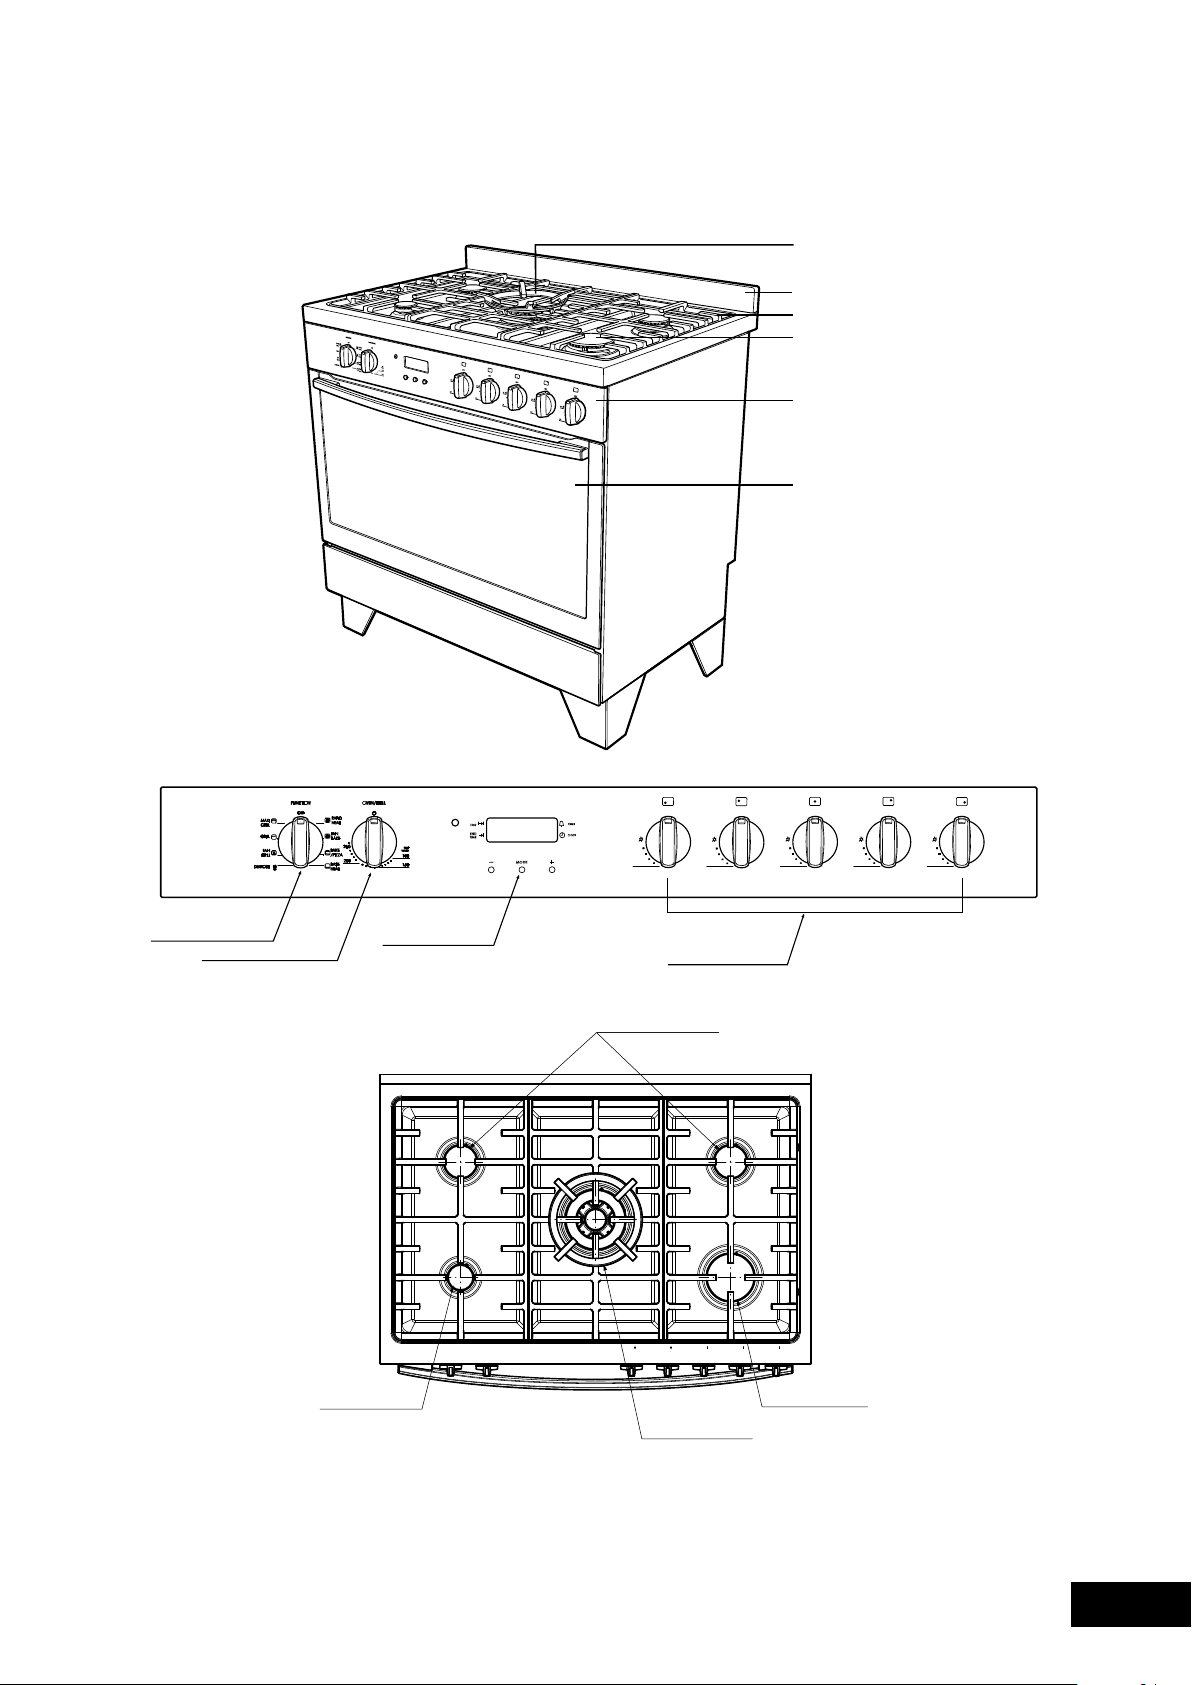
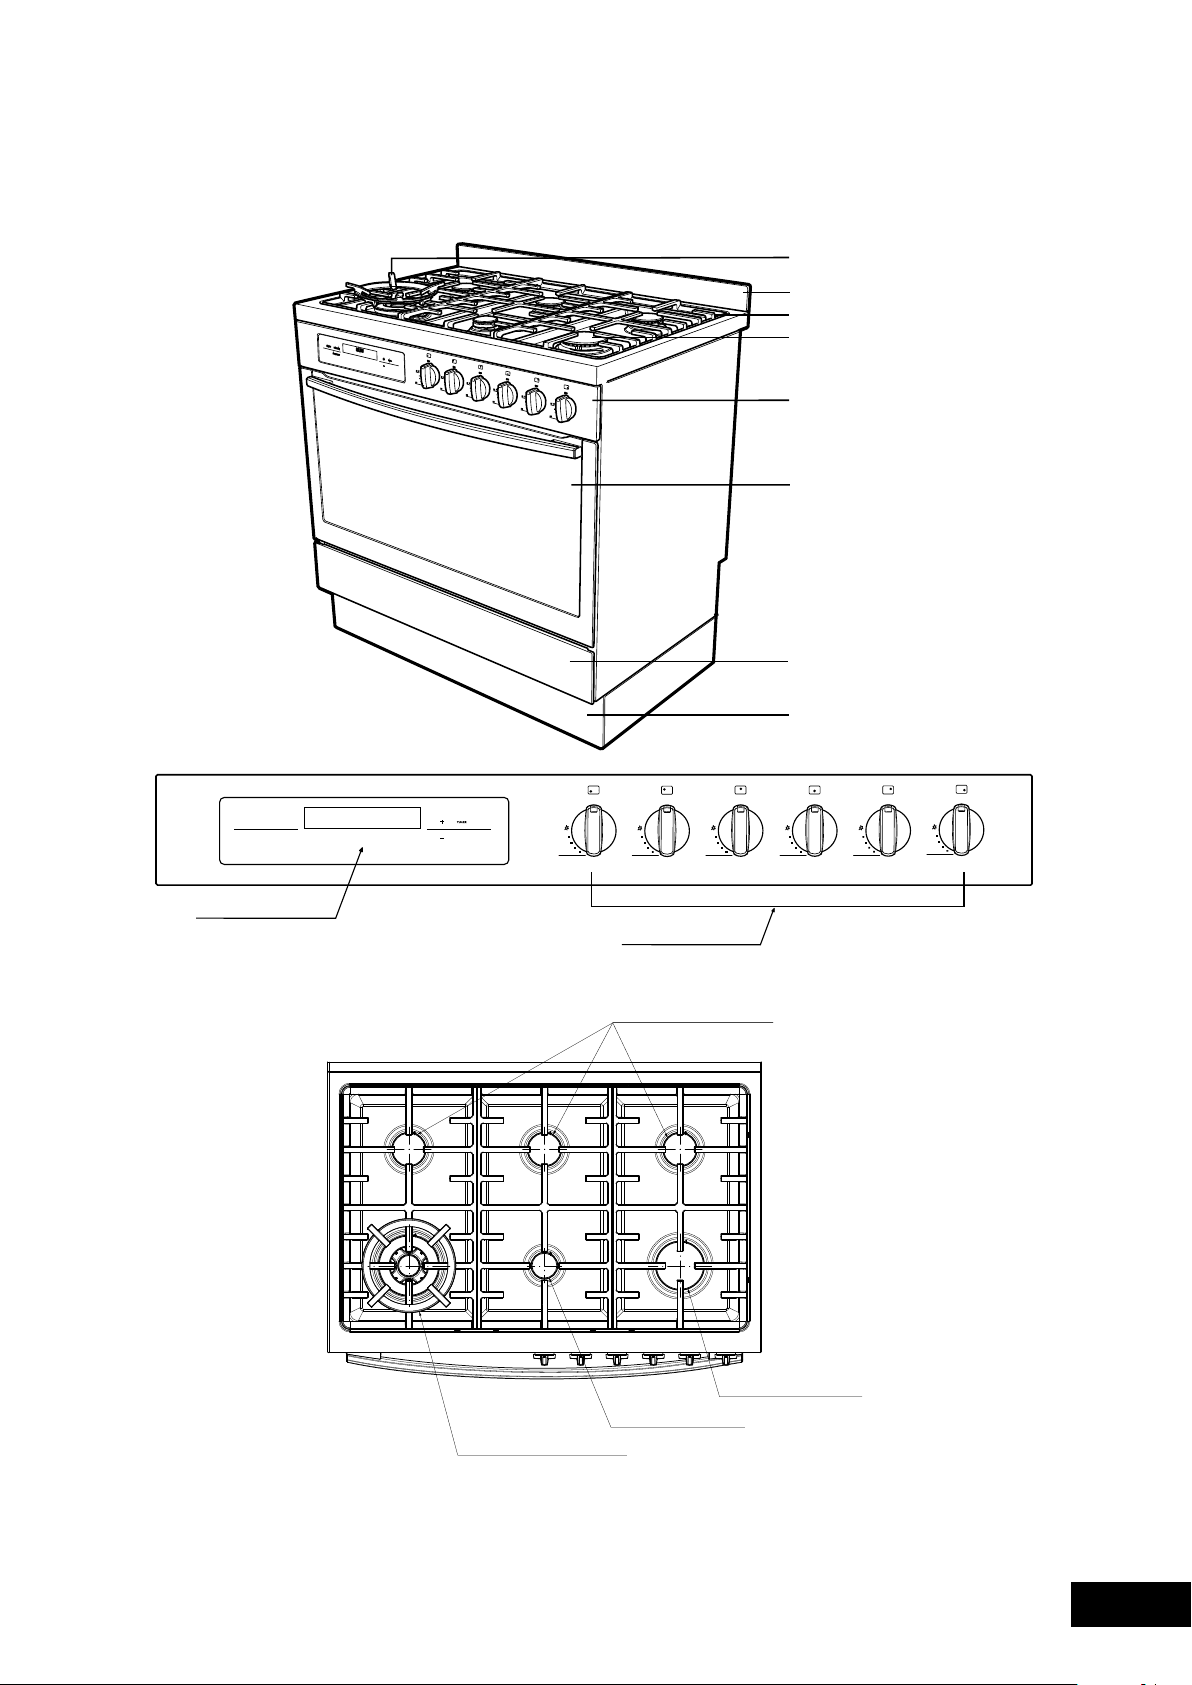
MODEL WFE912SA
Gas hob, multi-function electric oven with electronic timer
DESCRIPTION
12:00
Control Panel
Gas Hob
6
H
L
O
I
O
F
F
O
F
F
H
L
O
I
O
F
F
H
L
O
I
O
F
F
H
L
O
I
O
F
F
H
L
O
I
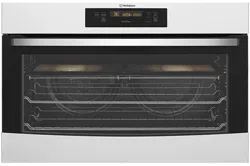
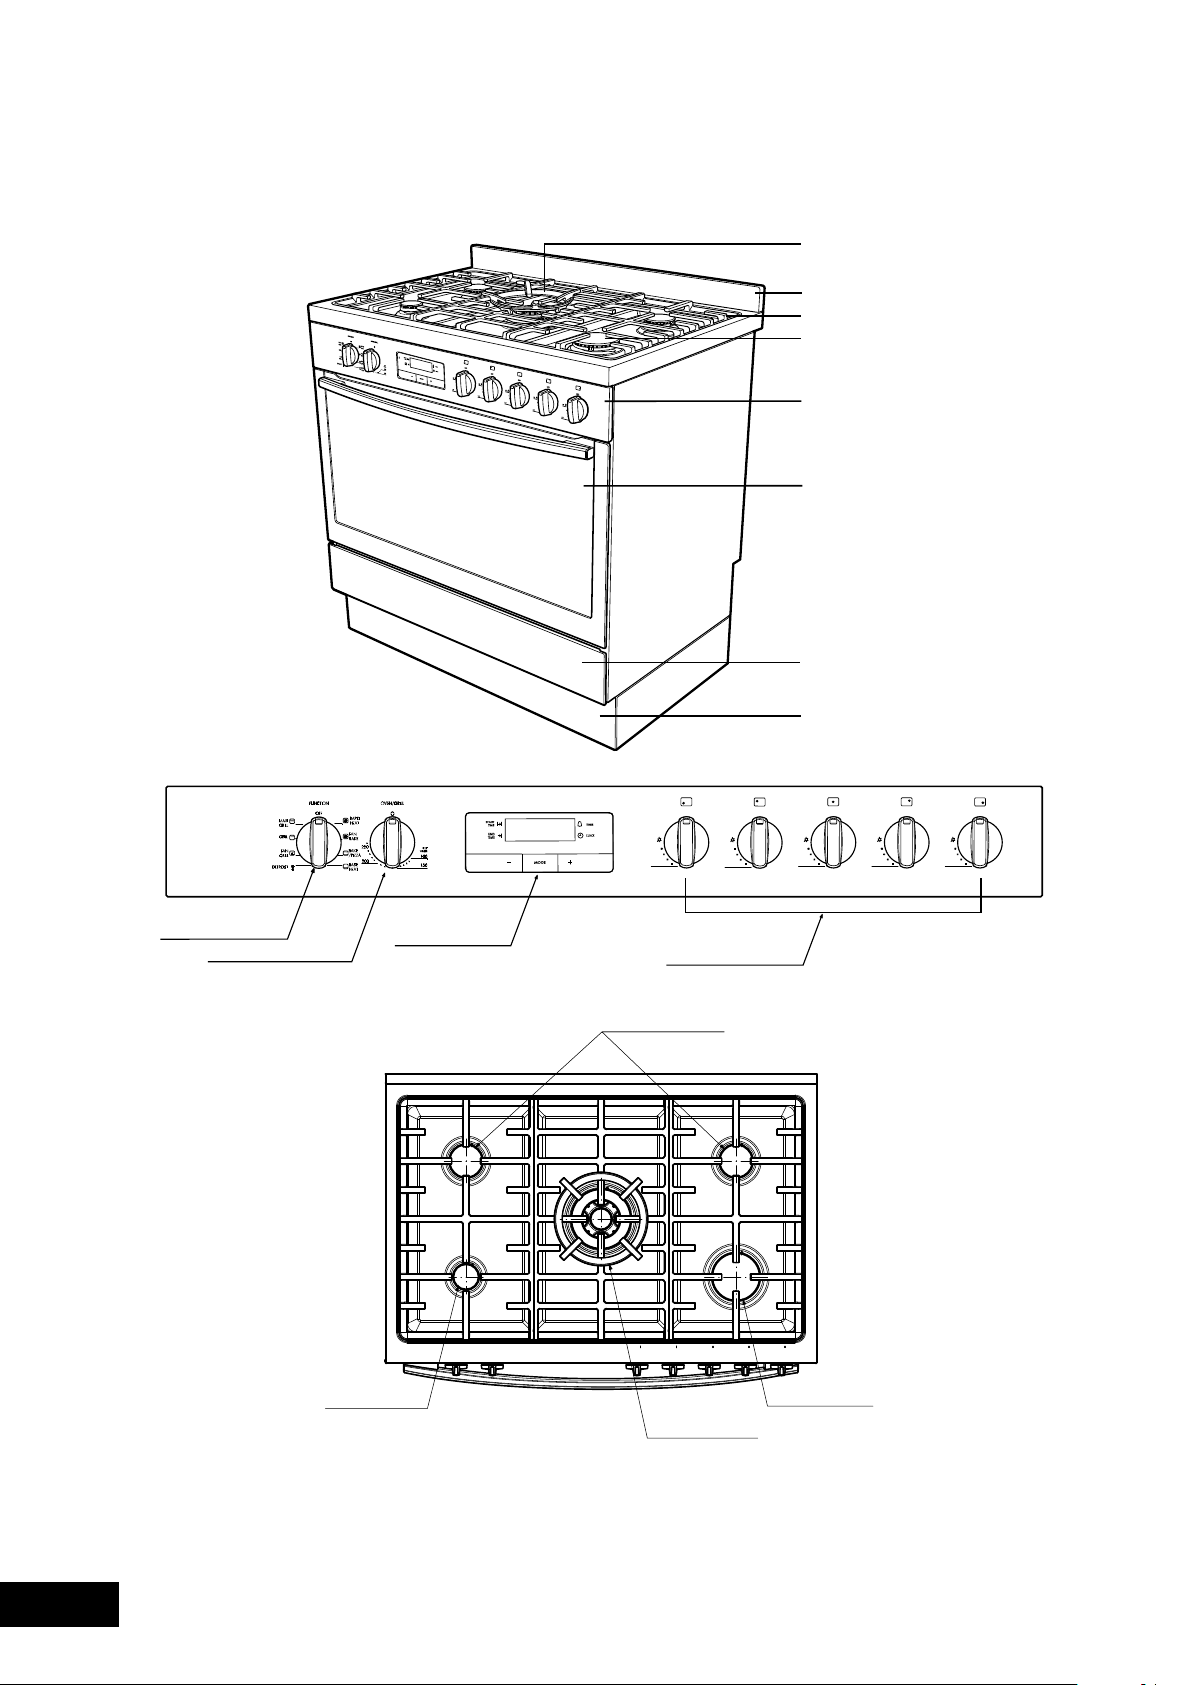
MODEL WFE914SA
Gas hob with flame safeguard, multi-function electric oven with touch control timer
Control Panel
Gas Hob
12:00
DESCRIPTION
7
O
F
F
H
L
O
I
ON/OFF
FUNCTION
FAST HEAT UP
O
F
F
H
L
O
I
H
L
O
I
O
F
F
O
F
F
H
L
O
I
O
F
F
H
L
O
I
O
F
F
H
L
O
I
Control Panel
Gas Hob
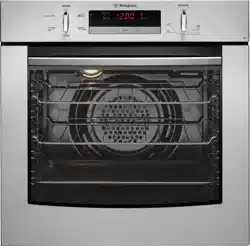
MODEL WFE916SA
Gas hob with flame safeguard, programmable touch control electric oven
DESCRIPTION
8
ON/OFF
FUNCTION
FAST HEAT UP
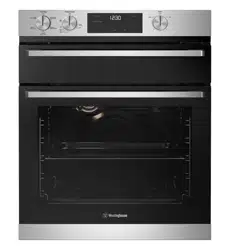
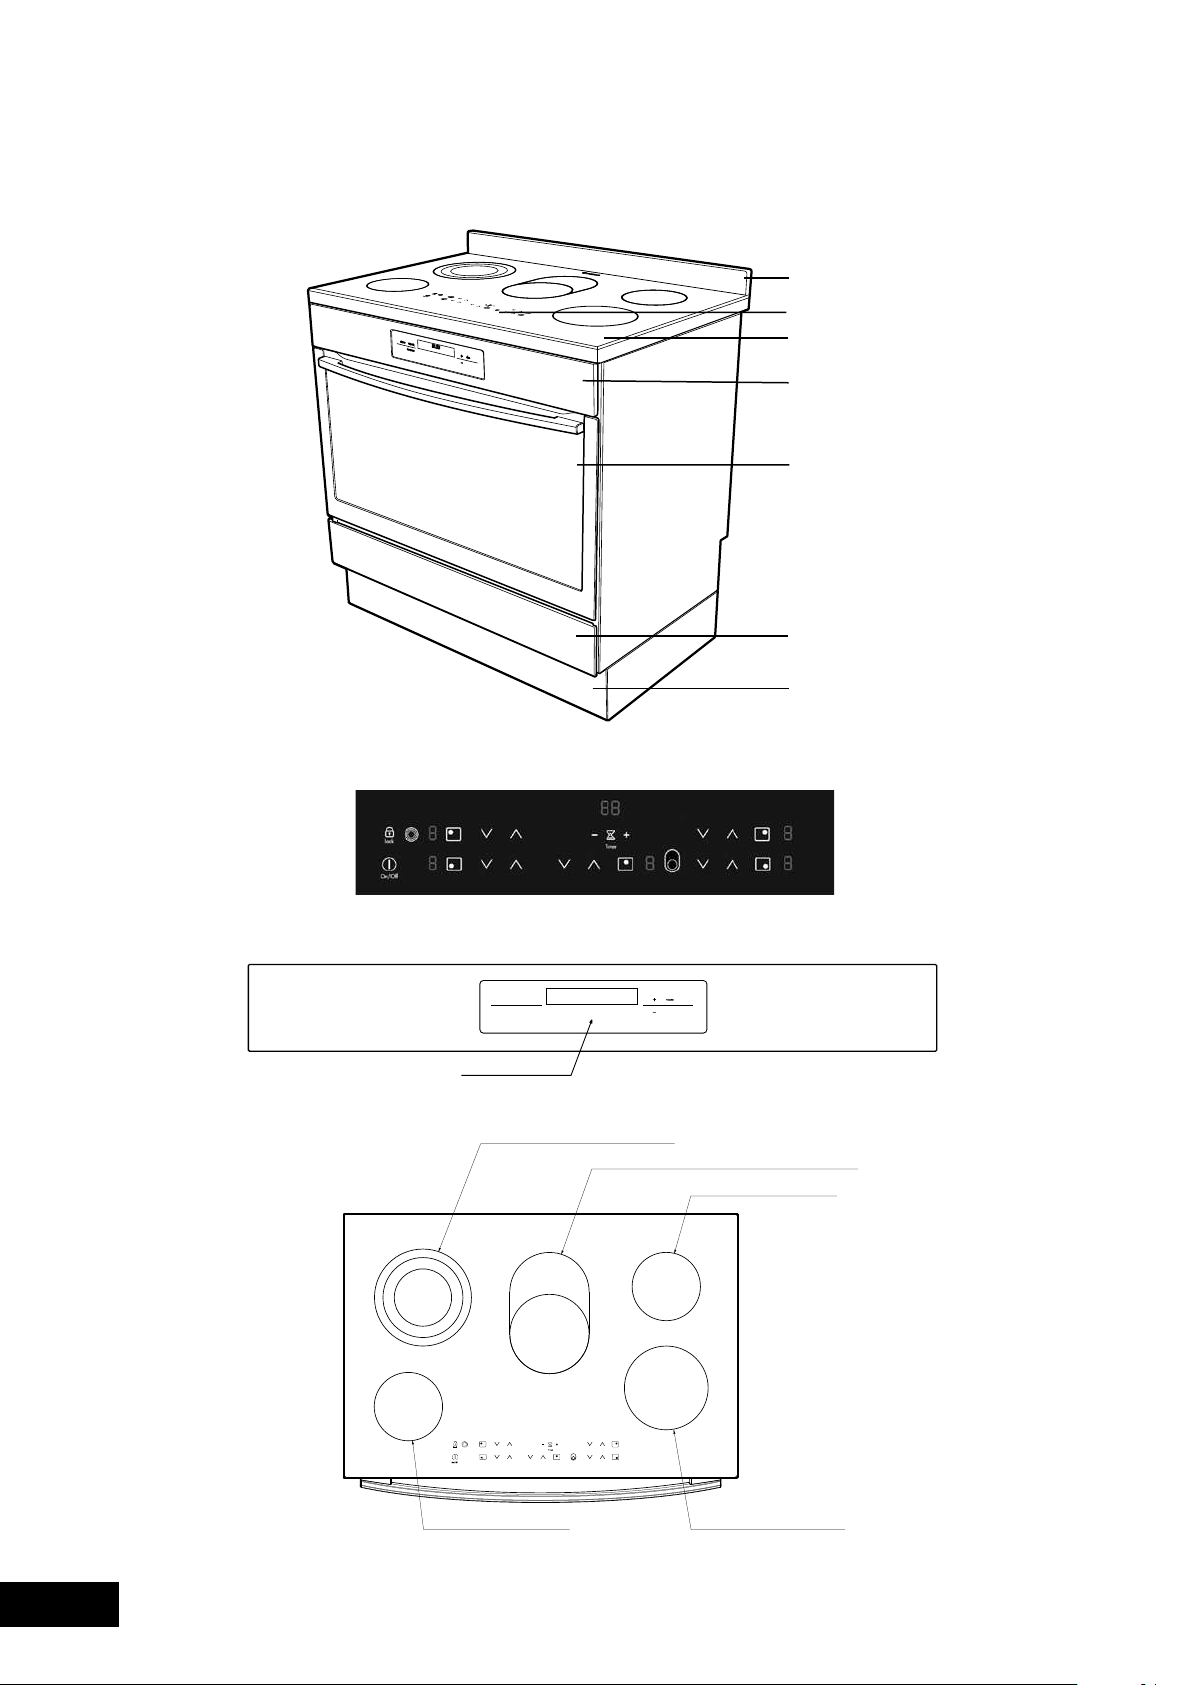
MODEL WFE946SA
Touch control electric ceramic hob, programmable touch control electric oven
Ceramic hob touch controls
Control Panel - oven programmable controller
Ceramic Hob
DESCRIPTION
9
ON/OFF
FUNCTION
FAST HEAT UP
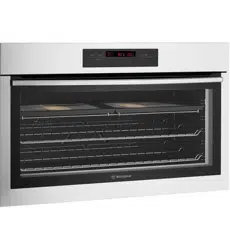
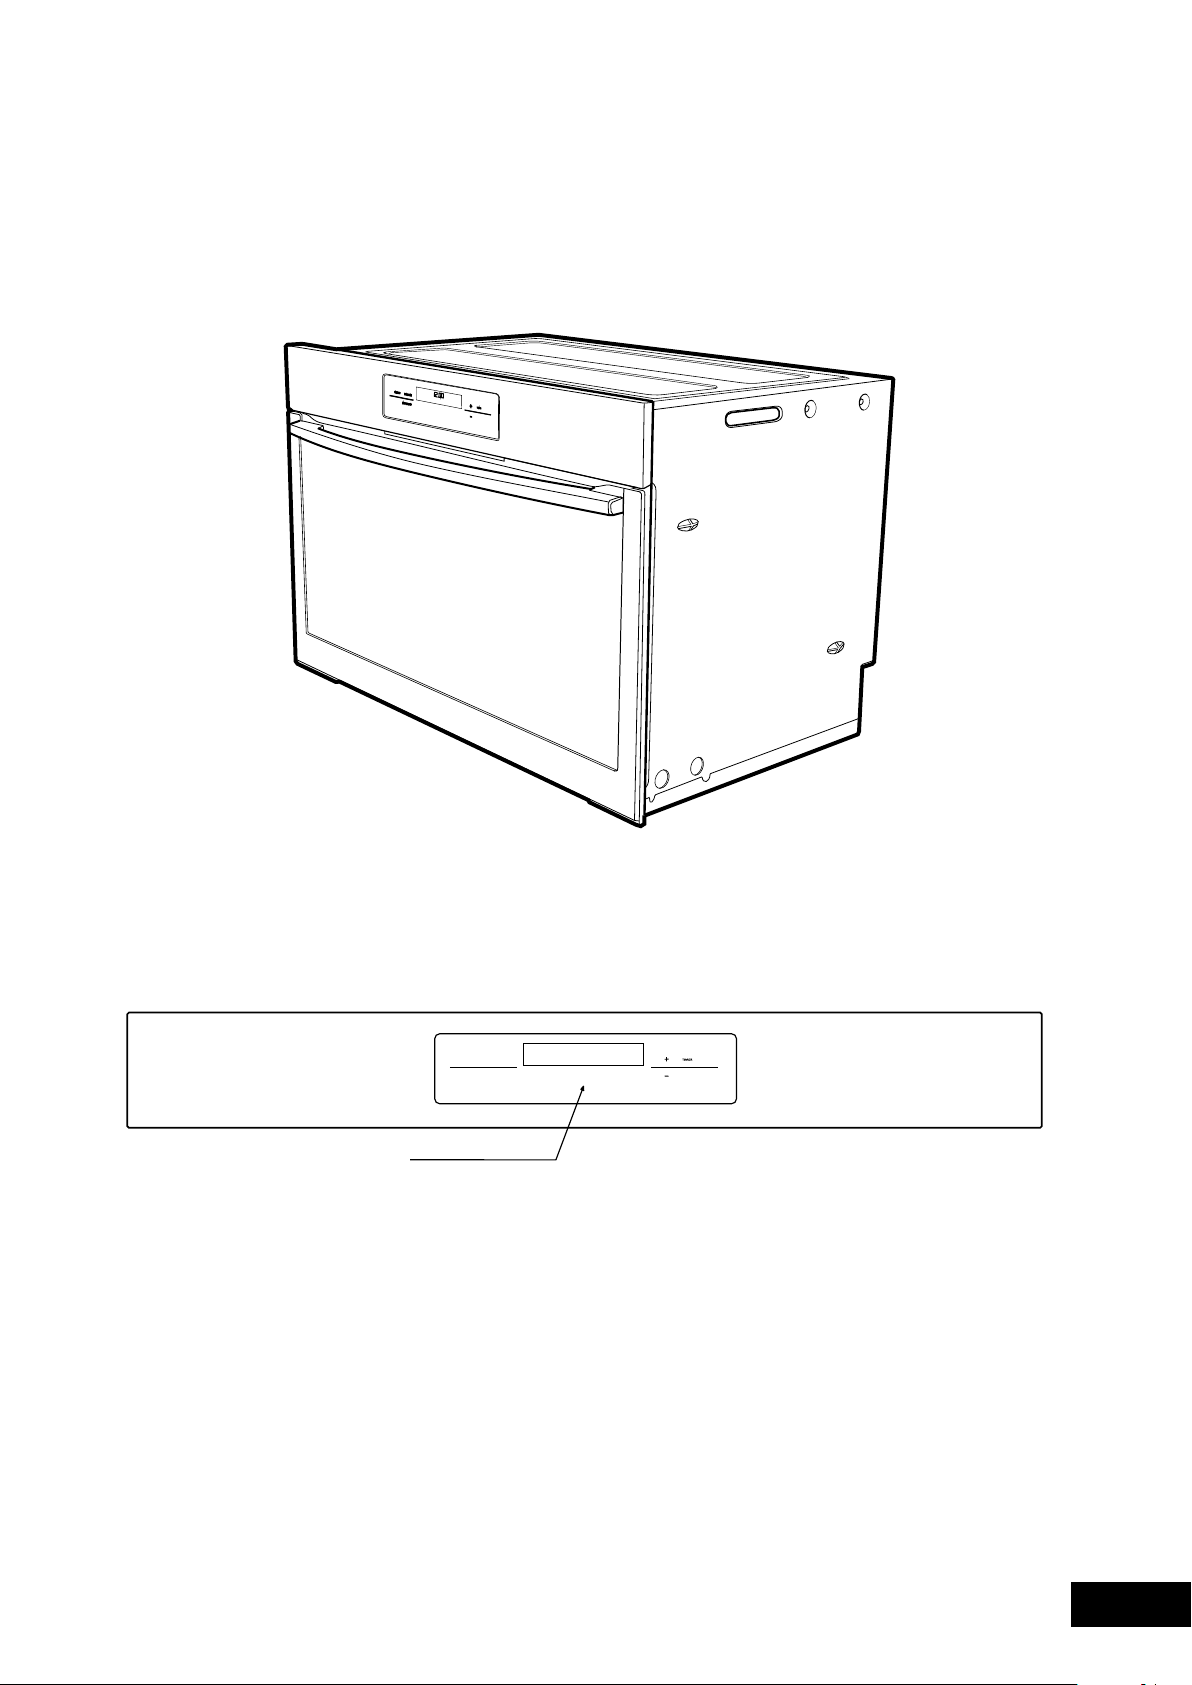
MODEL WVE916SA
Programmable touch control electric oven
Control Panel - oven programmable controller
DESCRIPTION
10
OPERATION
BEFORE OPERATING YOUR APPLIANCE
FOR THE FIRST TIME
TIPS & INFORMATION
SETTING THE TIME
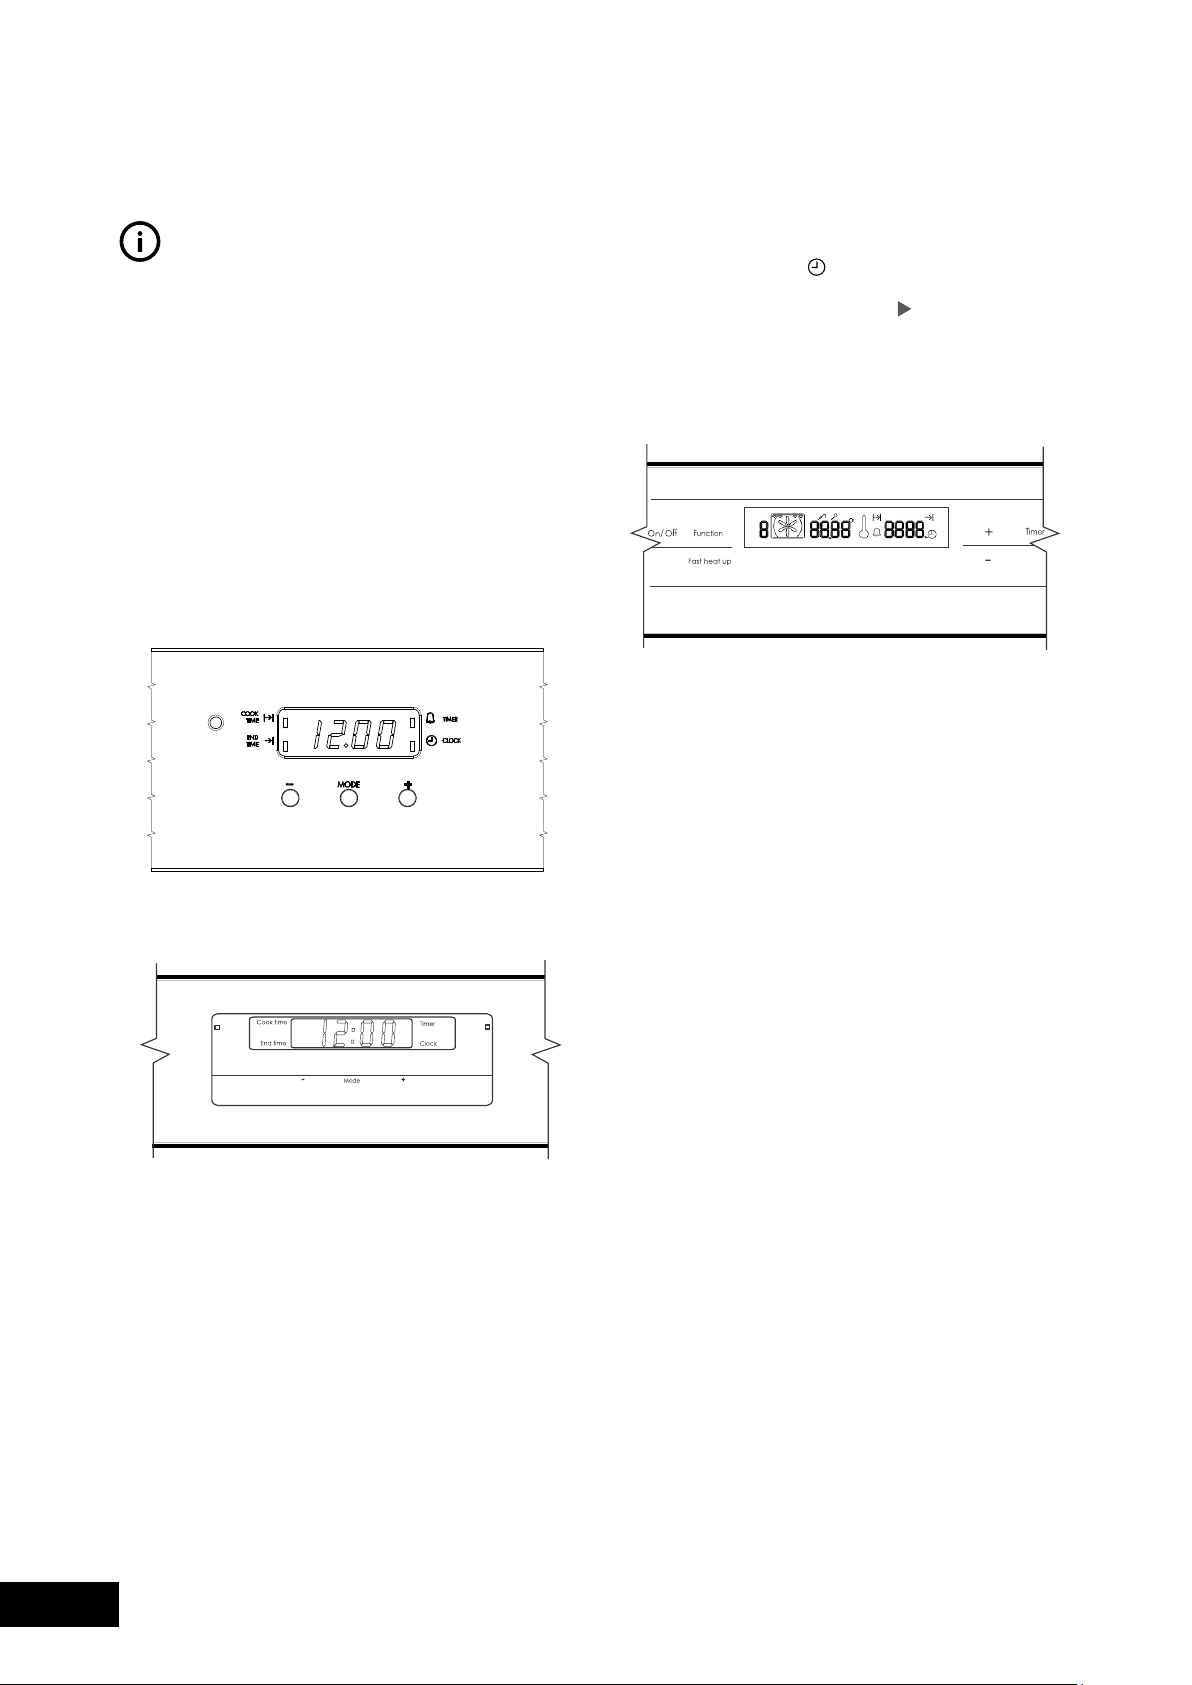
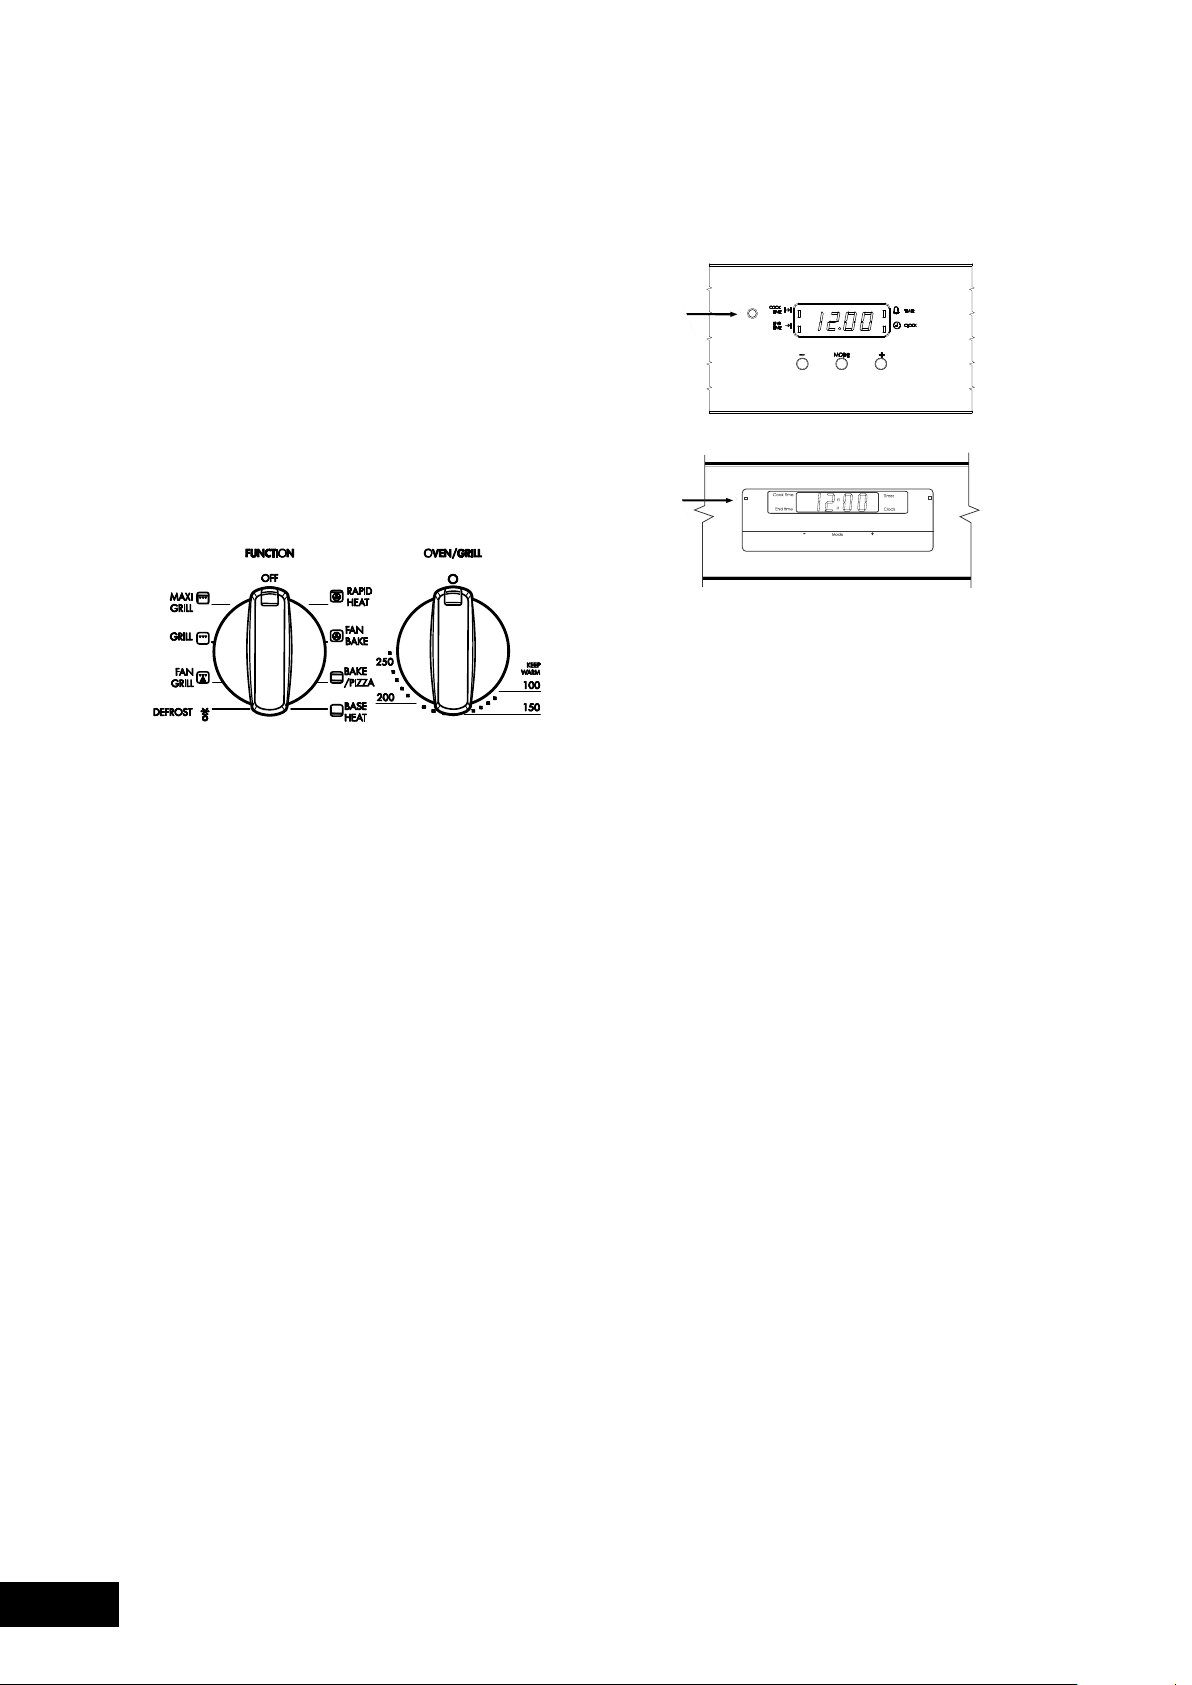
PUSH BUTTON AND TOUCH CONTROL ELECTRONIC CLOCK
MODELS WFE912 & WFE914
NOTE: The clock has a 24-hour display.
PROGRAMMABLE CONTROLLER: MODELS WFE916, WFE946 & WVE916
NOTE: The clock has a 24-hour display.
MODEL WFE912
MODEL WFE914
PREPARING YOUR APPLIANCE FOR THE FIRST TIME
11
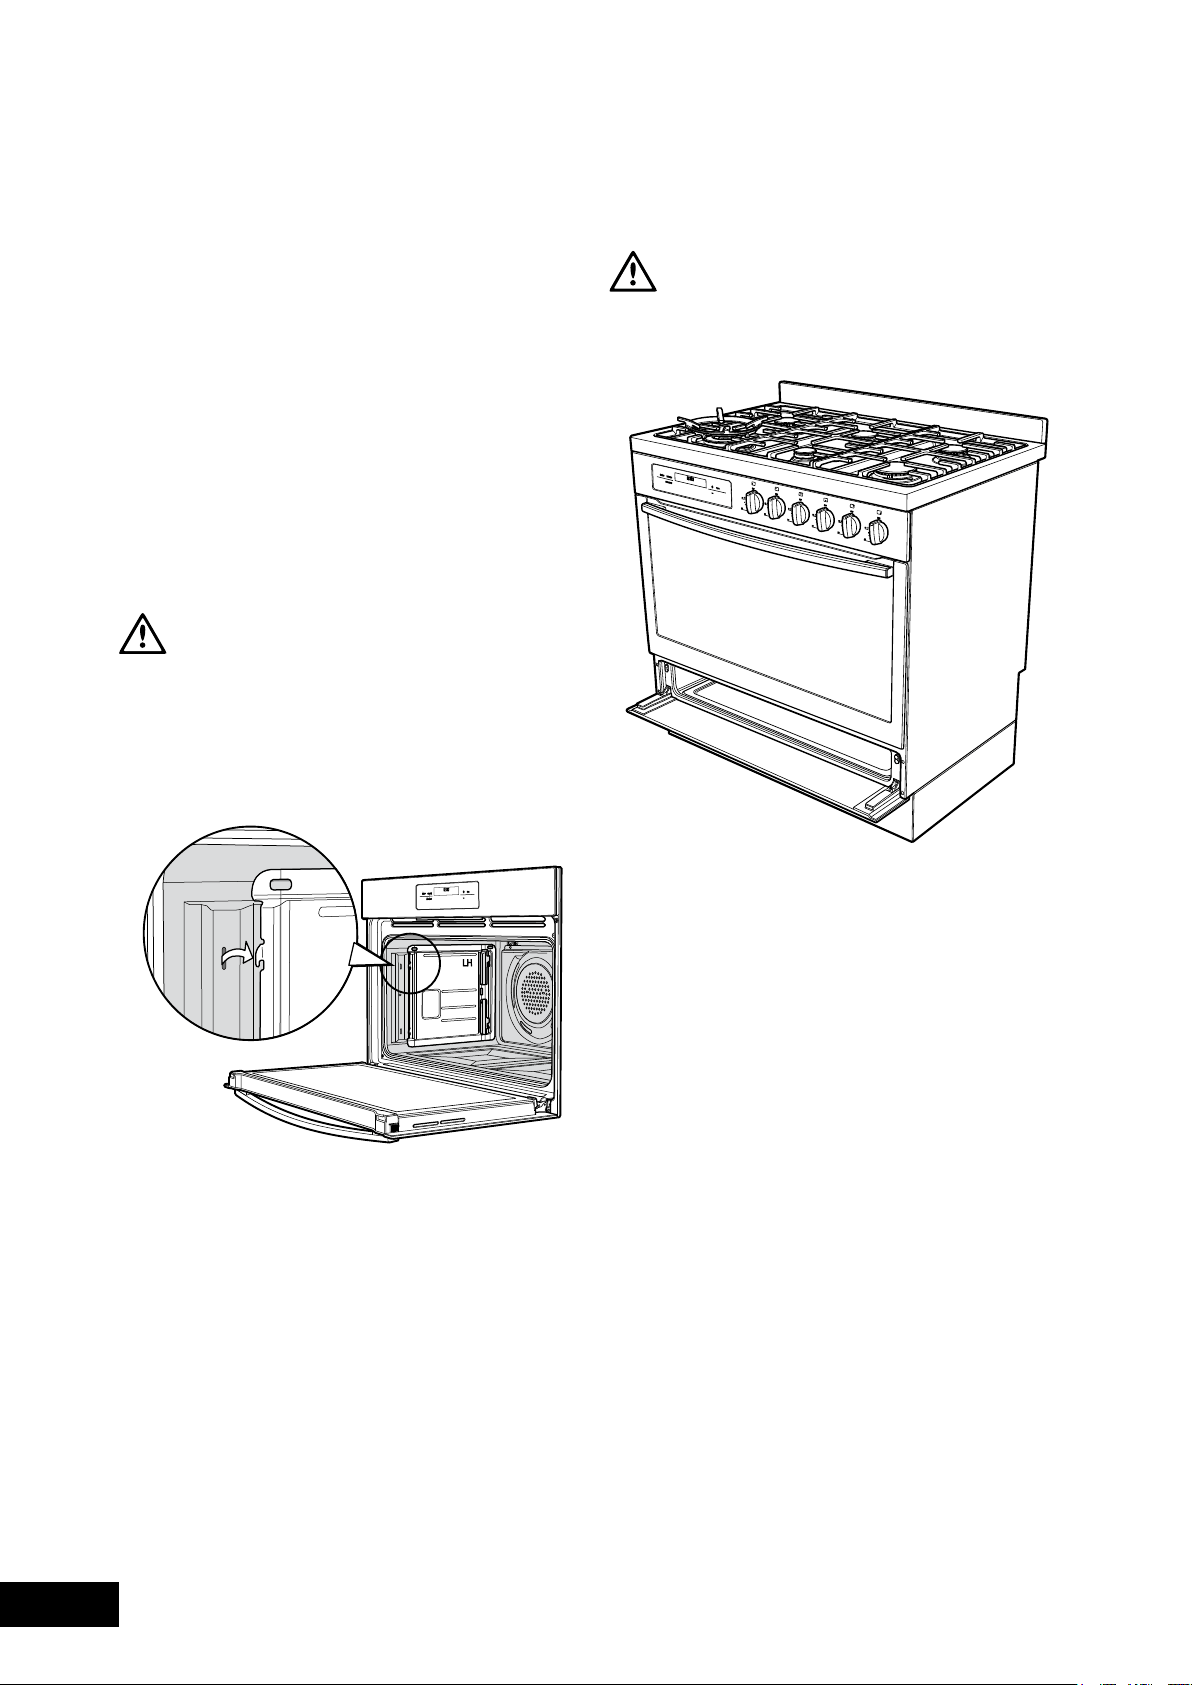
INSTALLATION
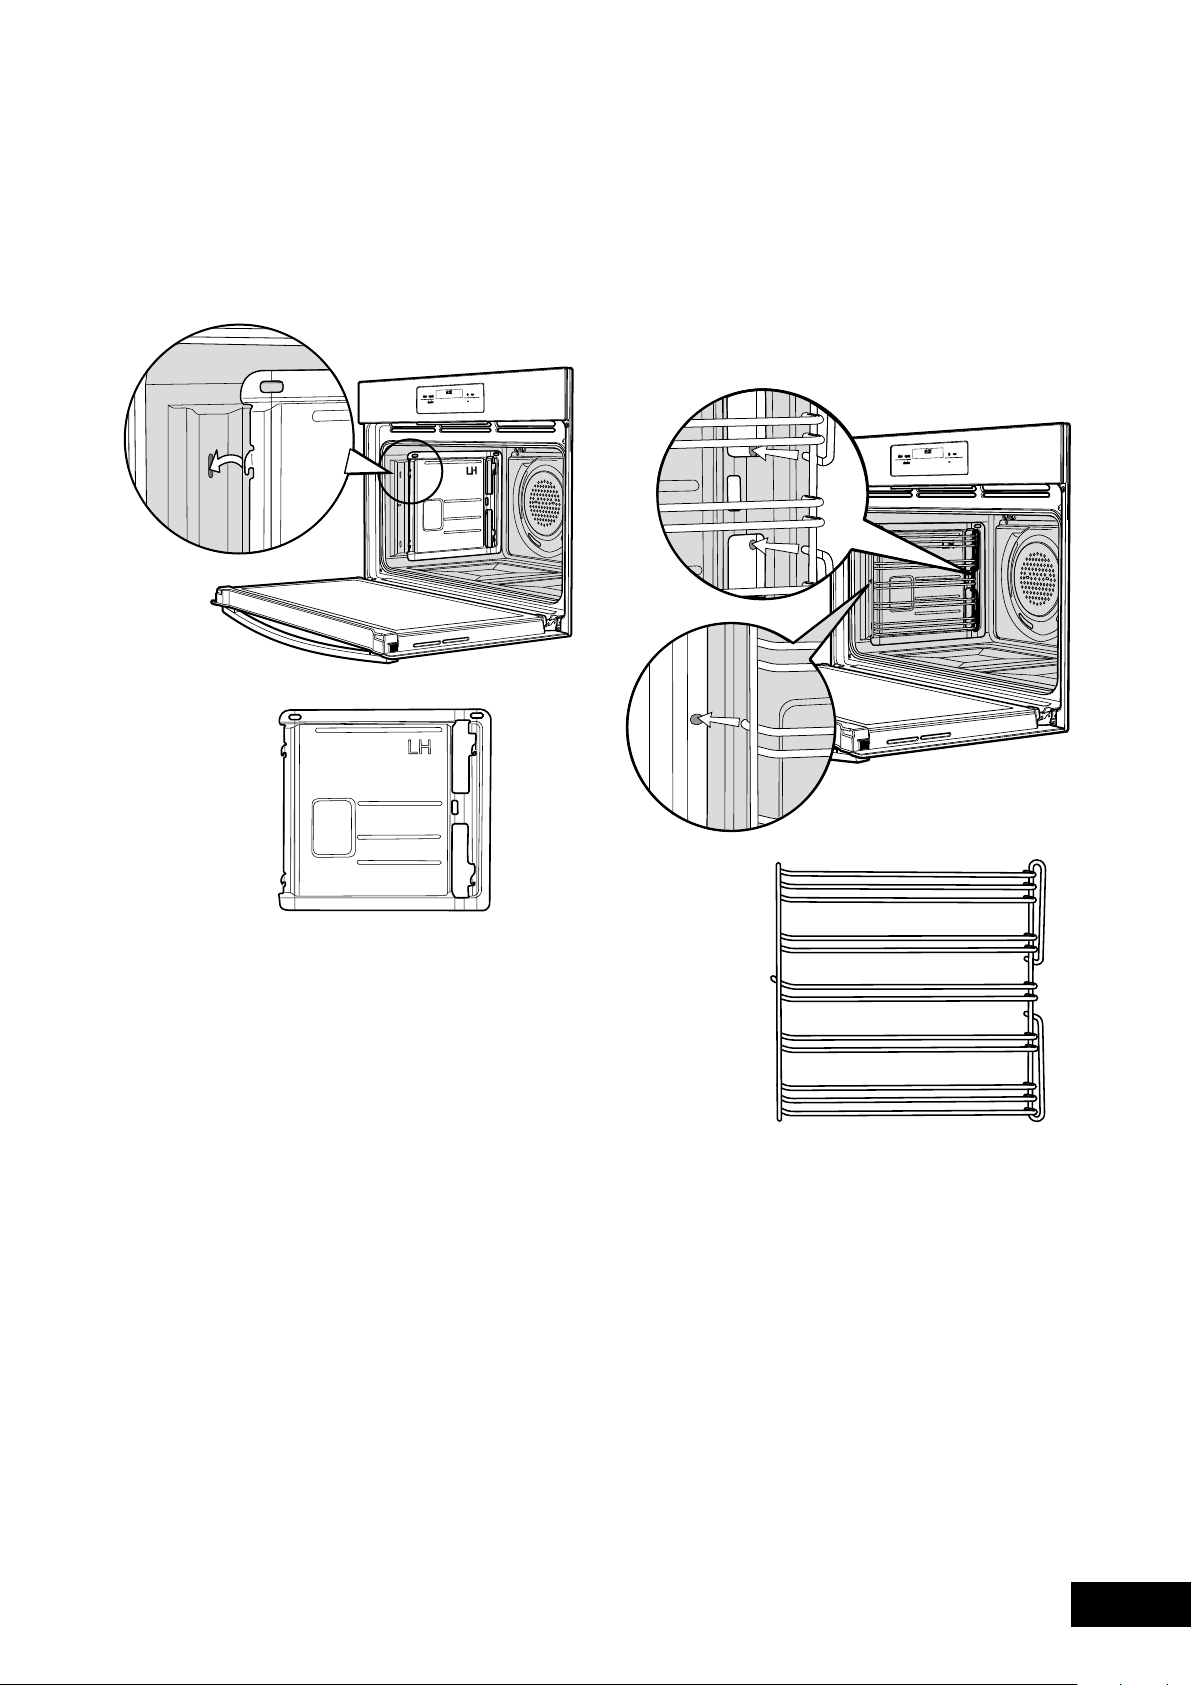
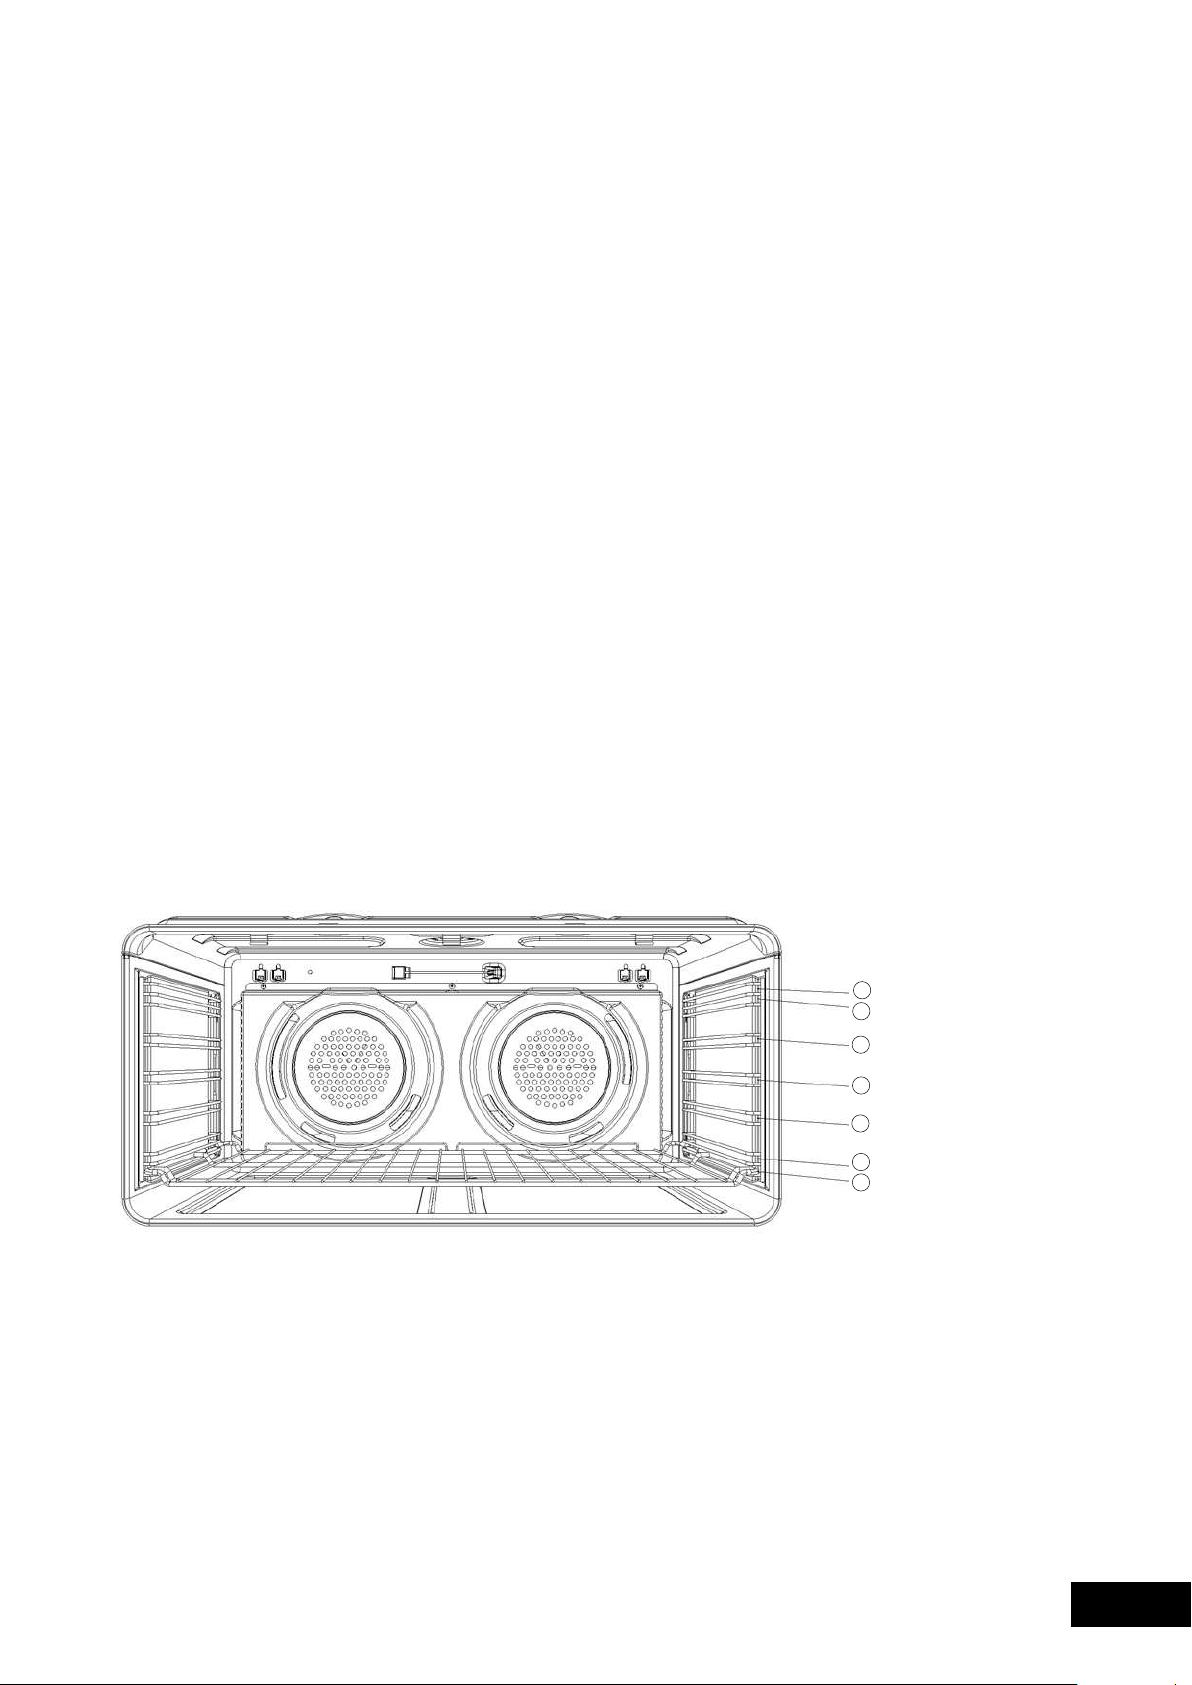
INSTALLING YOUR OVEN ACCESSORIES
SIDE RACKS
CATALYTIC LINERS (ON SELECTED MODELS)
Cleaning your appliance
PRIOR TO INSTALLING ACCESSORIES, REMOVE ALL PACKAGING
AND REMOVE PLASTIC FILM FROM EXTERNAL PANELS
12
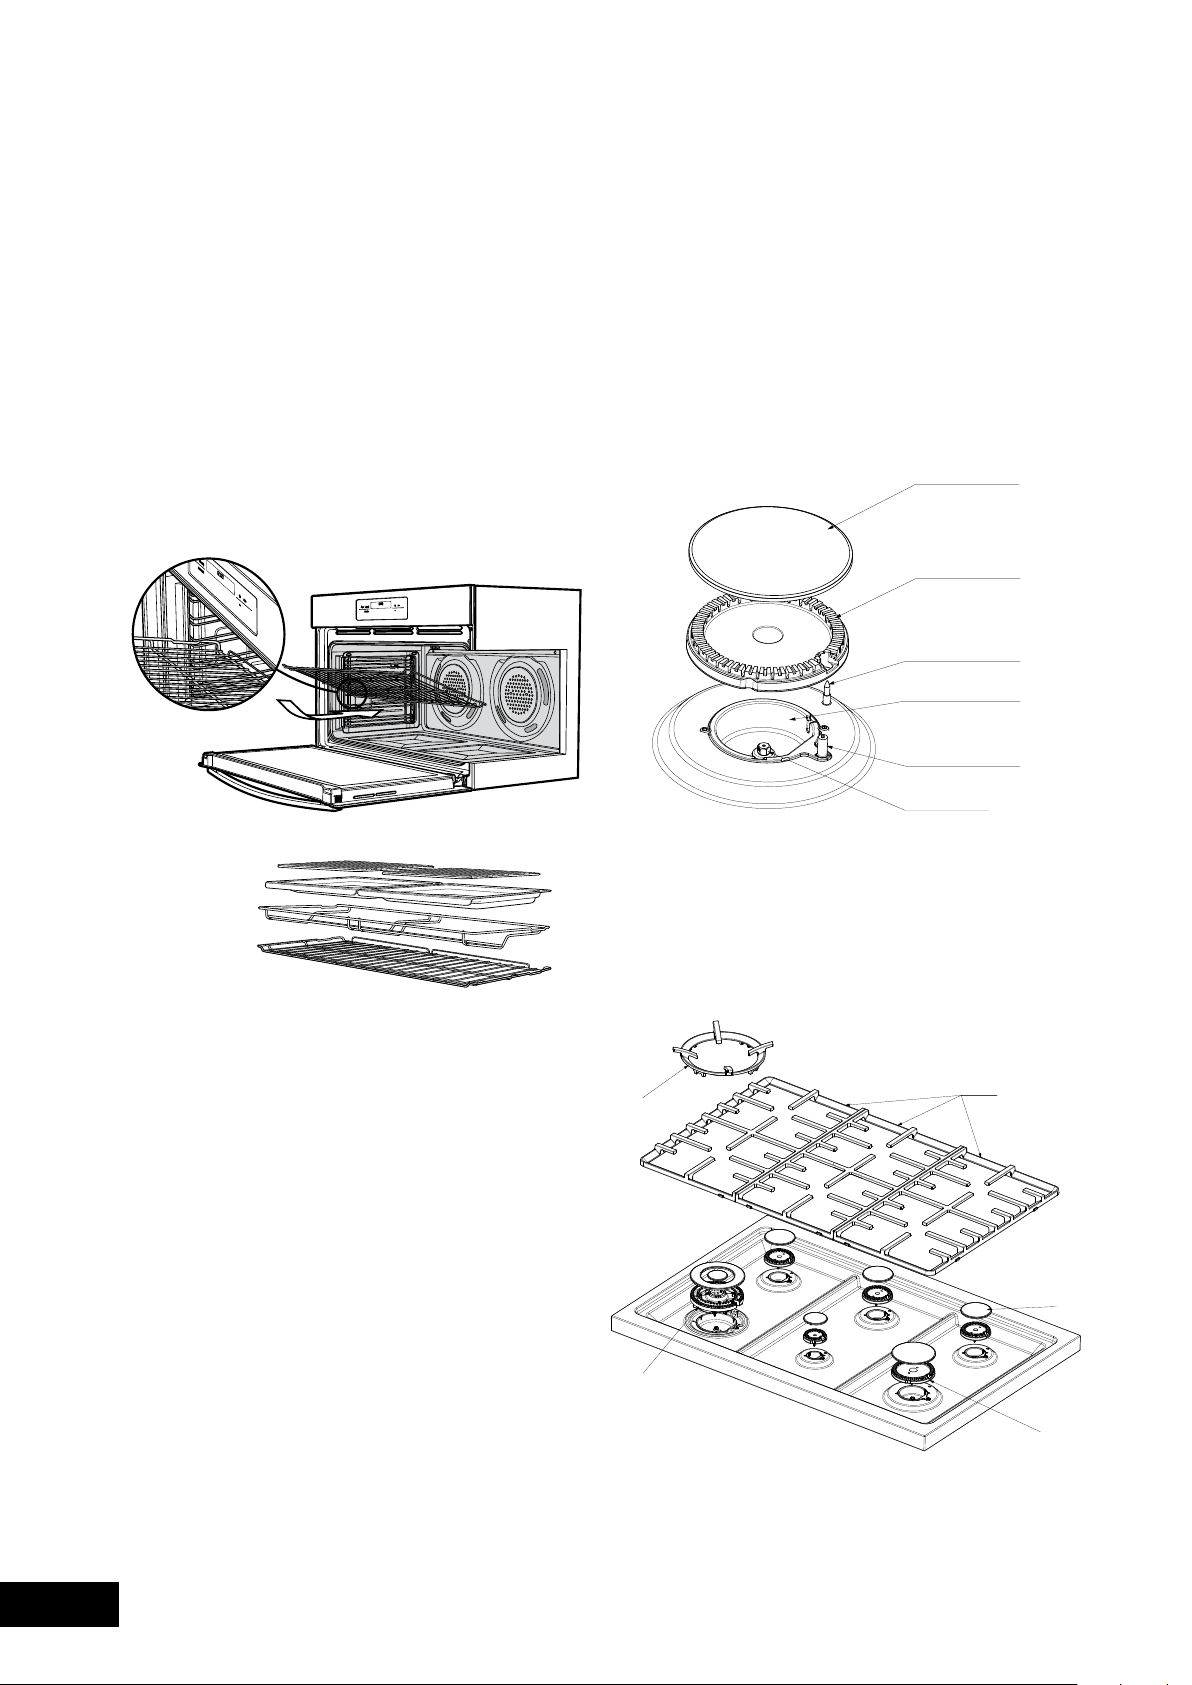
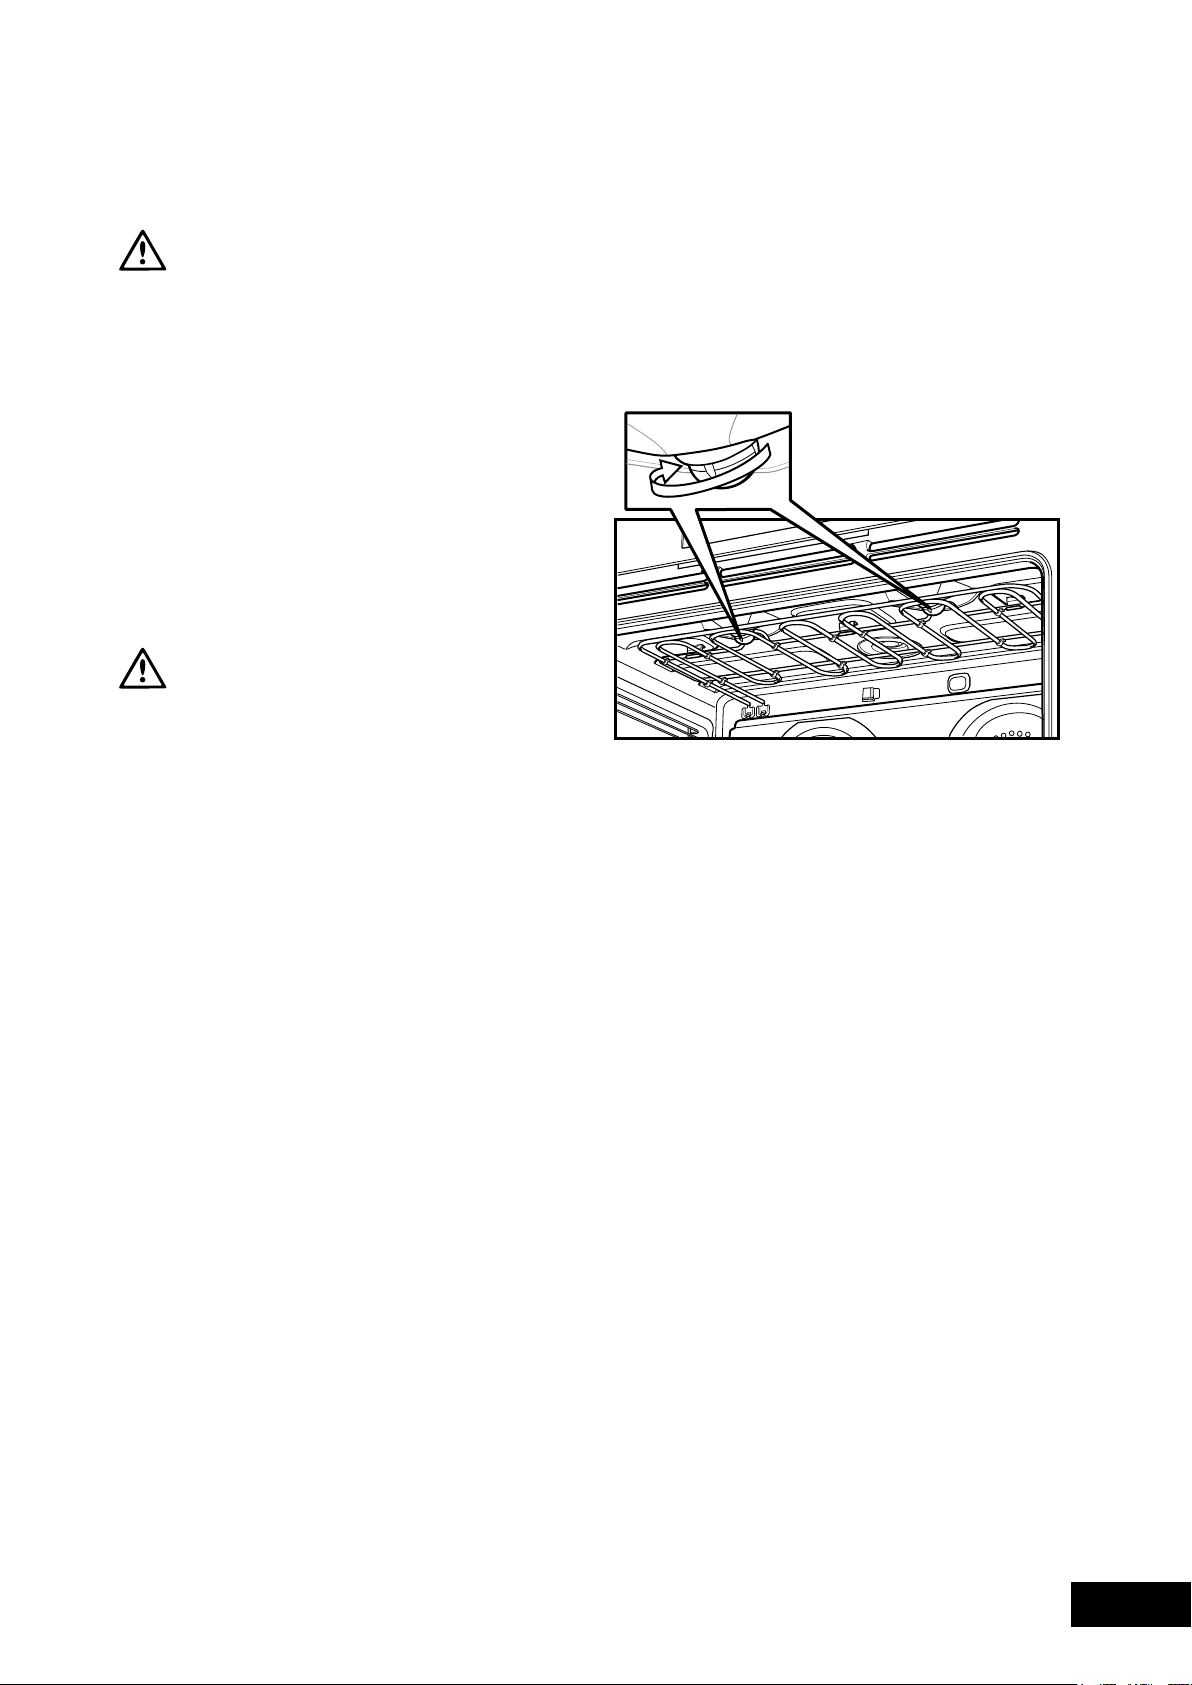
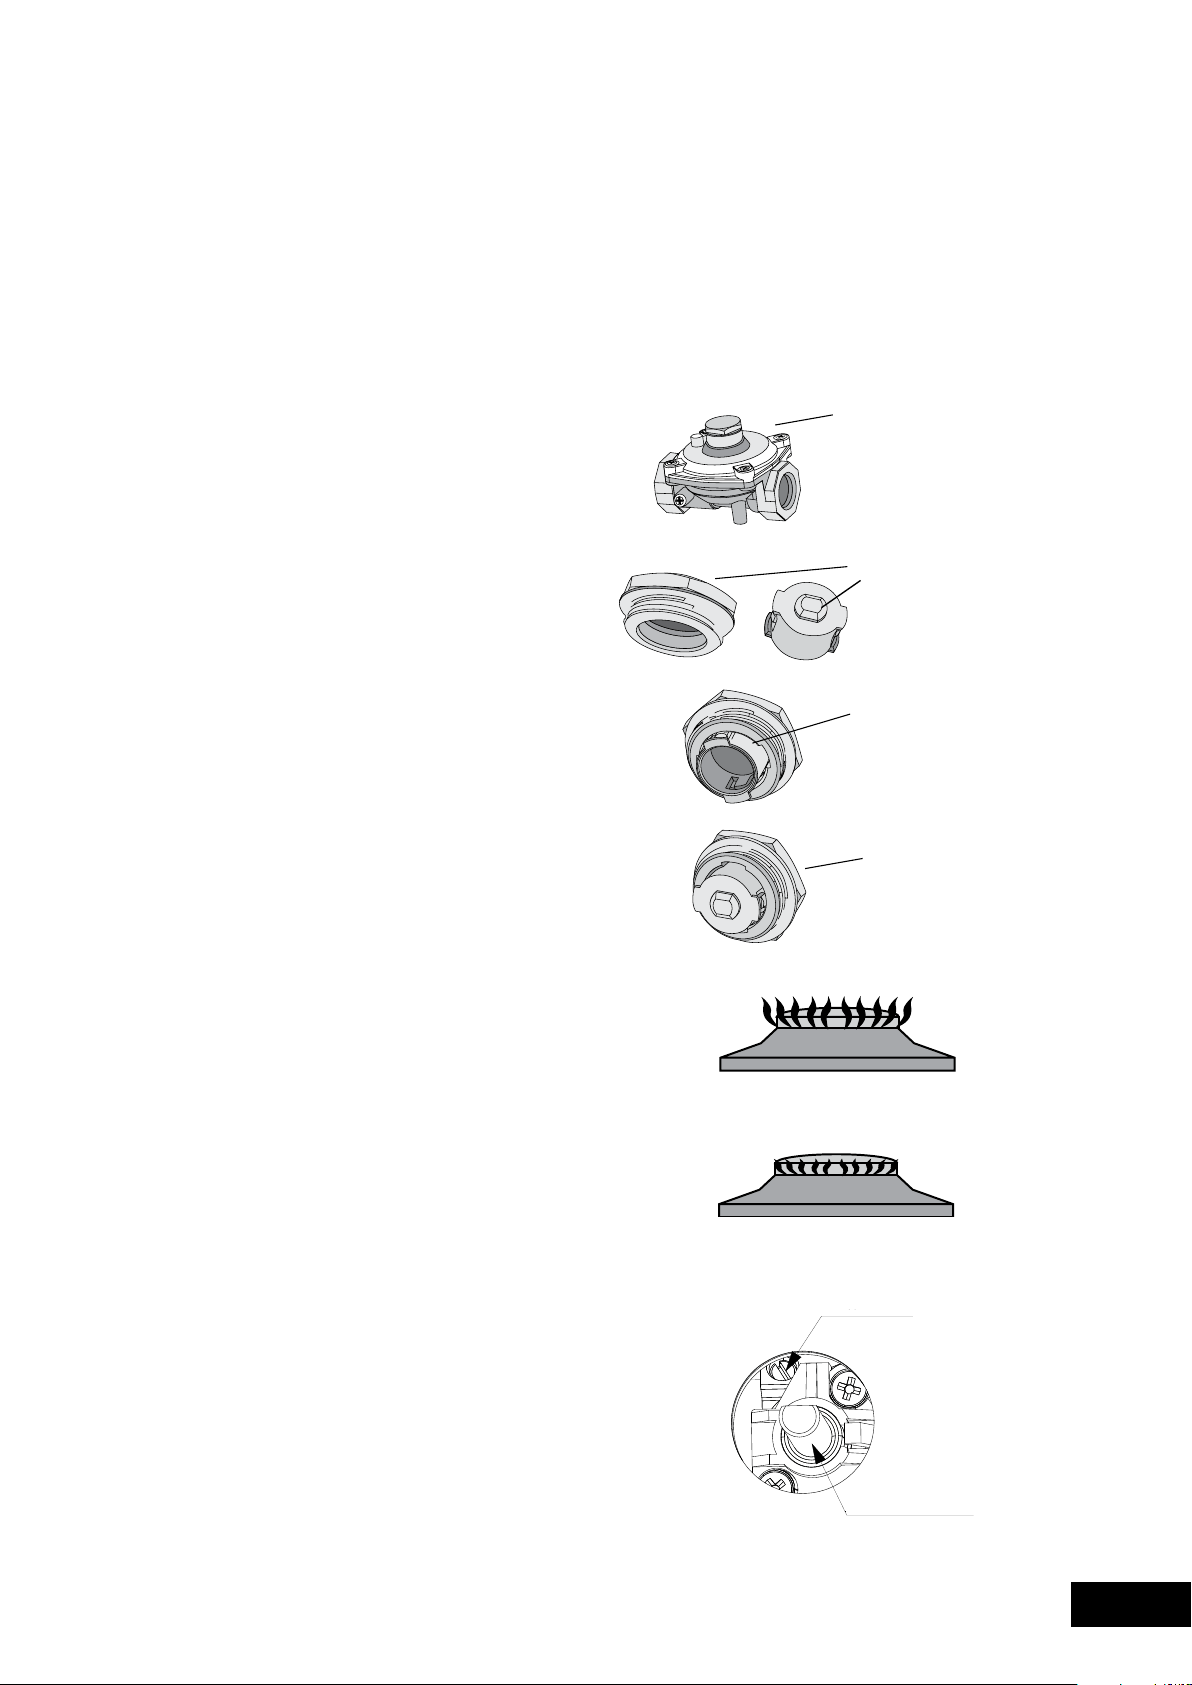
INSTALLING BURNERS
NOTE: When the burner is correctly fitted it will sit level
on the hob
INSTALLING TRIVETS
INSTALLATION
INSTALLING BURNERS AND TRIVETS
INSTALLING YOUR OVEN ACCESSORIES
SHELVES AND TRAYS
13
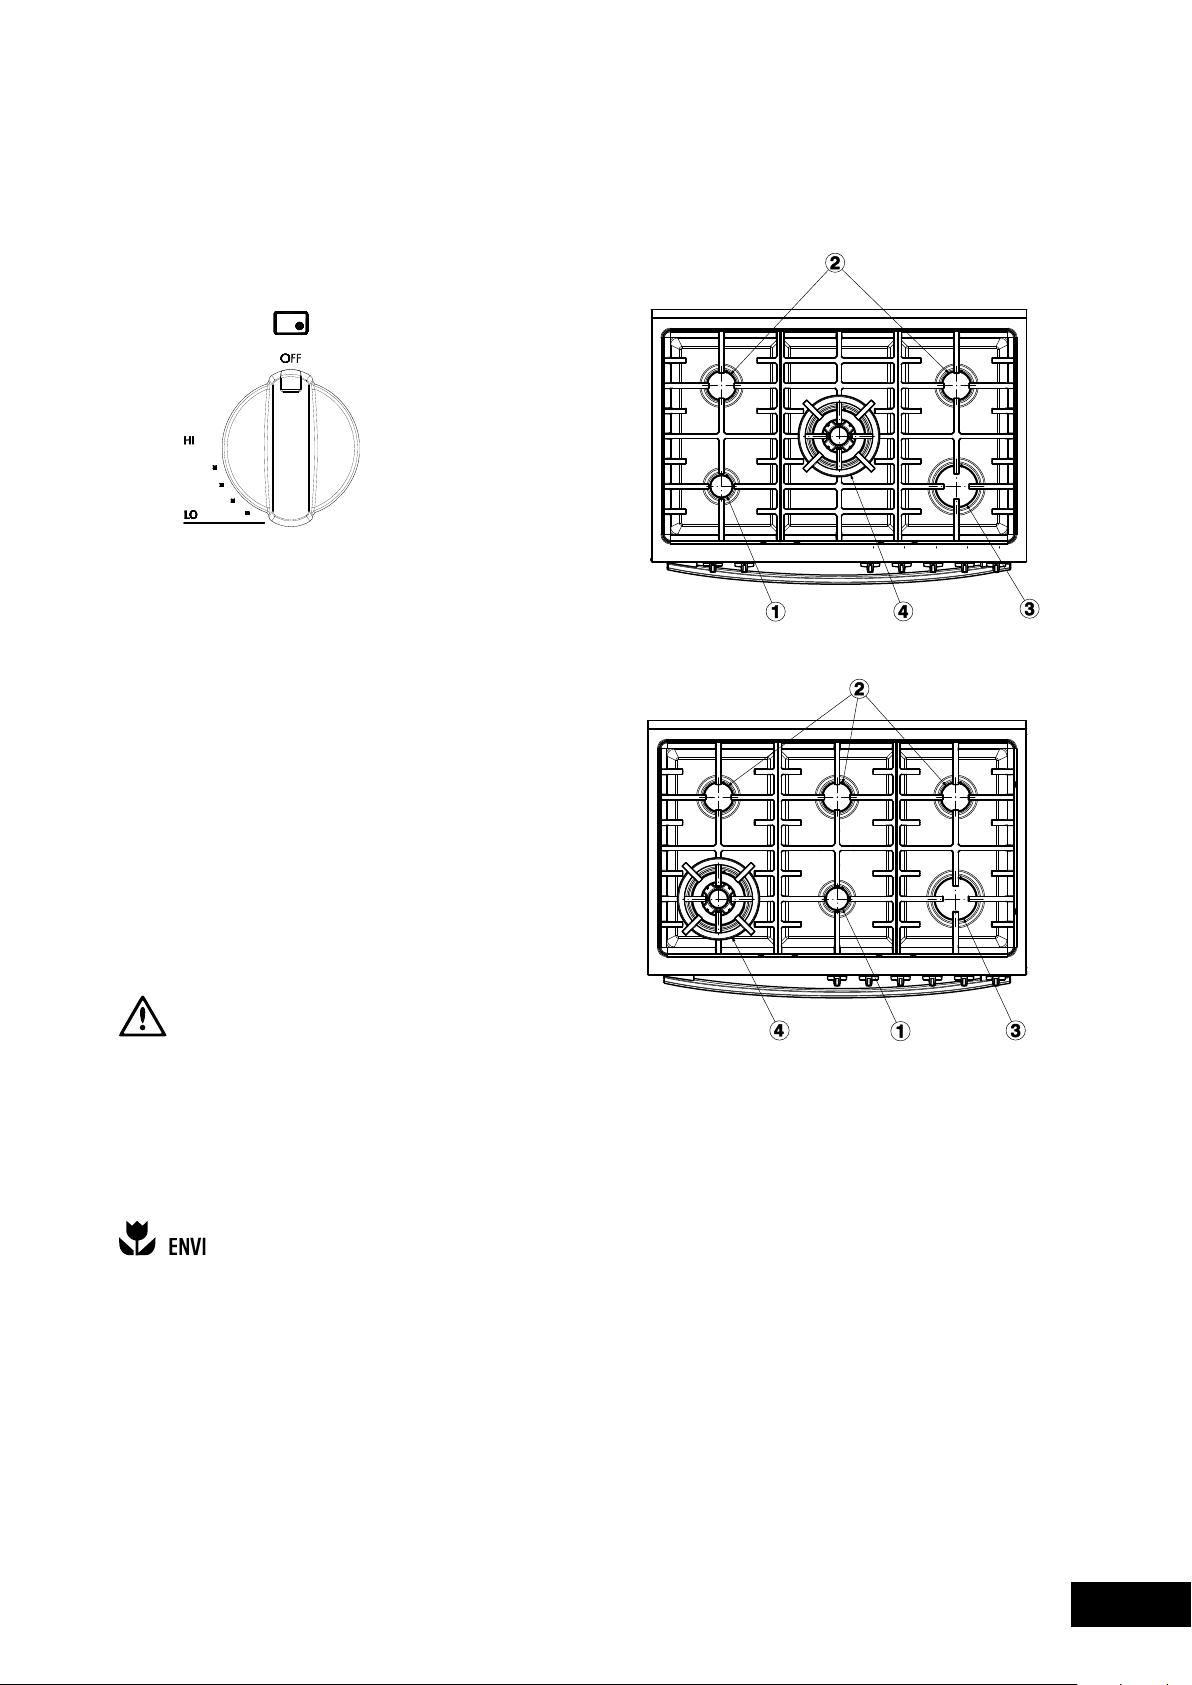
GETTING TO KNOW YOUR GAS COOKTOP
USAGE
USING YOUR GAS HOTPLATES
LIGHTING BURNERS
Electronic ignition
Flame safeguard models WFE914 & WFE916
WARNING
VIRONMENTAL TIPS
NOTE: In the absence of electrical power, carry out the
ignition directly to the burner with a hand held ignition
source.
1. LOW HEAT BURNER (5.1MJ/H)
2. MEDIUM HEAT BURNER (9.0MJ/H)
3. HIGH HEAT BURNER (12.1MJ/H)
4. INTENSE HEAT WOK BURNER (14.4MJ/H)
MODEL WFE912 & WFE914
MODEL WFE916
NOTE: Gas controls turn anticlockwise from ‘Off’
and have limited movement.

14
USAGE
CERAMIC HOTPLATES MODEL WFE946
1. SINGLE COOKING ZONE 1200W
2. SINGLE COOKING ZONE 1800W
3. TRIPLE COOKING ZONE 2300/1600/800W
4. MULTI-PURPOSE COOKING ZONE 2200/1400W
WARNING
VIRONMENTAL TIPS
GETTING TO KNOW YOUR CERAMIC COOKTOP
15
USAGE
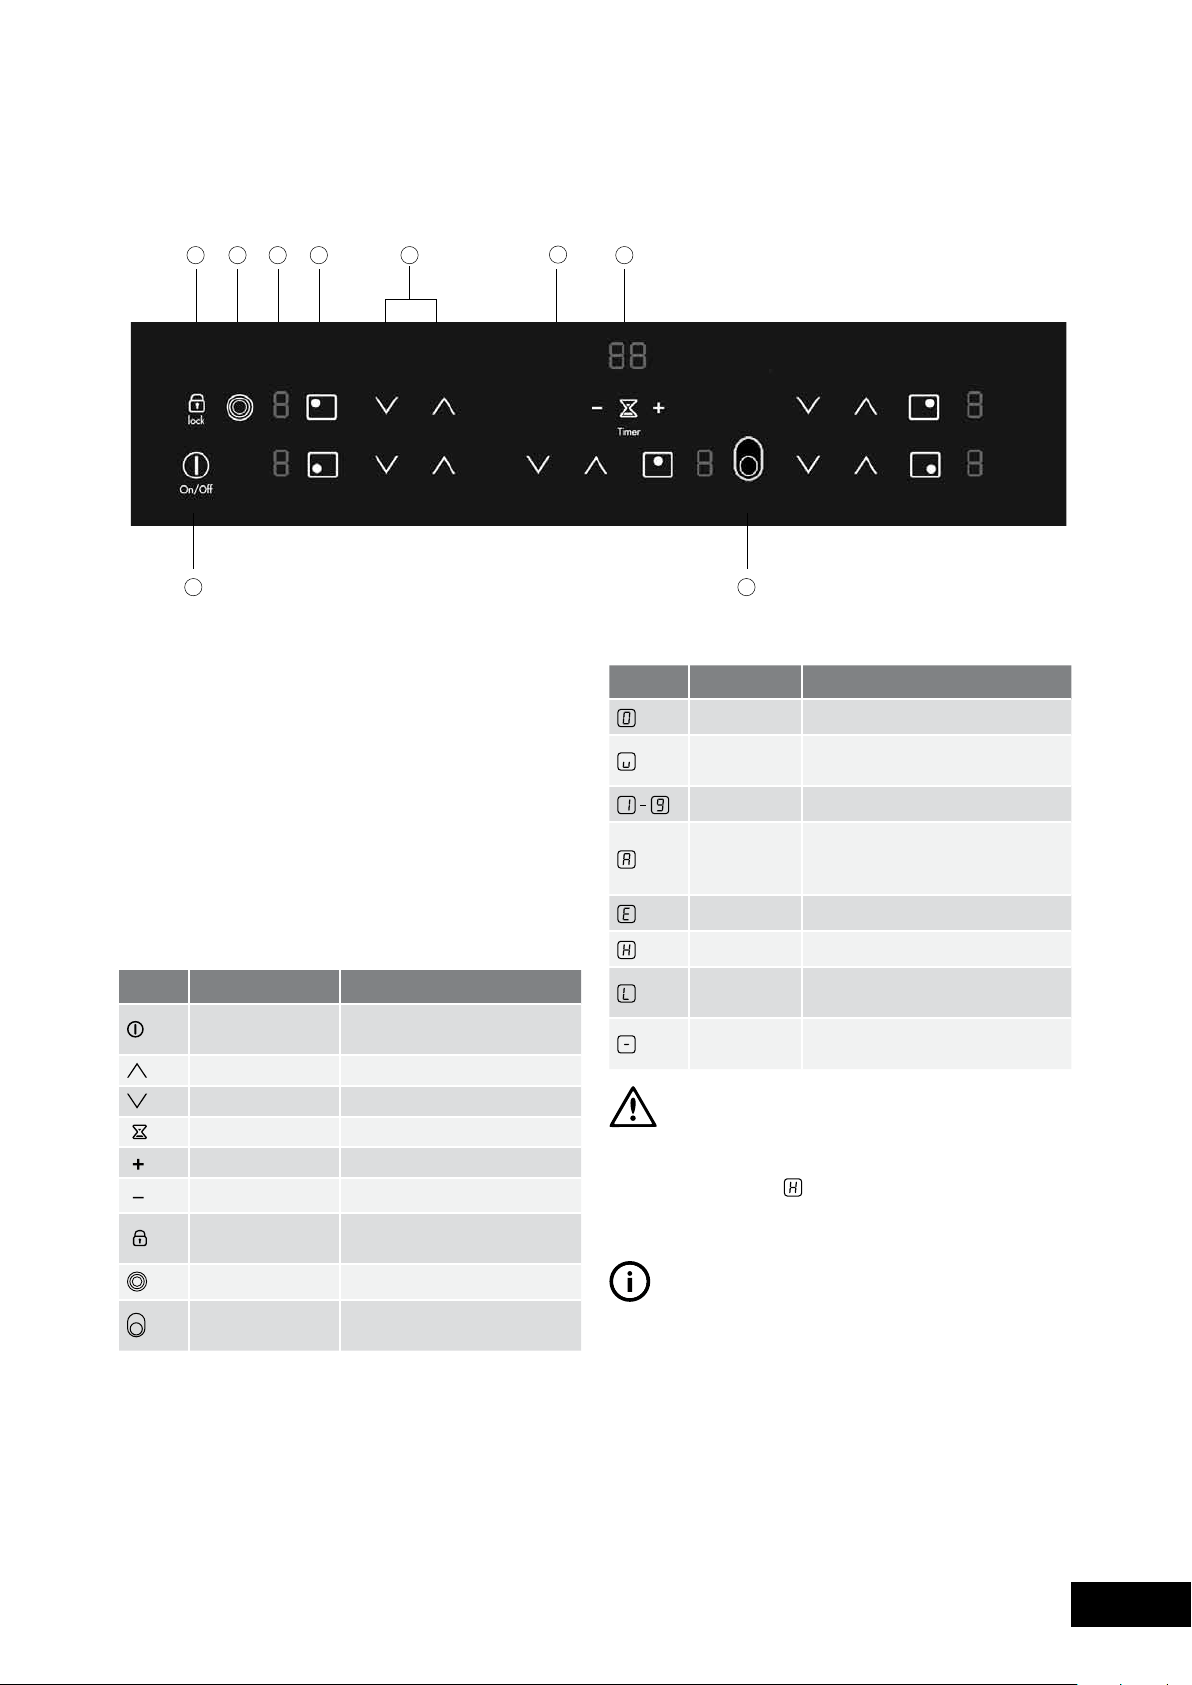
CERAMIC COOKTOP CONTROLS
1. ON/OFF WITH POWER INDICATOR
2. LOCK WITH PILOT LIGHT
3. TRIPLE RING COOKING ZONE
4. DISPLAY
5. ZONE INDICATOR
6. HEAT SETTING SELECTION
7. TIMER SETTING SELECTION
8. TIMER DISPLAY
9. MULTIPURPOSE COOKING ZONE
ICONS SENSOR FIELD
FUNCTION
DISPLAYS
ICONS
DISPLAY DESCRIPTION
WARNING
TIPS & INFORMATION
GETTING TO KNOW YOUR CERAMIC COOKTOP
16
OPERATION
CONTROL PANEL
DISPLAY
CONTROL PANEL
DISPLAY
TRIPLE COOKING
ZONE
CONTROL PANEL
INDICATOR LIGHT
MULTI-PURPOSE ZONE SENSOR FIELD
INDICATOR LIGHT
SWITCHING THE CERAMIC COOKTOP ON AND OFF
USING YOUR CERAMIC COOKTOP
TIPS & INFORMATION
SETTING THE HEAT SETTING
SWITCHING THE OUTSIDE RING ON AND OFF
TIPS & INFORMATION
TIPS & INFORMATION
LOCKING/UNLOCKING THE CONTROL PANEL
TIPS & INFORMATION
USING THE AUTOMATIC WARM-UP FUNCTION
TIPS & INFORMATION
CONTROL PANEL
DISPLAY
CONTROL PANEL
POSSIBLE HEAT
SETTINGS
DISPLAY
17
OPERATION
USING YOUR CERAMIC COOKTOP
USING THE CHILD SAFETY DEVICE
SWITCHING ON THE CHILD SAFETY DEVICE
STEP CONTROL PANEL
DISPLAY
SWITCHING OFF THE CHILD SAFETY DEVICE
STEP CONTROL PANEL
DISPLAY
HEAT SETTING
AUTOMATIC WARM UP (MIN:SEC)
OVERRIDING THE CHILD SAFETY DEVICE
STEP CONTROL PANEL
DISPLAY
TIPS & INFORMATION
18
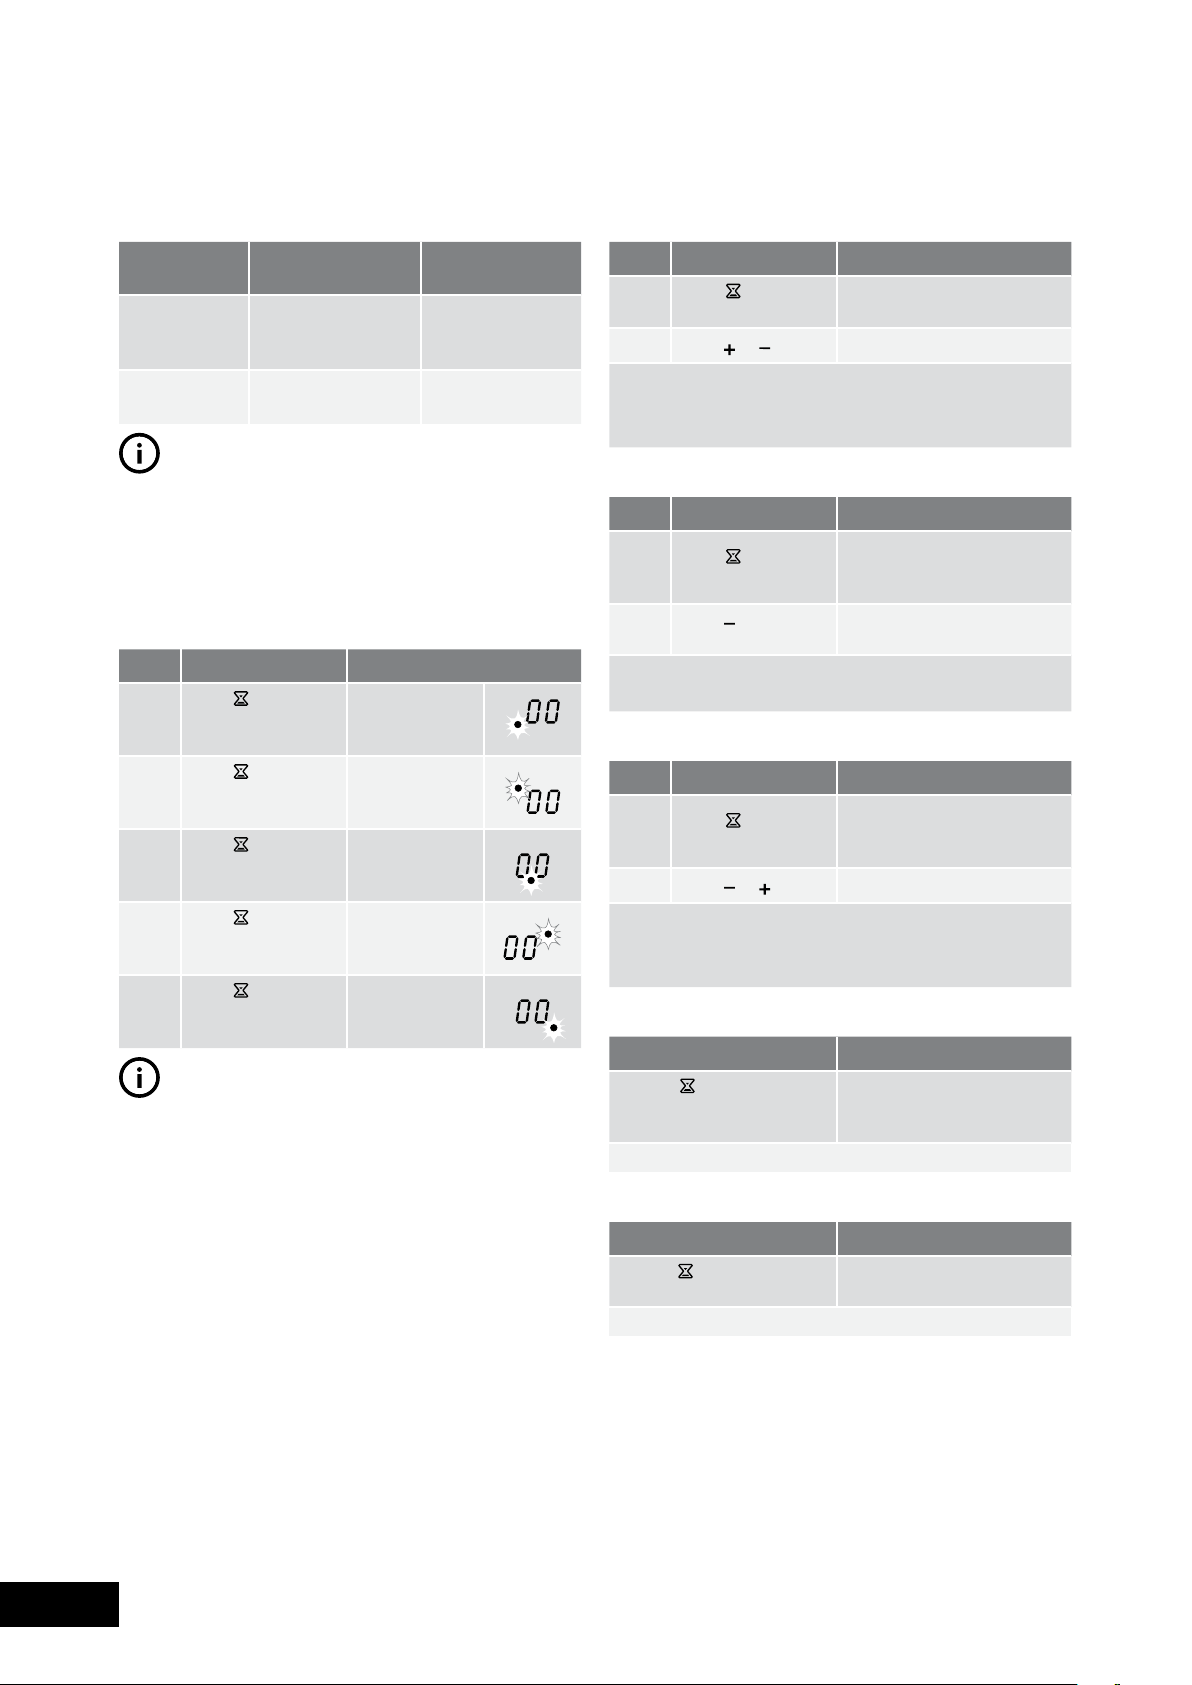
USING THE TIMER
FUNCTION CONDITION
OUTCOME AFTER THE
TIME HAS LAPSED
00
00
TIPS & INFORMATION
SELECTING A COOKING ZONE
STEP CONTROL PANEL
DISPLAY
TIPS & INFORMATION
SETTING THE TIME
STEP CONTROL PANEL
DISPLAY
0099
SWITCHING OFF THE TIMER FUNCTION
STEP CONTROL PANEL
DISPLAY
00
CHANGING THE TIME
STEP CONTROL PANEL
DISPLAY
0199
DISPLAYING THE TIME REMAINING FOR A COOKING ZONE
CONTROL PANEL FIELD
DISPLAY
SWITCHING OFF THE ACOUSTIC SIGNAL
CONTROL PANEL FIELD
ACOUSTIC SIGNAL
USING YOUR CERAMIC COOKTOP
OPERATION
19
USING YOUR CERAMIC COOKTOP
AUTOMATIC SWITCH OFF
Cooking surface
Control panel
Cooking zones
HEAT SETTING
SWITCHES OFF AFTER
–
–
OPERATION

20
USAGE
USING YOUR OVEN
UNDERSTANDING YOUR OVEN FUNCTIONS
RAPID HEAT
Function 1
FAN BAKE
Function 2
BAKE/PIZZA
Function 3
Function 4
FAN ASSIST
Function 5
PIZZA
Function 6
BASE HEAT
21
USING YOUR OVEN
USAGE
Function 7
FAN GRILL
Function 8
GRILL
Function 9
Function 10
FAST HEAT UP
COOLING/VENTING FAN
CONDENSATION
NOTE: If you are using water in cooking, this will turn
to steam and may condense outside your appliance.
This is not a problem or fault with your oven.
DEFROST
MAXI GRILL
22
OPERATING THE PUSH BUTTON & TOUCH CONTROL CLOCK
MODELS WFE912 & WFE914 ONLY
GENERAL FEATURES
NOTE: Your touch control clock only operates with
your main oven.
SETTING THE TIME OF DAY
I
I
NOTE: The clock has a 24-hour display.
CHANGE THE TIME OF DAY (DAYLIGHT SAVING)
I
I
SETTING THE TIMER
I
I
USAGE
USING YOUR OVEN
OPERATING YOUR OVEN TEMPERATURE AND FUNCTION SELECTORS
MODELS WFE912 & WFE914
PREHEATING YOUR OVEN WITH “RAPID HEAT”
MODEL WFE912
MODEL WFE914

23
USING YOUR OVEN
USAGE
SETTING THE COOKING DURATION
I
I
NOTE: Do not forget to add preheating time if necessary.
SETTING THE COOKING END TIME
I
I
SETTING THE DELAYED START COOKING TIME
TO CHECK OR CANCEL SETTINGS
ON COMPLETION OF COOKING
SWITCHING THE CLOCK DISPLAY ON AND OFF
NOTE: If a timer mode is set, then it is not possible to
switch the display off.
24
USAGE
USING YOUR OVEN
SETTING THE TIME OF DAY
NOTE: The clock has a 24-hour display.
CHANGE THE TIME OF DAY (DAYLIGHT SAVING)
SETTING THE OVEN FUNCTION
CHANGING THE OVEN TEMPERATURE
NOTE: The temperature can only be adjusted when the
degrees symbol “°” is flashing. The temperature setting
changes in increments of 5°C. To change the temperature
after the degrees symbol “°” stops flashing, press the
“Function” and then press the – or + to change the
temperature.
SETTING THE COOKING TIME
❘➔❘
SETTING THE STOP TIME
➔❘
SETTING THE DELAYED START COOKING TIME
❘➔❘
➔❘
❘➔❘
➔❘
USING YOUR PROGRAMMABLE CONTROLLER TO OPERATE THE OVEN
ON/OFF
FUNCTION
FAST HEAT UP
O
F
F
H
L
O
I
ON/OFF
FUNCTION
FAST HEAT UP
O
F
F
H
L
O
I
H
L
O
I
O
F
F
O
F
F
H
L
O
I
O
F
F
H
L
O
I
O
F
F
H
L
O
I
MODELS WFE946 & WVE916
MODEL WFE916

25
USAGE
USING YOUR OVEN
ON COMPLETION OF COOKING
SETTING THE MINUTE MINDER
NOTE: This feature has no effect on the oven operation.
DEMONSTRATION MODE – PROGRAMMABLE CONTROLLER MODELS
USING FHU (FAST HEAT UP) MODE
NOTE: The temperature can only be adjusted when
the degrees symbol “°” is flashing.
NOTE: “FHU” cannot be selected if the oven temperature
is above the preset temperature.
ACTIVATING THE CHILD-PROOF LOCK
NOTE: When the child-proof lock function is active the
time of day and minute minder can only be set.
RELEASING THE CHILD-PROOF LOCK
BEEP ON TOUCH
SAFETY CUT-OUT FEATURE

26
OPERATION
COOKING TEST
GET TO KNOW YOUR NEW OVEN WITH THIS ‘SIMPLE TEST CAKE’
‘SIMPLE TEST CAKE’
METHOD:
FOOT NOTE:
If desired substitute butter for either margarine or olive
oil spread. Recipe is based on the Australian standard
metric 250ml cup and 20ml tablespoon sets.
27
COOKING GUIDE
COOKING
OVEN SHELF LOCATION
28
COOKING
COOKING GUIDE
CHOOSING THE BEST OVEN SETTINGS
MODES WITHOUT OVEN FAN
FOOD TEMPERATURE C OVEN SHELF POSITION* TIME IN MINUTES
MODES WITH OVEN FAN
FOOD TEMPERATURE C OVEN SHELF POSITION* TIME IN MINUTES
SINGLE SHELF MULTI SHELF
29
COOKING GUIDE
COOKING
ROASTING MEAT
MEAT RECOMMENDED TEMPERATURE MINUTES PER
KILOGRAM
ROASTING POULTRY AND FISH
POULTRY &
FISH
RECOMMENDED TEMPERATURE MINUTES PER
KILOGRAM
GRILLING GUIDE
NOTE: Always clean the grill/oven dish after every use.
Excessive fat build up may cause a fire.
GRILLING IS CONDUCTED WITH THE OVEN DOOR CLOSED
OVEN/GRILL DISH WITH
WIRE RACK INSERT
WARNING
GUIDE TO BETTER GRILLING
FAN GRILL
30
COOKING
PROBLEMS
PROBLEM CAUSES REMEDIES
DEALING WITH COOKING PROBLEMS
(SEE ALSO SOLVING PROBLEMS)

31
CLEANING
WARNING
STAINLESS STEEL
WARNING
NOTE: Make sure you follow the polish or brushing lines
in the stainless steel.
GLASS
WARNING
GAS HOTPLATE
CERAMIC HOTPLATE
NOTE: Items with high sugar content not only include jam
and fruit, but also vegetables such as peas, tomatoes
and carrots.
OVEN
GRILL
CLEANING YOUR APPLIANCE
32
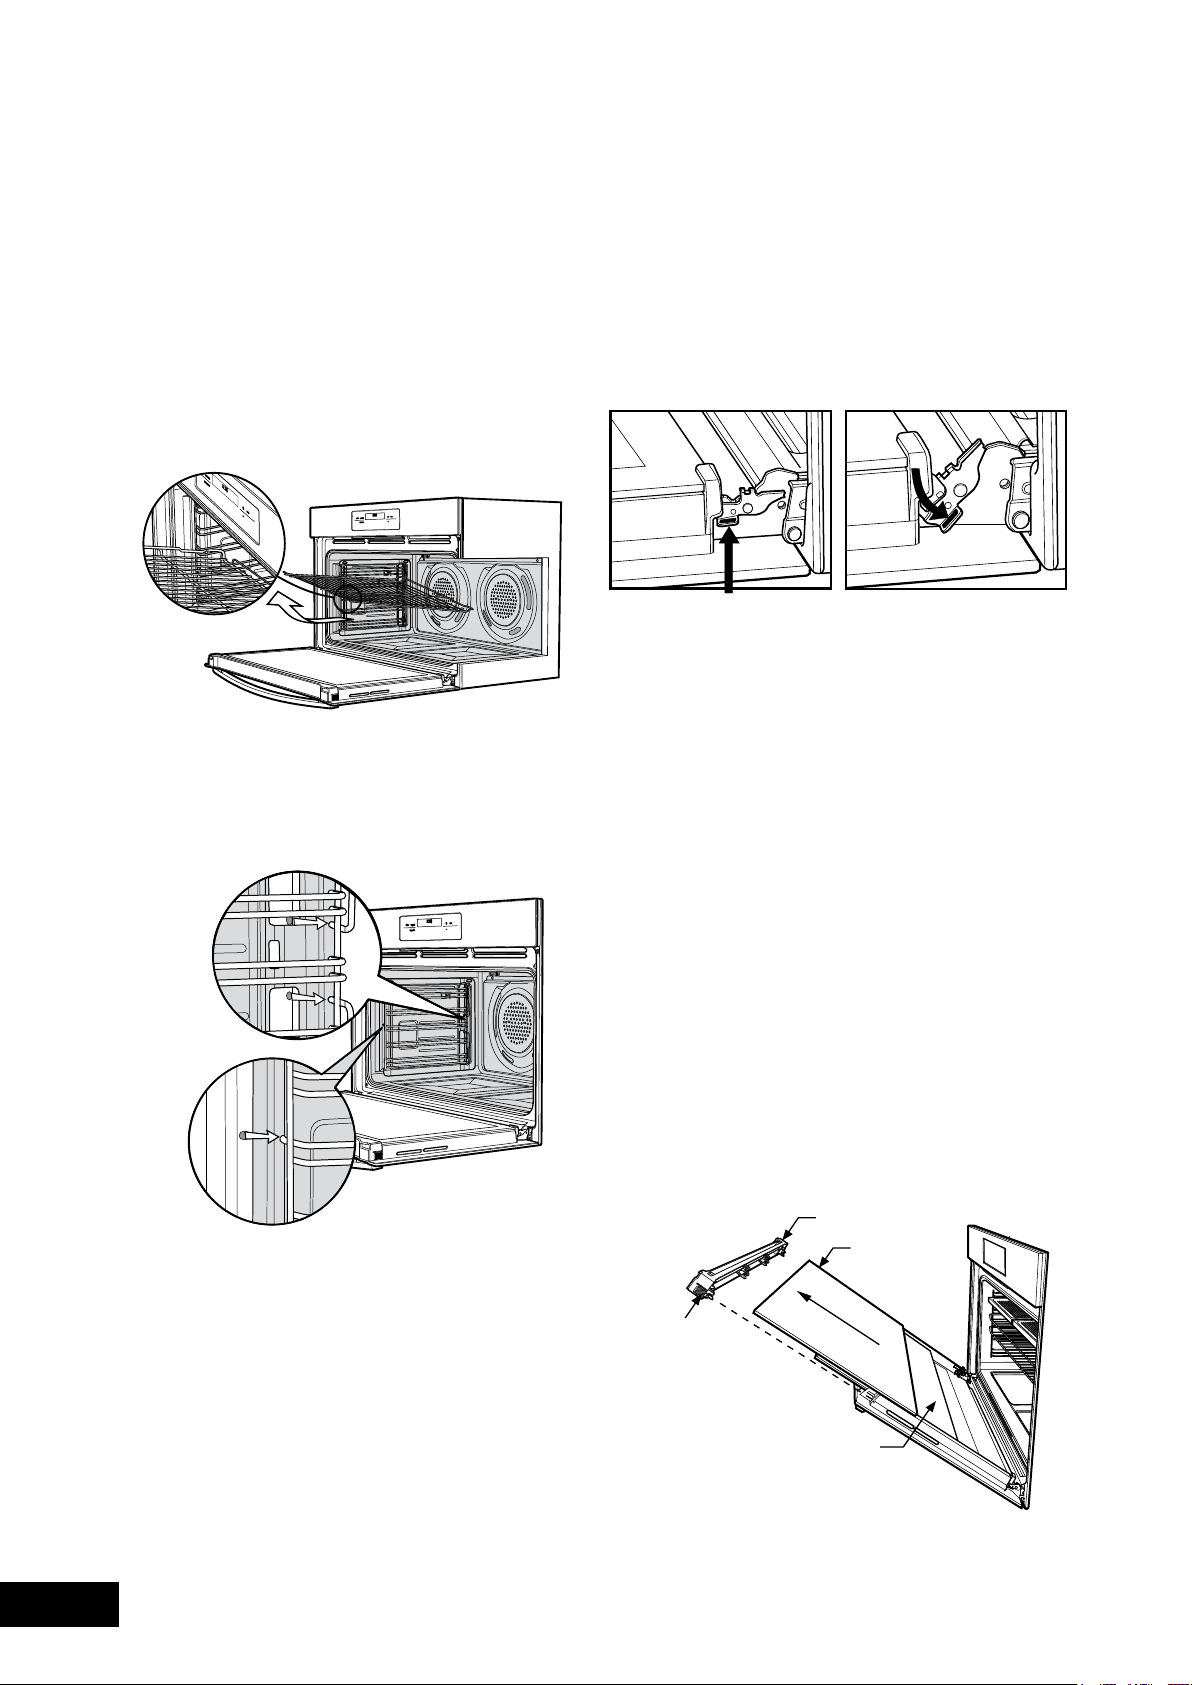
CLEANING YOUR OVEN ACCESSORIES
REMOVING THE TRAYS AND SHELVES FROM YOUR APPLIANCE
REMOVING THE SIDE RACKS OR SHELF SUPPORTS
CLEANING YOUR OVEN DOOR
Door top trim
Inner glass
Press here on each
side to release trim clips
Middle glass
CLEANING
33
CLEANING
CLEANING YOUR OVEN DOOR
WARNING
WARNING
CLEANING YOUR OVEN ACCESSORIES
CHANGING THE LIGHT GLOBE
34
OPERATION
CLEANING
WARNING
REMOVING THE CATALYTIC LINERS
CATALYTIC LINERS (WHERE FITTED)
STORAGE COMPARTMENT (SELECTED MODELS)
WARNING
WVE916SA
CLEANING
35
STORAGE
FAULTS
NOTE: We may charge for service even in the guarantee
period if your problem is due to the causes listed below.
PROBLEM POSSIBLE CAUSE WHAT TO DO
SOLVING PROBLEMS
FURTHER INFORMATION
NOTE: Only authorised personnel should carry out servicing. If the household fuse continues to blow, call the Customer Care Centre.
In the event of a power failure the gas burners may be lit with a hand held igniter and used. Take care to avoid letting unburnt gas
flow for more than 5 seconds when attempting to light the burner.
36
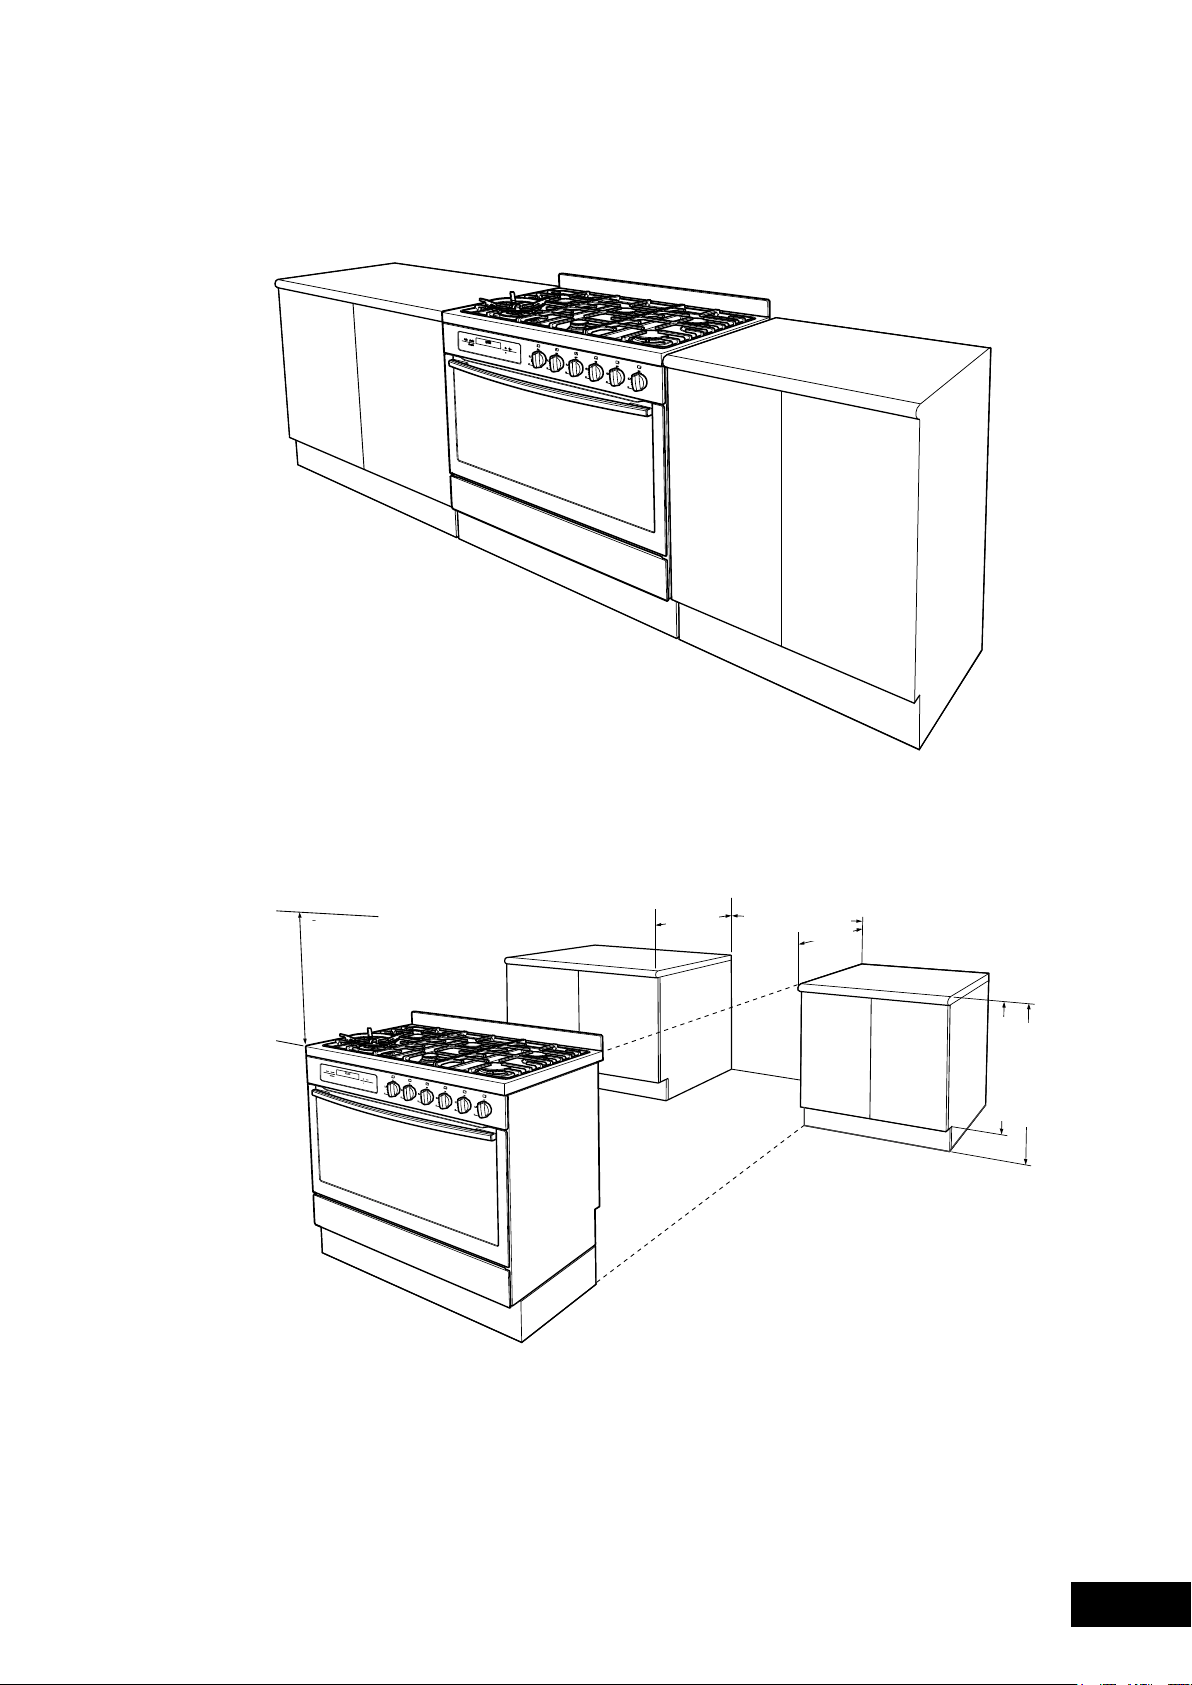
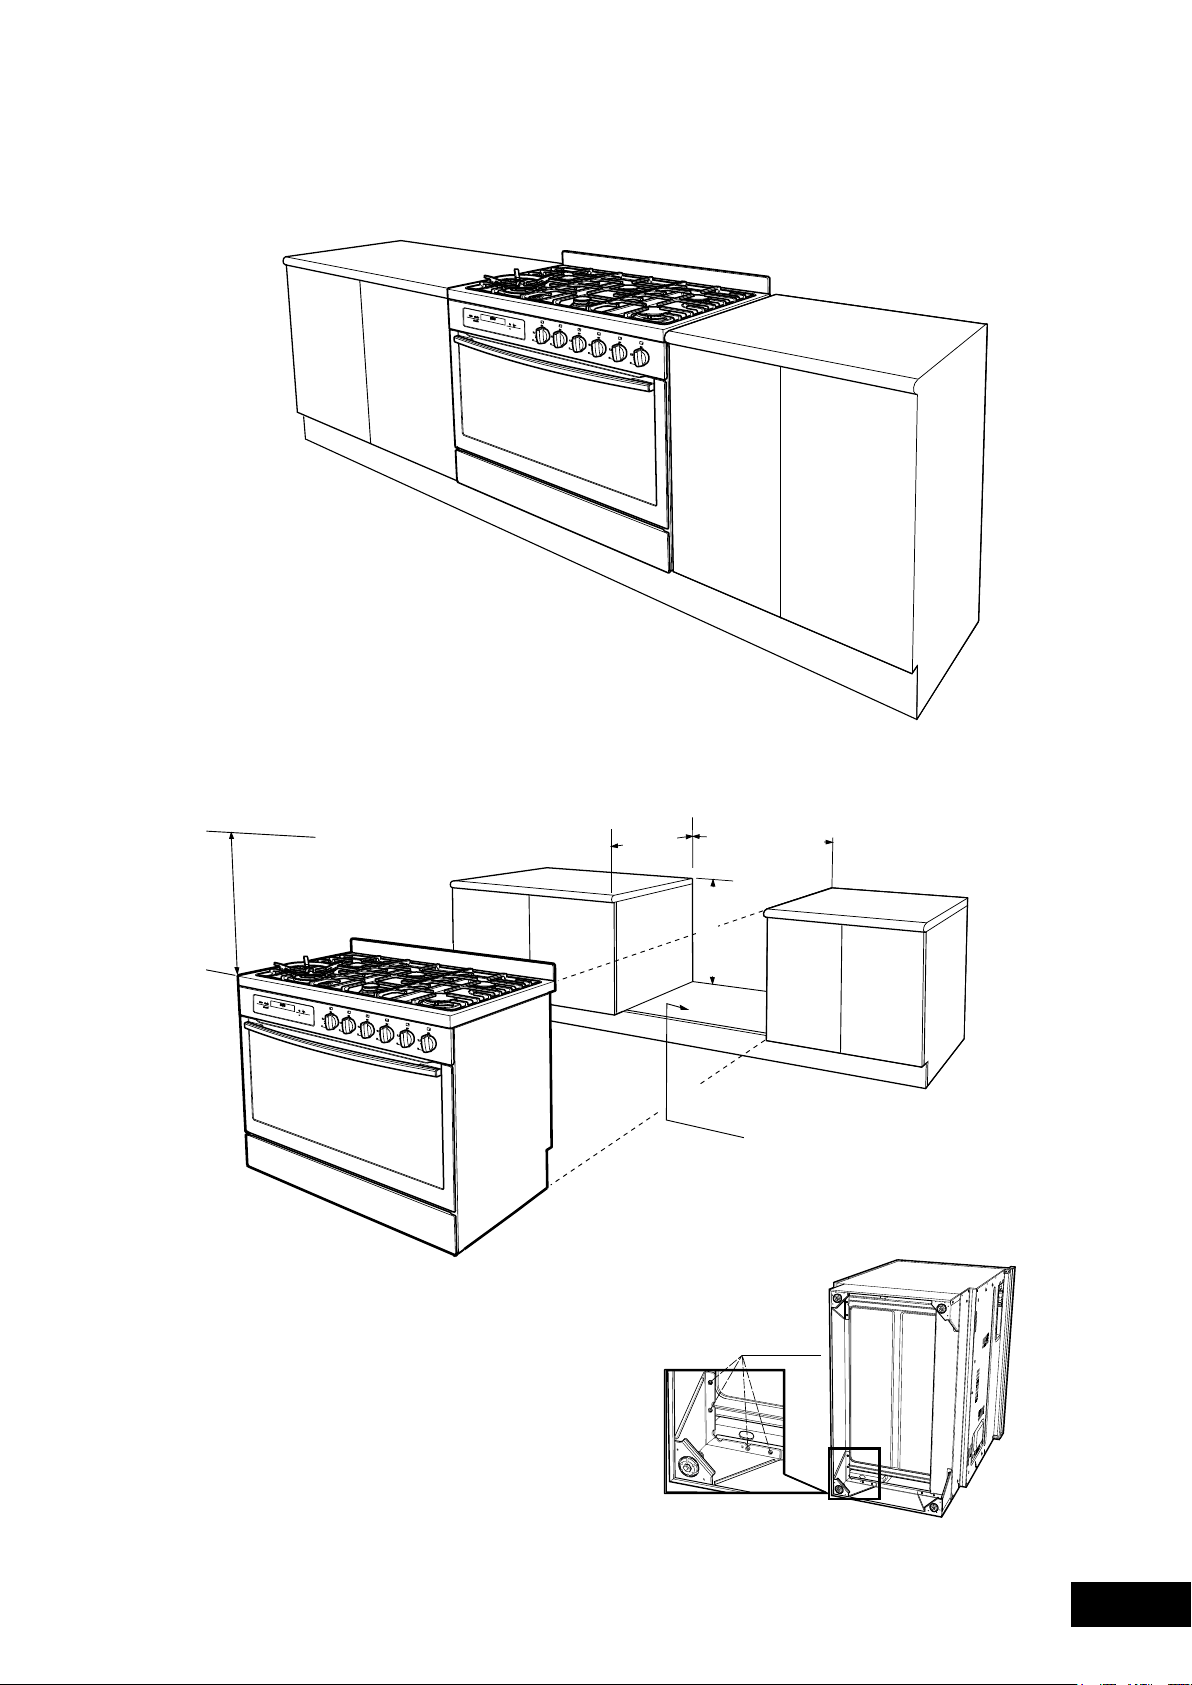
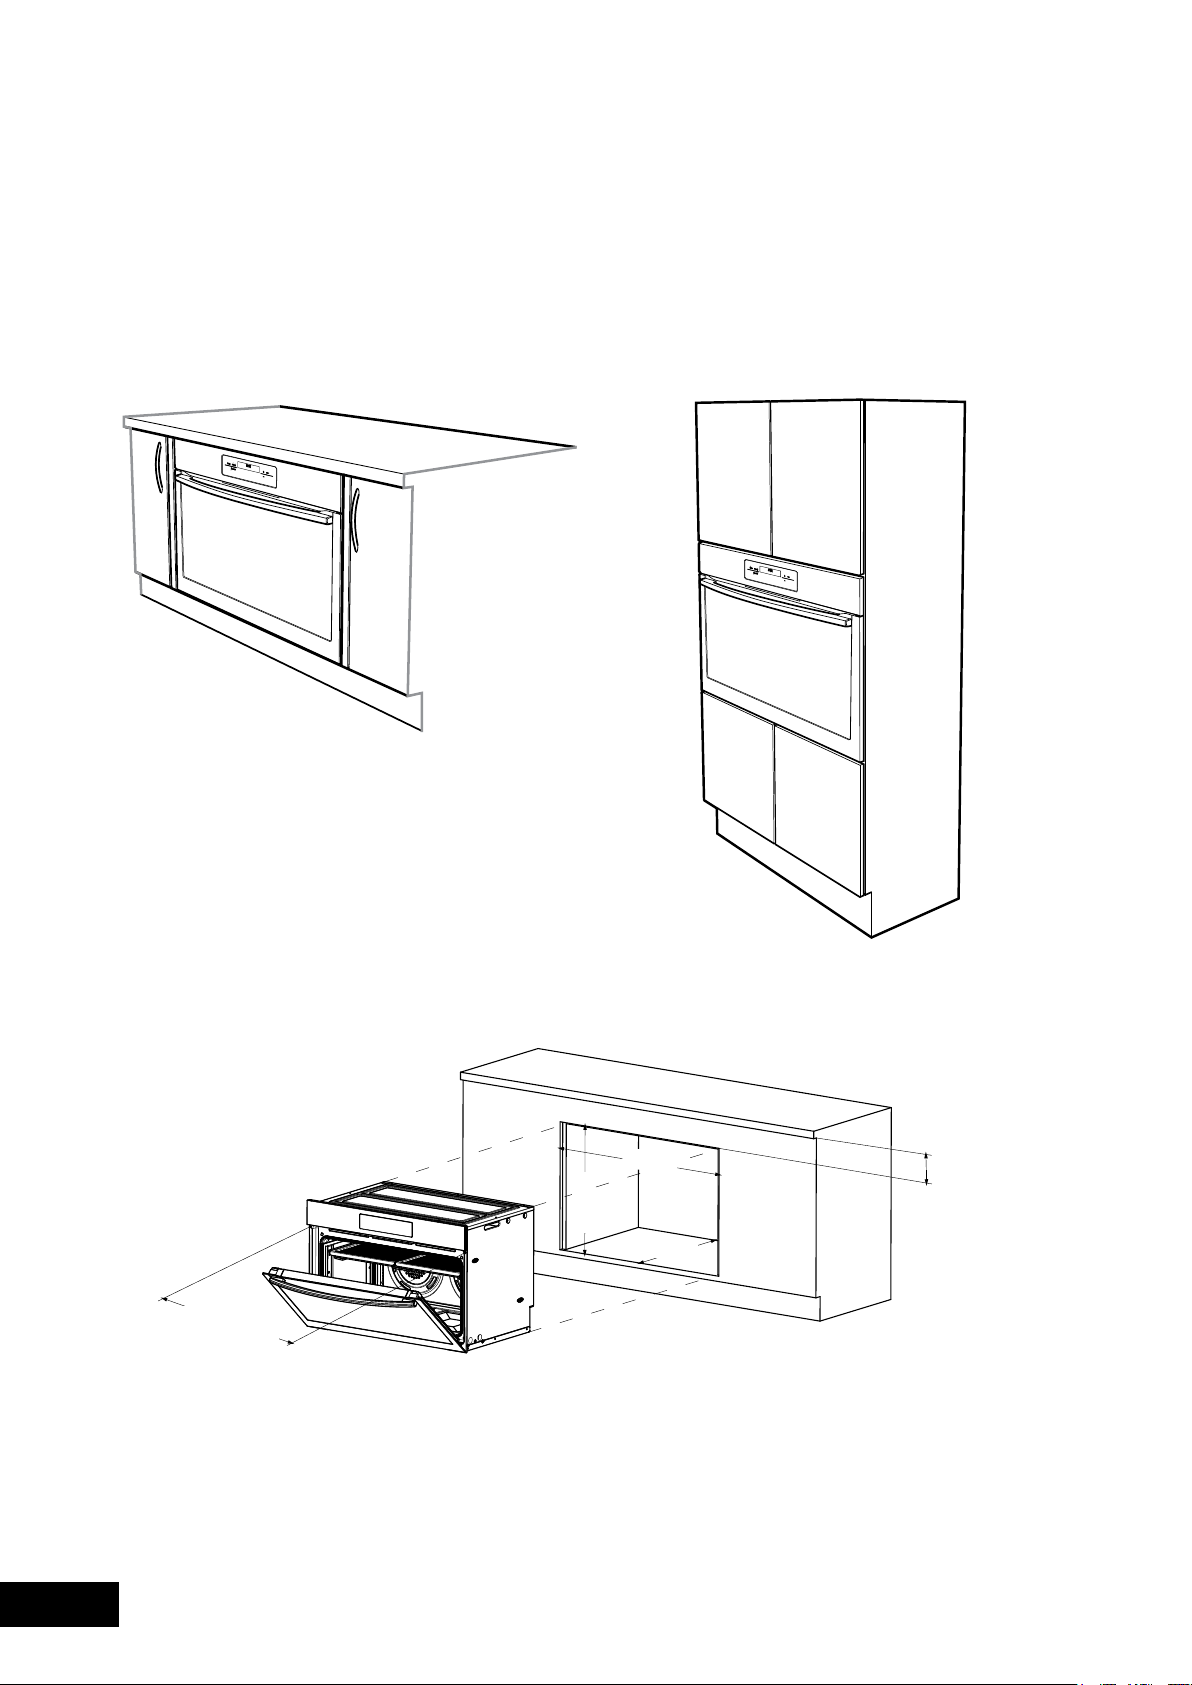
PROBLEMS
INSTALLATION OF THE APPLIANCE
CABINET REQUIREMENTS
WARNING
GAS MODEL CLEARANCE REQUIREMENTS
MODELS WFE912, WFE914 &WFE916
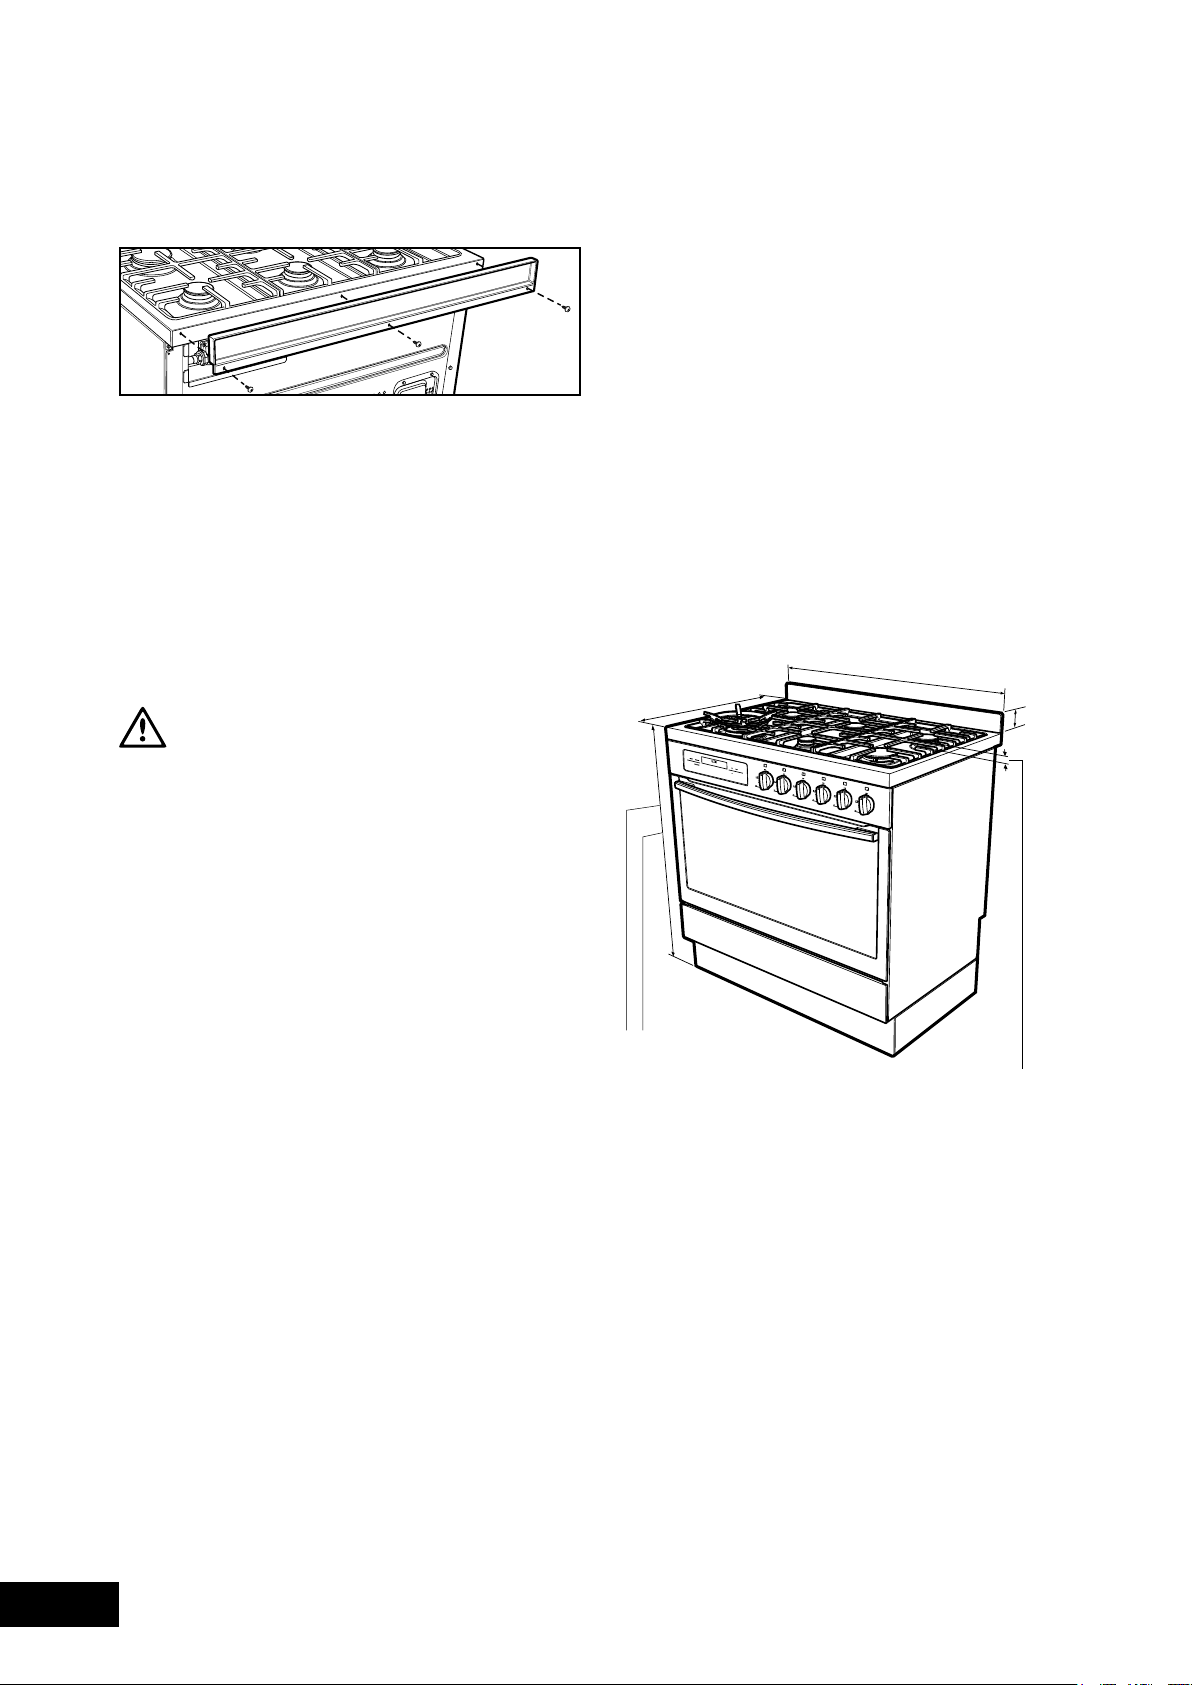
INSTALLING SPLASHBACK (MODELS WITH HOB ONLY)
37
INSTALLATION
INSTALLATION OF THE APPLIANCE
600mm minimum
vertical clearance
from combustible
surfaces
600mm
900mm minimum
755mm NOM
900mm NOM
600mm
FREESTANDING INSTALLATION
38
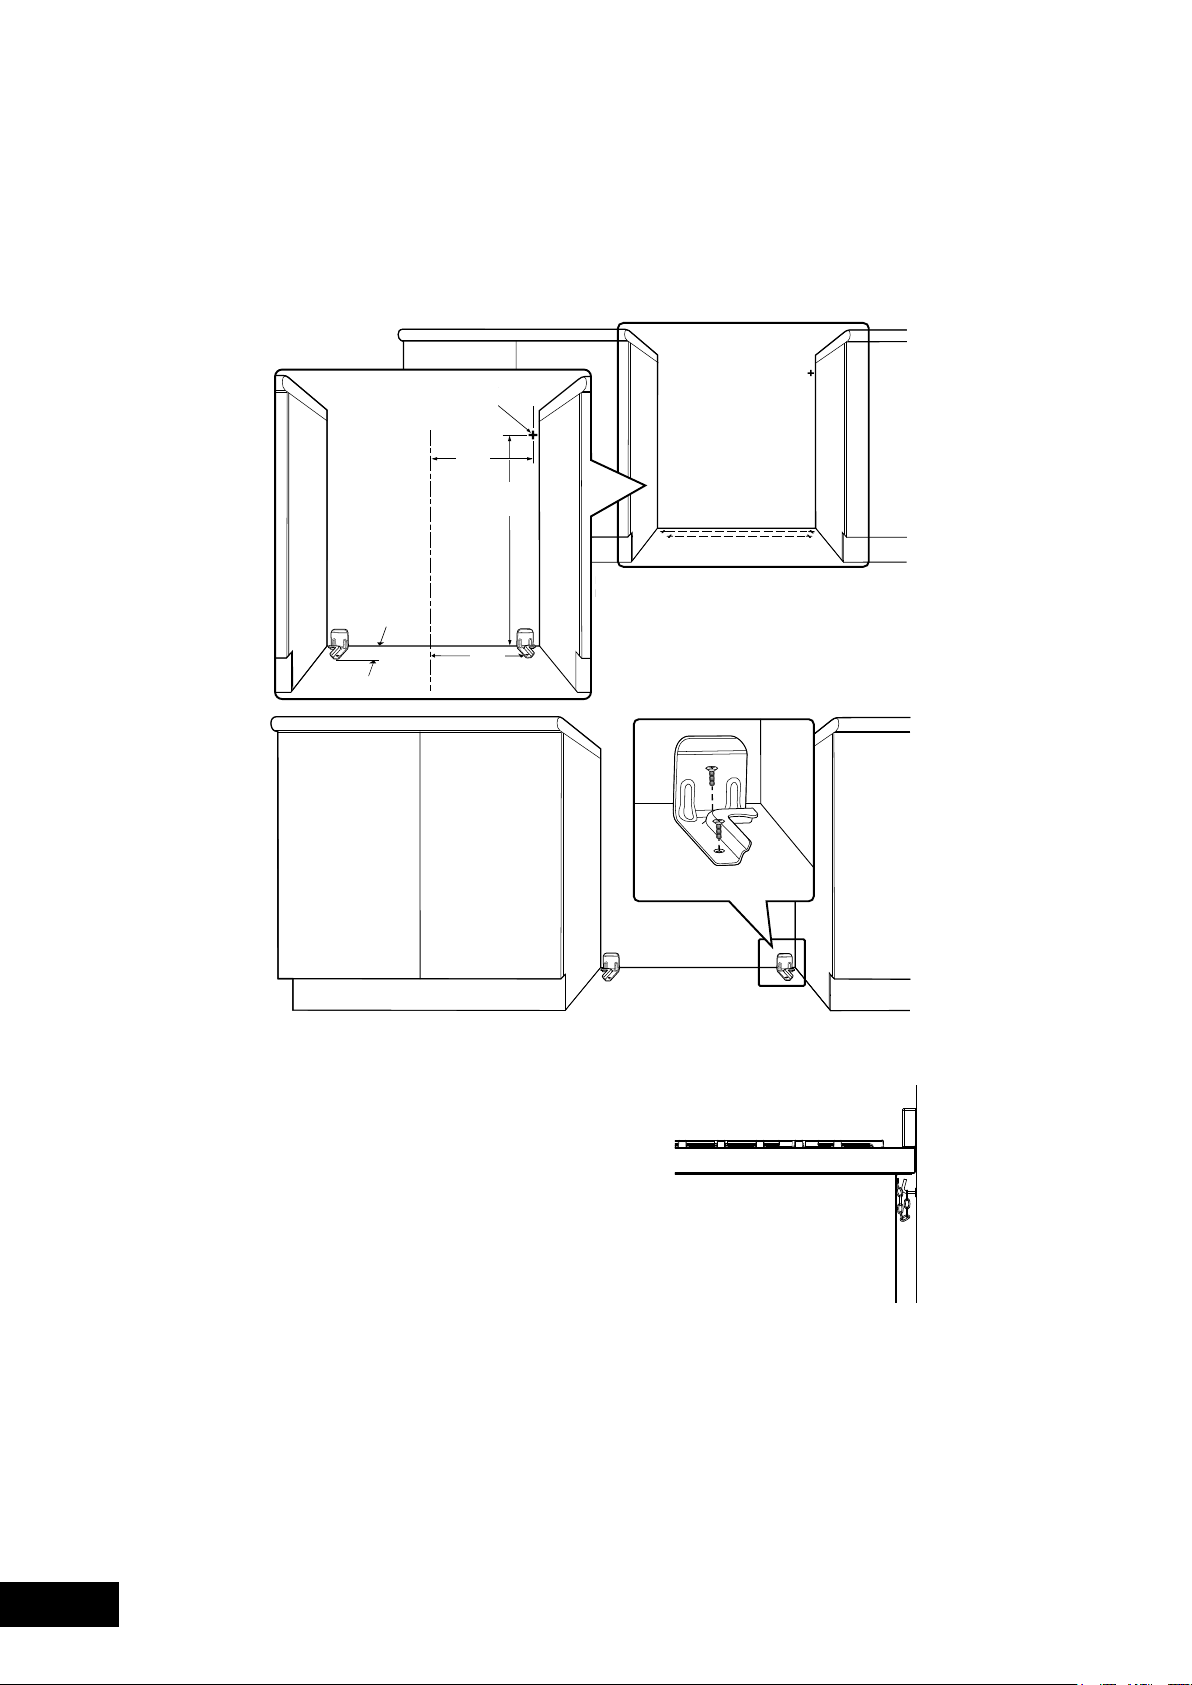
INSTALLATION
INSTALLATION OF ANTI-TILT BRACKETS AND HOOK
INSTALLATION OF THE APPLIANCE
Hook
Measurements are to be adjusted to account for the thickness of any skirting
board or tiles coming between the back of the appliance and the wall.
C
L
425
194
376
FREESTANDING INSTALLATION (continued)
39
INSTALLATION
SLOT-IN INSTALLATION
INSTALLATION OF THE APPLIANCE
TO REMOVE THE APPLIANCE KICK PANEL
Remove 4 screws on
each corner bracket
SLOT IN CONVERSION
This surface is to be level
with the top edge of the kickboard
600mm minimum
vertical clearance
from combustible
surfaces
600mm
900mm minimum
755mm maximum
895mm
40
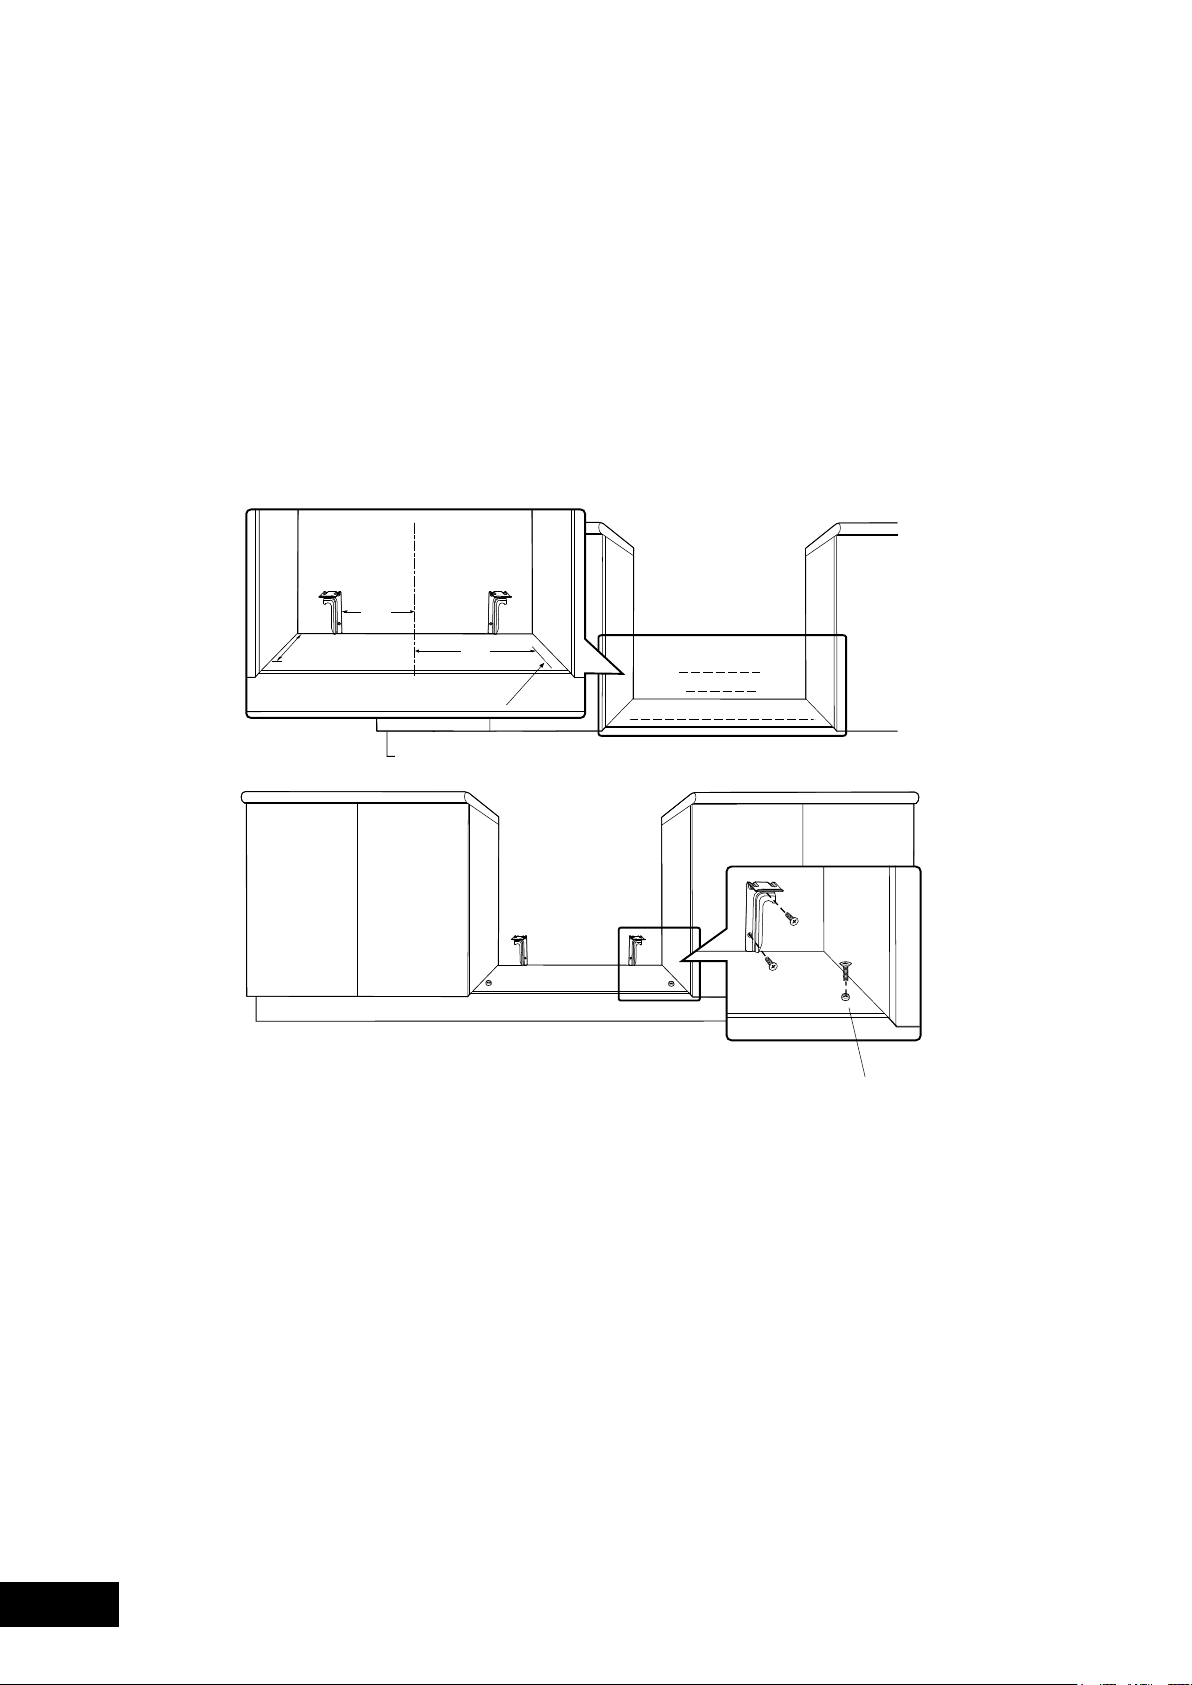
INSTALLATION
INSTALLATION OF THE APPLIANCE
INSTALLATION OF ANTI-TILT BRACKETS AND STOPS
+
+
+
+
+
+
+
+
Location of
holes for front stops
Measurements are to be adjusted to account for the thickness of any skirting
board or tiles coming between the back of the appliance and the wall.
4
7
5
C
L
414
183
INSTALLATION SEQUENCE FOR FREESTANDING
OR SLOT IN INSTALLATION
SLOT-IN INSTALLATION (continued)

41
INSTALLATION
BUILT-IN INSTALLATION
CABINET CONSTRUCTION FOR BUILT IN OVEN
NOTE: Your appliance must be mounted on a flat surface
for the full width and depth of the product.
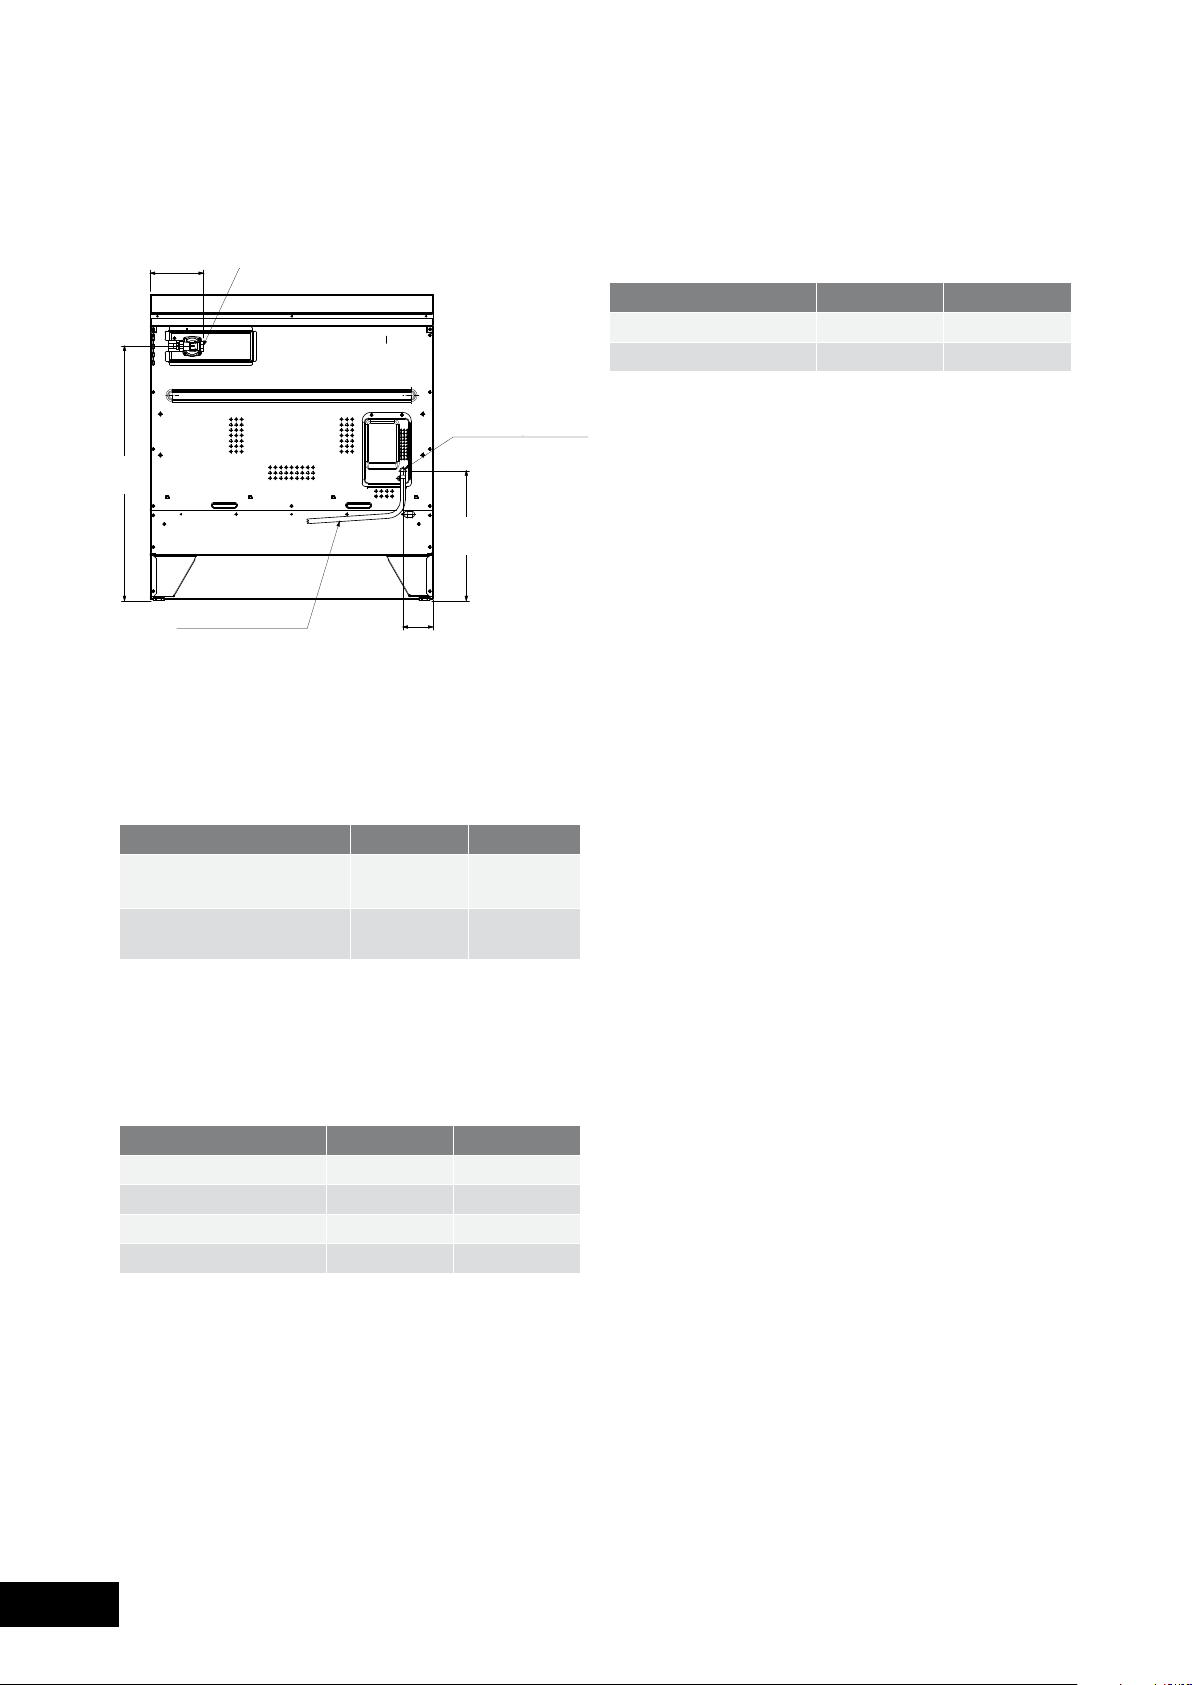
Oven Dimensions
42
INSTALLATION
INSTALLATION OF THE APPLIANCE
NOTE: If a power point is fitted it must be accessible with
the appliance installed.
UNDERBENCH INSTALLATION
VERTICAL CABINET INSTALLATION
43
INSTALLATION
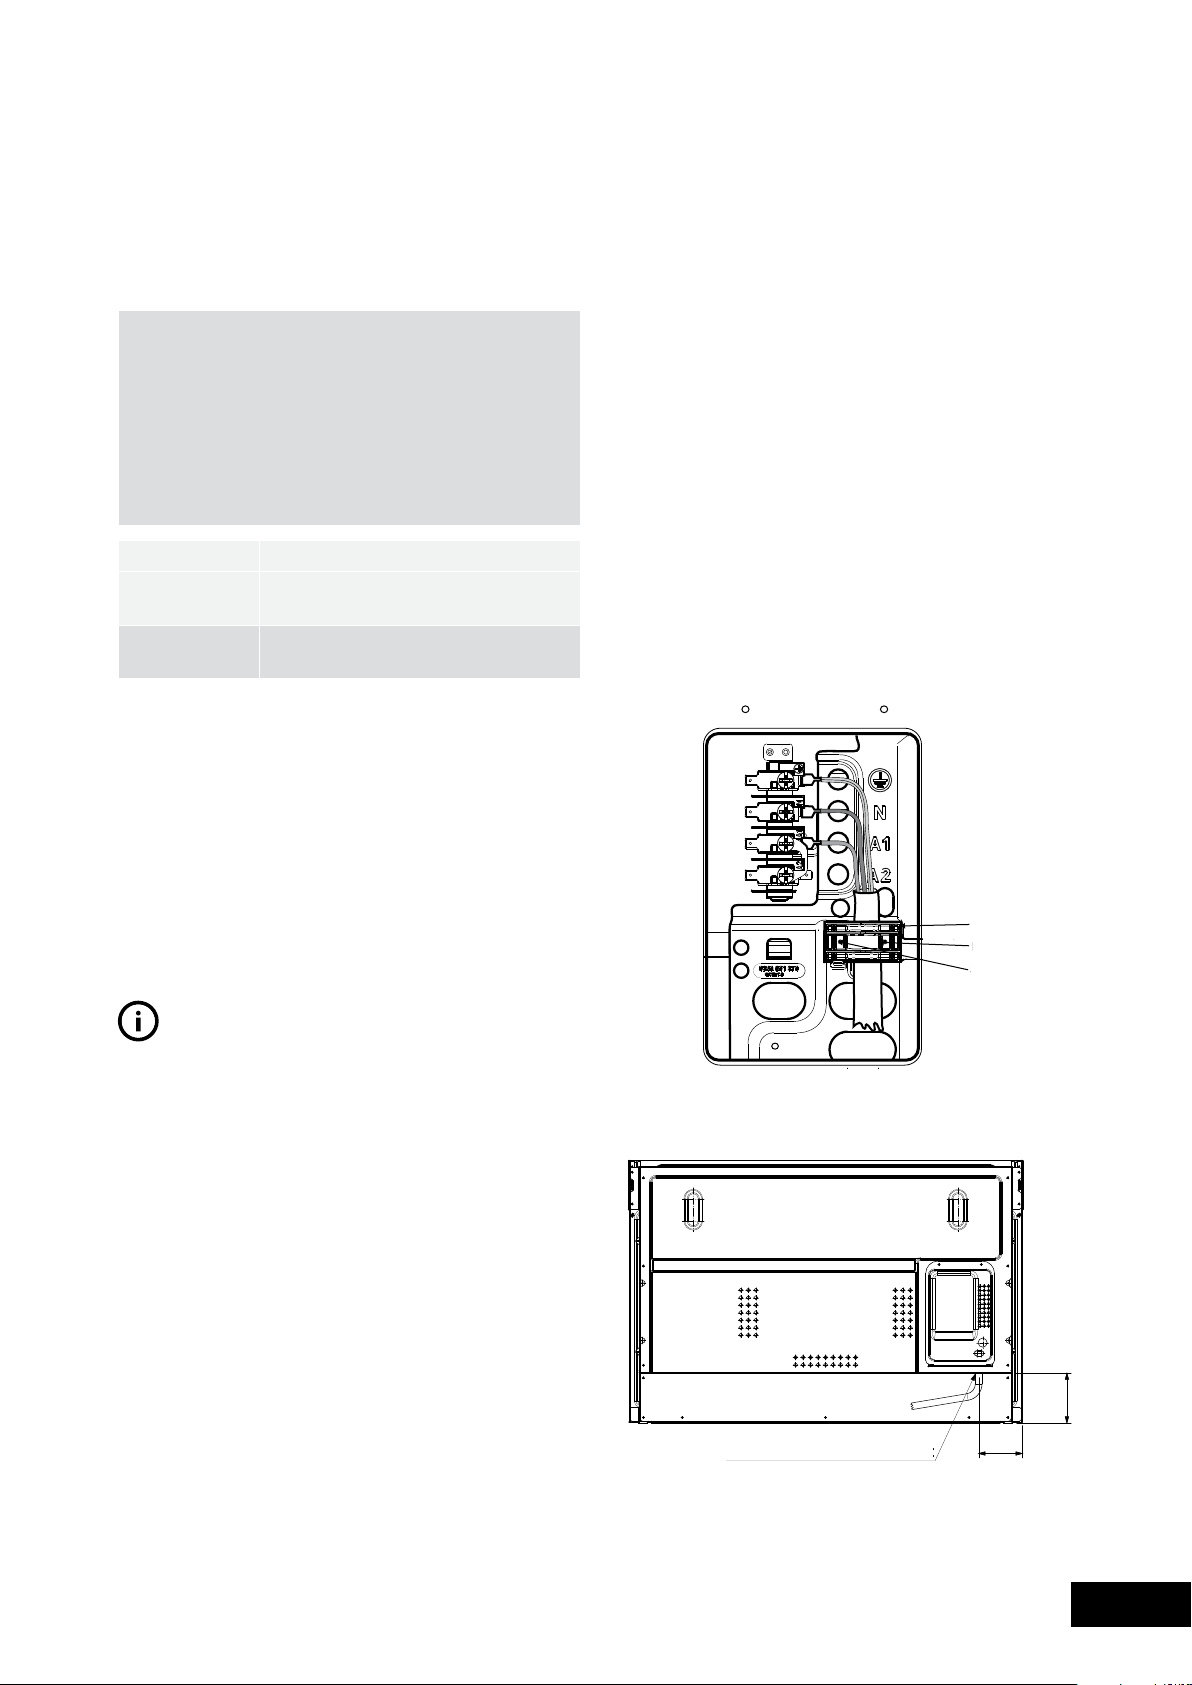
WIRING REQUIREMENTS
For New Zealand Only:
NOTE : When connections are made to a multi-phase
230/240V supply, the bridge piece MUST be
removed from between the active connections.
TIPS & INFORMA
TION
BEFORE YOU COOK IN YOUR NEW OVEN IT IS IMPORTANT
THAT THE PROTECTIVE OILS USED IN THE MANUFACTURE OF THE
PRODUCT BE REMOVED.
CONNECTING TO SERVICES AND COMMISSIONING
HARD WIRING DETAIL
ELECTRICAL CONNECTION LOCATION - MODEL WVE916
44
ELECTRICAL & GAS CONNECTION LOCATIONS
INSTALLING THE GAS COOKER
GAS TYPE NATURAL GAS UNIVERSAL LPG
INJECTOR ORIFICE NATURAL GAS UNIVERSAL LPG
GAS CONNECTION
CHECKING PIPING SIZE
GAS TYPE NATURAL GAS UNIVERSAL LPG
NOTE: AS/NZS5601.1 will help you with this matter.
INSTALLATION
MODELS WFE912, WFE914, WFE916 AND WFE946
GAS PRESSURES
45
INSTALLATION
LPG CONVERSION
MODELS WFE912, WFE914 & WFE916

46
TESTING THE OPERATION OF THE GAS COOKER
NOTE: You MUST test the cooker after installation, before
you hand it over to the customer. You MUST have a
manometer and a connecting tube.
CHECKING GAS SUPPLY
NOTE: It will take additional time to light the gas for the
first time as air needs to be purged from the pipes.
CHECKING THE FUNCTION OF THE REGULATOR
TESTING THE COOKER FEATURES
NOTE: When flame is unsatisfactory, then refer to the
Electrolux Technical Publications and correct the fault,
if possible.
NOTE: If the cooker cannot be adjusted to perform
correctly, then inform the customer of the problem and
put a warning notice on the cooker. If the problem is
dangerous, then disconnect the cooker. If there is a
fault, then the customer should be advised to contact the
manufacturer’s local service organisation or the retailer.
INSTALLATION
47
INSTALLATION
1. In this warranty
(a) ‘acceptable quality’ as referred to in clause 10 of this warranty has
the same meaning referred to in the ACL;
(b) ‘ACL’ means Trade Practices Amendment (Australian Consumer
Law) Act (No.2) 2010;
(c) ‘Appliance’ means any Electrolux product purchased by you
accompanied by this document;
(d) ‘ASC’ means Electrolux’ authorised serviced centres;
(e) ‘Electrolux’ means Electrolux Home Products Pty Ltd of 163
O’Riordan Street, Mascot, NSW 2020, ABN 51 004 762 341 in
respect of Appliances purchased in Australia and Electrolux (NZ)
Limited of 3-5 Niall Burgess Road, Mount Wellington, in respect
of Appliances purchased in New Zealand;
(f) ‘major failure’ as referred to in clause 10 of this warranty has the
same meaning referred to in the ACL and includes a situation when
an Appliance cannot be repaired or it is uneconomic for Electrolux, at
its discretion, to repair an Appliance during the Warranty Period;
(g) ‘Warranty Period’ means:
(i) where the Appliance is used for personal, domestic or household
use (i.e. normal single family use) as set out in the instruction
manual, the Appliance is warranted against manufacturing
defects in Australia for 24 months and in New Zealand for 24
months, following the date of original purchase of the Appliance;
(ii) where the Appliance is used for commercial purposes (including
being used to directly assist a business or where the Appliance is
used in a multi-family communal or share type environment), the
Appliance will then be warranted against manufacturing defects
in Australia for 3 months and in New Zealand for 3 months,
following the date of original purchase of the Appliance.
(h) ‘you’ means the purchaser of the Appliance not having purchased
the Appliance for re-sale, and ‘your’ has a corresponding meaning.
2. This warranty only applies to Appliances purchased and used in Australia
or New Zealand and is in addition to (and does not exclude, restrict, or
modify in any way) any non-excludable statutory warranties in Australia
or New Zealand.
3. During the Warranty Period Electrolux or its ASC will, at no extra charge
if your Appliance is readily accessible for service, without special
equipment and subject to these terms and conditions, repair or replace
any parts which it considers to be defective. Electrolux or its ASC may
use remanufactured parts to repair your Appliance. You agree that
any replaced Appliances or parts become the property of Electrolux.
This warranty does not apply to light globes, batteries, lters or similar
perishable parts.
4. Parts and Appliances not supplied by Electrolux are not covered by
this warranty.
5. You will bear the cost of transportation, travel and delivery of the
Appliance to and from Electrolux or its ASC. If you reside outside of the
service area, you will bear the cost of:
(a) travel of an authorised representative;
(b) transportation and delivery of the Appliance to and from Electrolux or
its ASC,
In all instances, unless the Appliance is transported by Electrolux or an
Electrolux authorised representative, the Appliance is transported at the
owner’s cost and risk while in transit to and from Electrolux or its ASC.
6. Proof of purchase is required before you can make a claim under
this warranty.
7. You may not make a claim under this warranty unless the defect claimed
is due to faulty or defective parts or workmanship. Electrolux is not liable
in the following situations (which are not exhaustive):
(a) the Appliance is damaged by:
(i) accident
(ii) misuse or abuse, including failure to properly maintain or service
(iii) normal wear and tear
(iv) power surges, electrical storm damage or incorrect power supply
(v) incomplete or improper installation
(vi) incorrect, improper or inappropriate operation
(vii) insect or vermin infestation
(viii) failure to comply with any additional instructions supplied with
the Appliance;
(b) the Appliance is modied without authority from Electrolux in writing;
(c) the Appliance’s serial number or warranty seal has been removed
or defaced;
(d) the Appliance was serviced or repaired by anyone other than
Electrolux, an authorised repairer or ASC.
8. This warranty, the contract to which it relates and the relationship
between you and Electrolux are governed by the law applicable where
the Appliance was purchased. Where the Appliance was purchased in
New Zealand for business purposes the Consumer Guarantee Act does
not apply.
9. To the extent permitted by law, Electrolux excludes all warranties and
liabilities (other than as contained in this document) including liability for
any loss or damage whether direct or indirect arising from your purchase,
use or non use of the Appliance.
10. For Appliances and services provided by Electrolux in Australia,
the Appliances come with a guarantee by Electrolux that cannot be
excluded under the Australian Consumer Law. You are entitled to a
replacement or refund for a major failure and for compensation for any
other reasonably foreseeable loss or damage. You are also entitled to
have the Appliance repaired or replaced if the Appliance fails to be of
acceptable quality and the failure does not amount to a major failure.
The benets to you given by this warranty are in addition to your other
rights and remedies under a law in relation to the Appliances or services
to which the warranty relates.
11. At all times during the Warranty Period, Electrolux shall, at its discretion,
determine whether repair, replacement or refund will apply if an
Appliance has a valid warranty claim applicable to it.
12. For Appliances and services provided by Electrolux in New Zealand,
the Appliances come with a guarantee by Electrolux pursuant to the
provisions of the Consumer Guarantees Act, the Sale of Goods Act and
the Fair Trading Act.
13. To enquire about claiming under this warranty, please follow these steps:
(a) carefully check the operating instructions, user manual and the terms
of this warranty;
(b) have the model and serial number of the Appliance available;
(c) have the proof of purchase (eg an invoice) available;
(d) telephone the numbers shown below.
14. You accept that if you make a warranty claim, Electrolux and its ASC
may exchange information in relation to you to enable Electrolux to meet
its obligations under this warranty.
Warranty
FOR SALES IN AUSTRALIA AND NEW ZEALAND
APPLIANCE: BUILT-IN OVEN, COOKTOP
AND FREESTANDING COOKER
Before calling for service, please ensure that the steps listed in point 13 above have been followed.
or to nd the address of your nearest
state service centre in Australia
For the cost of a local call (Australia only)
ELECTROLUX HOME PRODUCTS
www.electrolux.com.au
or to nd the address of your nearest
state spare parts centre in Australia
For the cost of a local call (Australia only)
or to nd the address of your nearest
authorised service centre in New Zealand
(New Zealand only)
ELECTROLUX HOME PRODUCTS
www.electrolux.co.nz
or to nd the address of your nearest
state spare parts centre in New Zealand
(New Zealand only)
GOV_Warr_Apr11
AUSTRALIA
NEW ZEALAND
For more information on all Westinghouse appliances,
or for dimension and installation information, call into your retailer,
phone or email our customer care team or visit our website:
TOP SERVICE
Westinghouse. We are part of the Electrolux family.
Share more of our thinking at www.electrolux.com