To ensure that critical air gaps are maintained under the appliance, we recommend that this appliance is mounted on a solid base and that the feet do not sink into any carpet or soft flooring.
The kitchen floor must be able to carry the weight of the appliance plus the additional weight of cookware and bake ware and food.
If an appliance hood is to befitted, refer to the manufacturer's instructions regarding fixing height.
The appliance corresponds to device class 1, i.e. it may be placed with the rear and one side to kitchen walls, kitchen furniture or equipment of any size. The kitchen furniture or equipment on the other side may only be of the same size or smaller.
Any kitchen furniture next to the appliance must be heat-resistant (212 °F min.).
Important notes to the consumer
Keep this manual for future reference.
As when using any range generating heat, there are certain safety precautions you should follow. These are listed in the front of this manual. Read and follow carefully.
Be sure your range is installed and grounded properly by a qualified installer or service technician.
To eliminate the need to reach over the cooktop, cabinet storage space above the cooktop should be avoided.
Important notes to the installer
Read manual before installing the cooker. Observe all governing codes and ordinances. Be sure to leave these instructions with the consumer.
Be sure your range is installed and grounded properly by a qualified installer or service technician.
Do not install the range over carpeting unless you place an insulating pad or sheet of I/44 inch (0.64cm) thick plywood between the unit and carpeting.
For installation the appliance must be connected in accordance with all local electrical
The appliance must be placed directly on the floor. It must not be placed onto a base or a pedestal.
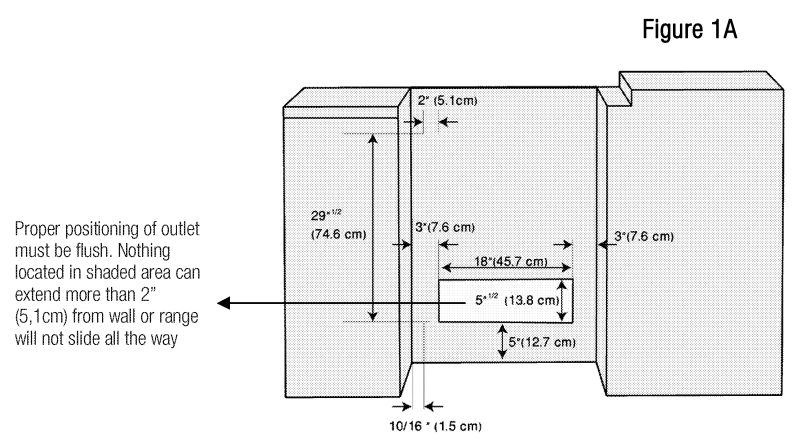
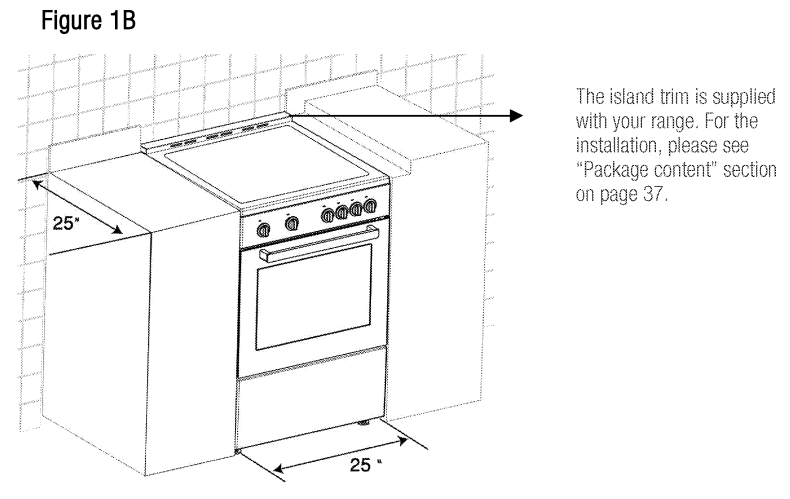
Clearances & Dimensions
Dimensions that are shown in figures 1 and 1A must be used. Given dimensions provide minimum clearance. There needs to be a 30-inch minimum clearance between the top of the cooking surface and the bottom of unprotected wood or metal cabinets or a 24-inch minimum when bottom of wood or metal cabinets are protected by not less than a 1/4-inch flame retardant millboard covered with not less than no. 29 msg sheet-steel, 0.015- inch stainless steel, 0.024-inch aluminum or 0.020-inch copper.
To eliminate the risk of burns or fire by reaching over heated surface units, cabinet storage space located above the surface units should be avoided. If cabinet storage is to be provided, the risk can be reduced by installing a range hood that projects horizontally a minimum of 5 inches beyond the bottom of the cabinets.
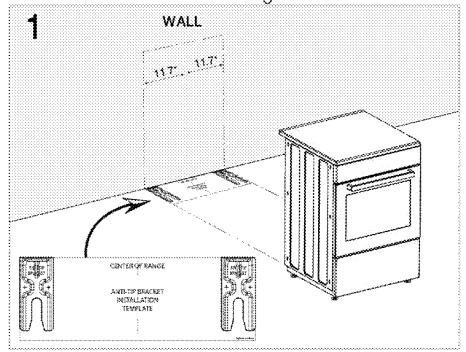
A package of anti-tip device is supplied with product. Anti-tip devices, screws, fixing plugs and anti-tip installation template is provided in this package,
Anti-tip brackets must be secured to both wall and floor and must be used for the both rear feet,
1.Place the back edge of the template against the wall behind the range.
2. Center the template in the gap in where the range will be installed.
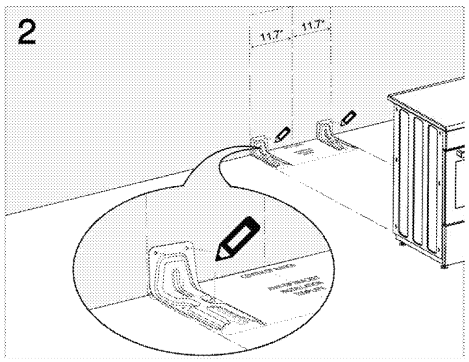
3. Place anti-tip brackets on the template and mark locations of the screw holes on the floor and wail (4 marks for 4 screws).
4, Remove the brackets and templates. Drill pilot holes on the marks in accordance with fixing plug and screw dimensions,
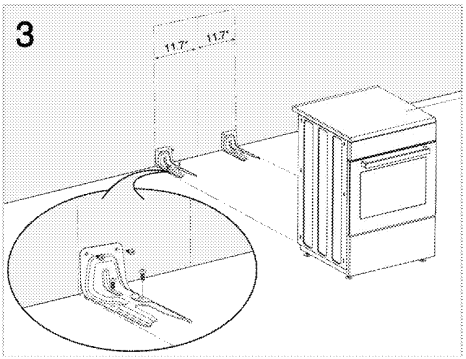
5. Screw and secure anti -tip brackets on the floor with screws.
6. Please ensure the product is level by adjusting the four feet at the bottom by fuming left or right and align level with the work top.
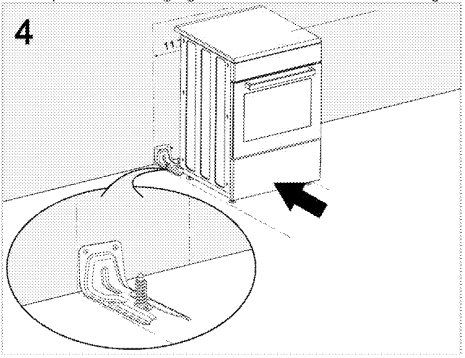
7. Slide range into place making sure the anti-tip device engages the foot at rear of range.
8. After installation cautiously grip the rear of the range to ensure the anti-tip bracket is engaging the rear foot of range.
Connection to the main supply
Provide Electrical connection
Install the junction box under the cabinet and run 120/240 or 120/208 Volt, AC wire from the main circuit panel. DO NOT connect the wire to the circuit panel at this time.
Electrical requirements
This appliance must be supplied with the proper voltage and frequency and connected to an individual, properly grounded branch circuit, protected by a circuit breaker or fuse. A circuit breaker or fuse is required by your appliance. The circuit breaker or fuse amperage recommended for your appliance is 40A.
Observe all governing codes and local ordinances
A 3 wire or 4 wire single phase 120/240 or 120/208 Volt, 60 Hz AC only electrical supply is required on a separate circuit fused on both sides of the line (red and black wires). A time-delay fuse or circuit breaker is recommended. DO NOT fuse neutral (white wire).
NOTE: Wire sizes and connections must conform with the fuse size and rating of the appliance in accordance with the American National Electrical Code ANSI/ NFPA No. 70-latest edition._
WARNING
Risk of electric shock, short circuit or fire by damage of the main power supply! The main power supply lead must not be clamped, bent or trapped or come into contact with hot parts of the appliance.
If the main power cable is damaged, it must be replaced by a qualified electrician.
This range may be connected by means of permanent "hard wiring" (flexible armored or nonmetallic shielded copper or aluminum cable), or by means of a power supply cord kit. Only a power supply cord kit rated at 120/ 240 volts and 40 or 50 amperes terminating in tinned leads and marked for use with ranges shall be used. If a 50 Amper cord is used it must be marked for use with a 1 3/8 inches (35 mm) diameter opening.15 EN Cord must have either 3 or 4 conductors to match electric receptacle (Use copper or Aluminum Conductors).
When installed where it is not permitted to ground through the neutral, a 4-conductor cord must be used or cable assembly. See manufacturer’s instructions.
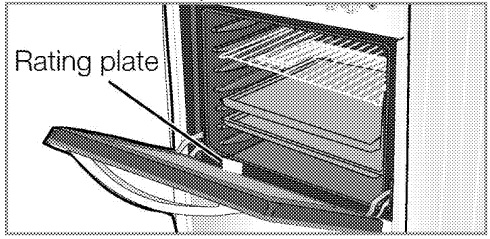
The main supply data must correspond to the data specified on the rating plate of the appliance. The rating plate is either seen when the door or the lower cover is opened.
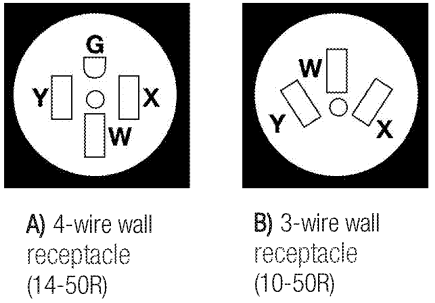
Figure A illustrates 4-wire receptacle required for new branch circuit installation (1996 NEC) mobile homes, and recreational vehicles or where local codes do not allow grounding thru the neutral. Figure B illustrates 3-wire receptacle that is allowed in areas that allow grounding through neutral.
This range is manufactured with the neutral terminal connected to the frame of the range.
Use a 3-wire, UL listed, 40- or 50-amp power supply cord.
If local codes do not permit grounding through the neutral, use a 4-wire, UL listed power supply cord rated at 250 volts, 40- or 50-amps and investigated for use with ranges.
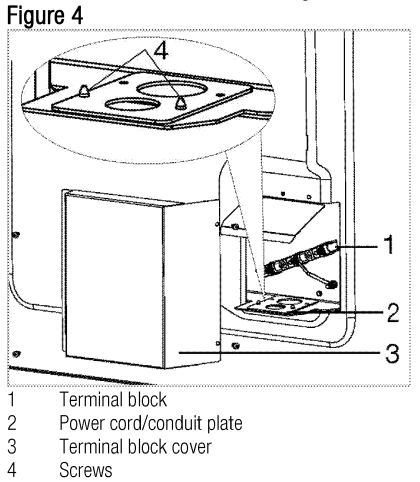
Access to Terminal Block
Loosen the screws on rear acces cover and take off the terminal block cover see Figure 4.
After completing connections put terminal block cover to the original location and tighten the screws.
Power cord connections
Strain relief installation
Purchase a strain relief before installation.
Remove the terminal block cover on the back of the range) by removing the screws as shown in figure 4. Do not discard screws.
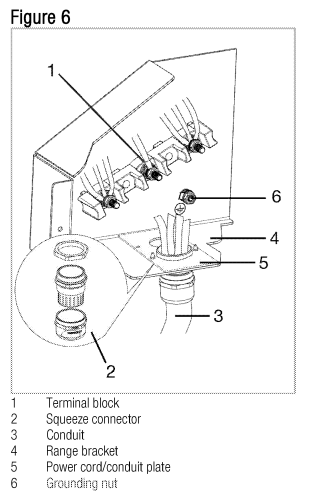
Remove the power cord/conduit plate (part no 2) shown in figure 4, by removing the two screws that secure it to the range bracket.
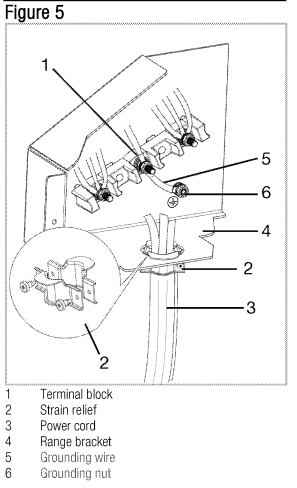
Using the 1 -3/8 in. diameter opening insert the strain relief and power cord through the opening and secure the strain relief as directed in the power cord instructions as shown in figure 5.
Conduit installation
Purchase a squeeze connector matching the diameter of the conduit and assemble it in the hole. Insert the conduit through the squeeze connector and tighten. Allow enough slack to easily attach the wires to the terminal block. A Listed conduit connector may also be used for this purpose.
Remove the terminal block cover (on the back of the range) by removing the screws as shown in Figure 4. Do not discard screws.
Determine the size of conduit needed and if necessary remove the power cord/conduit plate (part no 4) or reverse the plate so that the proper size opening in power cord/conduit plate for your conduit is directly over the 1 -3/8 in opening in the range bracket, shown in Figure 6. Secure the power cord/conduit plate using the same screws that were removed to take the plate off.
Secure the conduit to the power cord/ conduit plate using a listed squeeze connector as shown in Figure 6.
See Figure.7 for 3 wire power connection and figure.8 for 4 wire connection.
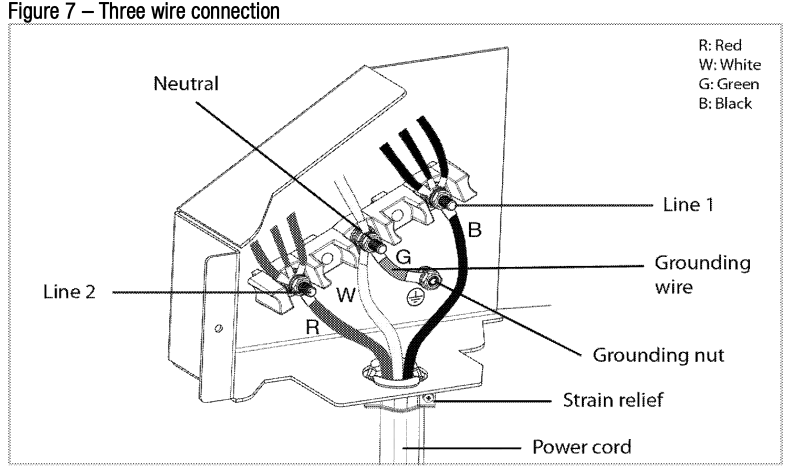
Three wire connection:
The four-wire connection (below) is preferred, but where local codes and ordinances permit grounding through the neutral and where conversion to four-wire is impractical, the unit may be connected to the power supply via a three wire connection.
Disconnect electrical power at breaker box.
Remove the terminal block cover to expose the terminal block.
Follow the manufacturer's installation instructions with the strain relief clamp and install.
Remove the top nut and washer from each terminal post.
Attach the neutral (white) wire to the center junction block terminal using one of the nut/washer parts.
Attach the Line 1 (black) wire to the right junction block terminal using one of the nut/washer parts.
Attach the Line 2 (red) wire to the left junction block terminal using one of the nut/washer parts.
Tighten all connections securely and put terminal block cover to the original location and tighten the screws.
Properly secure strain relief (see previous
Four wire connection:
Disconnect electrical power at breaker box.
Remove the terminal block cover to expose the terminal block.
Remove the top nut and washer from each post.
Remove nut and washer on the ground connection from range bracket.
Remove nut and washer located at the center of the terminal block. Remove and discard the green grounding wire between center of terminal block and ground connection on the range bracket.
Attach the grounding (green) wire of the power supply cord to the ground connection on the range bracket using one of the nut/washers removed in step 4.
Attach the neutral (white) wire to the center terminal block using one of the nut/washer parts.
Attach the Line 1 (black) wire to the right terminal block using one of the nut/washers removed in step 3.
Attach the Line 2 (red) wire to the left terminal block using one of the nut/washer parts.
Properly secure strain relief/squeeze connector (see previous section).
Tighten all connections securely and put terminal block cover to the original location and tighten the screws.
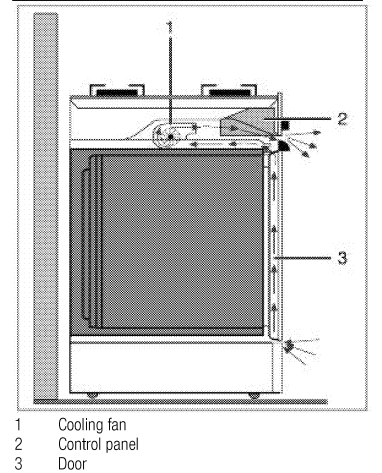
For products with cooling fan
The cooling fan cools both the built-in cabinet and the front of the product._
Initial use
Time setting
Press +/- keys to set the time of the day after the oven is energized for the first time.
Confirm the setting by touching symbol and wait for 4 seconds without touching any keys to confirm.
How to operate the oven
General information on baking, roasting and broiling.
Tips for baking
Use non-sticky coated appropriate metal plates or aluminum vessels or heat-resistant silicone moulds.
Make best use of the space on the rack.
Place the baking mould in the middle of the shelf.
Select the correct rack position before turning the oven or Broil on. Do not change the rack position when the oven is hot.
Always place oven racks in desired location while oven is cool. If rack must be moved while oven is hot, do not let potholder contact hot heating element in oven.
Keep the oven door closed.
Tips for roasting
Seasoning with lemon juice and black pepper will improve the cooking performance when cooking a whole chicken, turkey or a large piece of meat.
Meat with bones takes about 15 to 30 minutes longer before it is cooked than a roast of the same size without bones.
You should calculate about 4 to 5 minutes cooking time per centimeter height of the meat.
Let meat rest in the oven for about 10 minutes after the cooking time. The juice is better distributed all over the roast and does not run out when the meat is cut.
Fish in a fire-resistant dish should be placed on the rack at the medium or lower level.
Tips for broiling
Broiling is ideal for cooking meat, fish and poultry and will achieve a nice brown surface without it drying out to much. Flat pieces, meat skewers and sausages are particularly suited for broiling as are vegetables with a high water content such as tomatoes and onions.
Distribute the pieces to be broiled on the wire shelf.
If the broiling is on the wire shelf, locate a dripping pan under it in order to collect the fat.
Add some water in dripping pan for easy cleaning.
How to use the electric oven
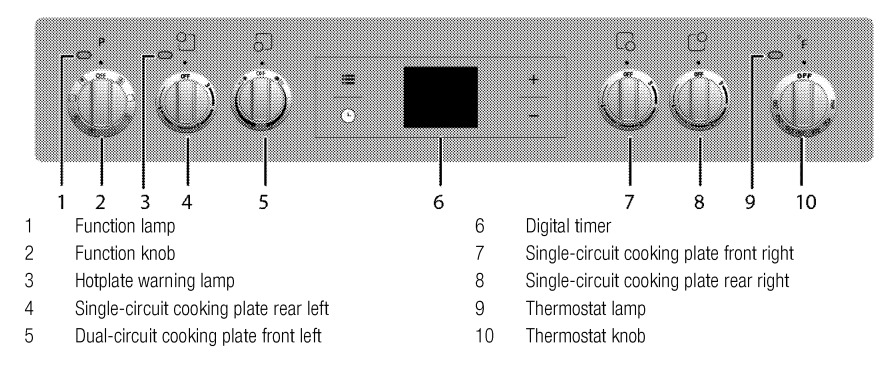
Select temperature and operating mode
The operating modes of the electric oven are selected with the function knob. The temperature is adjusted with the thermostat knob.
All oven functions are turned off by turning the relevant knob to off (upper) position.
Set thermostat knob to the desired temperature.
Set function knob to the required operating mode.
* The oven heats up to the adjusted temperature and maintains it. During heating, temperature lamp stays on.
Switch off electric oven
Turn function knob and thermostat knob to off position (top).
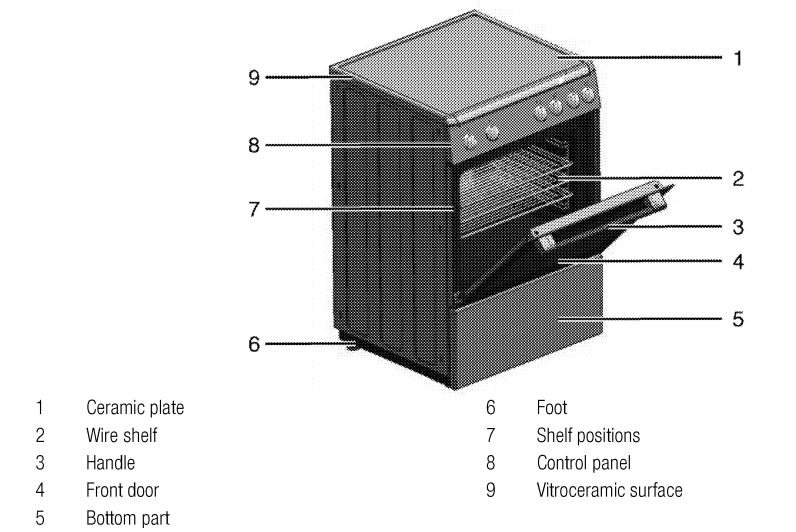
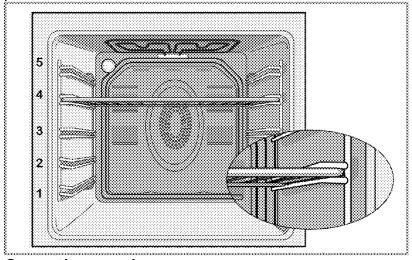
Rack positions (For models with wire shelf)
It is important to place the wire shelf onto the side rack correctly. Wire shelf must be inserted between the side racks as illustrated in the figure. Do not let the wire shelf stand against the rear wall of the oven. Slide your wire shelf to the front section of the rack and settle it with the help of the door in order to obtain a good broil performance.
Operating modes
The order of operating modes shown here may be different from the arrangement on your product.
Top and bottom heating
Top and bottom heating are in operation. Food is heated simultaneously from the top and bottom. For example, it is suitable for cakes, pastries, or cakes and casseroles in baking moulds. Cook with one tray only.
Bottom heating
Only bottom heating is in operation. It is suitable for pizza and for subsequent browning of food from the bottom.
Fan supported bottom/top heating
Top heating, bottom heating plus fan (in the rear wall) are in operation. Hot air is evenly distributed throughout the oven rapidly by means of the fan. Cook with one tray only.
Operating with fan
The oven is not heated. Only the fan (in the rear wall) is in operation. Suitable for thawing frozen granular food slowly at room temperature and cooling down the cooked food.
Fan Heating
Warm air heated by the rear heater is |oqJ evenly distributed throughout the oven rapidly by means of the fan. It is suitable for cooking your meals in different rack levels and preheating is not required in most cases. Suitable for cooking with multi trays.
“3D” funtion
Top heating, bottom heating and fan assisted heating (in the rear wall) are in operation. Food is cooked evenly and quickly all around. Cook with one tray only.
Broil
Large broil at the ceiling of the oven is in operation. It is suitable for broiling large amount of meat.
Put big or medium-sized portions in correct rack position under the broil heater for broiling.
Set the temperature to maximum level.
Turn the food after half of the broiling time.
Broil with convection air
Broiling effect is not as strong as in Full Broil
Put small or medium-sized portions in correct shelf position under the broil heater for broiling.
Set the desired temperature.
Turn the food after half of the broiling time.
Using the oven clock
Cooking by setting the cooking time;
You can set the oven so that it will stop at the end of the specified time by setting the cooking time on the timer.
Select the function for cooking.
Touch until symbol appears on display for cooking time.
Set the cooking time with + / - keys.
After the cooking time is set, symbol and the time slice will appear on display continuously.
Place the dish into the oven and set the temperature with temperature knob. Cooking will start.
Cooking time starts to count down on display when cooking starts and all parts of time slice symbol is lit. The set cooking time is divided into equal parts and when the time of each parts ends, the symbol of that parts turns off. So you can understand the ratio of remaining cooking time to total cooking time easily.
Setting the the end of cooking time to a later time;
After setting the cooking time on the timer, you can set the end of cooking time to a later time.
Select the function for cooking.
Touch until symbol appears on display for cooking time.
Set the cooking time with + / - keys.
Once the Cooking Time is set, symbol will appear on display continuously.
Touch until symbol appears on display for the end of cooking time.
Press + /- keys to set the end of cooking time.
After the cooking time is set, symbol plus symbol and the time slice will appear on display continuously. Once the cooking starts, symbol disappears.
Place the dish into the oven and set the temperature with temperature knob. Cooking will start.
Oven timer calculates the startup time by deducting the cooking time from the end of cooking time you have set. Selected operating mode is activated when the startup time of cooking has come and the oven is heated up to the set temperature. It maintains this temperature until the end of cooking time.
Cooking time starts to count down on display when cooking starts and all parts of time slice symbol is lit. The set cooking time is divided into 4 equal parts and when the time of each parts ends, the symbol of that parts turns off. So you can understand the ratio of remaining cooking time to total cooking time easily.
After the cooking process is completed, "End" appears on the displayed and the timer gives an audio warning.
Audio warning sounds for 2 minutes. To stop the audio warning, just press any key. Audio warning will be silenced and current time will be displayed.
Activating the keylock
You can prevent oven from being intervened with by activating the key lock function.
Touch until symbol appears on display.
"OFF” will appear on the display.
Press + to activate the key lock.
Once the key lock is activated, "On” appears on the display and the symbol remains lit.
To deactivate the keylock
Touch until symbol appears on display.
" On" will appear on the display.
Disable the key lock by pressing the -- key.
"OFF" will be displayed once the keylock is deactivated.
Setting the alarm clock
You can use the timer of the product for any warning or reminder apart from the cooking program.
The alarm clock has no influence on the functions of the oven. It is only used as a warning. For example, this is useful when you want to turn food in the oven at a certain point of time. Timer will give an audio warning at the end of the set time.
Touch until symbol appears on display.
Set the alarm duration by using + / - keys
symbol will remain lit and the alarm time will appear on the display once the alarm time is set.
At the end of the alarm time, symbol starts flashing and the audio warning is heard.
Turning off the alarm
Audio warning sounds for 2 minutes. To stop the audio warning, just press any key.
Audio warning will be silenced and current time will be displayed.
Cancelling the alarm;
Touch until symbol appears on display in order to cancel the alarm.
Press and hold ™ key until "00:00" is displayed._ 1 2
Changing alarm tone
Touch until symbol appears on display.
Adjust the desired alarm tone with + / - keys.
The tone you have set will be activated in a short time.
Selected alarm tone will appear as ”b-01 ”, ”b-02” or ”b-03” on the display.
Changing the time of the day
To change the time of the day you have previously set:
Touch until symbol appears on display.
Set the time of the day with+ / - keys.
The time you have set will be activated in a short time.
Economy mode
You can save energy with economy mode while cooking by setting cooking time in the oven.
This mode completes the cooking with the inner temperature of the oven by switching off the heaters before the end of cooking time.
Setting the economy mode
Touch symbol until eco symbol appears on display.
"OFF" will appear on the display.
Enable economy mode by touching + key.
Once the economy mode is activated, "On" appears on the display and the eco symbol remains lit.
Disabling economy mode
Touch symbol until eco symbol appears on display.
"On" will appear on the display.
Disable economy mode by touching – key.
"Off" will be displayed once the eco mode is deactivated.
Setting the screen brightness
Touchuntil d-01 or d-02 or d-03 appears on display for display brightness.
Set the desired brightness with +/- keys.
»The time you have set will be activated in a short time.
Maintenance and care
General information
Service life of the product will extend and the possibility of problems will decrease if the prod-uct is cleaned at regular intervals._
Clean the product thoroughly after each use In this way it will be possible to remove cooking residues more easily, thus avoiding these from burning the next time the appliance is used.
No special cleaning agents are required for cleaning the product. Use warm water with washing liquid, a soft cloth or sponge to clean the product and wipe it with a dry cloth.
Do not use any abrasive cleaning materials!
Do not use cleaning agents that contain acid or chloride to clean the stainless or inox surfaces and the handle. Use a soft cloth with a liquid detergent (not abrasive) to wipe those parts clean, paying attention to sweep in one direction._
Cleaning the burner/plate Ceramic hobs
Always rinse off fully with a clean cloth wrung out in clean water (as residue could damage the ceramic glass surface next time the hob is used). In no case should crusts be scratched off with serrated edge knives, steel wool or the like. Remove calcium stains (yellow staining) with small amounts of decalcifying agents such as Durgol, vinegar or lemon juice.
Do not allow vinegar, coffee, milk, saltwater, lemon or tomato juice to remain in contact with enamel parts (i.e. inside the oven).
Apply agent with a sponge and, in the event of heavier soiling, let it work in for a longer period of time. Afterwards, wash off hob with water.
Cleaning the control panel
Clean the control panel and knobs with a damp cloth and wipe them dry._
Cleaning the oven
No oven cleaner or any other special cleaning agent is required for cleaning the oven. It is recommended to wipe the oven with a damp cloth while it is still warm.
Do not allow fat or oils to build up in the oven base, or oven accessories.
To clean the side wall
Remove the front section of the side rack by pulling it in the opposite direction of the side wall.
Remove the side rack completely by pulling it towards you.
Clean oven door
To clean the oven door, use warm water with washing liquid, a soft cloth or sponge to clean the product and wipe it with a dry cloth.
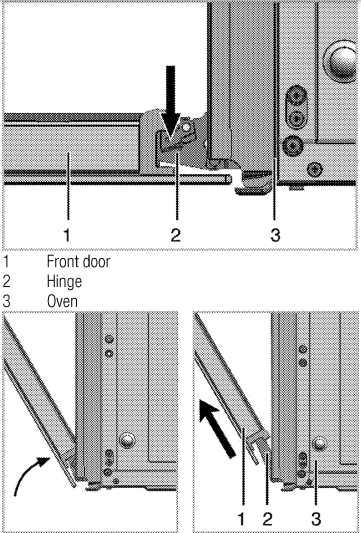
Removing the oven door
Open the front door (1).
Open the clips at the hinge housing (2) on the right and left hand sides of the front door by pressing them down as illustrated in the figure.
3. Move the front door to half-way.
4. Remove the front door by pulling it upwards to release it from the right and left hinges.
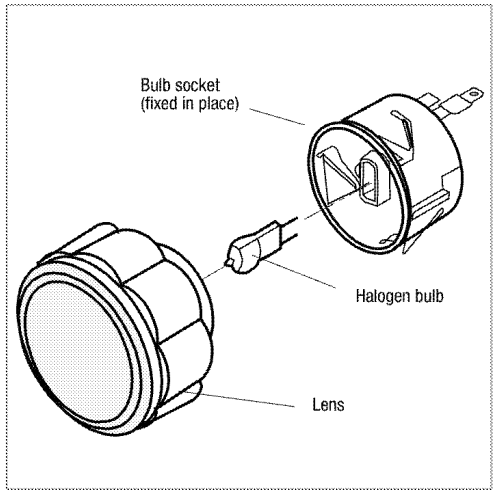
Replacing the oven lamp.
Each oven is equipped with one halogen lights located in the back wall of the oven. The lights are switched on when the door is opened or when the oven is in a cooking cycle. The oven lights are not illuminated during self clean. Each light assembly consist of a removable lens, a light bulb as well as a light socket housing that is fixed in place. Light bulb replacement is considered to be a routine maintenance item.
To replace a light bulb:
1. Read warning on this page.
2.Turn off power at the main power supply (your fuse or breaker box).
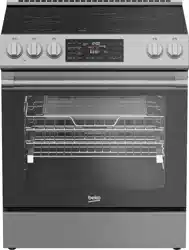
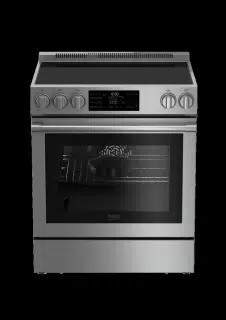
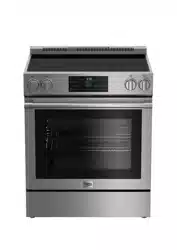
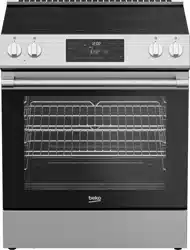
Overview
Troubleshooting
Oven emits steam when it is In use.
It is normal that steam escapes during operation. »> This is not a fault.
Product emits metal noises while heating and cooling.
When the metal parts are heated, they may expand and cause noise. »> This is not a fault.
Product does not operate.
The mains fuse is defective or has tripped. »> Check fuses in the fuse box. If necessary, replace or reset them.
Product is not plugged into the (grounded) socket. »> Check the plug connection.
Oven light does not work.
Oven lamp is defective. »> Replace oven lamp.
Power is cut. »> Check if there is power. Check the fuses in the fuse box. If necessary, replace or reset the fuses.
Oven does not heat.
Function and/or Temperature are not set. »> Set the function and the temperature with the Function and/or Temperature knob/key.
In models equipped with a timer, the timer is not adjusted. »> Adjust the time. (In products with microwave oven, timer controls only microwave oven.)
Power is cut. »> Check if there is power. Check the fuses in the fuse box. If necessary, replace or reset the fuses.
(In models with timer) Clock display is blinking or clock symbol is on.
A previous power outage has occurred. »> Adjust the time/Switch of the product and switch it on again.
Note
Consult the Authorised Service Agent or technician with licence or the dealer where you have purchased the product if you can not remedy the trouble although you have implemented the instructions in this section. Never attempt to repair a defective product yourself.
Q: Hello. How to use Beko oven SLER24410SS?
Moved into a new unit with this model, did not see the manual. Although I can easily turn the stovetop on, I do not know how to work the oven. May someone help with this? Thank u Reply


 symbol and wait for 4 seconds without touching any keys to confirm.
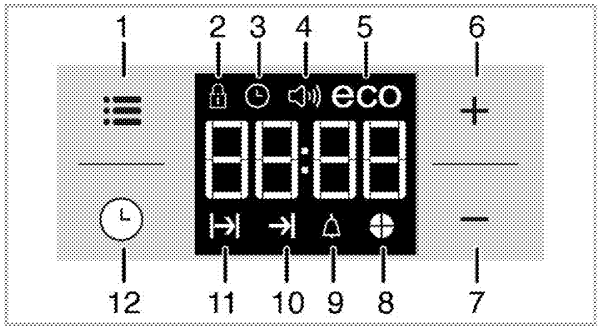

 Top and bottom heating
 Bottom heating
 Fan supported bottom/top heating
 Operating with fan
 Fan Heating
 “3D” funtion
 Broil
Broil Broil with convection air
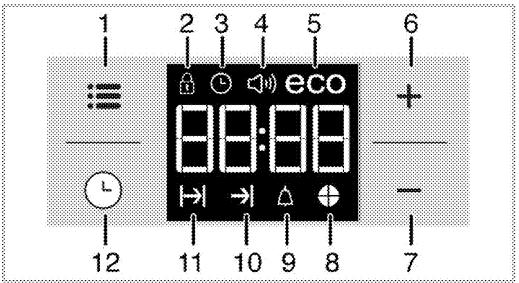
 until
until  symbol appears on display for cooking time.
 until
until  symbol appears on display.
 symbol appears on display.
 symbol appears on display.