Owner 's Manual for Range
Overview

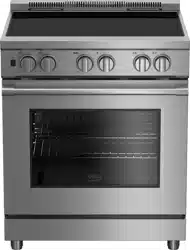
1 Splashback
2 Burner plate
3 Control panel
4 Handle
5 Front door
6 Foot
7 Lower part

1 Oven lamp button
2 Induction cooking plate Rear Left
3 Induction cooking plate Front Left
4 Function knob
5 Thermostat knob
6 Induction cooking plate Front Right
7 Induction cooking plate Rear Right
Preparation
Tips for saving energy
The following information will help you to use your appliance in an ecological way, and to save energy:
• Use dark colored or enamel coated cookware in the oven since the heat transmission will be better.
• While cooking your meals, perform a preheating operation if it is advised in the user manual or cooking instructions.
• During cooking, the not open the oven door frequently.
• Try to cook more than one type of meal with in the oven at the same time (You can cook two different meals at the same time by locating cooking bowls on the same shelf). It will be suitable to cook more than one meal after each other. The oven will already be hot.
• Defrost frozen meals before cooking them.
• You can save energy by switching off your oven a few minutes before the end of the cooking time. (The oven door should not be opened).
• Use pots/pans with lids for cooking, without a lid, the energy consumption may be up to 4 times higher.
• Choose the burner/plate which is suitable to the saucepan base. Always choose the correct size of saucepans for your meals.
For larger burners/plates more energy is needed.
• Take care to use flat base saucepans while cooking on electrical cookers.
• Pots with an even and thick bottom provide better thermal conduction. You can save up 1/3 of electricity.
• Pots and pans should match the size of plates. The bottom of the pot or pan should not be smaller than the plate.
• Keep plates and pan bottoms clean, dirt will reduce the heat transmission between plate and pan bottoms.
• In case of longer cooking times, switch off the plate 5 to 10 minutes before the end of the cooking time. When you use the residual heat, you can save up to 20 % of electricity.
First cleaning of the appliance
IMPORTANT
When removing appliance for cleaning or service , disconnect AC power supply. Carefully remove the range by pulling outward. Range is heavy, use care in handling

The surface might get damaged by some detergents or cleaning materials.
Do not use aggressive detergents, cleaning powders/creams or any sharp objects during cleaning.
Be careful to avoid steam burn. Some cleaners can produce noxious fumes if applied to a hot surface.
1. Remove all packaging materials.
2. Wipe the surfaces of the appliance with a damp cloth or sponge and dry with a cloth.
Initial heating
IMPORTANT:
Smoke and smell may emit for a couple of (hours during the initial operation. This is quite normal. Ensure that the room is well ventilated to remove the smoke and smell. Avoid directly inhaling the smoke and the smell that emits.
Heat up the product for about 30 minutes and then switch it off. Thus, any production residues or layers will be burnt off and removed.
WARNING
Hot surfaces cause bums!
Product may be hot when it is in use. Never touch the hot burners, inner sections of the oven, heaters and etc. keep children away. Always use heat resistant oven gloves when putting in or removing dishes into/from the hot oven.
Electric oven
1. Take all baking trays and the wire grill out of the oven.
2. Close the oven door.
3. Select the bake function.
4. Set the temperature 350° F (175 °C).
5. Operate the oven about 30 minutes.
6. Turn off your oven.
Broil
1. Take all baking trays and the wire grill out of the oven.
2. Select the broil function.
3. Set the broil level to “HI”.
5. Operate the broil about 30 minutes.
5. Turn off your oven.
Smoke and smell may emit for a couple of hours during the initial operation. This is quite Inormal. Ensure that the room is well ventilated to remove the smoke and smell. Avoid directly inhaling the smoke and the smell that emits.
How to use the hob
General information about cooking
DANGER
Risk of fire over by overheated oil!
When you heat oil, do not leave it unattended.
WARNING
Do not use water on grease fires. Never pick up a flaming pan. Turn the controls off. Smother a flaming pan on a surface unit by covering the pan completely with a well-fitting lid or a fire blanket, cookie sheet or flat tray. Use a multi-purpose dry chemical or foam-type fire extinguisher.
WARNING
Do not place or store items that can melt or catch fire on the glass cooktop, even when it is not being used. If the cooktop is inadvertently turned on, they may ignite. Heat from the cook top or oven vent after it is turned off may cause them to ignite also.
• Always position pans centrally over the heating element. When transferring pans from one heating element to another always lift the pans do not slide them.
• Before frying foods, always dry them well and gently place into the hot oil. Ensure complete thawing of frozen foods before frying.
• Do not cover the vessel you use when heating oil.
• Place the pans and saucepans in a manner so that their handles are not over the hob to prevent heating of the handles. Do not place unbalanced and easily tilting vessels on the hob.
• Do not place empty vessels and saucepans on cooking zones that are switched on. They might get damaged.
• Operating a cooking zone without a vessel or saucepan on it will cause damage to the product. Turn off the cooking zones after the cooking is complete.
• As the surface of the product can be hot, do not put plastic and aluminum vessels on it. Clean any melted such materials on the surface immediately. Such vessels should not be used to keep foods either.
• Use flat bottomed saucepans or vessels only.
• Put appropriate amount of food in saucepans and pans. Thus, you will not have to make any unnecessary cleaning by preventing the dishes from overflowing. Do not put covers of saucepans or pans on cooking zones.
• Place the saucepans in a manner so that they are centered on the cooking zone. When you want to move the saucepan onto another cooking zone, lift and place it onto the cooking zone you want instead of sliding it.
WARNING
Never leave surface units unattended at high heat settings. Boil over causes smoking and greasy spillovers that may ignite.
• Make sure reflector pans or drip bowls are in place. Absence of these pans or bowls during cooking may subject wiring or components underneath to damage.
Tips for glass ceramic plate
• The glass ceramic surface is heat- resistant and insensitive to large temperature deviations.
• Do not use the glass ceramic plate for keeping objects or as cutting surface.
WARNING
Do not cook popcorn in prepackaged 'aluminum containers on the cooktop. They could leave aluminum marks that cannot be removed completely.
• Use pot and pans with ground bottoms. Sharp edges cause scratches on the surface.
• Do not use aluminum pots and pans. Aluminum damages the glass ceramic surface.
WARNING
Glazed cooking utensils - only certain types of 'glass, glass/ceramic, ceramic, earthenware, or other glazed utensils are suitable for range-top service without breaking due to the sudden change in temperature.
For foods containing sugar in any form, clean up all spills and soils as soon as possible. Allow the cook- top to cool down slightly. Then, while wearing oven mitts, remove the spills while the surface is still warm. If sugary spills are allowed to cool down, they can adhere to the cook-top and can cause pitting and permanent marks.
WARNING
Use pot and pans with ground bottoms. Sharp edges cause scratches on the surface.
WARNING
Avoid scratching the glass cooktop. The cook fcp can be scratched with items such as knives, sharp instruments, rings or other jewelry and rivets on clothing.
WARNING
If a wet sponge or cloth is used to wipe spills bn a hot cooking area, be careful to avoid steam burn. Some cleaners can produce noxious fumes if applied to a hot surface. Utensil handles should be turned inward and not extend over adjacent Face units. To reduce the risk of burns, ignition of flammable materials, and spillage due to unintentional contact with the utensil, the handle of a utensil should be positioned so that it is turned inward, and does not extend over adjacent surface units.
DANGER

Tipping of pan
Make sure that the handles of cookware do not stick out over the edge of the appliance, to avoid them being knocked over by accident. This also makes it more difficult for children to reach the cooking pans.
• Ensure handles of pans cannot accidentally be caught or knocked and do not get hot by adjacent heating zones. Avoid pans that are unstable and easily tipped. Pans that are too heavy to move easily when filled can also be a hazard.
WARNING
Do not store items of interest to children in cabinets above a range or on the back guard of a range - children climbing on the range to reach items could be seriously injured.
Saucepan selection
• Glass ceramic surface is heatproof and is not affected by big temperature differences.
• Do not use the glass ceramic surface as a place of storage or as a cutting board.
• Use only the saucepans and pans with machined bottoms. Sharp edges create scratches on the surface.

Spills may damage the glass ceramic surface and cause fire.
Do not use vessels with concave or convex bottoms.
Use only the saucepans and pans with flat bottoms.
They ensure easier heat transfer.
For induction hobs, use only vessels suitable for induction cooking.
Saucepan test
Use following methods to test whether your saucepan is compatible with the induction hob or not.
1. Your saucepan is compatible if its bottom holds magnet.
2. Your saucepan is compatible if " " does not flash when you place your saucepan on cooking zone and start the hob.
You can use steel, teflon or aluminium saucepans with special magnetic bottom that contains labels or warnings indicating that the saucepan is compatible with induction cooking. Glass and ceramic vessels, pots and the stainless steel vessels with non-magnetic aluminium bottom should not be used.
Saucepan recognition-focusing system
In induction cooking, only the area covered by the vessel on the relevant cooking zone is energised. The vessel's bottom is recognised by the system and only this area is heated automatically. Cooking stops if the cooking vessel is lifted from the cooking zone during cooking. Selected cooking zone and "" symbol flashes alternately.
Safe use
Do not select high heating levels when you will use a non-sticking (teflon) saucepan with no oil or with very little oil.
Do not put metal items such as forks, knives or saucepan covers onto your hob since they can get heated.
Never use aluminium folio for cooking. Never place food items wrapped with aluminium folio onto the cooking zone.
If there is an oven under your hob and if it is running, sensors of the hob can decrease the cooking level or turn off the oven.
When the hob is running, keep items with magnetic properties such as credit cards or cassettes away from the hob.
Selecting cooking zone suitable to the vessel

Using the burners/plates
DANGER:
Avoid scratching or impacting glass doors, 'cooktops or control panels. Doing so may lead to glass breakage. Do not cook on a product with broken glass. Shock, fire or cuts may occur.
Do not let any objects fall onto the plate. Even small objects (e.g. salt shaker) may damage the burner/ plate.
DANGER:
Do not use glass surface with cracks. Water may enter into the cracks and cause a short circuit.
DANGER:
If the surface is damaged in any way (e.g. visible cracks), switch off the device immediately to reduce the risk of an electric shock.
If cooktop should break, cleaning solutions and spillovers may penetrate the broken cooktop and create a risk of electric shock.
Contact a qualified technician immediately.
Using the hobs
DANGER
■Broken glass!
DO not let any objects fall onto the hob. Even small objects (e.g. salt shaker) may damage the hob.
Do not use glass ceramic hobs with cracks. Water may enter into the cracks and cause a short circuit.
If the surface is damaged in any way (e.g. visible cracks), switch off the device immediately to reduce the risk of an electric shock.
Turning on the cooking zones
Graphics and figures are for informational purposes only. Actual displays and functions may vary according to the model of your hob.
Turning the hob control knob counterclockwise the power of the according cooking zone can be increased. To reduce the power of the cooking zone again it is necessary to turn the hob control knob clockwise.
The current power level is on the display unit of the hob.

Turning off the cooking zones:
The hob control knob is turned from the locked “OFF” position to switch a cooking zone on as well as when the hob control knob is turned back to the OFF position to switch a cooking zone off.
If all knobs are turned to OFF locked position the display disappears after 'several times. If a buzzer is implemented a signal is played when the control is switched off.
Cooking leves
There are 10(1 -9 level with booster(p)) cooking levels on the hob control hobs. Additionally the hob has 3 different cooking levels as melting,warming and simmer.

The melting and warming levels can be defined dependently of variant. The simmer level 94°C (201 °F) is fixed temperature value.
Residual heat indicator
"H" symbol that appears on the cooking zone display indicates that the hob is still hot and may be used to keep a small amount of food warm. The symbol will disappear when the cooking zone cools down or when it is activated.
When power is cut off, residual heat indicator will not light up and does not warn the user against hot cooking zones.
High Power (Booster)
Booster is a function which facilitates cooking. All cooking zones indicated with "P" symbol in the Technical Specifications table are equipped with Booster function.
Turning on High Power (Booster):
1. Push and turn the related hob control knob counter clockwise to position “P”.

2. Turn the hob control knob in the left overwind position to activate High power (Booster “P”), “P” will appear on related cooking zone display.
The hob will drop to level 9 after several minutes (optional) automatically.
Not each pan suitable to reach the full boost power due its magnetic and electrical characteristic.
Turning off High Power (Booster):
Turn the hob control knob in the left overwind position to turn off High power (Booster “P”).
“9” will appear on related cooking zone display.
Child Lock
You can protect the hob by child lock to prevent children from changing hob functions.
Activating the Child Lock
1. Turn the first two hob control knobs from the left simultaneously in to the right overwind and hold in that position at least 2 second.
» Child lock function will be activated.

lf any key is pressed when the child lock is active, “L" symbol will appear on cooking zone displays.
Deactivating child lock
Turn the first two hob control knobs from the left simultaneously in to the right overwind and hold in that position at least 2 second.
Child lock function will be deactivated.
If the hob is turned off and on in this condition, child lock will be still active.
lf any hob control knob was in a position different from “OFF”, after unlocking all hob control knobs have to be turned back in the “OFF” position
Quick Heating Function
Quick heating is a function which facilitates cooking. All cooking zones are equipped with Quick heating function. This function can be operated by setting temperature level beforehand.
Turning on Quick Heating Function:
1. Turn the related hob control knob in to the right overwind and hold in that position at least 2 second.
» “A” will appear on related cooking zone display.

2. Turn the hob control knob counter-clockwise to set heating level (it is supposed that level 7 is selected for the example).

 “A” and “7” will appear on related cooking zone display alternately.
Within the next 10 seconds a valid cooking level has to be selected.
When the Quick operation time is up, the hob continue operating at the set temperature.
Turning off Quick Heating Function:
The hob control knob is turned from the locked “Off” position to turn off the Quick Heating function.
Table: Quick Heating Operation Times

Using induction cooking zones safely and efficiently
Operating principles: Induction hob heats directly the cooking vessel as a feature of its operating principles. Therefore, it has various advantages when compared to other hob types. It operates more efficiently and the hob surface does not heat up.
Induction hob is equipped with superior safety systems that will provide you maximum usage safety.
Your hob can be equipped with induction cooking zones with a diameter of 145 (6”), 210 (9”) and 260(11 ”) mm depending on the model. With induction feature, each cooking zone detects each vessel placed on them. Energy builds up only where the vessel contacts with the cooking zone and thus, minimum energy consumption is achieved.
Operation time constraints
The hob control is equipped with an operation time limit. When one or more cooking zones are left on, the cooking zone will automatically be deactivated after a certain period of time (see Table-1). If there is a timer assigned to the cooking zone, the timer display will also turn off later. Operation time limit depends on the selected temperature level. Maximum operation time is applied at this temperature level.
The cooking zone may be restarted by the user after it is turned off automatically as described above.
Table-1: Operation time limits

Overheating protection
Your hob is equipped with some sensors ensuring protection against overheating.
Following may be observed in case of overheating:
• Active cooking zone may be turned off.
• Selected level may drop. However, this condition cannot be seen on the indicator.
• E2 error might be given.
Power management
The power managment is independently done by the induction system .The latest set cooking level has priority. If it is not possible to output the required power on a cooking zone it will not be displayed. The display changes only when the actual cooking level is reached by turning the knob left.
Precise power setting
Induction hob reacts the commands immediately as a feature of its operating principles. It changes the power settings very fast. Thus, you can prevent a cooking pot (containing water, milk and etc.) from overflowing even if it was just about to overflow.
Operating noisy
Some noises may arise from the induction hob.
These sounds are normal and a part of induction cooking.
• Noise becomes prominent in high temperature levels.
• Alloy of the saucepan can cause noise.
• In low levels, a regular on/off sound can be heard because of the operating principles.
• Noise can be heard if an empty saucepan is heated. When you put water or food in it, this sound will clear away.
• The noise of the fan that cools electric system can be heard.
Error messages
Table-2: Error codes and error

For further information about error messages that may appear on the touch control panel, see Table-2.
lf the surface of the touch control panel is exposed to intense vapor, entire control system may become deactivated and give error signal.
Keep the surface of the touch control panel clean. Erroneous operation may be observed.
How to operate the oven
General information on baking, roasting and broiling
WARNING
Hot surfaces cause burns!
Product may be hot when it is in use. Never touch the hot burners, inner sections of the oven, heaters and etc. Keep children away. Always use heat resistant oven gloves when putting in or removing dishes into/from the hot oven.
DANGER:
Be careful when opening the oven door as steam may escape. Exiting steam can scald your hands, face and/or eyes.
Tips for baking
• Use non-sticky coated appropriate metal plates or aluminum vessels or heat-resistant silicone moulds.
• Make best use of the space on the rack.
• Place the baking mould in the middle of the shelf.
• Select the correct rack position before turning the oven or Broil on. Do not change the rack position when the oven is hot.
• Always place oven racks in desired location while oven is cool. If rack must be moved while oven is hot, do not let potholder contact hot heating element in oven.
• Keep the oven door closed.
Tips for roasting
• Seasoning with lemon juice and black pepper will improve the cooking performance when cooking a whole chicken, turkey or a large piece of meat.
• Meat with bones takes about 15 to 30 minutes longer before it is cooked than a roast of the same size without bones.
• You should calculate about 4 to 5 minutes cooking time per centimeter height of the meat.
• Let meat rest in the oven for about 10 minutes after the cooking time. The juice is better distributed all over the roast and does not run out when the meat is cut.
• Fish in a fire-resistant dish should be placed on the rack at the medium or lower level.
Tips for broiling
Broiling is ideal for cooking meat, fish and poultry and will achieve a nice brown surface without it drying out to much. Flat pieces, meat skewers and sausages are particularly suited for broiling as are vegetables with a high water content such as tomatoes and onions.
• Distribute the pieces to be broiled on the wire shelf.
• If the broiling is on the wire shelf, locate a dripping pan under it in order to collect the fat.
• Add some water in dripping pan for easy cleaning.
Fire danger due to food which is unsuitable for grilling!
Only use food for grilling which is suitable for intensive grilling heat.
Do not place the food too far in the back of the grill. This is the hottest area and fat food may catch fire.
WARNING
Do not insert your finger or any other object in the 'holes of the back wall of the oven.
Fan only runs if necessary for improving performance of cooking and saving the energy of the oven.
Tips for cooking vegetables
1. If the vegetable dish runs out of juice and gets to dry,
» Since using a lid during cooking will keep the juice of the dish in the pan, cook your vegetable dishes in a pan with a lid instead of a tray.
2. If a vegetable dish does not get cooked,
» Boil the vegetables beforehand or prepare them like canned food and put in the oven.
How to use the electric oven

1. Function knob
2. Thermostat knob
1. Set the Function knob to the desired operating mode.
2. Set the Temperature knob to the desired temperature.
» Oven heats up to the adjusted temperature and maintains it. During heating, temperature lamp stays on.
Switch off the electric oven
1. Turn the function and thermostat knobs to off (upper) position.
Cooking Functions Bake
Only bottom heat is on. The bake mode can be used for a variety of food items, from cakes to casseroles.
Bake food on a single rack with the pans are positioned in the middle of the oven. Bake foods with 1" (25mm) to 1.5" (38mm) space between pans and oven walls.
When using the Bake mode, preheat the oven for best results.
Baking time will vary with the size, shape and material of the pan used.
Convection Bake
Only ring heater is on. The heat comes from back of steel plate and is circulated throughout the oven by the convection fan. The convection bake mode can be used for a variety of food items, from cakes to breads.
It is also ideal for sponge cakes, pasties and biscuits on multiple racks (3 and 5) at the same time and large quantities of baked foods.
The cakes are positioned with the top rack cakes towards the back of the oven and the lower rack cakes towards the front of the oven. Bake foods with 1" (25mm) to 1.5" (38mm) space between pans and oven walls.
When using the Convection Bake mode, preheat the oven for best results.
Baking time will vary with the size, shape and material of the pan used.
Convection Roast
Top and bottom heat are on. The heat comes from top and bottom and is circulated throughout the oven by the convection fan. The convection roast mode can be used for meat, poultry and large quantities of roasted foods.
Roast food on a single rack with the pan is positioned in the middle of the oven.
When using the Convection Roast mode, preheat the oven for best results.
For best performance, use a pan and grid (roasting tray or broiler tray) under the meat or poultry. The pan catches grease spills.
WARNING
Do not cover meat or use roasting bags in this mode.
Broil
Top heat is on. The broil mode can be used for cuts of meat, poultry and fish. It can also be used to brown breads. The food must be put on a grid in a pan (broiler tray).
Broil food on a single rack with the broiler tray are centrally located with respect to the heating element.
The broil mode has two settings; low TO" and high “Hi”,
When using the Broil mode, preheat the oven 5-6 minutes for best results.
Turn foods once during the recommended cook time.
The size, weight, thickness, starting temperature and personal preference of doneness will affect broiling times.
Sabbath
Only bottom heat is on. Cook food on a single rack with the pans are positioned in the middle of the oven. Cook foods with 1" (25mm) to 1"(38mm) space between pans and oven walls.
The maximum time for Sabbath mode is 75 hours.
IMPORTANT: Light is off when the Sabbath function in use. No change in light if you press the button without Sabbath mode.
WARNING:
Food Poisoning Hazard: Do not let food sit in oven for more than 1 hour before or after cooking. Doing so can result in food poisoning or sickness.
WARNING:
To avoid permanent damage to the oven bottom finish do not line the oven bottom with any type of foil or liner.
WARNING:
Sabbath mode sbould be used on only the Jewish Sabbath and Holidays.
WARNING:
The health of some birds and pets is extremely sensitive to the fumes given off during the Sabbath mode. Always move birds and pets to another closed and well ventilated room. Keep the kitchen well-ventilated during the Sabbath mode also for your health.
All food should be placed in the oven before the Sabbath begins, since none may be placed in the oven during the Sabbath.
On the Sabbath the oven door may only be opened once, all the food removed and then closed. On the Holidays, the oven door may be opened/closed at any time as often as desired.
Bullnose
The bullnose lights can be illuminated with Illumination for control panel button,
Cooking times table
1 st rack of the oven is the bottom rack.
The timings in this chart are meant as a guide. Timings may vary due to temperature of food, thickness, type and your own preference of cooking.
Baking and roasting


How to operate the broil
WARNING
Hot surfaces may cause burns! Keep children away from the product.Close oven door during grilling.
The broil is operated by the function and thermostat knob. In off position (top) the gas supply is locked.

1 Function knob
2 Thermostat knob
Switching on Broil
1. Keep the function knob pressed and turn it clockwise to the “Broil”.
2. Keep the thermostat knob pressed and turn it clockwise to the “HI” or “LO” level on “Broil”.
3. After 30-75 seconds, the burner will operate
CAUTION:
When thermostat knob is turned to the "Broil" or “Broll-HI”, functions except “Broil” and “Seit-Ciean” will not operate.
Switch off broil
1. Turn the function and thermostat knobs to off (upper) position.
For equipment with a cooling fan
The cooling fan cools the front of the products.

1 Cooling fan motor
2 Front door
IMPORTANT:
The cooling fan continues to operate for “about 20-30 minutes after the oven is switched off.
Maintenance and care
General information
Service life of the product will extend and the possibility of problems will decrease if the product is cleaned at regular intervals.
DANGER:
Risk of electric shock!
Switch off the electricity before cleaning appliance to avoid an electric shock.
DANGER:
Mot surfaces may cause burns!
Allow the appliance to cool down before you clean it.
IMPORTANT:
The surface might get damaged by some detergents or cleaning materials. Do not use aggressive detergents, cleaning powder/cream or any sharp objects. Do not use aggressive detergents, cleaning powder/cream or any sharp objects.
- Clean the appliance thoroughly after each use; in this way it will be possible to remove cooking residues more easily, thus avoiding these from burning the next time the appliance is used.
IMPORTANT:
No special cleaning agents are required for cleaning the appliance. It is recommended to use warm water with washing liquid, a soft cloth or sponge and use a dry cloth for drying.
Do not use any abrasive cleaning materials!
The surface might get damaged by some detergents or cleaning materials.
Do not use aggressive detergents, cleaning powders/creams or any sharp objects during cleaning.
Do not use harsh abrasive cleaners or sharp metal scrapers to clean the oven door glass since they can scratch the surface, which may result in shattering of the glass.
WARNING:
Do not use steam cleaners to clean the appliance as this may cause an electric shock.
Cleaning the burner/plate
Ceramic hobs
Always rinse off fully with a clean cloth wrung out in clean water (as residue could damage the ceramic glass surface next time the hob is used). In no case should crusts be scratched off with serrated edge knives, steel wool or the like. Remove calcium stains (yellow staining) with small amounts of decalcifying agents such as Durgol, vinegar or lemon juice.
Do not allow vinegar, coffee, milk, saltwater, lemon or tomato juice to remain in contact with enamel parts (i.e. inside the oven).
Apply agent with a sponge and, in the event of heavier soiling, let it work in for a longer period of time. Afterwards, wash off hob with water.
WARNING:
Sugar-based food such as custard and syrup should immediately be scraped off without waiting for the surface to cool down. Otherwise the burner/plate may be permanently damaged.
Cleaning the control panel
Clean the control panel and knobs with a damp cloth and wipe them dry.
IMPORTANT:
Damage of the control panel! Do not remove the control knobs for control panel cleaning.
Cleaning the oven
No oven cleaner or any other special cleaning agent is required for cleaning the oven. It is recommended to wipe the oven with a damp cloth while it is still warm.
To clean the side wall, unscrew the 4 screws on the steel rack. After cleaning operation, assemble the steel rack to the oven body again. Do not damage the balancing stands when cleaning the cast grill.
WARNING:
Do not use oven cleaners. No commercial oven cleaner or oven liner protective coating of any kind should be used in or around any part of the oven.

Self-cleaning function
WARNING:
If the oven is hot, self-cleaning mode can not be operated until the oven is cold. If the self cleaning mod malfunctions (powercut), turn the oven off and disconnect the power supply, and call the service.

1 Function knob
2 Thermostat knob
DANGER:
Hot surfaces cause burns!
Do not touch the product during self cleaning step and keep children away from it. Keep at least 30 minutes before removing the remnants.
The oven is equipped with self-cleaning function. The oven is heated to approx. (421 °C) 790 °F and existing dirt is burned to ashes. A strong smoke development may arise. Provide for good ventilation. The self-cleaning should be used after approx, every 10th oven usage.
The self-cleaning has three levels. It can be selected according to level of dirtiness.
Low (LO): it takes 3 hours.
Medium (MED): it takes 4 hours.
High (HI): it takes 5 hours.
1. Remove all accessories from the oven.
2. Before the self-cleaning cycle, remove dirt from exterior surfaces and oven interior with a damp cloth.
WARNING:
Do not clean the door gasket.
Fiberglass gasket is highly sensitive and can get damaged easily.
In case of a damage on the oven door gasket, replace with the new one from the authorized service.
3. Keep the function knob pressed and turn it clockwise to desired level of “Clean”. (L0,MED or HI).
This duration cannot be changed.
WARNING:
The health of some birds and pets is extremely sensitive to the fumes given off during the Self-Cleaning cycle. Always move birds and pts to another closed and well ventilated room. Keep the kitchen we 11-ventilated during the Self-Cleaning cycle also for your health.
4. Oven door cannot be opened during self cleaning. It remains locked for a while after the self-cleaning function ends. Do not force the door lock with handle until the oven get cool.
5. After a clean cycle, remove soil deposits with vinegar water.
During the Self-Dleaning cycle, the gas flow to hob burners will be cut. After turning the function and thermostat knob to off position, the door lock will be automatically opened. When the oven gets cool, the gas flow to hob burners will be started.
During the Self-Cleaning cycle, the lamp cannot be operated.
Clean oven door
To clean the oven door, use warm water with washing liquid, a soft cloth or sponge to clean the product and wipe it with a dry cloth.
Don't use any harsh abrasive cleaners or sharp metal scrapers for cleaning the oven. They scratch surface and destroy the glass.
Removing the oven door
When removing the oven door, make sure oven Is cool and power to the oven has been turned off before removing the door.
Failure to do so could result in electrical shock or burns.
The oven door is heavy and parts of it are fragile. Use both hands to remove the oven door. The door front is glass. Handle carefully to avoid breakage.
Grasp only the sides of the oven door. Do not grasp the handle as it may swing in your hand and cause damage or injury.
Failure to grasp the oven door firmly and properly could result in personal injury or product damage.
To avoid injury from hinge bracket snapping closed, be sure that both levers are securely In place before removing the door, Also, do not force door open or closed - the hinge could be damaged and injury could result.
Do not lay removed door on sharp or pointed objects as this could break the glass. Lay on a flat, smooth surface, positioned so that the door cannot fall over.
Oven door can be removed in order to clean the inside of oven easily
1. Open the oven door completely.
2. Press the hinge clamps located at both sides of the door backwards.

3. Move the oven door to a slightly inclined position.
4. Raise the oven door forwards with your two hands.
5. Once you complete cleaning, perform the same procedure in reverse order to reinstall the oven door.
Once you complete cleaning, perform the same procedure in reverse order to reinstall the oven door.
Replacing the oven lamp
DANGER:
Before replacing the oven lamp, make sure that the product is disconnected from mains and cooled down in order to avoid the risk of an electrical shock.
Hot surfaces may cause burns!
The oven lamp is a special electric light bulb [that can resist up to 300°C (573 °F). See Technical specifications, for details. Oven lamps can be obtained from Authorised Service Agents or technician with license.
If your oven is equipped with a square lamp:
The oven lights can be illuminated with lamp button. The lights are switched on when the door is opened or when the oven is in a cooking cycle. The oven lights are not illuminated during self clean. Each light assembly consist of a removable lens, a light bulb as well as a light socket housing that is fixed in place. Light bulb replacement is considered to be a routine maintenance item.
The oven lights are not illuminated during self clean.
1. Turn off power at the main power supply (your fuse or breaker box).
2. Remove the wire racks as described. See Cleaning the oven.

3. Remove the protective glass cover with a screwdriver.
4. Pull out oven lamp and replace it with new one.
5. Install the glass cover and then the wire racks.
Troubleshooting
Oven emits steam when it is in usd.
• It is normal that steam escapes during operation. » This is not a fault.
Product emits metal noises while heating anti cooling.
• When the metal parts are heated, they may expand and cause noise. » This is not a fault.
Product does not operate.
• The mains fuse is defective or has tripped. » Check fuses in the fuse box. If necessary, replace or reset them.
• Product is not plugged into the (grounded) socket. » Check the plug connection.
• Buttons/knobs/keys on the control panel do not function. » Keylock maybe enabled. Please disable it. (See. Using the keylock, page
Oven light does not work.
• Oven lamp is defective. » Replace oven lamp.
• Power is cut. » Check if there is power. Check the fuses in the fuse box. If necessary, replace or reset the fuses.
Oven does not heat.
• Function and/or Temperature are not set. » Set the function and the temperature with the Function and/or Temperature knob/key.
• In models equipped with a timer, the timer is not adjusted. » Adjust the time. (In products with microwave oven, timer controls only microwave oven.)
• Power is cut. » Check if there is power. Check the fuses in the fuse box. If necessary, replace or reset the fuses.
(In models with timer) Clock display is blinking or clock symbol is on.)
• A previous power outage has occurred. » Adjust the time/Switch of the product and switch it on again.
Consult the Authorised Service Agent or the dealer where you have purchased the product if you can not remedy the trouble although you have implemented the instructions in this section. Never attempt to repair a defective product yourself.