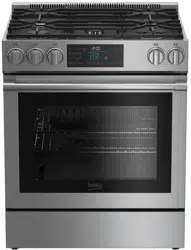
User manual Gas Range
Preparation
Tips for saving energy
The following information will help you to use your appliance in an ecological way, and to save
energy:
- Use dark colored or enamel coated cookware in the oven since the heat transmission will be better.
- While cooking your dishes, perform a preheating operation if it is advised in the user manual or cooking instructions.
- Do not open the door of the oven frequently during cooking.
- Try to cook more than one dish in the oven at the same time whenever possible. You can cook by placing two cooking vessels onto the wire shelf.
- Cook more than one dish one after another. The oven will already be hot.
- Defrost frozen dishes before cooking them.
- Use pots/pans with cover for cooking. If there is no cover, energy consumption may increase 4 times.
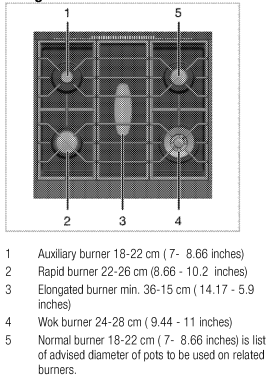
- Select the burner which is suitable for the bottom size of the pot to be used. Always select the correct pot size for your dishes. Larger pots require more energy.,
Initial Operation
- Before first usage of your appliance, don't forget to remove the sticker on the control panel
- IMPORTANT: Smoke and smell may emit for a couple of hours during the Initial operation. This is quiienormai. Ensure that the room Is well ventilated
to remove the smoke and smell. Avoid direc-tlyinhaiing the smoke and the smell that emits.
Setting the time
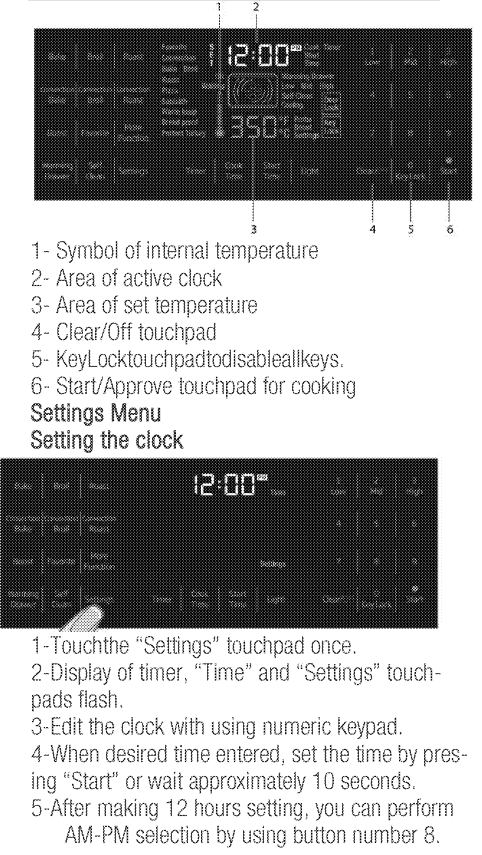
Settings the Time
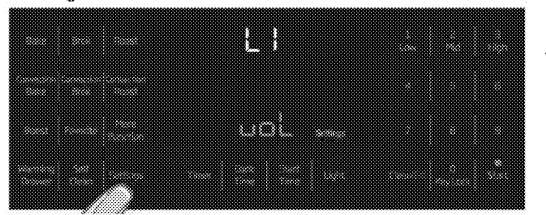
- Touchthe “Settings” touchpad twice.
- “Settings” touchpad flashes and “vol” icon appears in the display.
- Adjust tone with touching 1,2 and 3 in the numeric keypad,
- When desired tone entered, set the tone by touching start” or wait 10 seconds.
Setting 12 hr - 24 hr
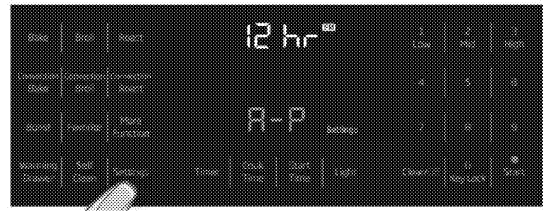
- Touchthe “Settings” touchpad three times,
- “Settings” touchpadfIashes.
- Adjust 12 hr or 24 hr with touching and 2 in the numeric keypad,
- Set the 12-hr or 24-hr by pressing “Start” or wait approximately 10 seconds.
Settings Temperature Unit
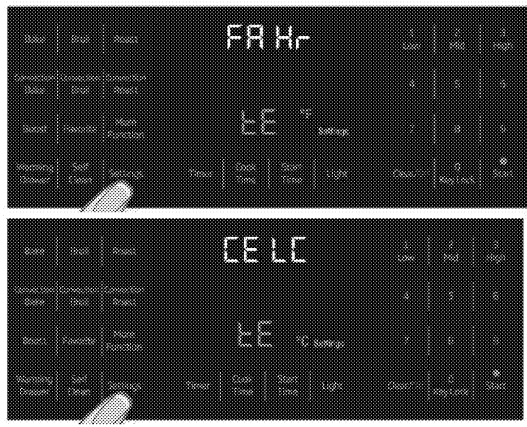
- Touch the “Settings” touchpad four times.
- “Settings” touchpad and icon of °F or °C flashing.
- Adjust °For°C with touching and 2 in the numeric keypad,
- When desired unit entered, set the temperature unit by touching “Start” or wait approximately 10 seconds,
Using Oven
- Stand-by mode is active when oven has power. The display shows only active time.
- When stand-by mode is active;
- Bake
- Broil
- Roast
- Convection Broil
- Convection Bake
- Convection Roast
- More Function
- Self Clean
- Warming Drawer
- Settings
- Light
- Key lock
- Favorite
- Timer
- touchpads are active,
Setting Temperature and Function Mode
Sample display for initial operation mode of oven functions,
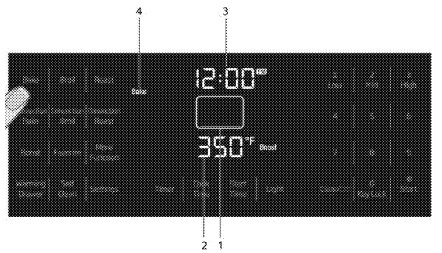
- Functions icon
- Area of set temperature
- Area of active clock
- Function mode name
Recornended temperature is shown in the area of set temperature and working heaters or components are shown in the functions icon.
Temperature”, “Cook Time”, and "Cook End Time" can be adjustable when functions are selected. Temperature should be adjustable when functions (except Broil, Convection Broil. Warm Keep and Warming Drawer) are firstly selected, Set temperature adjusts with a numeric keypad. You can change set temperature after starting cook, if you want to change set temperature after starting cook, touch same function and change set temperature, Broil, Convection Broil, Warm Keep and Warming Drawer functions' temperature can adjustwithpressing1-Low,2-Mid and 3-High in the numeric keypad.
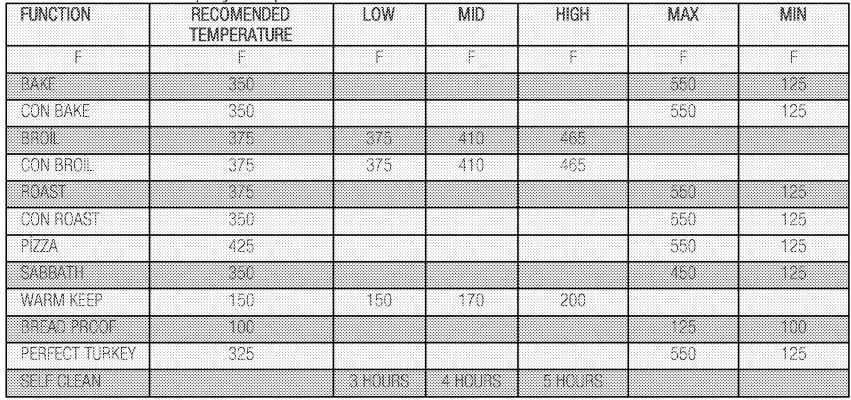
Function Table
- Function table indicates the functions that can be used in the oven and their respective maximum, minimum and initial display temperatures,
How to use the hob
General information about cooking
WARNING: Never fill the pan with oil more than one third of it. Do not leave the hob unattended when heating oil. Overheated oils bring risk of fire. Never attempt to extinguish a possible fire
CAUTION: Never fill the pan with oil more than one third of it. Do not leave the hob unattended when heating oil. Overheated oils bring risk of fire. Never attempt to extinguish a possible fire
- Before frying foods, always dry them well and gently place into the hot oil. Ensure complete thawing of frozen foods before frying.
- Do not cover the vessel you use when heating oil.
- Place the pans and saucepans in a manner so that their handles are not over the hob to prevent heating of the handles. Do not place unbalanced and easily tilting vessels on the hob.
- Do not place empty vessels and saucepans on cooking zones that are switched on. They might get damaged.
- Operating a cooking zone without a vessel or saucepan on it will cause damage to the product. Turn off the cooking zones after the cooking is complete.
- As the surface of the product can be hot, do not put plastic and aluminum vessels on it. Such vessels should not be used to keep foods either.
- Use flat bottomed saucepans or vessels only.
- Put appropriate amount of food in saucepans and pans. Thus, you will not have to make any unnecessary cleaning by preventing the dishes from overflowing.
- Do not put covers of saucepans or pans on cooking zones.
- Place the saucepans in a manner so that they are centered on the cooking zone.
- When you want to move the saucepan onto another cooking zone, lift and place it onto the cooking zone you want instead of sliding it.
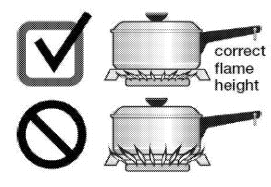
Gas cooking
- Size of the vessel and the flame must match each other. Adjust the gas flames so that they will not extend the bottom of the vessel and center the vessel on saucepan carrier.
Using the hobs
Igniting the gas burners
Gas burners are controlled with gas hob knobs.
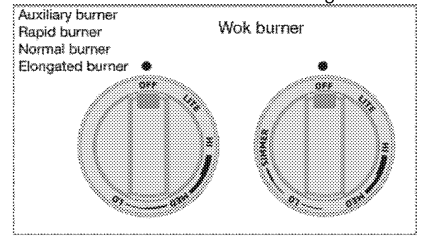
- Keep burner knob pressed.
- Turn it counterclockwise to level “LITE" Gas is ignited with the spark created.
- Adjust it to the desired cooking power
Turning off the gas burners
- Turn the knob to off (upper) position.
Wok burner
- Wok burners help you to cook faster. Wok, which is particularly used in Asian kitchens is a kind of deep and flat fry-pan made of sheet metal, which is used to cook minced vegetable and meat at strong flame in a short time.
- Since meals are cooked at strong flame and in a very short time in such fry-pans that conduct the heat rapidly and evenly, the nutrition value of the food is preserved and vegetables remain crispy. You can use wok burner for regular saucepans as well.
How to operate the oven
Tips for baking
- Use non-sticky-coated appropriate metal plates or aluminum vessels or heat-resistant silicone moulds.
- Make best use of the space on the rack.
- Place the baking mould in the middle of the shelf.
- Select the correct rack position before turning the oven or Broil on. Do not change the rack position when the oven is hot.
- Always place oven racks in desired location while oven is cool. If rack must be moved while oven is hot, do not let the potholder contact hot heating element in oven.
- Keep the oven door closed.
Tips for roasting
- Seasoning with lemon juice and black pepper will improve the cooking performance when cooking a whole chicken, turkey or a large piece of meat.
- Meat with bones takes about 15 to 30 minutes longer before it is cooked than a roast of the same size without bones.
- You should calculate about 4 to 5 minutes cooking time per centimeter height of the meat.
- Let meat rest in the oven for about 10 minutes after the cooking time. The juice is better distributed all over the roast and does not run out when the meat is cut.
- Fish in a fire-resistant dish should be placed on the rack at the medium or lower level.
Tips for broiling
- Broiling is ideal for cooking meat, fish and poultry and will achieve a nice brown surface without it drying out to much. Flat pieces, meat skewers and sausages are particularly suited for broiling as are vegetables with a high water content such as tomatoes and onions.
- Distribute the pieces to be broiled on the wire shelf.
- If the broiling is on the wire shelf, locate a dripping pan under it in order to collect the fat.
- Add some water in dripping pan for easy
- Fire danger due to food which is unsuitable for grilling! Only use food for grilling which is suitable for intensive grilling heat. Do not place the food too far in the back of the grill. This is the hottest area and fat food may catch fire.
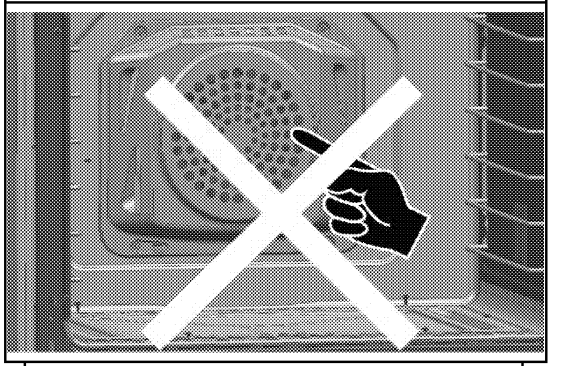
- WARNING: Do not insert your finger or any other object in the holes of the back wall of the oven
Switch on the gas oven
The gas oven is automatically ignited by means of the function and thermostat knobs.
- Keep the function knob pressed and turn it clockwise to desired operating mode.
- Keep the thermostat knob pressed and turn it clockwise to the desired temperature.
- After 30-75 seconds, the burner will ignite
Cooking times table
- 1 st rack of the oven is the bottom rack.
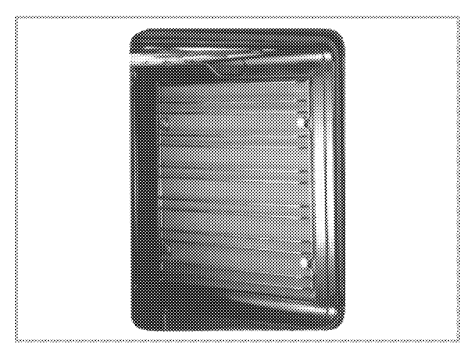
- Maximum load capacity of oven tray: 4 kg
- After turning the function and thermostat knob and glow. When the igniter reaches a certain temperature, gas will begin to flow and the burner will be ignited. The illumination during ignition is normal.
Switch off the gas oven
- Turn the function and thermostat knobs to off (upper) position
The timings in this chart are meant as a guide, timings may vary due to temperature of food, thickness, type and your own preference of cooking.
Maintenance and care
General information
Service life of the product will extend and the possibility of problems will decrease if the product is cleaned at regular intervals.
DANGER: Disconnect the product from mains supply “"^before starting maintenance and cleaning works. There is the risk of electric shock!
DANGER: Allow the product to cool down before you 'clean it. Hot surfaces may cause burns!
Keep the appliance area clear and free from combustible materials, gasoline and other flammable vapors and liquids.
- Do not obstruct the flow of combustion and ventilation air.
- Clean the product thoroughly after each use. In this way it will be possible to remove cooking residues more easily, thus avoiding these from burning the next time the appliance is used.
- No special cleaning agents are required for cleaning the product. Use warm water with washing liquid, a soft cloth or sponge to clean the product and wipe it with a dry cloth.
- Always ensure any excess liquid is thoroughly wiped off after cleaning and any spillage is immediately wiped dry.
- Do not use cleaning agents that contain acid or chloride to clean the stainless or inox surfaces and the handle. Use a soft cloth with a liquid detergent (not abrasive) to wipe those parts clean, paying attention to sweep in one direction.
The surface might get damaged by some detergents or cleaning materials. Do not use aggressive detergents, cleaning powders/creams or any sharp objects during cleaning. Do not use harsh abrasive cleaners or sharp metal scrapers to clean the oven door glass since they can scratch the surface, which may result in shattering of the glass.
Do not use steam cleaners to clean the appliance as this may cause an electric shock.
Cleaning the burner/plate
Gas hobs
- Remove and clean the saucepan carriers and burner caps.
- Clean the hob.
- Refit the burner caps and make sure that they are seated correctly.
- When installing the pan supports, pay attention to place the saucepan carriers so that the burners are centered.
Cleaning the control panel
- Clean the control panel and knobs with a damp cloth and wipe them dry._
- Do not remove the control buttons/knobs to Control panel may get damaged!
Cleaning the oven
- No oven cleaner or any other special cleaning agent is required for cleaning the oven. It is recommended to wipe the oven with a damp cloth while it is still warm.
- To clean the side wall, unscrew the 4 screws on the steel rack. After cleaning operation, assemble the steel rack to the oven body again. Do not damage the balancing stands when cleaning the cast grill
Clean oven door
- To clean the oven door, use warm water with washing liquid, a soft cloth or sponge to clean the product and wipe it with a dry cloth.
- Don't use any harsh abrasive cleaners or 11 Jsharp metal scrapers for cleaning the oven door. They could scratch the surface and destroy the glass.
Removing the oven door
- When removing the oven door
- Make sure oven is cool and power to the oven has been turned off before removing the door.
- Failure to do so could result in electrical shock or burns.
- The oven door is heavy and parts of it are fragile. Use both hands to remove the oven door. The door front is glass. Handle carefully to avoid breakage.
- Grasp only the sides of the oven door. Do not grasp the handle as it may swing in your hand and cause damage or injury.
- Failure to grasp the oven door firmly and properly could result in personal injury or product damage.
- To avoid injury from hinge bracket snapping closed, be sure that both levers are securely in place before removing the door. Also, do not force door open or closed—the hinge could be damaged and injury could result.
- Do not lay removed door on sharp or pointed objects as this could break the glass. Lay on a flat, smooth surface, positioned so that the door cannot fall over.
- Oven door can be removed in order to clean the inside of oven easily
- Open the oven door completely,
- Press the hinge damps located at both sides or the door backward,
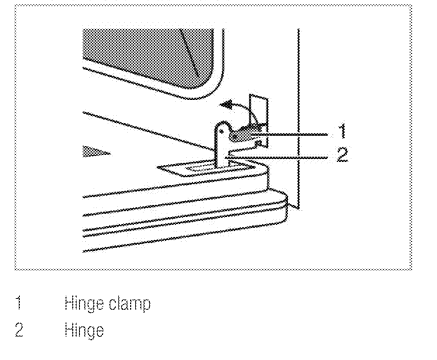
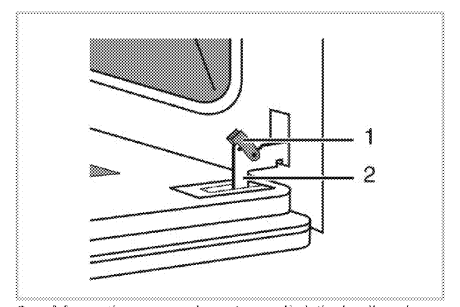
3. Move the oven door to a slightly inclined position.
4. Raise the oven door forward with your two hands.
5. Once you complete cleaning, perform the same procedure in reverse order to reinstall the oven door
Replacing the oven lamp
- Before replacing the oven lamp, make sure that the product is disconnected from mains and cooled down in order to avoid the risk of an electrical shock. Hot surfaces may cause burns!
- The oven lamp is a special electric light bulb that can resist up to 30Q°C (573 °F). See Technical specifications for details. Oven lamps can be obtained from Authorised Service Agents or technicians with license.
- Position of lamp might vary from the fingure
If your oven is equipped with a square lamp: The oven lights can be illuminated with lamp button. The lights are switched on when the door is opened or when the oven is in a cooking cycle. The oven lights are not illuminated during self clean. Each light assembly consists of a removable lens, a light bulb as well as a light socket bousing that is fixed in place. Light bulb replacement is considered to be a routine maintenance item.
The oven lights are not illuminated during self clean.
1. Turn off power at the main power supply (your fuse or breaker box).
2. Remove the wire racks as described. See Cleaning the oven.

3. Remove the protective glass cover with a screwdriver.
4. Pull out oven lamp and replace it with new one.
5. Install the glass cover and then the wire racks
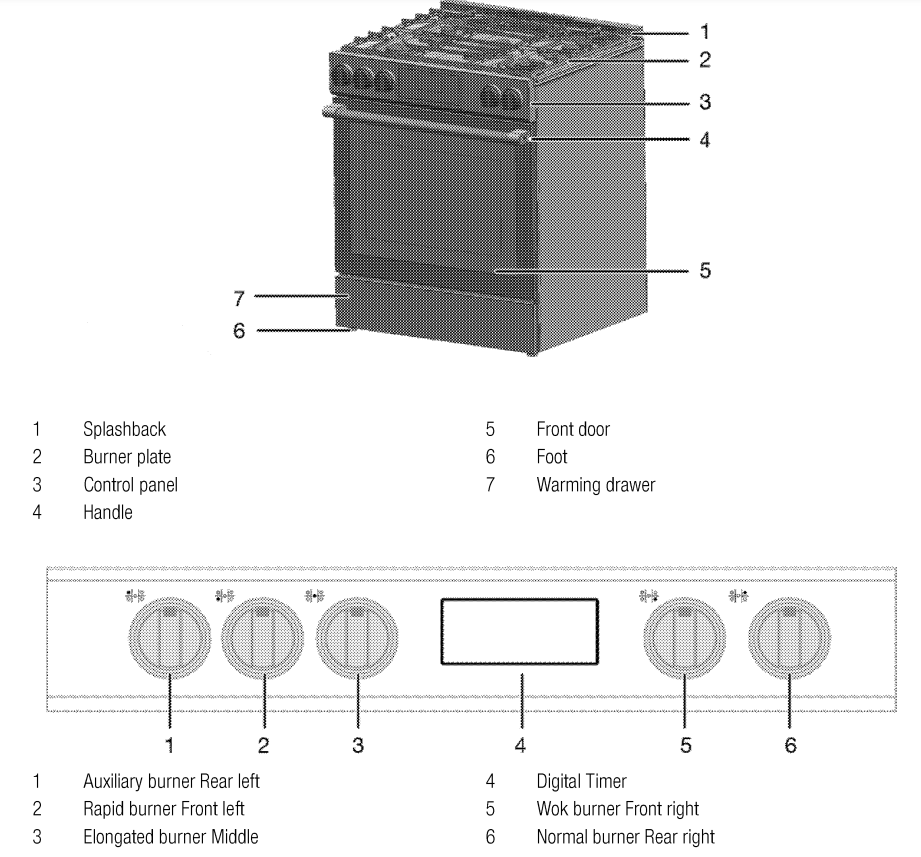
Overview
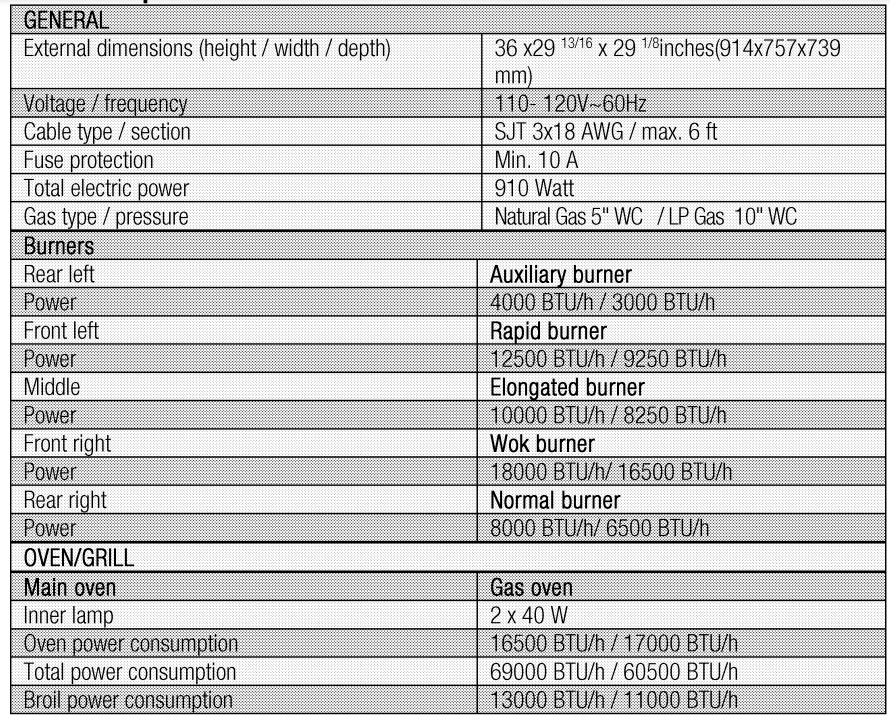
Technical specifications
Troubleshooting
1. Oven emits steam when it is in use.
- It is normal that steam escapes during operation. »> This is not a fault.
2. Product emits metal noises while heating and cooling.
- When the metal parts are heated, they may expand and cause noise. »> This is not a fault.
3. There is no ignition spark.
- No current. »> Chock fuses in the fuse box.
4. There is no gas.
- Main gas valve is closed. »>Open gas valve.
- Gas pipe is bent. »>lnstall gas pipe properly.
5. Burners are not burning properly or at all.
- Burners are dirty. »>Clean burner components.
- Burners are wet. »>Dry the burner components.
- Burner cap is not mounted safely. »>Mount the burner cap properly.
- Gas valve is closed. »>Open gas valve.
Consult the Authorised Service Agent or technician with licence or the dealer where you have purchased the product if you can not remedy the trouble although you have implemented the instructions in this section. Never attempt to repair a defective product yourself.