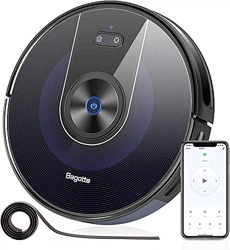
Documents: Go to download!
- User Manual - (English, French, Spanish, German, Italian)
- Bagotte BG800 App Install Guide - (English)
User Manual BG800 Vacuum Cleaner

About Your Robot
Main body
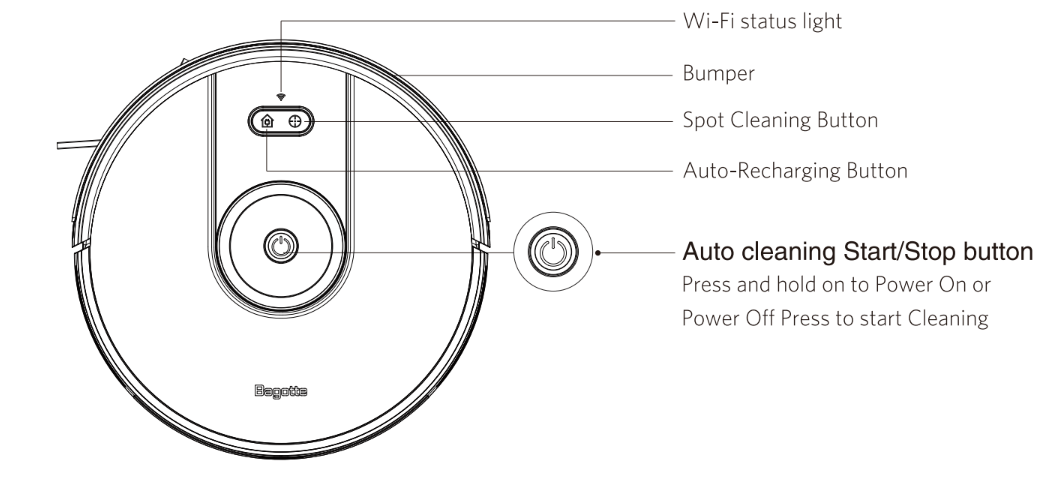

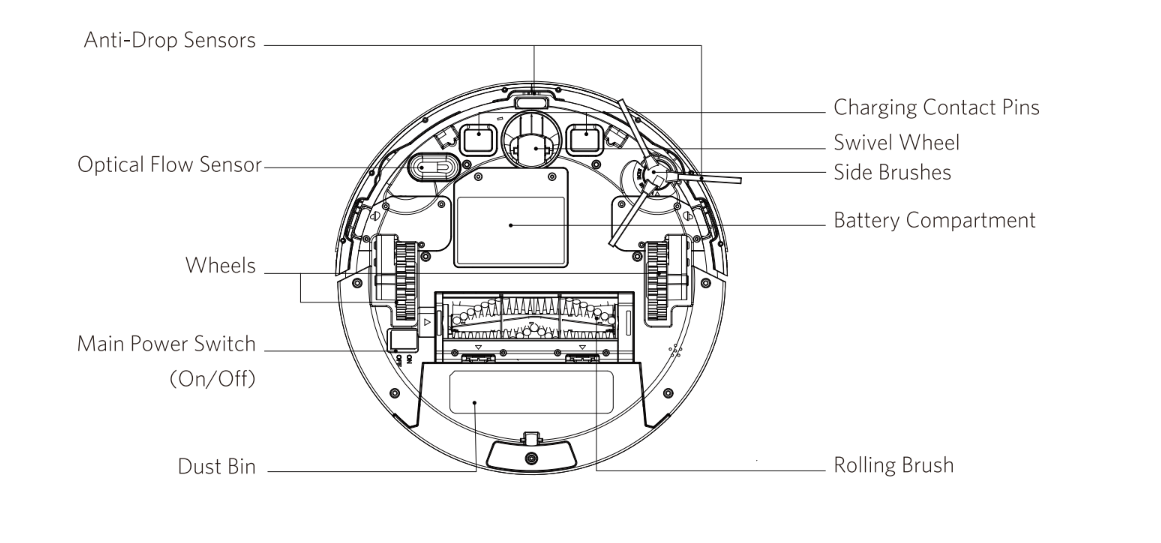
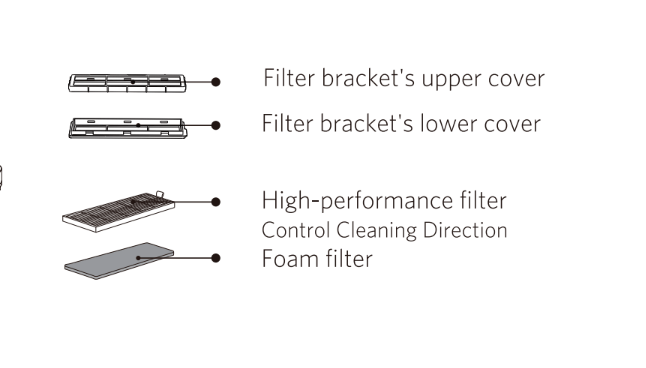
Accessories in the Box


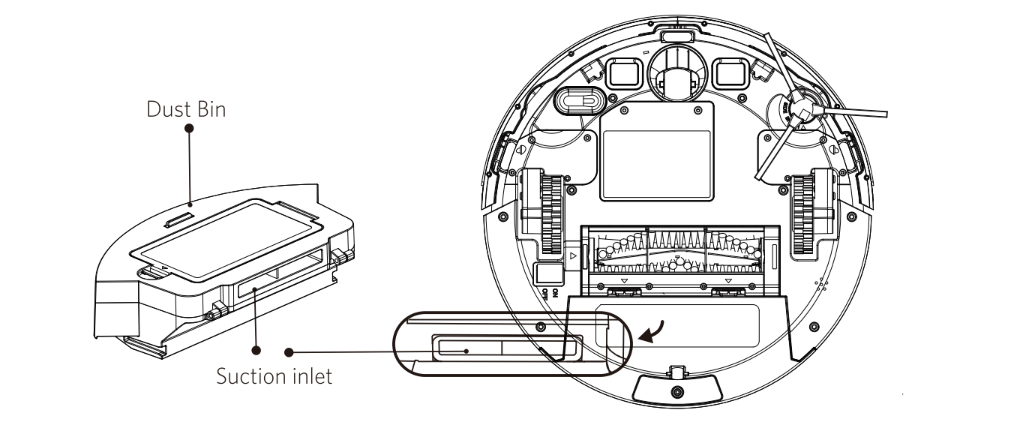
Dust Bin and Suction Inlet
Charging Base

Remote Control
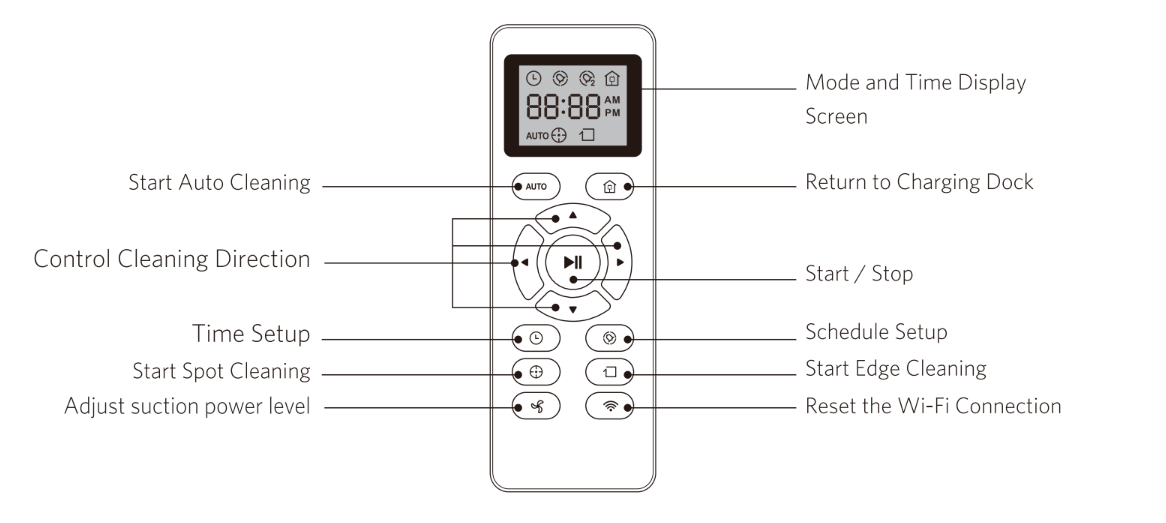
Install 2 AAA batteries before using the remote control for the first time. Make sure the positive and negative ends are facing the correct polarity direction as marked in the battery compartment.
LED Indication
You can see the status of Robot from the LED indicator.
- Breathing purple
- Charging
- Solid blue
- Standby/ Cleaning/ Fully charged
- Solid purple
- Lower power and returning to Charging Base
- Off
- Robot is off
- To conserve power, the light automatically turns off when robot is not docked to the Charging Base and has been inactive for 10 minute.
- Flashing/ Solid red + Beeping
- Robot has an error.
- Refer to the “ Troubleshooting>Error Tone” section in this
manual for solutions.
Using Your Robot
Important Tips Before Use


- Remove power cords and small objects from the floor that may entangle robot.
- Robot may climb on top of objects less than 0.63 in/16 mm in height. Remove these objects if possible.
- Keep robot away from wet areas.
- Keep robot away from spaces lower than 2.87 in/73mm to prevent robot from getting stuck. If necessary, place a physical barrier to block off the problem areas.
- Fold tasseled edges of area rugs underneath to prevent tangling robot. Avoid cleaning very dark-colored high-pile rugs or rugs thicker than 1.02 in/26 mm as they may cause robot to malfunction.
- Anti-drop sensors prevent robot from tumbling down stairs and steep drops. They may work less effectively if dirty or used on reflective/very dark-colored floors. It is recommended to place physical barriers to block off areas where robot may fall.
Place physical barriers in front of fireplaces and areas that may cause damage to robot if entered.
Preparation
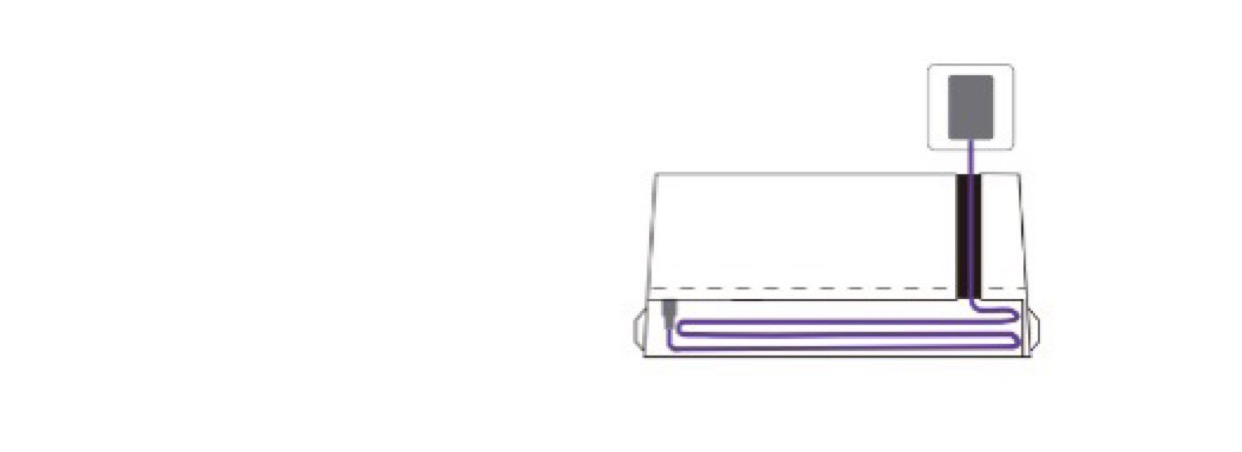
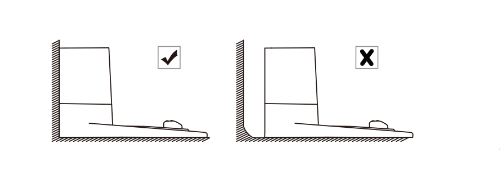
- Plug in the Charging Base, and take the rest wire into the trunking at the bottom of Charging Base.
Note: If you don't put the rest wire into the trunking, which may stuck the robot while charging or cleaning.
- Charging Base Position
- Place the Charging Base on a hard, level surface and against a wall.
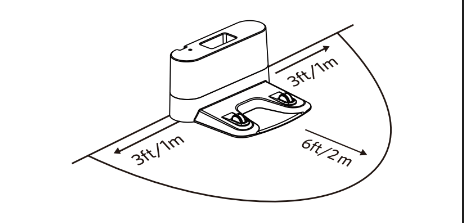
- Remove objects within 3 ft/1m of the left and right side and within 6 ft/ 2m of the front of the charging base.
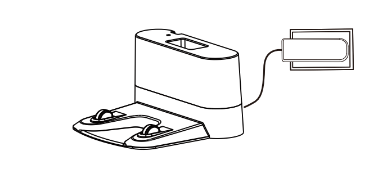
- Connect the round connector of the adapter into the power socket on the Charging Base and the other end into a wall outlet.
- Install the Charging Base in a location that Robot can easily access. It is recommended to place the Charging Base against a wall, and on a hard-level surface rather than on rugs or carpets.
- Always keep the Charging Base plugged in, otherwise Robot will not automatically return to it.
- Install Side Brushes
- Attach side brushes to the bottom of robot by pressing a brush into each slot.
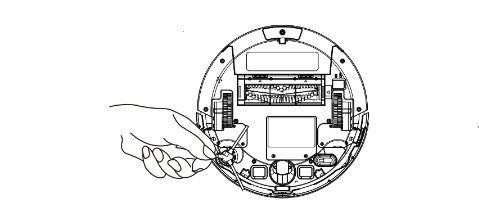
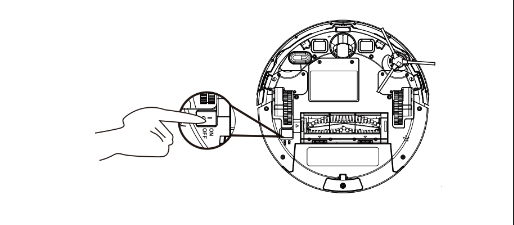
- Turn on the main power switch on the bottom of robot.
Charge Your Robot
- Robot has a pre-installed rechargeable battery that has to be fully charged before use.
- Robot returns to the Charging Base at the end of a cleaning cycle or when its battery is
running low.
Method 1: Attach Robotto the Charging Base by aligning its charging pins with the charging pins on the base.
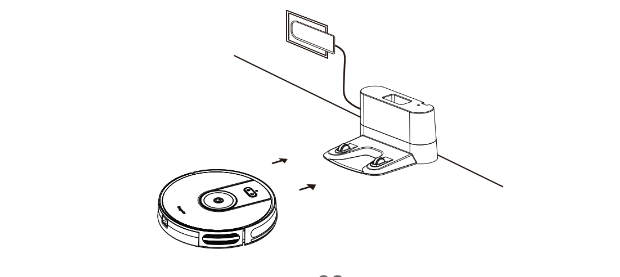
Method 2: Press the button on the remote control to return robot to the Charging Base.
- Turn off the main power switch if robot will not be used for a long period of time.
- To preserve the battery's lifespan , recharge at least once evry 6 months.
Use Your Robot with the Bagotte App
To enjoy all available features, it is recommended to control your robot via the Bagotte App.
Before you start, make sure that:
- Your smartphone or tablet is connected to a Wi-Fi network.
- Your smartphone or tablet is running iOS 8.0 (or above) or Androi 4.4 (or above).
- The 2.4GHz band wireless signal is enabled on your wireless router.
- The Wi-Fi status light on robot is slowly flashing blue.
- Robot is attached to the Charging Base to ensure it has enough power during setup.

- Download the Bagotte App from the App Store (iOS devices) or Google Play (Androi devices).
- Open the app and create a user account.
- Tap the "+" icon in the top right corner to add your robot to your Bagoote account.
- Follow the instructions in the app to set up the Wi-Fi connection.
- After connecting successfully, you can control robot via the app.
- With the app, you can select a cleaning mode, set the time, schedule a cleaning, view the system status, receive notifications and access additional features.
Wi-Fi Status Light

- If you have any problems during the Wi-Fi seup process, refer to the "Troubleshooting>Wi-Fi connection" section in this Manual.
- If robot gets stuck in any space, tap Find My Robot in the app to find the machine. This function is available in the app only.
Reset the Wi-Fi Connection
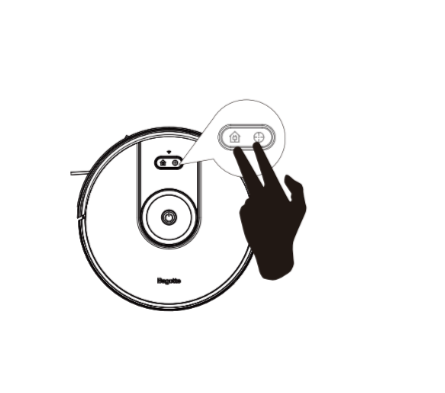
Method 1: Press and hold these two button at the same time on robot for 3 seconds to reset the Wi-Fi connection if necessary.
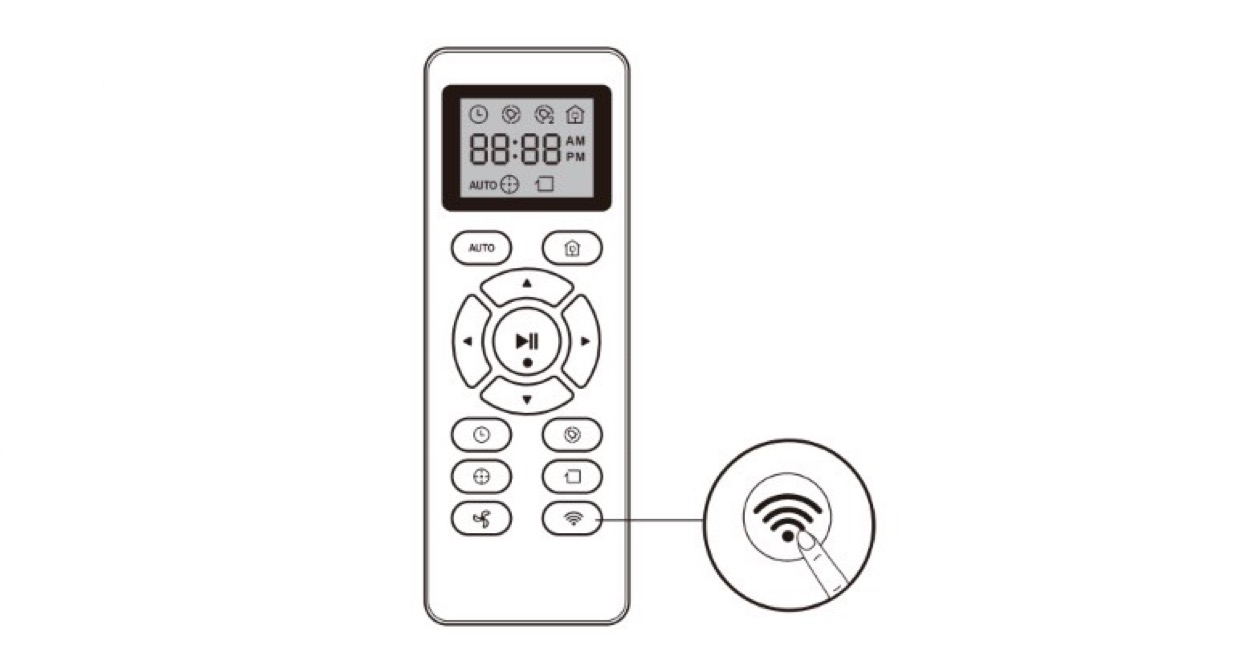
Method 2: Press and hold Wi-Fi symbol on the remote control for 3 seconds to reset the Wi-Fi connection if neccessary
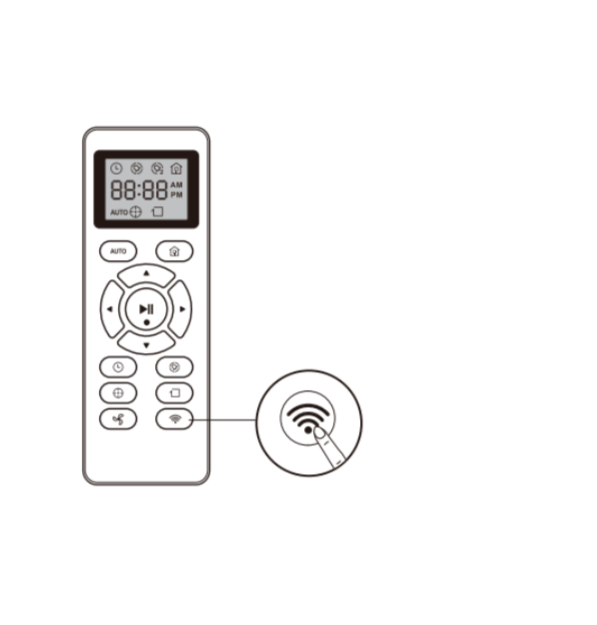
- You will hear a beep when the Wi-Fi connection has been reset and the Wi-Fi status light will slowly flash blue. Now you can follow the Wi-Fi instructions in the Bagotte App to set up the Wi-Fi connection.
Schedule Cleaning
With the Bagotte App, you can schedule robot to start cleaning at a particular time.
- You can set the time and customize the cleaning schedules from Sunday to Saturday on the Bagotte App. This function is available in the app only.
Start/Stop Cleaning
1. Start Cleaning Cycle
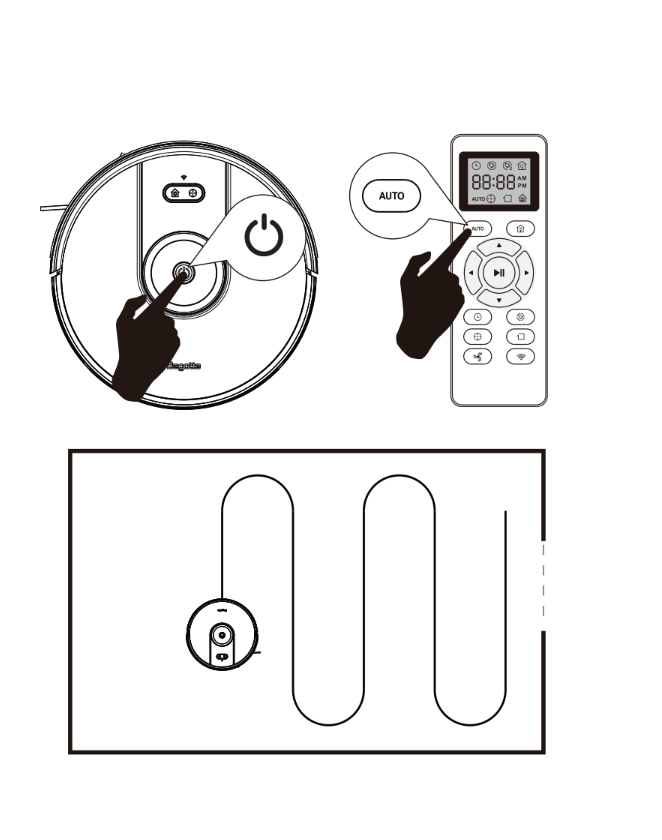
- Press the power button once to wake up the Robot
- Press the power button again to start a cleaning cycle (or press the AUTO button on Remote Control
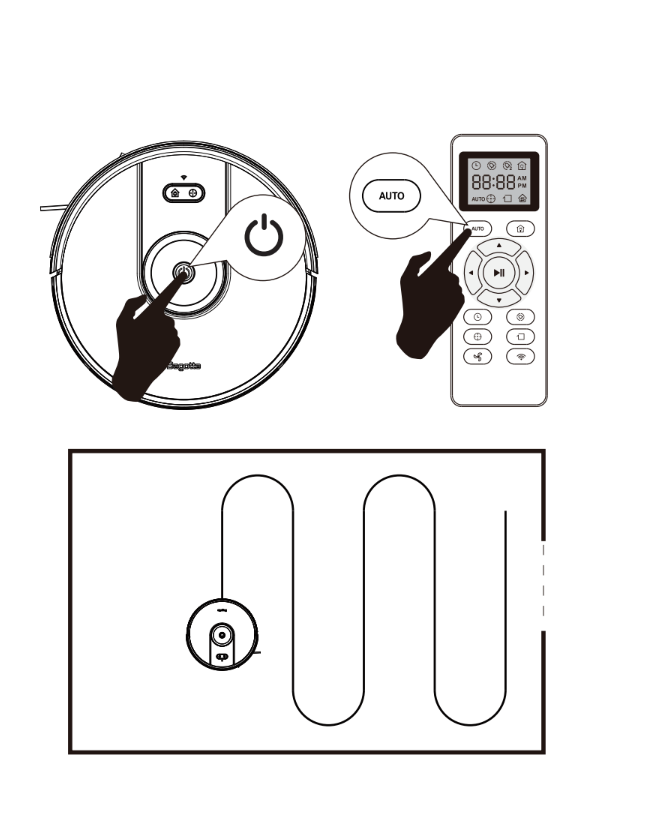
- If its battery gets low before finishing a cleaning cycle, robot will return to the Charging Base to recharge
- If the Charging Base is inaccessible, robot will not be able to recharge. It will return to its starting location and the cleaning cycle will end, please place the robot manually on Charging Base for charging. (Refer Active the Robot)
Note: Please refer to section 3.5 for more Cleaning Mode.
2. Pause
- To pause the robot during a cleaning cycle press the power button or press the pause symbol button on Remote Control.
- To resume the cleaning cycle, press the power button again.
- To send robot back to The Charging Base, press charge symbol button.
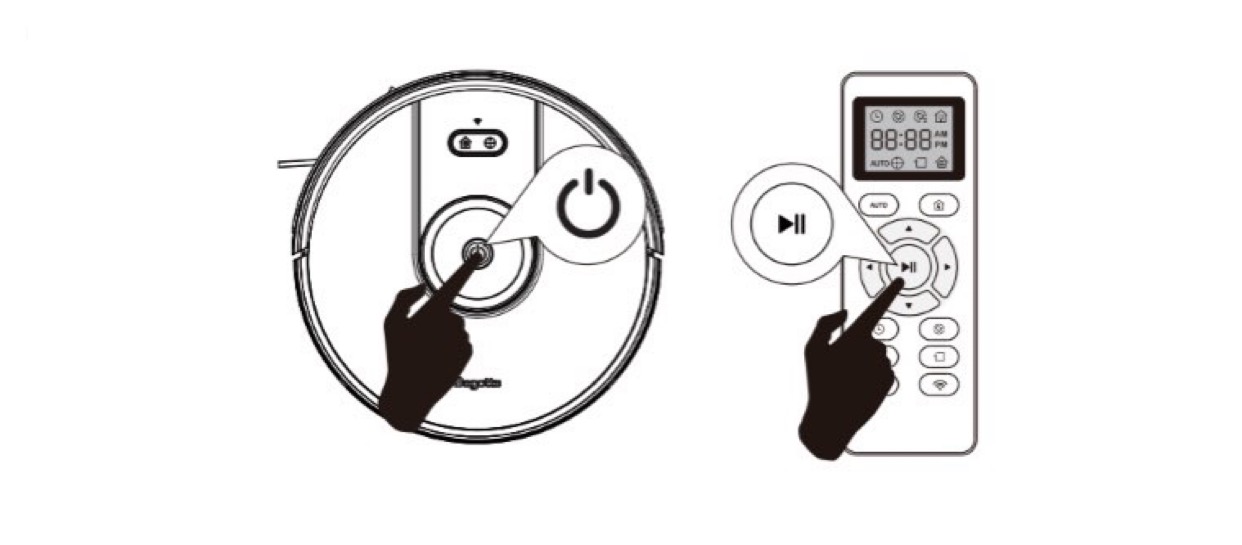
Note : The actions listed above can also be managed from the Remote Control.
3. Power OFF
- To end the cleaning cycle and put robot in standby mode, press and hold the power button until robot indicators turn off.
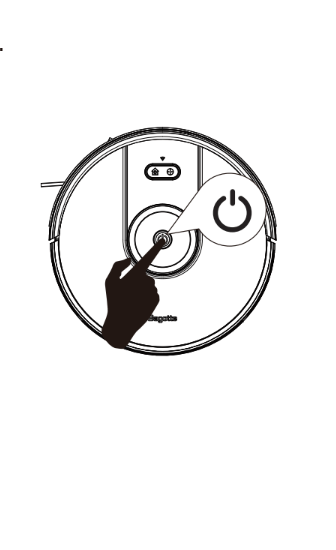
Cleaning Mode
1. Auto Cleaning
- At the start of a cleaning cycle, robot will map out your home and clean them efficientlty.
- At various times throughout the cleaning cycle, robot touches up around the edges of the room, as well as chair legs and other furniture.
- Robot continues this process until it has cleaned entire level of your home. If its battery gets low before finishing a cleaning cycle, robot will auto returns to the Charging Base to recharge.
- Once robot finishes its cleaning cycle, it returns to Charging Base to recharge.
2. Spot Cleaning
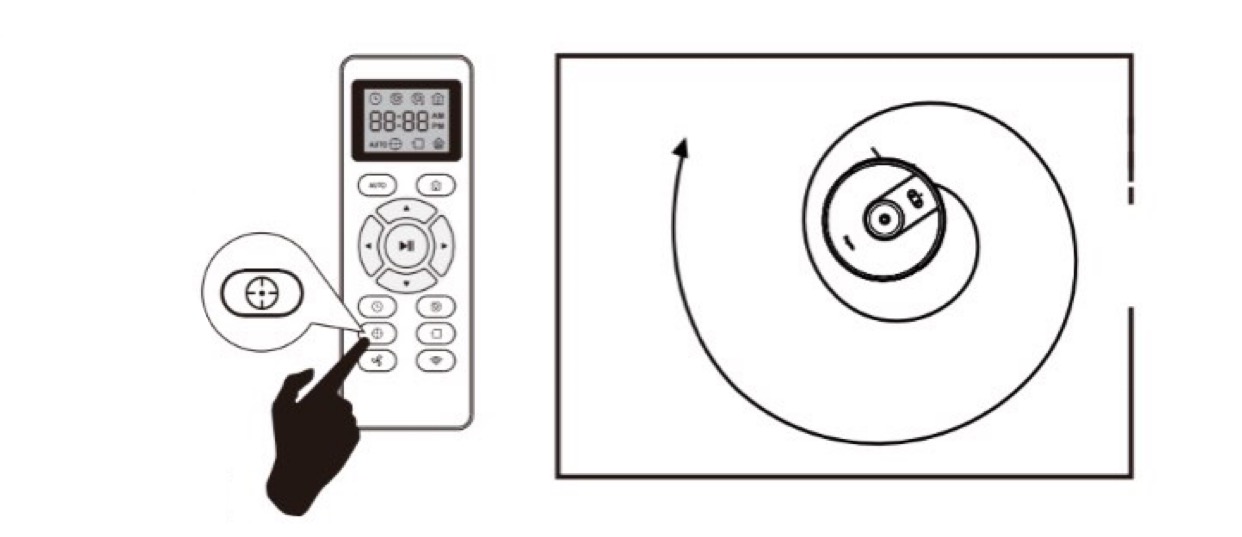
- When you select Spot Cleaning, robot intensely cleans a localized area by spiraling outward about 3 feet (1 meter) in diameter and then spiraling inward to where it started.
- When Spot Cleaning, robot boosts is vacuum power to provide the best cleaning possible where you need it.
- To use Spot Cleaning, place robot on top of the localized debris and press
 Spot on the Remote Control or press
  botton on the robot.
3. Edge Cleaning
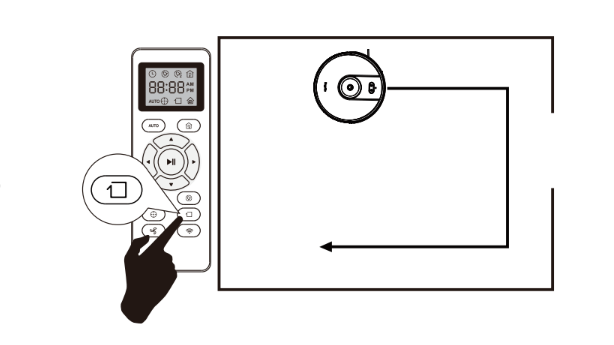
After robot finishes cleaning the open areas of your floor, it uses Edge Clean to ensure that it has cleaned along walls and around furniture legs. If you prefer a quicker edge cleaning, press the  button on Remote Control
4. Adjust suction Cleaning
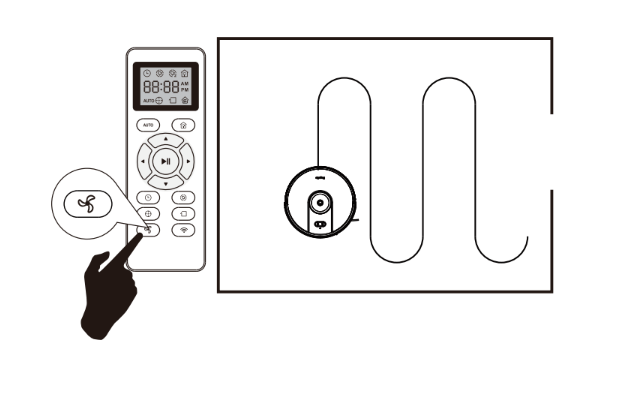
In Auto, Spt, Edge Cleaning mode, press  on the remote control repeatedly to adjust the suction power level.

Set Time and Scheduled Cleaning
1. Set Time
Make sure the time is set correctly to your local time before setting a scheduled cleaning.
- Make sure the main power switch on the bottom of robot is turned on.
- Press
 on the remote control.
 - Press
 to set the "hour" and "minute". Note: Make sure AM/PM is set correctly
 - Press
 or
or  symbol to save the setting. Robot will BEEP ONCE to indicate the time has been set.
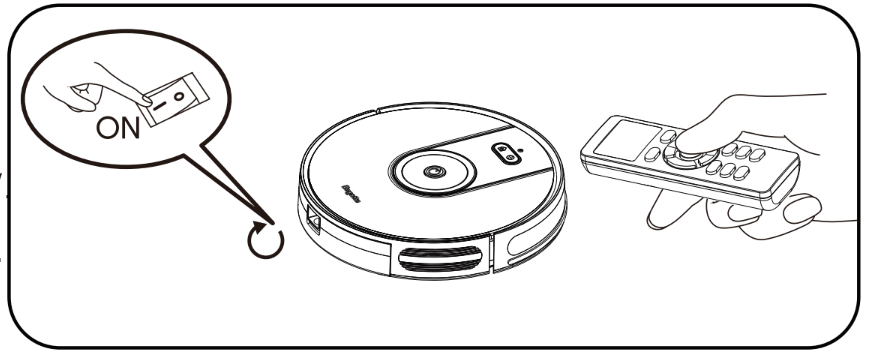

To ensure the time is set successfully, make sure robot is turned on. You will hear a beep when the tome has been set.
2. Set a Scheduled Cleaning
- You can schedule robot to start cleaning at a specified time.
- To cancel a previously scheduled cleaning, press and hold
 for 3 seconds until robot beeps twice and
  disappears.
Note: Before setting a scheduled cleaning, make sure the time has been set correctly to your local time; refer to the previous section "Set Time" for how to set the time.
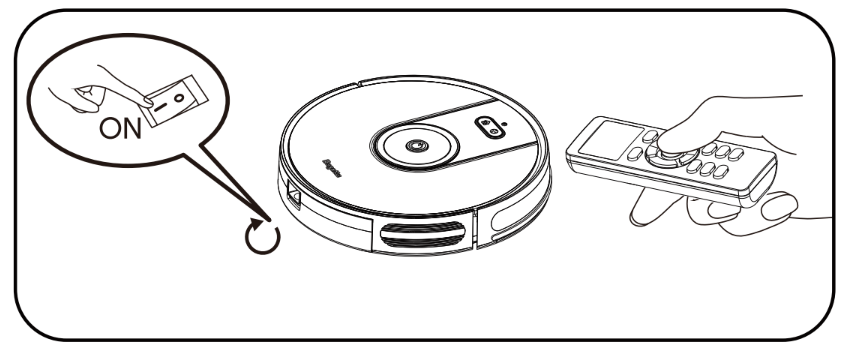
- Make sure the main power switch on the bottom of robot is turned on.
- Press
 on the remote control.
  will blink on the display.
 - Press
 to set the "hour" and "minute". Note: Make sure AM/PM is set correctly
 - Press
 or
or  symbol to save the setting. Robot will BEEP ONCE to indicate the time has been set.

To ensure the time is set successfully, make sure robot is turned on. You will hear a beep when the time has been set.
Use the Boundary Strip.
With the Boundary Strip, you can keep robot away from any area or item you do not want robot to clean.
Robot will recognize the Boundary Strip and will not cross into the blocked-off area.
- Identify the area or item you do not want robot to get close to.
- If necessary, use scissors to cut Boundary Strip to a shorter length. Be sure to correctly measure the length before cutting.

- Apply the supplied strips of adhensive tape to lay the Boundary Strip flat on the floor. Make sure the strips is placed FLAT on the floor or uder an area rug
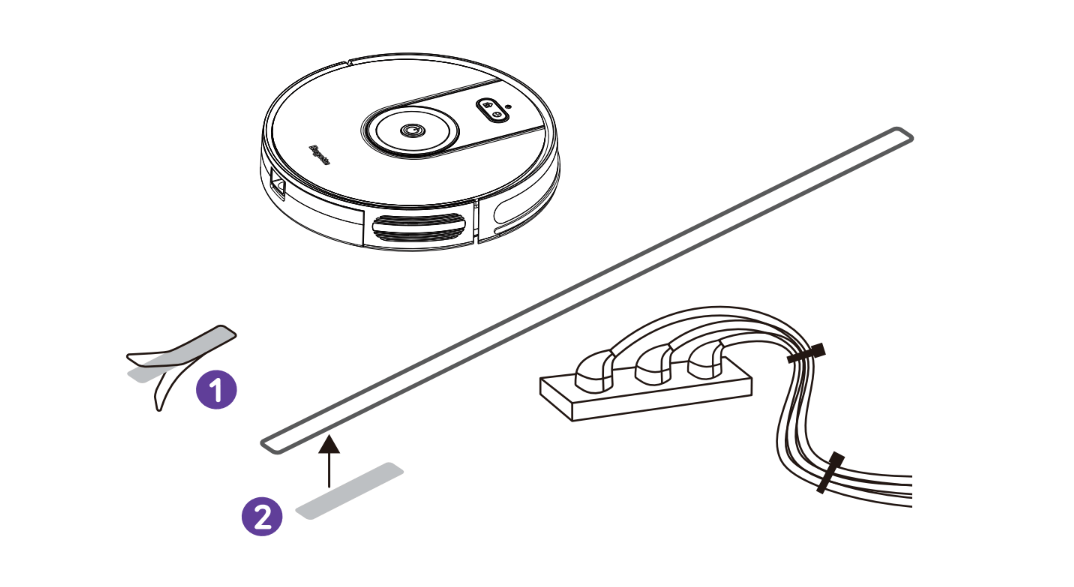
- If the Boundary Strip is rolled up, remove and then re-apply on the floor with adhensive tape. Otherwise the Boundary Strip may not work well.
- Make sure the Boundary Strip is placed on the same sureface plance robot is used on.
- Be careful not to damage the floor when using adhansive tape. It is not recommended for use on carpets.
- Keep the Boundary Strip away from abjects that emit excessive heat.
Use Your Robot with Amazon Alexa/the Google Assistant
Amazon Alexa or the Google Assistant is a smart voice control device that anables you to control robot with your voice.
Before you start, make sure that:
- Robot is attached to the Charging Base to ensure there is enough power.
- Robot is connected with the Bagotte app.
- You have an Alexa-enabled device ( i.e Amazon Echo, Echo Dot and Amazon Tap, Echo Show, Echo Spot) or a device enabled with the Google Assistant (i.e Google Home, Google Home Mini). These devices are sold separatedly.
- The Amazon Alexa app or Google Home app is already installed on your smart device, and you have created an acoount.
To control Robot with Amazon Alexa
- Open the Amazon Alexa app and select “Skills & Game” from the menu.
- On the Skills screen, search for “Smart Life”.
- Once you have found the “Smart Life” skill, tap Enable.
- Login with your Bagotte a ccount so that Alexa can control your robot.
- Say simple commands to Alexa.
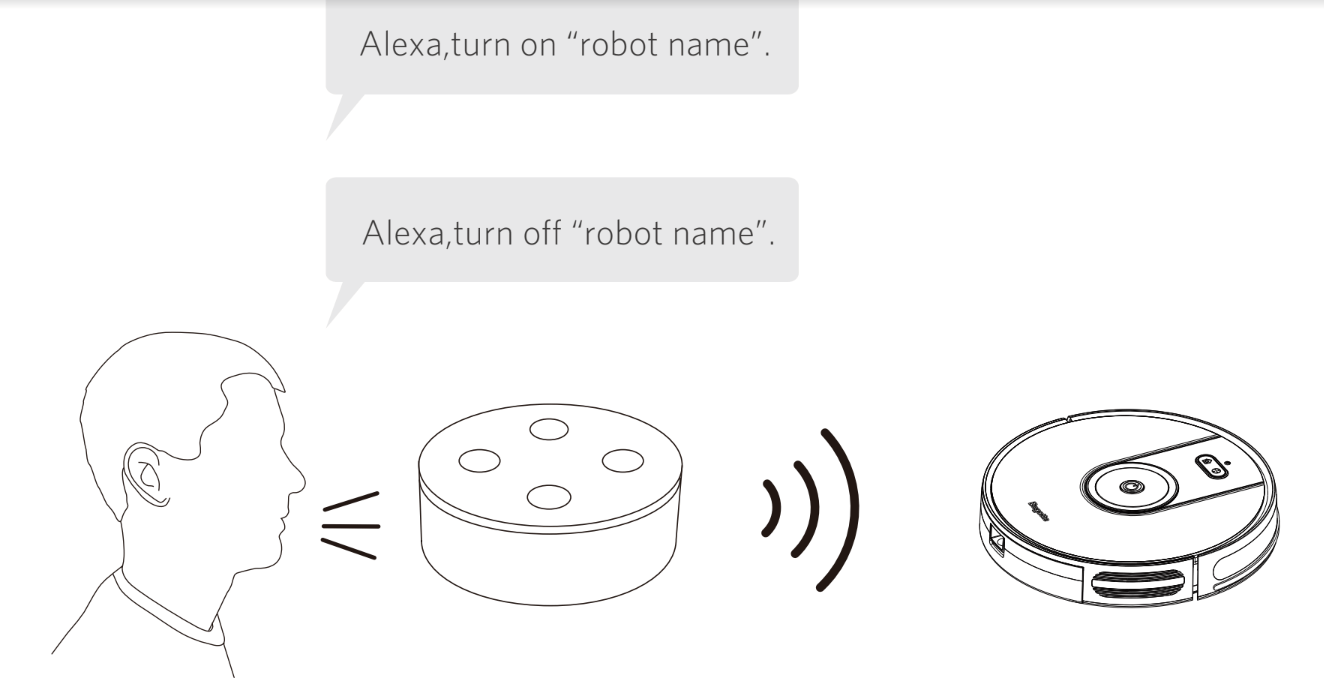
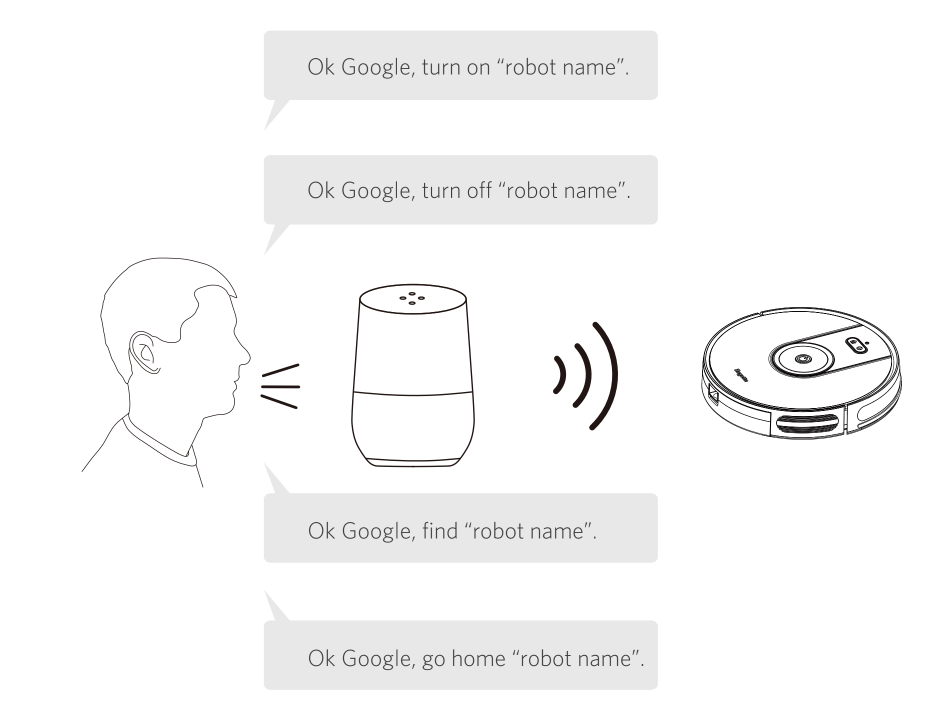
To control robot with the Google Assistant
Robot now works with the Google Assitant on devices like the Google Home.
- Open the Google Home app
- Say "Ok Google, talk to Robot" to the Google Assiant-enabled device to intiate the Google action for Robot.
- Follow the instructions in the Google Home app to authorize the Google Assistant with your Bagotte App acoount.
- To control Robot with your voice, say simple commands to Google Assistant.
Regular Robot Care
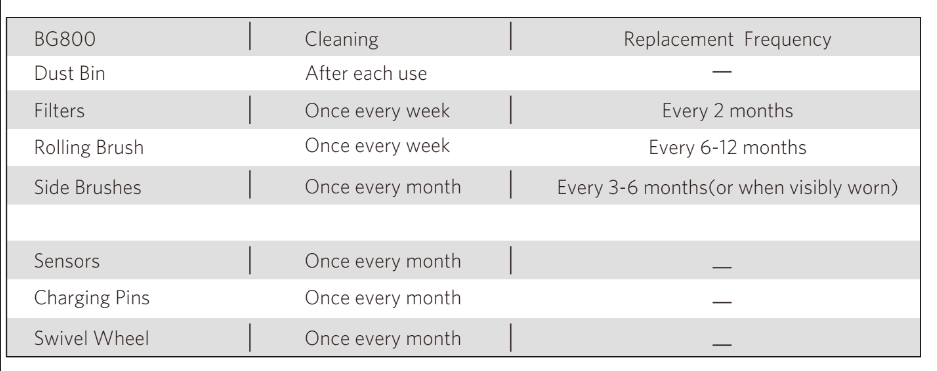
To keep robot running at peak performance, perform the following care produres. If you notice robot picking up less debris from your floor, then empty the bin, clean the filter and rolling brush.
Recommended cleaning/ replacement frequency:
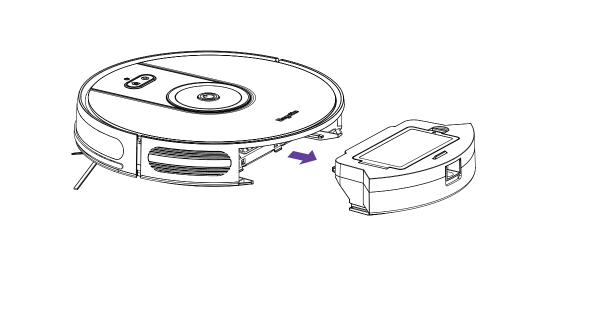
Emptying Robot's Bin
- Press bin release button to remove the bin
- Open bin's door to empty it
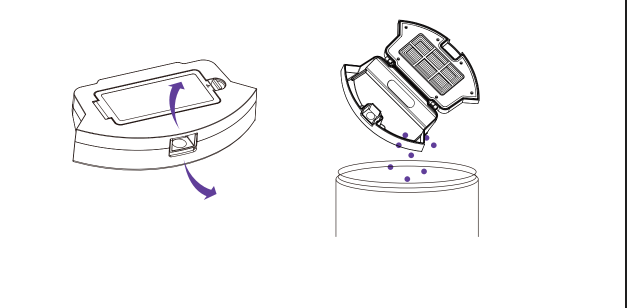
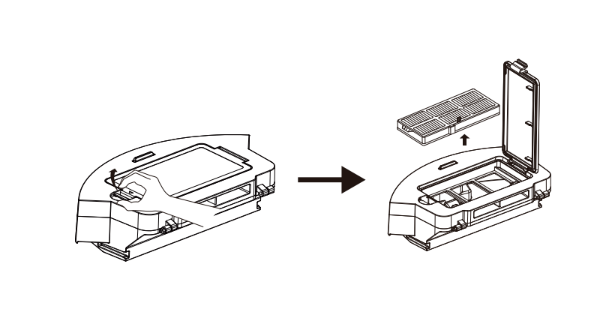
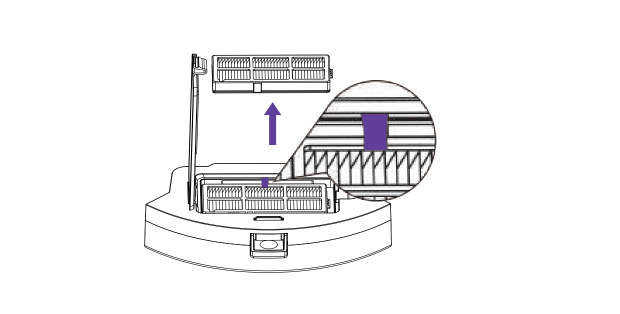
Cleaning Robot's Filter
- Remove filter by grasping the white tab.
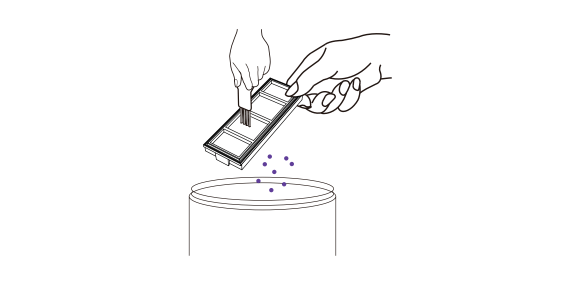
- Shake off debris by tapping the filter against your trash container.
Cleaning Robot 's Rolling Brush,Side Brush, Swivel Wheel
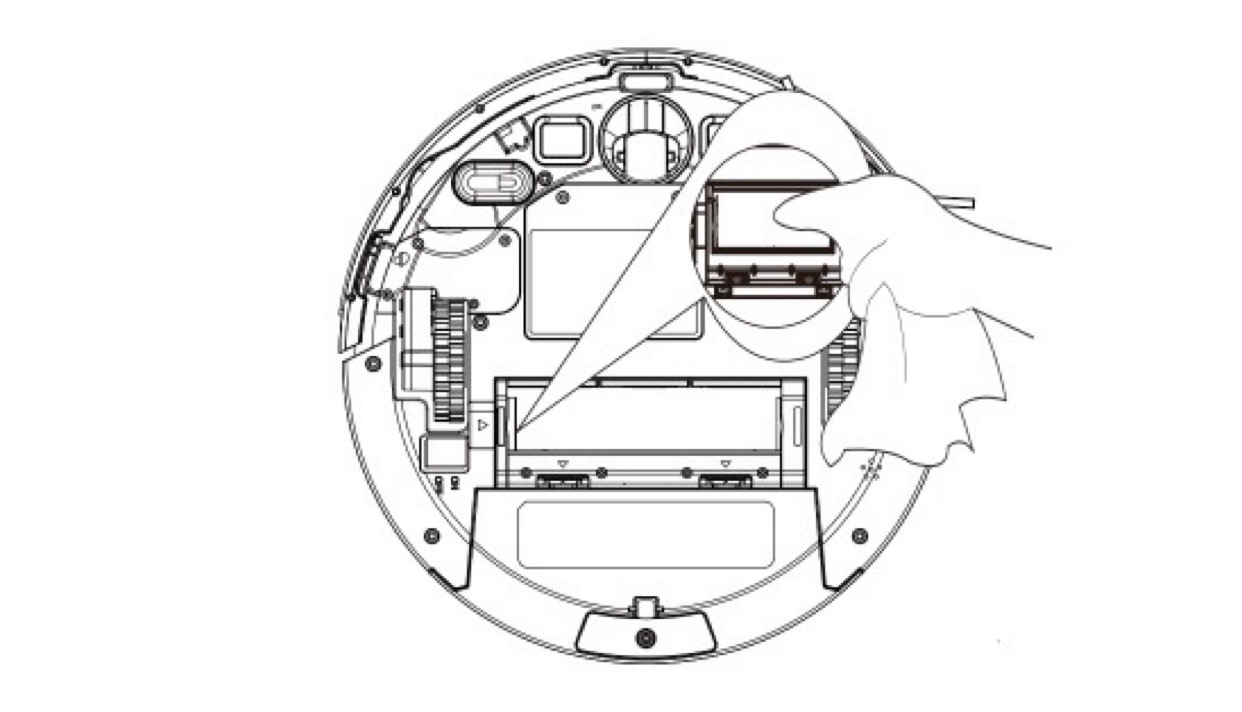
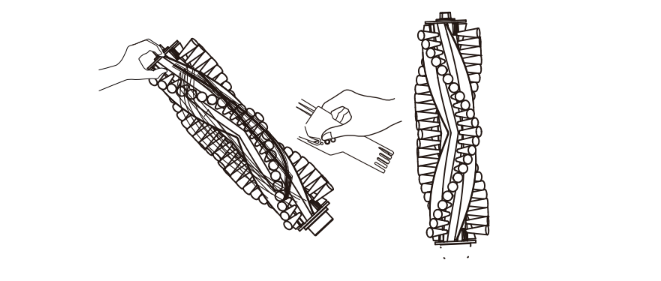
- Take out the rolling brush,clean the vacuuming aisle by a cloth.
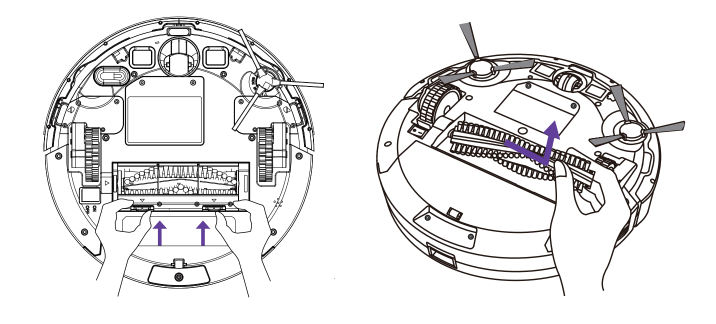
- Clean the rolling brush. Cut down the hair winded in the rolling brush with the provided cleaning tool's knife.
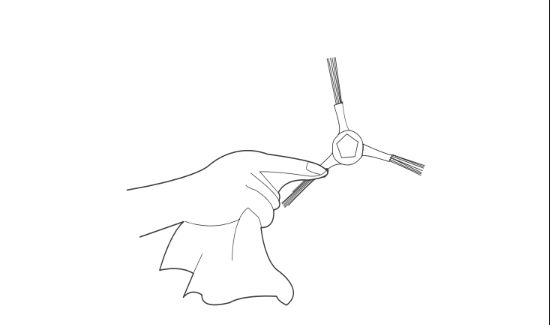
- Remove the side brush,use a cloth to remove the dust from the brush.
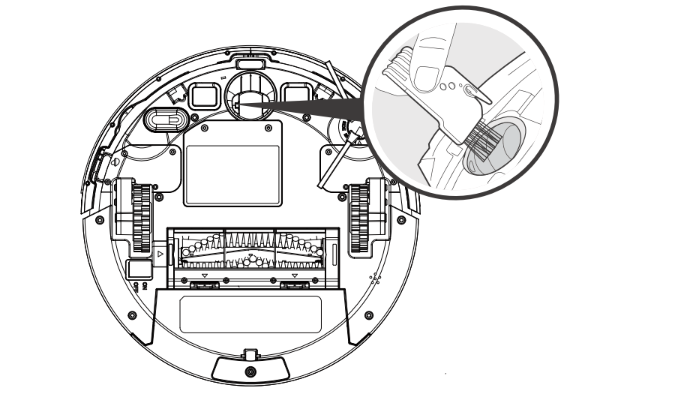
- Pull out the swivel wheel, then clean the Swivel Wheel with the cleaning tool.
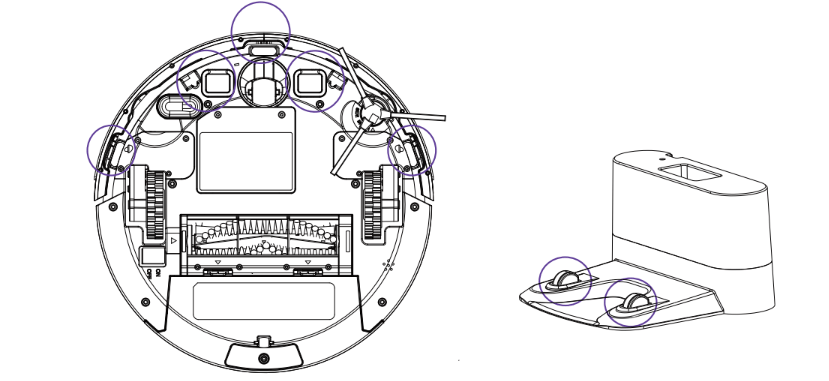
Clean the Sensors and Charging Pins
To maintain the best performance, clean the drop sensors and charging pins regularly.
- Dust o the drop sensors and charging contact pins using a cloth or cleaning brush.
Troubleshooting
Error Tones
When robotis in trouble, it will emit a series of short or long beeps and the red indicator on robot will be solid or flashing.
1. Flashing red indicator light
- Two beeps
- Robot’s bumper is stuck.
- Tap robot’s bumper several times to dislodge any debris that may be trapped underneath.
- Robot’s bumper is stuck.
- Three beeps
-
Robot’s drop sensors are dity
-
Clean the drop sensors gently with a dry cloth.
-
Place robot in a new location.
-
- Robot is stuck on the ledge of a staircase and
cannot reverse.- Use a ohysical barrier to block o the problem area.
-
- Four beeps
-
Robot’s power level is too low.
-
Manually charge robotfor at least 5 hours.
-
-
2. Solid red indicator light
- One beep
- Robot’s left/right wheel is stuck.
- Turn o robot and remove any hair or debris from the left/right wheel.
- Robot’s left/right wheel is stuck.
- Two beeps
- Robot’s side brush is stuck.
- Turn o robot and remove any hair or debris
debris from the side brush.
- Turn o robot and remove any hair or debris
- Robot’s side brush is stuck.
- Three beeps
- Four beeps
-
Robot’s rolling brush is stuck
-
Turn o robot and remove any hair or debris
from the rolling brush.
-
-
Frequently asked questions
- Robot cannot be activated.
- Make sure the main power switch is in the ON position.
- Make sure the battery is fully charged.
- Replace the batteries (2 AAA) in the remote control.
- Make sure the remote control is within range (16 ft/5 m) of robot.
- If you still have trouble,turn o the main power switch,wait then turn it back on.
- The remote control does not work.
- Replace the batteries in the remote control.
- Make sure Robot is turned on and fully charged.
- Robot stops working suddenly.
- Check if robot is trapped or stuck on an obstacle.
- Check if the battery level is too low.
- If you still have trouble,turn o the main power switch,wait for 2 seconds and then turn it back on.
- You cannot schedule cleanings.
- Make sure the main power switch on the bottom of robot is turned on.
- Make sure the time, time of day (AM/PM), and the scheduled time have been set correctly.
- Check if robot’s power is too low to start cleaning.
- Suction power is weak.
- Check if any obstructions are blocking the suction inlet.
- Empty the dust collector.
- Clean the filters with a vacuum cleaner or a cleaning brush.
- Check if the filters are wet due to water or other liquid on the floor. Air-dry the filters completely before use.
- Robot cannot be charged.
- Check if the indicator on the Charging Base lights up.
If not, contact the bagotte service center to repair or replace the Charging Base. - Dust o the charging contact pin with a dry cloth.
- Check if you can hear a beep when robot is docked onto the Charging Base.
If not, contact the bagotte service center to repair or replace the Charging Base.
- Check if the indicator on the Charging Base lights up.
- Robot cannot return to the Charging Base.
- Remove objects within 3 ft/1 m to the left and right side and within 6 ft/2 m of the front of the Charging Base.
- When robot is in the vicinity of the Charging Base, it will return more quickly.
However, if the Charging Base is located far away, robot will need more time to return.
Please be patient as it works its way back. - Clean the charging contact pins.
- The rolling brush does not rotate.
- Clean the rolling brush.
- Check if the rolling brush and brush guard have been installed properly.
- Robot’s movements or travel path are abnormal.
- Clean the sensors carefully with a dry cloth.
- Restat robot by turning the power switch o and on.
- Robot cannot connect to a Wi-Fi network.
- Make sure your Wi-Fi router supports the 2.4GHz and
802.11b/g/n bands; the 5GHz band is not supported. For
details, refer to the “Troubleshooting > Wi-Fi connection”
section in this manual.
- Make sure your Wi-Fi router supports the 2.4GHz and
- You cannot control Robot with Amazon Alexa.
- Check if there are any Internet connection problems.
- Check whether you have insatlled the Amazon Alexa app onto your smart device and enabled "Smart Life" Skill in the Amazon Alexa app. For details, refer to the "Use Your Robot with Amazon Alexa/ the Google Assistant" section in this manual.
- Make sure you have an Bagotte account.
- Make sure you are using correct Alexa voice-commands.
- You cannot control Robot with the Google Assistant.
- Check if there are any Internet connection problems.
- Check if you have insatlled the Google Home app onto your smart device and initiated "Smart Life" action in the Google Home app. For details, refer to the "Use Your Robot with Amazon Alexa/ the Google Assistant" section in this manual.
- Check if you are using the proper commands when talking to the Google Assistant. When making your request, first say the wake words “Ok Google”.
- Repeat your question. Speak clearly to the Google Assistant.
Wi-Fi Connection
Before Wi-Fi setup, make sure robot and your Wi-Fi network meet the following requirements.
Wi-Fi Setup Requirements
- Robot :
- Robot is fully charged and the main power switch on the bottom of robot is turned on.
- Wi-Fi status light slowly flashes blue.
- Wi-Fi Network:
- Use the correct password for your network.
- Do not use a VPN (Virtual Private Network) or Proxy Server.
- Your Wi-Fi router supports 802.11b/g/n and IPv4 protocol.
- You are using a 2.4GHz router or a dual-band router that is configured to support a 2.4GHz frequency band. Robot does not support 5GHz frequency band.
- If robot cannot connect to the Wi-Fi network and you are using a 2.4/5GHz mixed network, switch to a 2.4GHz network for Wi-Fi setup. You can switch back once your setup is complete.
- When connecting to a hidden network, make sure you enter the correct network name, SSID (case sensitive), and connecting to a 2.4GHz wireless network.
- When using a network extender/repeater, make sure the network name (SSID) and password are the same as your primary network.
- The firewall and port settings of your Wi-Fi router allow robotto connect with the Bagotte servers.
- Network Security Requirement
- WPA and WPA2 using TKIP, PSK, AES/CCMP encryption.
- WEP EAP (Enterprise Authentication Protocol) is not supported.
- Wi-Fi Channels
- The FCC requires that all wireless devices in the United States operate on the 1-11 wireless spectrum channels.
- Some countries outside North America can use spectrum channels higher than channel 11. Refer to your local regulatory agency to determine which channels are accessible.
- A future software release will support access to channels above 11 for users outside North America. Until then, use channels 1-11.
If you cannot control robot with your smartphone, try the solutions below to solve the problem.
If the problem persists, contact the Bagotte service center for help.
- Solid blue
- Robot has connected to your router, but cannot access the Internet.
- Check if your router is connected to the Internet.
- Robot has connected to your router, but cannot access the Internet.
- Rapidly flashing blue
- Robot cannot connect to your wireless router.
- Check if you have modified your network name and password.
- Reset Wi-Fi connection if necessary. Refer to the “Use Your Robot with the Bagotte App > Reset the Wi-Ficonnection”section in this manual.
- Robot cannot connect to your wireless router.
- Slowly flashing blue
- Wi-Fi connection is reset or has not been set up before.
- Set up Wi-Fi connection with Robot. Refer to the “Use Your robot with the Bagotte App”
section in this manual. - Reset Wi-Fi connection if necessary. Refer to the “Use Your Robot with the Bagotte App > Reset the Wi-Fi connection”section in this manual.
- Set up Wi-Fi connection with Robot. Refer to the “Use Your robot with the Bagotte App”
- Wi-Fi connection is reset or has not been set up before.
- Off
- Robot is turned o.
- Robot’s power level is low.
- Charge robot by attaching it to the Charging Base. Make sure the main power switch on the bottom of robot is turned on.
- Robot is in Sleep mode.
Specifications
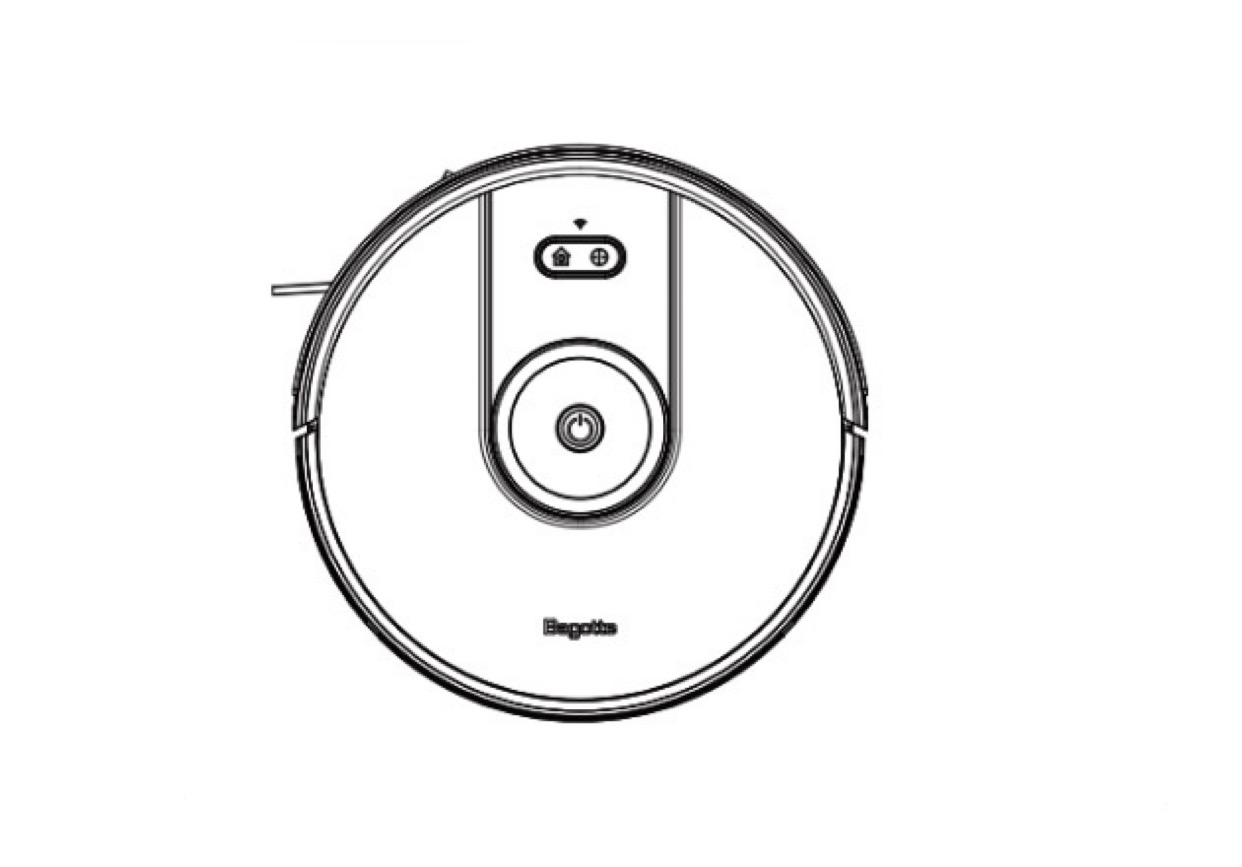
- Product Model: BG800
- Input: 19 V 0.6 A
- Battery VoltageDC: 14.4 V
- Power Consumption: 28 W
- Battery Type: DC 14.4 V Li-ion 2600 mAh
- Dust Collector Capacity: 0.5L
- Max Cleaning Time: 100 mins
- Charging Time: 300 - 360 mins
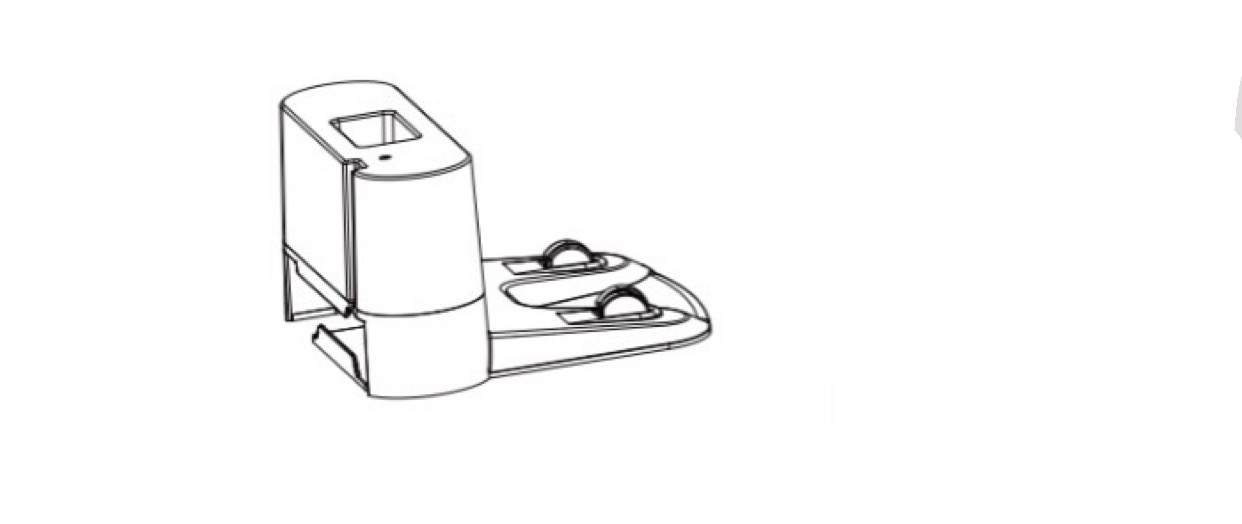
- Input: 19 V - 0.6 A
- Ouput: 19 V - 0.6 A
