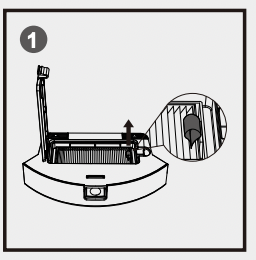
User Manual Robot Vacuum Cleaner
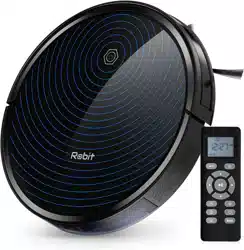
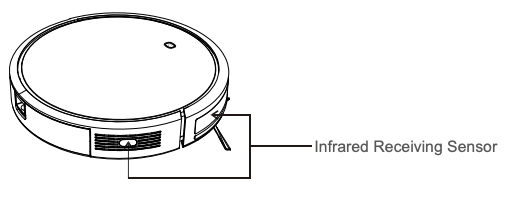
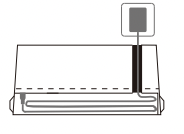
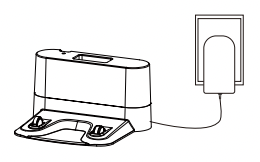
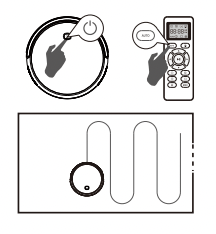
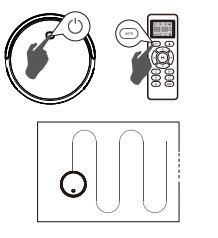
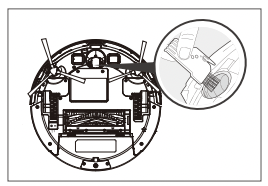
Product Diagram
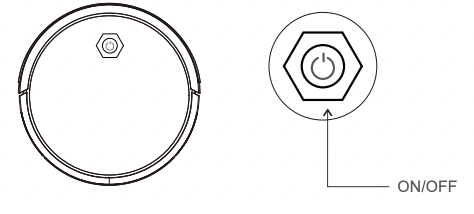
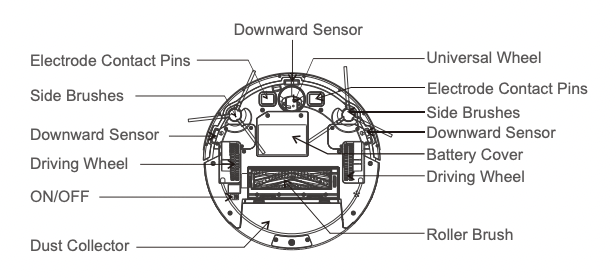
Host chart
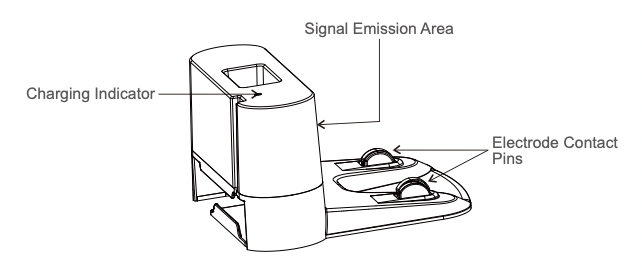
Charging Dock
Remote Contorl
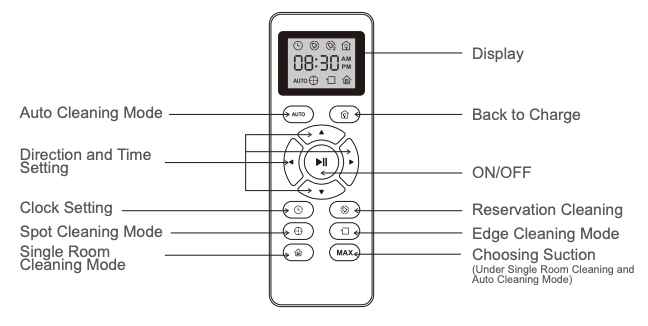
NOTE: Install a pair of AAA batteries before using the remote control for the first time, please make sure the polarity of the battery is installed correctly. When using the remote control, please point to the robot vacuum, the working distance is 0-5 meters.
Using Your R3000 Robot
Note Before Use
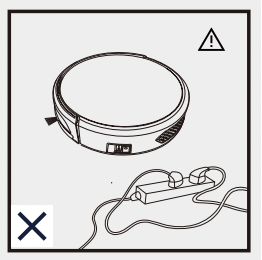
- Remove the power cords and small objects from the floor that may entangle the robot.
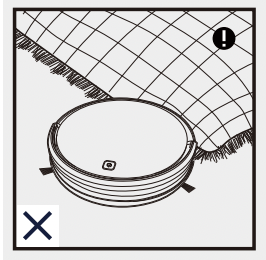
- The robot can cross the floor of 0.59inch/ 15mm heights and 15° inclination, but it is not suitable for long-pile carpet. It is recommended to use on the floor, tile and thin carpet. (Thinner than 0.3inch/ 0.8mm)
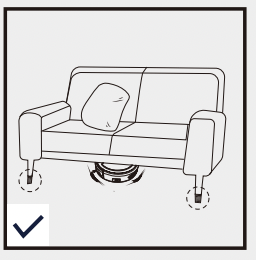
- Keep the robot away from space lower than 2.4inch/ 80mm to prevent it from being stuck.
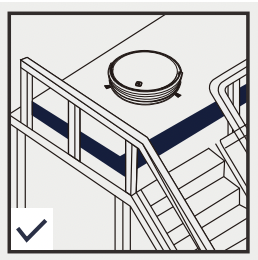
- R3000 robot has anti-drop sensors to prevent it from falling down from heights. It is recommended to set up physical barriers to block off areas where the robot may fall.
Preparations Before Use
Quick Start
Connect the charging base and put the remaining cables into the cable storage box at the bottom of the charging base.
- Warm Reminder: Unsaved cables may trap the host being cleaned or retrieved.
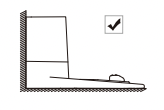
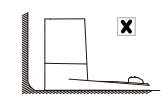
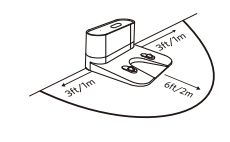
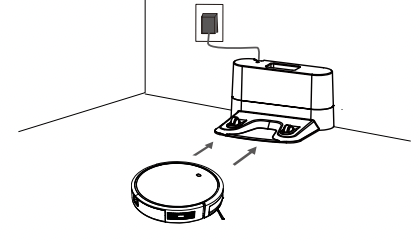
Place the Charging Base
- Place the charging base on a hard, level surface and let it against the wall.
- Remove objects within 3ft/ 1m of the left and right side and within 6ft/ 2m
- Connect the plug of the adapter to the power socket of the charging base, and the other end to the wall socket.
* Warm Reminders: Make sure that the charging base is on when the power is turned on, otherwise, the product cannot be automatically recharged.
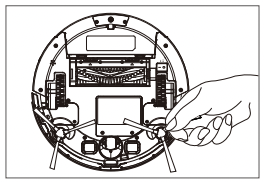
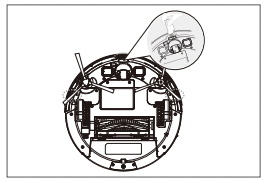
Install the side brushes properly
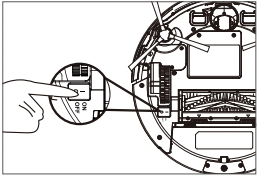
Turn on the button at the bottom of the host (1 is turn on, 0 is turn off)
Activate the Robot Vacuum
Make sure that the Electrode Contact Pins on the charging base matches the Electrode Contact Pins on the robot, and place the product on the charging base. If successful, the product emits a series of beeps, once the switch button is lit, the product can be used.
Operations Guide
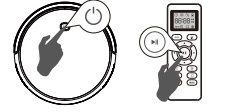
Start Cleaning
Press the once to activate the host.
Press the on the host or the  on the remote control to start automatic cleaning.
Stop Cleaning
- Press the on the host or the
 on the remote control to pause the robot vacuum being cleaned.
- If you want to continue cleaning, press the on the host again or the on the remote control.
Power Off
Press the until the light of the host goes out.
Cleaning Mode
Automatic Cleaning Mode
Press the on the main unit or the on the remote control to start automatic cleaning.
If the battery is low before the cleaning is completed, the host will return to the charging base for charging.
* Warm Reminder: During the recharging process, there may be a phenomenon that the charging base cannot be found. At this time, the host will flash a red light and beep for four times. Please put the host manually into the charging base for charging.
Spot Cleaning Mode
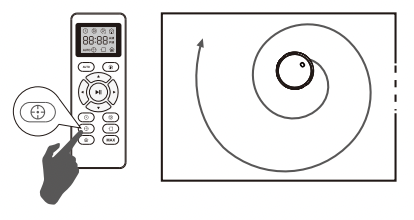
Select the spot cleaning mode, the host rotates outward spirally, about 1 m in diameter to focus on cleaning the local area, and then circle inward to the starting point. In this mode, the machine increases suction power to provide you with the best cleaning of the desired location. Place the machine in a partially dirty place, and then press the  on the remote control.
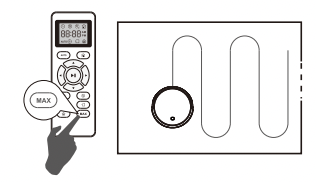
Max. Suction Cleaning Mode
In the automatic cleaning/single-room cleaning mode, by pressing the on the remote control, the main unit can increase the suction force power and perform deeper cleaning at the maximum suction force. Vacuum suction function is off by default.
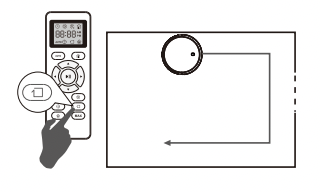
Edge Cleaning Mode
Press the on the  remote control and sweep along the edges to ensure sweeping along the walls and around the furniture legs.
Single Room Cleaning Mode
When a specific room needs to be cleaned, press the button on the remote control.
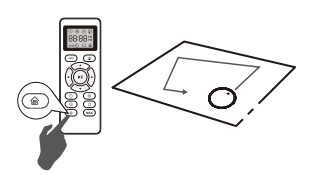
Tips: In this mode, the R3000 robot will stop after cleaning about 30 minutes. Please make sure the door is closed to prevent the R3000 from leaving the room.
Time and Schedule Cleaning
The host can make schedule settings for the cleaning time. The schedule timing function can only be realized by the remote control. Before making the schedule timing, please ensure that the time of the remote control is consistent with your local time.
Tips: When you set the clock or the schedule, please make sure that the remote control is close to the machine.
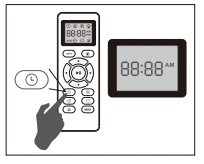
Remote Control Display Time Setting
- Press the on the
 remote control. The setting in the time display starts to flash.
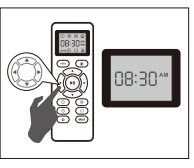
- Press the
 or
or to select the minute or hour setting. Press the
 or
or to set the desired time.
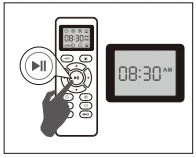
- Press the
 again, after the clock is set, the machine will emit a "beep".
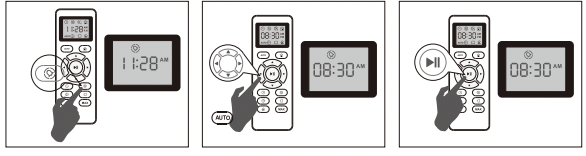
Scheduled Cleaning Setting
- Press the
 on the remote control, and then start showing one hour in the display to set the cleaning schedule.
- Press the or to select the minute or hour setting. Press the or to set the desired time.
- Press the again, when the cleaning plan setting is completed, the machine will emit a beep.
Cancel Scheduled Cleaning
- Press the on the remote control for about 4 seconds. When the scheduled cleaning plan is canceled, the machine will make a beep.

Cleaning and Maintenance
In order to ensure the service life and the best cleaning performance of the robot vacuum, please refer to the following instructions to clean and maintain the robot vacuum parts.
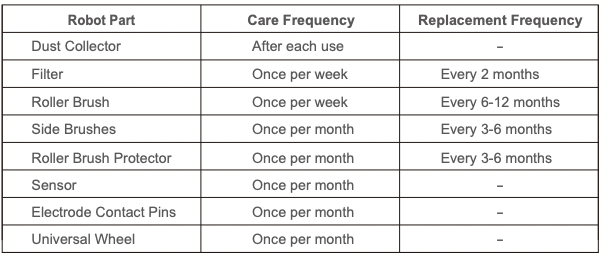
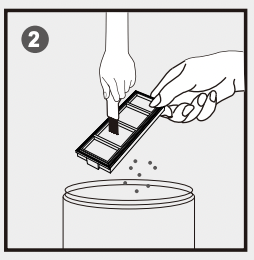
Clean Dust Box
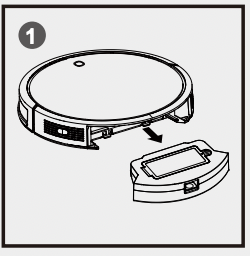
1. Press the dust box release button to remove it.
2. Open the lid of the dust box to empty it.
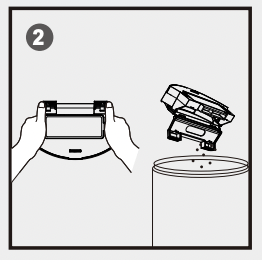
Clean Filter
1. Pull the white label to remove the filter.
2. Shake off the dust on the filter.
Clean Side Brushes, Roller Brushes, Universal Wheels and Sensors
1. Remove the roller brush and clean the dust suction channel with a cloth.
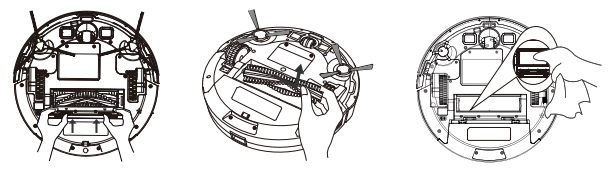
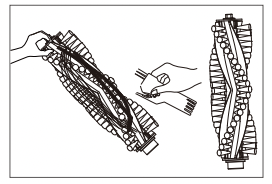
2. Clean the roller brush. Remove the hair from the roller brush with the cleaning tool provided.
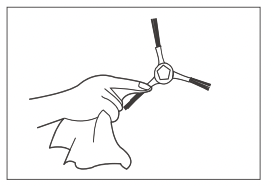
3. Remove the side brush. Clean the side brush with a cloth.
4. Clean the universal wheel with a cleaning brush.
5. Use a cleaning brush to clean the dust on the sensor to ensure the best performance.
Trouble Shooting
When the machine breaks down, the red LED will flash or be always on when the LED is broken, and it will be accompanied by a beeping sound. Please refer to the following sounds and light flashing tips to solve the problem of the robot vacuum. If you still can't handle it, please contact our customer services at any time.
* Tips: For some faults, you can solve the problem by restarting the machine. To restart the machine, press the switch on the bottom of the machine, you will hear a beep, indicating that the restart was successful.
Always Red
1 beep - There may be an obstacle stuck in the side wheel
- Restart after cleaning the side wheels
2 beeps - There may be an obstacle stuck in the side brush
- Restart after cleaning the side brush
3 beeps - The fan may has an obstacle
- Clean the dust box and fan, then restart
4 beeps - There may be an obstacle stuck in the roller brush
- Remove and clean the cover and roller brush of the vacuum and restart
Flash Red
1 beep - Bumper may be held up
- Press the left, center and right side of the anti-collision beam with your hand to check whether it can rebound automatically
2 beeps - There are dirts on the downward sensor or the machine is on a suspended ground/in dark environment
- Clean the down-ward sensor of the machine, place the machine on level ground, and restart
3 beeps - The battery is low
- Put the robot vacuum back to the charging base for charging
The host cannot be activated
- 1. Make sure the main switch at the bottom of the host is turned on
- 2. Make sure the battery is fully charged
- 3. Replace the remote control with a pair of AAA batteries
- 4. Make sure the distance between the remote control and the host is 0-5 meters
- 5. If the problem is not resolved, turn off the main switch at the bottom of the host, and then turn it on again
Remote control fails
- 1. Replace the new battery and install it correctly
- 2. Make sure that the power switch of the host is turned on and there is sufficient power to complete the operation
The host suddenly suspends work
- 1. Check if the host is trapped by an obstacle
- 2. Check if the power is too low
- 3. If there is still a problem, turn off the main switch at the bottom of the host and then turn it on again
The host does not automatically clean at the scheduled time
- 1. Make sure the host power switch is turned on
- 2. Make sure that the time displayed on the remote control is consistent with the local time (AM/PM), and set the time correctly. Check whether the host has enough power to work (you can check the current indicator status)
Weak suction power
- 1. Check whether there is an obstruction blocking the suction port
- 2. Empty the dust box
- 3. Clean the filter
- 4. Check if the filter is wet, make sure the filter is completely dry before use
The host cannot charge
- 1. Make sure the socket is charged and fully contacts the electrode contact pins of the charging stand. When the contact is good, you will hear a beep
- 2. Clean the electrode contact pins with a dry cloth
The host cannot return to the charging dock
- Remove obstacles within 1 meter on the left and right sides of the charging base and within 2 meters in the front. The charging base can be placed according to the instruction manual. When the host is near the charging base, it will return faster. If the charging base is located far away, the host will need more time to return, please be patient and wait for it to be recharged. If in the process of retrieving the charge, the remaining power of the host is too low, it will stop at the same place, the red light flashes, and there will be four beeps
Roller brush does not rotate
- 1. Check if the roller brush is installed correctly.
- 2. Clean the roller brush.
Abnormal running path
- 1. Clean the down-ward sensor with a dry cloth
- 2. Clean the drive wheel
- 3. Press the left, center and right side of the anti-collision beam with your hand to check whether it can rebound automatically
- 4. Turn off the power switch, restart the host