The display type consists of the following 5 patterns.
ANALOG (P.23)
DIGITAL (P.24)
BAR (P.25)
NO REV (P.26)
PRACTICE (P.27)
To change the display type: (P.60) (P.72)
Each display type has the SPORT mode. (P.28)
The operation of the instrument is mainly explained in the ANALOG display type. Factory default setting is ANALOG.
Do not operate the display functions for a long time with the engine stopped. It may result in a low (or dead) battery.
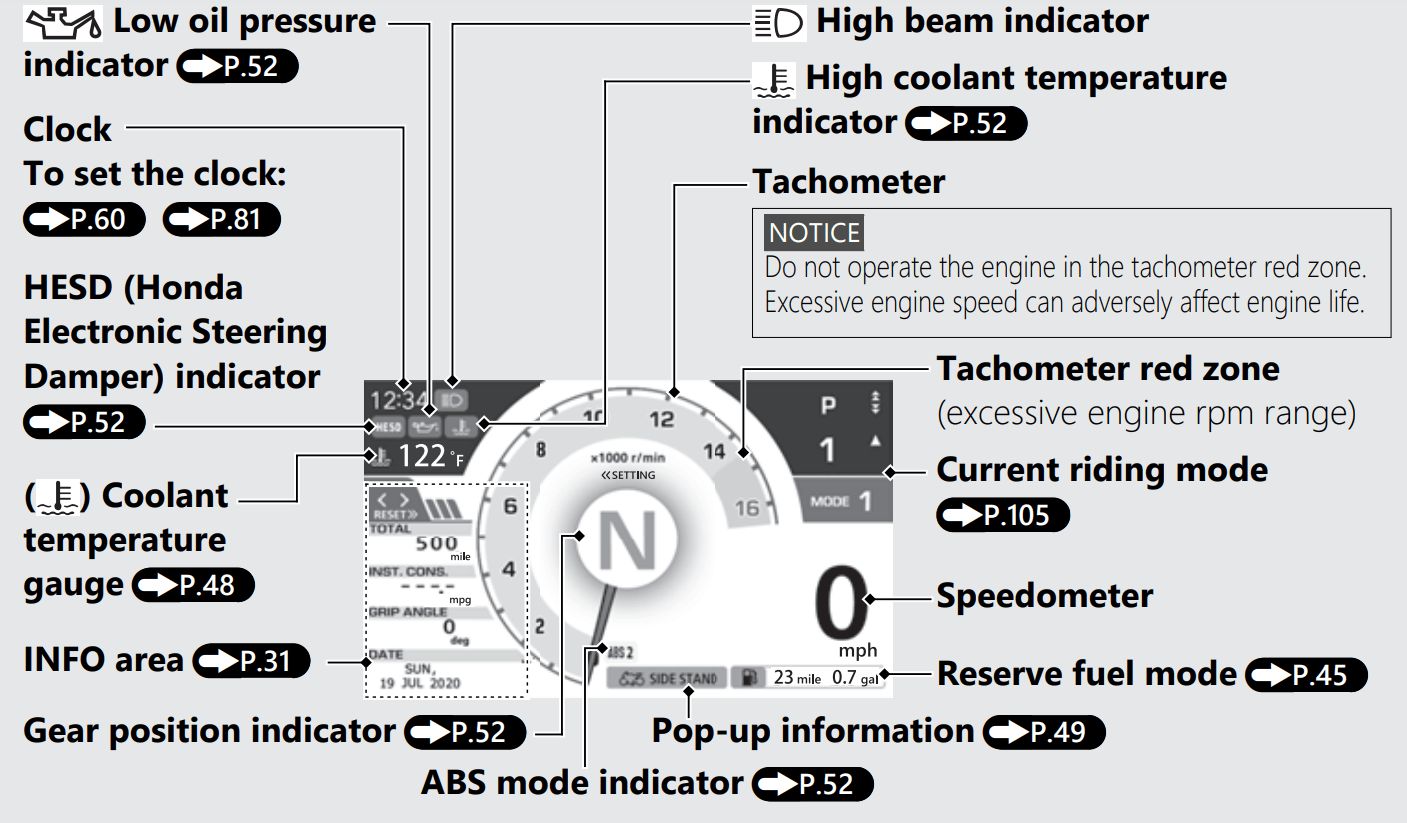
STD mode display: Display type: ANALOG (Factory default setting)
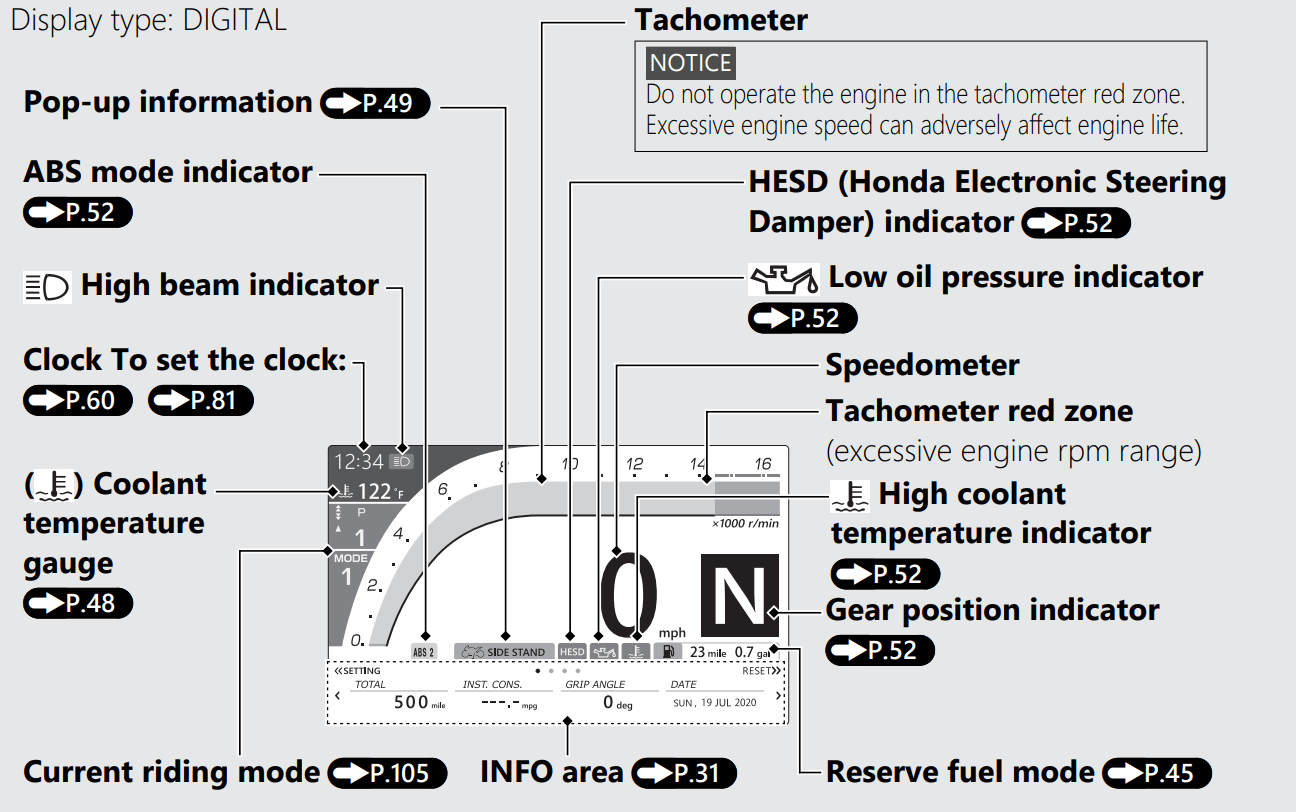
Display type: DIGITAL
Display type: BAR
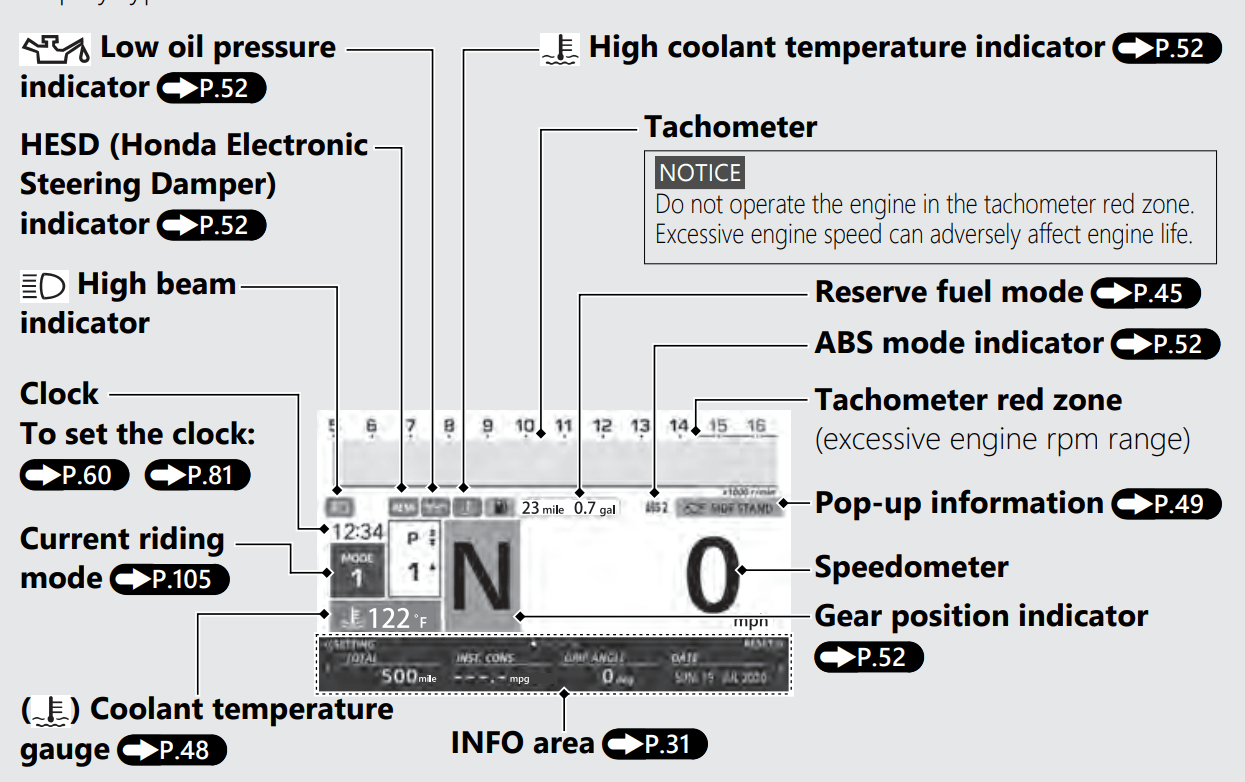
Display type: NO REV
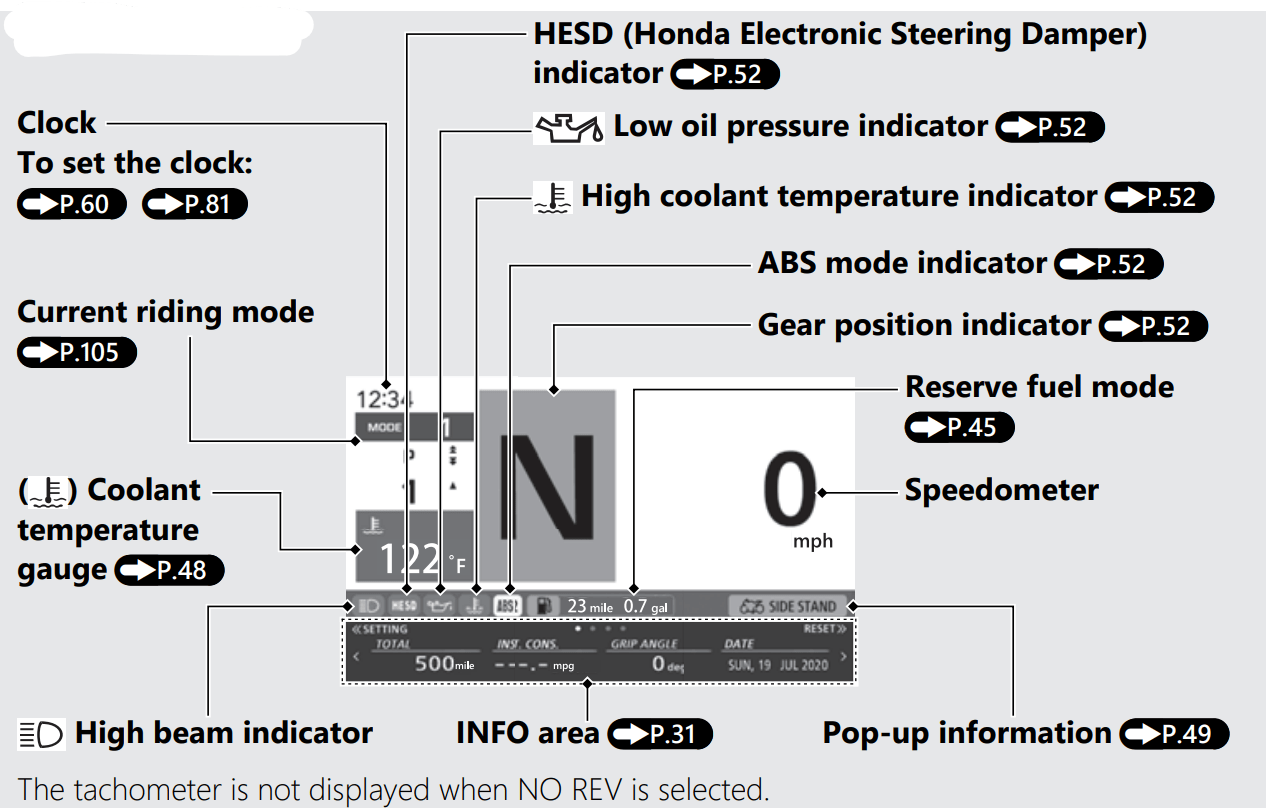
Display type: PRACTICE
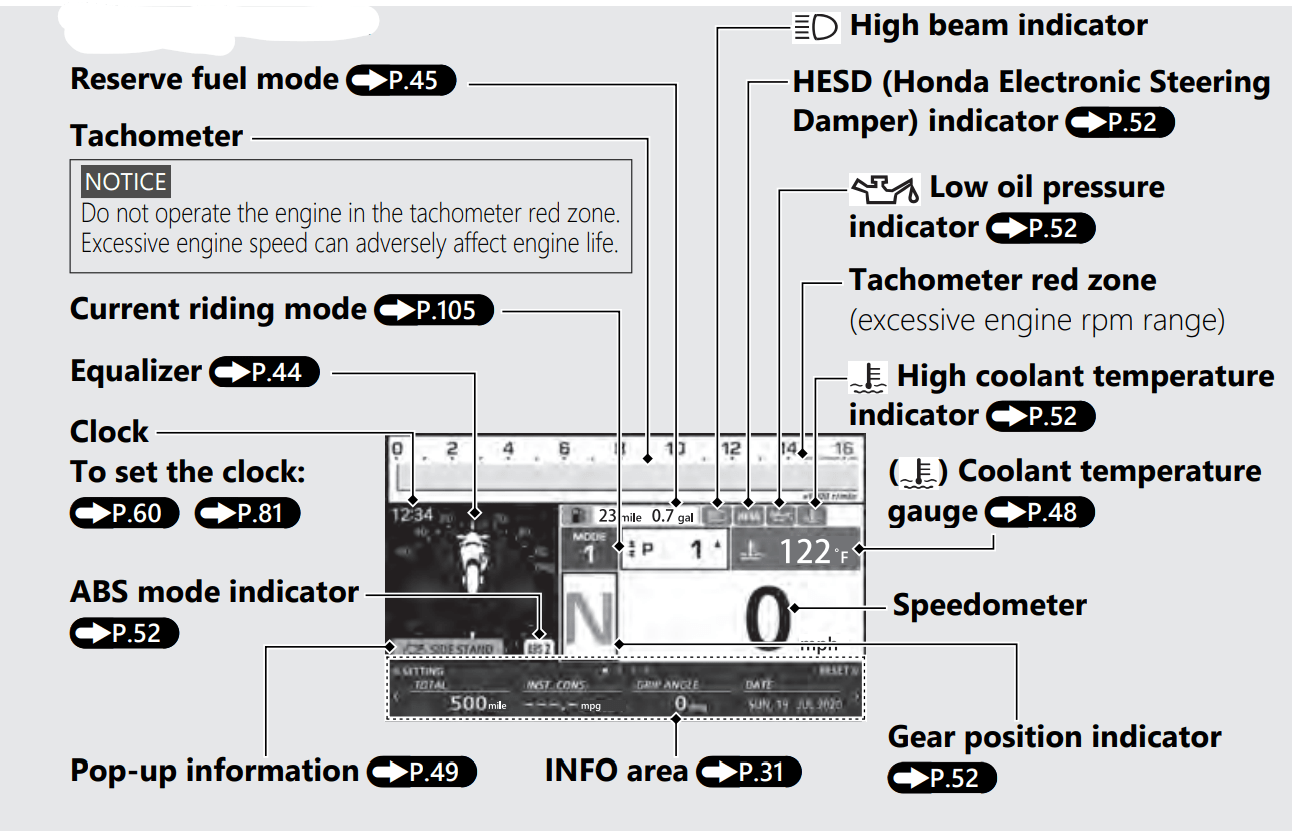
Indicators
If one of these indicators does not come on when it should, have your dealer check for problems.
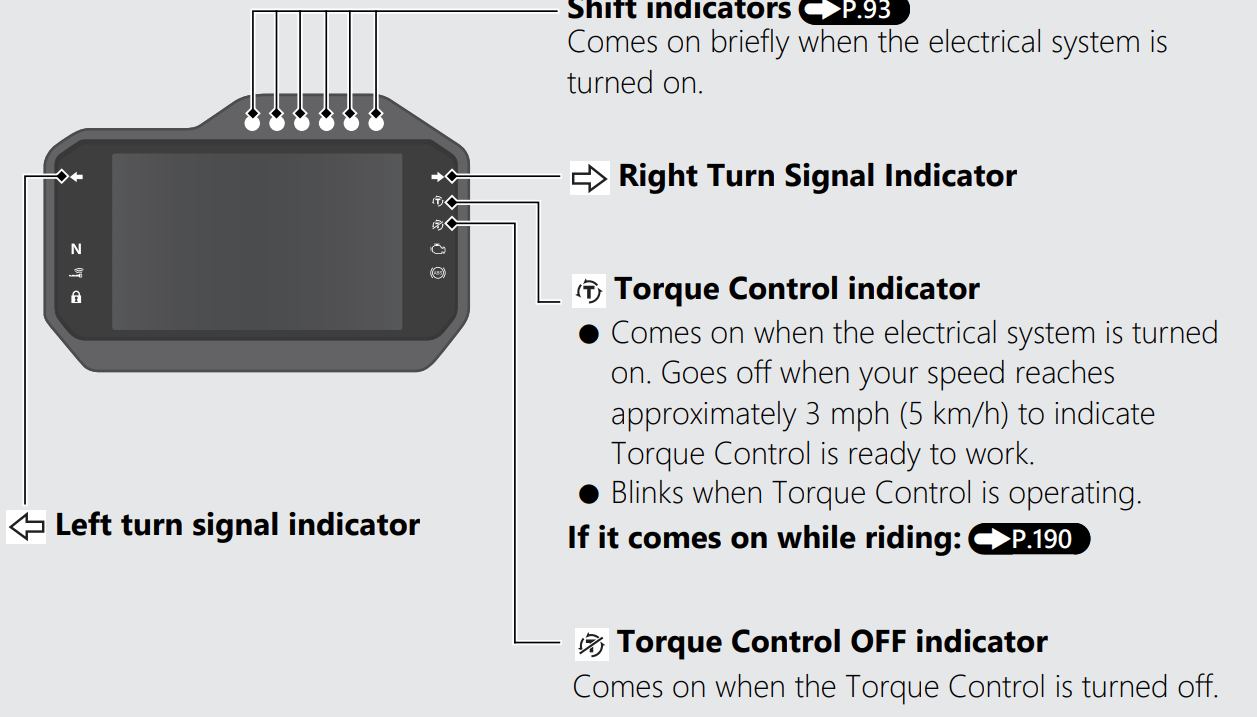
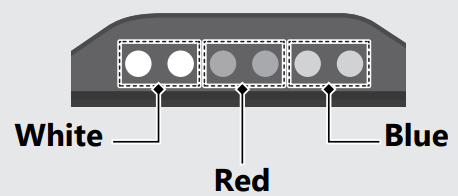
Shift Indicators
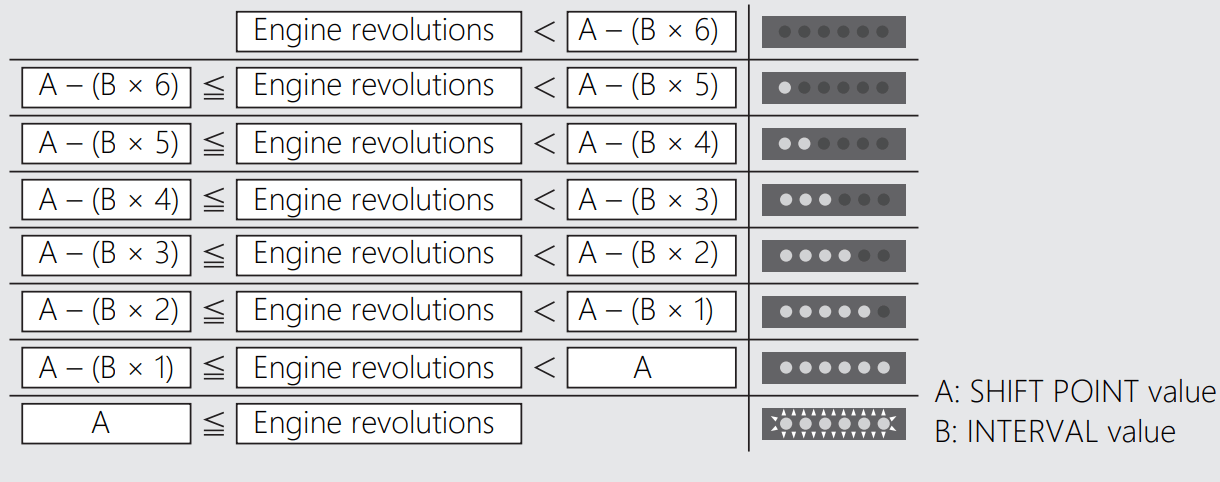
The shift indicators light or blink by the engine revolutions.
The timing and brightness of the indicators light/blink depend on the "REV INDICATOR" setting.
The indicator colors are as follows.
Setting of the Shift Indicators
Definition
Maintenance
Maintenance Fundamentals
Drive Chain
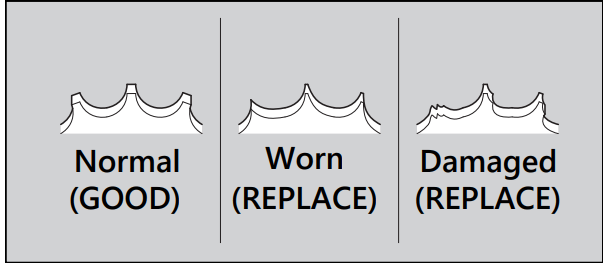
The drive chain must be inspected and lubricated regularly. Inspect the chain more frequently if you often ride on bad roads, ride at high speed, or ride with repeated fast acceleration.
If the chain does not move smoothly, makes strange noises, has damaged rollers, has loose pins, has missing O-rings, or kinks, have the chain inspected by your dealer.
Also inspect the drive sprocket and driven sprocket. If either has worn or damaged teeth, have the sprocket replaced by your dealer.
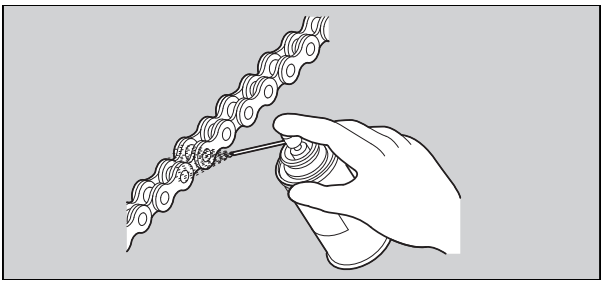
Cleaning and Lubricating
After inspecting the slack, clean the chain and sprockets while rotating the rear wheel. Use a dry cloth with chain cleaner designed specifically for O-ring chains, or neutral detergent. Use a soft brush if the chain is dirty.
After cleaning, wipe dry and lubricate with the recommended lubricant.
Recommended lubricant: Pro Honda HP Chain Lube or equivalent
Do not use a steam cleaner, a high pressure cleaner, a wire brush, volatile solvent such as gasoline and benzene, abrasive cleaner, chain cleaner or lubricant NOT designed specifically for O-ring chains as these can damage the rubber O-ring seals.
Avoid getting lubricant on the brakes or tires. Avoid applying excess chain lubricant to prevent spray onto your clothes and the vehicle.
Recommended Coolant
Pro Honda HP Coolant is a pre-mixed solution of antifreeze and distilled water
Concentration: 50% antifreeze and 50% distilled water
A concentration of antifreeze below 40% will not provide proper corrosion and cold temperature protection.
A concentration of up to 60% will provide better protection in colder climates.
Tires (Inspecting/Replacing)
Checking the Air Pressure
Visually inspect your tires and use an air pressure gauge to measure the air pressure at least once a month or any time you think the tires look low. Always check air pressure when your tires are cold.
Even if the direction of the valve stem is changed, do not return it to the original position. Have your vehicle inspected by your dealer.
Inspecting for Damage
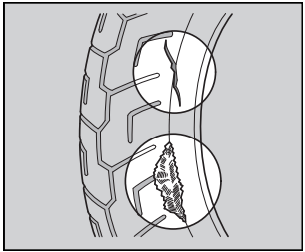
Inspect the tires for cuts, slits, or cracks that exposes fabric or cords, or nails or other foreign objects embedded in the side of the tire or the tread.
Also inspect for any unusual bumps or bulges in the side walls of the tires.
Inspecting for Abnormal Wear
Inspect the tires for signs of abnormal wear on the contact surface.
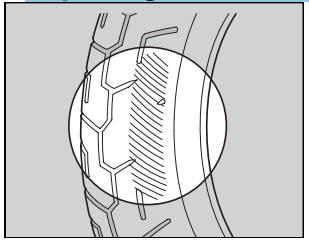
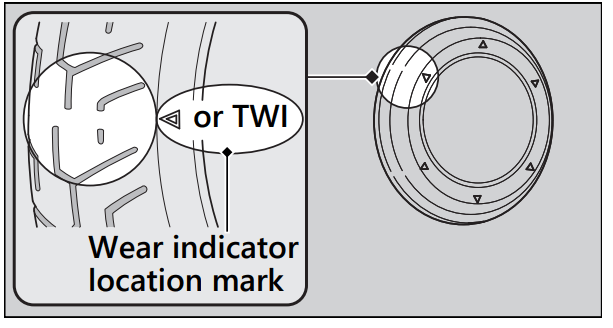
Inspecting Tread Depth
Inspect the tread wear indicators. If they become visible, replace the tires immediately. For safe riding, you should replace the tires when the minimum tread depth is reached.
Have your tires replaced by your dealer. For recommended tires, air pressure and minimum tread depth, see “Specifications.”
Follow these guidelines whenever you replace tires.
Use the recommended tires or equivalents of the same size, construction, speed rating, and load range.
Have the wheel balanced with Honda Genuine balance weights or equivalent after the tire is installed.
Do not install a tube inside a tubeless tire on this vehicle. Excessive heat build-up can cause the tube to burst.
Use only tubeless tires on this vehicle. The rims are designed for tubeless tires, and during hard acceleration or braking, a tubetype tire could slip on the rim and cause the tire to rapidly deflate.
Other Adjustments
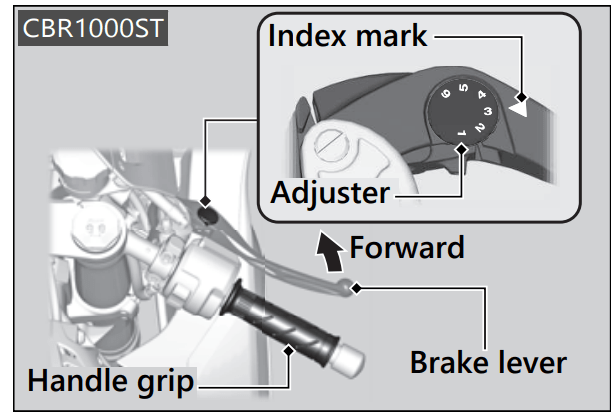
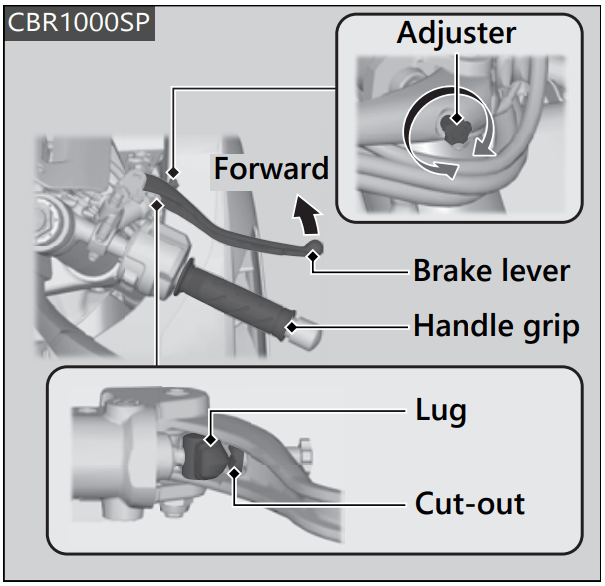
Adjusting the Brake Lever
You can adjust the distance between the tip of the brake lever and handle grip
Adjustment method
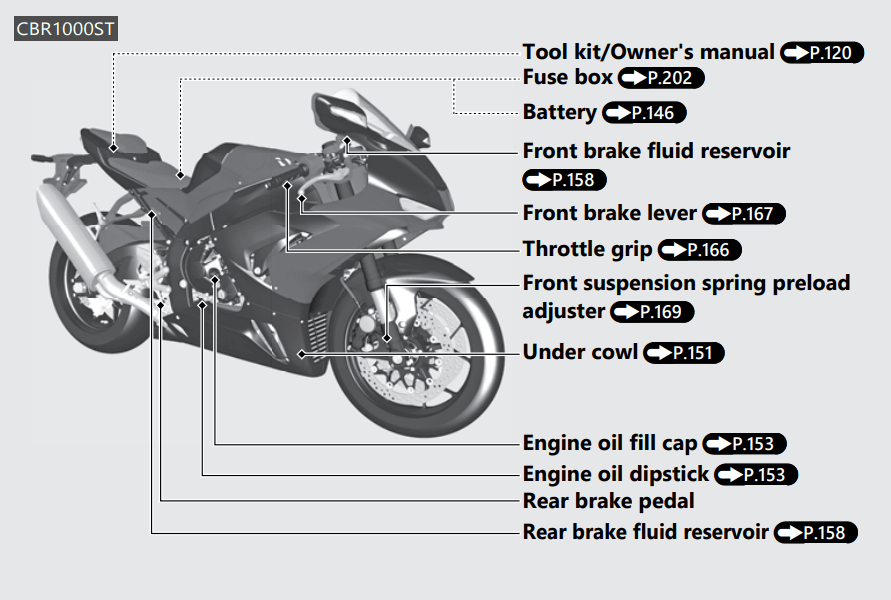
CBR1000ST
Turn the adjuster until the numbers align with the index mark while pushing the lever forward in the desired position.
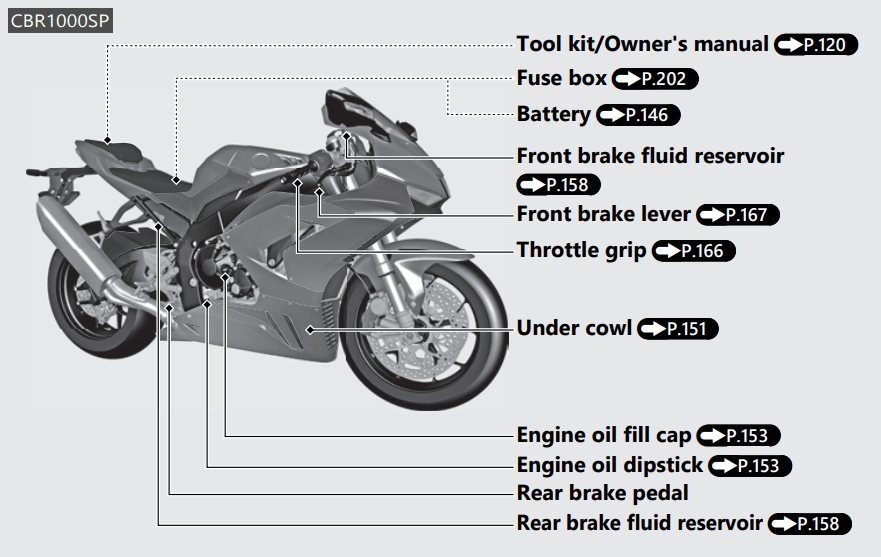
CBR1000SP
Turn the adjuster clockwise while pushing the lever forward to widen the distance. Turn the adjuster counterclockwise while pushing the lever forward to narrow the distance.
Make sure the cut-out is seated on the lug.
After adjustment, check that the lever operates correctly before riding.
NOTICE: Do not turn the adjuster beyond its natural limit.
Troubleshooting
Engine Will Not Start
Starter Motor Operates But Engine Does Not Start
Check the following items:
Check the correct engine starting sequence.
Check that there is gasoline in the fuel tank.
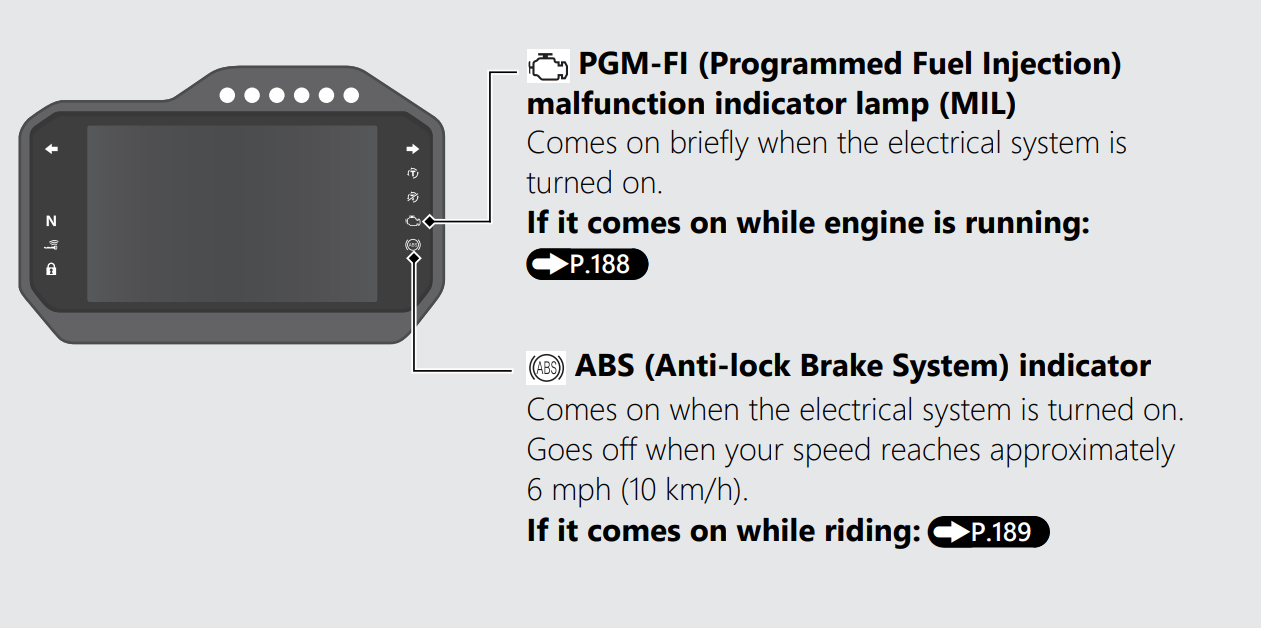
Check if the PGM-FI malfunction indicator lamp (MIL) is on.
If the indicator lamp is on, contact your dealer as soon as possible.
Starter Motor Does Not Operate
Check the following items:
Check the correct engine starting sequence.
Check for a blown fuse.
Check for a loose battery connection or battery terminal corrosion
Check the condition of the battery.
If the problem continues, have your vehicle inspected by your dealer.
Overheating (High coolant temperature indicator is on)
The engine is overheating when the following occurs:
High coolant temperature indicator comes on.
Acceleration becomes sluggish. If this occurs, pull safely to the side of the road and perform the following procedure.
Extended fast idling may cause the high coolant temperature indicator to come on.
NOTICE: Continuing to ride with an overheated engine can cause serious damage to the engine.
Stop the engine using the ignition switch, and then push the ignition ON switch to turn on the electrical system.
Check that the radiator fan is operating, and then turn the electrical system off. If the fan is not operating: Suspect a fault. Do not start the engine. Transport your vehicle to your dealer. If the fan is operating: Allow the engine to cool with the electrical system turned off.
After the engine has cooled, inspect the radiator hose and check if there is a leak. If there is a leak: Do not start the engine. Transport your vehicle to your dealer.
Check the coolant level in the reserve tank.
Add coolant as necessary.
If 1-4 check normal, you may continue riding, but closely monitor the high coolant temperature indicator.
Warning Indicators On or Flashing
Low Oil Pressure Indicator
If the low oil pressure indicator comes on, pull safely to the side of the road and stop the engine.
NOTICE: Continuing to ride with low oil pressure can cause serious damage to the engine.
Check the engine oil level, and add oil as necessary.
Start the engine.
Only continue riding if the low oil pressure indicator goes off.
Rapid acceleration may momentarily cause the low oil pressure indicator to come on, especially if the oil is at or near the low level. If the low oil pressure indicator stays on when the oil level is at the proper level, stop the engine and contact your dealer.
If the engine oil level goes down rapidly, your vehicle may have a leak or another serious problem. Have your vehicle inspected by your dealer.
If the indicator comes on while riding, you may have a serious problem with the PGM-FI system. Reduce speed and have your vehicle inspected by your dealer as soon as possible.
ABS (Anti-lock Brake System) Indicator
If the indicator operates in one of the following ways, you may have a serious problem with the ABS. Reduce your speed and have your vehicle inspected by your dealer as soon as possible.
Indicator comes on or starts flashing while riding.
Indicator does not come on when the electrical system is turned on.
Indicator does not go off at speeds above 6 mph (10 km/h).
If the ABS indicator stays on, your brakes will continue to work as a conventional system, but without the anti-locking function.
The ABS indicator may flash if you turn the rear wheel while the rear wheel is lifted off the ground. In this case, turn the electrical system off and on again. The ABS indicator will go off after your speed reaches 19 mph (30 km/h).
HESD (Honda Electronic Steering Damper) Indicator
If the indicator comes on while riding, you may have a serious problem with the HESD. Reduce speed and have your vehicle inspected by your dealer as soon as possible.
Torque Control Indicator
If the indicator operates in one of the following ways, you may have a serious problem with the Torque Control. Reduce your speed and have your vehicle inspected by your dealer as soon as possible.
Indicator comes and stays on (solid) while riding.
Indicator does not come on when the electrical system is turned on.
Indicator does not go off at speeds above 3 mph (5 km/h).
Even when the Torque Control indicator is on, your vehicle will have normal riding ability without Torque Control function.
When the indicator comes on while the Torque Control is in operation, you will have to completely close the throttle to regain normal riding ability.
The Torque Control indicator may come on if you rotate the rear wheel while your vehicle is lifted off the ground. In this case, turn the electrical system off and on again. The Torque Control indicator will go off after your speed reaches 3 mph (5 km/h)
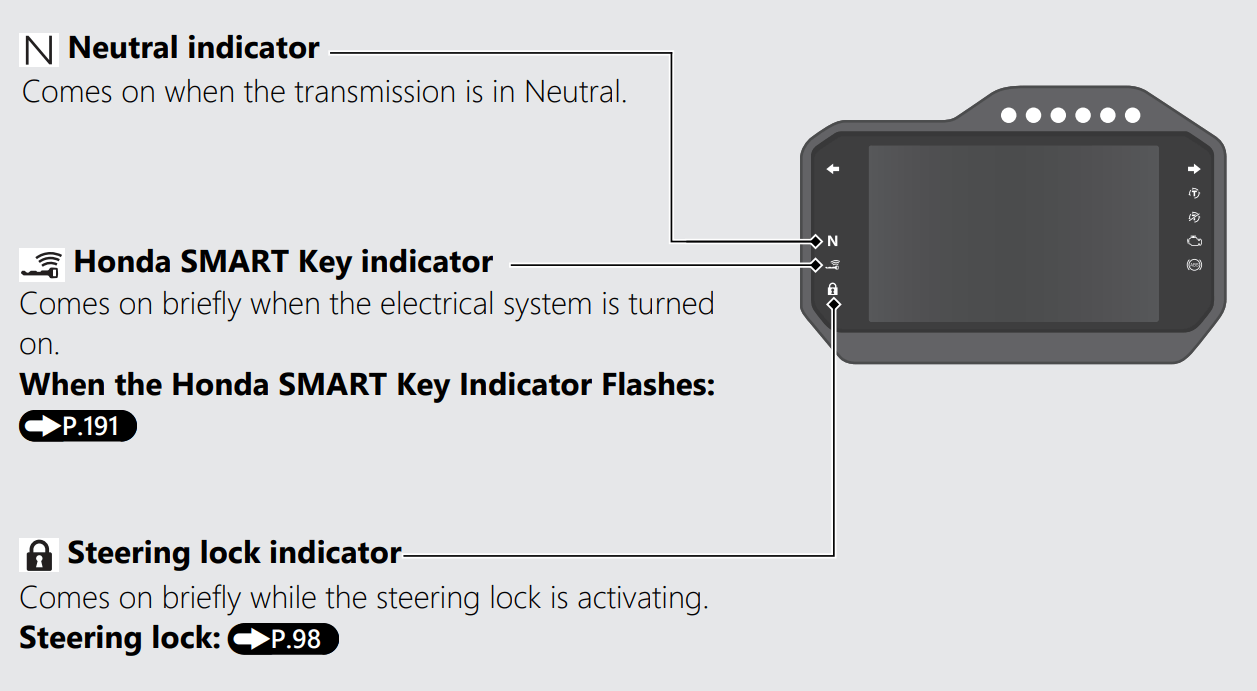
Honda SMART Key Indicator
When the Honda SMART Key indicator flashes 5 times
Replacing the Honda SMART Key Battery
When the Honda SMART Key indicator is flashing while the electrical system is on
The Honda SMART Key indicator flashes when communication between your vehicle and Honda SMART Key stops after turning on the electrical system. It is probably caused by the following:
Strong radio waves or noise are affecting the system
You lose the Honda SMART Key while riding
However, this does not affect the operation of your vehicle until the electrical system is off.
You may not be able to turn off the electrical system when losing the Honda SMART Key while riding, or if the battery is low, or because the system is affected by strong radio waves or noise. If this occurs, turn the ignition switch knob OFF/ (Lock) counterclockwise and hold it until the electrical system shut off.
You can also turn off the electrical system by turning the ignition switch knob OFF/ (Lock) counterclockwise 3 times within 3 seconds.
If the electrical system cannot be turned on because the Honda SMART Key battery becomes weak (or dead), it can be activated by means of emergency procedures
When the Honda SMART Key System Does Not Operate Properly
When the Honda SMART Key system does not work properly, perform the following.
Check that the Honda SMART Key system is activated. Lightly push the ON/OFF button on the Honda SMART Key. If the Honda SMART Key LED is red, activate the Honda SMART Key system. If the Honda SMART Key LED does not respond, replace the battery.
Check that there is no communication failure in the Honda SMART Key system. The Honda SMART Key system uses lowintensity radio waves. The Honda SMART Key system may not work properly in the following conditions:
When there are facilities nearby that generate strong radio waves or noise such as TV towers, power stations, radio stations, or airports.
When you carry the Honda SMART Key with a laptop or wireless communication device such as a radio or mobile phone.
When the Honda SMART Key comes into contact with or is covered by metal objects.
Check that a registered Honda SMART Key is used. Use a registered Honda SMART Key. The Honda SMART Key system cannot be activated without a registered Honda SMART Key.
Make sure that you do not use a broken Honda SMART Key. If you use a broken Honda SMART Key, the Honda SMART Key system cannot be activated. Bring the ID tag to your dealer.
Check the battery condition and battery lead in your vehicle. Check the battery and battery terminals. If the battery is weak, contact your dealer.
If the Honda SMART Key system cannot be activated due to other causes, contact your dealer.
Activating the Electrical System in an Emergency
The mechanical key and ID tag can be used to activate the electrical system when the electric system cannot be turned on because the Honda SMART Key battery becomes weak or dead.
Set up to ID number input mode
Remove the front seat using a 5 mm Hex wrench provided in the tool kit.
To access the tool kit, remove the rear seat.
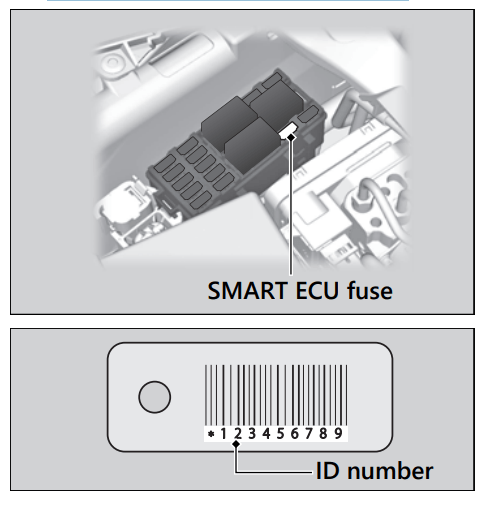
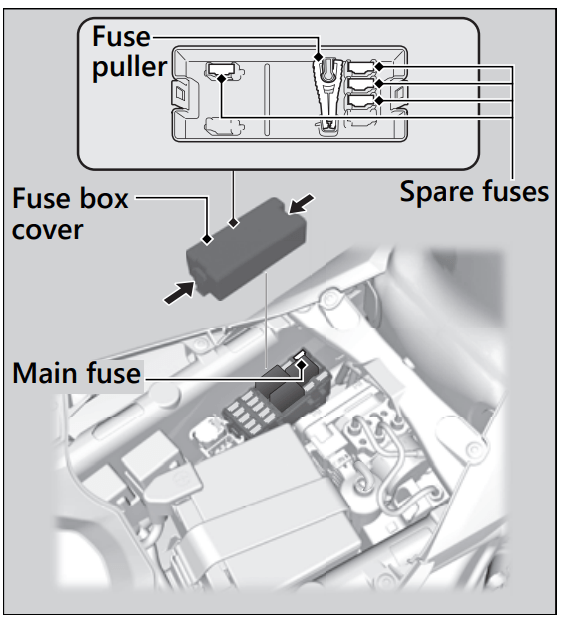
Remove the fuse box cover.
Pull out the SMART ECU fuse with the fuse puller and wait about 2 minutes before insert the SMART ECU fuse again.
Push and hold the ignition ON switch for more than 4 seconds.
The steering lock indicator comes on and the system enters the ID number input mode.
Check the ID number on the ID tag.
ID number input
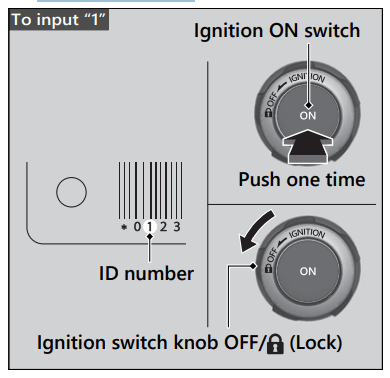
You can input your ID number by pushing the ignition ON switch and Turn the ignition switch knob OFF/ (Lock) counterclockwise. Input the ID number on the ID tag in order from the left in turn by pushing the ignition ON switch.
The ID number is input according to the number of times the ignition ON switch is pushed.
Push the ignition ON switch the desired number of times, then turn the ignition switch knob OFF/ (Lock) counterclockwise to fix the current digit (the steering lock indicator goes off briefly and comes on again), and input the next digit, and then repeat until all the digits are input.
While inputting the ID number, if the button is not pressed for about 60 seconds, the inputted ID number is cancelled and the system returns to the state before removing the SMART ECU fuse (the steering lock indicator goes off).
Example:
To input “0”, turn the ignition switch knob OFF/ (Lock) counterclockwise without pushing the ignition ON switch, and then input next digit.
To input “1”, push the ignition ON switch once, and then turn the ignition switch knob OFF/ (Lock) ) counterclockwise to input the next digit.
ID number input success
After the last digit of the ID number is inputted, ID number is authenticated, the steering lock indicator will flash every 2 seconds.
Push the ignition ON switch within 30 seconds after the ID number is authenticated.
If the steering is locked
The steering will be unlocked. To active the electrical system, push the ignition ON switch once again within 30 seconds after the ID number is authenticated.
If the steering is unlocked
The electrical system will be activated. You can start the engine.
You can turn off the engine and electrical system and also lock the steering using the ignition switch. The ignition switch operation is disabled 30 seconds after the electrical system is turned off.
To activate the electrical system again, repeat the procedures for activating the electrical system in an emergency
ID number input failure
If the ID number is not authenticated after inputting, the steering lock indicator goes off. The steering cannot be unlocked and the electrical system will not activate.
Repeat the procedures for activating the electrical system in an emergency.
ID number input cancel
If you input the wrong number, you can cancel ID number input by not operating the switch for about 60 seconds (the steering lock indicator goes off ).
Repeat the procedures for activating the electrical system in an emergency.
Tire Puncture
Repairing a puncture or removing a wheel requires special tools and technical expertise. We recommend you have this type of service performed by your dealer.
After an emergency repair, always have the tire inspected/replaced by your dealer.
Emergency Repair Using a Tire Repair Kit
If your tire has a minor puncture, you can make an emergency repair using a tubeless tire repair kit.
Follow the instructions provided with the emergency tire repair kit.
Riding your vehicle with a temporary tire repair is very risky. Do not exceed 30 mph (50 km/h). Have the tire replaced by your dealer as soon as possible.
WARNING
Riding your vehicle with a temporary tire repair can be risky. If the temporary repair fails, you can crash and be seriously injured or killed.
If you must ride with a temporary tire repair, ride slowly and carefully and do not exceed 30 mph (50 km/h) until the tire is replaced.
Electrical Trouble
Battery Goes Dead
CBR1000ST
Charge the battery using a motorcycle battery charger.
Remove the battery from the vehicle before charging.
Do not use an automobile-type battery charger, as these can overheat a motorcycle battery and cause permanent damage. If the battery does not recover after recharging, contact your dealer.
NOTICE: Jump starting using an automobile battery can damage your vehicle's electrical system and is not recommended. Bump starting is also not recommended.
CBR1000SP
Battery charging is needed.
A battery charger recommended by your lithium-ion (li-ion) battery manufacturer is needed for battery charging.
Contact your dealer before charging the battery.
Remove the battery from the vehicle before charging.
NOTICE: Only use a charger recommended by your lithium-ion (li-ion) battery manufacturer. Using a battery charger that is not recommended can cause permanent damage to your battery.
If the battery does not recover after recharging, contact your dealer.
NOTICE: Do not jump-start, as this can damage your vehicle's electrical system and battery. Bump starting is not recommended.
Burned-out Light Bulb
All light bulbs on the vehicle are LEDs. If there is an LED which is not turned on, see your dealer for servicing.
Blown Fuse
Before handling fuses, see “Inspecting and Replacing Fuses.”
Fuse Box Fuses
Remove the front seat.
Remove the fuse box cover.
Pull the main fuse and other fuses out one by one with the fuse puller furnished in reverse side of the fuse box cover and check for a blown fuse. Always replace a blown fuse with a spare fuse of the same rating.
Spare fuses are provided on back side of the fuse box cover.
Reinstall the fuse box cover.
Reinstall the front seat
NOTICE: If a fuse fails repeatedly, you likely have an electrical problem. Have your vehicle inspected by your dealer.
Information
Keys
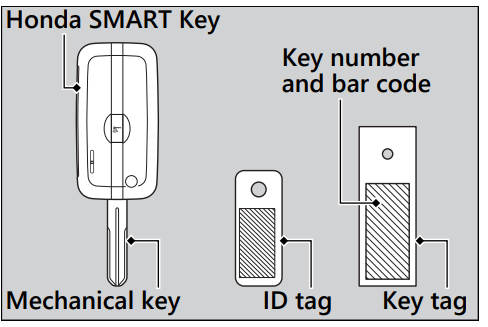
Honda SMART Key
The Honda SMART Key is equipped with a mechanical key.
Carrying the Honda SMART Key allows you to perform the following operations:
Locking or unlocking the steering and activating or deactivating the electrical system
Opening the fuel fill cap and rear seat
The ID number of the Honda SMART Key is on the ID tag. You can also unlock the steering (if it is locked) and activating the electrical system by inputting the ID number.
Always carry the ID tag, but separate from the Honda SMART Key, to avoid losing all of them at the same time.
Also store the key tag and a copy of your ID number in a safe place other than your vehicle.
The Honda SMART Key contains electronic circuits. If the circuits are damaged, the Honda SMART Key will not allow you to perform any operations.
Do not drop the Honda SMART Key or set heavy objects on them.
Protect the Honda SMART Key from direct sunlight, high temperature, and high humidity.
Do not scratch or puncture.
Do not store near any magnetized products such as a magnetized key chain.
Always keep the Honda SMART Key away from electric appliances such as a TV, radio, PC or low-frequency massage device.
Keep the Honda SMART Key away from liquids. If it gets wet, dry it immediately with a soft cloth.
Keep the Honda SMART Key away from the vehicle while washing the vehicle.
Do not burn.
Do not wash in an ultrasonic cleaner.
If fuel, wax, or grease adhere to the Honda SMART Key, wipe it off immediately to avoid cracking or warping.
Do not disassemble the Honda SMART Key other than when changing a battery. Only the cover of the Honda SMART Key can be disassembled. Do not disassemble other parts.
Do not lose your Honda SMART Key. If you lose it, you will need to register a new Honda SMART Key. See your dealer with your ID tag for registration.
The battery in the Honda SMART Key system normally lasts about 2 years.
Do not keep mobile phones or other radio transmitting devices in any compartment. The radio frequency from the devices will interrupt the Honda SMART Key system.
To get an additional Honda SMART Key, take the Honda SMART Key and the vehicle to your dealer.
USA
Each radio frequency device installed in the vehicle conforms to the requirements and standards of the regulation listed below:
This device complies with Part 15 of the FCC Rules. Operation is subject to the following two conditions: (1) this device may not cause harmful interference, and (2) this device must accept any interference received, including interference that may cause undesired operation.
Changes or modifications not expressly approved by the party responsible for compliance could void the user’s authority to operate the equipment.
Canada
This device complies with Industry Canada’s licence-exempt RSSs. Operation is subject to the following two conditions: (1) This device may not cause interference; and (2) This device must accept any interference, including interference that may cause undesired operation of the device.
Le présent appareil est conforme aux CNR d’Industrie Canada applicables aux appareils radio exempts de licence. L’exploitation est autorisée aux deux conditions suivantes: 1) l’appareil ne doit pas produire de brouillage; 2) l’utilisateur de l’appareil doit accepter tout brouillage radioélectrique subi, même si le brouillage est susceptible d’en compromettre le fonctionnement.
Caring for Your Vehicle
Frequent cleaning and polishing is important to ensure the life of your Honda. A clean vehicle makes it easier to spot potential problems. In particular, seawater and salts used to prevent ice on roads promote the formation of corrosion. Always wash your vehicle thoroughly after riding on coastal or treated roads.
Washing
Allow the engine, muffler, brakes, and other high-temperature parts to cool before washing.
Rinse your vehicle thoroughly using a low pressure garden hose to remove loose dirt.
If necessary, use a sponge or a soft towel with mild cleaner to remove road grime.
Clean the windscreen, headlight lens, panels, and other plastic components with extra care to avoid scratching them. Avoid directing water into the air cleaner, muffler, and electrical parts.
Thoroughly rinse your vehicle with plenty of clean water and dry with a soft, clean cloth.
After the vehicle dries, lubricate any moving parts.
Make sure that no lubricant spills onto the brakes or tires. Brake discs, pads, drum or shoes contaminated with oil will suffer greatly reduced braking effectiveness and can lead to a crash.
Lubricate the drive chain immediately after washing and drying the vehicle.
Apply a coat of wax to prevent corrosion.
Avoid products that contain harsh detergents or chemical solvents. These can damage the metal, paint, and plastic on your vehicle. Keep the wax clear of the tires and brakes.
If your vehicle has any matte painted parts, do not apply a coat of wax to the matte painted surface.
Washing Precautions: Follow these guidelines when washing:
Do not use high-pressure washers:
High-pressure water cleaners can damage moving parts and electrical parts, rendering them inoperable.
Water in the air intake can be drawn into the throttle body and/or enter the air cleaner.
Do not direct water at the muffler:
Water in the muffler can prevent starting and causes rust in the muffler.
Dry the brakes:
Water adversely affects braking effectiveness. After washing, apply the brakes intermittently at low speed to help dry them.
Do not direct water under the seat:
Water in the under seat compartment can damage your documents and other belongings.
Do not direct water at the air cleaner:
Water in the air cleaner can prevent the engine from starting.
Do not direct water near the headlight:
The headlight's inside lens may fog temporarily after washing or while riding in the rain. This does not impact the headlight function. However, if you see a large amount of water or ice accumulated inside the lens(es), have your vehicle inspected by your dealer.
Do not use wax or polishing compounds on matte painted surface:
Use a soft cloth or sponge, plenty of water, and a mild detergent to clean matte painted surfaces. Dry with a soft clean cloth.
Aluminum Components
Aluminum will corrode from contact with dirt, mud, or road salt. Clean aluminum parts regularly and follow these guidelines to avoid scratches:
Do not use stiff brushes, steel wool, or cleaners containing abrasives.
Avoid riding over or scraping against curbs
Panels
Follow these guidelines to prevent scratches and blemishes:
Wash gently using a soft sponge and plenty of water.
To remove stubborn stains, use diluted detergent and rinse thoroughly with plenty of water.
Avoid getting gasoline, brake fluid, or detergents on the instruments, panels, or headlight.
Windscreen
Using plenty of water, clean the windscreen with a soft cloth or sponge. (Avoid using detergents or any kind of chemical cleaner on the windscreen.) Dry with a soft, clean cloth.
NOTICE: To avoid possible scratching or other damage, use only water and a soft cloth or sponge to clean the windscreen.
For a dirtier windscreen, use a diluted neutral detergent with a sponge and plenty of water. Make sure to wash off all the detergent. (Detergent residue may cause windscreen cracks.)
Replace the windscreen if scratches cannot be removed and they obstruct clear vision.
Take care to keep battery electrolyte, brake fluid, or other chemical solvents off the windscreen and screen garnish. They will damage the plastic.
Exhaust Pipe and Muffler
The exhaust pipe and muffler are titanium and stainless steel but may become stained by mud or dust.
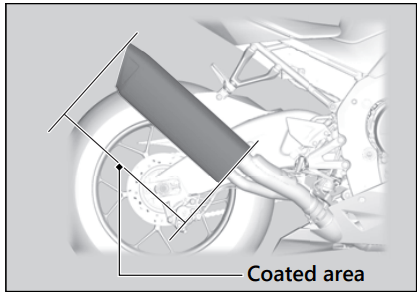
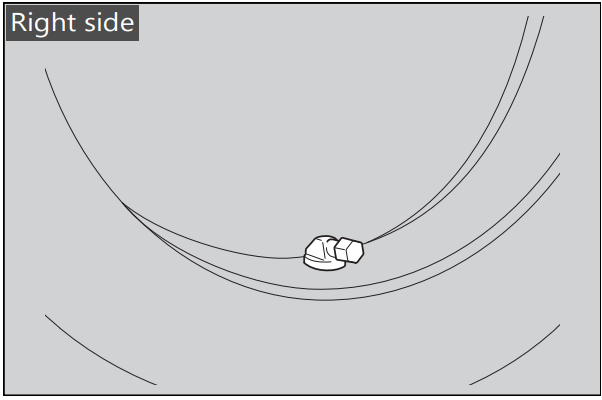
The part in the following illustration is coated to prevent oxidation.
To avoid damaging the coating, do not use aggressive chemical cleaners or compounds.
Coated area
To remove mud or dust, use a wet sponge and a mild detergent, then rinse well with clean water. Dry with chamois or a soft towel.
Use a soft cloth sprayed with a multi-purpose spray lubricant and wipe clean.
Uncoated area
To remove mud or dust, use a wet sponge and a liquid kitchen abrasive, then rinse well with clean water. Dry with chamois or a soft towel. If necessary, remove heat stains by using a commercially available fine texture compound. Then rinse by the same manner as removing mud or dust.
NOTICE: Even though the exhaust is made of titanium and stainless steel, it can become stained. Remove all marks and blemishes as soon as they are noticed.
Storing Your Vehicle
If you store your vehicle outdoors, you should consider using a full-body cover. If you won't be riding for an extended period, follow these guidelines:
Wash your vehicle and wax all painted surfaces (except matte painted surfaces). Coat chrome pieces with rust-inhibiting oil.
Lubricate the drive chain.
Place your vehicle on a maintenance stand and position a block so that both tires are off the ground.
After rain, remove the body cover and allow the vehicle to dry.
Remove the battery to prevent discharge. Fully charge the battery and then place it in a shaded, well-ventilated area.
If you leave the battery in place, disconnect the negative - terminal to prevent discharge.
After removing your vehicle from storage, inspect all maintenance items required by the Maintenance Schedule.
USA
For more information about storage, refer to the Honda Winter Storage Guide, available from your dealer.
Canada
For more information about storage, visit our website at www.honda.ca and look up “Storage Tips” under the “Honda Warranty” in the Warranty tab for your Model.


 (Lock) counterclockwise and hold it until the electrical system shut off.