Owner 's Guide for SUPER CUB
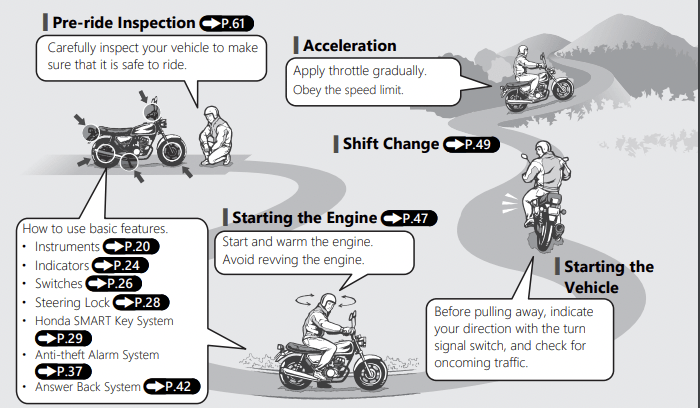
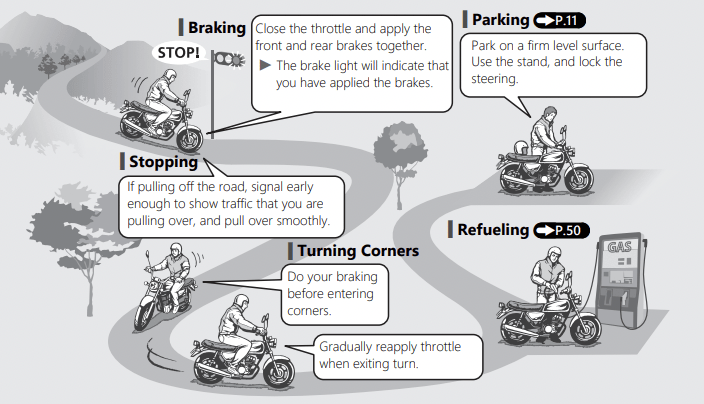
Basic Operation Flow
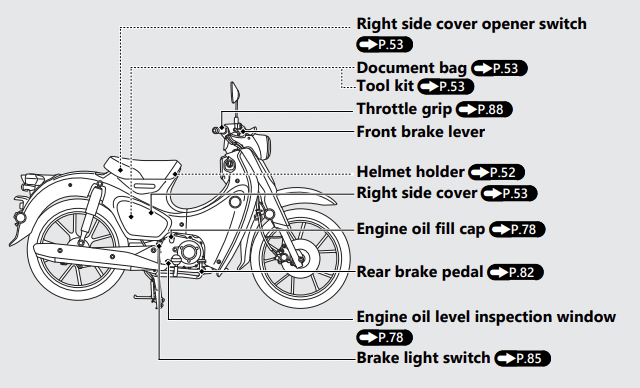
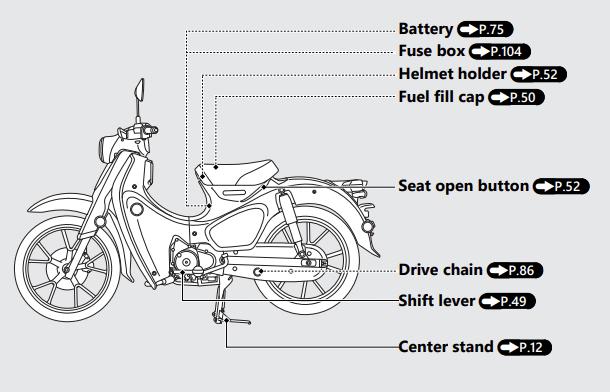
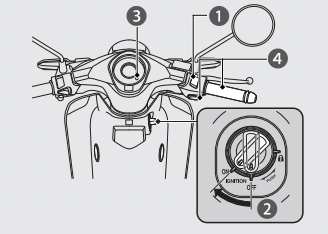
Parts Location
Instruments

Remaining fuel when only 1st (E) segment starts flashing approximately: 0.26 US gal (1.0 L)
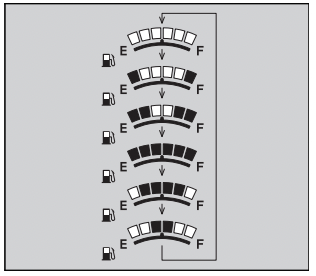
If the fuel gauge indicator flashes in a repeat pattern or turns off
Display Check
When the ignition switch is turned to the ON position, the speedometer needle swings to the maximum scale on the dial once, all the mode and digital segments will show. If any part of the display does not come on when it should, have your dealer check for problems.
Display Setting
You can adjust the two settings.
• Clock setting
• Changing of mileage unit
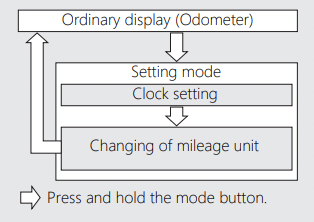
The established setting can also be set by turning the ignition switch to the OFF position.
The control is automatically switched from the setting mode to the ordinary display if the button is not pressed for about 30 seconds. Even in this case, the established setting is maintained.
1 Clock setting:
- Turn the ignition switch to the ON position.
- With odometer displayed, press and hold the mode button, the hour digits start flashing.
- Press the mode button until the desired hour is displayed.

4. Press and hold the mode button, the minute digits start flashing
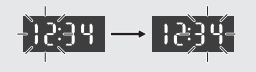
5. Press the mode button until the desired minute is displayed.

6. Press and hold the mode button. The clock is set, and then the display moves to the changing of mileage unit.
2 Changing of mileage unit:
1. Press the mode button to select either “km” or “mile”.
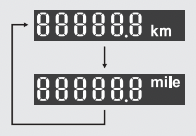
2. Press and hold the mode button. The mileage unit is set, and then the display returns to the ordinary display.
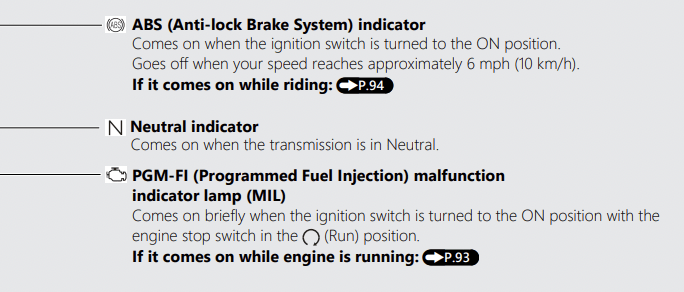
Indicators
If one of these indicators does not come on when it should, have your dealer check for problems.
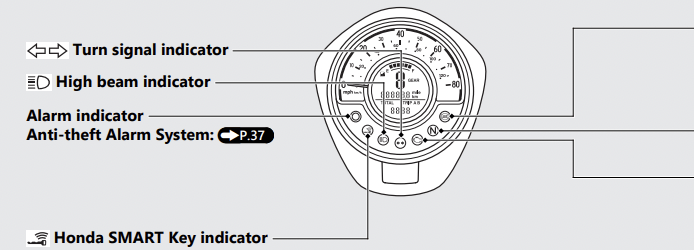
Comes on when vehicle and Honda SMART Key verification is complete, and the ignition switch can be operated. Goes off when the ignition switch is turned to the ON position.
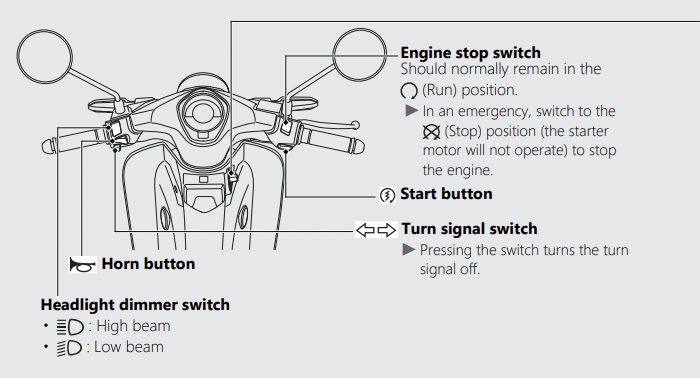
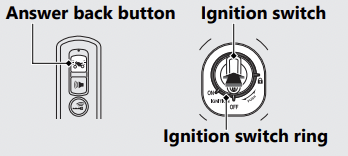
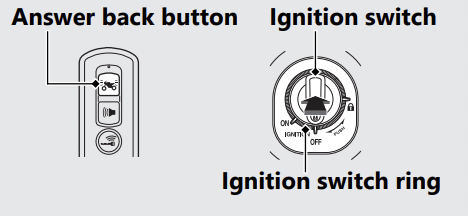
Switches
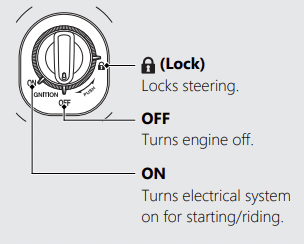
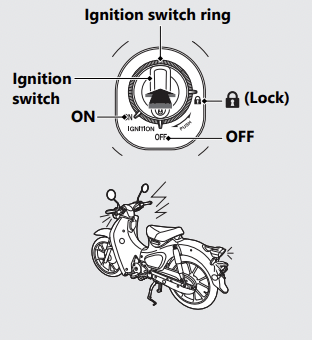
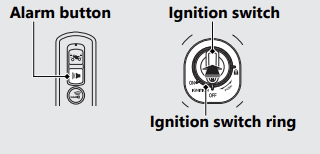
Ignition switch
Switches the electrical system on/off and locks the steering.
To unlock the ignition switch:

Steering Lock
Lock the steering when parking to help prevent theft. A U-shaped wheel lock or similar device is also recommended.
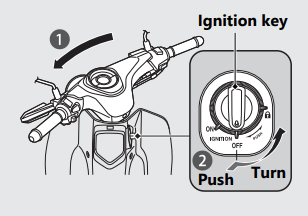
Locking
- Turn the handlebar all the way to the left.
- Push the ignition switch down, and turn it to the (Lock)
 position.
- To unlock the ignition switch. (P.34)
- Jiggle the handlebar if the lock is difficult to engage.
3. Lock the ignition switch.
Unlocking
Push the ignition switch in, and turn it to the OFF position.
- To unlock the ignition switch.
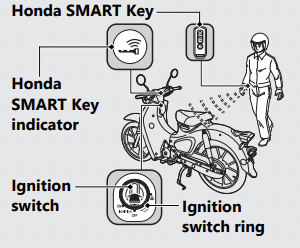
Honda SMART Key System
The Honda SMART Key system allows you to operate the main switch without inserting a key into a keyhole.
The system runs a two-way authentication between the vehicle and the Honda SMART Key to verify if it is the registered Honda SMART Key.
The Honda SMART Key system uses lowintensity radio waves. It may affect medical equipment such as a cardiac pacemaker.
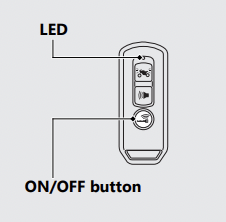
Switching the Honda SMART Key System
To switch the Honda SMART Key system to activation or deactivation
Press the ON/OFF button until the Honda SMART Key LED changes color.
To check the Honda SMART Key system status
Lightly press the ON/OFF button. The Honda SMART Key LED will show the status. When the Honda SMART Key LED is:
Green: (active) Honda SMART Key system authentication can be performed.
Red: (inactive) Honda SMART Key system authentication cannot be performed.
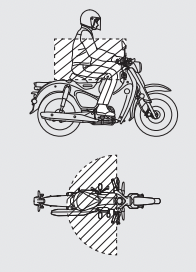
Operating Range
The operating range varies when the ignition switch is locked or unlocked.
The Honda SMART Key system uses lowintensity radio waves. Therefore, the operating range may be wider or narrower, or the Honda SMART Key system may not work properly in the following situations:
- When the Honda SMART Key battery is depleted.
- When there are facilities nearby that generate strong radio waves or noise, such as TV towers, power stations, radio stations, or airports.
- When you carry the Honda SMART Key with a laptop or wireless communication device such as a radio or mobile phone.
- When the Honda SMART Key comes into contact with or is covered by metal objects.
When the ignition switch is unlocked:
The system can be operated within the shaded area shown in the illustration.
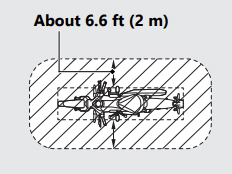
When the ignition switch is locked:
The system can be operated within the shaded area shown in the illustration.
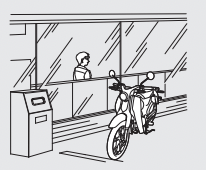
Anyone can unlock the ignition switch and start the engine if your Honda SMART Key is within operating range of your vehicle, even if you are on the other side of a wall or window. If you are away from your vehicle but your Honda SMART Key is still within operating range, deactivate the Honda SMART Key system.
To switching the Honda SMART Key system
Anyone in possession of the Honda SMART Key can perform the following operations if the Honda SMART Key is within operating range:
- Starting the engine
- Unlocking the ignition switch
- Unlocking the seat lock
- Unlocking the steering lock
You should always keep the Honda SMART Key on your person after you get on and off the vehicle or while riding.
Do not place the Honda SMART Key in any compartment.
If the ignition switch is in the ON position, the vehicle can be operated even by a person who does not have a verified Honda SMART Key.
Whenever you leave your vehicle, lock the steering and lock the ignition switch. (P.35)
Make sure the ignition switch ring goes off and all turn signals flash once at this time.
Switching the ignition switch
To Unlock the Ignition Switch
1 Make sure that the Honda SMART Key is activated. (P.30)
2 To authenticate the Honda SMART Key system, push the ignition switch.
- When properly authenticated and the ignition switch is unlocked, the buzzer rings times, the Honda SMART Key indicator and ignition switch ring come on.
- The buzzer sound can be cancelled. (P.36)
3 Turn the ignition switch to the ON position while the Honda SMART Key indicator comes on.
- If you do not turn the ignition switch to theON position within 20 seconds after pushing in the ignition switch in, the Honda SMART Key indicator and ignition switch ring will go off, the turn signals flash 1 time, and then the ignition switch will be locked.
When the Honda SMART Key system does not work properly (P.97)
If someone without the Honda SMART Key tries to turn the ignition switch, the ignition switch rotates freely. If you notice the ignition switch is in a different position, turn the ignition switch to the original (OFF or Lock)) position.
To Lock the Ignition Switch
1 Turn the ignition switch to the OFF or (Lock) position.
2 Lock the ignition switch by doing one of the following:
- Leave the operating range with the Honda SMART Key. (P.31)
- Push the ignition switch.
- Wait for approximately 20 seconds after turning the ignition switch from ON to OFF or (Lock) position.
- Switch the Honda SMART Key system to inactive. (P.30)
3 Make sure that the Honda SMART Key indicator and ignition switch ring go off, the turn signals flash once, and the buzzer rings time. This indicates that the ignition switch is locked.
- The buzzer sound can be cancelled.
When the Honda SMART Key system does not work properly (P.97)
Always make sure the ignition switch position is in the OFF or (Lock) position when you leave your vehicle.
When the ignition switch is locked in the OFF position, the steering cannot be locked. To lock the steering, unlock the ignition switch.
Switch the Buzzer Sound When the Ignition Switch is Locked/Unlocked
Enable
1 Deactivate the Honda SMART Key system. (P.30)
2 Lightly press the ON/OFF button. The red Honda SMART Key LED comes on.
3 While the red LED is on, press the answer back button.
- The red LED starts blinking when the buzzer sound is properly enabled.
Disable
- Deactivate the Honda SMART Key system. (P.30)
- Lightly press the ON/OFF button. The red Honda SMART Key LED blinks.
- While the red LED is blinking, press the answer back button.
- The red LED stops blinking but stays on when the buzzer sound is properly disabled.
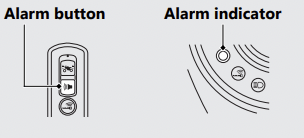
Anti-theft Alarm System
The anti-theft alarm system is a device to reduce the likelihood of theft. When the sensor detects vibration or movement with the ignition switch in the OFF or (Lock) position and the system is set, the alarm is activated.
The buzzer rings and the turn signals blink for about 10 seconds when the anti-theft alarm system detects vibration caused by contact or movement.
The buzzer rings and the turn signals blink for about 60 seconds when the anti-theft alarm system detects a substantial change in the vehicle posture. After the buzzer rings for seconds, the anti-theft alarm system will be reset in that posture.
If the ignition switch is left in the OFF or (Lock) position for more than 10 days, the anti-theft alarm system will no longer operate.
When the system is active and the vehicle receives a signal from pressing the answer back or alarm button, system activation will be extended for 10 days.
To reset the system, unlock the ignition switch and turn the ignition switch to the ON position once.
- To unlock the ignition switch. (P.34)
The anti-theft alarm system uses lowintensity radio waves. It may affect medical equipment such as a cardiac pacemaker.
When the battery in the vehicle is weak, the anti-theft alarm system may not function.
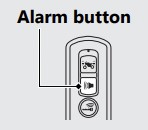
Setting the Anti-theft Alarm System
- Turn the ignition switch to OFF or (Lock) position.
- Press the alarm button. Within a second, the turn signal light blinks and the buzzer rings 1 time. After 2 seconds, the buzzer rings 1 time. The anti-theft alarm system is activated. The alarm indicator flashes while the anti-theft alarm system is activated.
Cancelling the Anti-theft Alarm System
1. To cancel the anti-theft alarm system, do one of the following:
• Press the alarm button on the Honda SMART Key.
• Unlock the ignition switch. (P.34)
• Press the seat open button while the Honda SMART Key is in the operating range
2. Make sure that the turn signal light and alarm indicator blink 2 times, and the buzzer rings 2 times. This indicates that the antitheft alarm system is cancelled.
Stopping the Anti-theft Alarm Activation
To stop the anti-theft alarm activation, do one of the following:
• Press the alarm button on the Honda SMART Key.
• Press the answer back button on the Honda SMART Key.
• Unlock the ignition switch. (P.34)
• Press the seat open button. (P.52)
After stopping the anti-theft alarm activation, the anti-theft alarm system will be cancelled.
Adjusting the Sensitivity of Anti-theft Alarm System
You can select from 3 sensitivity levels for the anti-theft alarm system.
- Remove the center cover. (P.77)
- Make sure that the Honda SMART Key system is active. (P.30)
- Push the ignition switch to authenticate the Honda SMART Key system. (P.34)
- Connect the EM mode coupler provided on the battery cover to the EM mode connector. (P.99)
- The Honda SMART Key indicator and ignition switch ring go off.
5 Push the ignition switch 1 time.
6 Repeat the following 3 times: Press the alarm button on the Honda SMART Key 2 times and the ignition switch 1 time
- When the alarm button is pressed, the Honda SMART Key LED comes on. Make sure the LED goes off before pressing the button again
- If the alarm button or ignition switch is not pressed for 1 minute, the Honda SMART Key indicator starts blinking and this mode will be cancelled. If so, remove the EM mode coupler, return to 3 and follow the procedure again.
7 Press the alarm button to select from 3 sensitivity levels.
3 alarm rings: high sensitivity
2 alarm rings: medium sensitivity
1 alarm ring: low sensitivity
The Honda SMART Key indicator and ignition switch ring come on while setting
8 Wait for about 10 seconds until the ignition switch ring starts blinking. The sensitivity level is set.
9 Remove the EM mode coupler from the EM mode connector to finish setting.
- The sensitivity level is also set if you remove the EM mode coupler before the ignition switch ring starts blinking.
10 Store the EM mode coupler on the battery cover. Reinstall the parts in reverse order.
If the Anti-Theft Alarm System Does Not Operate Properly
If any of the following situations arise, the battery (P. 75) in the vehicle may be discharged or there is a system problem. Remove the battery and see your dealer.
The alarm does not ring.
The alarm rings but fades out.
The alarm system does not stop.
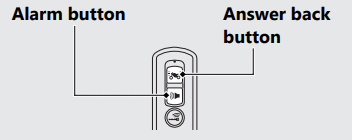
Answer Back System
The answer back system is a device to find the location of your vehicle. When the immobilizer is active and you press the answer back button on the Honda SMART Key with the ignition switch in the OFF or (Lock) position, the turn signals light, the ignition switch ring lights, and the buzzer rings, informing you of your vehicle's location. The ignition switch ring will light for about 1 minute.
The answer back system uses low-intensity radio waves. It may affect medical equipment such as a cardiac pacemaker.
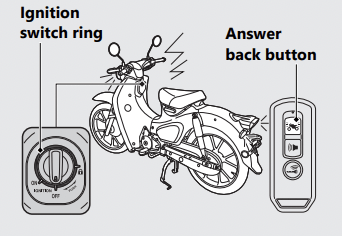
Operation
Press the answer back button on the Honda SMART Key.
- The answer back system will not function when the ignition switch is in the ON position. When the battery in the vehicle is weak, the answer back system may not function.
If the ignition switch is left in the OFF or (Lock) position for more than 10 days, the answer back system will no longer operate. When the system is active and the vehicle receives a signal from pressing the answer back or alarm button, system activation will be extended for 10 days. To reset the system, unlock the ignition switch and turn the ignition switch to the ON position once.
- To unlock the ignition switch. (P.34)
Adjusting the Answer Back Buzzer Sound Volume Level
You can select the buzzer sound volume from 3 levels.
- Remove the center cover. (P.77)
- Make sure that the Honda SMART Key system is activated. (P.30)
- Push the ignition switch to authenticate the Honda SMART Key system. (P.34)
- Connect the EM mode coupler provided on the battery cover to the EM mode connector. (P.99)
- The Honda SMART Key indicator and ignition switch ring go off.
5. Push the ignition switch 1 time.
6. Repeat the following 3 times: Press the answer back button on the Honda SMART Key 2 times and the ignition switch 1 time.
- When the answer back button is pressed, the Honda SMART Key LED comes on. Make sure the LED goes off before pressing the button again.
- If the answer back button or ignition switch is not pressed for 1 minute, the Honda SMART Key indicator starts blinking and this mode will be cancelled. If so, remove the EM mode coupler, return to 3 and follow the procedure again.
7. Press the answer back button to select from 3 levels for the sound volume. The Honda SMART Key indicator and ignition switch ring come on while setting.
8. Wait for about 10 seconds until the ignition switch ring starts blinking. The sound volume level is set.
9. Remove the EM mode coupler from the EM mode connector to finish setting.
- The sound volume level is also set if you remove the EM mode coupler before the ignition switch ring starts blinking.
10. Store the EM mode coupler on the battery cover. Reinstall the parts in reverse order.
Changing the Answer Back Buzzer Sound Pattern
You can select buzzer sound from 3 patterns.
- Remove the center cover. (P.77)
- Make sure that the Honda SMART Key is active. (P.30)
- Push the ignition switch to authenticate the Honda SMART Key system. (P.34)
- Connect the EM mode coupler provided on the battery cover to the EM mode connector. (P.99)
- The Honda SMART Key indicator and ignition switch ring go off.
5. Push the ignition switch 1 time.
6. Repeat the following 3 times: Press the answer back button on the Honda SMART Key 3 times and the ignition switch 1 time.
- When the answer back button is pressed, the Honda SMART Key LED comes on. Make sure the LED goes off before pressing the button again.
- If the answer back button or ignition switch is not pressed for 1 minute, the Honda SMART Key indicator starts blinking and this mode will be cancelled. If so, remove the EM mode coupler, return to 3 and follow the procedure again.
7. Press the answer back button to select from 3 buzzer sound patterns. The Honda SMART Key indicator and ignition switch ring come on while setting
8. Wait for about 10 seconds until the ignition switch ring starts blinking. The sound pattern is set.
9. Remove the EM mode coupler from the EM mode connector to finish setting.
- The sound pattern is also set if you remove the EM mode coupler before the ignition switch ring starts blinking.
10. Store the EM mode coupler on the battery cover. Reinstall the parts in reverse order.
Temporary Silence Mode
Temporary silence mode is the immediate way to turn off the answer back system buzzer sound.
Enable:
Press and hold the answer back button for about 2 seconds, the Honda SMART Key LED changes to red.
Disable:
Re-press and hold the answer back button for about 2 seconds, the Honda SMART Key LED changes to green.
Starting the Engine
Start your engine using the following procedure, regardless of whether the engine is cold or warm. This vehicle is equipped with a Honda SMART Key system. Always keep Honda SMART Key on you when you ride the vehicle. (P.31)
NOTICE
• If the engine does not start within 5 seconds, turn the ignition switch to the OFF position and wait 10 seconds before trying to start the engine again to recover battery voltage.
• Extended fast idling and revving the engine can damage the engine, and the exhaust system.
• Snapping the throttle or fast idling for more than about 5 minutes may cause exhaust pipe discoloration.
- Make sure the engine stop switch is in the
 (Run) position.
- Turn the ignition switch to the ON position.
- Shift the transmission to Neutral (
 indicator to come on).
- Press the start button with the throttle completely closed.
If you cannot start the engine:
Open the throttle slightly (about 0.1 in (3 mm), without freeplay).
About 0.1 in (3 mm), without freeplay
If the engine does not start:
- Open the throttle fully and press the start button for 5 seconds.
- Repeat the normal starting procedure.
- If the engine starts, open the throttle slightly if idling is unstable.
- If the engine does not start, wait 10 seconds before trying step 1 & 2 again.
Shifting Gears
Your vehicle transmission has 4 forward gears, four-up shift pattern when you shift with your toe. With a heel and toe shifter, you can also shift to a higher gear by pressing the shift lever down with your heel. You can shift to a lower gear by depressing the shift lever down with your toe.
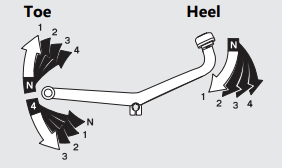
Recommended Shift Points

NOTICE Improper shifting can damage the engine, transmission, and drive train. Also, coasting or towing the vehicle for long distances with the engine off can damage the transmission.
Refueling
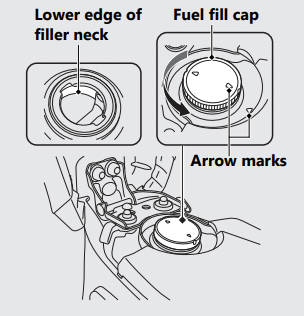
Do not fill with fuel above the lower edge of the filler neck.
Fuel type: Unleaded gasoline only
Recommended fuel octane number: Pump Octane Number (PON) 86 or higher.
Tank capacity: 0.98 US gal (3.7 L)
Opening the Fuel Fill Cap
- Open the seat. (P.52)
- Turn the fuel fill cap counterclockwise until it stops and remove the cap.
Closing the Fuel Fill Cap
1 Install and tighten the fuel fill cap firmly by turning it clockwise
- Make sure that the arrow marks on the cap and fuel tank are aligned.
2 Close the seat.
WARNING Gasoline is highly flammable and explosive. You can be burned or seriously injured when handling fuel.
• Stop the engine, and keep heat, sparks, and flame away.
• Handle fuel only outdoors.
• Wipe up spills immediately.
Storage Equipment
Helmet holder
The helmet holders are located under the seat.
- Use the helmet holders only when parked.

Seat Open
The seat open button can be operated when the Honda SMART Key is in the operating range (P. 31) and the ignition switch is in the OFF or (Lock) position.
Press the seat open button and open the seat.
- If the battery does not have enough voltage to start the engine, the seat may not open.
Seat Close
Close the seat and push down on the rear of the seat until it locks. Make sure that the seat is locked securely to pull it up lightly.
WARNING Riding with a helmet attached to the holder can interfere with your ability to safely operate the vehicle and could lead to a crash in which you can be seriously hurt or killed. Use the helmet holder only while parked. Do not ride with a helmet secured by the holder.
Maintenance
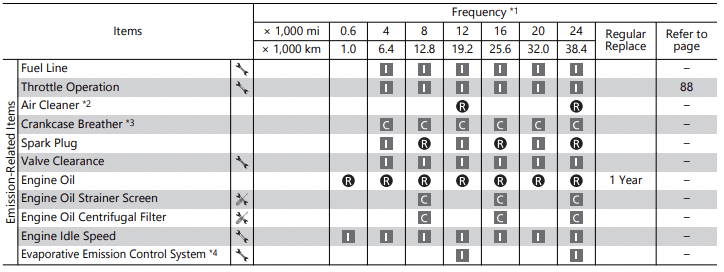
Maintenance Schedule
The maintenance schedule specifies the maintenance requirements necessary to ensure safe, dependable performance, and proper emission control.
Maintenance work should be performed in accordance with Honda's standards and specifications by properly trained and equipped technicians. Your dealer meets all of these requirements. All scheduled maintenance is considered a normal owner operating cost and will be charged to you by your dealer. Keeping an accurate maintenance record will help ensure your vehicle is properly maintained. P. 60
Make sure whoever performs the scheduled maintenance completes the maintenance record. Retain all service documents. If you sell your vehicle, these service documents should be transferred with the vehicle to the new owner.
Maintenance Level
 : Intermediate. We recommend service by your dealer, unless you have the necessary tools and are mechanically skilled. Procedures are provided in an official Honda Service Manual (P. 123).
 : Technical. In the interest of safety, have your vehicle serviced by your dealer.
Maintenance Legend
 : Inspect (clean, adjust, lubricate, or replace, if necessary)
 : Lubricate
 : Replace
 : Clean
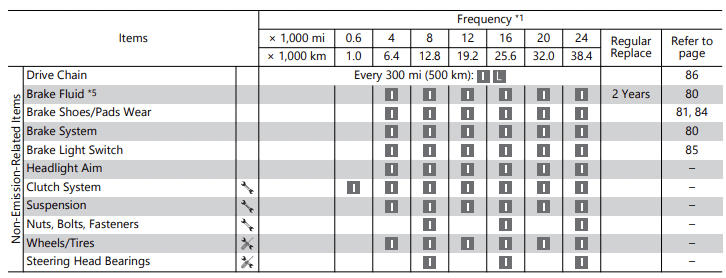
Notes:
*1 : At higher odometer reading, repeat at the frequency interval established here.
*2 : Service more frequently when riding in unusually wet or dusty areas.
*3 : Service more frequently when riding in rain or at full throttle.
*4 : 50 STATE (meets California)
*5: Replacement requires mechanical skill.
Battery
Your vehicle has a maintenance-free type battery. You do not have to check the battery electrolyte level or add distilled water. Clean the battery terminals if they become dirty or corroded. Do not remove the battery cap seals. There is no need to remove the cap when charging.
NOTICE An improperly disposed of battery can be harmful to the environment and human health. Always confirm local regulations for proper battery disposal instruction.
What to do in an emergency
If any of the following occur, immediately see your doctor.
● Electrolyte splashes into your eyes:
- Wash your eyes repeatedly with cool water for at least 15 minutes. Using water under pressure can damage your eyes.
● Electrolyte splashes onto your skin:
- Remove affected clothing and wash your skin thoroughly using water.
● Electrolyte splashes into your mouth:
- Rinse mouth thoroughly with water, and do not swallow.
WARNING The battery gives off explosive hydrogen gas during normal operation. A spark or flame can cause the battery to explode with enough force to kill or seriously hurt you. Wear protective clothing and a face shield, or have a skilled mechanic do the battery servicing.
WARNING: Battery posts, terminals, and related accessories contain lead and lead compounds.
Wash your hands after handling.
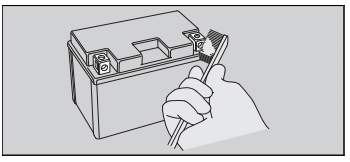
Cleaning the Battery Terminals
1. Remove the battery. P. 75
2. If the terminals are starting to corrode and are coated with a white substance, wash with warm water and wipe clean.
3. If the terminals are heavily corroded, clean and polish the terminals with a wire brush or sandpaper. Wear safety glasses.
4. After cleaning, reinstall the battery.
The battery has a limited life span. Consult your dealer about when you should replace the battery. Always replace the battery with another maintenance-free battery of the same type.
Charging
If you use electrical accessories that drain the battery or you do not ride frequently, we recommend that you charge the battery every 30 days using a charger designed specifically for your Honda, which can be purchased from your dealer. Read the information that came with your battery charger and follow the instructions on the battery. Avoid using an automobile-type battery charger, as these can overheat a motorcycle battery and cause permanent damage. Make sure the ignition switch is in the OFF position before charging the battery.
NOTICE Improper charging can damage the battery. If you can’t charge the battery or it appears unable to hold a charge, contact your dealer.
NOTICE Jump starting using an automobile battery can damage your vehicle's electrical system and is not recommended. Bump starting is also not recommended.
NOTICE Installing non-Honda electrical accessories can overload the electrical system, discharging the battery and possibly damaging the system.
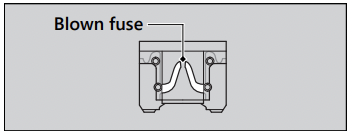
Fuses
Fuses protect the electrical circuits on your vehicle. If something electrical on your vehicle stops working, check for and replace any blown fuses. P. 104
Inspecting and Replacing Fuses
Turn the ignition switch to the OFF position to remove and inspect fuses. If a fuse is blown, replace with a fuse of the same rating. For fuse ratings, see “Specifications.” P. 131
NOTICE Replacing a fuse with one that has a higher rating greatly increases the chance of damage to the electrical system.
If a fuse fails repeatedly, you likely have an electrical fault. Have your vehicle inspected by your dealer.
Engine Oil
Engine oil consumption varies and oil quality deteriorates according to riding conditions and time elapsed. Check the engine oil level regularly, and add the recommended engine oil if necessary. Dirty oil or old oil should be changed as soon as possible.
Selecting the Engine Oil
For recommended engine oil, see “Specifications.” P. 130
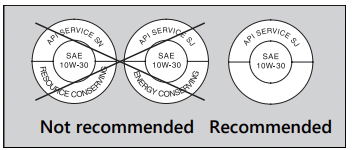
If you use non-Honda engine oil, check the label to make sure that the oil satisfies all of the following standards:
● JASO T 903 standard*1: MA
● SAE standard*2: 10W-30
● API classification*3: SG or higher
*1. The JASO T 903 standard is an index for engine oils for 4-stroke motorcycle engines. There are two classes: MA and MB. For example, the following label shows the MA classification.
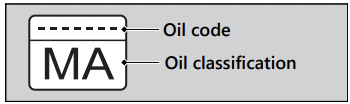
*2. The SAE standard grades oils by their viscosity.
*3. The API classification specifies the quality and performance rating of engine oils. Use SG or higher oils, excluding oils marked as “Energy Conserving” or “Resource Conserving” on the circular API service symbol.
Engine Oil
Checking the Engine Oil
1. If the engine is cold, idle the engine for 3 to 5 minutes.
2. Turn the ignition switch to the OFF position and wait for 2 to 3 minutes.
3. Place your vehicle on its center stand on a firm, level surface.
4. Check that the oil level is between the upper level and lower level marks on the oil level inspection window.
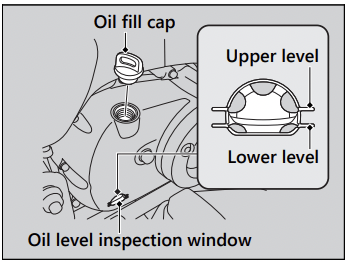
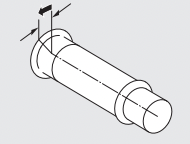
Adding Engine Oil
If the engine oil is below or near the lower level mark, add the recommended engine oil.
1. Remove the oil fill cap. Add the recommended oil until it reaches the upper level mark.
- Place your vehicle on its center stand on a firm, level surface when checking the oil level.
- Do not overfill above the upper level mark.
- Make sure no foreign objects enter the oil filler opening.
- Wipe up any spills immediately
2. Securely reinstall the oil fill cap.
NOTICE Overfilling with oil or operating with insufficient oil can cause damage to your engine. Do not mix different brands and grades of oil. They may affect lubrication and clutch operation.
For the recommended oil and oil selection guidelines, see “Maintenance Fundamentals.”
Brakes
Checking the Front Brake Fluid
1. Place your vehicle in an upright position on a firm, level surface.
2. Check that the brake fluid reservoir is horizontal and that the fluid level is above the LWR mark.
If the brake fluid level in the reservoir is below the LWR mark or the brake lever freeplay becomes excessive, inspect the brake pads for wear. If the brake pads are not worn, you most likely have a leak. Have your vehicle inspected by your dealer.

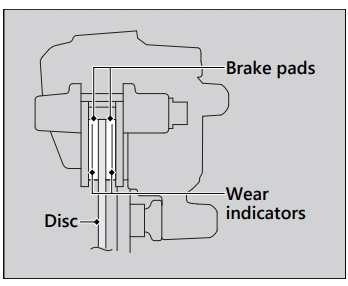
Inspecting the Front Brake Pads
Check the condition of the brake pad wear indicators. The pads need to be replaced if a brake pad is worn to the indicator. Inspect the brake pads from below the brake caliper.
If necessary have the pads replaced by your dealer. Always replace both left and right brake pads at the same time.
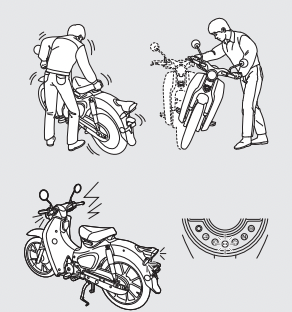
Drive Chain
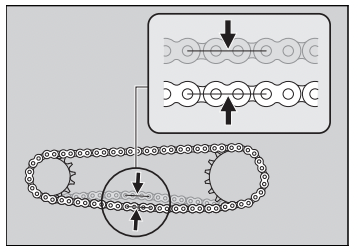
Inspecting the Drive Chain Slack
Check the drive chain slack at several points along the chain. If the slack is not constant at all points, some links may be kinked and binding. Have the chain inspected by your dealer.
1. Shift the transmission to Neutral. Stop the engine.
2. Place your vehicle on its center stand on a firm, level surface.
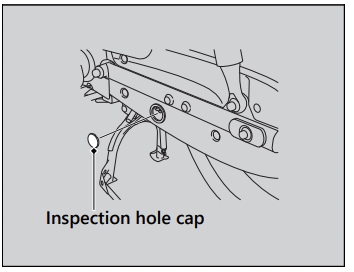
3. Remove the inspection hole cap.
4. Move the drive chain up and down with your finger.
Drive chain slack: 1.0 - 1.4 in (25 - 35 mm)
- Do not ride your vehicle if the slack exceeds 1 15/16 in (50 mm).
5. Rotate the rear wheel and check that the chain moves smoothly.
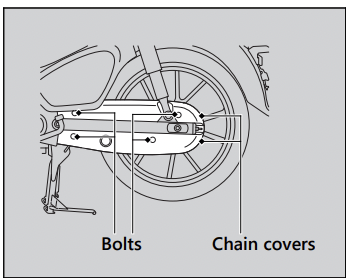
6. Remove the chain covers by removing the bolts.
7. Inspect the sprockets. P. 68
8. Clean and lubricate the drive chain. P. 69
9. Install the parts in the reverse order of removal.
10.Tighten the bolts.
Troubleshooting
Engine Will Not Start
Starter Motor Operates But Engine Does Not Start
Check the following items:
● Check the correct engine starting sequence. P. 47
● Check that there is gasoline in the fuel tank.
● Check if the PGM-FI malfunction indicator lamp (MIL) is on.
- If the indicator lamp is on, contact your dealer as soon as possible.
Starter Motor Does Not Operate
Check the following items:
● Check the correct engine starting sequence. P. 47
● Make sure engine stop switch is in the (Run) position. P. 26
● Check for a blown fuse. P. 104
● Check for a loose battery connection
● Check the condition of the battery.
If the problem continues, have your vehicle inspected by your dealer.
Warning Indicators On or Flashing
PGM-FI (Programmed Fuel Injection) Malfunction Indicator Lamp (MIL)
If the indicator comes on while riding, you may have a serious problem with the PGM-FI system. Reduce speed and have your vehicle inspected by your dealer as soon as possible.
ABS (Anti-lock Brake System) Indicator
If the indicator operates in one of the following ways, you may have a serious problem with the ABS. Reduce your speed and have your vehicle inspected by your dealer as soon as possible.
● Indicator comes on or starts flashing while riding.
● Indicator does not come on when the ignition switch is in the ON position.
● Indicator does not go off at speeds above 6 mph (10 km/h).
If the ABS indicator stays on, your brakes will continue to work as a conventional system, but without the anti-locking function.
The ABS indicator may flash if you turn the rear wheel while the rear wheel is lifted off the ground. In this case, turn the ignition switch to the OFF position, and then to the ON position again. The ABS indicator will go off after your speed reaches 19 mph (30 km/h).
Honda SMART Key Indicator
When the Honda SMART Key indicator flashes 5 times
- Replacing the Honda SMART Key Battery P. 89
When the Honda SMART Key indicator is flashing while the ignition switch is in the ON position
The Honda SMART Key indicator flashes when communication between your vehicle and Honda SMART Key stops after turning the ignition switch to the ON position. It is probably caused by the following:
● Strong radio waves or noise are affecting the system
● You lose the Honda SMART Key while riding
However, this does not affect the operation of your vehicle until the ignition switch is locked.
If you turn the ignition switch to the OFF or (Lock) position while the Honda SMART Key indicator is flashing, the ignition switch ring, turn signals and the Honda SMART Key indicator will come on, the buzzer will ring for about 20 seconds then automatically go off, and the ignition switch will lock. To stop this flashing and ringing, press and hold the ignition switch for more than 2 seconds. After the flashing and ringing stop, the ignition switch is locked. If you do not have the Honda SMART Key, the ignition switch can be unlocked in another way.
Other Warning Indications
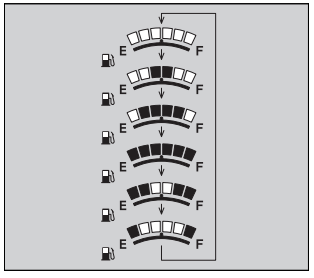
Fuel Gauge Failure Indication
If the fuel system has an error, the fuel gauge indicators will be displayed as shown in the illustration. If this occurs, see your dealer as soon as possible.
When the Honda SMART Key System Does Not Operate Properly
When the Honda SMART Key system does not work properly, perform the following.
● Check that the Honda SMART Key system is activated. Lightly push the ON/OFF button on the Honda SMART Key. If the Honda SMART Key LED is red, activate the Honda SMART Key system. P. 30
If the Honda SMART Key LED does not respond, replace the battery
● Check that there is no communication failure in the Honda SMART Key system. The Honda SMART Key system uses lowintensity radio waves. The Honda SMART Key system may not work properly in the following conditions:
- When there are facilities nearby that generate strong radio waves or noise such as TV towers, power stations, radio stations, or airports
- When you carry the Honda SMART Key with a laptop or wireless communication device such as a radio or mobile phone.
- When the Honda SMART Key comes into contact with or is covered by metal objects.
● Check that a registered Honda SMART Key is used. Use a registered Honda SMART Key. The Honda SMART Key system cannot be activated without a registered Honda SMART Key.
● Make sure that you do not use a broken Honda SMART Key. If you use a broken Honda SMART Key, the Honda SMART Key system cannot be activated. Bring the ID tag to your dealer.
● Check the battery condition and battery lead in your vehicle. Check the battery and battery terminals. If the battery is weak, contact your dealer.
If the Honda SMART Key system cannot be activated due to other causes, contact your dealer.
Unlock the Ignition Switch in an Emergency
Set up to ID number input mode
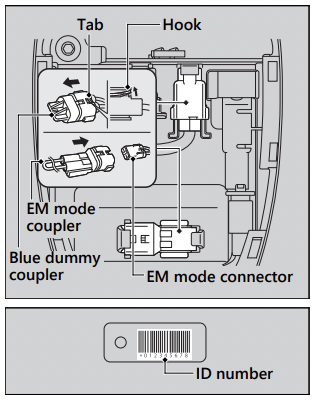
1. Remove the center cover. P. 77
2. Pull out the EM mode connector.
3. Remove the blue dummy coupler by releasing the tab of the EM mode connector while lifting the hook of the blue dummy coupler.
4. Check the ID number on the ID tag.
5. Connect the EM mode coupler on the battery cover to the EM mode connector.
ID number input
You can input your ID number by pressing the ignition switch when the ignition switch is OFF or (Lock) position. Input the ID number on the ID tag in order from the left in turn by pressing the ignition switch. The ID number is authenticated according to the number of times the ignition switch is pushed.
Push the ignition switch the desired number of times within 5 seconds when the ignition switch ring comes on. After 5 seconds, the ignition switch ring goes off and comes on again. This means that the inputted number is fixed, and you can input the next number.
- If the ignition switch ring does not come on in blue, the battery may be low. Contact your dealer.
Example:
● To input “0”, wait for 5 seconds without pushing the ignition switch when the ignition switch ring comes on.
● To input “1”, push the ignition switch once within 5 seconds when the ignition switch ring comes on.

ID number input success
After the last ID number is inputted, the ignition switch ring and Honda SMART Key Indicator will flash every 2 seconds until the EM mode coupler is removed. Be sure to remove the EM mode coupler and return the blue dummy coupler. The buzzer rings 2 times when the EM mode coupler is removed. The ignition switch is then unlocked. Reinstall the parts in reverse order of removal and turn the ignition switch to the ON position within 6 minutes. You can start the engine. To lock the ignition switch, turn the ignition switch to the OFF, or (Lock) position, and press and hold the ignition switch for 2 seconds. The buzzer rings 1 time. The ignition switch also locks automatically when the ignition switch has been in the OFF, or (Lock) position for about 6 minutes after the ID number is successfully inputted. When the ignition switch is locked, the ignition switch ring goes off.
To unlock the ignition switch again, repeat the procedure for unlocking the ignition switch.
ID number input failure
After the last ID number is inputted, the ignition switch ring and Honda SMART Key Indicator will flash every second until the EM mode coupler is removed, and the ignition switch cannot be unlocked. Pull out the EM mode coupler and reconnect it to the EM mode connector. Follow the procedure again.
ID number input cancel
Pull out the EM mode coupler from the EM mode connector. Also, if you make a mistake while inputting the ID number, remove the EM mode coupler from the EM mode connector, connect it to the EM mode connector again, and then re-input the ID number from the beginning.
● Store the removed EM mode coupler on the battery cover at all times.
Tire Puncture
Repairing a puncture or removing a wheel requires special tools and technical expertise. We recommend you have this type of service performed by your dealer. After an emergency repair, always have the tire inspected/replaced by your dealer.
Emergency Repair Using a Tire Repair Kit
If your tire has a minor puncture, you can make an emergency repair using a tubeless tire repair kit. Follow the instructions provided with the emergency tire repair kit. Riding your vehicle with a temporary tire repair is very risky. Do not exceed 30 mph (50 km/h). Have the tire replaced by your dealer as soon as possible.
WARNING Riding your vehicle with a temporary tire repair can be risky. If the temporary repair fails, you can crash and be seriously injured or killed. If you must ride with a temporary tire repair, ride slowly and carefully and do not exceed 30 mph (50 km/h) until the tire is replaced.
Electrical Trouble
Battery Goes Dead
Charge the battery using a motorcycle battery charger. Remove the battery from the vehicle before charging. Do not use an automobile-type battery charger, as these can overheat a motorcycle battery and cause permanent damage. If the battery does not recover after recharging, contact your dealer.
NOTICE Jump starting using an automobile battery can damage your vehicle's electrical system and is not recommended. Bump starting is also not recommended.
Burned-out Light Bulb
All light bulbs on the vehicle are LEDs. If there is an LED which is not turned on, see your dealer for servicing.
Blown Fuse
Before handling fuses, see “Inspecting and Replacing Fuses.” P. 66
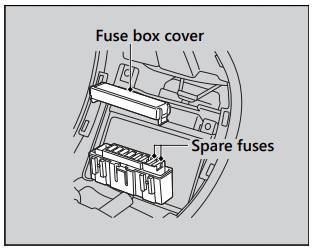
Fuse Box Fuses
1. Remove the center cover. P. 77
2. Remove the battery cover. P. 75
3. Remove the fuse box cover.
4. Pull the fuses out one by one with the fuse puller in the tool kit and check for a blown fuse. Always replace a blown fuse with a spare fuse of the same rating.
- Spare fuses are provided near the battery
5. Reinstall the fuse box cover.
6. Reinstall the battery cover.
7. Reinstall the center cover.
NOTICE If a fuse fails repeatedly, you likely have an electrical problem. Have your vehicle inspected by your dealer.
Unstable Engine Operation Occurs Intermittently
If the fuel pump filter is clogged, unstable engine operation will occur intermittently while riding.
Even if this symptom occurs, you can continue to ride your vehicle.
If unstable engine operation occurs even if sufficient fuel is available, have your vehicle inspected by your dealer as soon as possible.