User Manual Fridge
Usage cautions
CAUTION
- Do not re-freeze frozen foods that have thawed completely. Do not place carbonated or fizzy drinks in the freezer compartment. Do not put bottles or glass containers in the freezer.
- When the contents freeze, the glass may break and cause personal injury.
- Use only the ice maker provided with the refrigerator.
- To get the best performance from the product:
- Do not place food too close to the vents at the rear of the refrigerator as this can obstruct free air circulation in the refrigerator compartment.
- Wrap food up properly or place it in airtight containers before putting it into the refrigerator.
- Do not place glass bottles or carbonated beverages into the freezer. They can freeze and break. Broken beverage containers can cause injury.
- Please observe maximum storage times and expiration dates of frozen goods.
- Do not place glass or bottles or carbonated beverages into the freezer.
- The container may freeze and break, and this may result in injury.
- Do not place carbonated or fizzy drinks in the freezer compartment. Do not put bottles or glass containers in the freezer.
- When the contents freeze, the glass may break and cause personal injury and property damage.
- Service Warranty and Modification.
- Any changes or modifications performed by a 3rd party on this finished appliance are not covered under Samsung warranty service, nor is Samsung responsible for safety issues that result from 3rd party modifications.
- Do not block the air vents inside the refrigerator.
- If the air vents are blocked, especially with a plastic bag, the refrigerator can be over cooled. If a cooling period lasts too long, the water filter may break and cause water leakage.
- Use only the ice-maker provided with the refrigerator.
- Wipe excess moisture from the inside and leave the doors open.
- Otherwise, odor and mold may develop.
- If the refrigerator is disconnected from the power supply, you should wait for at least five minutes before plugging it back in.
- When the refrigerator got wet by water, pull out the power plug and contact your Samsung Electronics service center.
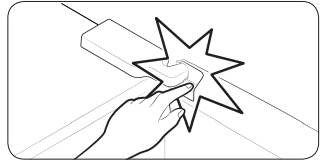
- Do not strike or apply excessive force to any glass surface.
- Broken glass may result in a personal injury and/or property damage.
- Fill the water tank and ice cube trays with potable water only (tap water, mineral water, or purified water).
- Do not fill the tank with tea or a sports drink. This may damage the refrigerator.
- Be careful that your fingers are not caught in.
- The lamps in the freezer and refrigerator can be turned off if the doors of the freezer and refrigerator are left open for 2 seconds or longer.
- The lamps will turn back on when the doors are closed and opened again.
- If the refrigerator is flooded, make sure to contact your nearest service center.
- There is a risk of electric shock or fire
Cleaning cautions
CAUTION
- Do not spray water directly on the inside or outside the refrigerator.
- There is a risk of fire or electric shock.
- Do not use a hair dryer to dry the inside of the refrigerator.
- Do not place a lighted candle in the refrigerator to remove bad odors.
- This may result in an electric shock or fire.
- Do not spray cleaning products directly on the display.
- Printed letters on the display may come off.
- If any foreign substance such as water has entered the appliance, unplug the power plug and contact your nearest service center.
- Failing to do so may result in an electric shock or fire.
- Use a clean, dry cloth to remove any foreign matter or dust from the power plug blades. Do not use a wet or damp cloth when cleaning the plug.
- Otherwise, there is a risk of fire or electric shock.
- Do not clean the appliance by spraying water directly onto it.
- Do not use benzene, thinner, or Clorox, Chloride for cleaning.
- They may damage the surface of the appliance and may cause a fire.
- Never put fingers or other objects into the dispenser hole.
- It may cause a personal injury or material damage.
- Before cleaning or performing maintenance, unplug the appliance from the wall socket.
- Failing to do so may result in an electric shock or fire.
Critical disposal warnings
WARNING
- Please dispose of the packaging material from this product in an environmentally friendly manner.
- Ensure that none of the pipes on the back of the refrigerator are damaged prior to disposal.
- R-600a or R-134a is used as a refrigerant. Check the compressor label on the rear of the appliance or the rating label inside the fridge to see which refrigerant is used for your refrigerator. If this refrigerator contains flammable gas (Refrigerant R-600a), contact your local authority in regard to safe disposal of this product.
- When disposing of this refrigerator, remove the door/ door seals and door latch so that small children or animals cannot become trapped inside. Children should be supervised to ensure that they do not play with the appliance. If trapped inside, a child may get hurt or suffocate to death.
- If trapped inside, the child may become injury and suffocate to death.
- Cyclopentane is used in the insulation. The gases in the insulation material require a special disposal procedure. Please contact your local authorities in regard to the environmentally safe disposal of this product.
- Keep all packaging materials well out of the reach of children, as packaging materials can be dangerous to children.
- If a child places a bag over his or her head, the child could suffocate.
Additional tips for proper usage
- In the event of a power failure, call the local office of your electric company and ask how long the failure is going to last.
- Most power failures that are corrected in an hour or two will not affect your refrigerator temperatures. However, you should minimize the number of door openings while the power is off.
- Should the power failure last more than 24 hours, remove and discard all frozen food.
- The refrigerator might not operate consistently (frozen contents can thaw or temperatures can become too warm in the frozen food compartment) if sited for an extended period of time in a location where ambient air temperatures are constantly below the temperatures for which the appliance is designed.
- In case of particular foods, keeping it under refrigeration can have a bad effect on preservation due to its properties.
- Your appliance is frost free, which means there is no need to manually defrost your appliance. This will be carried out automatically.
- Temperature rise during defrosting complies with ISO requirements. If you want to prevent an undue rise in the temperature of frozen food while the appliance defrosts, wrap the frozen food in several layers of newspaper.
- Do not re-freeze frozen foods that have thawed completely.
Saving Energy Tips
- Install the appliance in a cool, dry room with adequate ventilation. Ensure that it is not exposed to direct sunlight and never put it near a direct source of heat (a radiator, for example).
- Not to block any vents and grilles is recommended for energy efficiency.
- Allow warm food to cool down before placing it in the appliance.
- Put frozen food in the refrigerator to thaw. You can then use the low temperatures of the frozen products to cool food in the refrigerator.
- Do not keep the door of the refrigerator open for too long when putting food in or taking food out. The shorter the time the door is open, the less frost build-up you’ll have in the freezer.
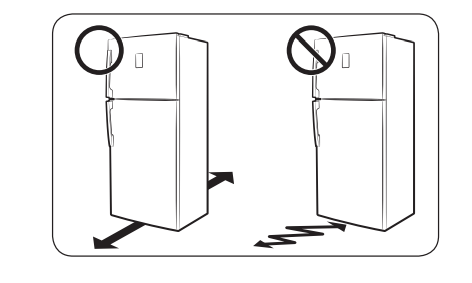
- It is recommended to install the refrigerator with clearance to the back and sides. This will help reduce power consumption and keep your energy bills lower.
- For the most efficient use of energy, please keep the all inner fittings such as baskets, drawers, shelves on the position supplied by manufacturer.
This appliance is intended to be used in household and similar applications such as
- staff kitchen areas in shops, offices and other working environments;
- farm houses and by clients in hotels, motels and other residential type environments;
- bed and breakfast type environments;
- catering and similar non-retail applications
Installation
Follow these instructions carefully to ensure a proper installation of this refrigerator and to prevent accidents before using it.
WARNING
- Use the refrigerator only for its intended purpose as described in this manual.
- Any servicing must be performed by a qualified technician.
- Dispose of the product packaging material in compliance with the local regulations.
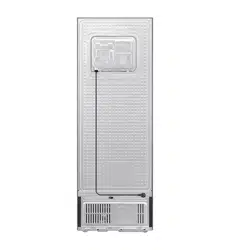
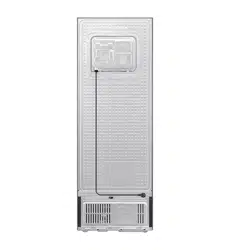
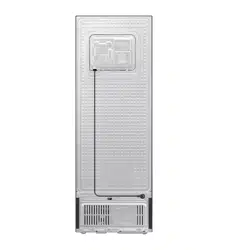
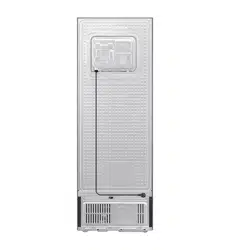
Refrigerator at a glance
NOTE The actual image and provided component parts of the refrigerator may differ, depending on the model and the country.

- Shelf Fre *
- Ice Maker *
- Fresh Room *
- Guard-Egg
- Slide Shelf
- Deodorizer *
- Movable VEG Box *
- Vegetable Drawer *
- Freezer Guard
- Tank Water *
- Multi Storage Basket *
- Guard-Bottle
* applicable models only
Optional accessories *
 Spacer: This helps keep the refrigerator cool.
 Cool pack: This helps keep the refrigerator cool.
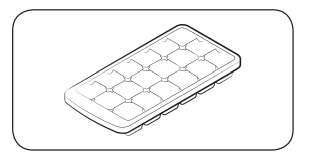 Ice tray: Used to make ice.
 Twist Ice Maker: Used to make ice.
* Your refrigerator may not include optional accessories listed above. Provision of optional accessories depends on the model and the country.
To secure more room for storage in the freezer compartment
Remove one or more optional accessories such as cool pack(s), shelf or shelves, twist ice maker(s), ice storage bins and their supports, all of which can be removed manually without a tool.
- These optional accessories do not affect thermal and mechanical performance.
- A declared storage volume of the freezer is based on the nonexistence of those optional accessories.
- To remove both ice makers, remove the right-handed one first (applicable to Ice Max models).
- For best energy efficiency, make sure all of shelves, drawers, and baskets are placed in their original position.
Load limit indicator (applicable models only)
The refrigerator has a load limit indicator on the top right side of the freezer compartment.
CAUTION • Do not put or keep food items over the load limit indicator. Otherwise, energy efficiency may be affected.
Step-by-step installation
STEP 1 Select a site
Site requirements:
- Solid, level surface without carpeting or flooring that may obstruct ventilation
- Away from direct sunlight
- Adequate room for opening and closing the door
- Away from a heat source
- Room for maintenance and servicing
- Temperature range: between 10 °C and 43 °C
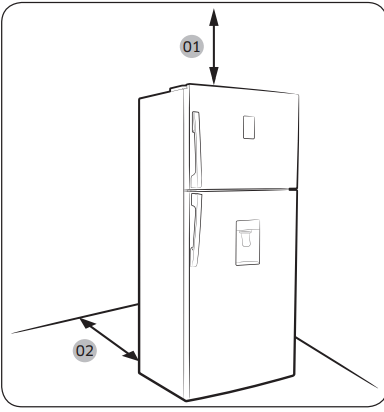
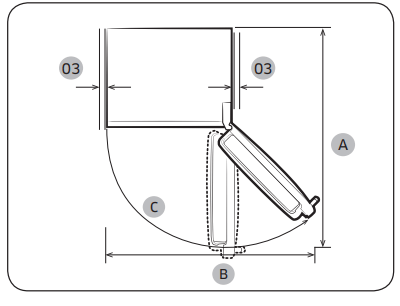
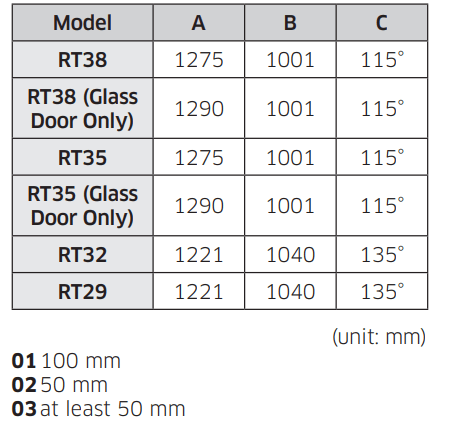
Clearance: See the pictures and table below for space requirements for installation.
STEP 2 Spacing (applicable models only)
- Open the door and locate the provided spacers (x2).
- Unpack both spacers and attach them to the rear of the refrigerator as shown. They help ventilate air to the rear wall and save power consumption.
STEP 3 Flooring
- The surface to install the refrigerator must support a fully loaded refrigerator, or approximately 90 kg.
- To protect the floor, put a large piece of cardboard on each leg of the refrigerator.
- Once the refrigerator is in its final position, do not move it unless necessary to protect the floor. If you have to, use a thick paper or cloth such as old carpets along the movement path.
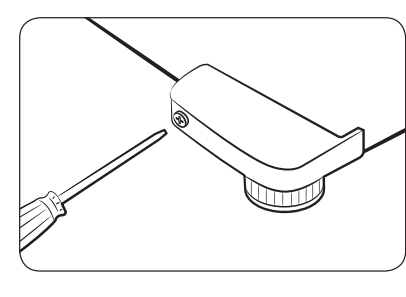
STEP 4 Adjust the levelling feet
Level the refrigerator by manually adjusting the levelling feet. Turn the levelling feet clockwise to lower the position, or turn counter clockwise to raise. For safety reasons, adjust the front side a little higher than the rear side.
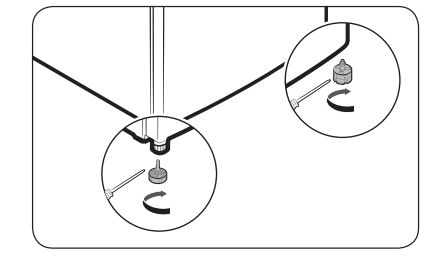
CAUTION: Before moving the refrigerator, make sure to turn the levelling feet counter clockwise so that the bottom of the refrigerator at least 66 mm from the floor.
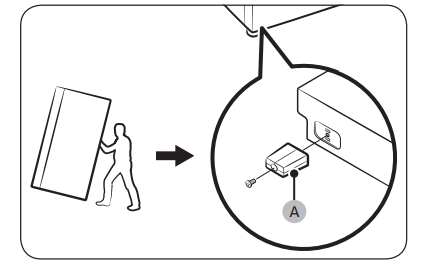
STEP 5 Attach the door support (glass door models only)
To prevent the refrigerator from falling or shaking while it is operating or when the door guard is fully loaded but the fridge is empty, follow these instructions to attach the door support (A). This work must be done by two persons.
- Tilt the refrigerator backward, and have one person hold the refrigerator from the back.
- The other person inserts the door support (A) into the bottom hole of the door.
- Use a Philips screwdriver to tighten the screw.
CAUTION To avoid personal injury or product damage from a fall or scratch, use caution throughout the entire process.
STEP 6 Initial settings
By completing the following steps, the refrigerator should be fully functioning.
- Plug the power cord into the wall socket to turn the refrigerator on.
- Open the door, and check if the interior light lights up.
- Set the temperature to the coldest, and wait for about an hour. Then, the freezer will be slightly chilled, and the motor will run smoothly.
- Wait until the refrigerator reaches the set temperature. Now the refrigerator is ready for use
STEP 7 Final check
When installation is complete, confirm that:
- The refrigerator is plugged into an electrical outlet and grounded properly.
- The refrigerator is installed on a flat, level surface with a reasonable clearance from the wall or the cabinet.
- The refrigerator is level and is sitting firmly on the floor.
- The door opens and closes freely, and the interior light turns on automatically when you open the door.
Operations
Feature panel
Button type
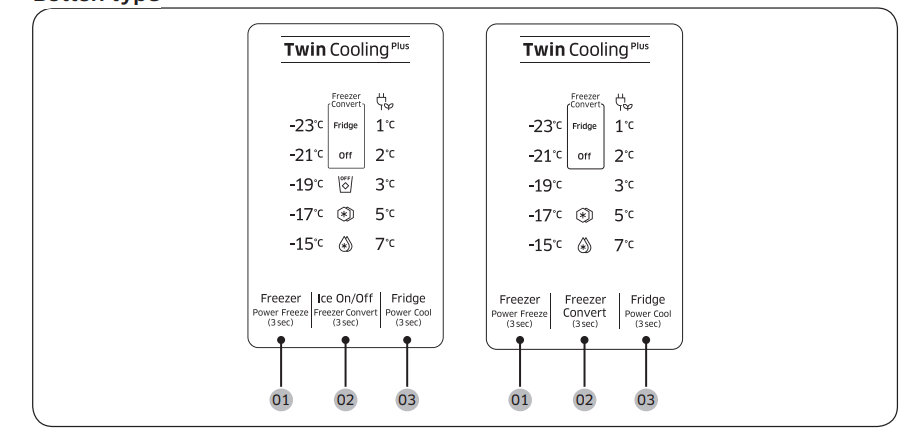
- Freezer (Power Freeze)
- Freezer Convert / Ice On/Off (applicable models only)
- Fridge (Power Cool)
1. Freezer (Power Freeze)
- Freezer
- The Freezer button can be used to set the freezer temperature between -15 °C and -23 °C (default: -19 °C).
- Each time you press the button, the temperature changes in this sequence: -23 °C -> -15 °C -> -17 °C ->-19 °C -> -21 °C -> -23 °C
- CAUTION
- To prevent system failure or food spoiling, do not set the temperature to -15 °C in summer (above 35 °C).
- Do not store glass bottles containing liquid in the freezer. Glass bottles will crack or break into pieces when the liquid freezes.
- Power Freeze
- Power Freeze speeds up the freezing process at maximum fan speed. The freezer keeps running at full speed for several hours and then returns to the previous temperature.
- To activate Power Freeze, press and hold Freezer for 3 seconds. The corresponding indicator (
 ) lights up, and the refrigerator will speed up the cooling process for you.
- To deactivate, press and hold Freezer again for 3 seconds. The freezer returns to the previous temperature setting.
- To freeze large amounts of food, activate Power Freeze for at least 20 hours before putting food in the freezer.
- The freezer keeps running at full speed for 50 hours and then returns to the previous temperature.
- NOTE Using Power Freeze increases power consumption. Make sure you turn it off and return to the previous temperature if you do not intend to use it.
2. Freezer Convert / Ice On/Off (applicable models only)
- Freezer Convert
- You can use the entire refrigerator with Fridge mode, or turn off the freezer.
- To change the default freezer mode, press and hold Freezer Convert for 3 seconds to enter the selection mode. Then, press Freezer Convert to select a desired mode.
- The mode changes in this sequence: Fridge -> Off -> Freezer ->Off -> Fridge setting mode.
- If you select Fridge, the Fridge indicator turns on. Power Freeze will be deactivated if active, and Ice On will turn off if enabled.
- If you select Off, the Off indicator turns on. The freezer will be turned off.
- If you select the Freezer setting mode, the freezer temperature indicators turn on for your selection. The default freezer temperature is -19 °C.
- Your changes will be set and activated after 10 seconds. To cancel or change the mode again, press and hold Freezer Convert again for 3 seconds. Then, follow the instructions as mentioned above.
- NOTE
- If you press and hold Freezer convert for 3 seconds in Freezer mode, the refrigerator switches to Fridge mode and you can select a mode (selection mode).
- If you press and hold Freezer convert for 3 seconds in other modes, the refrigerator switches to selection mode where you can press Freezer Convert to select a different mode.
- When refrigeration or freezing functions are at 'Off mode', the temperature of the fridge or freezer remains under 15 °C to prevent mold and odors, using low electricity
- Fridge or Freezer cannot be powered off independently.
- Do not store food or beverage in refrigerator when refrigeration or freezing functions are at 'Off mode'. 15 °C is not cool enough to prevent spoilage.
WARNING
- Do not put glass bottles containing liquid in the freezer. When cancelling Freezer Convert, the glass bottles may break or burst in the freezer.
- Make sure to remove frozen foods from the freezer before enabling the Freezer Convert. Frozen foods melt and spoil as the temperature increases (Freezer mode changes to Fridge mode).
- Make sure to remove chilled foods from the freezer before disabling the Freezer Convert. Chilled foods may freeze as the temperature decreases (Fridge mode changes to Freezer mode).
NOTE If you want to use Freezer Convert, it is strongly recommend to use plastic containers to store food, especially vegetables.
- Ice On/Off
- (Applicable models only)
- By default, the refrigerator is set to make ice with the corresponding indicator on. To disable this function, press Ice On/Off to turn it off. We recommend disabling the function in the following cases:
- The ice bucket is already full of ice.
- You want to save power consumption.
- The water tank is empty.
- NOTE If you press Freezer Convert to select Fridge or Off, the refrigerator enters Ice Off mode.
3. Fridge (Power Cool)
- Fridge
- To adjust the fridge temperature, press Fridge to select the corresponding temperature. You can change the temperature between 1 °C and 7 °C (default: 3 °C).
- With the temperature set to 1 °C, press Fridge to turn the vacation indicator on. The temperature bar turns off. Press again to deactivate Vacation mode. The temperature bar displays 7 °C.
- CAUTION
- In winter, do not set the temperature control to 1 °C. This may cause problems with the cooling performance.
- In summer, do not set the temperature control to 5-7 °C. This may also cause problems with the cooling performance.
- Power Cool
- Power Cool speeds up the cooling process at maximum fan speed. The fridge keeps running at full speed for several hours and then returns to the previous temperature.
- To activate Power Cool, press and hold Fridge for 3 seconds. The corresponding indicator (
 ) lights up, and the refrigerator will speed up the cooling process for you.
- To deactivate Power Cool, press and hold Fridge again for 3 seconds. The fridge returns to the previous temperature setting.
- NOTE Using Power Cool increases power consumption. Make sure you turn it off and return to the previous temperature if you don’t intend to use it.
- Vacation
- If you are going on vacation or a business trip, or if you do not intend to use the fridge for an extended time, use the Vacation mode.
- To activate Vacation mode, press Fridge with the 1 °C indicator selected. The vacation indicator (
 ) turns on while the display of the fridge temperatures will turn off. The fridge temperature will be controlled under 17 °C, but the freezer remains active as previously set.
- To deactivate Vacation mode, press Fridge again. The fridge temperature will restore the default 7 °C.
- NOTE It is strongly recommended to empty the fridge compartment and make sure the door is closed.
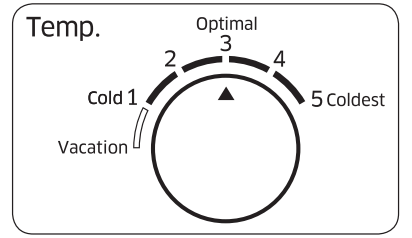
Dial type
Fridge
To ensure optimal performance, we recommend setting the temperature to Optimal.
- To decrease the temperature for strong cooling, set the temperature control to level 4-5.
- To increase the temperature for weak cooling, set the temperature control to level 1-2.
-
CAUTION
- In winter, do not set the temperature control to level 4-5. This may cause problems with the cooling performance.
- In summer, do not set the temperature control to level 1-2. This may also cause problems with the cooling performance.
Vacation
If you are going on vacation or a business trip, or if you do not intend to use the fridge for an extended time, use the Vacation mode.
To activate Vacation mode, turn the fridge dial to select Vacation (vacation level). The fridge temperature will be controlled under 17 °C, but the freezer remains active as previously set. The Vacation mode will be deactivated automatically if you adjust the fridge temperature.
NOTE It is strongly recommended to empty the fridge compartment and make sure the door is closed.
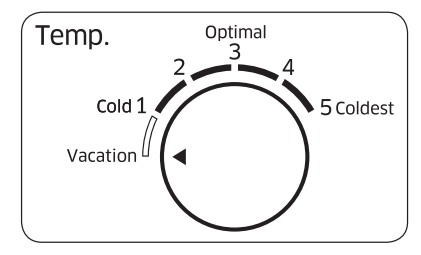
Freezer
- To decrease the temperature for strong cooling, set the temperature control to level 4-5.
- To increase the temperature for weak cooling, set the temperature control to level 1-2.
CAUTION
- In winter, do not set the temperature control to level 4-5. This may cause problems with the cooling performance.
- In summer, do not set the temperature control to level 1-2. This may also cause problems with the cooling performance.
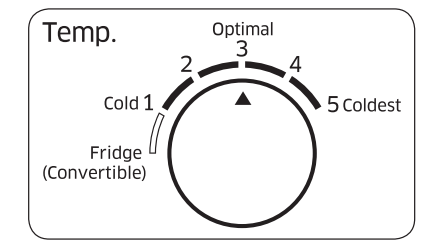
Fridge (Convertible)
You use the freezer as Fridge mode. To enable Fridge mode for the freezer, turn the Freezer Temp. Control dial to a Fridge (Convertible) level. Once setup is complete, the temperature of the freezer is controlled to about 3 °C.
NOTE It is strongly recommended to empty the fridge compartment and make sure the door is closed.
Special features
The actual image and special functions of your refrigerator may differ, depending on the model and the country.
Ice making (applicable models only)
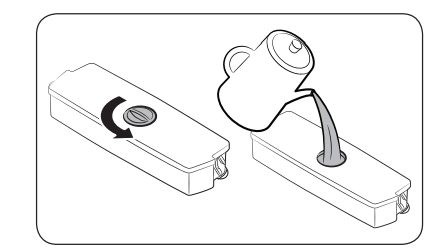
Twist ice maker
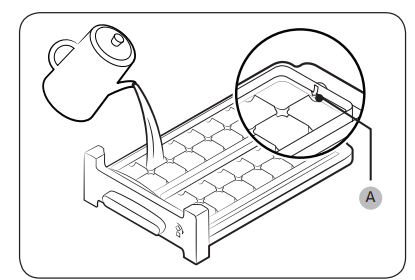
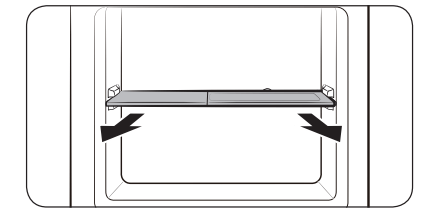
1. Open the freezer door, and slide open the ice tray.
2. Fill the tray with water up to the maximum level (A) marked on the inner rear of the tray.
3. Slide the tray back into position.
NOTE The ice making time depends on your temperature settings.
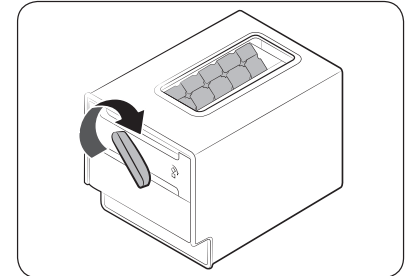
NOTE
- Make sure the ice cube storage bin is in place under the ice tray.
- To dispense the ice cubes, turn the handle of the bin to the right to empty half of the ice cubes into the bin. Then, turn it to the left to empty the other half.
- Take out the bin by slightly twisting and pulling to the front.
Tray type
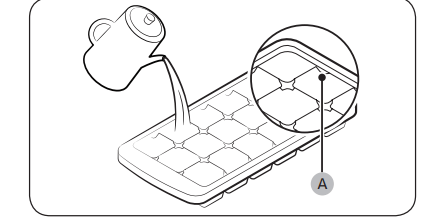
To make ice cubes, fill the tray with water up to the maximum level (A) marked on the inner rear of the tray
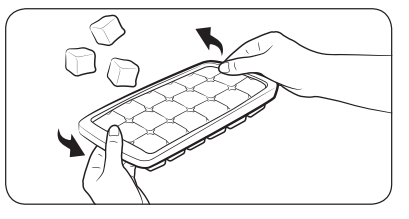
To empty the ice tray, hold both ends of the tray and gently twist to remove the ice cubes.
Water dispenser (applicable models only)
With the water dispenser, you can dispense chilled water without opening the fridge door.
NOTE: If you keep pushing the dispenser lever for about 1 minute, the dispenser will stop operating for performance issues. To dispense more water, wait a few seconds and try again.
To fill the water tank
For first-time use, clean the inner side of the water tank and dry well.
- Hold both handgrips on the front of the tank, and slide out as shown.
- Open the front lid (A) of the cover or the entire cover (B) and fill the tank with a max of 5 L water.

- CAUTION Do not exceed the max line. Water overflows.
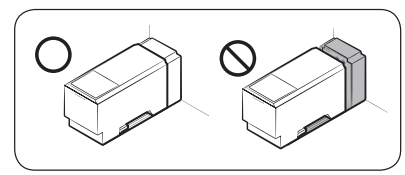
- Reinsert the water tank and fit into the dispenser mechanism. Make sure the front side (with the front lid) of the tank faces to the front.
CAUTION
- Make sure the water tank fits into the shelf. Otherwise, the water tank may not operate properly.
- Do not use the refrigerator without inserting the water tank. This may decrease the cooling performance.
- Fill the tank only with potable water such as mineral or purified water. Do not use other liquid.
- Use caution when moving a filled tank. Physical injury may occur if the tank is dropped.
- Do not try to disassemble the internal pump yourself. If the internal pump is damaged or disconnected from the water tank, the dispenser does not operate.
For first-time use
- Push the dispenser lever for 10 seconds to emit air from the hoses of the water supply system.
- Discard the first six glasses of water to remove impurities in the water supply system.
To dispense water
Put a glass under the water outlet, and gently push against the dispenser lever with the glass.
CAUTION
- Make sure the glass is in line with the dispenser to prevent the dispensed water from spilling out.
- If you do not use the water dispenser for 2-3 days, the dispensed water may have an abnormal smell or taste. This is not a system failure. Discard the first 1-2 glasses of water.
Auto ice maker (applicable models only)
For first-time use
- Let the ice maker make ice for 1-2 days.
- Discard the first 1-2 buckets of ice to remove impurities in the water supply system.
- When the upper ice tray is full, use the lower ice tray
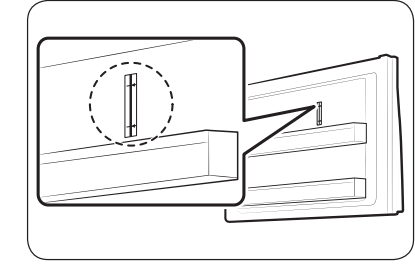
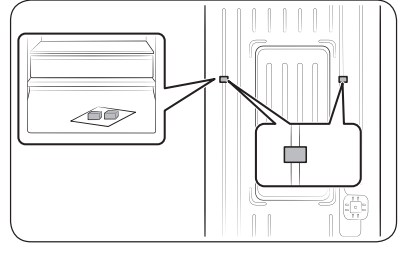
Test button
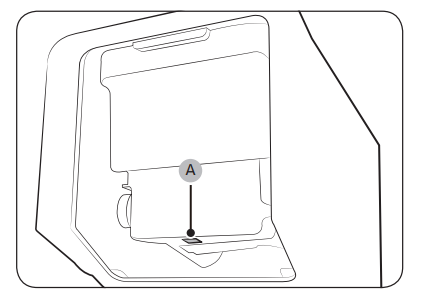
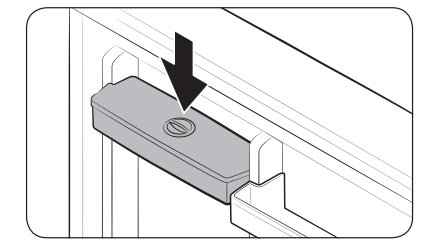
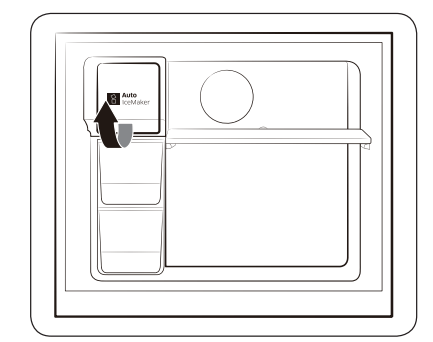
If the auto ice maker does not make ice, remove the ice bucket and press Test (A) to check if the auto ice maker operates properly.
Water dispenser
With the water dispenser, you can dispense water without opening the fridge door. The water tank must be filled with potable water before use.
To fill the water tank with potable water Open the door and locate the water tank that is located in the door shelf area.
- Hold the handgrips on both sid
- Fill the water tank with potable water up to 2.3 liters. You can remove either the top cap or the cover and pour water.
- NOTE For first-time use, clean inside the water tank.
-
- Reinsert the water tank and close the door. Make sure the water outlet of the water tank faces forward.
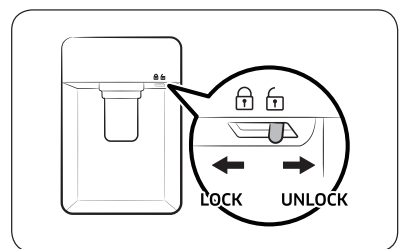
- Put a water glass under the water outlet of the dispenser, and gently push the dispenser lever to dispense water. Make sure the water dispenser is unlocked.
CAUTION
- The water dispenser is designed to dispense potable water. Fill the water tank only with potable water. Do not fill with any other liquids.
- Do not fill the water tank excessively, which causes an overflow.
- Do not try to fill the water tank without removing it from the door.
- Make sure that water tank is seated properly.
- Do not use the refrigerator without the water tank. This may reduce performance and efficiency.
- To prevent water bouncing, make sure the glass is in line with the dispenser lever.
NOTE: To secure more room, you can use the water tank to store food. In this case, remove the lid of the tank.
Maintenance
Handle and care
Ice tray provided models
First remove the ice tray, and then lift up the freezer shelf to remove.
Freezer and fridge shelves
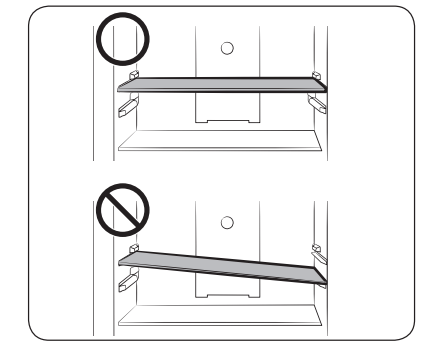
- To remove a shelf, first open the door completely. Pull the shelf forward, lift up, and then pull out.
- When reinserting the shelf, make sure the “Front” label of the shelf faces forward.
- Do not attempt to tilt the shelf into position
Door guards
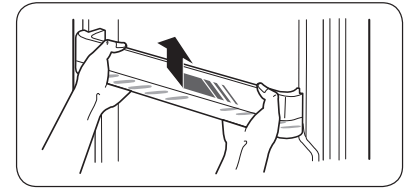
Slightly lift up and pull out the door guard.
CAUTION To prevent accidents, empty the door guards before removing.
Cleaning
Regularly use a dry cloth to remove all foreign substances such as dust or water from the power plug terminals and contact points.
- Unplug the power cord of the refrigerator.
- Use a moistened soft lint-free cloth or paper towel to clean the refrigerator’s interior and exterior.
- When done, use a dry cloth or paper towel to dry well.
- Plug in the power cord of the refrigerator to turn the refrigerator on.
NOTE If you have removed any removable parts such as shelves for cleaning, refer to the overall layout in the What’s included section to make sure you have reinserted correctly.
WARNING
- Do not use benzene, thinner, or home/car detergent such as Clorox™ for cleaning purposes. They may damage the surface of the refrigerator and cause a fire.
- Do not spray water onto the refrigerator. This may cause electric shock.
- Do not put fingers or other objects into the dispenser hole.
Replacement
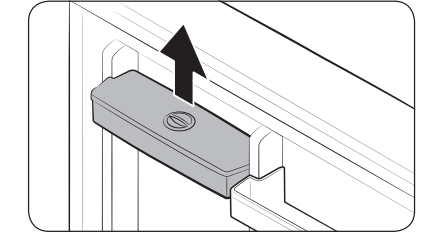
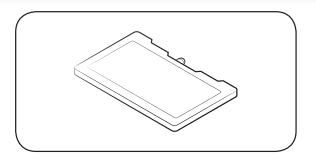
Deodorizer filter (applicable models only)
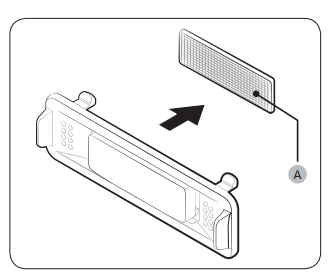
While holding the top and bottom sides of the filter case, unlock the filter case to reveal the deodorizer filter (A). Replace the filter, and then reinsert the case.
Lamps
The lamps are not user-serviceable. To replace the lamps of the refrigerator, contact a local Samsung service centre.
Troubleshooting
If you encounter an abnormal situation with the refrigerator, first check the table below and try the suggestions.
General
Symptom & Action
- Does not operate or cool.
- Make sure the power cord is connected properly.
- Make sure the temperature control is set correctly.
- Make sure to keep the refrigerator away from direct sunlight or a heat source. Failing to do so may affect the cooling performance.
- Make sure the refrigerator has enough room from the rear and side walls or the cabinet. Failing to do so may affect the cooling performance.
- Too much food may block the ventilation of the refrigerator. To keep the refrigerator in normal operation, do not put too much food inside.
- Food in the fridge freezes.
- Check if the temperature control is set to the lowest temperature. If so, change the temperature to higher or optimal.
- This happens if the ambient temperature is too low. Set the temperature higher.
- Check if food containing a high portion of water is put in the coldest area of the fridge or near the cooling vent. If this happens, move the food to other shelves in the fridge.
- Emits noises.
- Make sure the refrigerator is installed on a stable, flat surface.
- Make sure the refrigerator has enough room from the rear and side walls or the cabinet.
- Make sure to keep the refrigerator from impurities or foreign objects inside or underneath.
- The refrigerator may produce a ticking sound from inside, which occurs when the various removable parts contract or expand. This is not a system failure
- The front corners and sides become warm and form condensation.
- To prevent condensation from forming, the refrigerator has heat-proof piping in the front corners. If the ambient temperature rises, this equipment may not work effectively. This is not a system failure.
- Condensation may form on the exterior surface of the refrigerator if humid air comes into contact with the cool surface of the refrigerator.
- The ice maker does not make ice.
- You must wait for 12 hours until the refrigerator makes ice.
- Make sure the ice maker is not stopped while making ice.
- Make sure the freezer is set below 0 °C (or -5 °C in warm ambient air).
- Make sure the water tank is filled with water.
- The water dispenser is not functioning.
- Check if the water tank is frozen. If so, select a higher fridge temperature.
- Make sure the water tank is filled with water.
- Make sure the water tank is installed properly.
- Make sure the water filter is installed properly.
- Produces a bubbling sound.
- The refrigerator makes this sound during the cooling process, which is normal.
- A bad smell comes from inside the refrigerator.
- Check for any spoiled food. We recommend cleaning the refrigerator on a regular basis and remove any spoiled or suspect food items.
- Make sure strong smelling food is wrapped up airtight
- Frost forms on the interior walls.
- Make sure no food blocks the vents of the refrigerator. It is also important to arrange food items evenly for ventilation.
- Make sure the door is closed properly.
- Condensation forms on the interior walls or around vegetables.
- This happens when food containing a high portion of water is stored uncovered, or the door has been left open for a while.
- Make sure food is covered or put in sealed containers.