Dryer User manual DVE(G)45R6300*/DVE(G)45R6100*
Installation
Step-by-step installation
Make sure you have a qualified technician install the dryer. Step by step installation instructions start below.
• Do not remove the protective film on the door before completing the product installation. If you remove the protective film before the installation is complete, the door may get scratched or damaged during installation.
• Make sure the installation location allows enough space for the dryer door to be fully open.
STEP 1 Install the exhaust system
1. Select a location and move the dryer to the site. For easy access, we recommend you install the dryer in the same location as your washer.
2. To change the door direction, see “Door reversal” on page 35.
3. Install the exhaust system as instructed in the “Exhaust ducting guide” section.
CAUTION
Before installing your dryer, remove the packing in the duct.
NOTE
• To move the dryer easily, lay two of the carton cushions from the packaging on the floor. Tip the dryer on its side so it lies across both cushion-tops. Push the dryer so that it is near its final location, and then set the dryer upright.
• Secure room around the dryer to facilitate ducting and wiring.
STEP 2 Connect the gas line (for gas models)
Before connecting the gas line, make sure you have read the “Gas requirements” section on page 20.
1. Remove the protective cap from the gas pipe.
2. Apply an LPG (Liquefied Petroleum Gas)-safe compound or 1.5 wraps of Teflon tape to all threaded connections.
3. Connect the gas supply to the dryer. An additional fitting is required to connect the 3/4” (1.9 cm) female thread end of a flexible connector to the 3/8” (1 cm) male threaded end on the dryer. Tighten up the fitting over all threads.
4. Turn on the gas supply, and check for any leaks using a soap solution. If a leak is found, tighten the connections and try again. Do not use an open flame to check for gas leaks.
STEP 3 Connect the electrical wiring (for electric models)
Before connecting the electrical wiring, make sure you have read the “Electrical requirements” section on page 21.
3-wire system
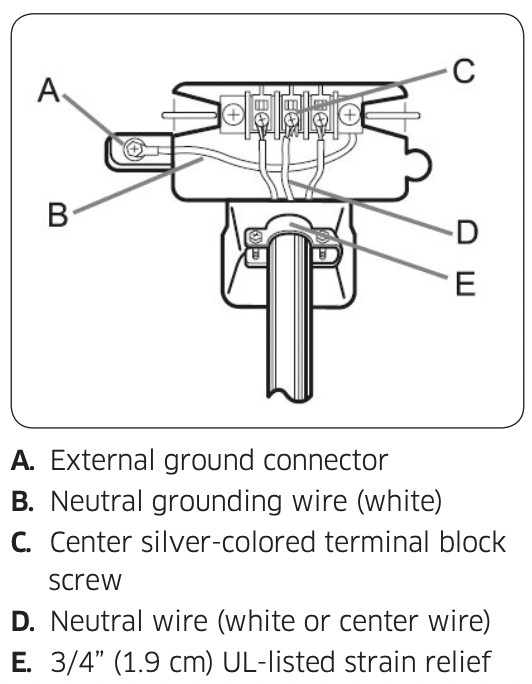
1. Loosen or remove the center terminal block.
2. Connect the neutral wire (white or center wire) of the power cable to the center, silver-colored terminal screw of the terminal block. Tighten the screws.
3. Connect the other wires to outer terminal block screws. Tighten the screws.
4. Tighten the strain relief screws.
5. Insert the terminal block cover into the rear panel of the dryer. Then, secure the cover with a hold-down screw.
CAUTION
• To convert from the 4-wire system to 3-wire system, connect the ground strap to the terminal block support to ground the dryer frame to the neutral conductor.
• Ring-type terminals are recommended. If using strap terminals, make sure they are tightened.
4-wire system
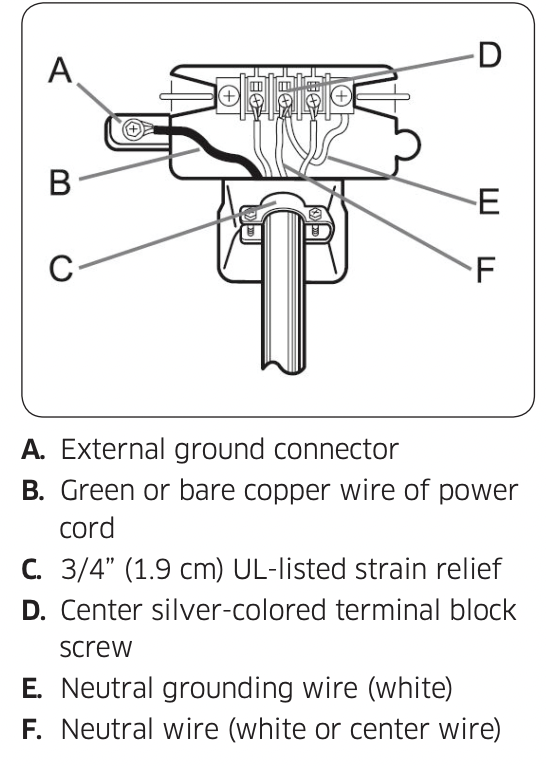
1. Remove the external ground connector’s screw and connect the ground wire (green or unwrapped) of the power cable to the screw.
CAUTION
- To connect the ground wire to the neutral position without through contact A (cabinet ground), contact a technician. This is not user serviceable.
- Ring-type terminals are recommended. If using strap terminals, make sure they are tightened.
2. Loosen or remove the screws from the center terminal block.
3. Connect the neutral wire (white or center wire) and ground wire (white) to the center screw of the terminal block. Tighten the screw.
4. Connect the other wires to the outer terminal block screws. Tighten the screws.
5. Tighten the strain relief screws. 6. Insert the tab of the terminal block cover into the rear slot of the dryer. Secure the cover with a hold-down screw.
WARNING
• All U.S. models are designed for a 3-wire system connection. The dryer frame is grounded to the neutral conductor at the terminal block. A 4-wire system connection is required for new or remodeled construction, mobile homes, or if local codes do not permit grounding through neutral. If you use the 4-wire system, you cannot ground the dryer frame to the neutral conductor at the terminal block.
• Remove the terminal block cover plate. Insert the power cord with a UL-listed strain relief through the hole provided in the cabinet near the terminal block.
• A strain relief must be used. Do not loosen the nuts already installed on the terminal block. Be sure they are tight. Use a 3/8” (1 cm) deep well socket.
STEP 4 Connect the water hose
The dryer must be connected to a cold water tap using the provided water hoses.
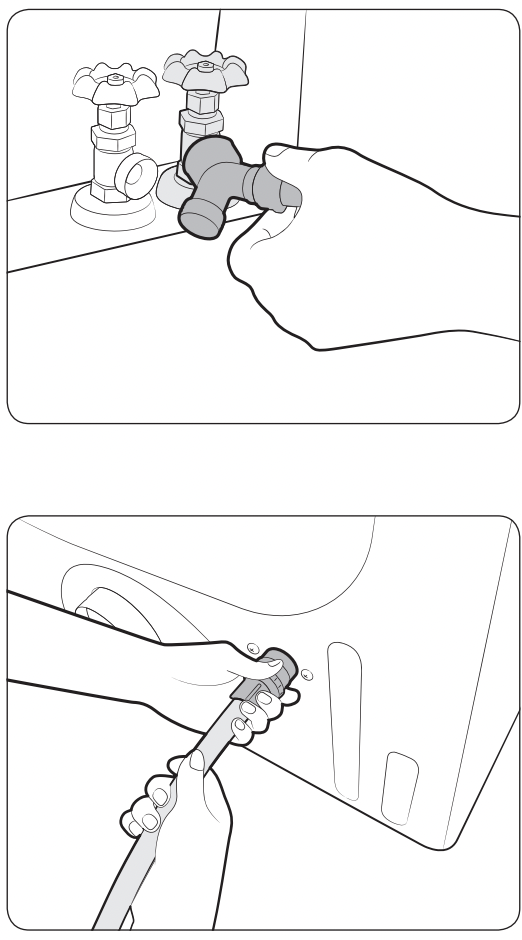
1. Close the cold water tap. If you have a washer’s cold water hose attached to the cold water tap, unscrew and remove the hose. Then, connect the female end of the Y-connector to the cold water tap.
2. Connect the straight end of the water hose to the Y-connector. Tighten the hose coupling by hand.
3. Using pliers, tighten the coupling an additional two-thirds turn. Do not overtighten. You can damage the coupling.
4. Connect the angled end of the water hose to the filling valve at the bottom rear of the dryer. Turn the coupling by hand until it is tight.
5. Using pliers, tighten the coupling an additional two-thirds turn. Do not overtighten. You can damage the coupling.
6. If you detached the cold water hose from your washer, attach the hose to the open end of the Y-connector, tighten the coupling by hand until it is tight, and then, using a pliers, tighten an additional two-thirds turn.
7. Open the cold water tap, and then check for any leaks. If the Y-connector cannot be directly connected to the cold water tap, use the short hose. See the “Using the short hose as an extension” section on page 30.
Using the short hose as an extension
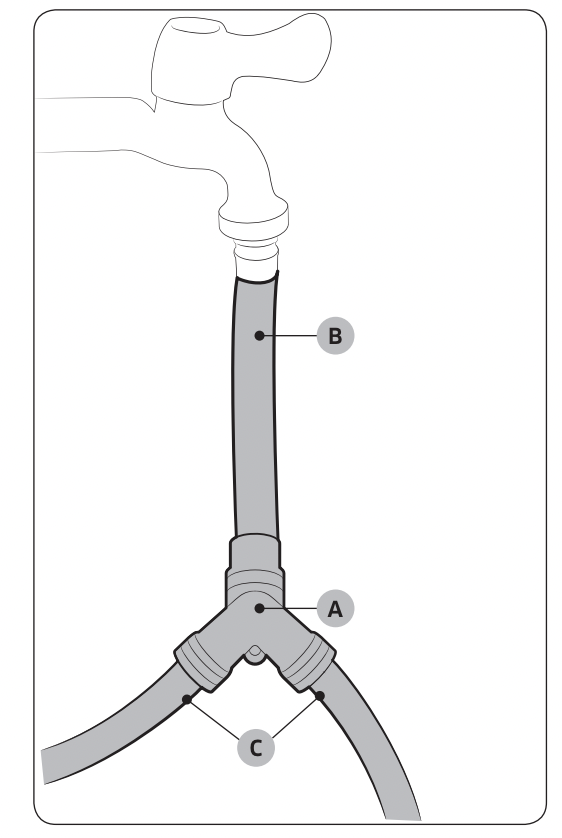
1. Close the cold water tap. If you have a washer’s cold water hose attached to the cold water tap, unscrew and remove the hose. Then, connect the short hose (B) to the cold water tap. Turn the coupling by hand until it is tight.
2. Using pliers, tighten the coupling an additional two-thirds turn. Do not overtighten. You can damage the coupling.
3. Connect the Y-connector (A) to the brass male end of the short hose. Turn the coupling by hand until it is tight.
4. Using pliers, tighten the coupling an additional two-thirds turn. Do not overtighten. You can damage the coupling.
5. Connect the angled end of the water hoses (C) to the filling valve at the bottom rear of the dryer. Turn the coupling by hand until it is tight.
6. Using pliers, tighten the coupling an additional two-thirds turn. Do not overtighten. You can damage the coupling.
7. If you detached the cold water hose from your washer, attach the hose to the free end of the Y-connector, tighten the coupling by hand until it is tight, and then, using a pliers, tighten an additional two-thirds turn.
8. Open the cold water tap, and then check for any leaks.
STEP 5 Level the dryer
To ensure optimal performance, the dryer must be level.
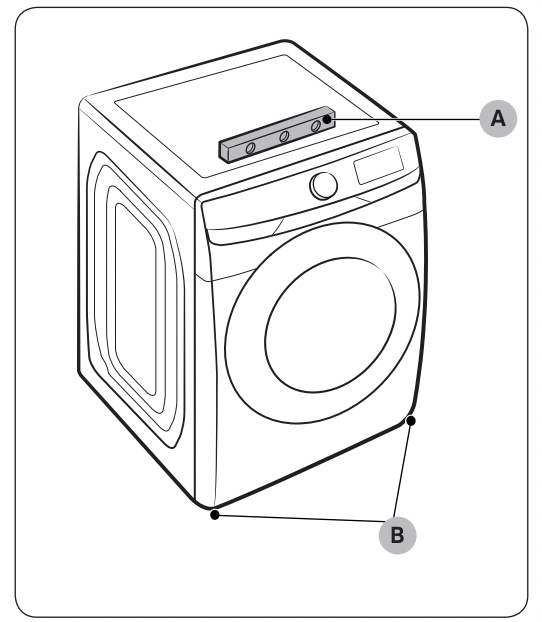
Using a level (A), check if the dryer is level side to side and then front to back. If the dryer is not level, turn the leveling feet (B) clockwise to lower the dryer or counterclockwise to raise the dryer.

NOTE
• To set the dryer to the same height as your washer, fully retract (A) the leveling feet by turning them counterclockwise, then loosen (B) the feet by turning them clockwise. Once the dryer is the same height as the washer, follow the directions above to level the dryer.
• Adjust the leveling feet only as much as necessary to level the dryer. Extending the leveling feet more than necessary can cause the dryer to vibrate.
STEP 6 Power on (for gas models)
Make sure all gas connections, the exhaust line, and all wiring is connected correctly. Then, plug the power cord into a power source and check the dryer’s installation and operation using the final checklist in Step 7 below.
STEP 7 Final Check
When installation is complete, confirm that:
• The dryer is plugged into an electrical outlet and grounded properly.
• The exhaust ductwork is connected, and the joints are taped.
• You have used rigid or stiff-walled flexible metal duct material, not plastic flexible duct.
• The dryer is level and is sitting firmly on the floor.
• The dryer starts, runs, heats, and shuts off properly.
• The gas is supplied properly with no leaks (For gas models only).
CAUTION
The burner may not ignite initially due to air in the gas line. Allowing your dryer to operate on a heat setting will purge the line. If the gas does not ignite within 5 minutes, turn your dryer off and wait 5 minutes. Be sure the gas supply to your dryer has been turned on. To confirm gas ignition, check the exhaust for heat.
Vent blockage test
After the dryer is installed, start the Vent Blockage Test to check if the duct system is properly installed. The Vent Blockage Test automatically detects the status of the ducts and reports any blockage or problems. Proper ducting can reduce drying time and save energy.
NOTE
The Vent Blockage Test must run when the dryer is cool. If the dryer warms up after the installation check, run the AIR FLUFF cycle for several minutes to reduce its internal temperature. Running the vent blockage test
1. Make sure the drum is empty, and then close the door. (If there are any clothes or other items in the drum, the test will not give accurate results.)
2. Press the Power button to turn the dryer on, then simultaneously press and hold the Adjust Time and Dryness buttons for 3 seconds. “InS” appears in the dryer’s display. (If you have started other procedures before the Vent Blockage Test, the dryer will not enter the Vent Blockage Test mode.)
3. Press the Start/Pause (Hold to Start) button. The Vent Blockage Test starts immediately. During the test, the number indicator makes a circle in 6 clockwise steps. The test takes about 2 minutes. Do not open the door during the test.
4. After 2 minutes, when the test is complete, the results are displayed and the dryer sounds a tone. If status of the duct system is normal, “0” appears and the dryer sounds a completion tone. If the duct system can not exhaust properly, “CLg” appears and the dryer sounds an alarm tone. If there are any other problems, an information code appears in the display. For information about the code, see the “Information codes” section on page 57.
- To stop or cancel the Vent Blockage Test, press the Power button to turn off your dryer.
- During the test, if “dc” appears in the display, make sure the door is closed. If “C1” is displayed, see if there is laundry inside drum. If there is, stop the test and remove it. Then, start the test again.
- The results remain on the display for about 5 minutes and then automatically turn off. You can turn the results off immediately by pressing the Power button.
NOTE
• During or after the test, the internal drum is hot. Use caution to prevent burns. The Vent Blockage Test is used to check for problems in the current duct system when the dryer is installed for the first time.
• If the test result displays “CLg” (the duct system is blocked), refer to the “Ducting requirements” section on page 18 and the “Exhaust ducting guide” section below, and then take proper measures to correct any problems. If the test is suspended, it could result in incorrect results. Follow the proper procedures when testing the dryer.
• Even if the test result is normal (“0”), the duct system could be blocked slightly. Properly install all duct work according to the installation instructions in this manual.
Door reversal
Type 1

1. Put a soft rug on the floor to rest the door on after you have removed it. This will prevent the door from being scratched.
2. Unplug the power cord.
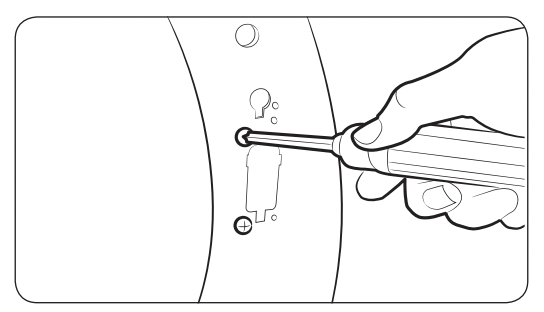
3. Remove two door hinge screws.
4. Lift the door and remove it.
NOTE
There is a screw on the back side of the hinge that will support the door as you unscrew the hinge screws.

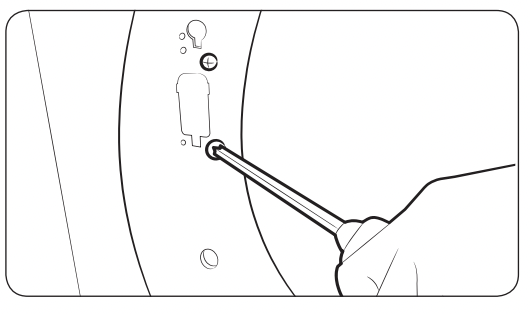
5. Remove the two screws that are above and below the cut-out in the frame front.
6. Remove the two screws above and below the lever holder on the opposite side of the door opening.

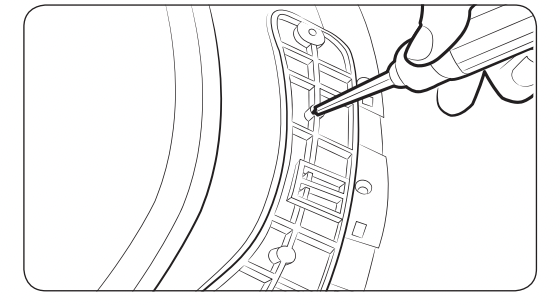
7. Remove the two screws that hold the lever holder in place, and then remove the lever holder.
8. Re-insert the two screws that held the lever holder into the same screw holes, and then tighten.

9. Remove the single screw from the back of the door hinge. NOTE This is the screw that supports the door against the frame so you can unscrew or screw in the hinge without needing to support the door yourself.
10.Insert the screw you just removed into the other screw hole on the back of the door hinge, and then tighten.
11.Place the door on the other side, and then reattach it to the dryer.

NOTE Insert the head of the screw on the back of the hinge into the hole above the cut out in the frame, and then slide the door hinge down until it stops. Make sure the protrusion on the back of the hinge is pressed into the cut out before you tighten the hinge screws.

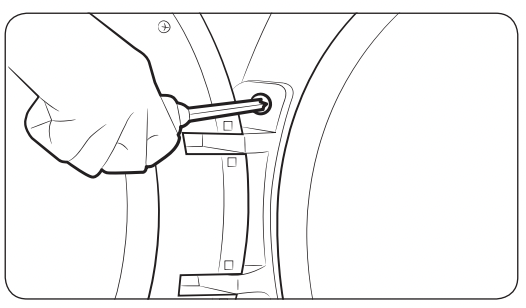
12.Push the lever holder into the cut out on the other side of the door opening. Insert screws, and then tighten as shown.
13.Re-attach the remaining screws to the remaining holes above and below the lever holder, and then tighten.
Before you start
Here are a few things you should know before starting your dryer.
Sort and load
• Put one wash load in the dryer at a time.
• Do not mix heavy and lightweight items together.
• To improve drying efficiency for one or two items, add a dry towel to the load.
• For best results, untangle items before inserting them into the dryer. Tangled items may degrade the drying efficiency or cause the door to open.
• Overloading reduces the tumbling action, resulting in uneven drying and wrinkling.
• Unless recommended on the care label, do not dry woolens or fiberglass items.
• Avoid drying unwashed items.
• Do not dry items soiled with oil, alcohol, gasoline, etc.
Functional prerequisite
Lint filter
To prevent a risk of fire, make sure to clean the lint filter before or after every load.
1. Turn off the dryer.
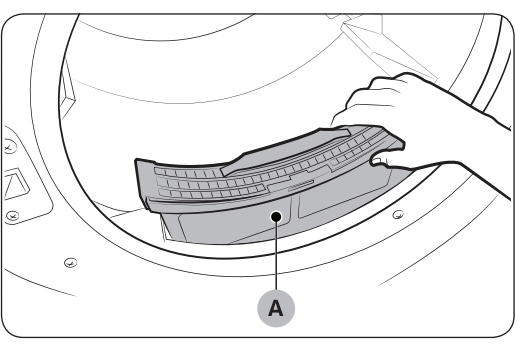
2. Open the door and pull out the lint filter (A) from inside the drum.
3. Open the lint filter by separating it at the top. Remove the lint, and then clean the lint filter.
4. Close the lint filter, reinsert the lint filter into the dryer, and then close the dryer door.
CAUTION
• Do not operate the dryer without the lint filter in place.
• Do not use a damaged or broken lint filter. This may reduce performance and/or cause fire.
Operations
WARNING
To reduce the risk of fire, electric shock, or injury, read the “Safety information” before operating this appliance.
Control panel
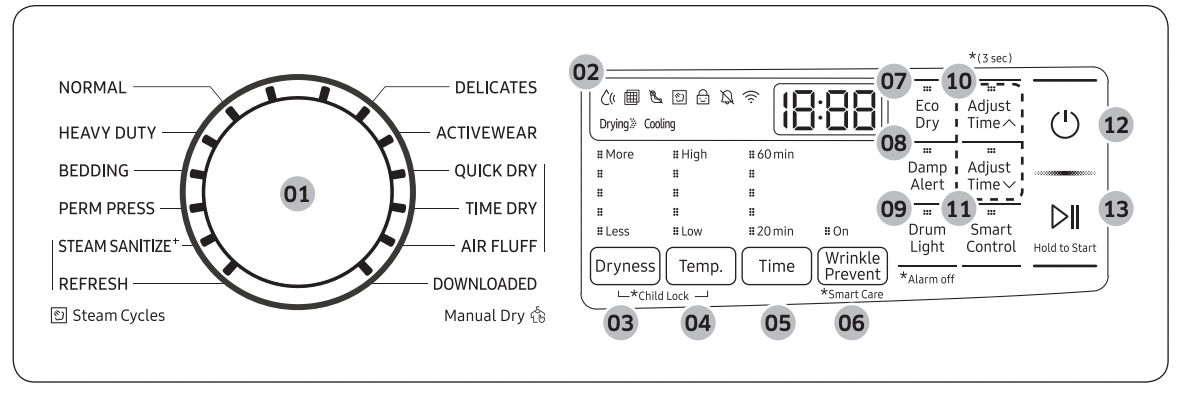
DVE45R6300*
DVG45R6300*
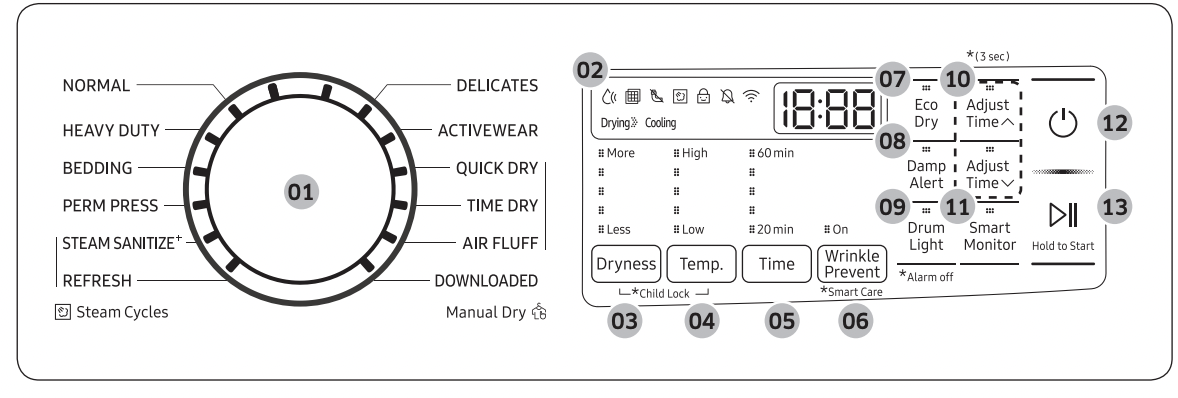
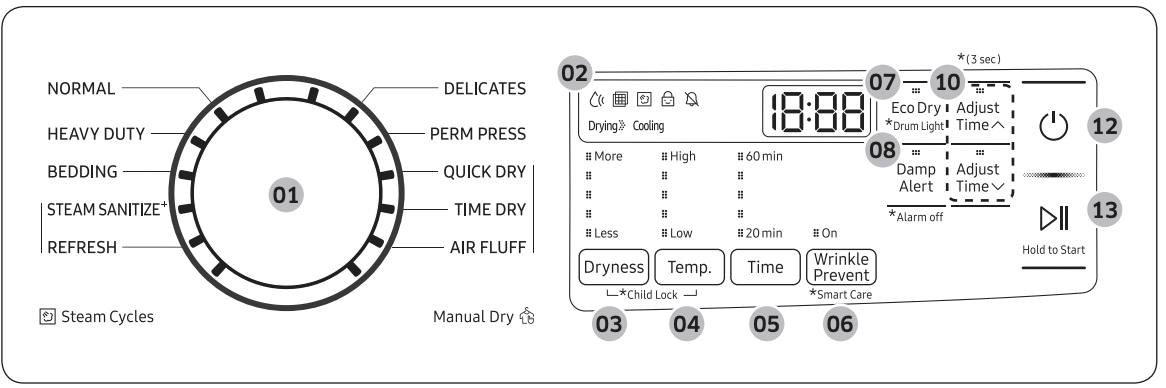
DVE(G)45R6100*
01. Cycle Selector
Turn the Cycle Selector to select the desired cycle. The indicator by the cycle name lights up.
• Steam Cycles: The dryer sprays water into the drum to deodorize clothes and reduce static electricity and wrinkles.
• Manual Dry: The drying time is fixed.
02. Digital Graphic Display
Displays all cycle information, including the cycle time, information code, and operating status.
03. Dryness Press to select a dry level. You can select from 5 different options (Less to More).
Please refer to following recommendations to select the appropriate dryness.
• For larger or bulkier loads, select More for complete dryness.
• For items that needs to lay flat or hang to dry, use Less to partially dry items.
NOTE
This option is not available with REFRESH, STEAM SANITIZE , ACTIVEWEAR, TIME DRY, QUICK DRY, and AIR FLUFF.
04. Temp.
Press to change the temperature of the current cycle. You can select from 5 different options (Low to High). Please select the appropriate temperature depending on the items in the load.
• High: For sturdy cottons or those labeled Tumble Dry.
• Medium: For permanent press, synthetics, lightweight cottons, or items labeled Tumble Dry Medium.
• Low: For heat sensitive items labeled Tumble Dry Low or Tumble Dry Warm. Provides the lowest heated drying temperature possible.
05. Time
Press Time to select a drying time for the selected cycle. This is available only with TIME DRY, QUICK DRY, and AIR FLUFF. This button is not available for Sensor Dry cycles because exact drying times are determined by fluctuating humidity levels.
06. Wrinkle
Prevent Wrinkle Prevent provides approximately 180 minutes of intermittent tumbling in unheated air at the end of the cycle to reduce wrinkling. Press Wrinkle Prevent to activate this feature. The load is dry and can be removed at any time during the Wrinkle Prevent cycle.
07. Eco Dry
This function is available with NORMAL and TIME DRY. With the Eco Dry activated, drying takes a longer time but power consumption is reduced.
The drying time can be extended by up to 3 times normal depending on the temperature and load. The Eco Dry function is enabled by default.
08. Damp Alert
This alert is available for all Sensor Dry cycles except for ACTIVEWEAR. Available dry levels are Normal, More, and Extra. If a load contains mixed fabrics, the Damp Alert indicator blinks when average dryness of the items in the load is 80 % dry. This lets you take items that you don’t want fully dried or that dry quickly out of the dryer early while letting others continue to dry.
09. Drum Light (DVE(G)45R6300* models only)
Press to turn the interior lamp on or off. The lamp stays lit for 2 minutes after it has turned on, regardless of whether the power is on or off or the door is open or closed, and then turns off automatically.
10. Adjust Time
You can change the set time for the selected cycle. This is available only with TIME DRY, QUICK DRY, and AIR FLUFF. To change the cycle time, press Adjust Time or Adjust Time until the desired time is displayed.
11. Smart Control (DVE45R6300* models only) / Smart Monitor (DVG45R6300* models only)
After connecting the Tumble Dryer to your home network using the SmartThings app, you can control or monitor the dryer remotely. When started, the Smart Control (Smart Monitor) indicator blinks. The dryer enters waiting mode and waits for remote commands.
12. Power
Press to turn on/turn off the dryer.
13. Start/Pause (Hold to Start)
Press and hold to start operation or press to stop operation.
NOTE
Do not take extremely tangled items from your washer and put them into the dryer. They can degrade the drying efficiency of the dryer or cause the door to open. We recommend that you untangle the items before putting them into the dryer. Also, do not put objects on the dryer, especially on the control panel.
CAUTION
Do not spray water directly onto the control panel. This may cause a system failure.
Icon description

Sensor Dry: This icon appears when the dryer operates the cycle which senses the internal humidity to determine the drying time.

Filter Chec: This icon displays after every load as a reminder to clean the lint filter. Clean the lint filter before every cycle and make sure the filter is properly inserted before starting a cycle.
Vent Sensor (DVE(G)45R6300* models only): The dryer features a vent sensor that detects and notifies you when it is time to clean the ductwork. The indicator lets you know the status of the duct.

Steam: This icon appears when the dryer is in steam process. The dryer sprays water into the drum to deodorize clothes and reduce static electricity and wrinkles.

Child Lock: This icon indicates that Child Lock is on. For more information on Child Lock, see page 49.

Alarm Off: This icon indicates that the alarm is off. For more information on Alarm Off, see page 51.

Wi-Fi (DVE(G)45R6300* models only): This icon indicates that the dryer is connected to Wi-Fi.
Simple steps to start
1. Press Power to turn the dryer on.
2. Turn the Cycle Selector to select a cycle.
3. Change the cycle settings (Dryness, Temp., and Time) as necessary.
4. Select desired options as necessary.
5. Press and hold Start/Pause (Hold to Start).
To change the cycle during operation
1. Press Start/Pause (Hold to Start) to stop operation.
2. Select a different cycle, and repeat steps 2-4 above if necessary.
3. Press and hold Start/Pause (Hold to Start) again to start the new cycle.
Cycle overview
Standard Cycles
NORMAL
For most fabrics including cottons and linens. If Normal is selected, the Eco Dry function is enabled by default. For more information, see Eco Dry in the “Control panel” section.
HEAVY DUTY
For drying items made out of heavy fabrics, such as jeans, corduroys, or work clothes, with high temperature heat.
BEDDING
For bulky items such as blankets, sheets, and comforters.
PERM PRESS
For drying wrinkle-free cottons, synthetic fabrics, knits, and permanent press fabrics automatically.
STEAM SANITIZE
Use to sanitize items by applying steam and high-temperature heat to the fabric. This cycle can make items soft and reduce smells. Confirm that the laundry load is wet or partially wet before starting this cycle.
REFRESH
Use to smooth out wrinkles and reduce odors in loads of one to four items. With this cycle selected, a small amount of water is sprayed into the dryer drum after several minutes of tumbling with heat. Before removing the laundry, confirm that the laundry load is dry.
DELICATES
For heat-sensitive items at a low drying temperature.
ACTIVEWEAR (DVE(G)45R6300* models only)
For exercise wear and outdoor wear such as sports jerseys, training pants, water-repellent jackets, and other performance clothing. Thick fabrics like a zipper or velcro closure of a jacket, or training socks may not be completely dried.
DOWNLOADED (DVE(G)45R6300* models only)
• Select to choose from more cycles available on the SmartThings app on your smartphone.
• Available cycles: TOWELS, SANITIZE, SHIRTS, JEANS, WOOL, ECO NORMAL, SMALL LOAD, LOW TEMP., RACK DRY, WRINKLE AWAY
• Factory setting: WRINKLE AWAY
Manual Dry
You can change the drying settings manually to your preference.
QUICK DRY
A quick drying cycle that runs for 30 minutes.
TIME DRY
You can specify a cycle time in minutes. If TIME DRY is selected, the Eco Dry function is enabled by default. For more information, see Eco Dry in the “Control panel” section.
AIR FLUFF
Tumbles the load in room temperature air.
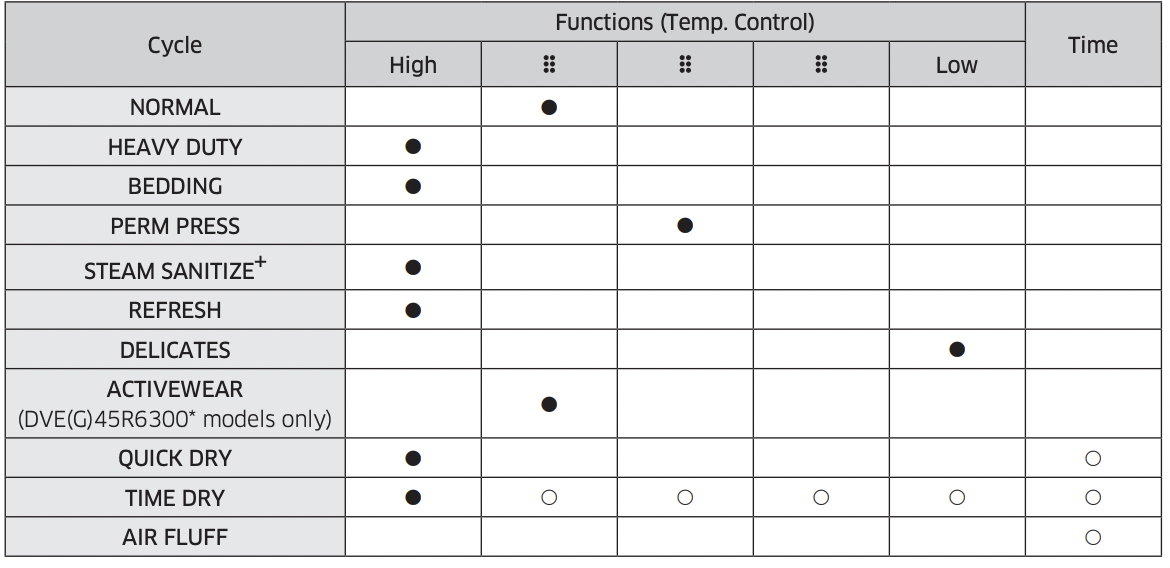
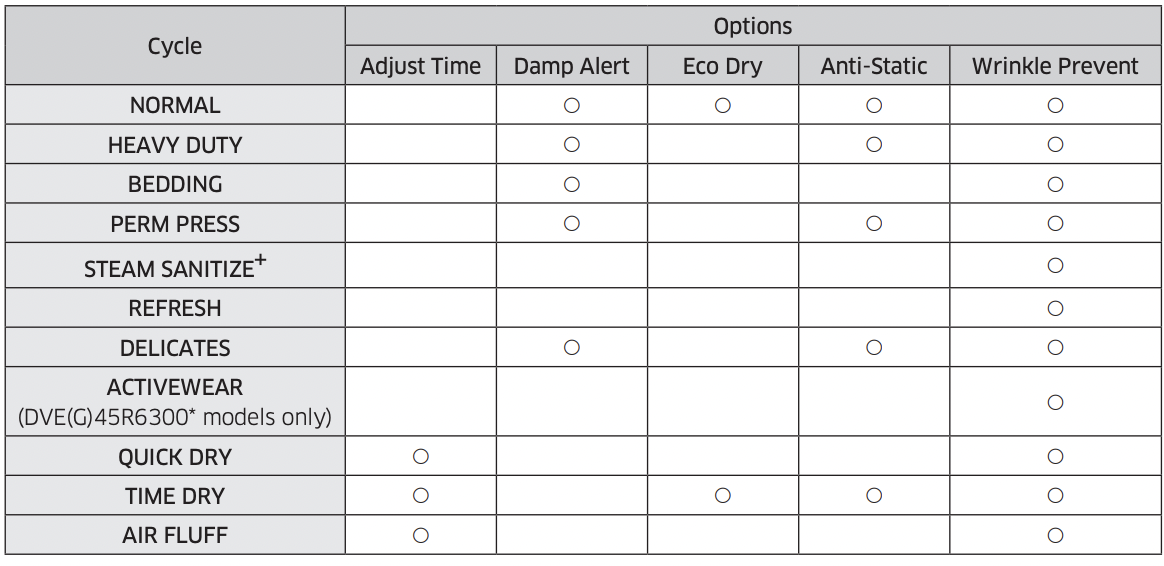
Cycle chart
NOTE
For best results, follow the load size recommendations for each dry cycle.
•  Large load: Fill the drum to about 3/4 full. Do not add items over this level as they need to tumble freely.
•  Medium load : Fill the drum to about 1/2 full.
•  Small load : Fill the drum with 3-5 items, not more than 1/4 full.
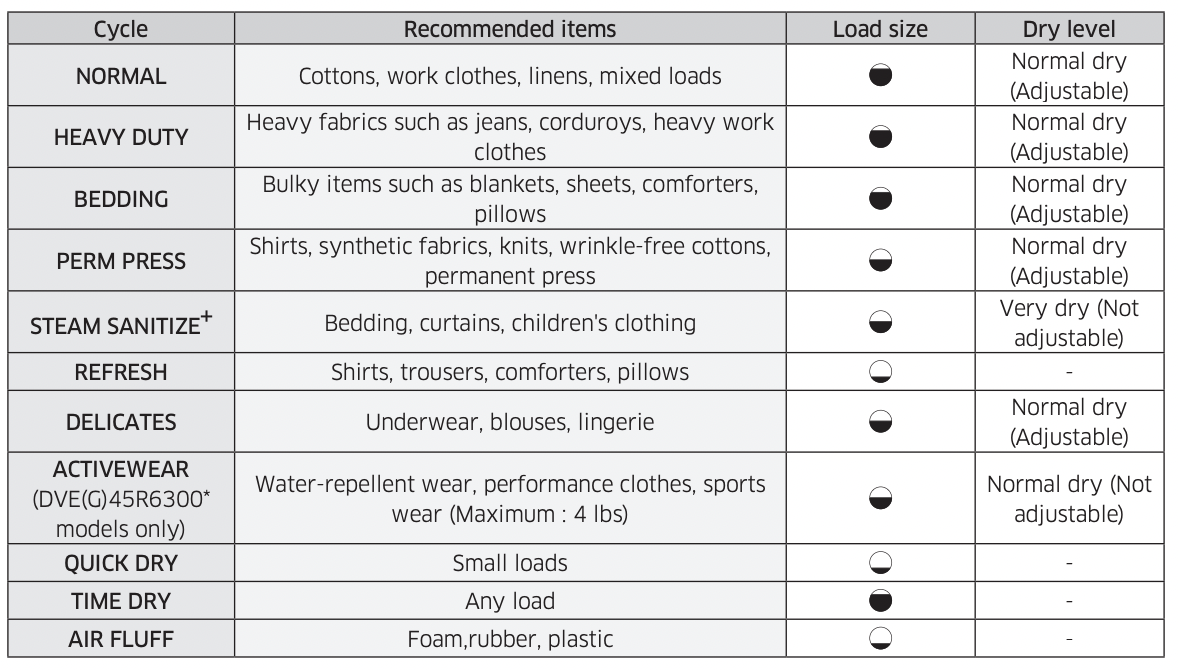
NOTE
 : factory setting,
  : can be selected
Drying guide
The best way to dry items is to follow the instructions on the care label. If no drying instructions are provided, see the following table for reference.
Bedspreads & Comforters
Follow the care label instructions or dry using Bedding.
• Make sure the item is thoroughly dry before using or storing.
• May require repositioning in the drum to ensure even drying.
Blankets
Use Normal and dry only one blanket at a time for best tumbling action.
• Make sure blankets are thoroughly dry before using or storing.
Curtains & Draperies
Use PERM PRESS and the Medium temperature setting to help minimize wrinkling.
• Dry curtains and draperies in small loads for best results and remove as soon as possible after the cycle is complete.
Cloth Diapers
Use Normal and the Medium temperature setting for soft, fluffy diapers.
Down–filled Items (jackets, sleeping bags, comforters, etc.)
Use Normal and the Medium temperature setting.
• Add a couple of dry towels to absorb moisture and shorten drying time.
Foam Rubber (rug backs, stuffed toys, shoulder pads, etc.)
Do not dry on a heat setting.
WARNING
Drying a rubber item with heat may damage it or cause a fire.
Pillows
Use Normal.
• Add a couple of dry towels and a pair of clean sneakers to help the tumbling action and to fluff the pillows.
• Do not dry kapok or foam pillows using a heated drying cycle.
Plastics (shower curtains, outdoor furniture covers, etc.)
Use TIME DRY and the Low temperature settings depending on the care label instructions.
WARNING
Do not dry:
• Fiberglass items (curtains, draperies, etc.)
• Woolens, unless recommended on the label
• Items spotted or soaked with vegetable or cooking oils
Special features
Child Lock 
Child Lock prevents children from playing with the dryer. When Child Lock is activated, all buttons except for the Power button are disabled. To activate/deactivate Child Lock, simultaneously press and hold Dryness and Temp. for 3 seconds.
NOTE
Once Child Lock is activated, it will remain active even after you restart the dryer. If other buttons, except for the Power button, do not respond, check the Child Lock indicator. If the indicator is on, follow the instructions above to turn Child Lock off.
Smart Care
To enable this function, you must first download the SmartThings app at the Play Store or the App Store and install it on a mobile device featuring a camera function. The Smart Care function has been optimized for Galaxy & iPhone series (applicable models only).
1. When the dryer detects an issue to check, an information code appears on the display. To enter Smart Care mode, press and hold Wrinkle Prevent for 3 seconds.
2. The dryer starts the self-diagnosis procedure and displays an information code if a problem is detected.
3. Run the SmartThings app on your mobile device, and then tap Smart Care.
4. Put the mobile device close to the dryer’s display so that the smartphone camera and the dryer face each other. The app automatically recognizes the information code.
5. When the information code is recognized correctly, the app provides detailed information about the problem with applicable solutions.
NOTE
• The function name, Smart Care, may differ depending on the language.
• If light is reflected off the dryer's display, the app may fail to recognize the information code.
• If the app fails to recognize the information code, you can enter the code manually in the app.
Alarm off
You can turn the alarm on or off. When the alarm is off, the melody of cycle completion and the power-off beep will not sound. However, the other sounds stay active.
• For the DVE(G)45R6300* model, press and hold Drum Light for 3 seconds.
• For the DVE(G)45R6100* model, press and hold Damp Alert for 3 seconds.
• Your setting will be retained even after you turn off the dryer. You can turn the alarm back on by pressing and holding the same button for 3 seconds.
Drum Light (DVE(G)45R6100* models only)
Press and hold Eco Dry for 3 seconds to turn the drum light on or off.
NOTE
The lamp stays lit for 2 minutes after it has turned on, regardless of whether the power is on or off or the door is open or closed, and then turns off automatically.
DOWNLOADED cycle (DVE(G)45R6300* models only)
You can choose from more cycles available on the SmartThings app on your smartphone.
1. On your smartphone, select the DOWNLOADED cycle. You can choose from TOWELS, SANITIZE, SHIRTS, JEANS, WOOL, ECO NORMAL, SMALL LOAD, LOW TEMP., RACK DRY, and WRINKLE AWAY.
2. Press Power on your dryer.
3. Turn the Cycle Selector to DOWNLOADED.
4. Press and hold Start/Pause (Hold to Start).
Bixby (DVE(G)45R6300* models only)
With Bixby, you can easily enjoy variety of services and contents, and experience intelligent customization services. (Voice command function is supported on applicable products only. For the products that do not support the voice command, you can download and connect to the SmartThings app on any Samsung mobile devices that support voice command to use some of the products’ functions through voice command.)
SmartThings (DVE(G)45R6300* models only)
Wi-Fi connection
On your smartphone, go to Settings, turn on the wireless connection, and then select your AP (Access Point).
• This appliance supports the Wi-Fi 2.4 GHz protocols.
Download
On an app market (Google Play Store, Apple App Store, Samsung Galaxy Apps), find the SmartThings app using the search term “SmartThings”. Download and install the app on your device.
NOTE
The app is subject to change without notice for improved performance.
Log in
You must first log into SmartThings with your Samsung account. To create a new Samsung account, follow the instructions in the app. You don’t need a separate app to create your account.
NOTE
If you have a Samsung account, use the account to log in. A registered Samsung smartphone user automatically logs in.
To register your appliance to SmartThings
1. Make sure your smartphone is connected to a wireless network. If not, go to Settings and turn on the wireless connection, and then select your AP (Access Point).
2. Open SmartThings on your smartphone.
3. If the “A new device is found.” message appears, select Add.
4. If no message appears, select + and then select your appliance from the list of devices available. If your appliance is not listed, select Device Type > Specific Device Model, and then add your appliance manually.
5. Register your appliance to the SmartThings app.
a. Add your appliance to SmartThings. Make sure your appliance is connected to SmartThings.
b. When registration is complete, then name of your appliance appears on your smartphone.
Maintenance
Keep the dryer clean for best performance and to lengthen its life cycle.
WARNING
Certain internal parts are intentionally not grounded and may present a risk of electric shock only during servicing.
Service Personnel - Do not contact the following parts while the appliance is energized: Control board and inlet valve.
Cleaning
Control panel
• Clean with a soft, damp cloth. Do not use abrasive substances.
• Do not spray liquid cleaning agents directly onto the dryer display.
• Some laundry pre-treatment soil and stain removers may damage the control panel.
• When using liquid cleaning agents, apply them to the cleaning cloth. Do not apply them directly to the dryer. Wipe up any spills or overspray immediately.
Drum
• Remove any stains from the drum with an all-purpose cleaner.
• Tumble old towels or rags to remove any remaining stains or cleaning substances. Stains may still be visible, but will not affect subsequent loads.
Powder coated drum
To clean the powder coated drum, use a damp cloth with a mild, non-abrasive cleaner suitable for easily marred surfaces. Remove cleaner residue and dry with a clean cloth.
Dryer exterior
• Clean with a soft, damp cloth. Do not use abrasive substances.
• Protect the surface from sharp objects.
• Do not place any heavy or sharp objects or a detergent container on the dryer. They can scratch or damage the top cover of the dryer.
• The dryer has a high-gloss finish on the entire surface. Be careful not to scratch or damage the surface.
Exhaust system
• Check and clean the exhaust system on a regular basis to maintain optimum performance.
• The external exhaust hood must be cleaned frequently to ensure proper air flow.
Troubleshooting
Checkpoints
If the dryer operates abnormally, first check the list of problems in the table below and try the suggested actions.
Does not run.
• Make sure the door is latched shut.
• Make sure the power cord is plugged into a live electrical outlet.
• Check your home’s circuit breakers or fuses.
• Press or tap Start/Pause (Hold to Start) again if the door was opened during a cycle.
• Clean the lint filter.
Does not heat.
• Check your home’s circuit breakers or fuses.
• Some cycles do not require heat. Check the selected cycle again.
• For a gas dryer, make sure the gas supply is on.
• Clean the lint filter and exhaust duct.
• The dryer may have moved into the cool-down phase of the cycle.
• Turn off the Eco Dry option for the NORMAL or TIME DRY cycles. When the Eco Dry option is on, the dryer performs an air dry process in the beginning of the cycle to reduce energy consumption. The air dry process does not use heated air, so you may feel that the dryer is not being heated, but this is normal.
Does not dry.
• Check all of the above, plus...
• Make sure the exhaust hood outside your home can open and close freely.
• Check the exhaust system for lint buildup. Ducting should be inspected and cleaned annually.
• Use a 4” rigid metal exhaust duct.
• Do not overload. 1 wash load = 1 dryer load.
• Dry heavy items and light weight items separately.
• Large, bulky items, such as blankets or comforters, may require repositioning to ensure even drying.
• Make sure that your washer is draining properly and extracting adequate water from the load.
• The load may be too small to tumble properly. Add a few towels and restart the dryer.
• The load may be too large to tumble properly. Remove some items and restart the dryer. • Clean the lint filter.
Is noisy.
• Check the load for objects such as coins, loose buttons, nails, etc. Remove promptly.
• It is normal to hear the dryer gas valve or heating element cycle on and off during the drying cycle.
• Make sure the dryer is leveled properly as outlined in the installation instructions.
• It is normal for the dryer to hum due to the high velocity of air moving through the dryer drum, fan, or exhaust system.
Dries unevenly.
• Seams, pockets, and other similarly heavy areas may not be completely dry when the rest of the load has reached the selected dryness level. This is normal. You can choose a higher dryness level or a cycle that involves a higher dryness level.
• If one heavy item is dried with a light weight load, such as one towel with sheets, it is possible that the heavy item will not be completely dry when the rest of the load has reached the selected dryness level.
• For the best drying results, dry heavy items and light weight items separately.
Has odors.
• Household odors from paint, varnish, strong cleaners, etc. may enter the dryer with the surrounding room air. This is normal as the dryer draws the air from the room, heats it, pulls it through the tumbler, and exhausts it outside.
• When these odors linger in the air, completely ventilate the room before using the dryer.
• Use the REFRESH cycle. If odors persist, wash and dry the items again.
Lint on clothes.
• Make sure the lint filter is cleaned before every load. For clothes that naturally build up lint, clean the filter during the cycle.
• Some fabrics are lint producers (for example, a fuzzy white cotton towel) and they must be dried separately from clothes that are lint trappers (for example, a pair of black linen pants).
• Divide larger loads into smaller loads for drying.
• Check pockets thoroughly before drying, then dry clothes.
• Remove lint inside the drum before drying a load.
Items still wrinkled after Wrinkle Prevent (Wrinkle Away, Wrinkle Release).
• Small loads of 1 to 4 items work best.
• Load fewer items. Load similar-type items.
• Take out the items immediately after drying is complete.
Water drips from the nozzle when the Steam cycles starts.
• This is steam condensation. The dripping water will stop after a short time.
Sprayed water is not visible during Steam cycles.
• Sprayed water is difficult to see when the door is closed.
Extended time.
• Sensor Dry automatically senses the moisture in the load and shuts the dryer off when the selected dryness level is reached. The drying time can change according to the type and amount of laundry. See the cycle chart for reference.
If a problem persists, contact a local Samsung service center.
If the dryer fails to operate, you may see an information code on the display panel. To determine what you should do, check the list of codes in the table below, and then try the suggested actions.
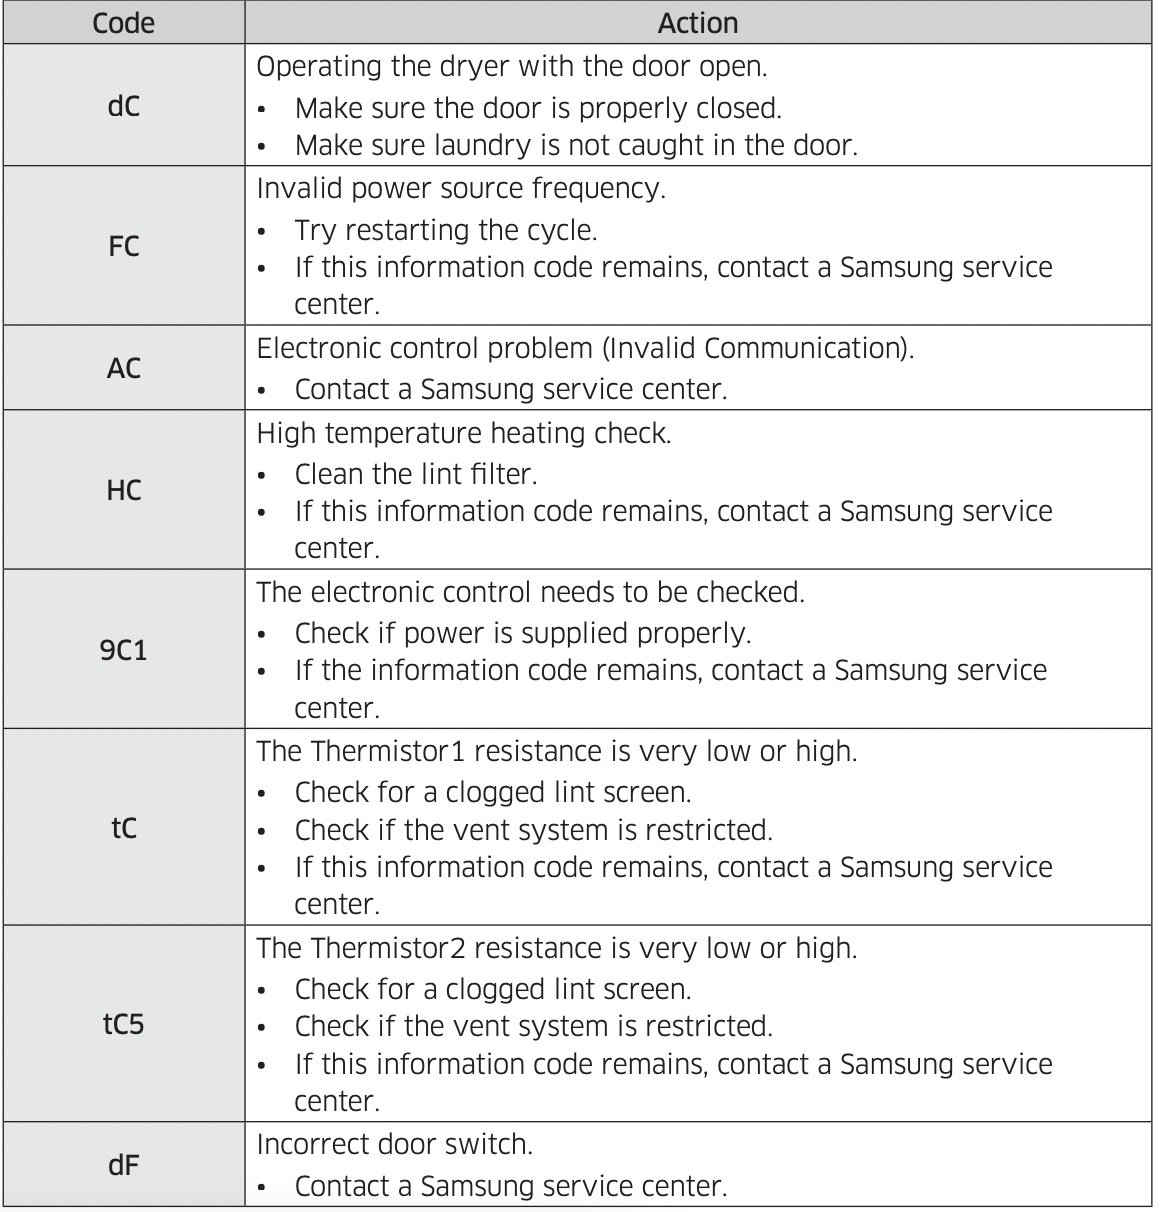
If any information code keeps appearing on the display, contact a Samsung service center.
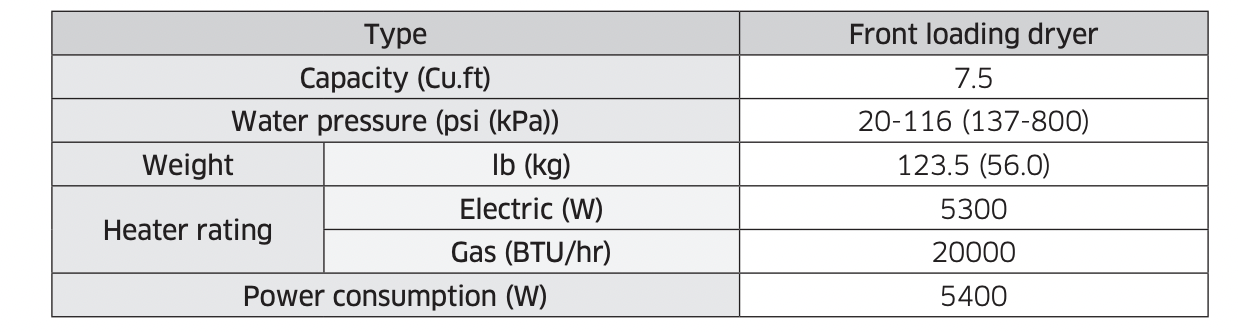
Specifications
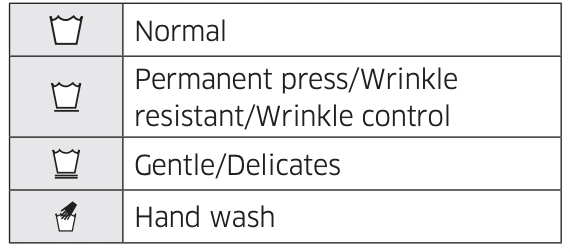
Fabric care chart
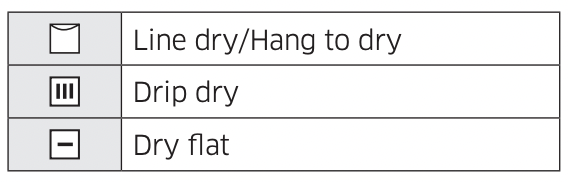
The following symbols provide garment care direction. The clothing care labels include symbols for drying, bleaching, ironing, and dry cleaning. The use of symbols ensures consistency among garment manufacturers of domestic and imported items. Follow care label directions to optimize garment life and reduce laundering problems.
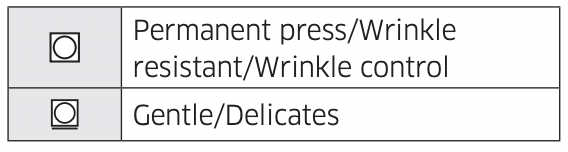
Wash cycle
Water temperature

NOTE
The Water Temperature table lists appropriate wash water temperatures for various items. The temperature range is 106-126 °F (41-52 °C) for Hot, 84-106 °F (29-41 °C) for Warm, and 61-84 °F (16- 29 °C) for Cold. (Wash water temperature must be a minimum of 61 °F (16 °C) for detergent activation and effective cleaning.)
Bleach
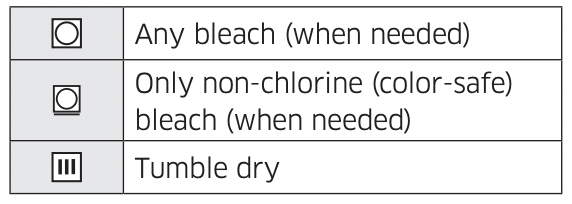
Normal
Special instructions
Heat setting
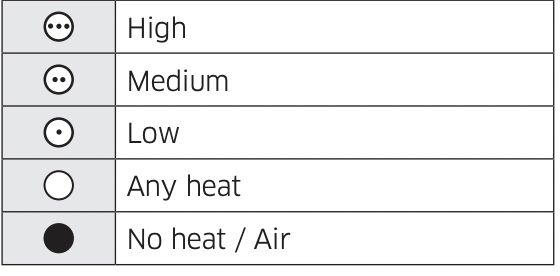
Iron dry or steam temperatures

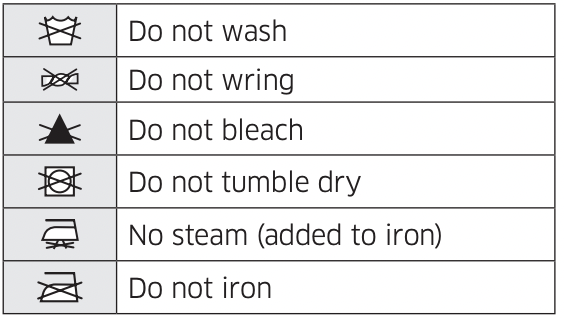
Warning symbols for laundering
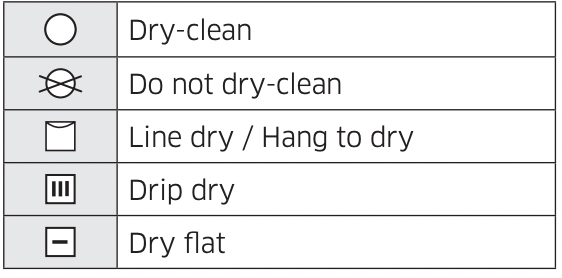
Dry-clean
Protecting the environment
This appliance is manufactured from recyclable materials. If you decide to dispose of this appliance, please observe local waste disposal regulations. Cut off the power cord so that the appliance cannot be connected to a power source. Remove the door so that animals and small children cannot get trapped inside the appliance.
Specification sheet