User's Manual Pioneer Receiver Getting Started
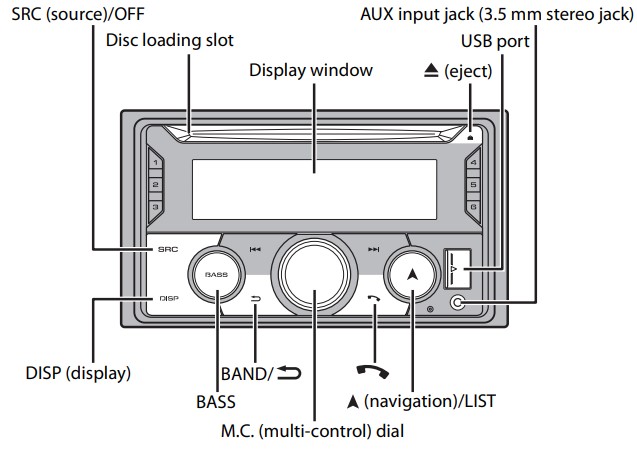
Basic operation
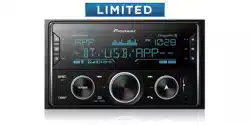
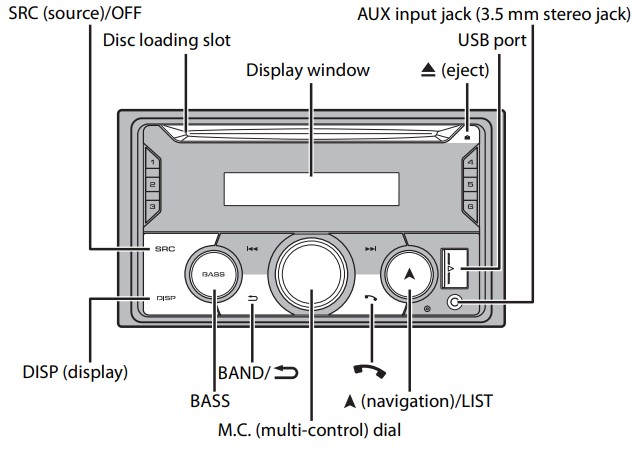
FH-S720BS/S722BS
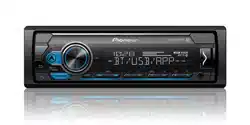
FH-S520BT/S52BT
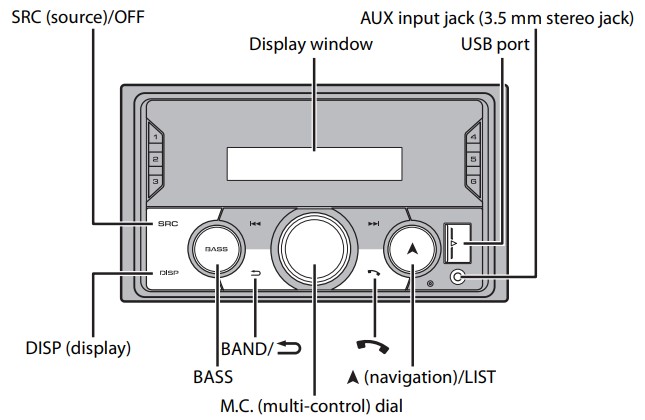
MVH-S620BS/S622BS
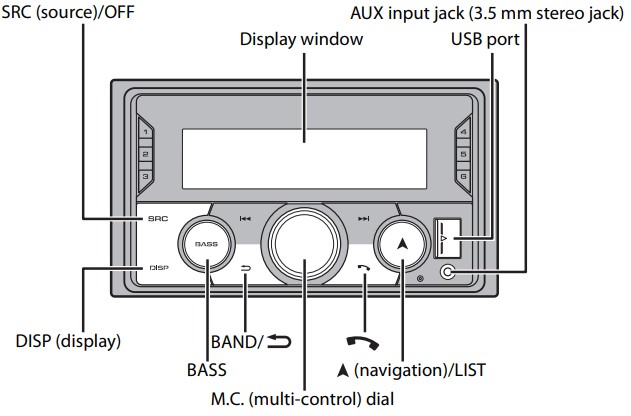
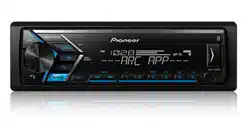
MVH-S420BT
Optional remote control
The remote control CD-R510 is sold separately
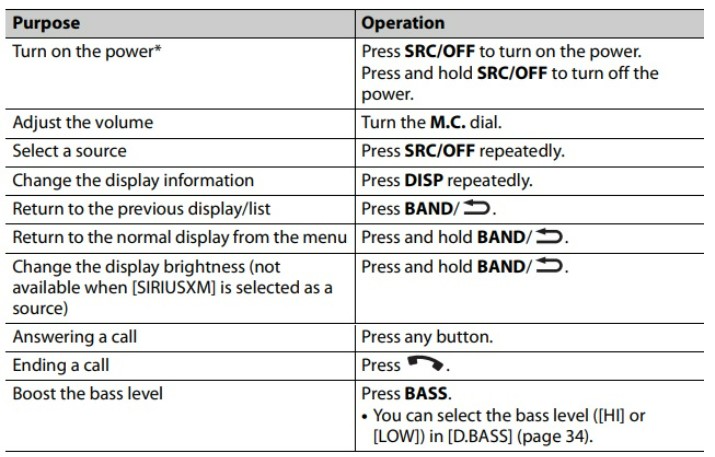
Frequently used operations
When this unit’s blue/white lead is connected to the vehicle’s auto-antenna relay control terminal, the vehicle’s antenna extends when this unit’s source is turned on. To retract the antenna, turn the source off.
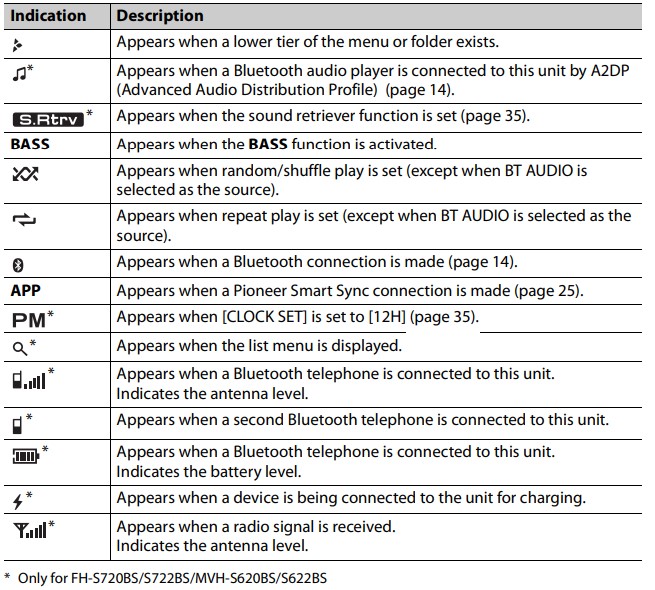
Display indication
Resetting the microprocessor
The microprocessor must be reset in the following situations:
- Before using this unit for the first time after installation
- If the unit fails to operate properly
- When strange or incorrect messages appear on the display
- Press the RESET button with a pen tip or other pointed instrument.

Setup menu
When you turn the ignition switch to ON after installation, the setup menu appears in the display.
1. Turn the M.C. dial to select the options, then press to confirm.
To proceed to the next menu option, you need to confirm your selection.
- LANGUAGE: Select the language to display the text information from a compressed audio file.
- CLOCK SET: Set the clock.
- Turn the M.C. dial to adjust the hour, then press to confirm. The indicator moves to the minute setting automatically.
- Turn the M.C. dial to adjust the minute, then press to confirm.
- SPEAKER MODE (Only for FH-S720BS/S722BS/ MVH-S620BS/S622BS): Switch between two operation modes: the 2-way network mode (NETWORK) and the standard mode (STANDARD) according to the connections you have established. For details on operation modes, see page 28. After selecting the appropriate mode, turn the M.C. dial to select [YES], then press to confirm.
- You cannot complete the setup menu without setting the [SPEAKER MODE].
- Once the speaker mode is set, this setting cannot be changed unless the default settings of this product are restored. Restore the default settings to change the speaker mode setting (refer to SYSTEM RESET on page 10).
- When [NETWORK] is selected, the beep tone function is not available.
2. [QUIT :YES] appears. To return to the first item of the setup menu, turn the M.C. dial to select [QUIT :NO], then press to confirm.
3. Press the M.C. dial to confirm the settings.
NOTE These settings other than [SPEAKER MODE] can be made at any time from the SYSTEM settings
Canceling the demonstration display (DEMO OFF)
- Press the M.C. dial to display the main menu.
- Turn the M.C. dial to select [SYSTEM], then press to confirm.
- Turn the M.C. dial to select [DEMO OFF], then press to confirm.
- Turn the M.C. dial to select [YES], then press to confirm.
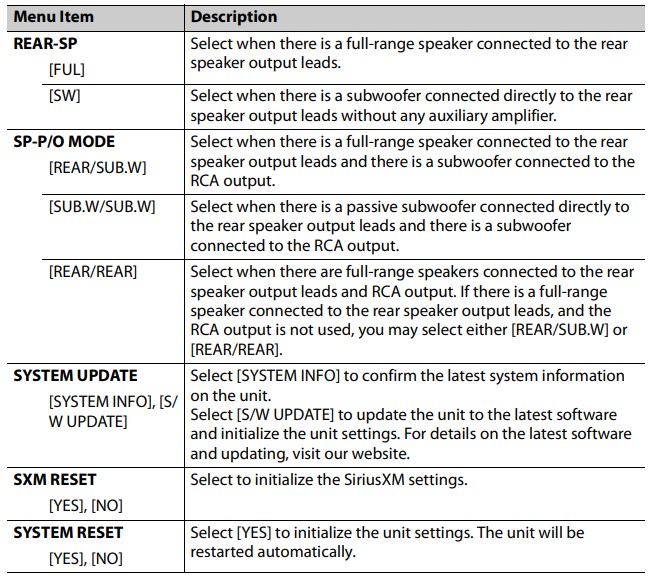
INITIAL settings
- Press and hold SRC/OFF until the unit turns off.
- Press the M.C. dial to display the main menu.
- Turn the M.C. dial to select [INITIAL], then press to confirm.
- Turn the M.C. dial to select an option, then press to confirm.
NOTE :The options vary depending on the unit.
Radio
The tuner frequencies on this unit are allocated for use in North America. Use in other areas may result in poor reception.
Receiving preset stations
- Press SRC/OFF to select [RADIO].
- Press BAND/
 to select the band from [FM1], [FM2], [FM3] or [AM].
 - Press a number button (1/
 to 6/
to 6/  ).
).
TIP: The  buttons can be also used to select a preset station when [SEEK] is set to [PCH] in the FUNCTION settings
Best stations memory (BSM)
The six strongest stations are stored on the number buttons (1/ to 6/ ).
- After selecting the band, press the M.C. dial to display the main menu.
- Turn the M.C. dial to select [FUNCTION], then press to confirm.
- Turn the M.C. dial to select [BSM], then press to confirm.
To seek a station manually
- After selecting the band, press to select a station. Press and hold then release to seek an available station. Scanning stops when the unit receives a station. To cancel seek tuning, press .
NOTE :
[SEEK] needs to be set to [MAN] in the FUNCTION settings.
To store stations manually
- While receiving the station you want to store, press and hold one of the number buttons (1/ to 6/ ) until it stops flashing
CD/USB/iPhone®/AUX
(iPhone source is not available when [USB MTP] is set to [ON] in the SYSTEM settings)
NOTE: CD function is not available for MVH-S620BS/S622BS/S420BT.
CD
- Insert a disc into the disc loading slot with the label side up.
To eject a disc, stop playback first then press 
USB devices (including Android™)/iPhone
- Open the USB port cover.
- Plug in the USB device/iPhone using an appropriate cable.
NOTE To automatically switch to USB source when a USB device/iPhone is connected to the unit, set [USB AUTO] to [ON] in the SYSTEM settings
AOA connections
A device running Android OS 4.1 or later installed and also supports AOA (Android Open Accessory) 2.0 can be connected to the unit via AOA, using the cable supplied with the device.
NOTE If you use an AOA connection, [APP CONTROL] needs to be set to [WIRED] and [USB MTP] needs to be set to [OFF] in the SYSTEM settings.
MTP connection
A device installed with Android OS 4.0 or most of later versions can be connected to the unit via MTP, using the cable supplied with the device. However, depending on the connected device, OS version or the numbers of the files in the device, audio files/songs may not be able to be played back via MTP. Note that MTP connection is not compatible with WAV file formats and FLAC file formats, and cannot be used with the MIXTRAX function.
NOTE If you use an MTP connection, [USB MTP] needs to be set to [ON] in the SYSTEM settings
AUX
- Insert the stereo mini plug into the AUX input jack.
- Press SRC/OFF to select [AUX IN] as the source.
NOTE If [AUX] is set to [OFF] in the SYSTEM settings, [AUX IN] cannot be selected as a source.
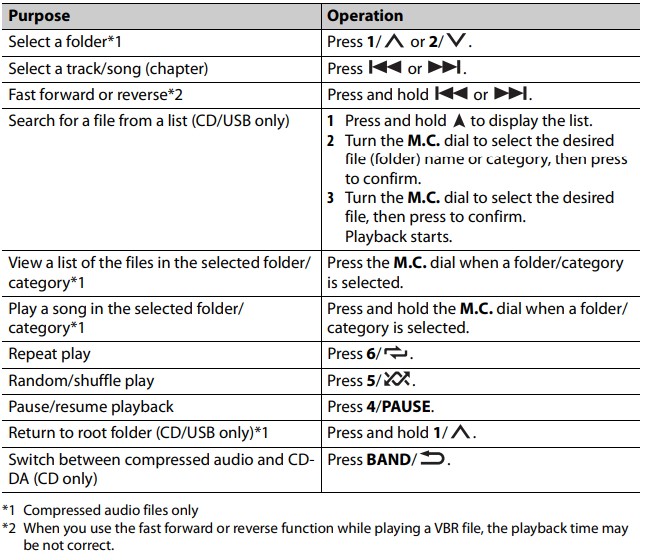
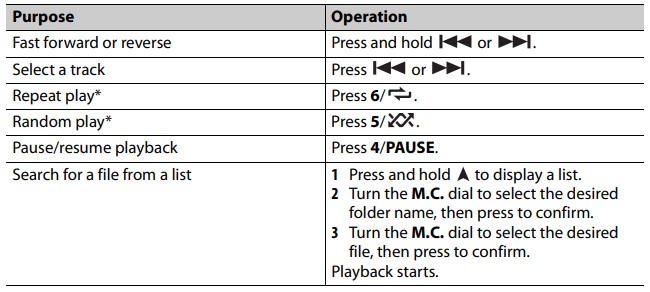
Operations
You can make adjustments in the FUNCTION settings (except for AUX IN/CD/ USB source). Note that the following operations do not work for an AUX device. To operate an AUX device, use the device itself.
About MIXTRAX (USB/iPhone only)
The MIXTRAX function creates a non-stop mix of your music library, accompanied by illumination effects. For details on MIXTRAX settings
NOTES
- iPhone needs to be connected with Pioneer Smart Sync via USB for using this function.
- Depending on the file/song, sound effects may not be available.
- Turn the MIXTRAX function off if the illumination effects it produces interfere with driving.
- Press 3/MIX to turn MIXTRAX on/off.
Bluetooth
Bluetooth connection
Important
If ten or more Bluetooth devices (e.g. a phone and separate audio player) are connected, they may not work properly. TIP The next connection to the unit is performed automatically if the Bluetooth device has been connected previously in the following steps.
- Turn on the Bluetooth function of the device. If you make a Bluetooth connection from the device, proceed to step 4.
- Press
 to display the [ADD DEVICE] setting. The unit starts to search for available devices, then displays them in the device list.
- To cancel searching, press the M.C. dial.
- If the desired device is not in the list, select [RE-SEARCH].
- If there is no device available, [NOT FOUND] appears in the display.
- If there is already a connected device, the phone menu appears by pressing .
- Turn the M.C. dial to select a device from the device list, then press to confirm. Press and hold the M.C. dial to switch the displayed device information between the Bluetooth device address and device name. If you make a Bluetooth connection from the unit, proceed to step 5.
- Select the unit name shown in the device display.
- Make sure the same 6-digit number appears on this unit and the device, then select [YES] if the 6-digit numbers displayed on this unit and the device are the same.
Bluetooth telephone
First, make a Bluetooth connection with the Bluetooth telephone. Up to two Bluetooth telephones can be connected simultaneously.
Important
- Leaving the unit on standby to connect to your phone via Bluetooth while the engine is not running can drain the vehicle’s battery.
- Be sure to park your vehicle in a safe place and apply the parking brake before operation.
To make a phone call
- Press to display the phone menu. When two phones are connected, a phone name appears first then a phone menu will display. To switch to another phone, press again.
- Turn the M.C. dial to select [RECENTS] or [PHONE BOOK], then press to confirm. If you select [PHONE BOOK], proceed to step 4.
- Turn the M.C. dial to select [MISSED], [DIALED] or [RECEIVED], then press to confirm.
- Turn the M.C. dial to select a name or phone number, then press to confirm. The phone call starts.
To answer an incoming call
- Press any button when a call is received.
TIP When two phones are connected to the unit via Bluetooth and there is an incoming call while one phone is being used for a call, a message will appear in the display. To answer that incoming call, you need to end the existing call.
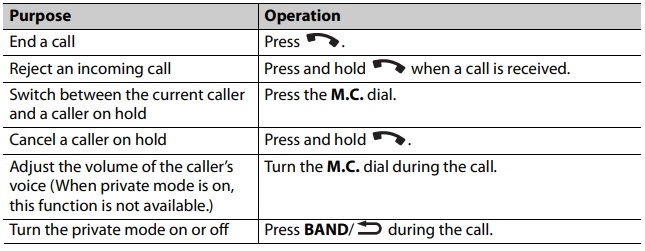
Basic operations
To preset phone numbers
- Select a phone number from a phone book or call history.
- Press and hold one of the number buttons (1/ to 6/ ). The contact is stored in the selected preset number.
To make a call using a preset number, press one of the number buttons (1/ to 6/ ), then press the M.C. dial, while the phone menu is displayed.
Voice recognition This function is only available when an iPhone/Android device equipped with voice recognition is connected to the unit via Bluetooth.
- Press and hold and then talk into the microphone to input voice commands. To exit the voice recognition mode, press BAND/ .
NOTE For details on the voice recognition features, refer to the manual supplied with your device.
TIP When a Pioneer Smart Sync connection is made, you can also use the voice recognition function from Pioneer Smart Sync installed on your iPhone/Android device by pressing and holding . For details on the voice recognition features, see the application’s help section.
Phone menu :
- Press to display the phone menu.

* If two phones are connected, this function does not work on incoming calls that are received while one of the phones is being used for a call.
Bluetooth audio
Important:
- Depending on the Bluetooth audio player connected to this unit, the available operations will be limited to the following two levels: – A2DP (Advanced Audio Distribution Profile) can only play back songs on your audio player. – AVRCP (Audio/Video Remote Control Profile) can perform functions such as playback, pause, select song, etc.
- The sound of the Bluetooth audio player will be muted when the phone is in use.
- When the Bluetooth audio player is in use, you cannot connect to a Bluetooth telephone automatically.
- Depending on the type of Bluetooth audio player you have connected to this unit, operation and information displayed may vary based on availability and functionality.
- Make a Bluetooth connection with the Bluetooth audio player.
- Press SRC/OFF to select [BT AUDIO] as the source.
- Press BAND/ to start playback.
NOTE: You must reconnect the Bluetooth connection when the source is switched or the unit is turned off.
TIP: When more than two and up to five devices are registered to the unit via Bluetooth, you can switch the Bluetooth device by playing back songs on the device. By doing so, playing back a song from the Bluetooth device of each passenger is easily available. However, depending on the usage conditions,multiple connections may not be available and the audio files/songs may not be able to be played back properly.
Basic operations
You can make various adjustments in the FUNCTION settings.
* Depending on the connected device, these operations may not be available.
Pandora®
(Not available when [USB MTP] is set to [ON] in the SYSTEM settings). Pandora music is a music service not affiliated with Pioneer. More information is available at http://www.pandora.com. The Pandora mobile application is available for iPhone and Android phones. Please visit www.pandora.com/everywhere/mobile for the latest compatibility information.
Listening to Pandora
Update the firmware of the Pandora application to the latest version before use.
- Connect this unit with the mobile device.
- iPhone via USB
- iPhone/Android device via Bluetooth
- Press SRC/OFF to select [PANDORA].
- Press and hold 1/ to display [APP CONTROL].
- Turn the M.C. dial to select one of the below
- Select [WIRED] for the USB connection.
- Select [BLUETOOTH] for the Bluetooth connection.
- Press SRC/OFF to select [PANDORA].
- Launch the Pandora application on the mobile device and start playback.
NOTE: When you connect a mobile device other than an iPhone/Android device, it may not operate correctly depending on your mobile device.
Basic operations You can make various adjustments in the FUNCTION settings
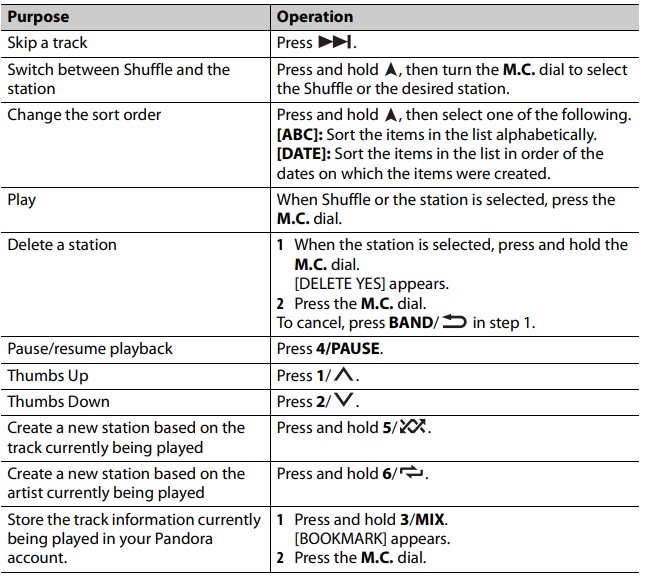
NOTE: Some functions of Pandora may not be operated from the unit.
Spotify®
(Not available when [USB MTP] is set to [ON] in the SYSTEM settings (page 36).) Spotify is a music streaming distribution service not affiliated with Pioneer. More information is available at http://www.spotify.com. The Spotify application is available for compatible smartphones, please visit https:// support.spotify.com/ for the latest compatibility information. To enjoy Spotify as you drive, first download the Spotify app to your iPhone or Android device. You can download it on the iTunes® App Store® or Google Play™. Choose a free account or a paid Premium account, either in the app or at spotify.com. A Premium account gives you more features, like offline listening.
Listening to Spotify
Update the firmware of the Spotify application to the latest version before use.
- Connect this unit with the mobile device.
- iPhone via USB
- iPhone/Android device via Bluetooth
- Press SRC/OFF to select [SPOTIFY].
- Press and hold 1/ to display [APP CONTROL].
- Turn the M.C. dial to select one of the below.
- Select [WIRED] for the USB connection.
- Select [BLUETOOTH] for the Bluetooth connection.
- Press SRC/OFF to select [SPOTIFY].
- Launch the Spotify application on the mobile device and start playback.
NOTE: When you connect a mobile device other than an iPhone/Android device, it may not operate correctly depending on your mobile device.
Basic operations
You can make various adjustments in the FUNCTION settings
NOTE: The available operations may vary according to the type of contents (track/album/artist/playlist/radio) you want to play
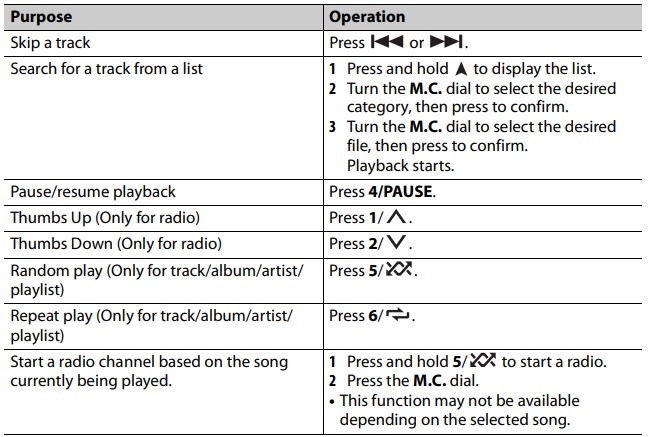
NOTE: Some functions of Spotify may not be operated from the unit.
SiriusXM Satellite Radio
(Only for FH-S720BS/S722BS/MVH-S620BS/S622BS) Only SiriusXM® brings you more of what you love to listen to, all in one place. Get over 140 channels, including commercial-free music plus the best sports, news, talk, comedy and entertainment. Welcome to the world of satellite radio. A SiriusXM Vehicle Tuner and Subscription are required.
Replay™ You can pause, rewind or replay live satellite radio as well as the channel you are currently listening to.
TuneStart™ Automatically start songs from the beginning when you tune to one of your preset music channels stored on the current band of presets. For details, refer to TUNE START.
NOTE TuneStart is compatible with SXV200 or later tuner models. Not compatible with SXV100.
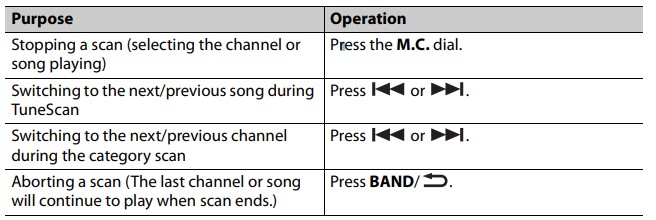
TuneScan™ Scan through short previews of songs you may have missed on music channels stored on the current band of presets. Each song in the current channel plays for six seconds at a time. For details, refer to TUNE SCAN (scanning the songs).
NOTE TuneScan is compatible with SXV200 or later tuner models. Not compatible with SXV100.
TuneMix™ Create a TuneMix™ preset made up of 2 or more of your favorite SiriusXM music channels. You can then access the TuneMix preset just like you would a traditional preset channel. You can also edit your TuneMix preset to add or remove channels. For details, refer to TUNEMIX.
NOTE TuneMix™ is compatible with the SXV300 or later tuner models. Not compatible with the SXV200 or SXV100.
Preparing for the SiriusXM Satellite Radio service
- Press SRC/OFF to select [SIRIUSXM].
You should be able to hear the SiriusXM preview channel on Channel 1. If you cannot hear the preview channel, please check the installation instructions to make sure your SiriusXM Connect tuner is properly installed. - Press to select Channel 0.
The Radio ID appears on the display. In addition, the Radio ID is located on the bottom of the SiriusXM Connect Vehicle Tuner.
NOTE The Radio ID does not include the letters I, O, S or F. - Activate the SiriusXM service online or by phone.
- [SUBSCRIPTION UPDATED] appears on the display when your SiriusXM Connect Vehicle Tuner has been subscribed successfully.
Press any key to clear the activation message.
NOTE The activation process usually takes 10 minutes to 15 minutes but may take up to an hour in some cases. Do not turn off the unit until you clear the activation message in step 4.
Listening to a channel
- Press SRC/OFF to select [SIRIUSXM].
- Press BAND/ to select a band from [SXM1], [SXM2] or [SXM3].
- Press to select a channel.
* Pressing and holding either button will rapidly browse through the channels.
* If you select a channel, you need to switch to [CHANNEL] by pressing and holding DISP
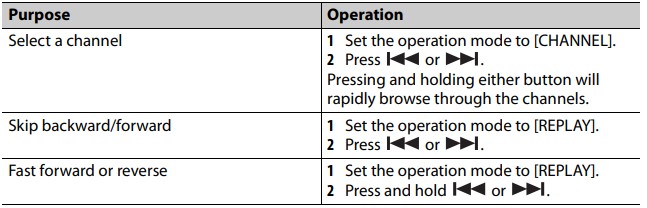
Basic operations
- Press and hold DISP to select the operation mode [CHANNEL] or [REPLAY].
TIP Pressing and holding BAND/ can jump from buffered content to live content
NOTE You can also make various adjustments in the SiriusXM settings
Scan options
Channel Preset-
- While receiving a channel you want to store, press and hold one of the number buttons(1/ to 6/ ) until it stops flashing.
To play the stored channels, select the band and then press a number button(1/ to 6/ ).
- To preset a channel from the program list
- While receiving a channel you want to store, press and hold

- Turn the M.C. dial to select [PRESETS], then press to confirm.
- Turn the M.C. dial to select a preset channel.
- Press and hold the M.C. dial to store.
To play the stored channels, turn the M.C. dial to select a preset channel, then press to confirm.
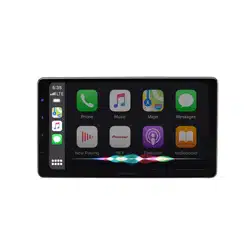
Using Pioneer Smart Sync/APP
Pioneer Smart Sync is the application that intelligently brings your maps, messages, and music together in the vehicle. You can operate the unit from Pioneer Smart Sync installed on an iPhone/Android device. In some cases, you can control aspects of the application, such as source selection, pause, etc., by using the unit. For details on what operations are available on the application, see the application’s help section. NOTE The APP source is not available when a Pioneer Smart Sync connection is not made or [USB MTP] is set to [ON] in the SYSTEM settings
For iPhone users
This function is compatible with iOS 10.3 or later. You can download Pioneer Smart Sync on iTunes App Store

For Android device users
For Bluetooth connections, this function is compatible with devices that have Android OS 5.0 or later installed. For USB connections, this function is compatible with a phone that runs Android 5.0 or later up to 7.1.2 and also supports AOA (Android Open Accessory) 2.0. However, the compatibility depends on the smartphone. You can download Pioneer Smart Sync on Google Play.

NOTE Some Android devices connected via AOA 2.0 may not work properly or emit sounds due to their own software design, regardless of the OS version.
Audio Adjustments
Operation modes
This unit features two operation modes: network mode and standard mode. You can switch between modes as desired.
Network mode
You can create a 2-way + SW multi-amp and multi-speaker system with high range speaker, middle range speaker and subwoofer for reproduction of high, middle and low frequencies (bands).
Standard mode
You can create a 4-speaker system with front and rear speakers or front speakers and subwoofers, or a 6-speaker system with front and rear speakers and subwoofers.
Adjusting the cut-off frequency value and the slope value
You can adjust the cut-off frequency value and the slope value of each speaker.
The following speakers can be adjusted.
Network mode:
[HIGH] (high-range speaker HPF), [MID HPF] (middle-range speaker HPF), [MID LPF] (middle-range speaker LPF), [SUBWOOFER]
Standard mode:
[FRONT], [REAR], [SUBWOOFER] NOTE [SUBWOOFER] can only be selected when [ON] is selected in [SUBWOOFER]
- Press the M.C. dial to display the main menu.
- Turn the M.C. dial to select [AUDIO], then press to confirm.
- Turn the M.C. dial to select [CROSSOVER], then press to confirm.
- Turn the M.C. dial to select the speaker unit (filter) to be adjusted, then press to confirm.
- Turn the M.C. dial to select [HPF] or [LPF] according to the speaker unit (filter), then press to confirm.
- Turn the M.C. dial to select an appropriate cut-off frequency for the speaker unit (filter) selected in step 4, then press to confirm.
Network mode:
[1.25K] to [12.5K] (if you choose [HIGH] or [MID LPF])
[25] to [250] (if you choose [MID HPF] or [SUBWOOFER])
Standard mode:
[25HZ] to [250HZ] - Turn the M.C. dial to select an appropriate slope for the speaker unit (filter) selected in step 4.
Network mode:
[–6] to [–24] (if you choose [HIGH], [MID HPF] or [MID LPF])
[–12] to [–36] (if you choose [SUBWOOFER])
Standard mode:
[–6] to [–24] (if you choose [FRONT] or [REAR])
[–6] to [–36] (if you choose [SUBWOOFER])
Settings
You can adjust various settings in the main menu.
- Press the M.C. dial to display the main menu.
- Turn the M.C. dial to select one of the categories below, then press to confirm.
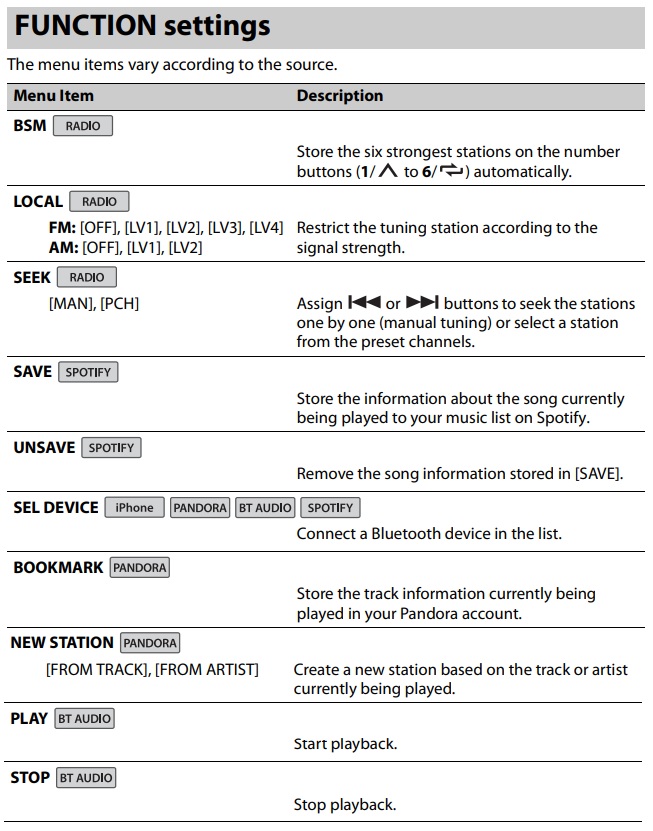
- FUNCTION settings
- AUDIO settings
- SYSTEM settings
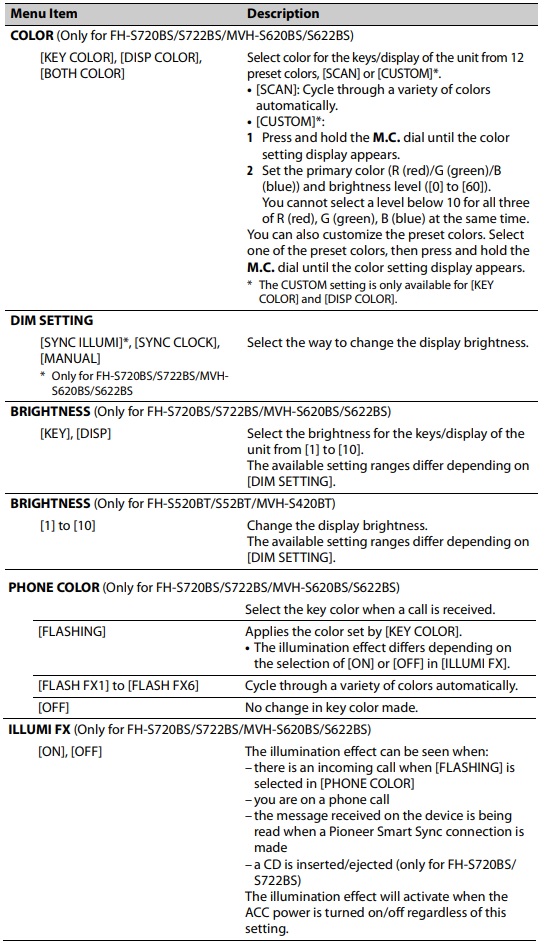
- ILLUMINATION settings
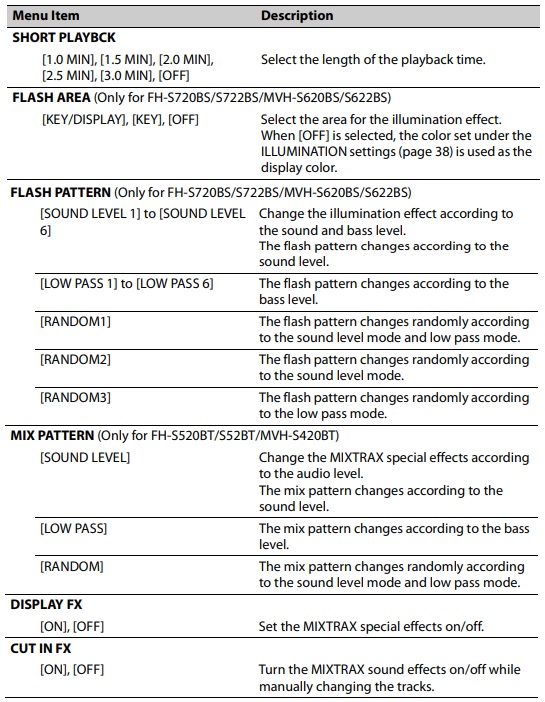
- MIXTRAX settings
- Turn the M.C. dial to select the options, then press to confirm.
FUNCTION settings
AUDIO settings
(Network mode is only available for FH-S720BS/S722BS/MVH-S620BS/S622BS.)
NOTE [CHK APP SETTG.] may be displayed when the setting is performed from Pioneer Smart Sync.
- EQ SETTING [SUPER BASS], [POWERFUL], [DYNAMIC], [NATURAL], [VOCAL], [VIVID], [SET BY APP]*, [CUSTOM1], [CUSTOM2], [FLAT] * [SET BY APP] is displayed when the preset equalizer curve that is not available in the unit has been set from Pioneer Smart Sync.
Select an equalizer band and level for further customizing.
Equalizer band: [50HZ] to [12.5kHZ]
Equalizer level: [–6] to [+6]- Select or customize the equalizer curve.
When you select a setting other than [CUSTOM1], [CUSTOM2] and [SET BY APP], you can also customize the equalizer curve by pressing and holding the M.C. dial, then store the customized equalizer curve in [CUSTOM1].
- FADER* 1*2 (Only for standard mode)
- Adjust the front and rear speaker balance.
- BALANCE
- Adjust the left and right speaker balance.
- SUBWOOFER [ON], [OFF]
- Set to [ON] when using a subwoofer speaker
- SPEAKER LEVEL
Network mode: [HIGH L], [HIGH R], [MID L], [MID R], [SUBWOOFER]
Standard mode: [FRONT L], [FRONT R], [REAR L], [REAR R], [SUBWOOFER]
Output level: [–24] to [10]- Select a speaker unit (filter) and adjust the output level. • Each value you have adjusted changes when you change the [POSITION] setting
- CROSSOVER
- Select a speaker unit (filter) to adjust the HPF or LPF cut-off frequency and the slope for each speaker unit. For details on the [CROSSOVER] setting
- POSITION [OFF], [FRONT LEFT] (front seat left), [FRONT RIGHT] (front seat right), [FRONT] (front seats), [ALL]*
* Only for standard mode- Select a listening position to adjust the speakers' output levels automatically and add a delay time that corresponds to the number and locations of occupied seats.
- TIME ALGNMNT
[INITIAL], [OFF], [CUSTOM] Select a type of speaker and adjust the speaker distance for further customizing in [CUSTOM].
Network mode: [HIGH L], [HIGH R], [MID L], [MID R], [SUBWOOFER]
Standard mode: [FRONT L], [FRONT R], [REAR L], [REAR R], [SUBWOOFER]
Speaker distance (inch): [140] to [0]- Select or customize the time alignment settings to reflect the distance between the listener’s position and each speaker.
- Select [INITIAL] to initialize the setting value.
- Select [OFF] to reset all setting values to 0.
- The [CUSTOM] setting is available when [FRONT LEFT] or [FRONT RIGHT] is selected in [POSITION] .
- The [CUSTOM] setting is not available when [OFF] is selected in [SUBWOOFER]
- SAVE SETTINGS [YES], [NO]
- Save to later recall the following sound settings at their current values: [CROSSOVER], [SPEAKER LEVEL], [EQ SETTING], [POSITION], [TIME ALGNMNT], [D.BASS], [SUBWOOFER].
- The settings that can be saved differ when a Pioneer Smart Sync connection is made.
- LOAD SETTINGS
- Load the sound settings, when you have already performed [SAVE SETTINGS].
- D.BASS [OFF], [LOW], [HI]
- Boost the bass level dynamically to offer an effect as if a subwoofer was added to the system.
- LOUDNESS [OFF], [LOW], [MID], [HI]
- Compensate for clear sound at low volume.
- SLA [+4] to [–4]
- Adjust the volume level for each source except FM. Each of the below combinations are set to the same setting automatically. •
- When making a USB connection, set USB, iPhone, PANDORA, APP, and SPOTIFY.
- When making a Bluetooth connection, set BT AUDIO, iPhone, PANDORA, APP, and SPOTIFY.
- S.RTRV
[1] (effective for low compression rates)
[2] (effective for high compression rates), [OFF]- Enhance compressed audio and restore rich sound.
- *1 Not available when [SW] is selected in [REAR-SP] in the INITIAL settings
- *2 Not available when [SUB.W/SUB.W] is selected in [SP-P/O MODE] in the INITIAL settings
- *3 Not available when [REAR/REAR] is selected in [SP-P/O MODE] in the INITIAL settings
SYSTEM settings
You can also access to these menus when the unit is turned off
- LANGUAGE
- [ENG](English), [ESP](Spanish), [FRA] (Canadian French)
- Select the language to display the text information from a compressed audio file
- CLOCK SET
- [12H], [24H]
- Set the clock
- This setting is not available when a Pioneer Smart Sync connection is made.
- SCROLL SET
- [ONCE], [LOOP], [OFF]
- Select the way to scroll the text in the display window.
- BEEP TONE (Only for standard mode)
- [ON], [OFF]
- A beep can be heard when any button is pushed. Select [OFF] to disable this function.
- INFO DISPLAY (Only for FH-S720BS/S722BS/MVH-S620BS/S622BS)
[SPEANA/CLOCK], [LIVE FX/ CLOCK], [CLOCK], [SPEANA], [LEVEL METER], [OFF]- Display the item on the sub information display.
- INFO DISPLAY (Only for FH-S520BT/S52BT/MVH-S420BT)
- [SOURCE/SPEANA], [CLOCK/ SPEANA], [SRC/LIVE FX], [CLOCK/ LIVE FX], [SOURCE], [SPEANA], [OFF] Display the item on the sub information display.
- When [SOURCE/SPEANA] or [CLOCK/SPEANA] is selected, display the antenna instead of the speana on the radio source.
- AUX
- [ON], [OFF]
- Set to [ON] when using an auxiliary device connected to the unit.
- BT AUDIO
- [ON], [OFF]
- Set the Bluetooth signal on/off.
- PANDORA
- [ON], [OFF]
- Set to [ON] when using the Pandora function.
- SPOTIFY
- [ON], [OFF]
- Set to [ON] when using the Spotify function.
- BT MEM CLEAR
- [YES], [NO]
- Clear the Bluetooth device data (device list, PIN code, call history, phone book, preset phone numbers) stored in the unit. [CLEARED] appears when data is successfully deleted.
- APP CONTROL
- [WIRED], [BLUETOOTH]
- Select the appropriate connection method according to your device.
- USB MTP
- [ON], [OFF]
- Set to [ON] when using the MTP connection. The following sources are not available when the setting is set to [ON].
APP, PANDORA, SPOTIFY, iPhone, and USB (AOA)
- AUTO APP CONN
- [ON], [OFF]
- Select [ON] to automatically launch Pioneer Smart Sync when the iPhone/Android device is connected to the unit.
- USB AUTO
- [ON], [OFF]
- Select [ON] to automatically switch to USB source when a USB device/iPhone is connected to the unit.
- Select [OFF] when a USB device/iPhone is being connected to the unit just for charging.
Information on the connections for each device
The available sources differ depending on the setting value. Please set [APP CONTROL] according to the table for the source you want to use. For details on Pioneer Smart Sync connection.
When Pioneer Smart Sync connection is NOT performed

ILLUMINATION settings
MIXTRAX settings.
Troubleshooting
- The display automatically returns to the normal display.
- No operations have been made for about 30 seconds.
- The repeat play range changes unexpectedly.
- Depending on the repeat play range, the selected range may change when another folder or track is being selected or during fast forwarding/reversing.
- Select the repeat play range again.
- A subfolder is not played back.
- Subfolders cannot be played when [FLD] (folder repeat) is selected.
- Select another repeat play range.
- The sound is intermittent.
- You are using a device, such as a cellular phone, that may cause audible interference.
- Move electrical devices that may be causing the interference away from the unit.
- The sound from the Bluetooth audio source is not played back.
- There is a call in progress on a Bluetooth-connected cellular phone.
- The sound will be played back when the call is terminated.
- A Bluetooth-connected cellular phone is currently being operated. –
- Stop using the cellular phone.
- The connection between the unit and the cellular phone is not established correctly after a call made by a Bluetooth-connected cellular phone
- Make a Bluetooth connection between the unit and the cellular phone again.
Error messages
Common
- AMP ERROR
- This unit fails to operate or the speaker connection is incorrect.
- The protective circuit is activated.
- Check the speaker connection.
- Turn the ignition switch OFF and back to ON again. If the message remains, contact your dealer or an authorized Pioneer Service Station for assistance.
- NO XXXX (NO TITLE, for example)
- There is no embedded text information.
- Switch the display or play another track/file.
CD player
- ERROR-07, 11, 12, 17, 30
- The disc is dirty.
- The disc is scratched.
- ERROR-07, 10, 11, 12, 15, 17, 30, A0
- There is an electrical or mechanical error.
- Turn the ignition switch OFF and back to ON, then back to the CD player.
- ERROR-15
- The inserted disc is blank.
- ERROR-23
- FORMAT READ
- Sometimes there is a delay between the start of playback and when you start to hear any sound.
- Wait until the message disappears and you hear sound.
- NO AUDIO
- The inserted disc does not contain any playable files.
- SKIPPED
- The inserted disc contains DRM protected files.
- The protected files are skipped.
- PROTECT
- All the files on the inserted disc are embedded with DRM.
USB device/iPhone
- FORMAT READ
- Sometimes there is a delay between the start of playback and when you start to hear any sound.
- Wait until the message disappears and you hear sound.
- NO AUDIO
- There are no songs.
- Transfer the audio files to the USB device and connect.
- The connected USB device has security enabled.
- Follow the USB device instructions to disable the security.
- SKIPPED
- The connected USB device contains DRM protected files.
- The protected files are skipped.
- PROTECT
- All the files on the connected USB device are embedded with DRM.
- N/A USB
- The connected USB device is not supported by this unit.
- Disconnect your device and replace it with a compatible USB device.
- HUB ERROR
- The USB device connected via a USB hub is not supported by this unit.
- Connect the USB device directly to this unit using a USB cable.
- CHECK USB
- The USB connector or USB cable has short-circuited.
- Check that the USB connector or USB cable is not caught in something or damaged.
- The connected USB device consumes more than maximum allowable current.
- Disconnect the USB device and do not use it. Turn the ignition switch OFF and back to ACC or ON. Connect only compliant USB devices.
- ERROR-19
- Communication failed.
- Perform one of the following operations, then return to the USB source.
- Disconnect the USB device.
- Change to a different source.
- iPhone failure.
- Disconnect the cable from the iPhone. Once the iPhone’s main menu is displayed, reconnect the iPhone and reset it.
- ERROR-23
- USB device was not formatted properly.
- Format the USB device with FAT12, FAT16 or FAT32.
- ERROR-16
- The iPhone firmware version is old.
- Update the iPhone version.
- iPhone failure.
- Disconnect the cable from the iPhone. Once the iPhone’s main menu is displayed, reconnect the iPhone and reset it.
- STOP
- There are no songs in the current list.
- Select a list that contains songs.
- NO BT DEVICE GO TO BT MENU TO REGISTER
- No Bluetooth device found.
- Connect the unit and iPhone via Bluetooth.
- CONN. FAILED PRESS BAND KEY TO RETRY
- Bluetooth connection with iPhone failed.
- Press BAND/ to make a connection again.
- DISCONNECTED PRESS BAND KEY TO RETRY
- Bluetooth connection lost.
- Press BAND/ to make a connection again.
Bluetooth device
- ERROR-10
- The power failed for the Bluetooth module of the unit.
- Turn the ignition switch OFF and back to ACC or ON.
Pandora
- ERROR-19
- Communication failed.
- Disconnect the cable from the device. Once the device’s main menu is displayed, reconnect the device and reset it.
- NOT FOUND
- The Pandora application has not started running yet.
- Start up the Pandora application.
- RATING ERROR
- The thumb rating operation was disabled.
- Run the same command for another track.
- CAN'T SKIP
- The skip operation was disabled.
- Run the same command for another track.
- THUMB ERROR
- Unable to save thumb rating.
- BOOKMARK ERR
- INOPERABLE
- The operation to save BookMark or add station was disabled.
- Run the same command for another track.
- UNABLE TO ADD
- SKIP LIMIT
- Due to music licensing restrictions, Pandora limits the total number of skips per hour.
- Wait until Pandora allows you to skip again.
- UPDATE APP
- This version of the Pandora application is not supported.
- Connect a device that has a compatible version of the Pandora application installed.
- LOG IN ERROR
- Your Pandora account is not logged in.
- Disconnect the cable from the device, and log in to your Pandora account. Then reconnect the device.
- ERROR
- Device error message displayed in the Pandora application.
- Check the connected device.
- Pandora system is undergoing maintenance.
- NO STATIONS
- No station found.
- Create a station in the Pandora application on your connected device.
- NO BT DEVICE GO TO BT MENU TO REGISTER
- No Bluetooth device found.
- Connect the unit and the device via Bluetooth
- CONN. FAILED PRESS BAND KEY TO RETRY
- Bluetooth connection failed.
- Press BAND/ to make a connection again.
- CHECK APP PRESS BAND KEY TO RETRY
- Connection to the Pandora application failed.
- Press BAND/ to make a connection again.
- DISCONNECTED PRESS BAND KEY TO RETRY
- Bluetooth connection lost.
- Press BAND/ to make a connection again.
- STATION LIMIT
- A new station cannot be added.
- Delete an old station to open a spot for a new one.
- CANNOT DELETE
- The station could not be deleted.
- Run the same command for another station.
- BAD NETWORK
- The connected device is out of area.
- Connect the device to a network.
- UNAVAILAVLE
- The connected device is out of area.
- Connect the device to a network.
- The operation was disabled.
- Run the same command for another station.
- CHECK APP
- An unknown error (including communication error) has occurred.
- Follow the instructions that appear on the screen.
APP
- CONNECT APP
- Pioneer Smart Sync connection is not made.
- Make a connection with Pioneer Smart Sync
Spotify
- NOT FOUND
- The Spotify application has not started running yet.
- Start up the Spotify application.
- NO BT DEVICE GO TO BT MENU TO REGISTER
- No Bluetooth device found.
- Connect the unit and the device via Bluetooth
- CONN. FAILED PRESS BAND KEY TO RETRY
- Bluetooth connection failed.
- Press BAND/ to make a connection again.
- CHECK APP PRESS BAND KEY TO RETRY
- Connection to the Spotify application failed.
- Press BAND/ to make a connection again.
- DISCONNECTED PRESS BAND KEY TO RETRY
- Bluetooth connection lost.
- Press BAND/ to make a connection again.
- CHECK APP
- An unknown error (including communication error) has occurred.
- Follow the instructions that appear on the screen.
SiriusXM Satellite Radio
- CHECK ANTENNA
- The antenna cable may be either disconnected or damaged.
- Check the antenna connection or replace if damaged.
- CHECK TUNER
- The radio is having difficulty communicating with the SiriusXM Connect Vehicle Tuner. The tuner may be disconnected or damaged.
- Verify that the SiriusXM Connect Vehicle Tuner cable is securely connected to the radio.
- NO SIGNAL
- The SiriusXM Connect Vehicle Tuner is having difficulty receiving the SiriusXM satellite signal.
- Move your vehicle outdoors with a clear view of the southern sky.
- Make sure that the SiriusXM magnetic mount antenna is mounted on a metal surface on the outside the vehicle.
- Move the SiriusXM antenna away from any obstructions.
- SUBSCRIPTION UPDATED
- This unit has detected a change in your SiriusXM subscription status.
- Press any key to clear the message.
- CH UNAVAIL
- The channel that you have requested is not available.
- Check the SiriusXM channel lineup.
- CHAN UNSUB
- The channel that you have requested is not included in your SiriusXM subscription package.
- Check the content of your SiriusXM subscription package.
- CH LOCKED
- The channel has been locked by the Parental Control function.
- Set [LOCKED CH] to [OFF] or [CLEAR ALL] to [YES] in the FUNCTION settings .
- NO TUNEMIX CH
- There is only one music channel in the band.
- Select a band with two or more music channels.
- Add more music channels to the current band.