WARNING: Do not use the robot on wet surfaces or surfaces with standing water.
Before using the product on a rug with tasseled edges, please fold the rug edges under.
Tidy up the area to be cleaned by putting furniture, such as chairs, in their proper place.
It may be necessary to place a physical barrier at the edge of a drop to stop the unit from falling over the edge.
Remove power cords and small objects from the floor that the robot could be obstructed by
Preparation
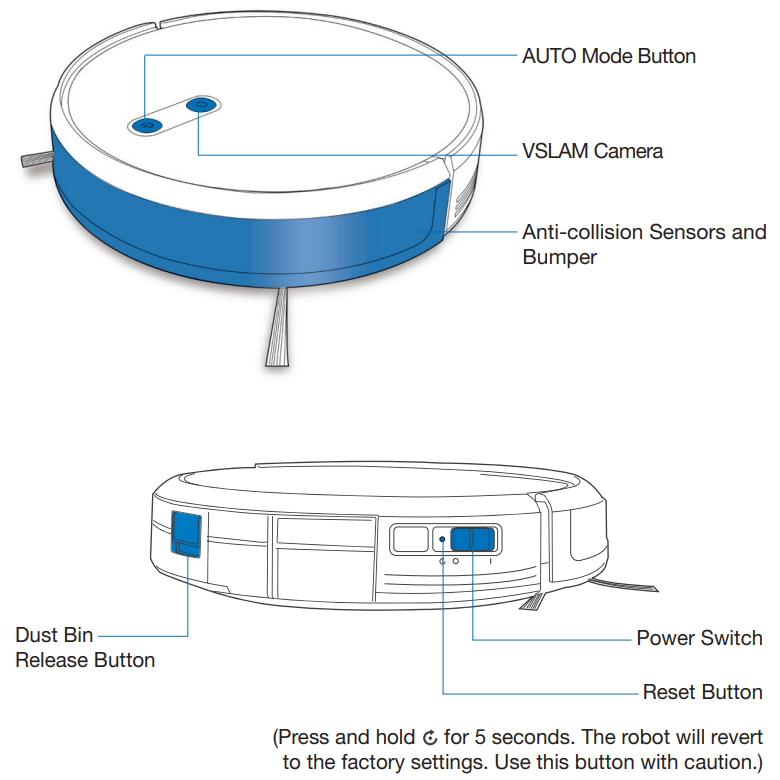
1. Remove Protective Strip
2. Docking Station Placement
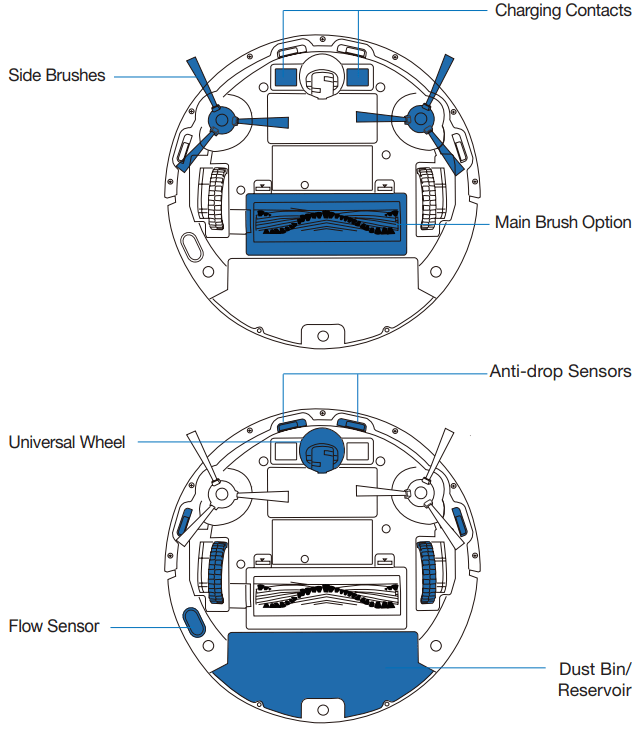
3. Install Side Brushes
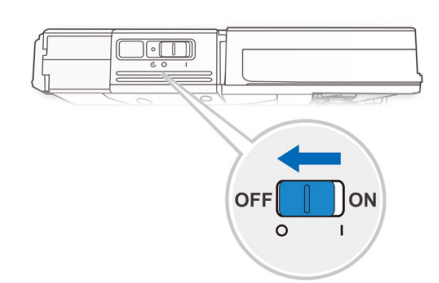
4. Power ON
5. Charge the robot
Note: When the robot completes the cleaning cycle or when battery power gets low, the robot automatically returns to the Docking Station to recharge itself.
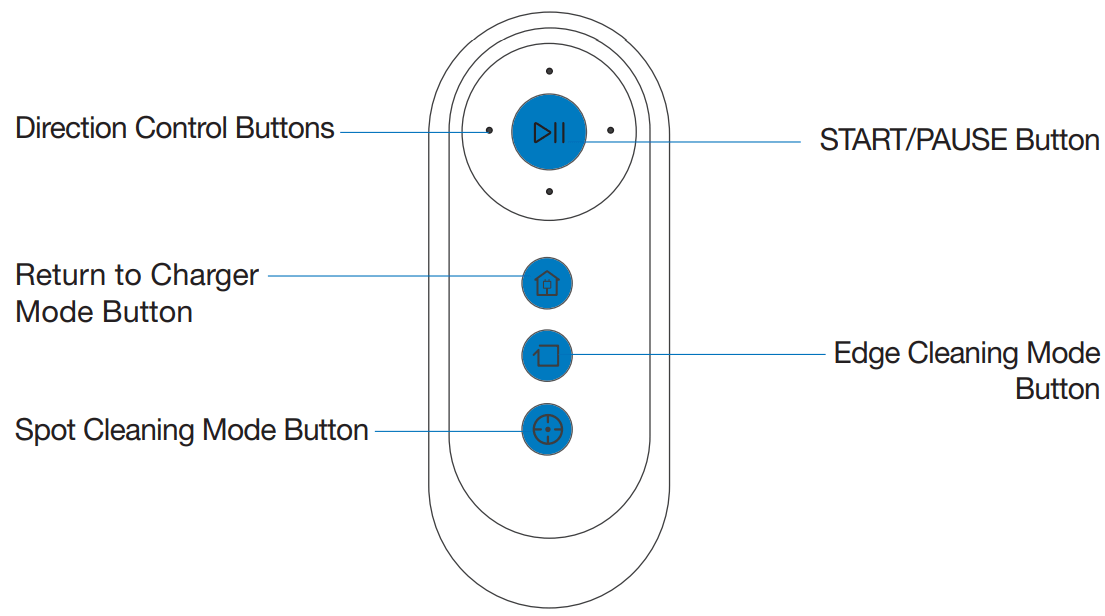
Selecting Cleaning Mode
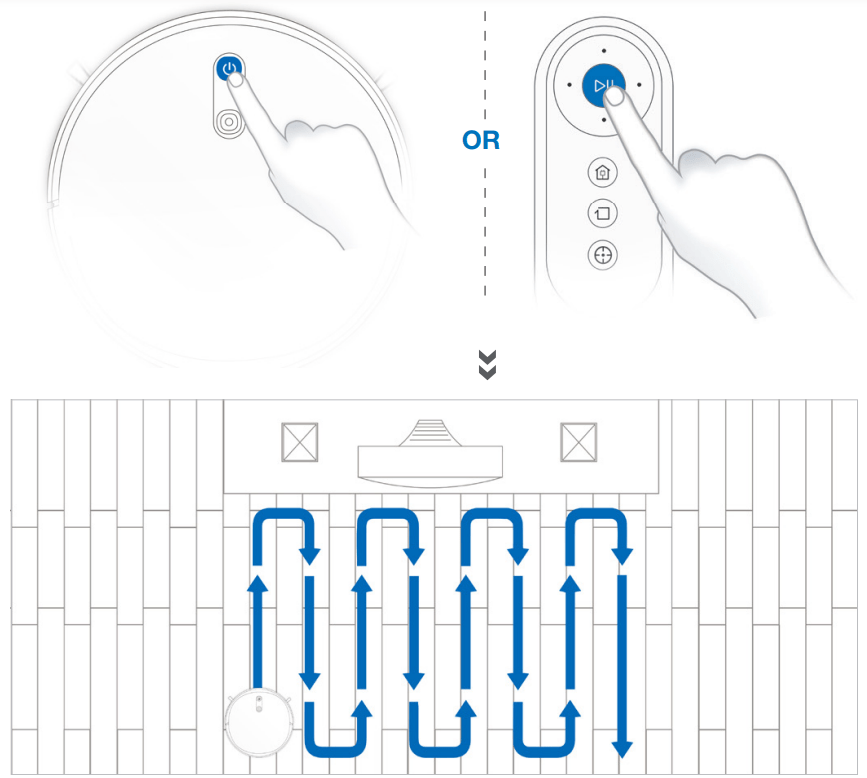
1. AUTO Cleaning Mode
A Programmed Cleaning Pattern (optimized for hard floors) will be selected by default.
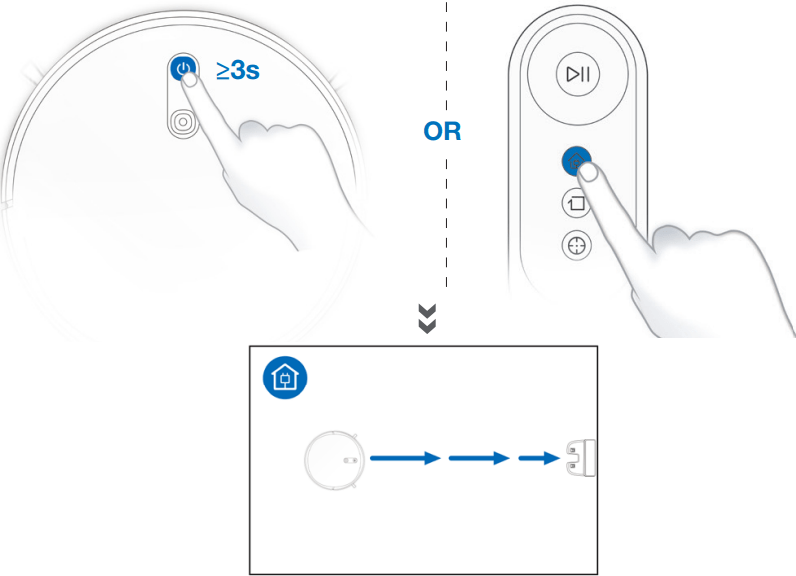
2. Return to Docking Station
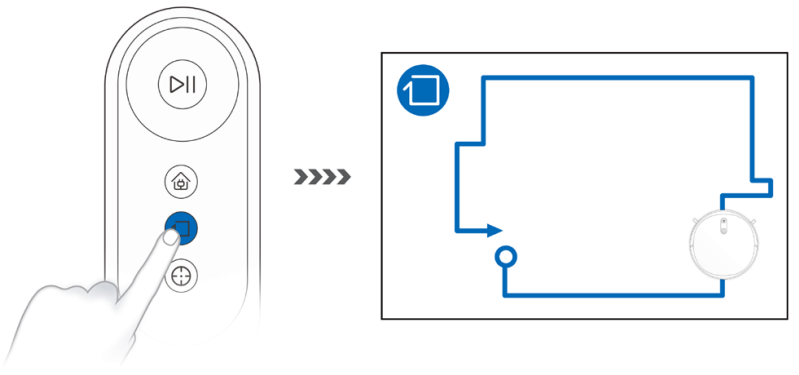
3. Edge Cleaning Mode
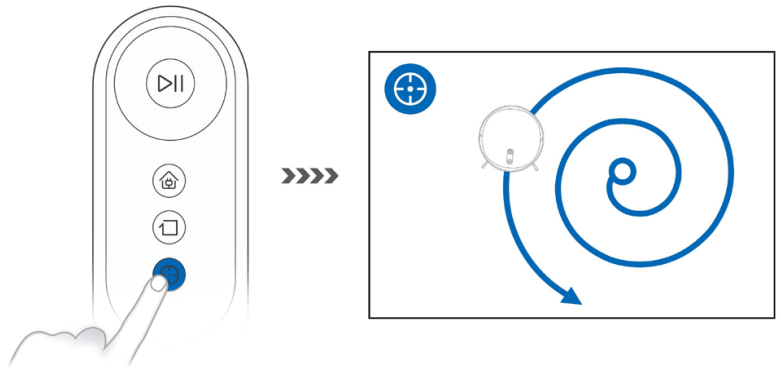
4. Spot Cleaning Mode
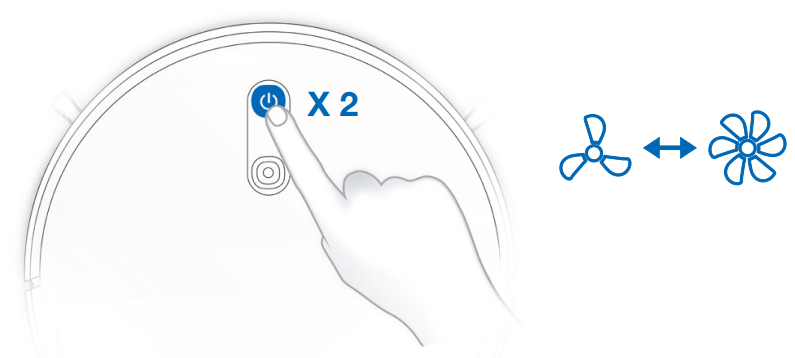
Switch vacuum power
Pause, Wake Up, Power Off
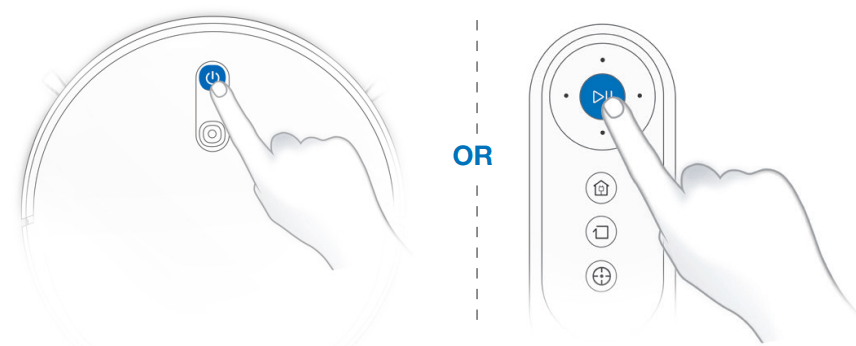
1. Pause
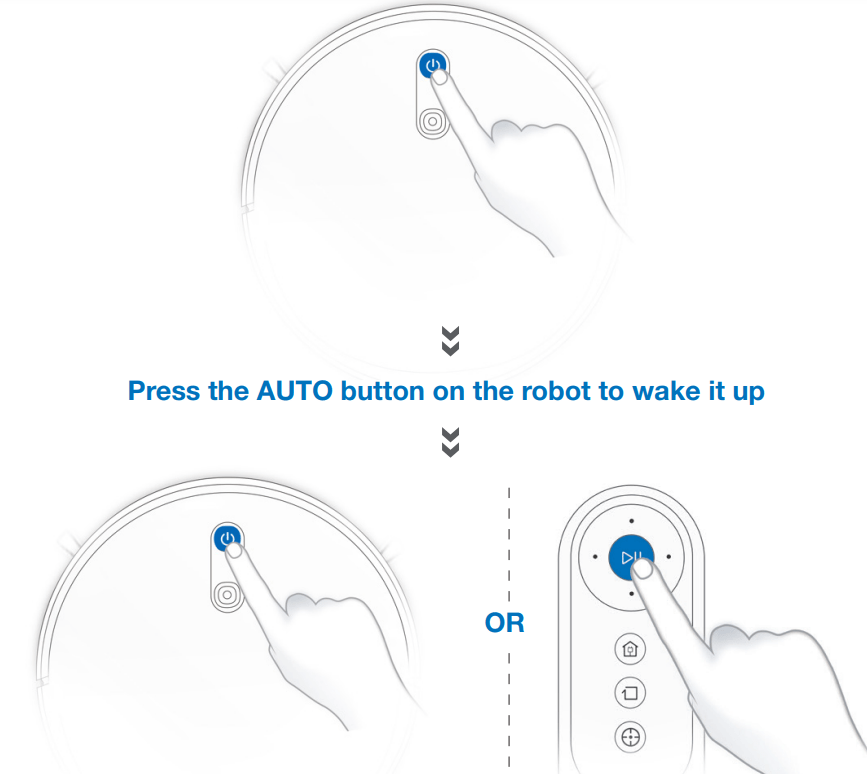
Note: The robot’s Control Panel stops glowing after the robot is paused for a few minutes. Press the AUTO Mode Button on the robot to wake up the robot.
2. Wake Up
3. Power OFF
Note: When the robot is not working, it is recommended to keep it switched ON and charging.
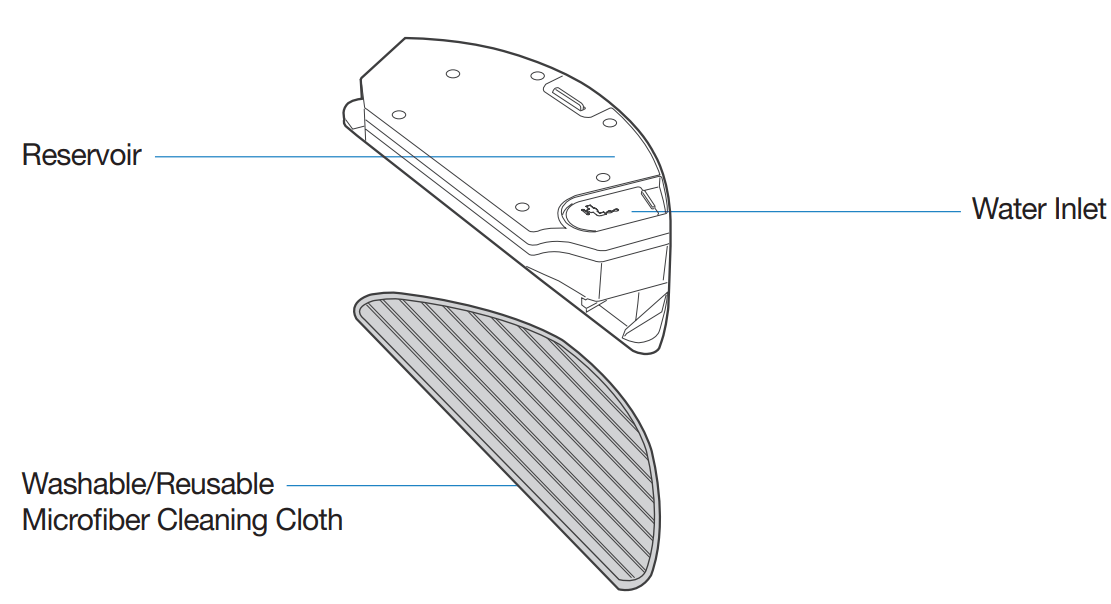
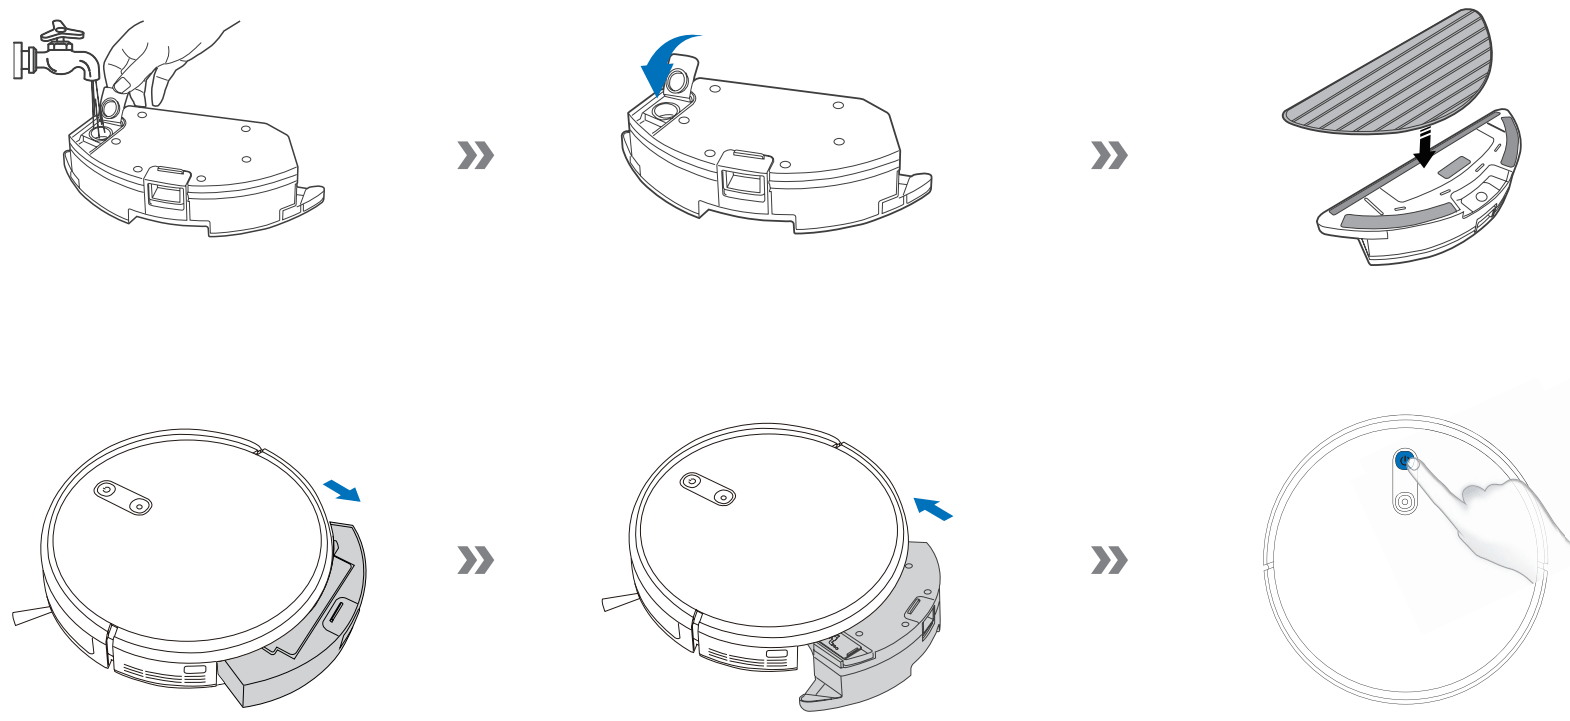
Optional Mopping System
Note: Empty the Reservoir and remove the Cleaning Cloth Plate before cleaning on carpet. When using the mopping system, fold area rug edges under themselves so the robot will avoid the rug. Be sure to use only water, and do not put washer fluid or any other cleaning solution in the Reservoir.
Note: After the robot finishes mopping, empty any remaining water from the Reservoir.
yeedi App
To enjoy all available features, it is recommended to control your Robot via the yeedi App.
Before you start, make sure that:
Your mobile phone is connected to a Wi-Fi network.
The 2.4GHz band wireless signal is enabled on your router.
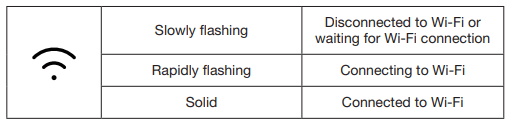
The Wi-Fi indicator light on Robot is slowly flashing.
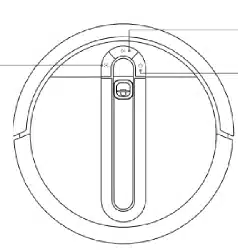
Wi-Fi Indicator Light
Tips: If you have any problems during the Wi-Fi setup process, refer to the Troubleshooting > Wi-Fi Connection section in this manual.
Maintenance
Before performing cleaning and maintenance tasks on the robot, turn the robot OFF and unplug the Charging Dock.
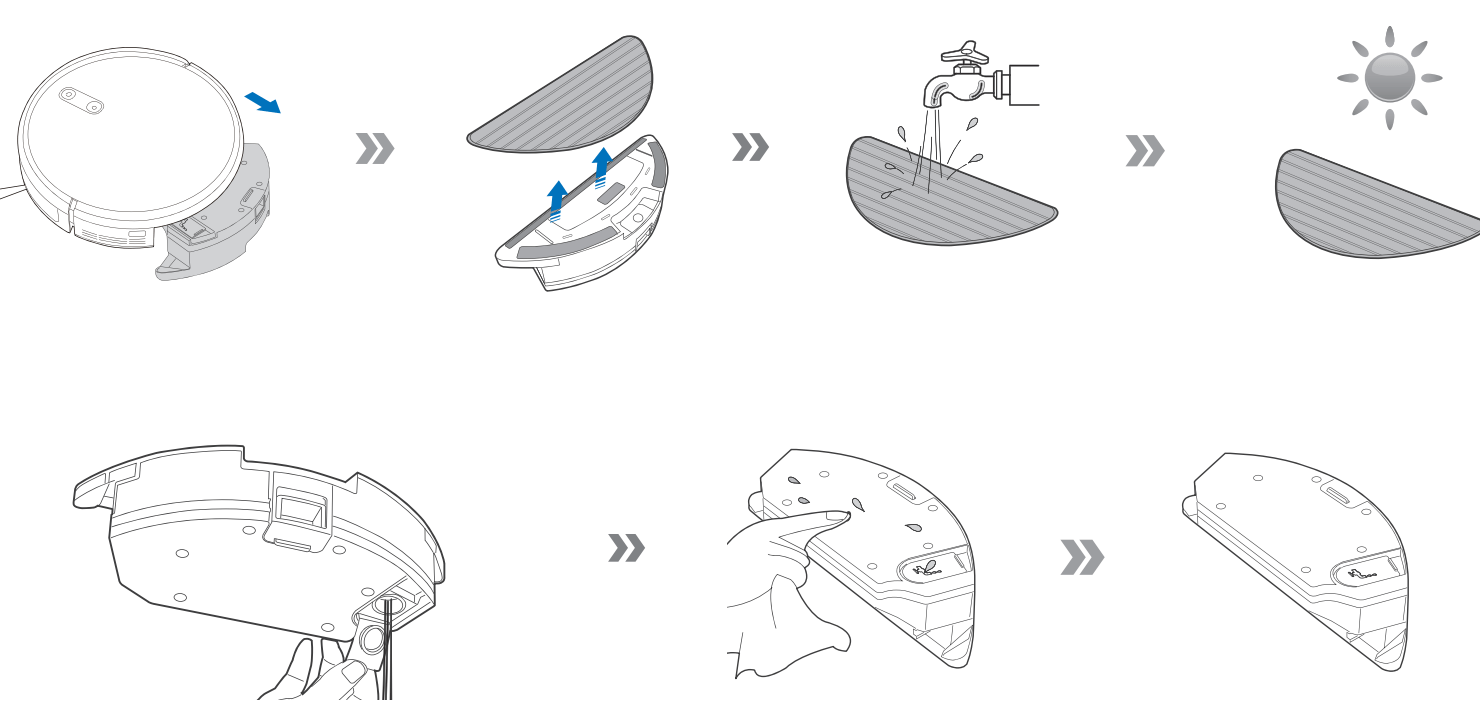
Optional Mopping System
Before performing cleaning and maintenance tasks on the robot, turn the robot OFF and unplug the Docking Station.
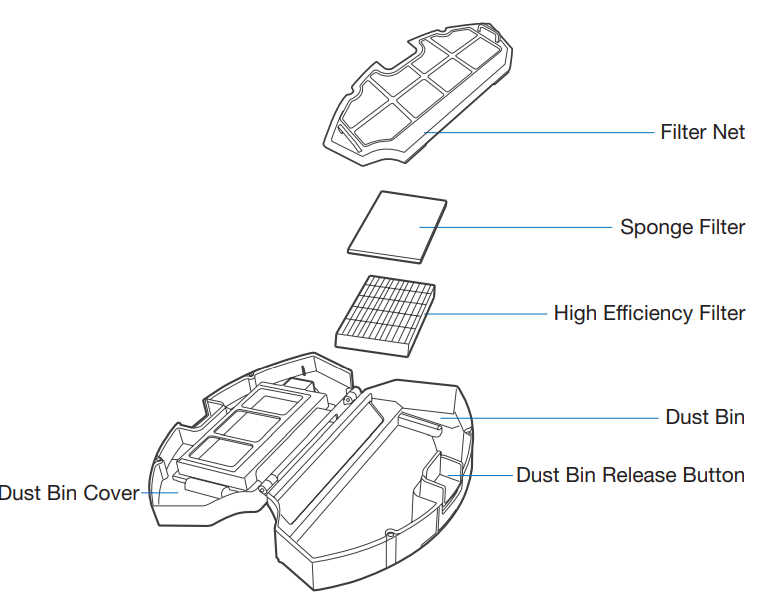
Dust Bin and Filters
Dust Bin
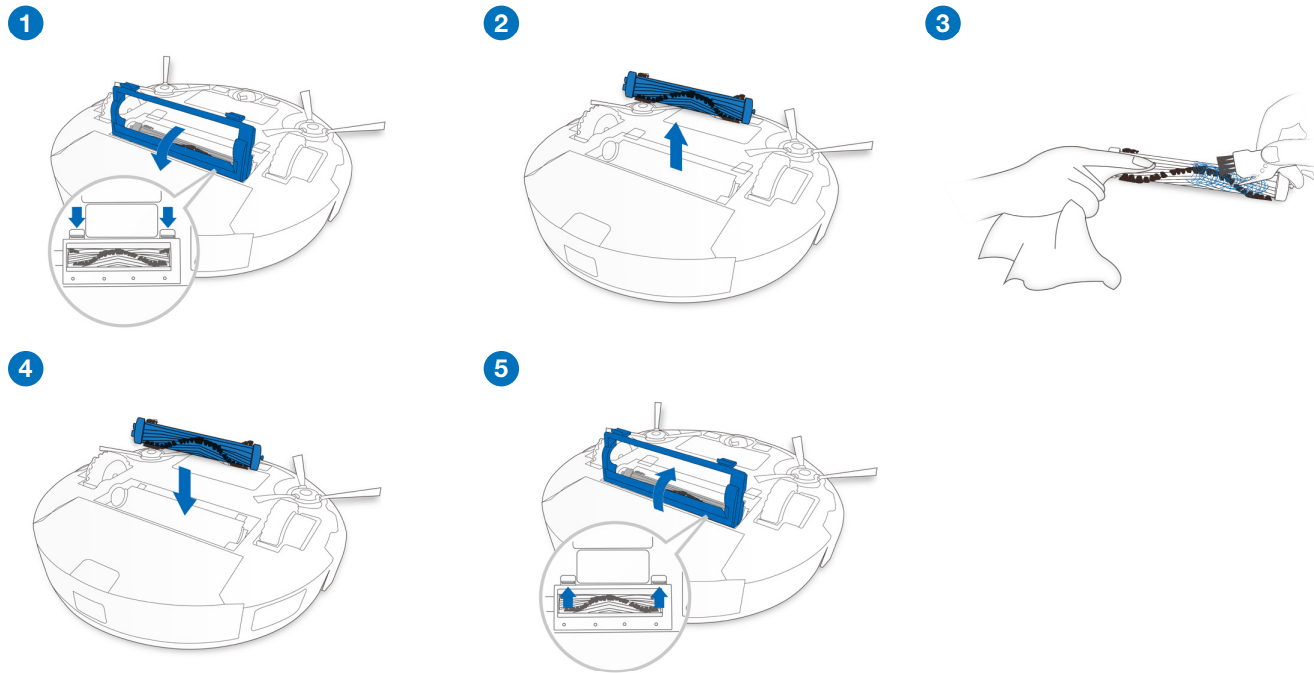
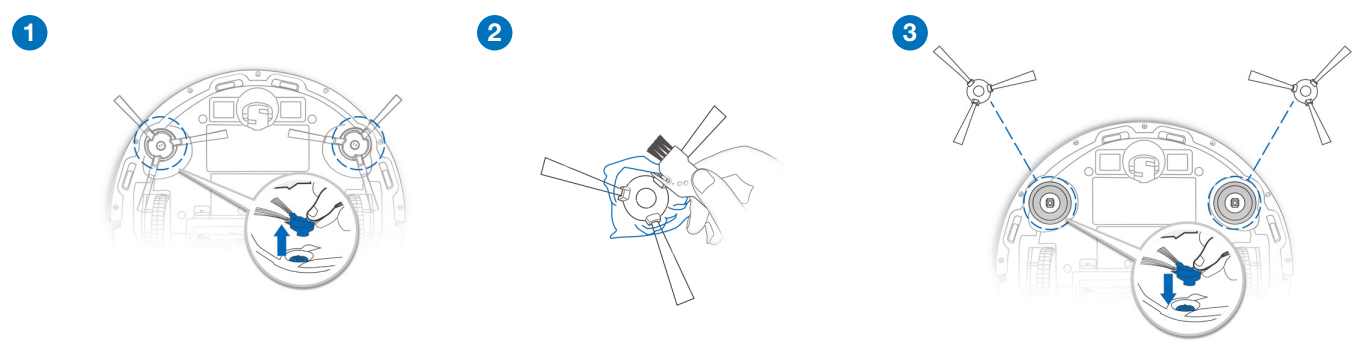
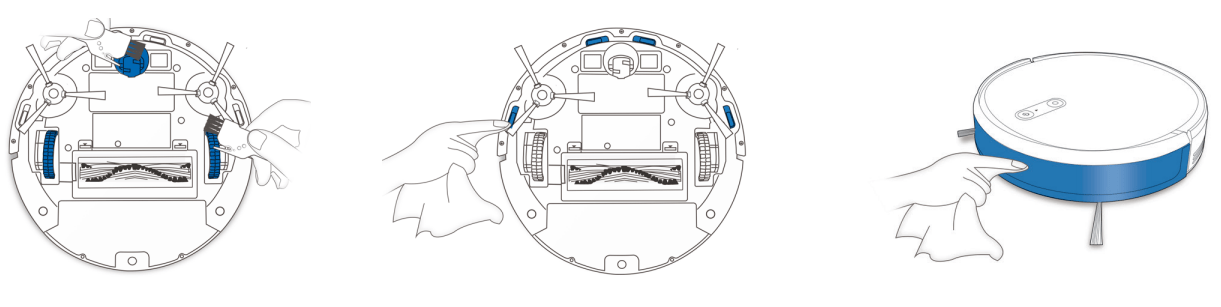
Main Brush and Side Brushes
Note: A Multi-Function Cleaning Tool is provided for easy maintenance. Handle with care, this cleaning tool has sharp edges.
Main Brush
Side Brushes
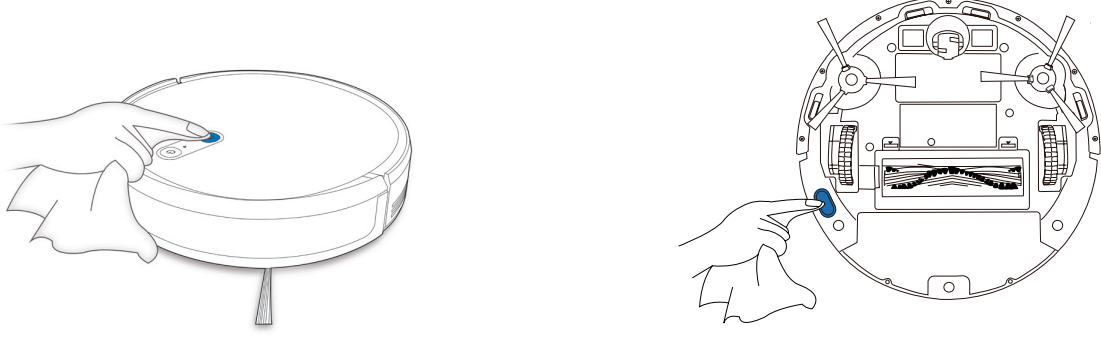
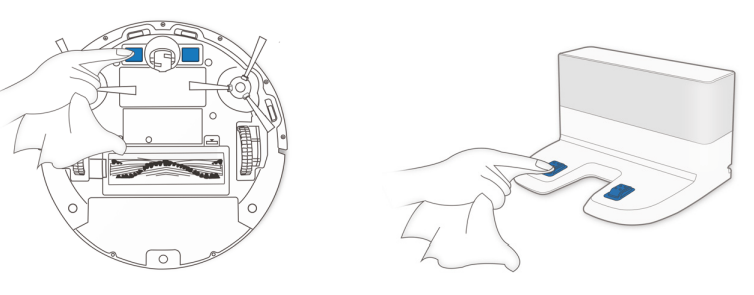
Other Components
Note: Before cleaning the robot’s Charging Contacts and Docking Station Pins, turn the robot OFF and unplug the Docking Station.
Regular Maintenance
To keep the robot running at peak performance, perform maintenance tasks and replace parts with the following frequencies:
Robot Part
Maintenance Frequency
Replacement Frequency
Side Brush
Once every 2 weeks
Every 3-6 months
Main Brush
Once per week
Every 6-12 months
Sponge Filter/ High Efficiency Filter
Once per week
Every 3-6 months
Universal Wheel Anti-Drop Sensors Bumper Charging Contacts Docking Station Pins
Once per week
/
A multi-function Cleaning Tool is provided for easy maintenance. Handle with care, this cleaning tool has sharp edges.
Note: YEEDI manufactures various replacement parts and fittings. Please contact Customer Service for more information on replacement parts.
Indicator Light and Alarm Sounds
Indicator Light
Scenario
Indicator Light
The robot is cleaning
AUTO Mode Button glows a solid WHITE
The robot is charging
AUTO Mode Button flashes WHITE
The robot has low battery
AUTO Mode Button glows a solid RED
The robot has a problem
AUTO Mode Button flashes RED
Programmed Cleaning Pattern is enabled
Cleaning Mode Switch Indicator lights up
Troubleshooting
Malfunction
Possible Causes
Solutions
The robot is not charging.
The robot is not switched ON.
Switch ON the robot.
The robot has not connected to the Docking Station.
Be sure that the robot’s Charging Contacts have connected to the Docking Station Pins.
The battery is completely discharged.
Re-activate the battery. Switch ON the robot. Place the robot on the Docking Station by hand, remove after charging for 3 minutes, repeat 3 times; then charge normally.
The robot cannot return to the Docking Station.
The Docking Station is not correctly placed.
Please refer to Section “Preparation” to place the Docking Station correctly.
The Docking Station is unplugged or moved manually during the cleaning.
Please make sure the Docking Station is plugged in and avoid move the Docking Station manually when the robot is cleaning.
The robot is working in a dark environment.
Make sure the rooms to be cleaned are well illuminated.
The robot is stuck by obstacles (including wires, carpet tassels, or electric fan bases, etc. ), or the door of the room where the Docking Station is placed is closed.
Please refer to Section “Notes Before Cleaning” to tidy up the space before using the robot.
The robot is paused for more than 60 minutes, or manually moved out of 1-meter radius of the original position during the cleaning.
It is suggested to pause the robot for no more than 60 minutes. When moving the robot, keep the robot within 1-meter radius of the original position. To ensure the cleaning efficiency, please try to avoid pausing or moving the robot during the cleaning.
The robot did not start cleaning from the Docking Station.
It is suggested to start the robot from the Docking Station.
The robot gets stuck while working and stops.
The robot is tangled with something on the floor (electrical wires, curtains, carpet fringing, etc.).
The robot will try various ways to free itself. If it is unsuccessful, manually remove the obstacles and restart.
The robot returns to the Docking Station before it has finished cleaning.
When the battery gets low, the robot automatically switches to Return to Charger Mode and returns to the Docking Station to recharge itself.
This is normal. No solution necessary
Working time varies according to floor surface, room complexity and the Cleaning Mode selected.
This is normal. No solution necessary
The robot does not clean the whole area.
The cleaning area is not tidy
Remove small objects from the floor and tidy up the cleaning area before the robot starts cleaning.
Technical Specifications
Model
K702G
Working Voltage
14.4V DC
Docking Station Model
CH1630RC
Rated Input
100-130V AC, 50/60Hz, 0.5A
Rated Output
20V DC, 0.8A
Remote Control Model
RC1633
Working Voltage
3 V DC
Note: Technical and design specifications may be changed for continuous product improvement.