Owner's Guide Vacuum Cleaner
About Your RoboVac
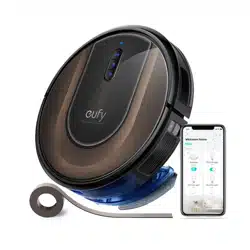
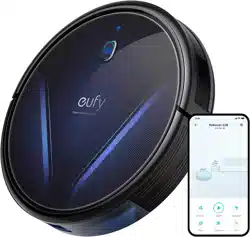
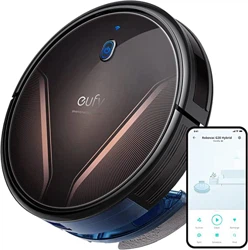
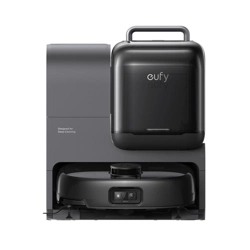
What's in the Box
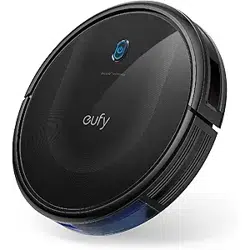
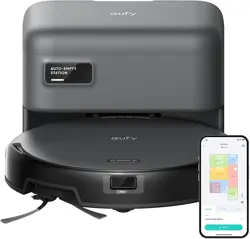
RoboVac
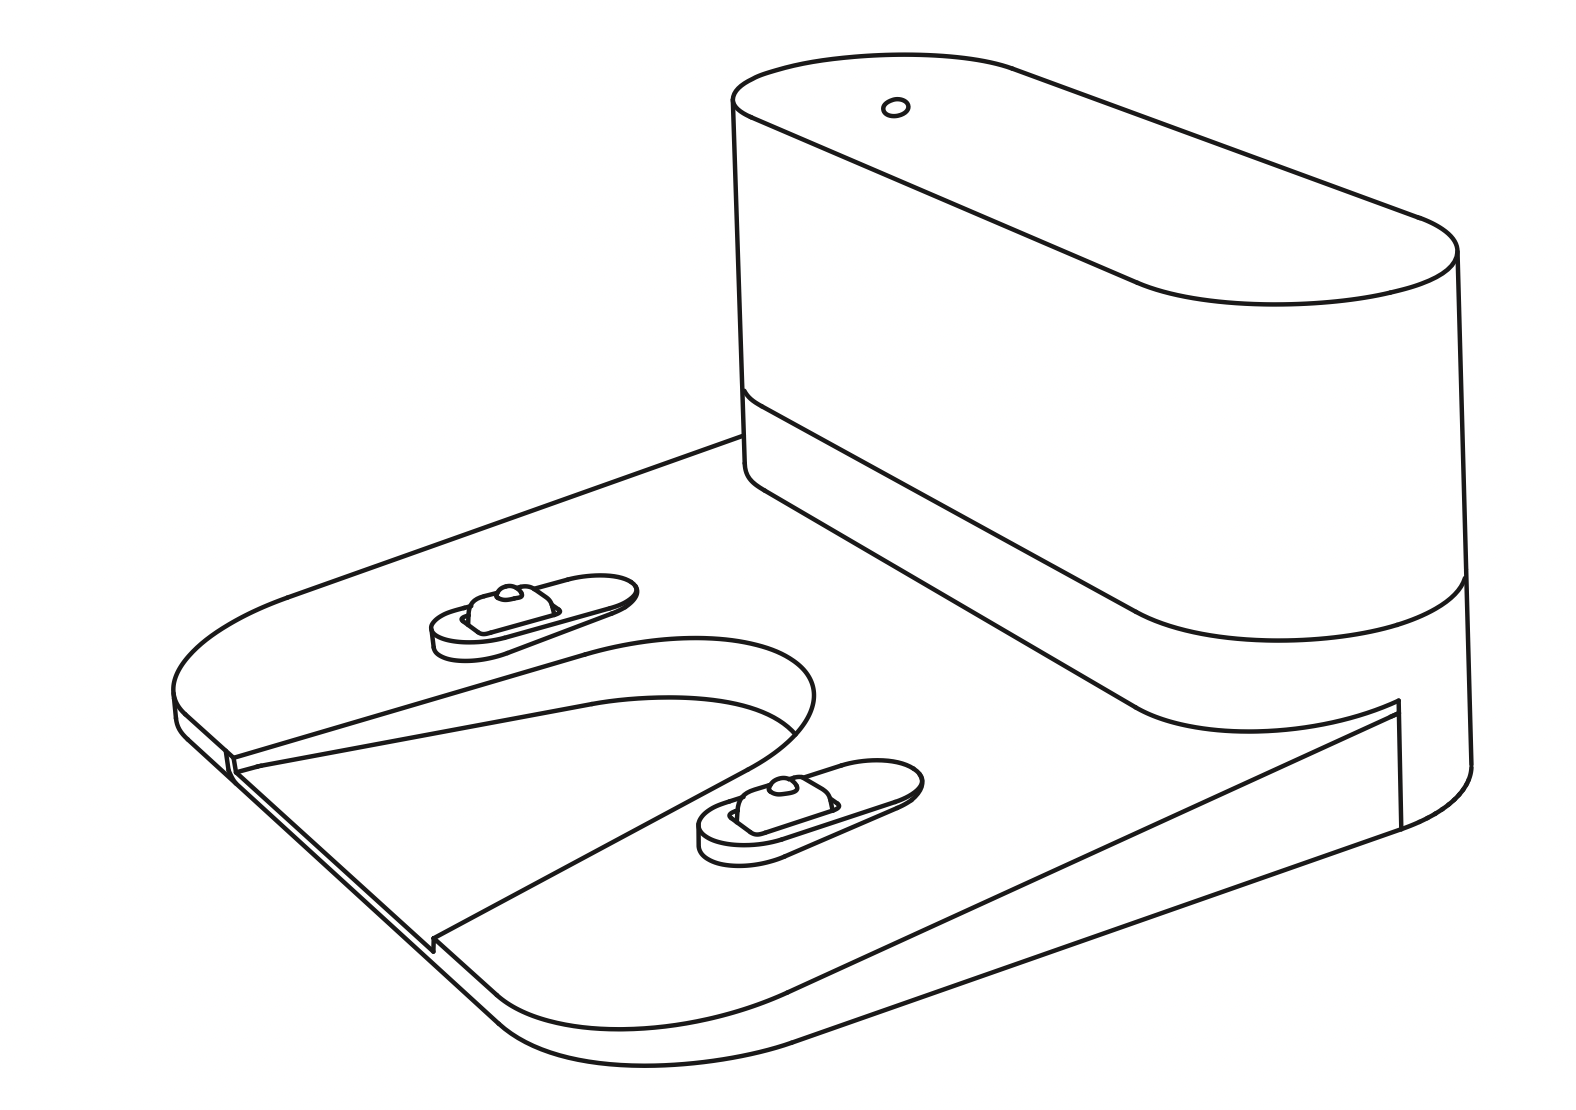
Charging Base
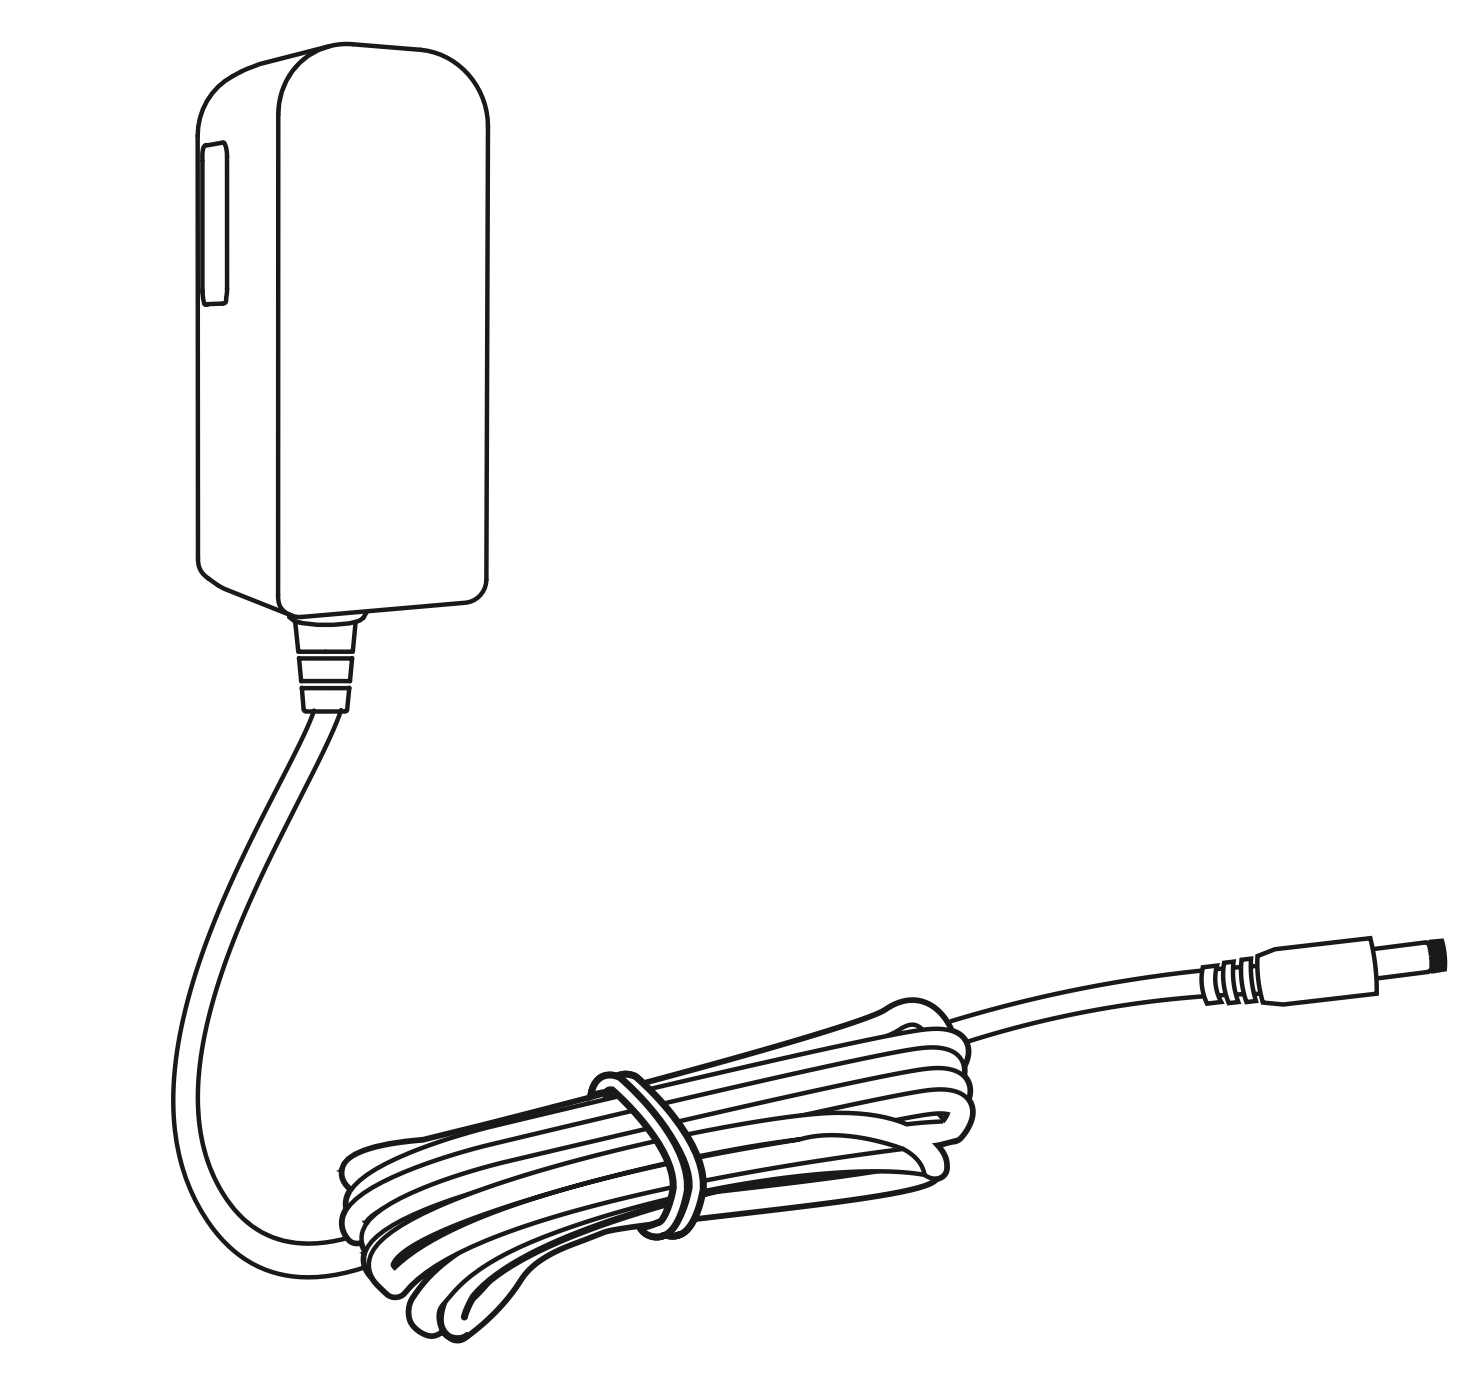
Power Adapter
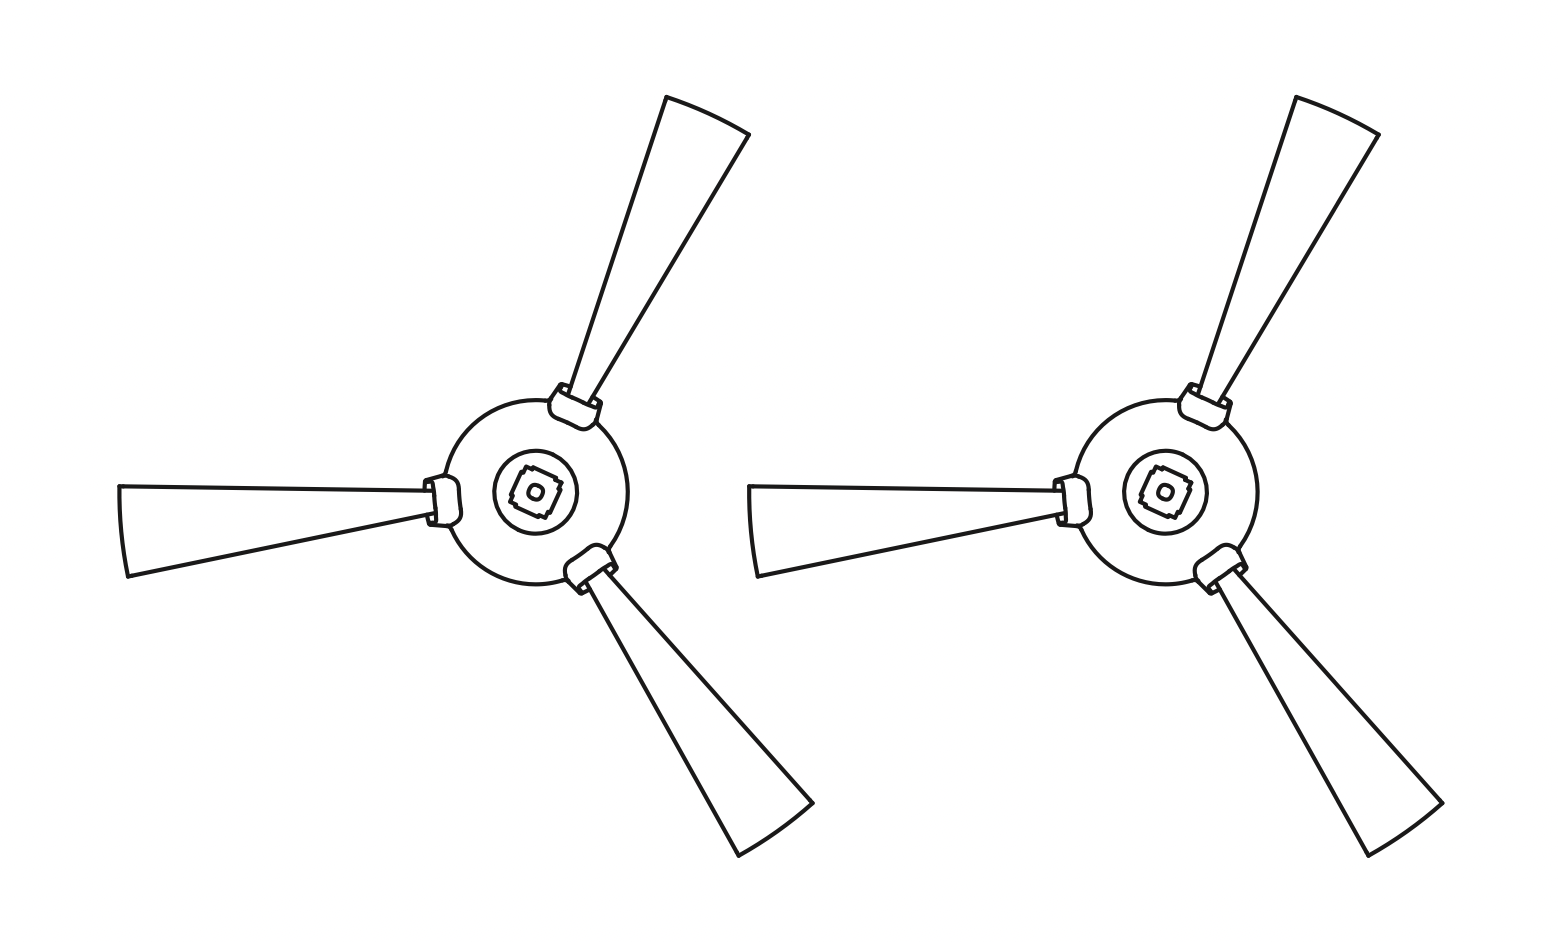
Additional Side Brushes (x2)
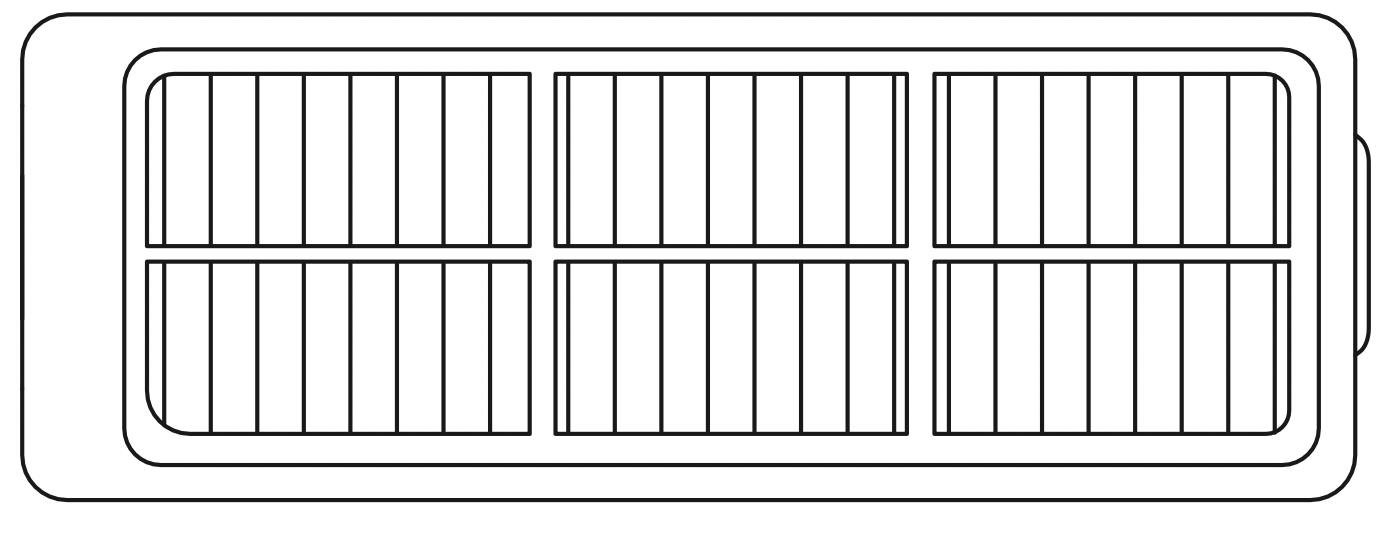
Additional Filter
Cleaning Tool
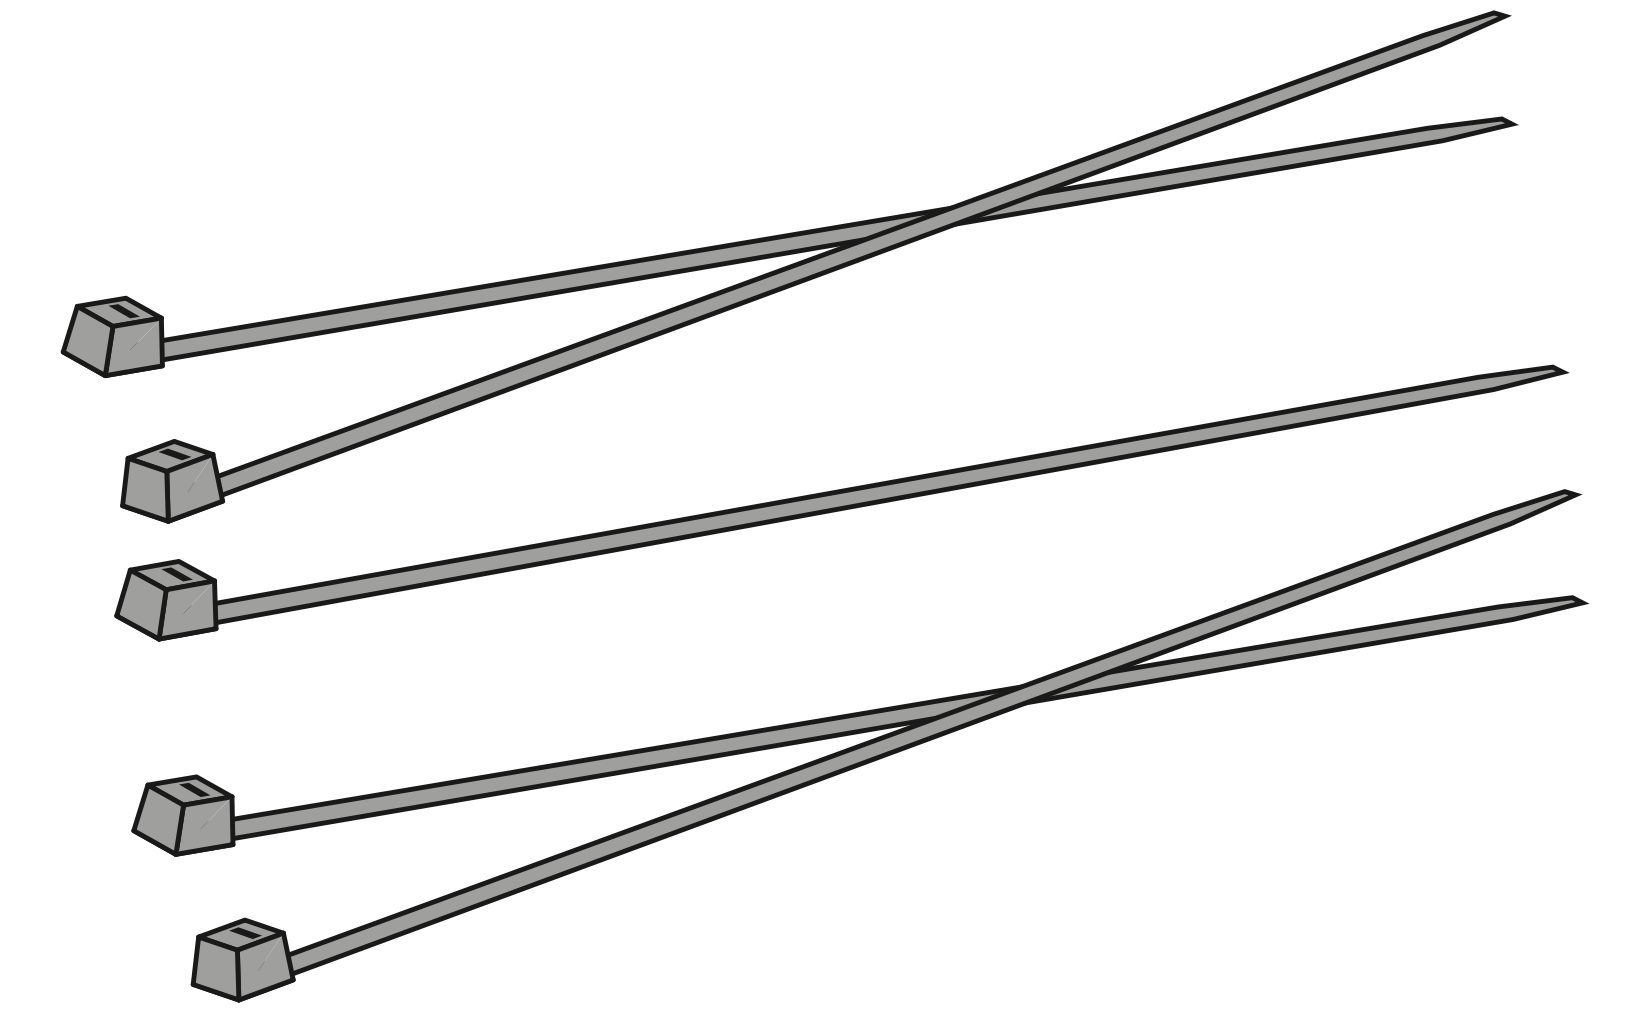
Cable Ties (x5)
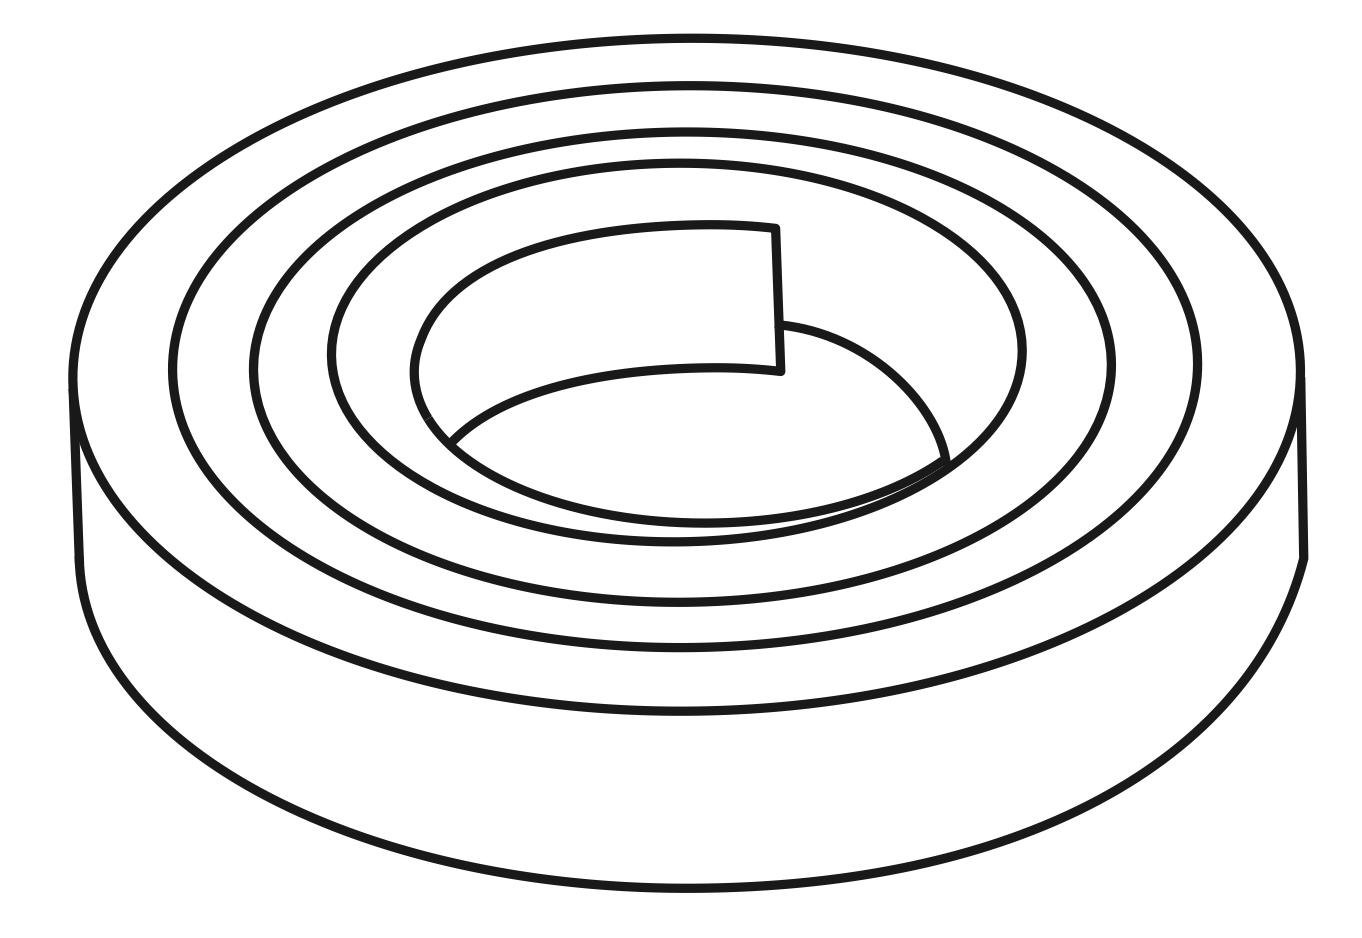
Boundary Strip 6.6 ft/ 2m Length
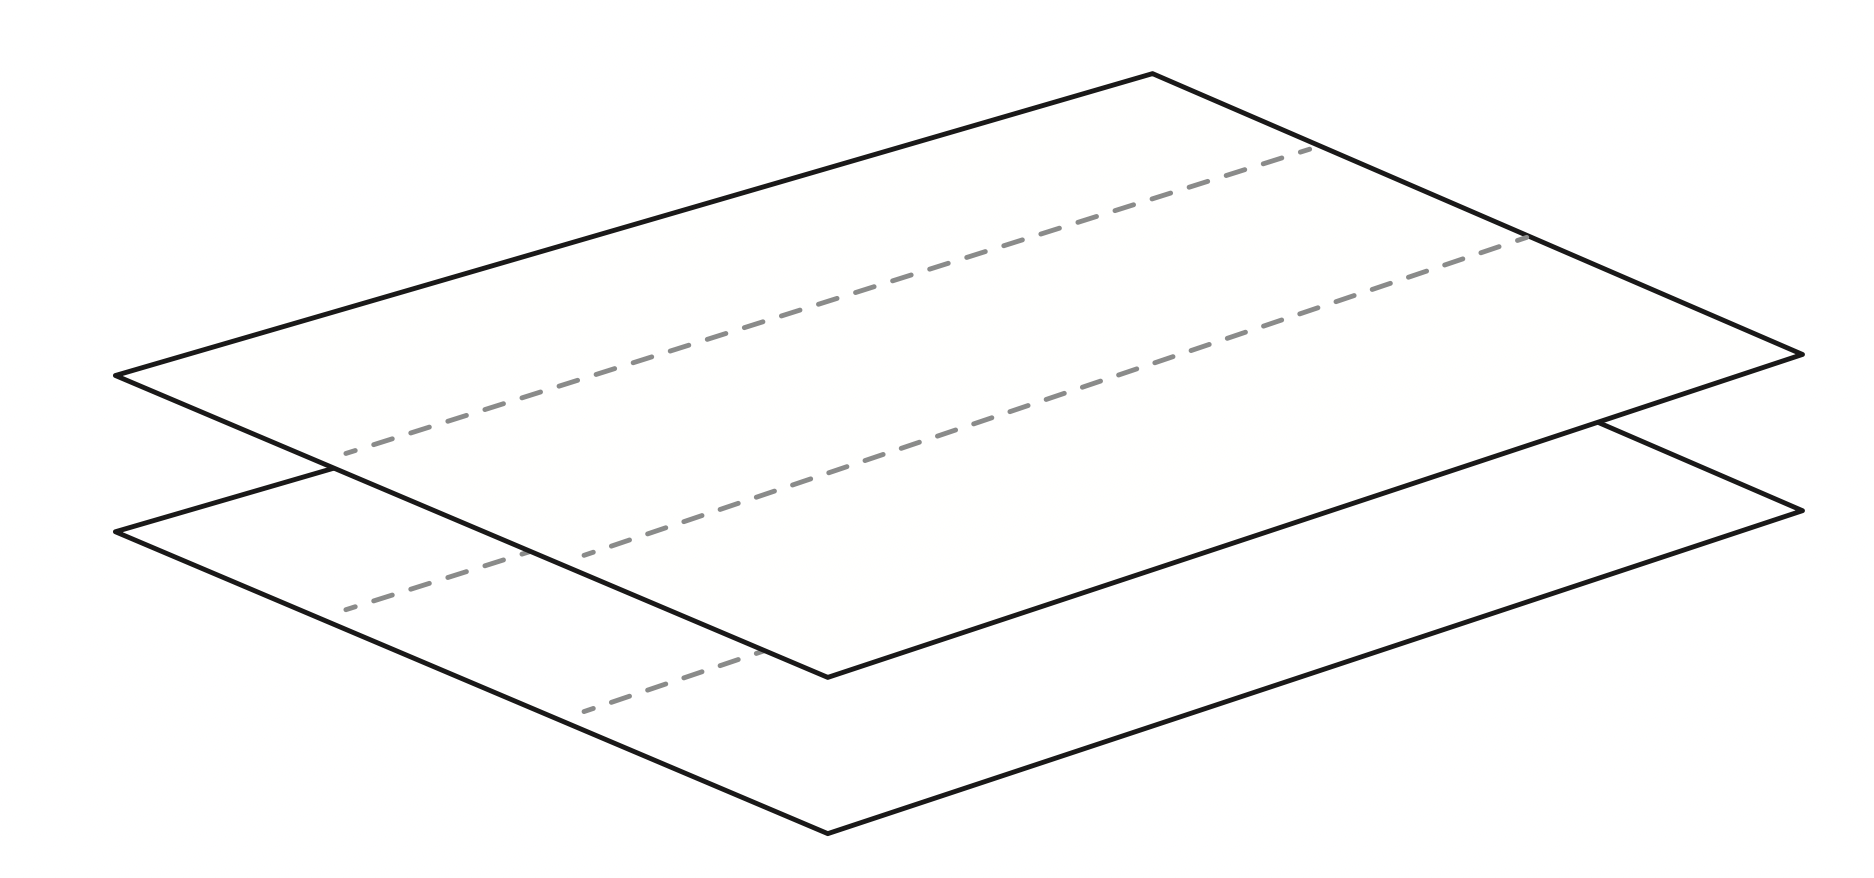
Adhesive Tapes (x2)
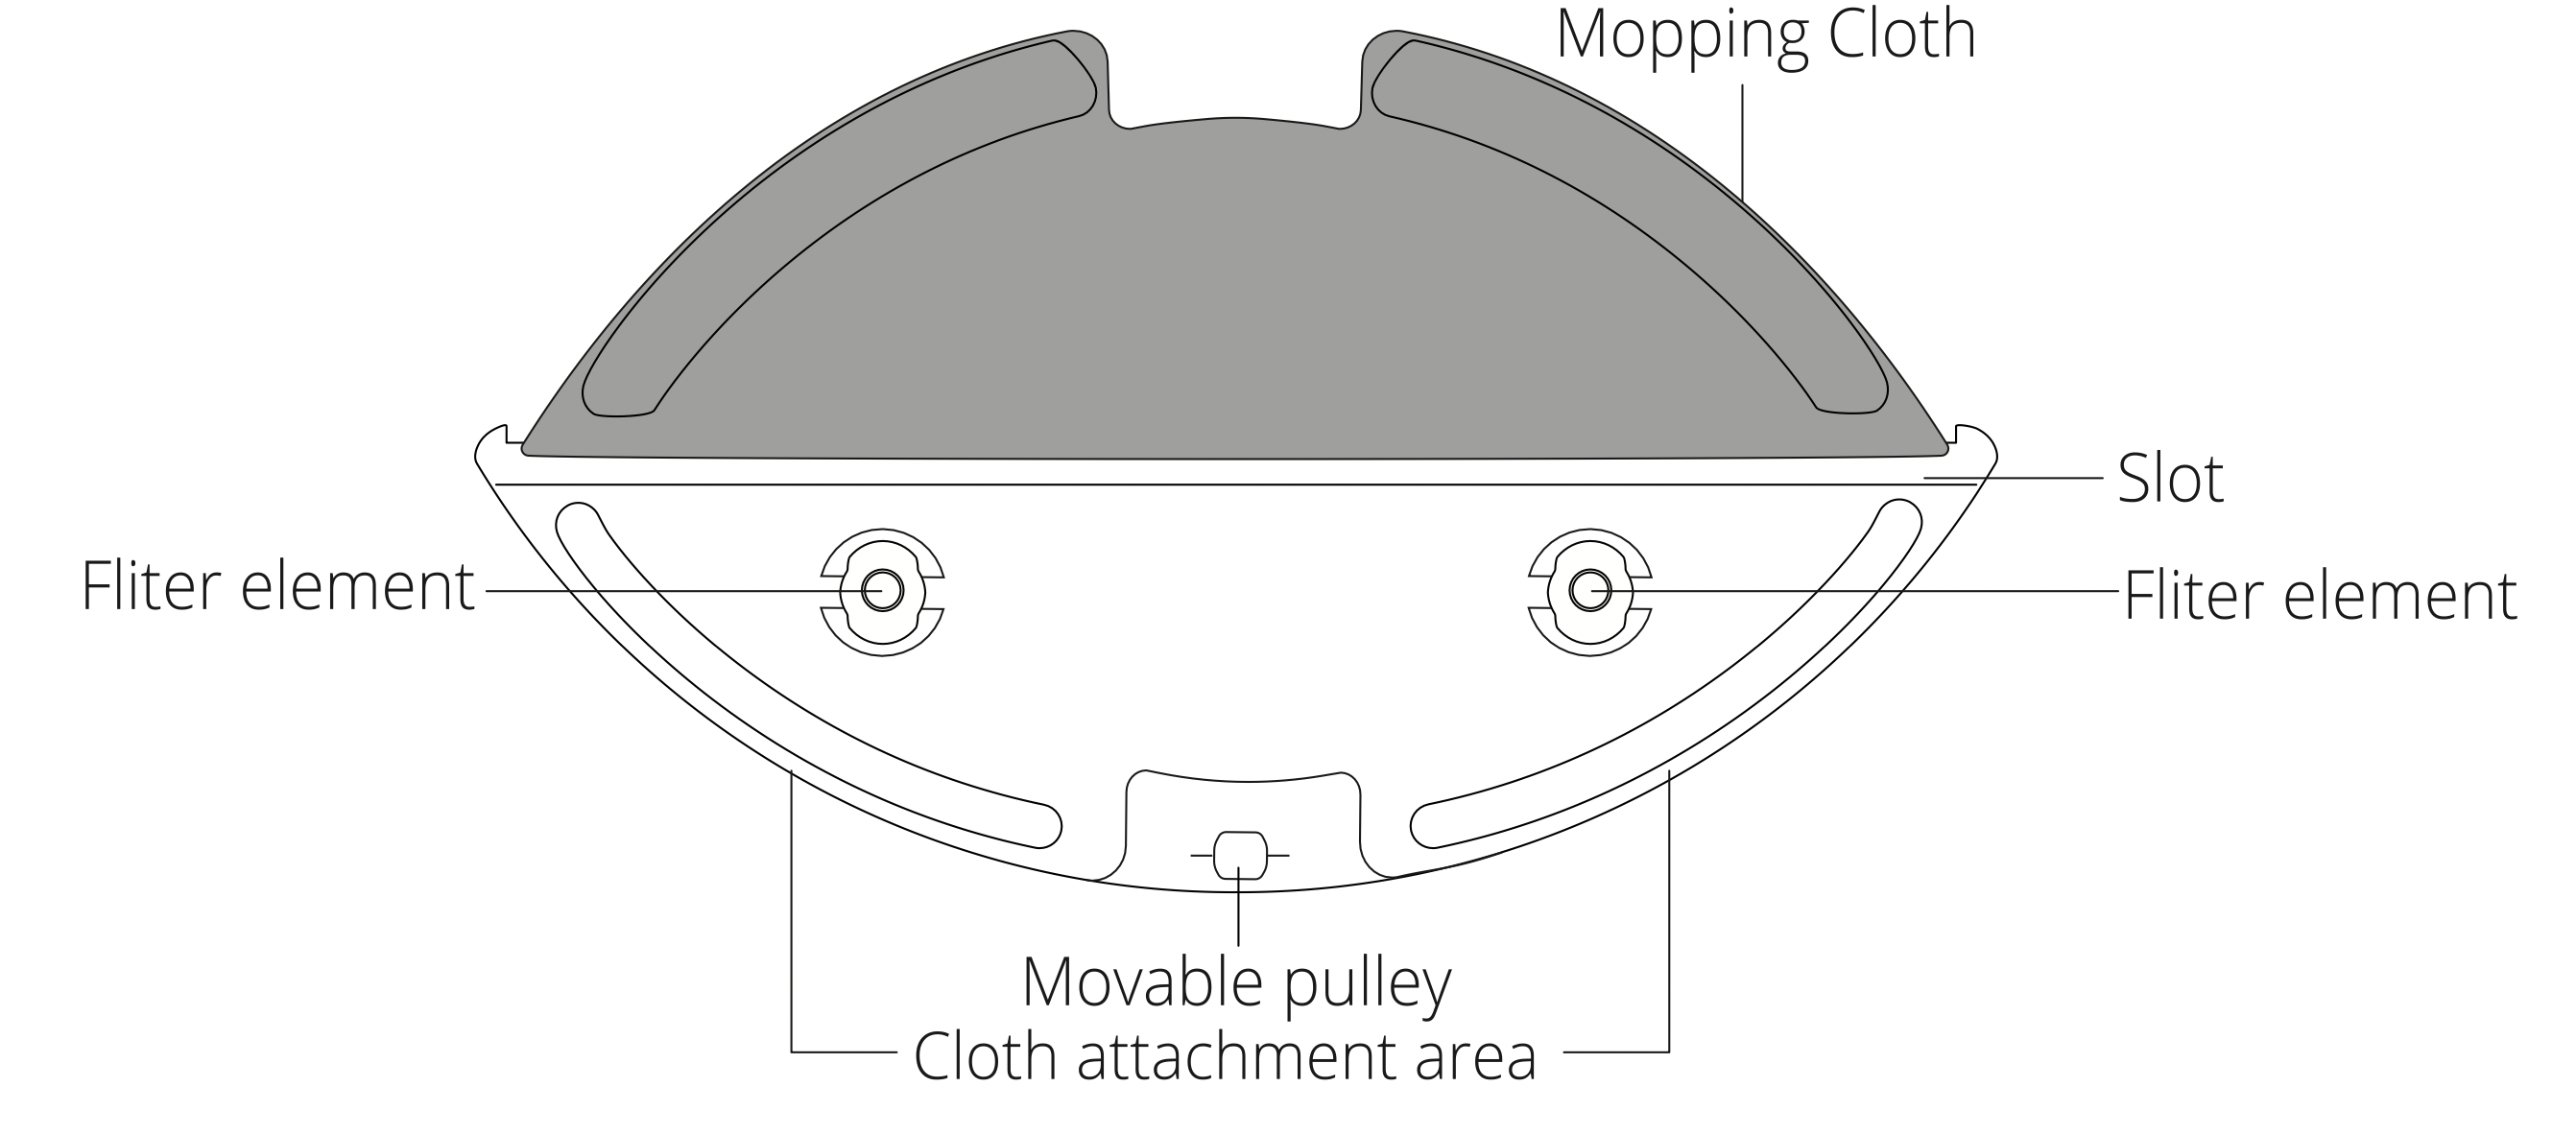
Water Tank
Disposable Mopping Cloths (x5)
Washable Mopping Cloth
Waterproof Pad

Filter Element (x4)
Owner's Manual & Other Documents
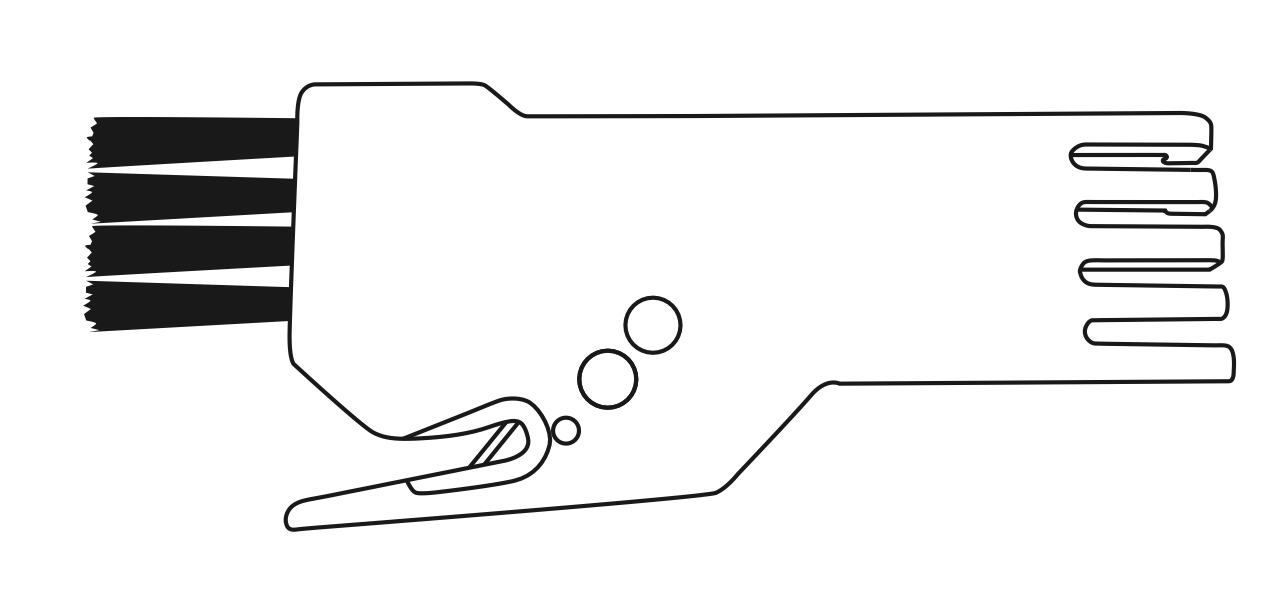
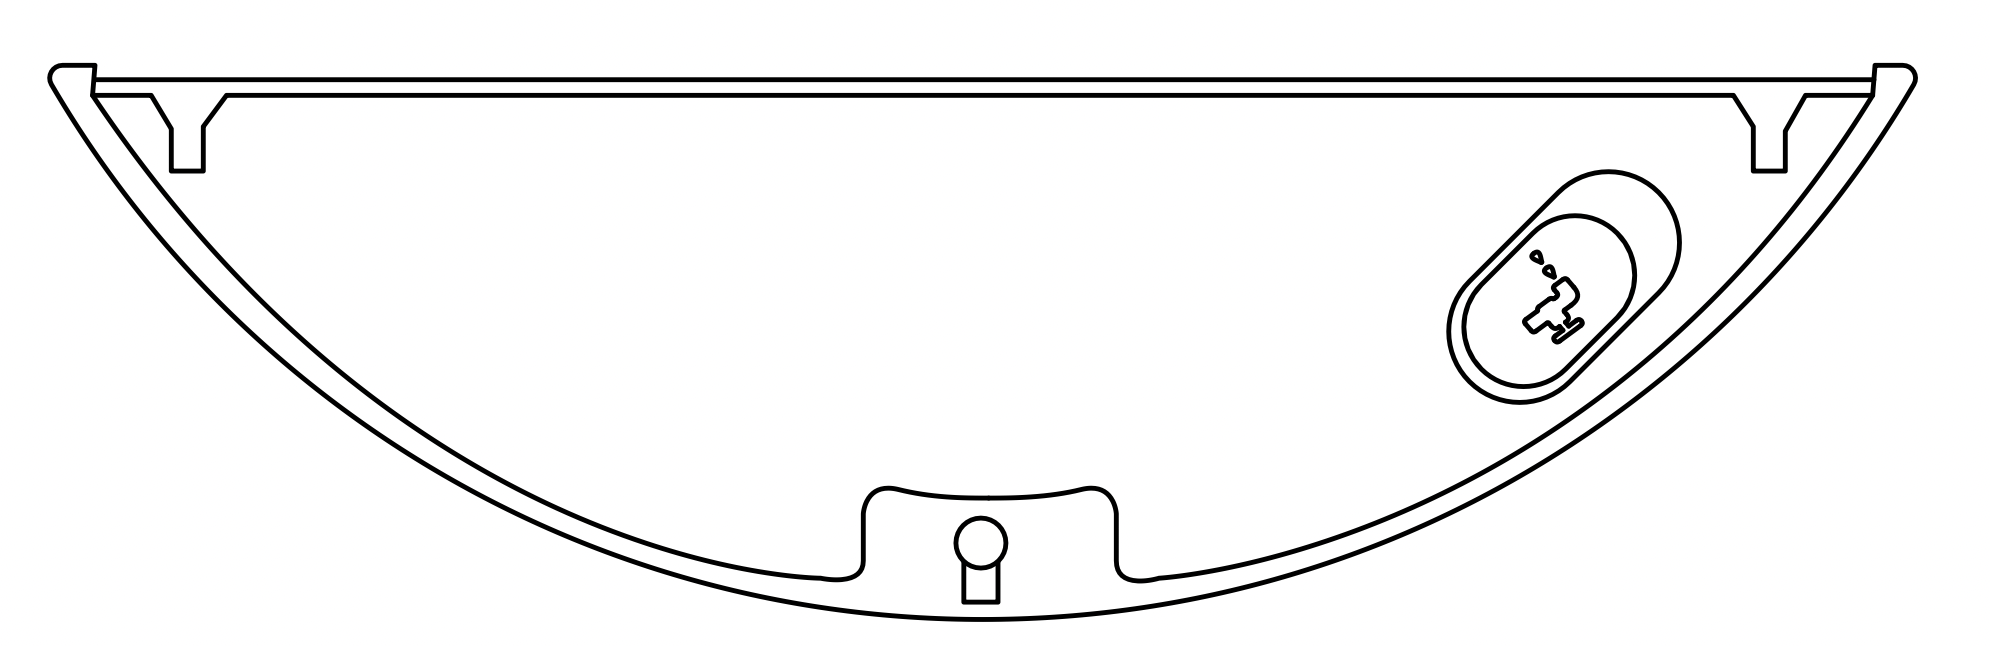
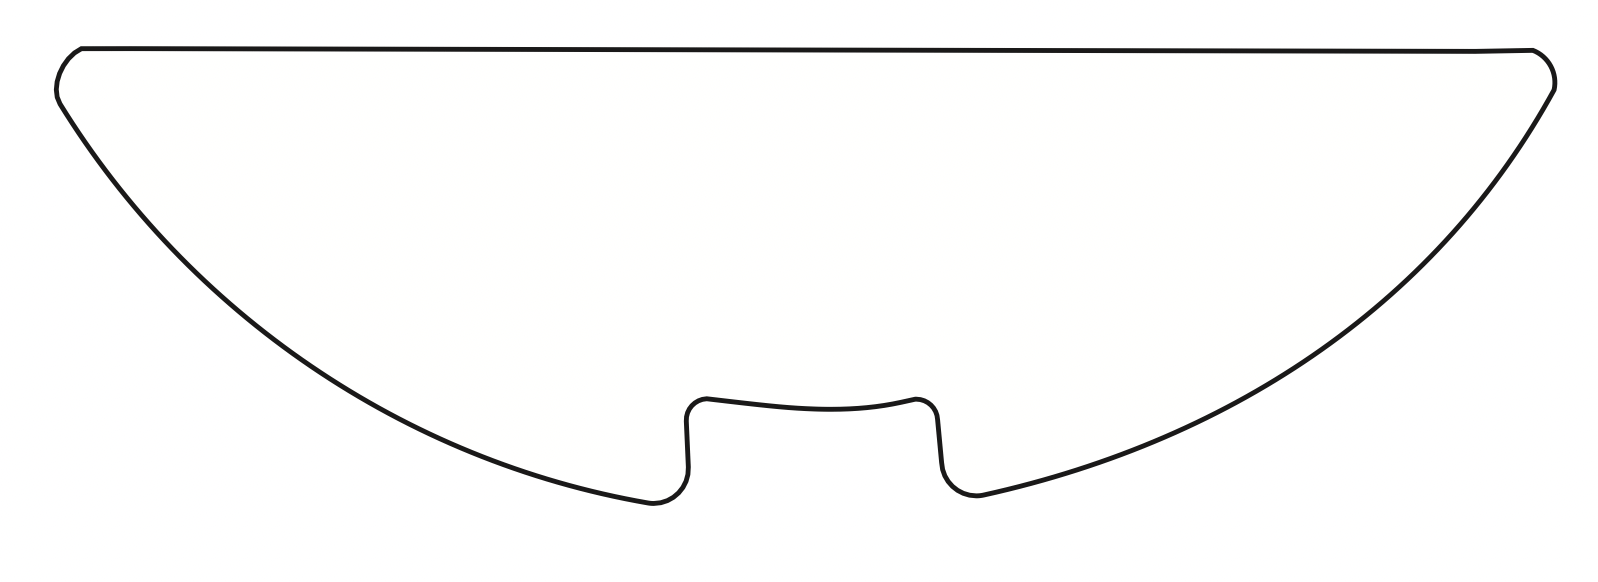
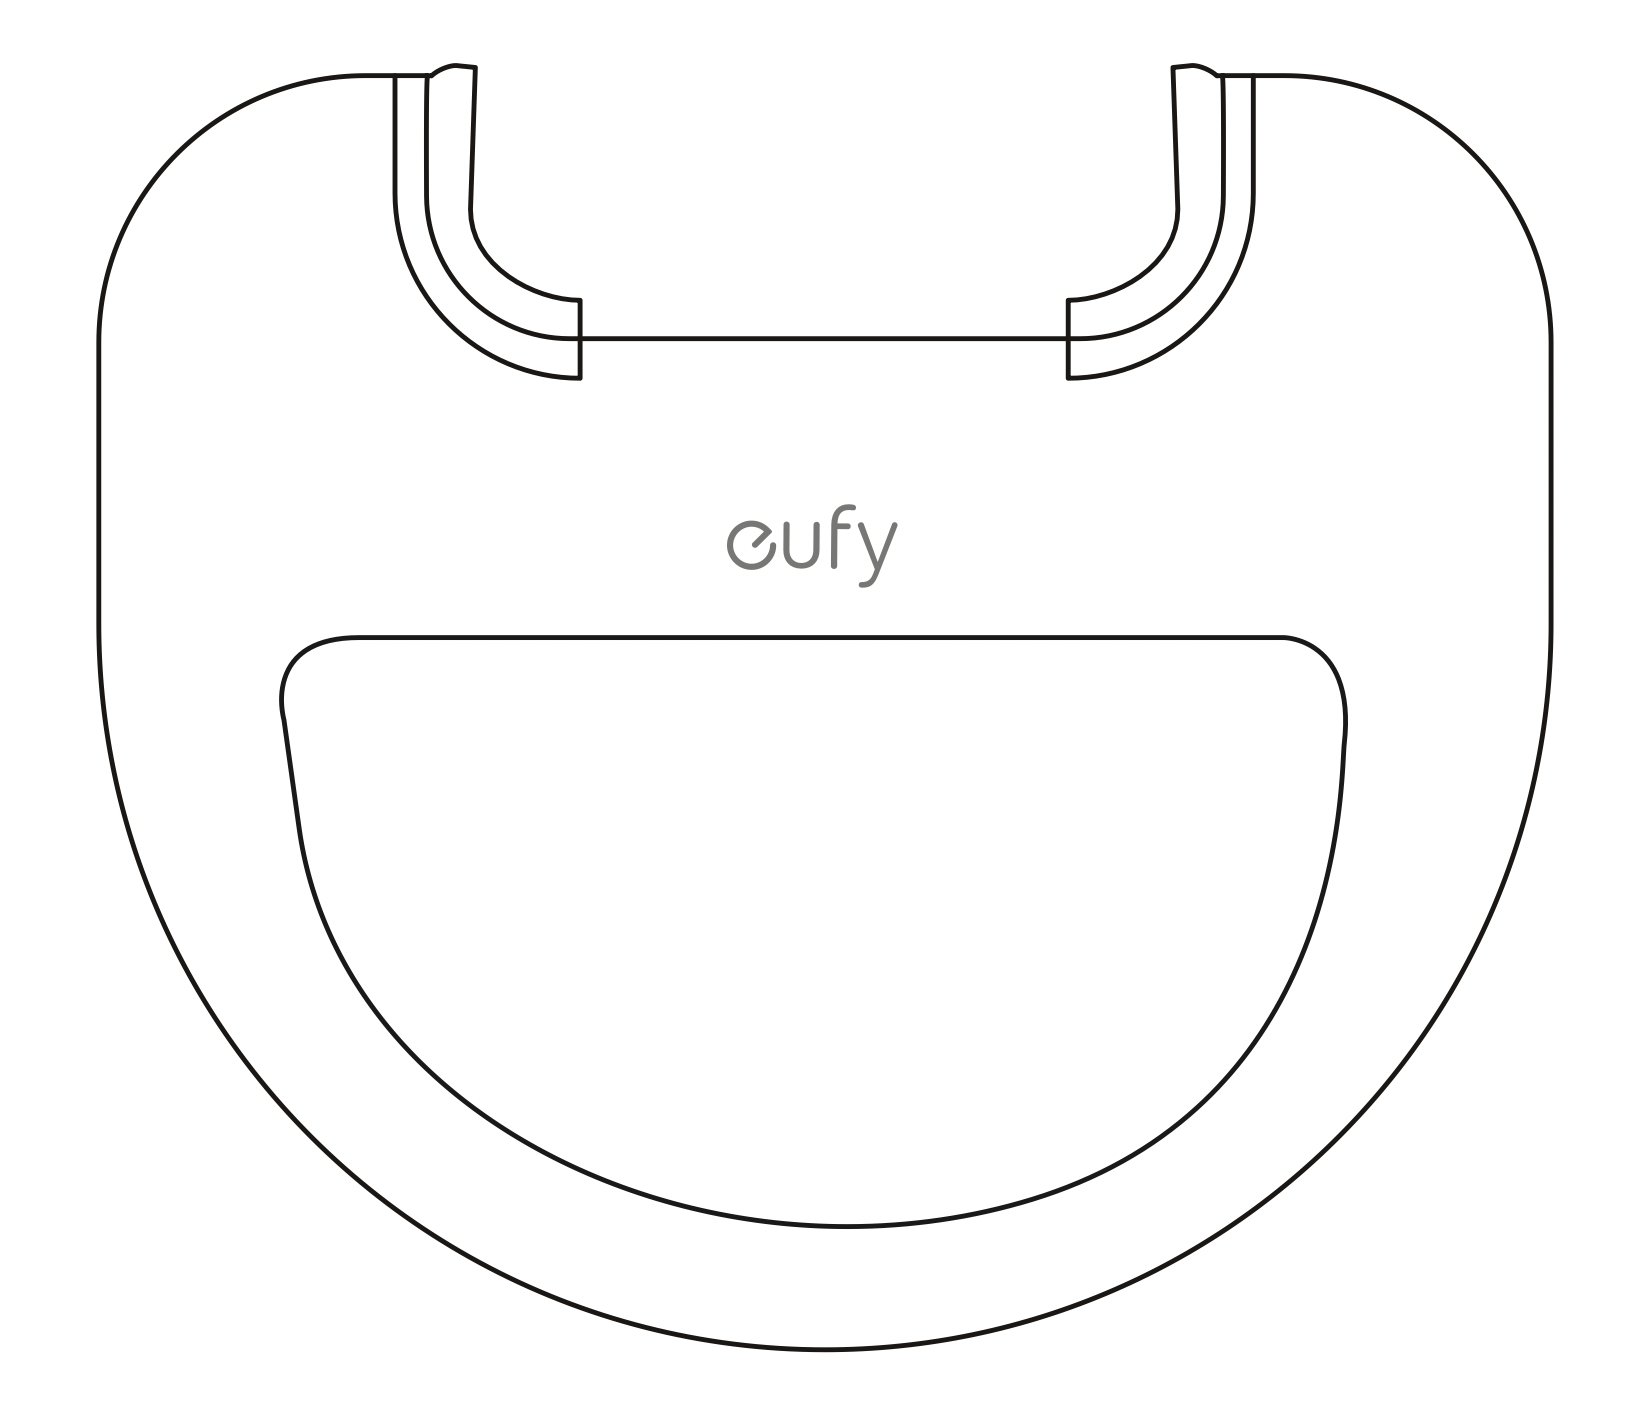
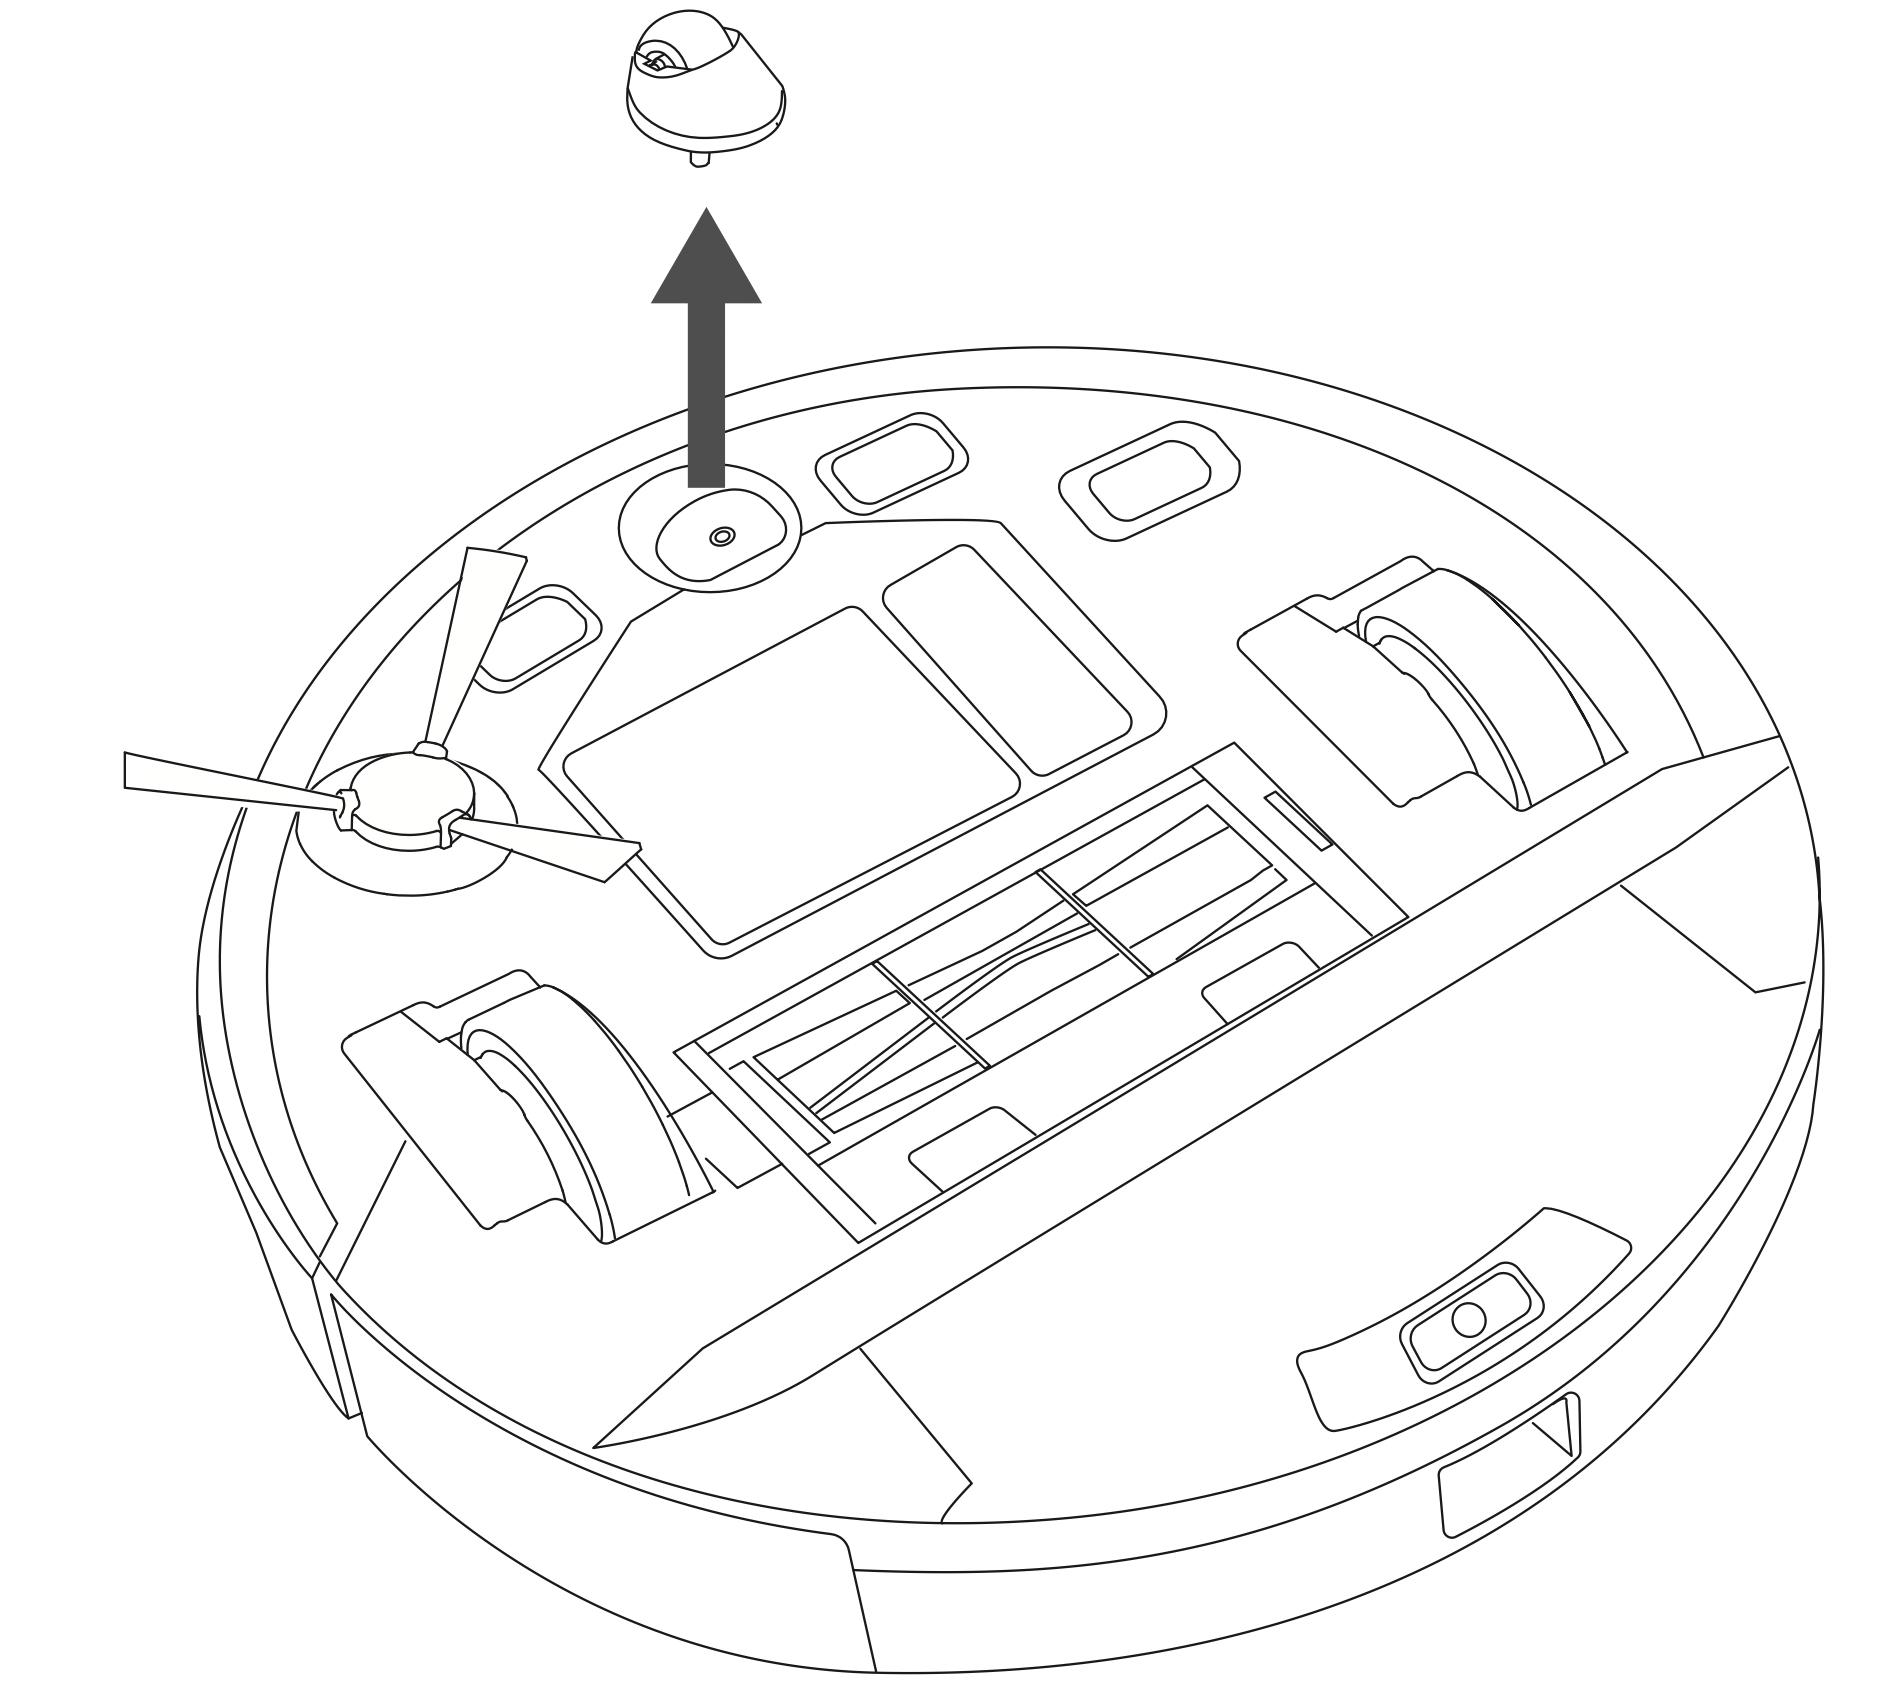
RobotVac Anatomy
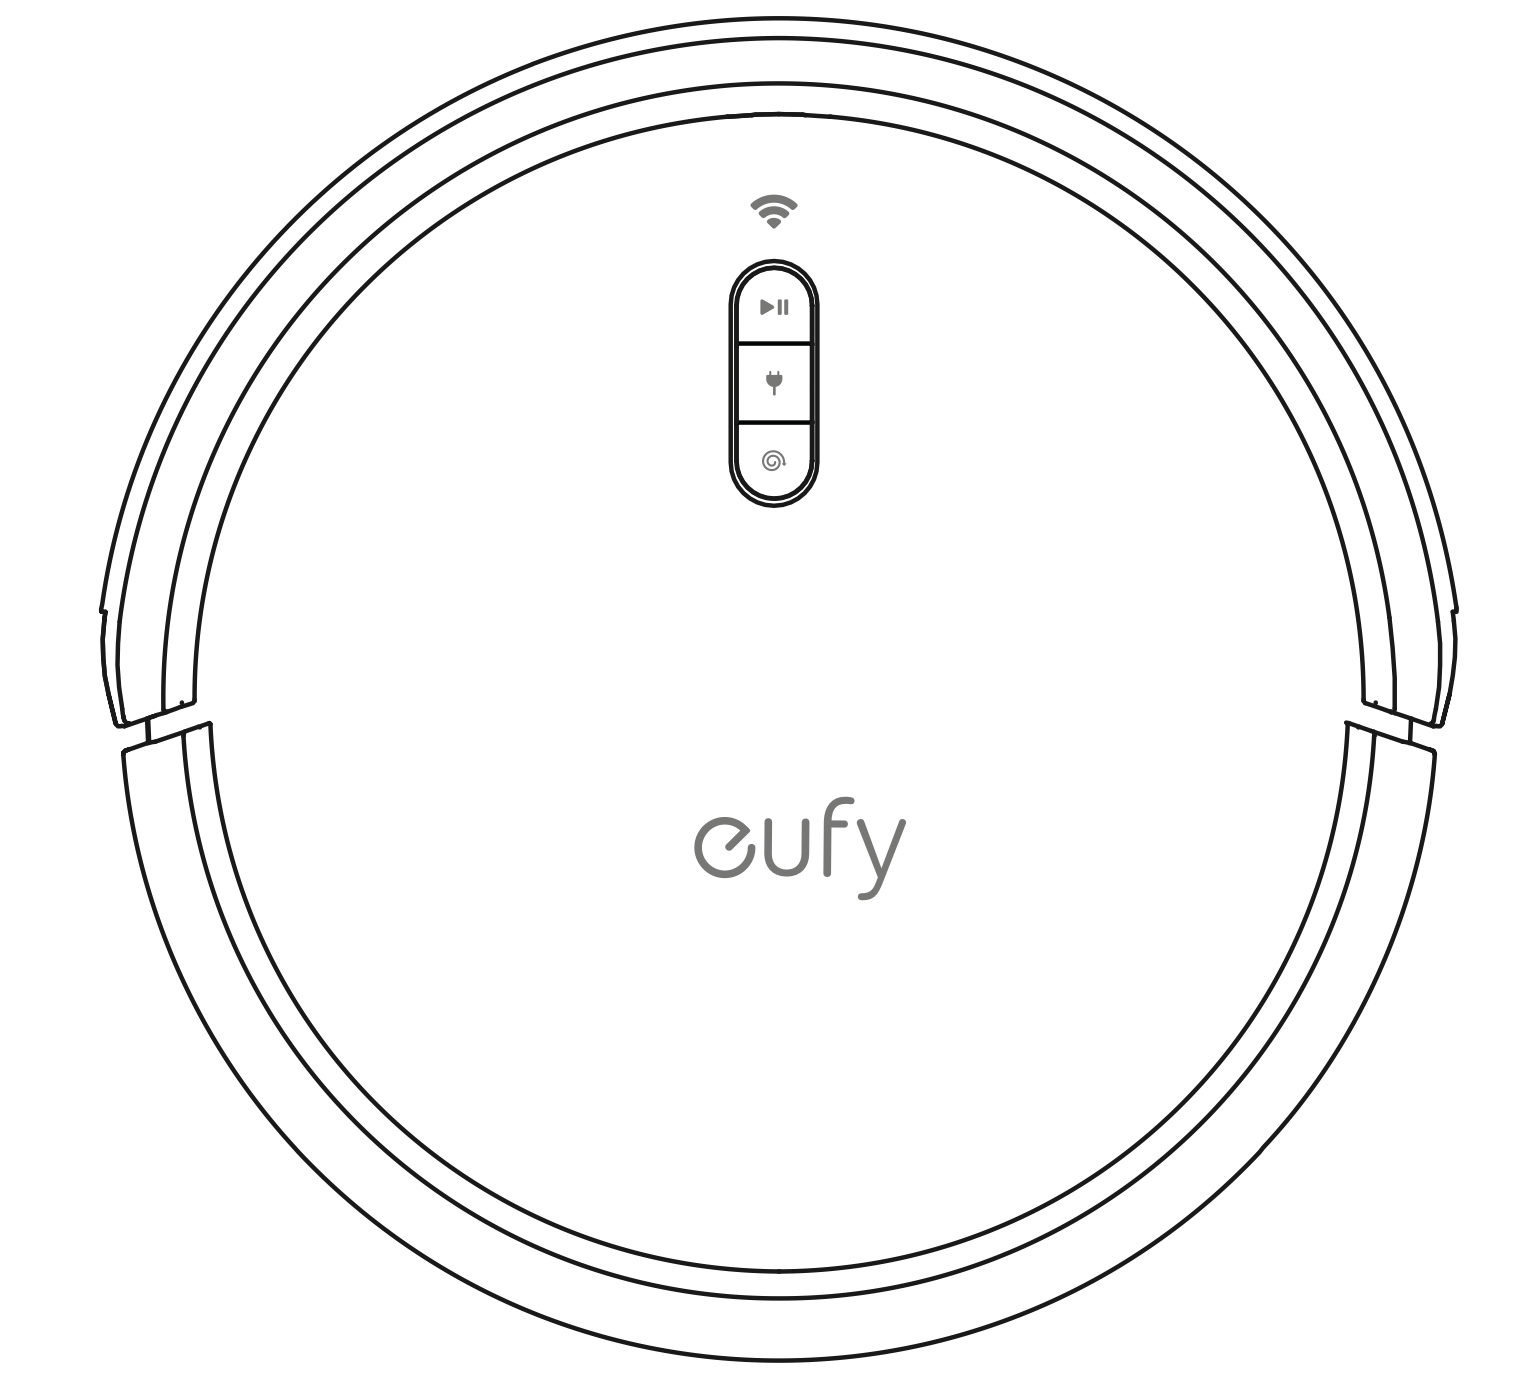
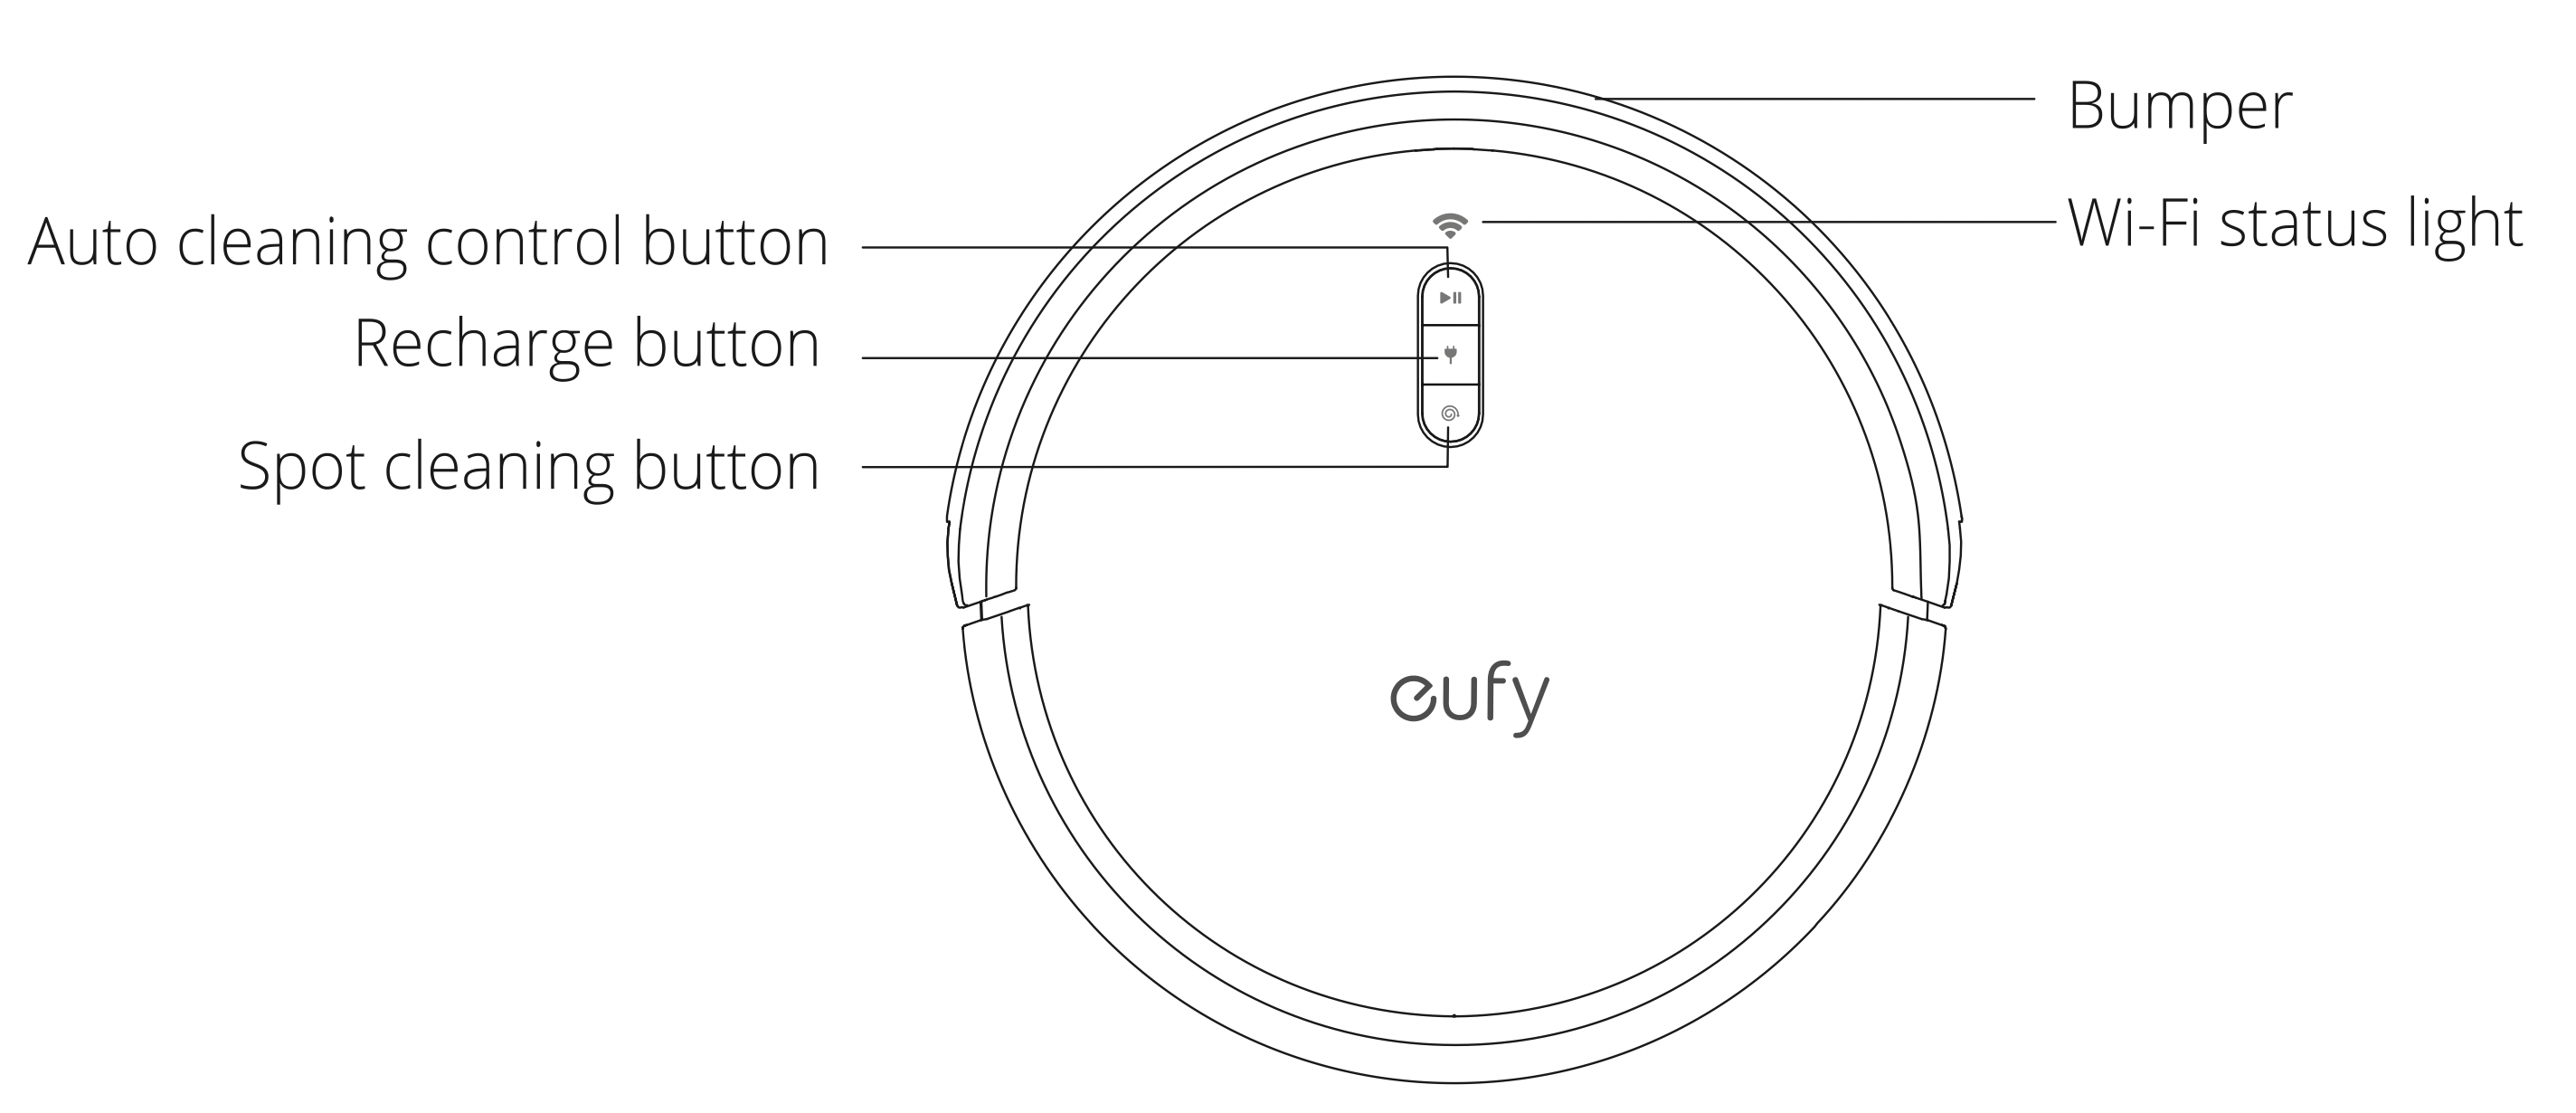
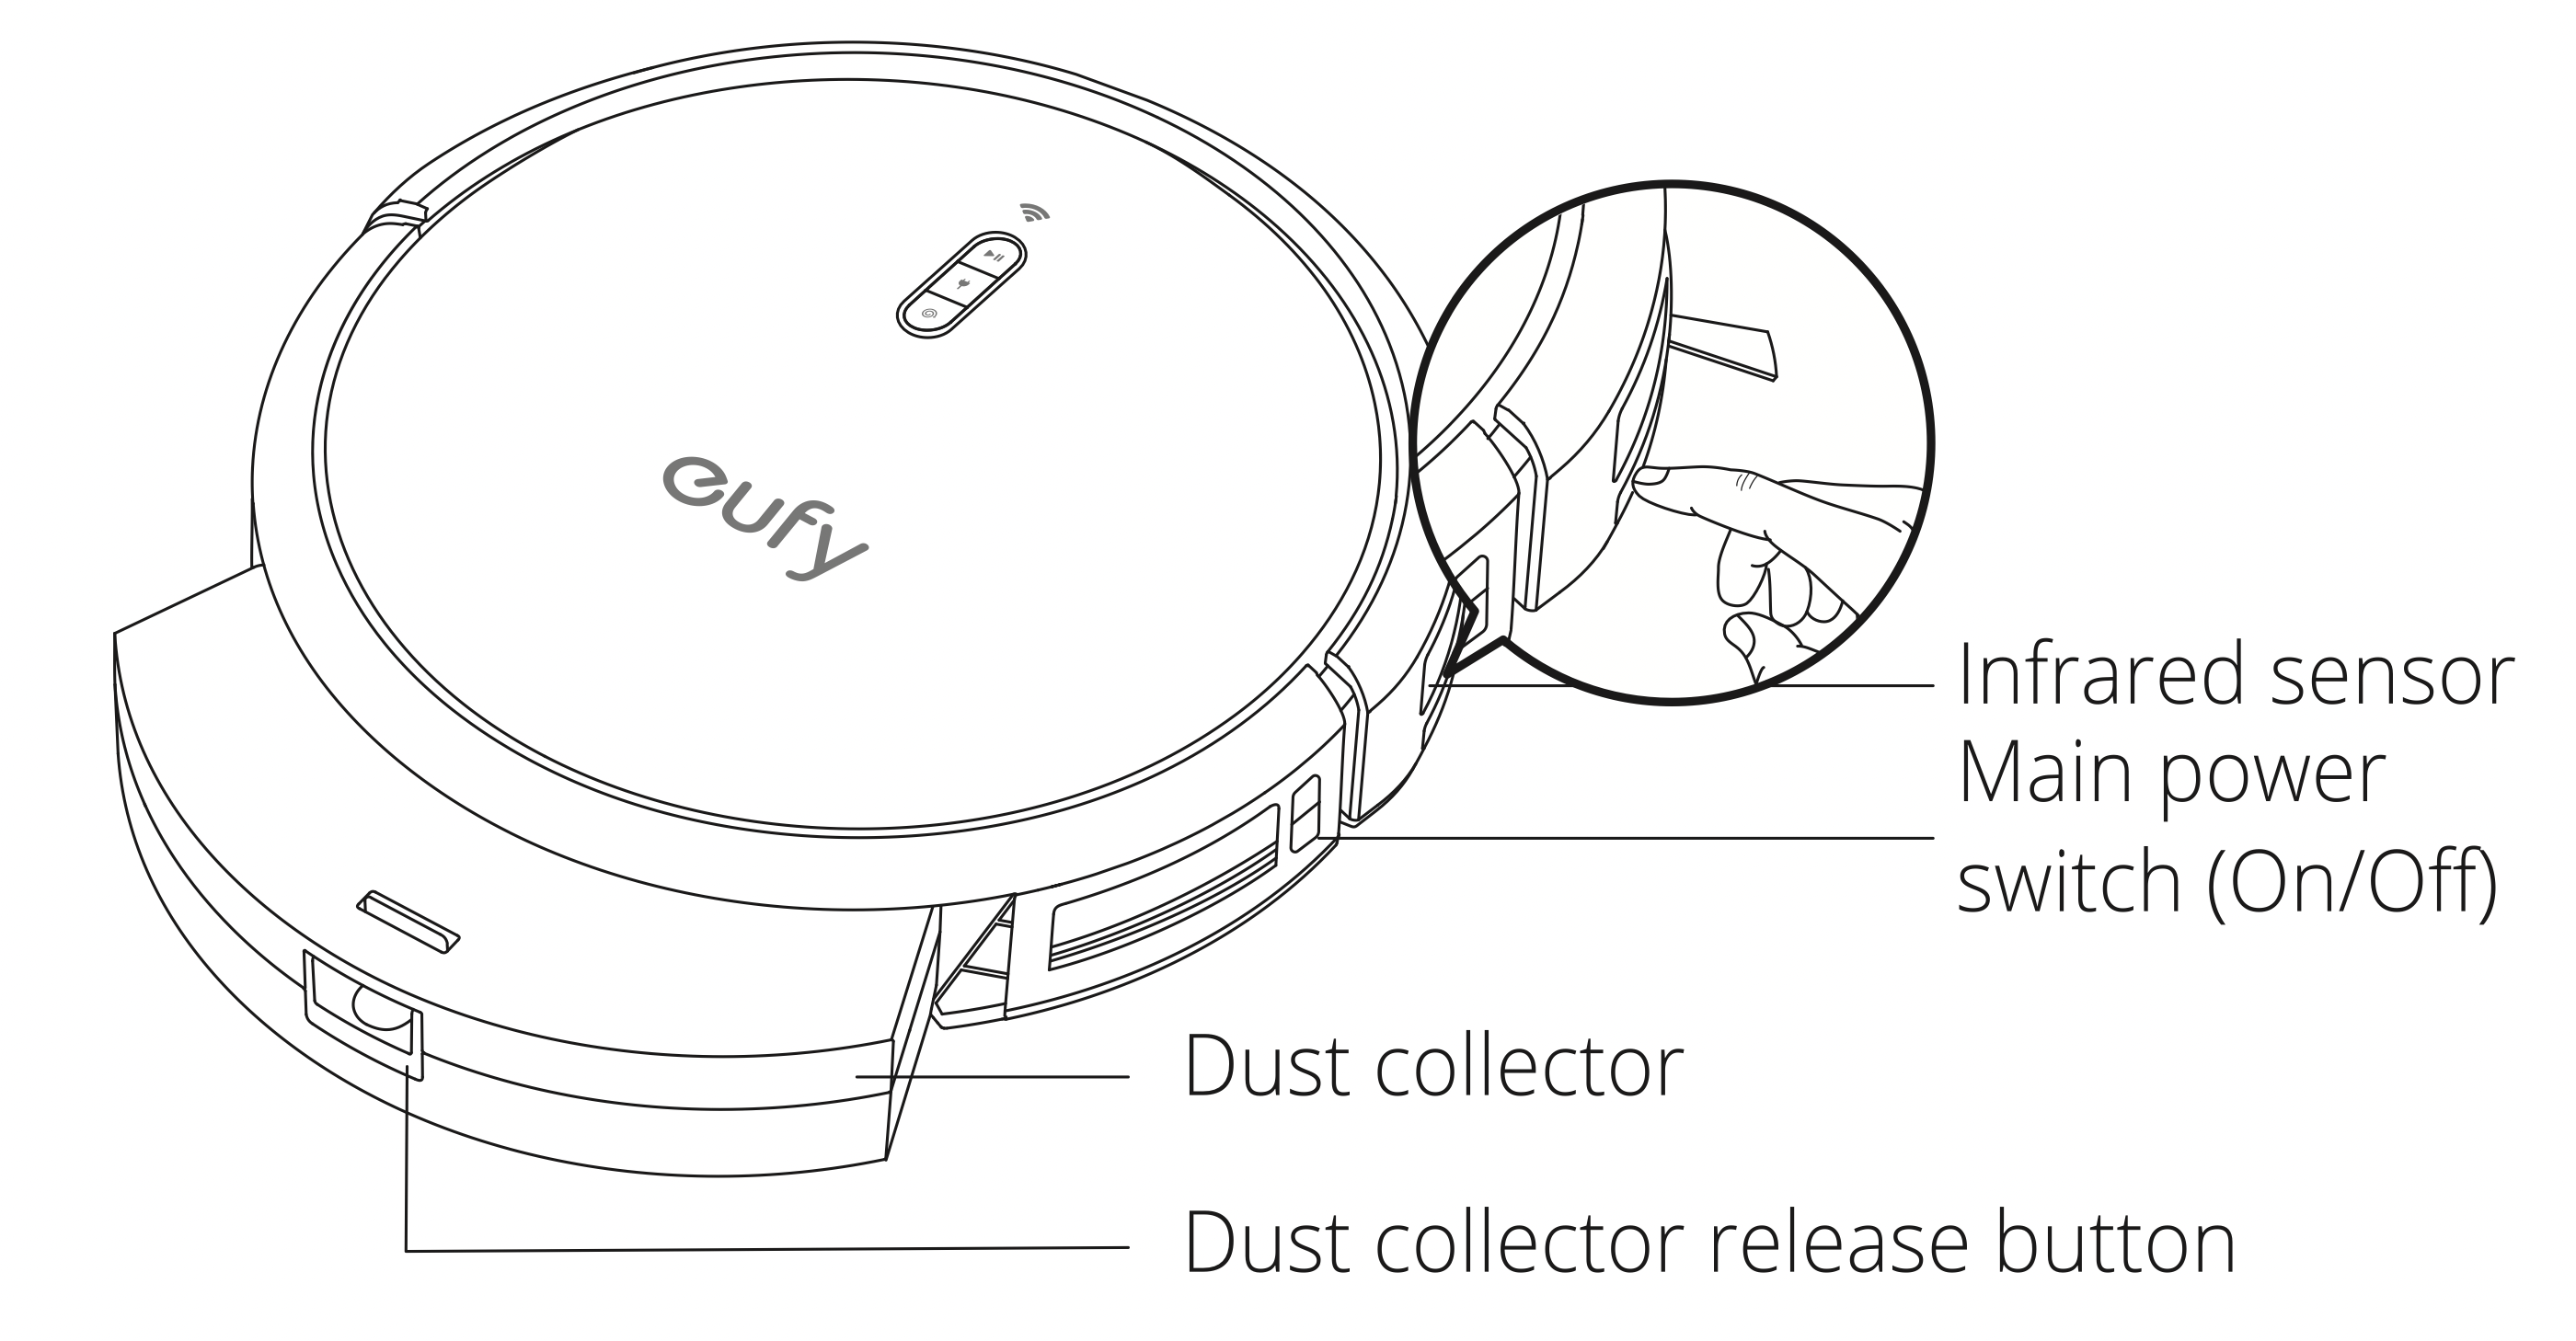
Top & Side
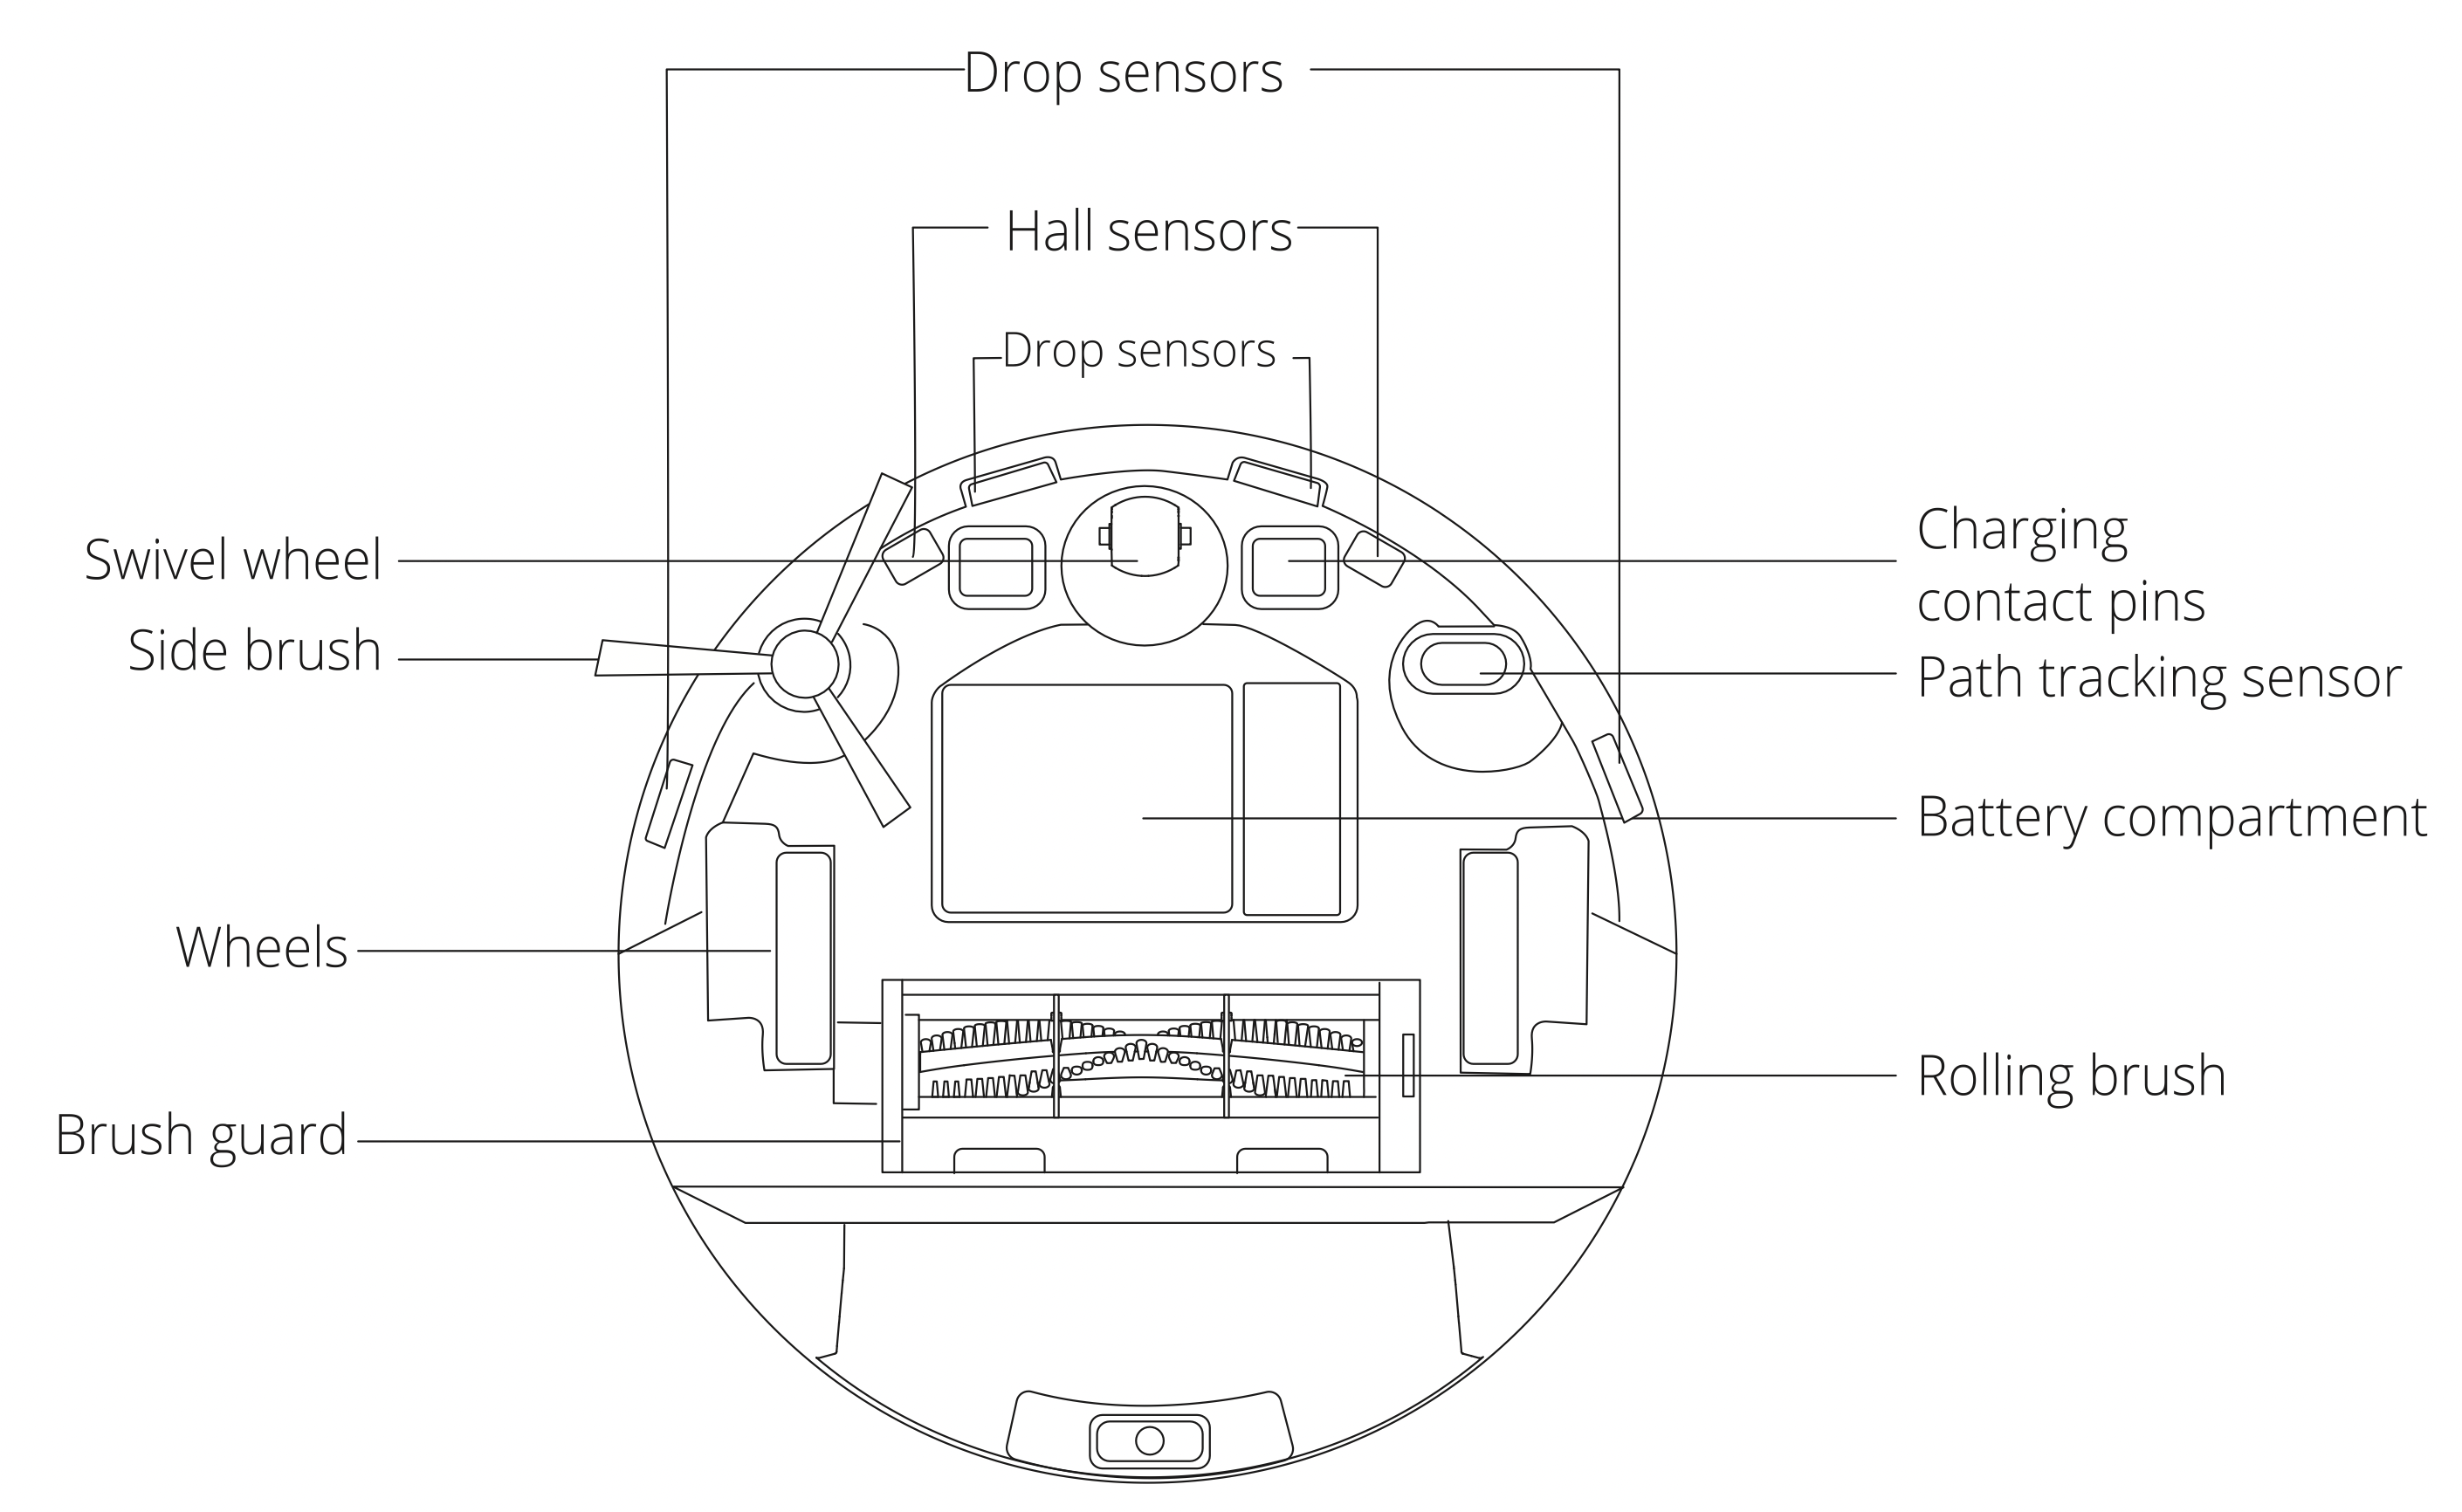
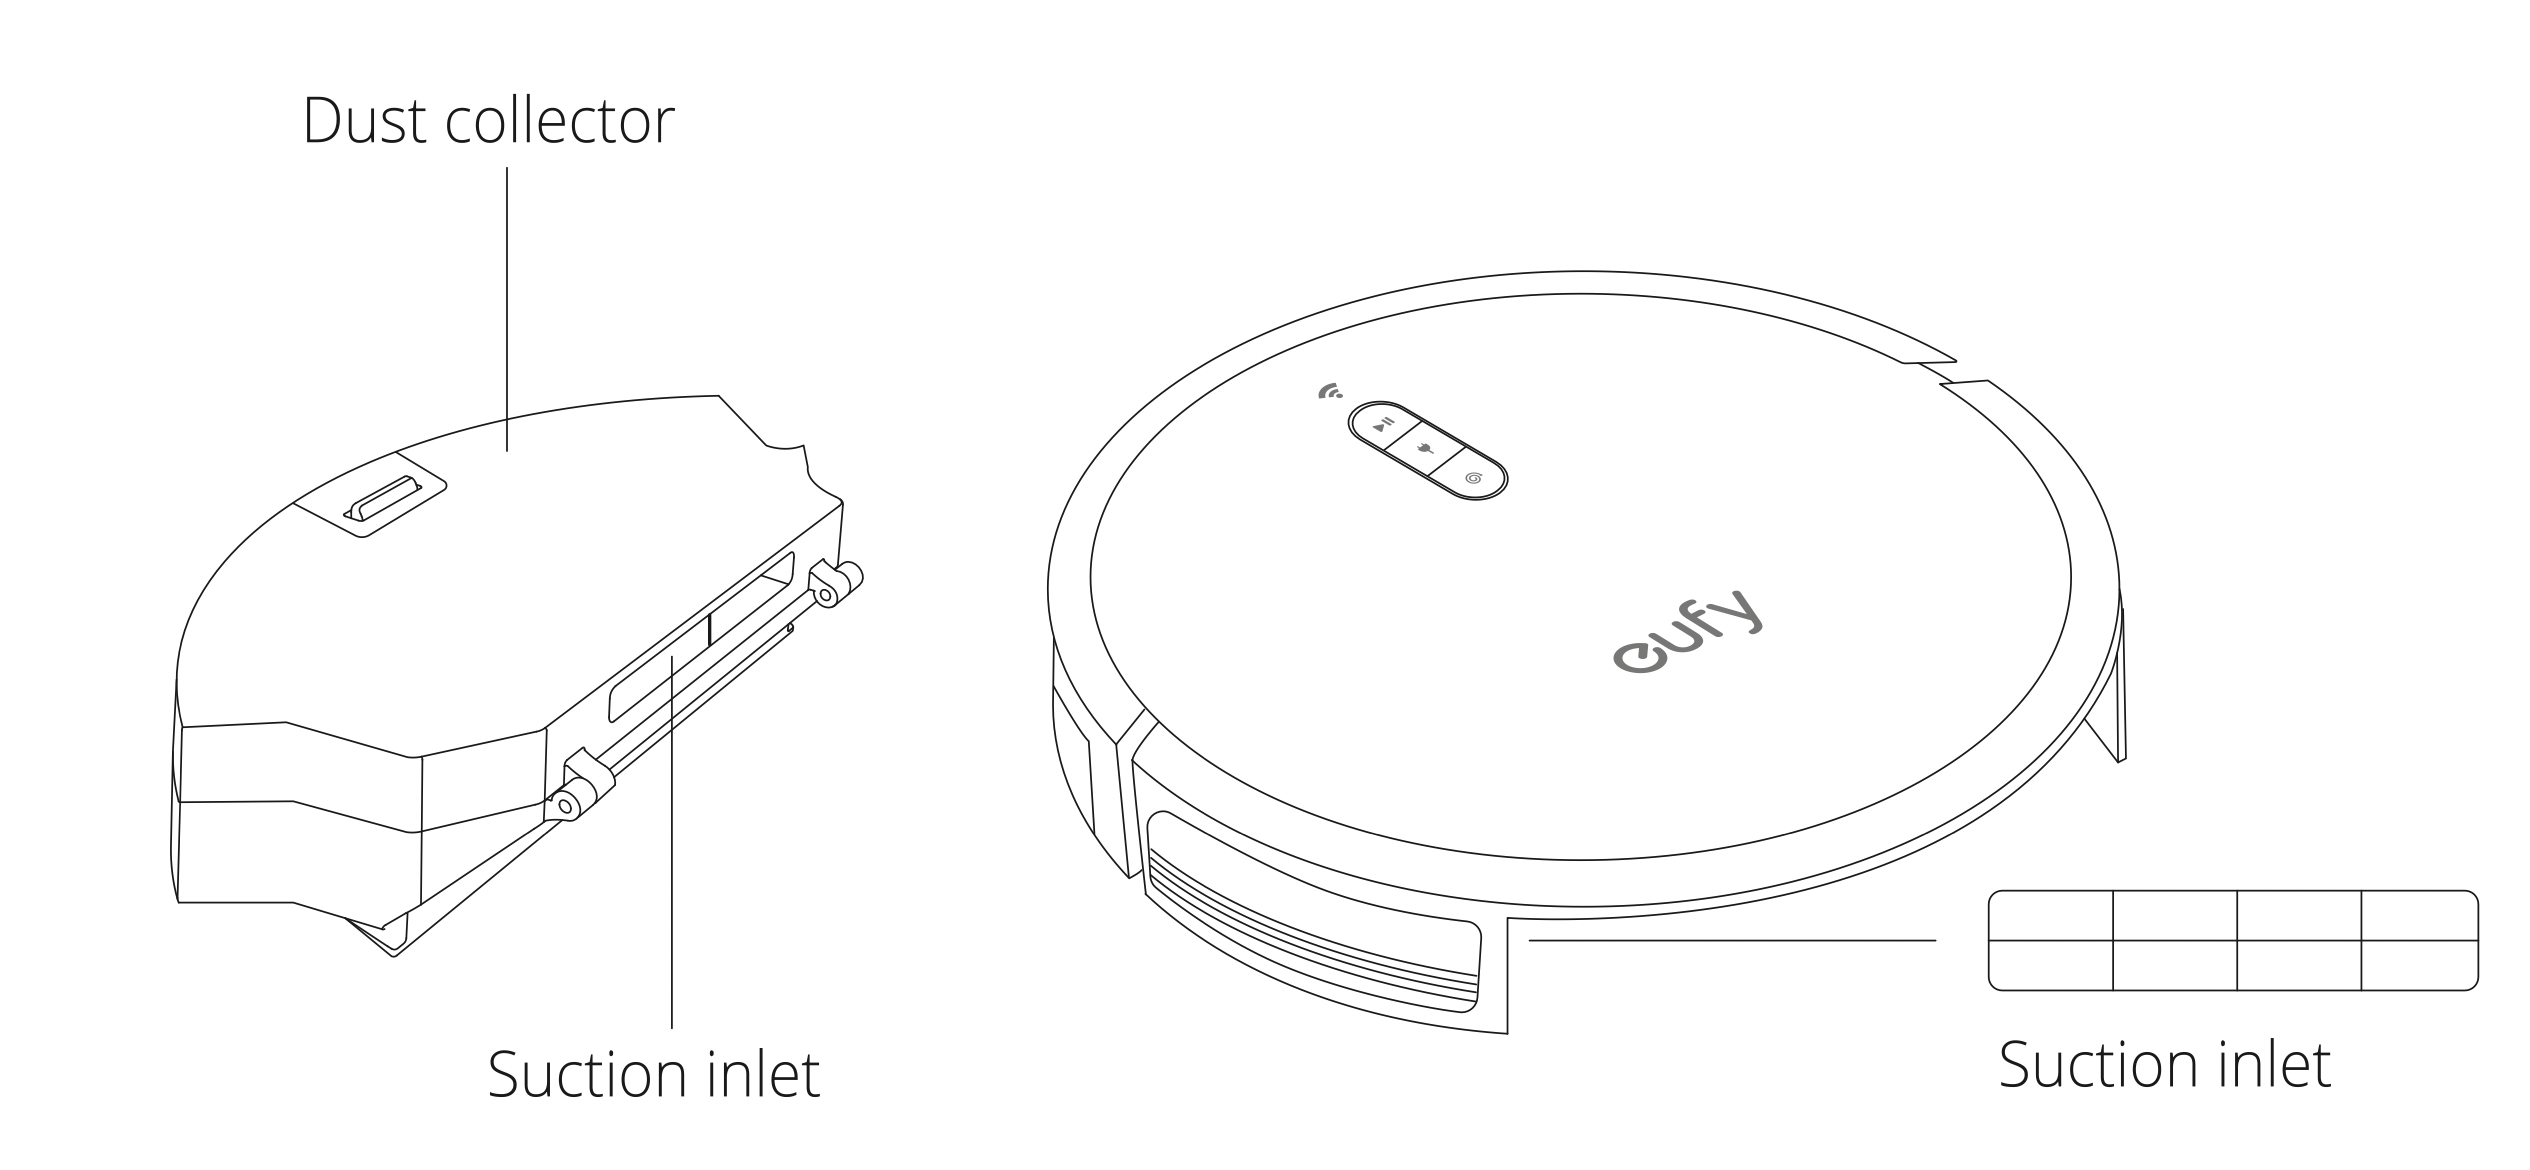
Bottom
Dust Collector
Suction Inlet
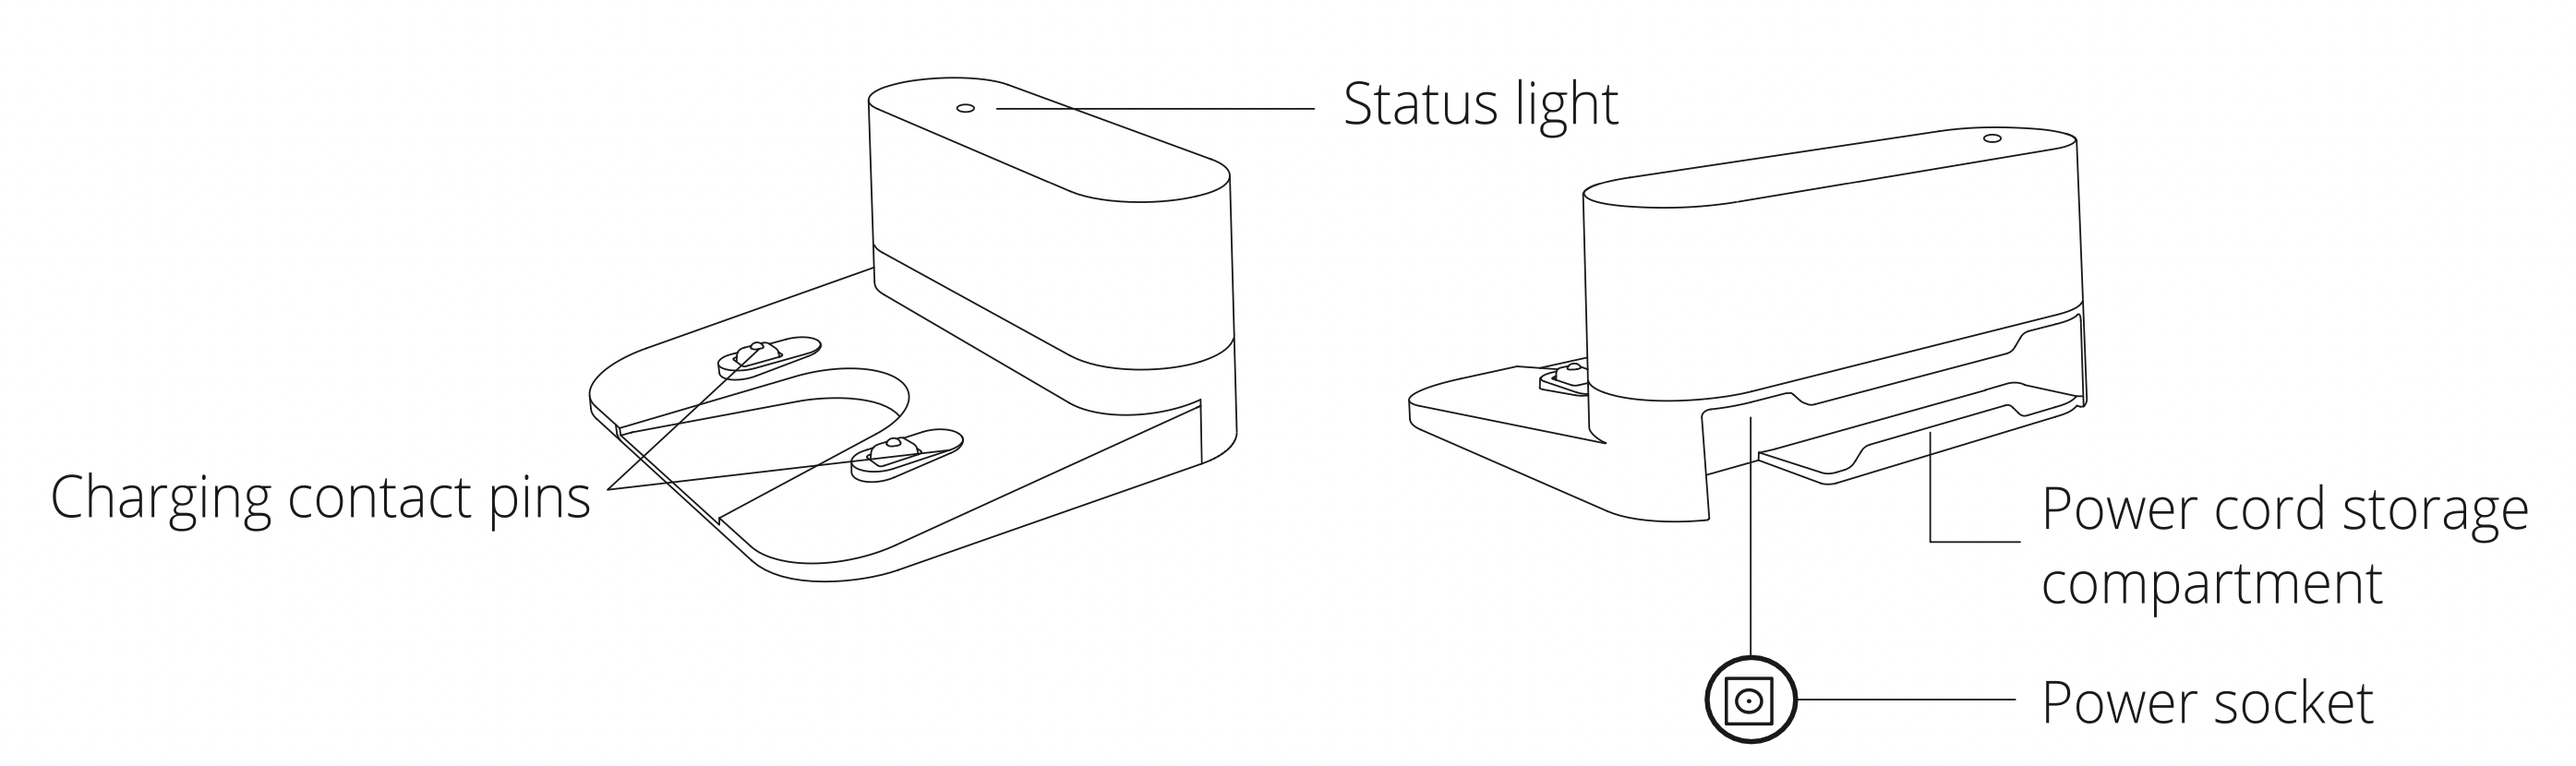
Charging Base
Water Tank

Button & Indicators
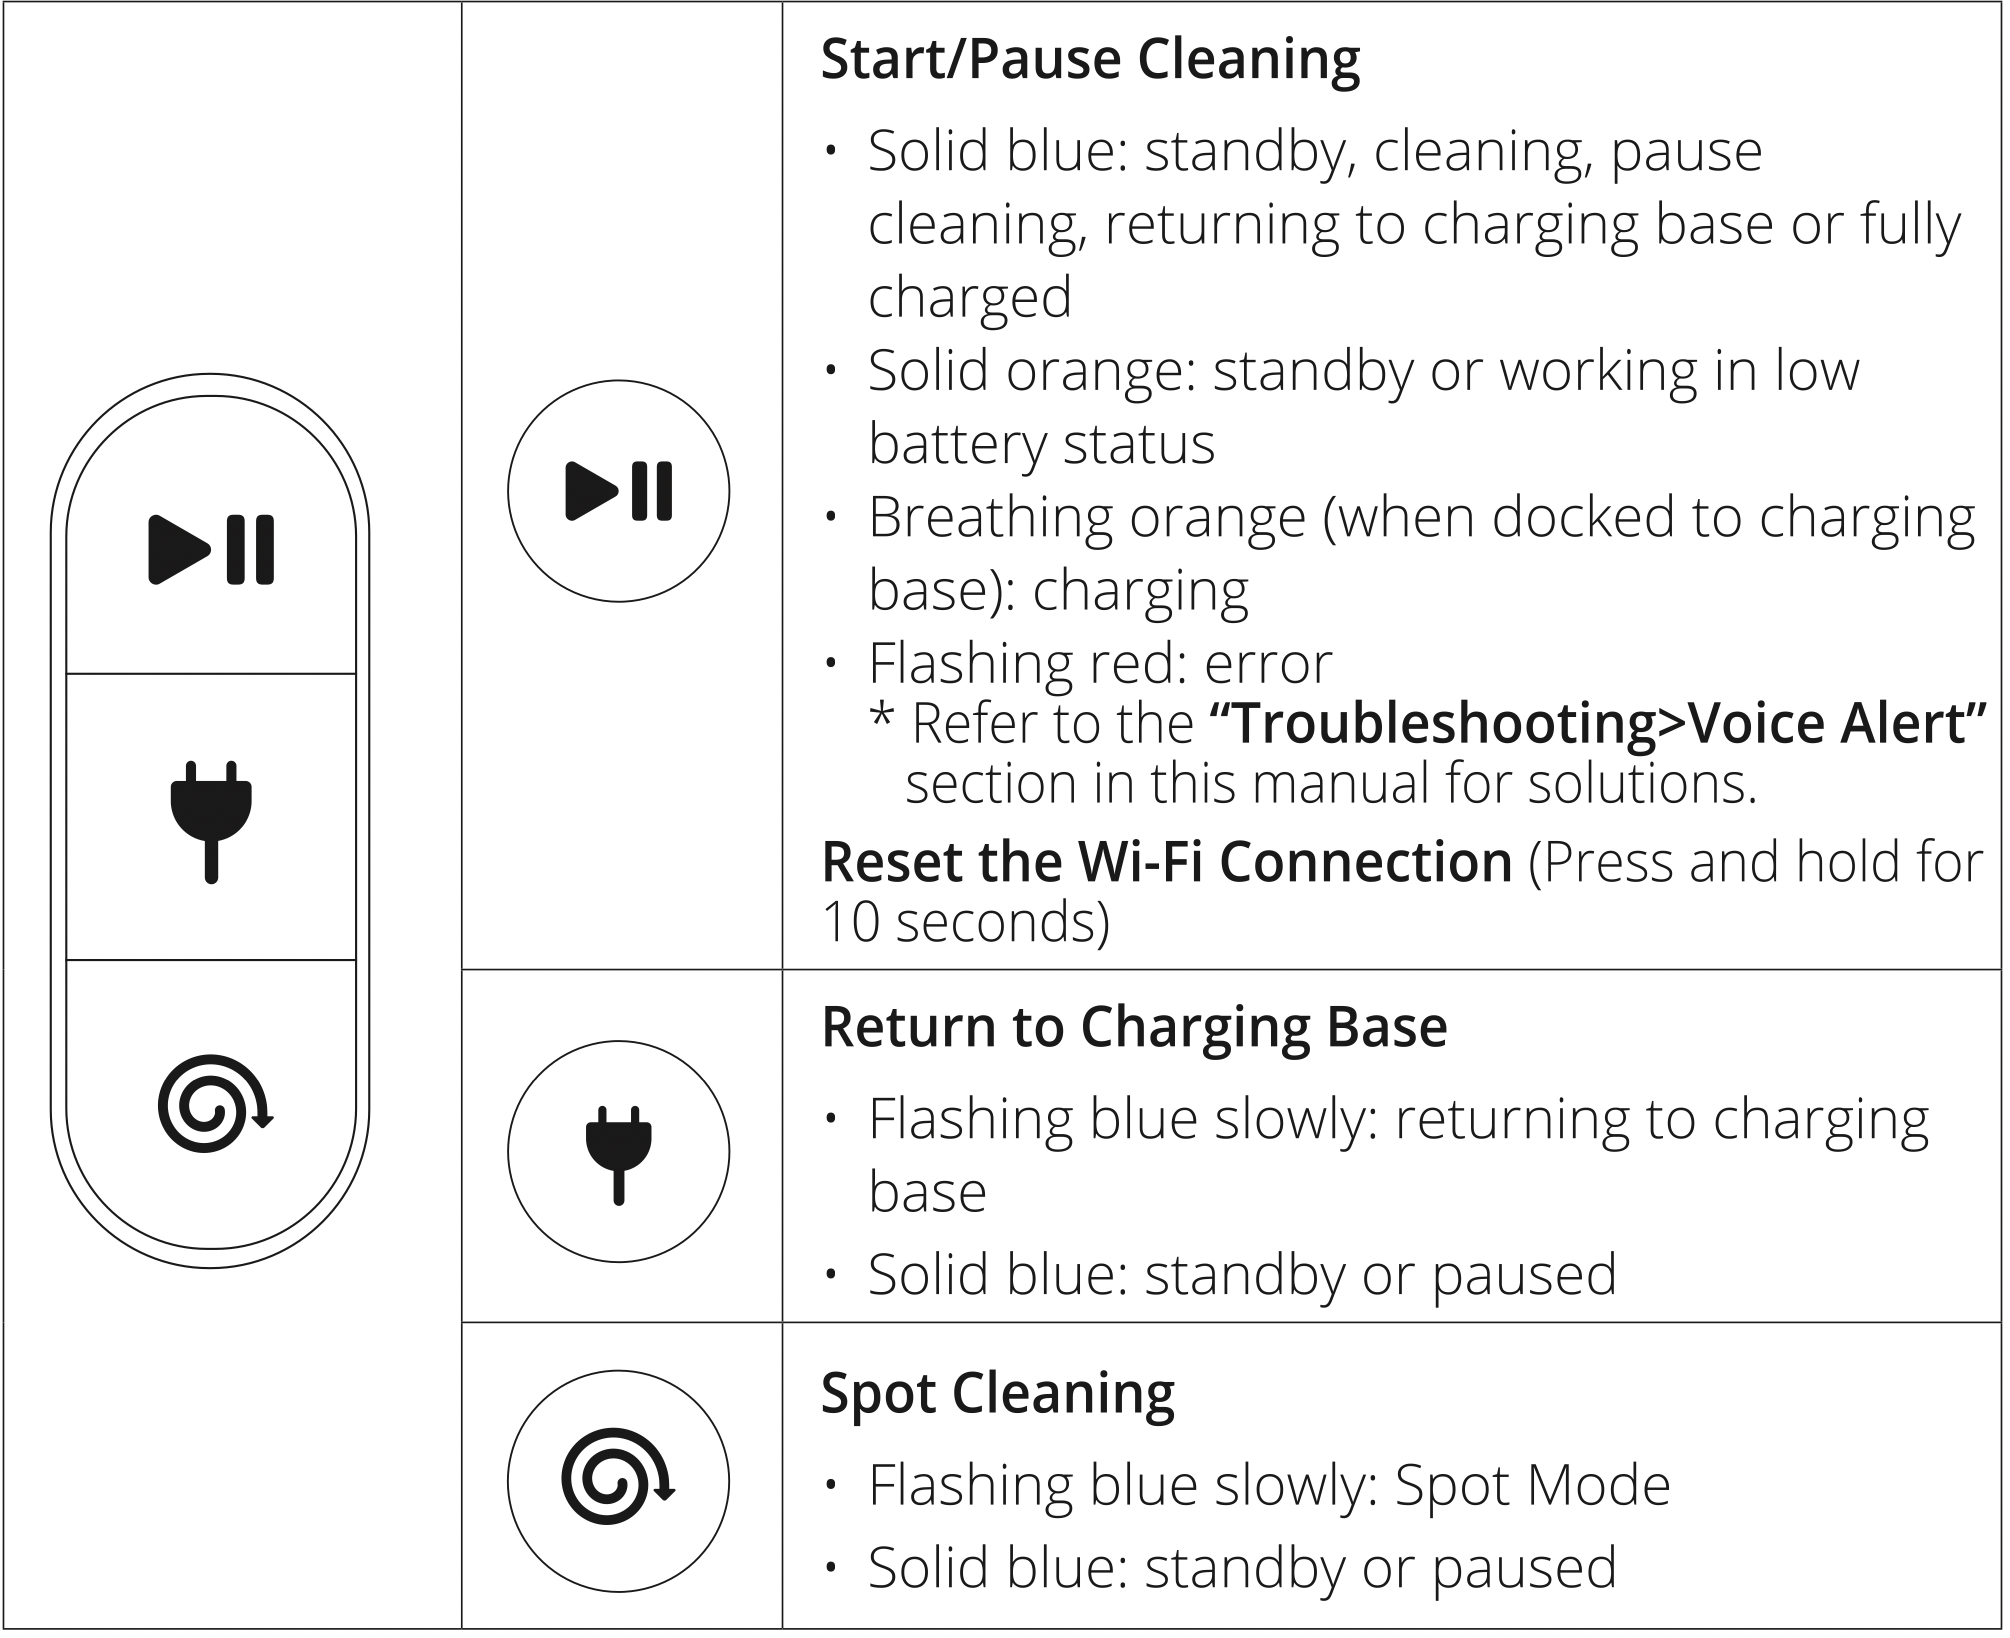
Tips:
- When you use the Find My Robot function via the Eufy Home app, all three LED indicators are solid blue and a voice prompt is heard.
- To conserve power, the blue light on the
 button becomes dim when:
- RoboVac is not docked to the Charging Base and has been inactive for 10 minutes;
- RoboVac is fully charged for 1 minute.
Using Your RoboVac
Important Tips Before Use
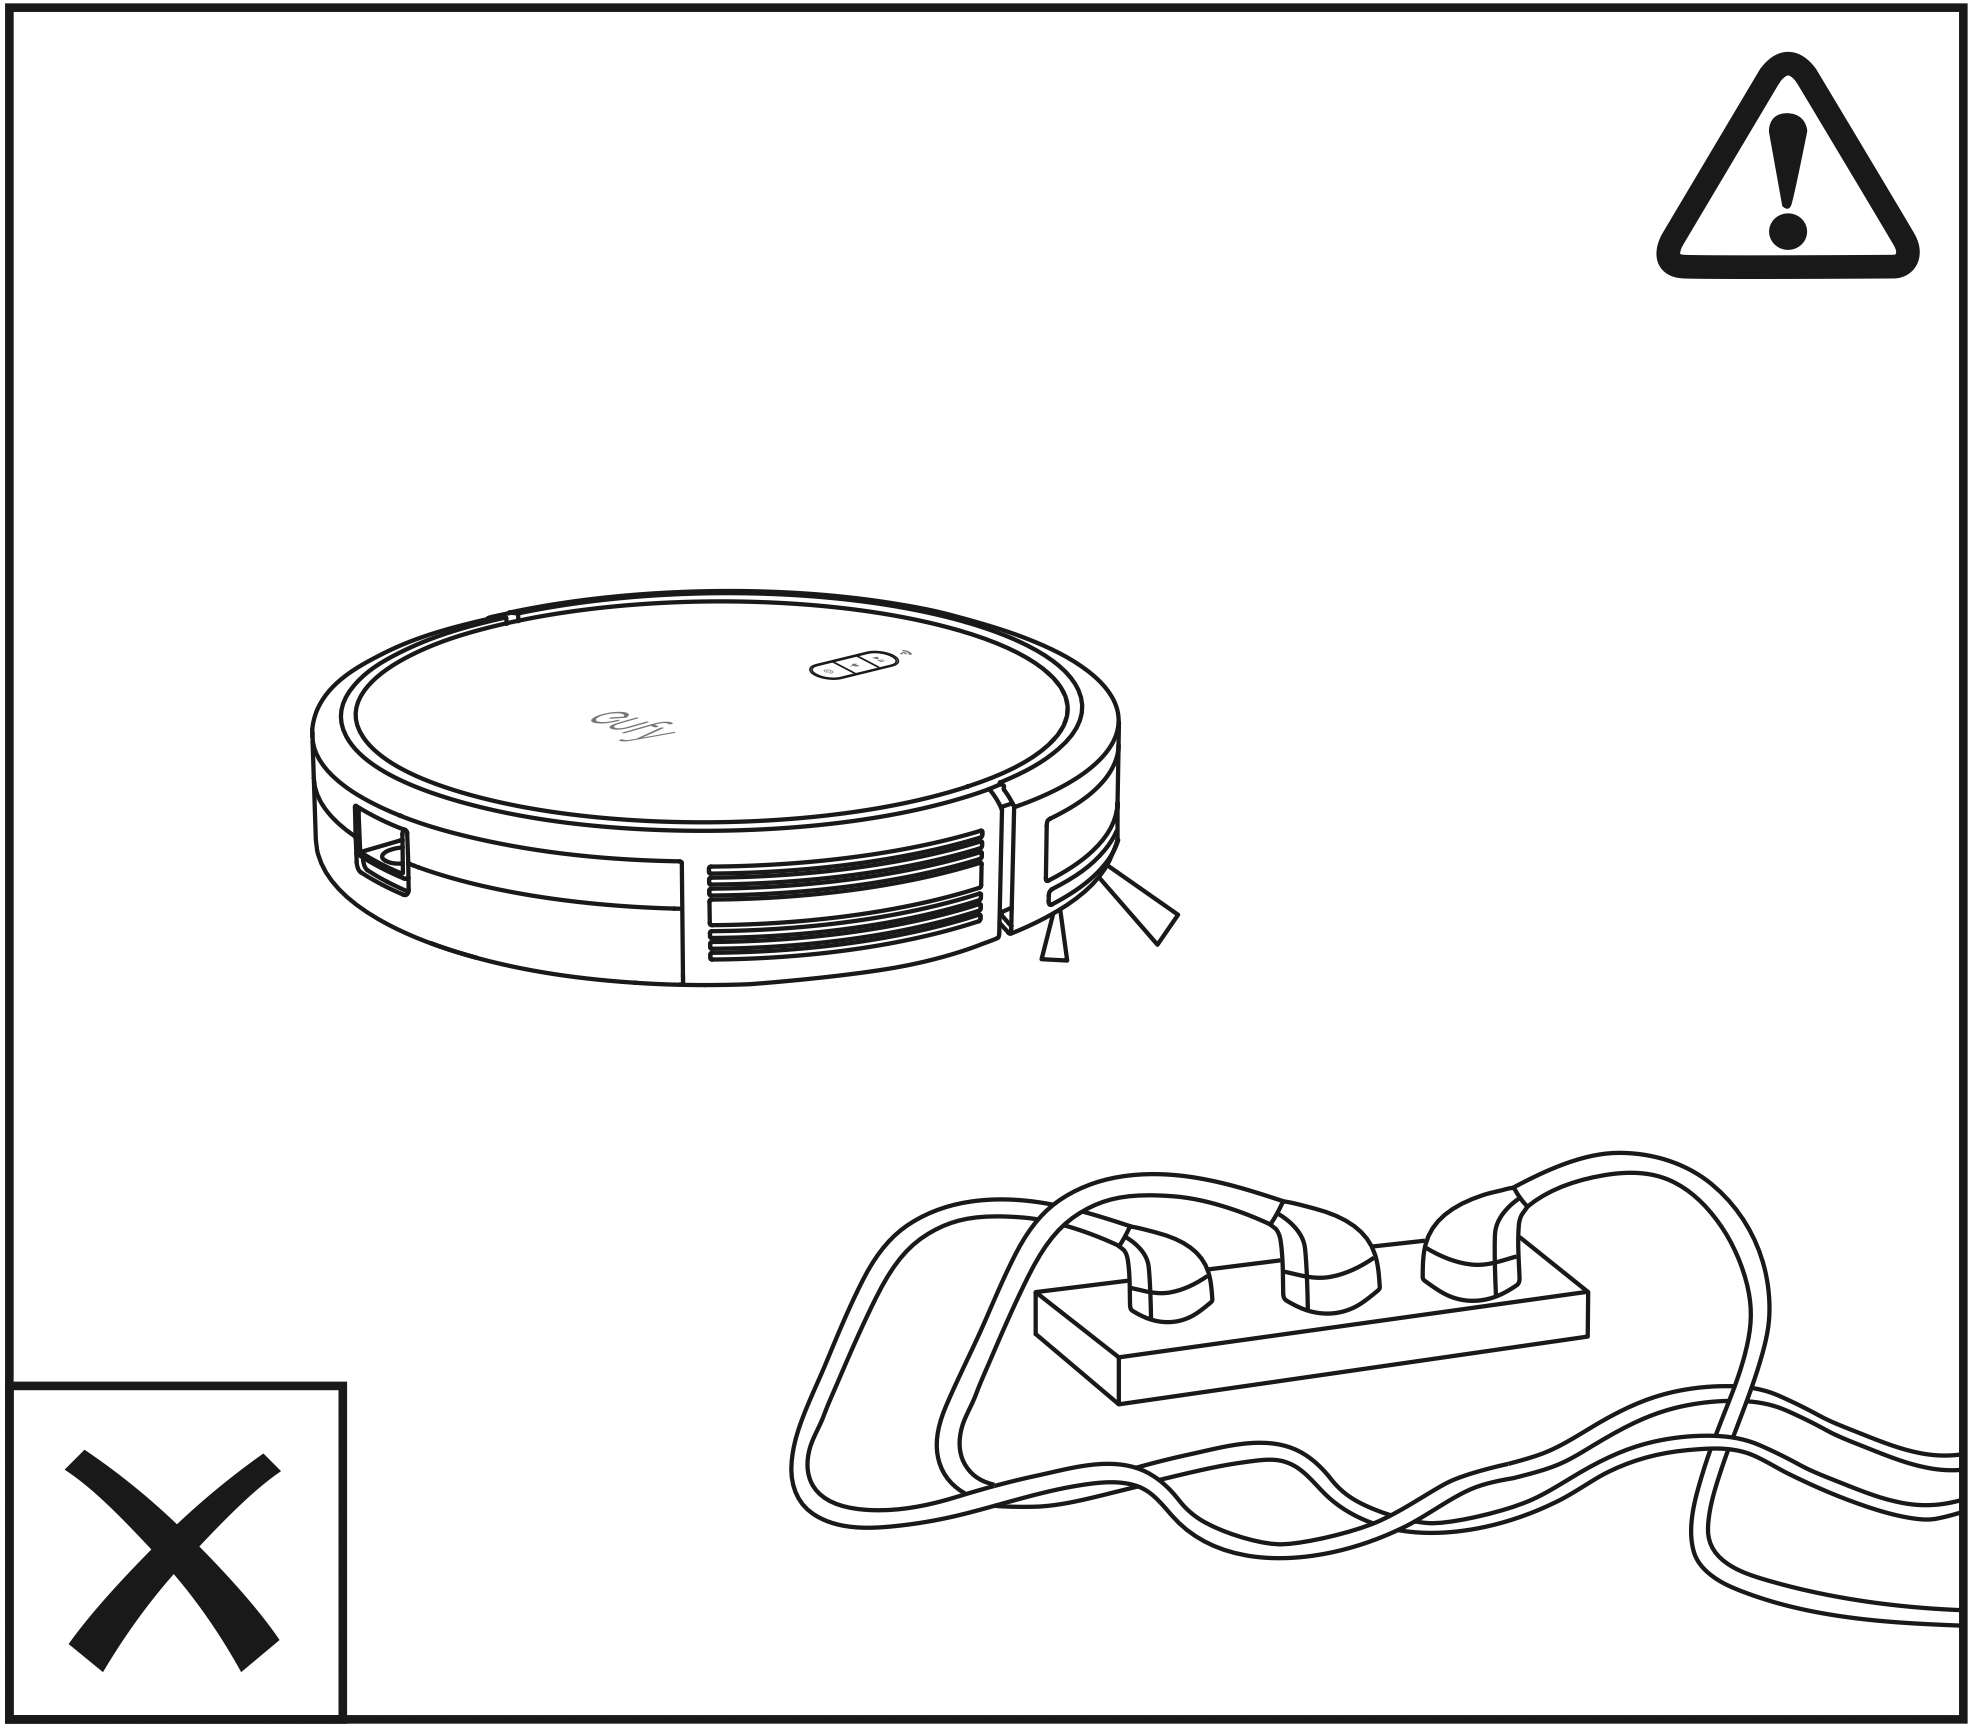
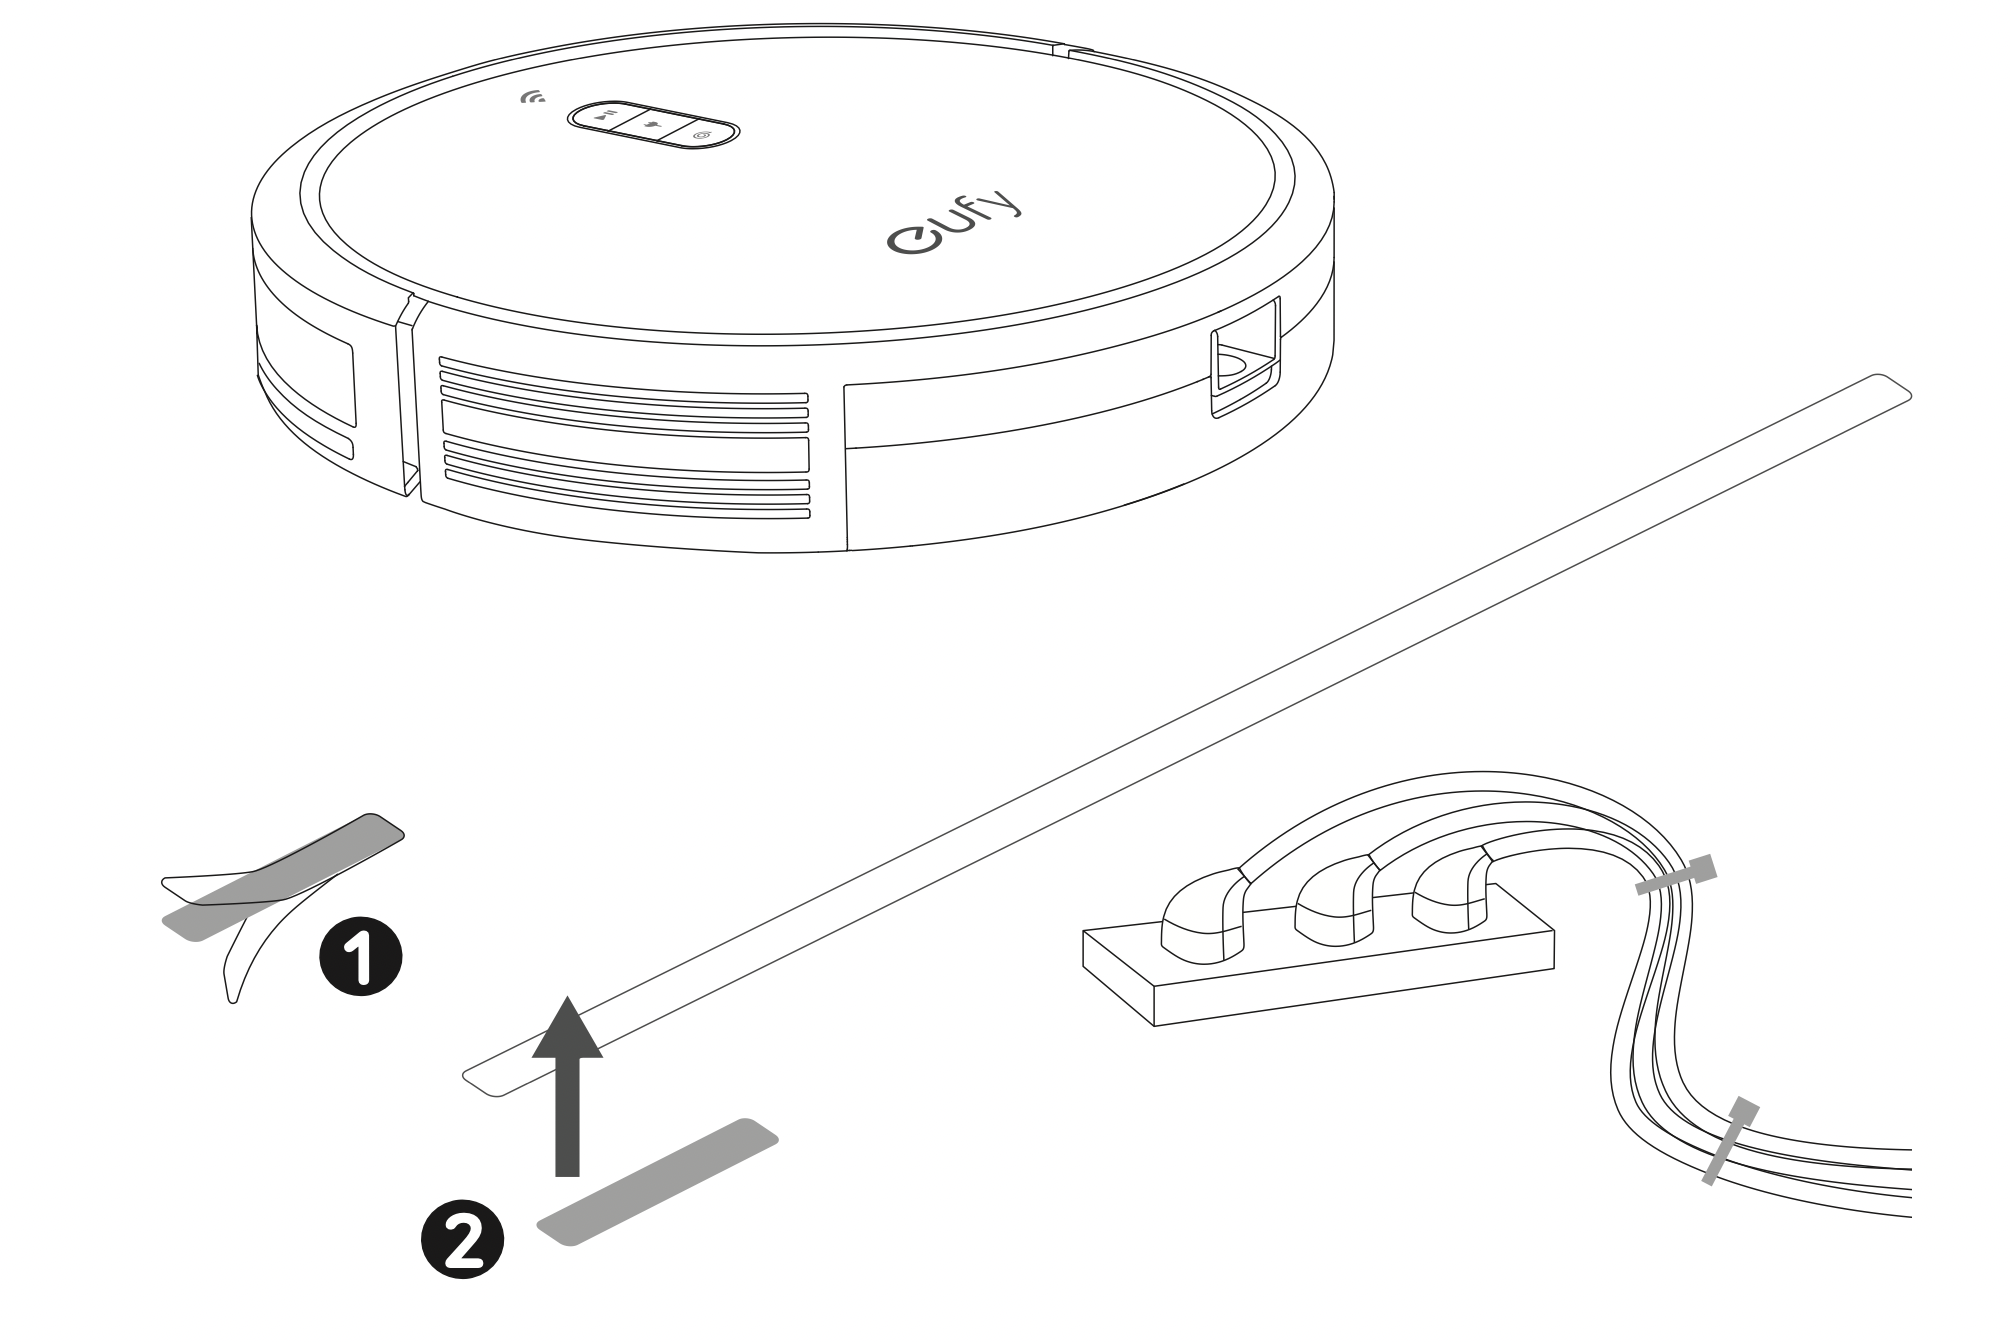
- Remove power cords and small objects from the floor that may entangle RoboVac. You can use the supplied cable ties to organize your wires and power cords.
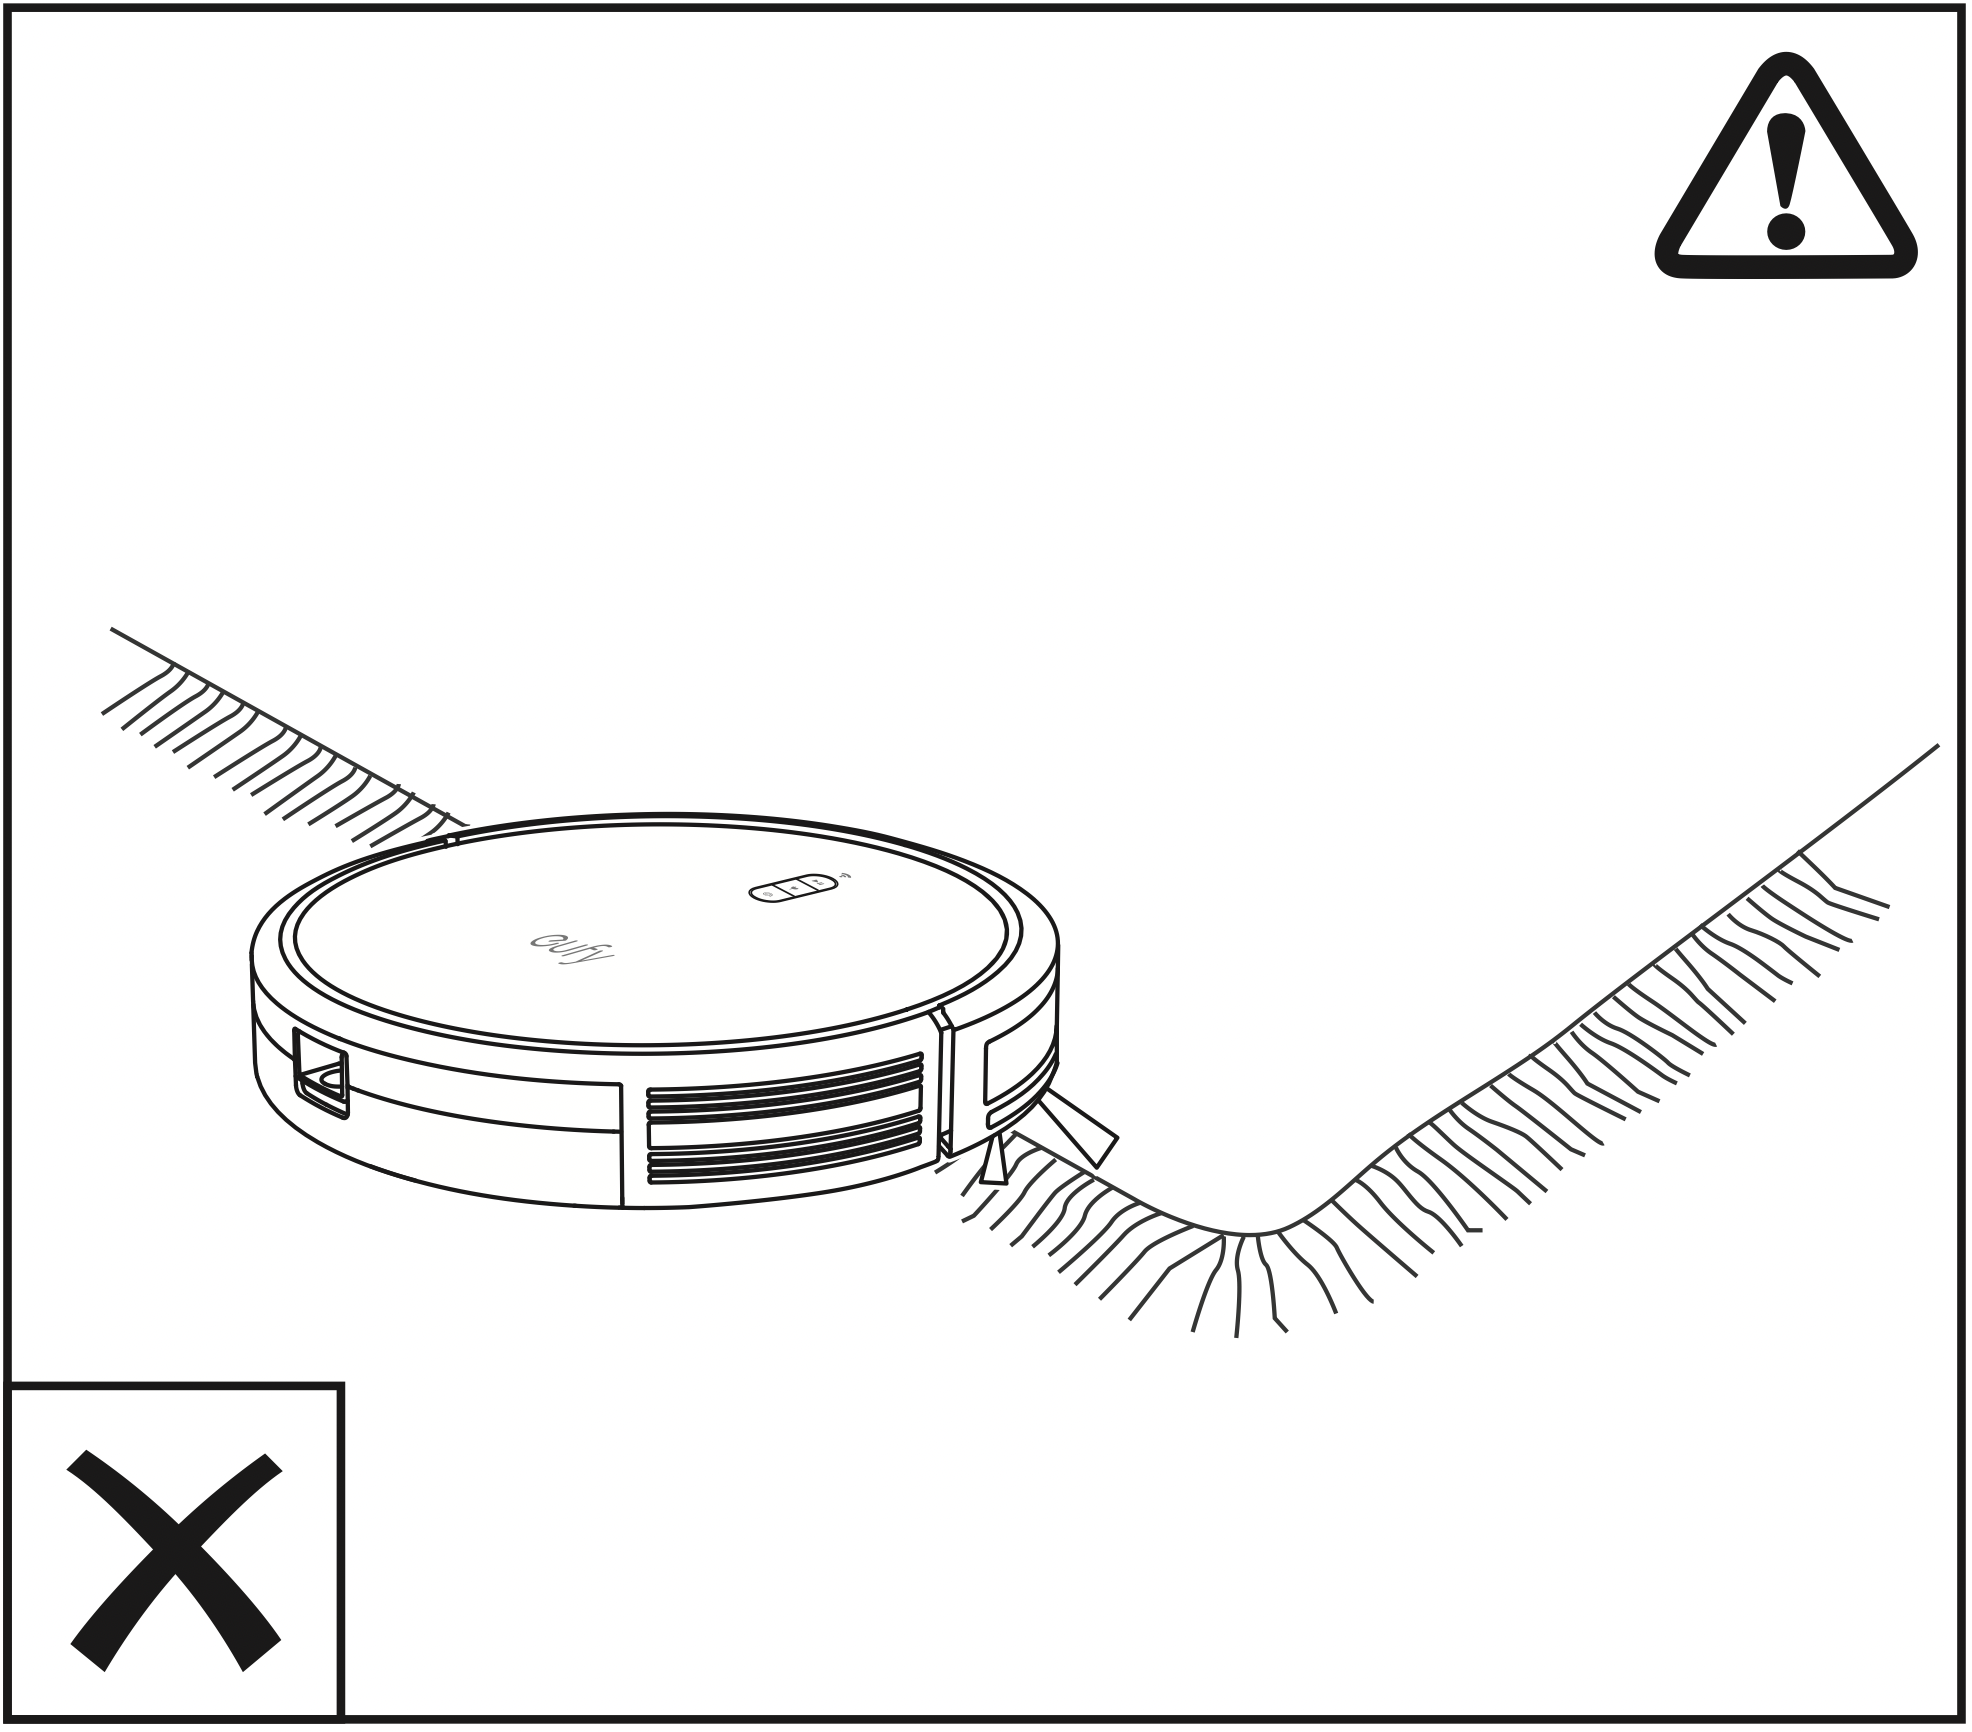
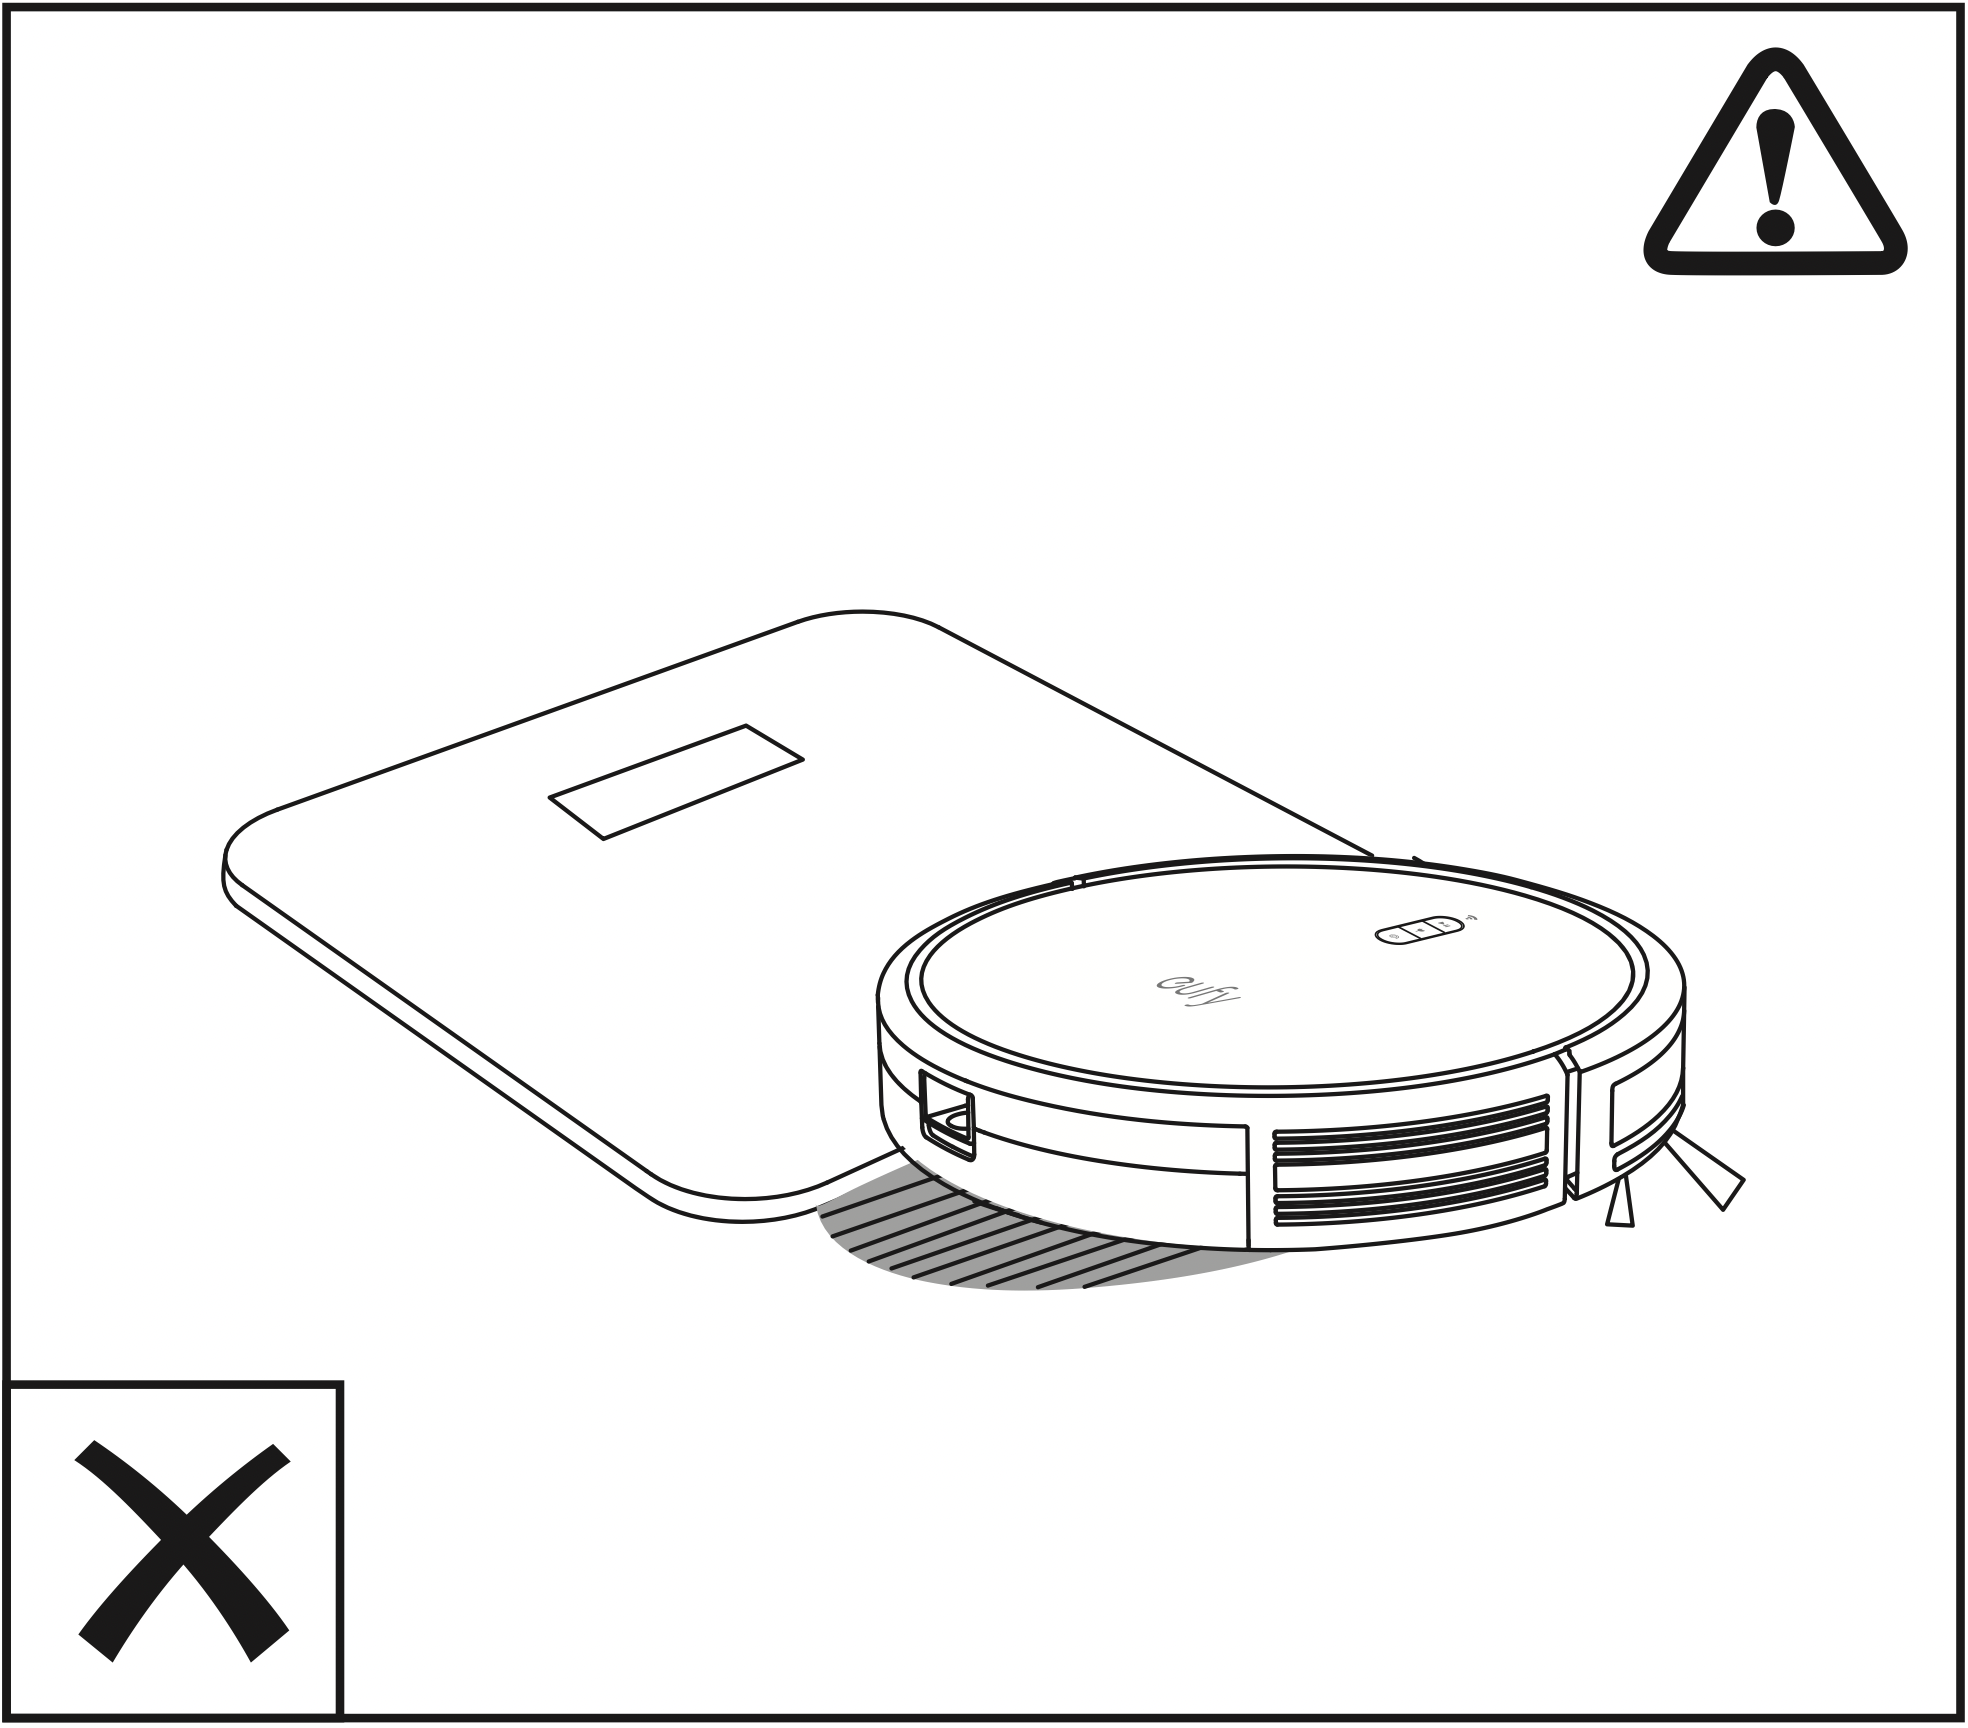
- Fold tasseled edges of area rugs underneath to prevent tangling RoboVac. Avoid cleaning very dark-colored high-pile rugs or rugs thicker than 1.02in/26mm as they may cause RoboVac to malfunction.
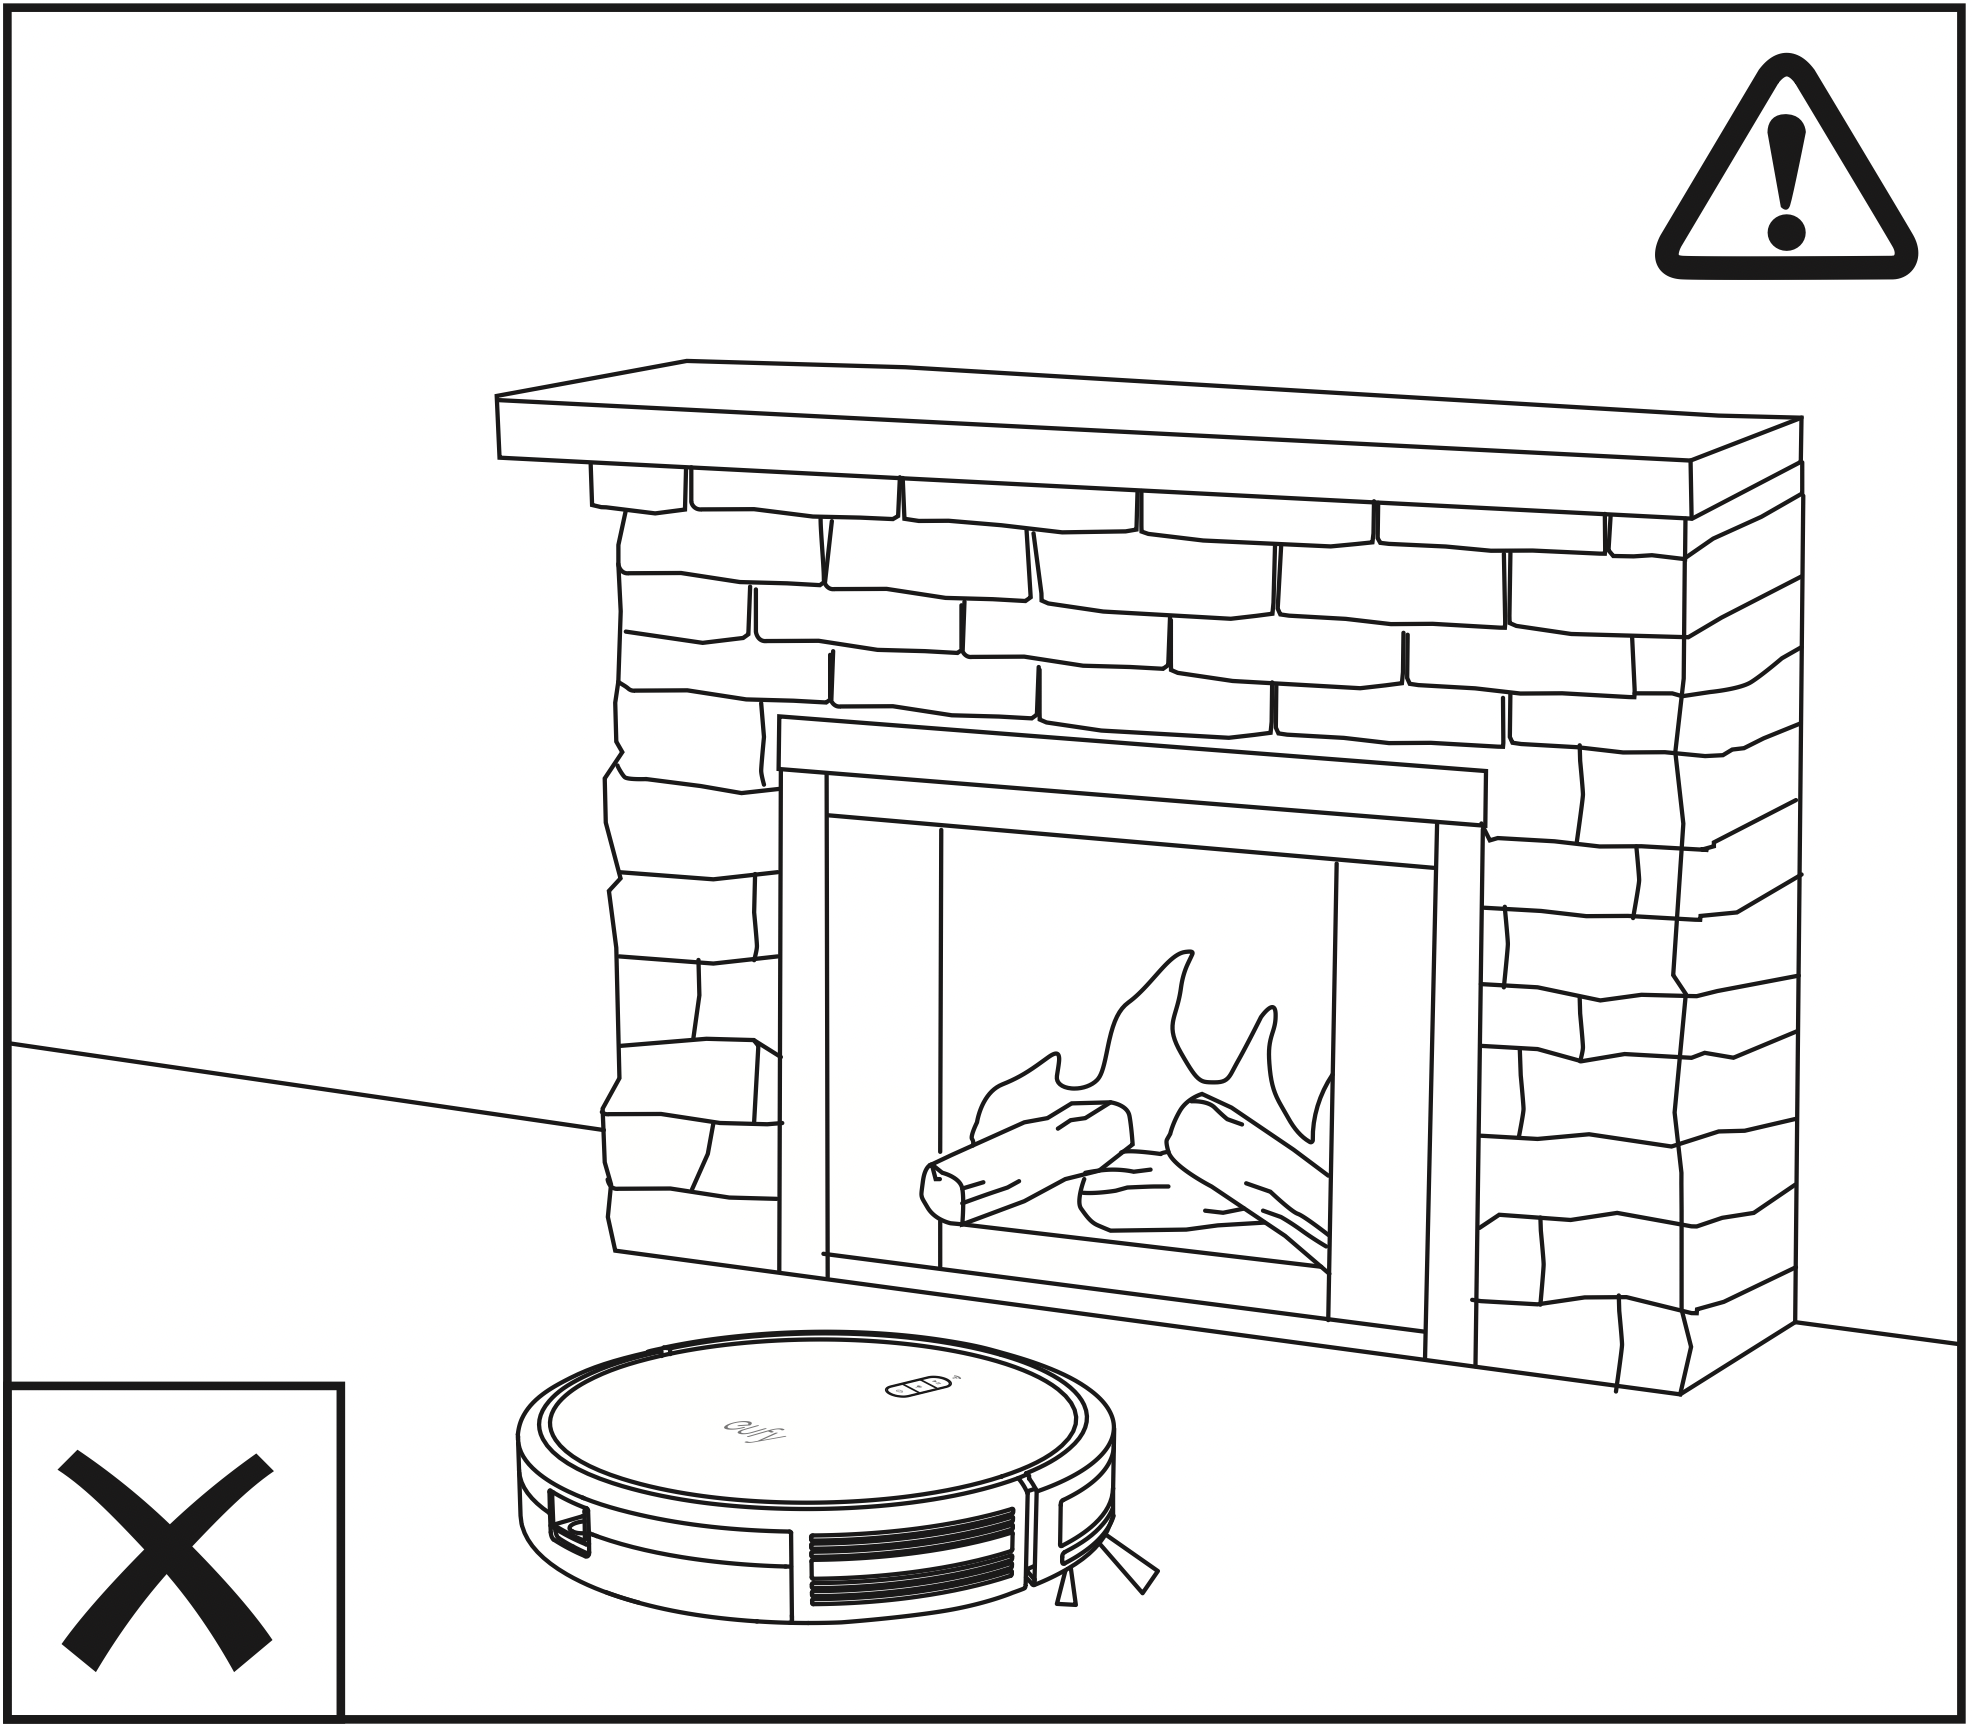
- It is strongly recommended to place boundary strips in front of fire places and certain areas (i.e. air vents)that may cause damage to RoboVac if entered.
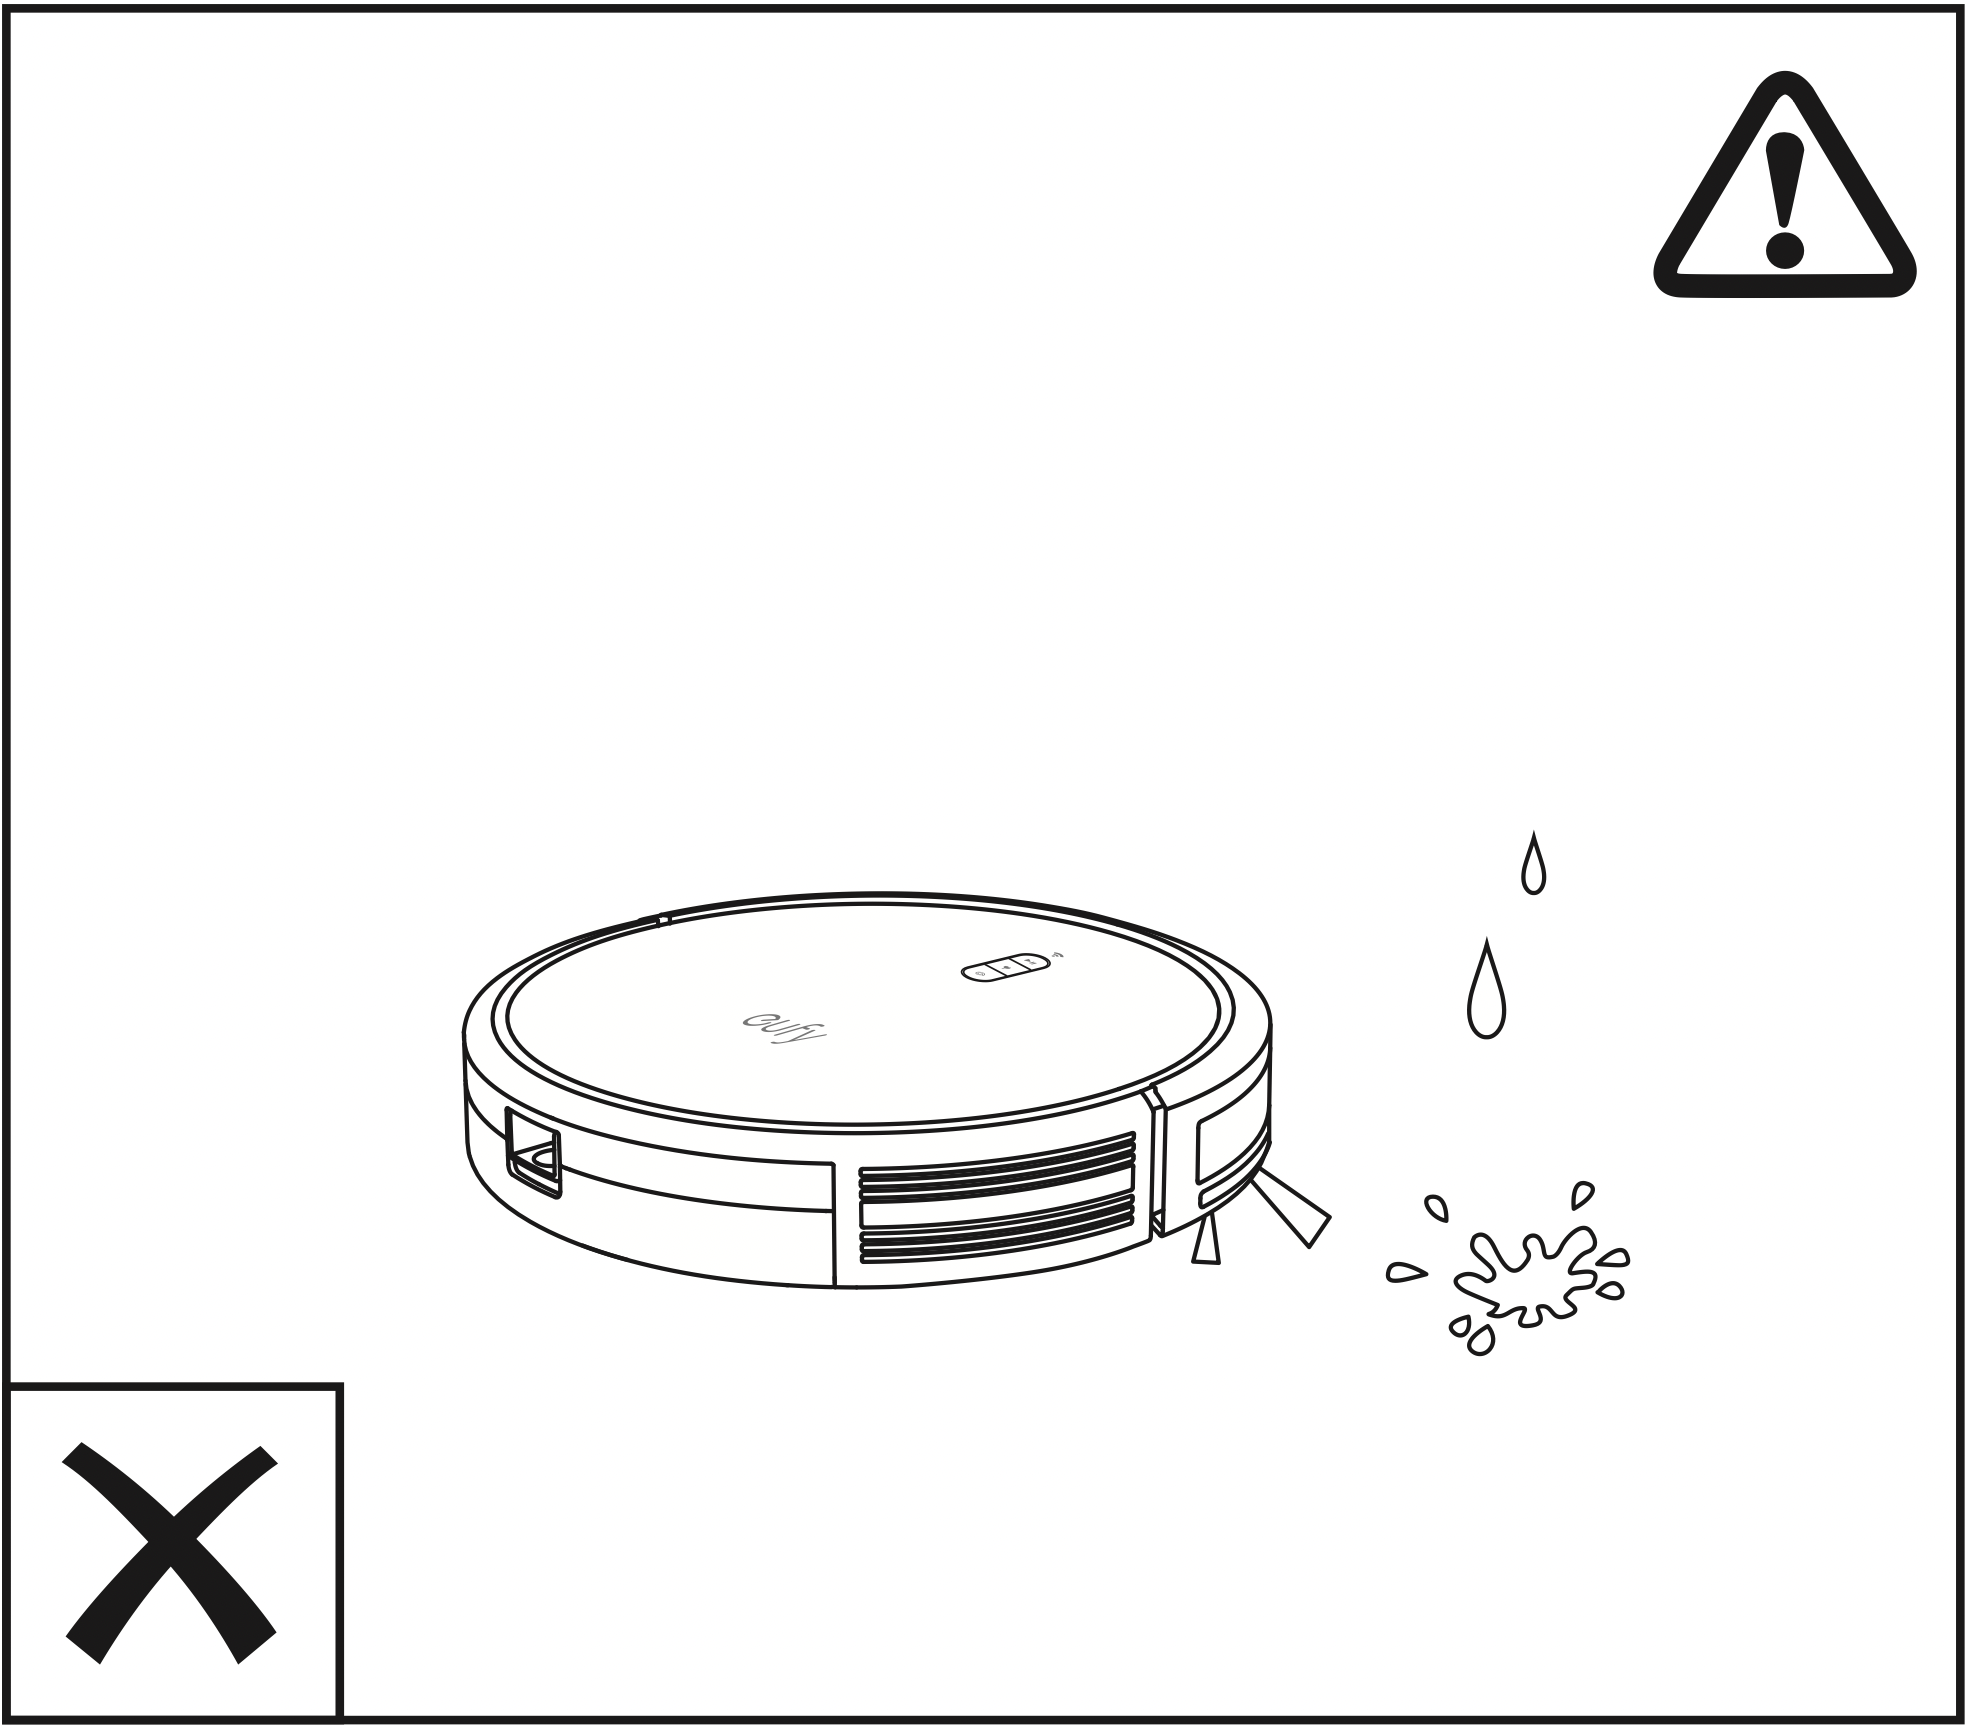
- Keep RoboVac away from wet areas during cleaning.
- RoboVac may climb on top of objects less than 0.63 in/16mm in height. Remove these objects if possible.
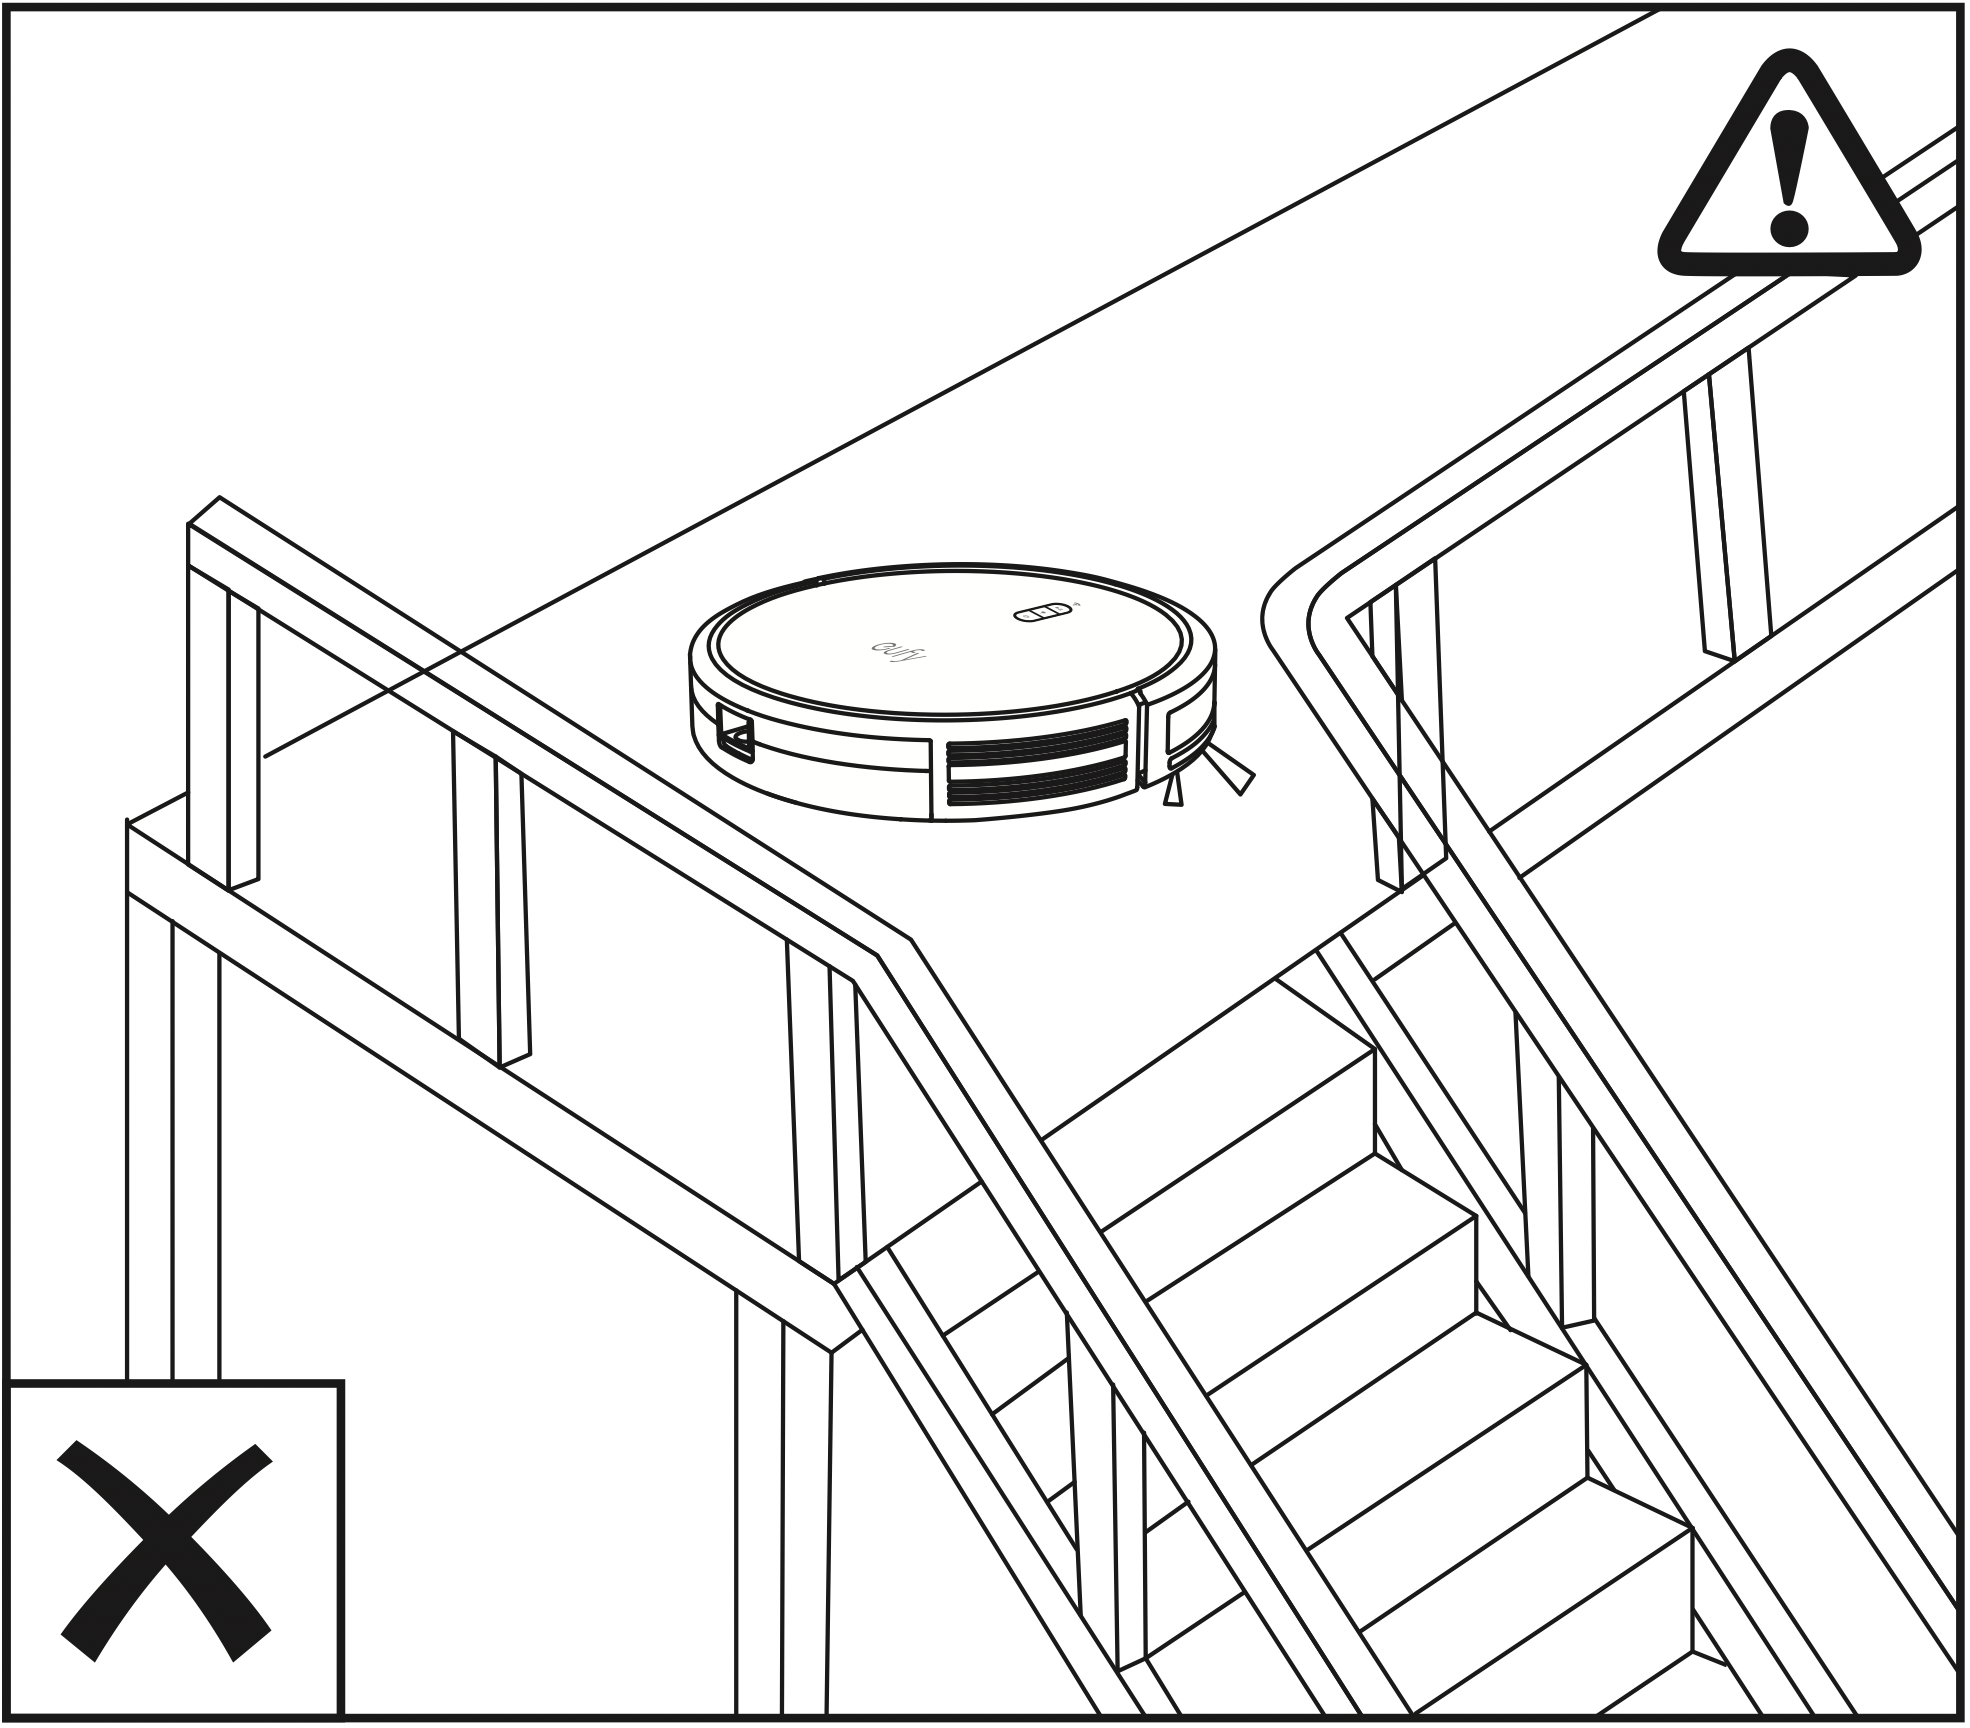
- Anti-drop sensors will prevent RoboVac from tumbling downstairs and steep drops in most cases. Sensors are less effective if dirty or used on carpeted/reflective/very dark-colored floors. It is recommended to place physical barriers to block off areas where RoboVac may fall.
Preparation
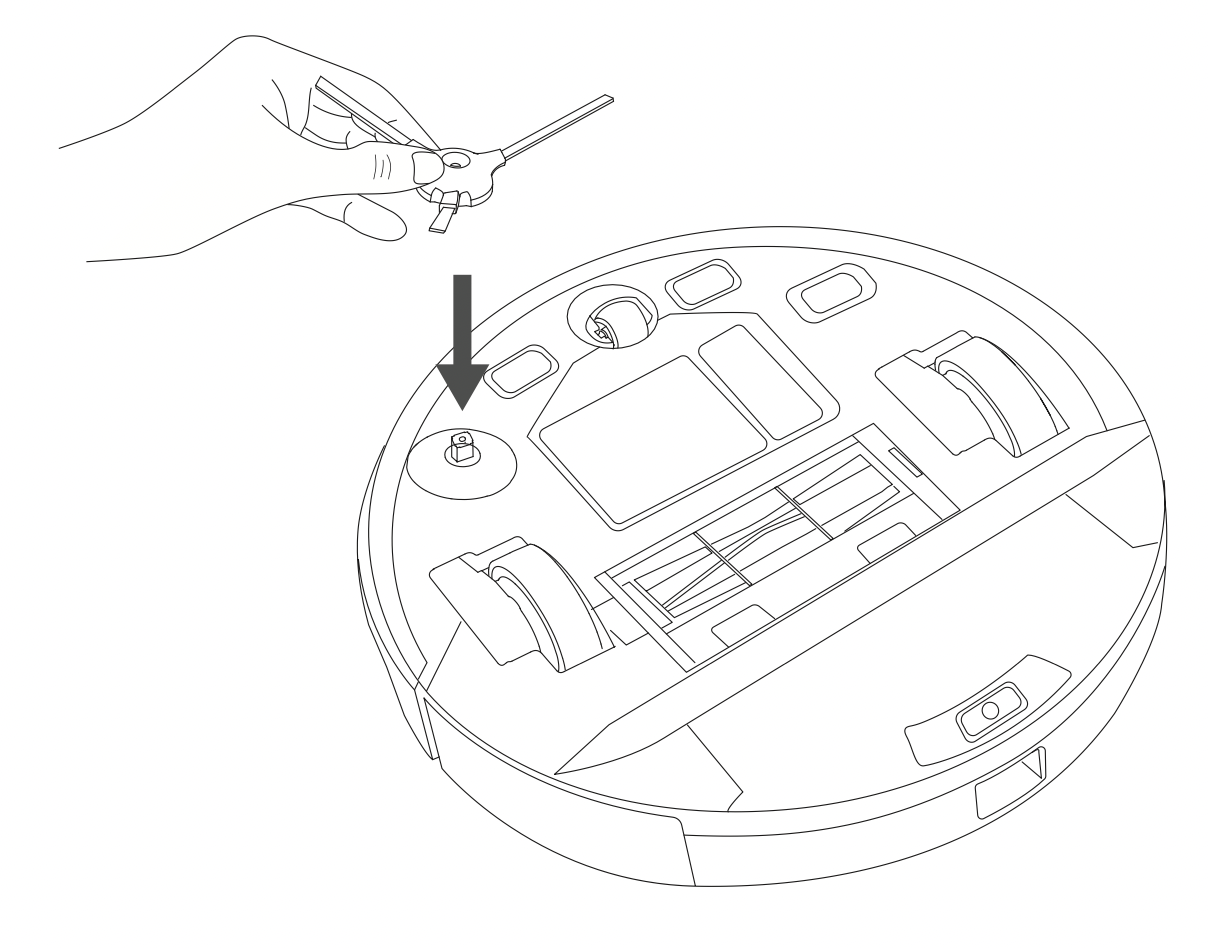
- Remove the sticker on the power switch, and the foam blocks beside the bumper before use.
- Install the side brush before use.
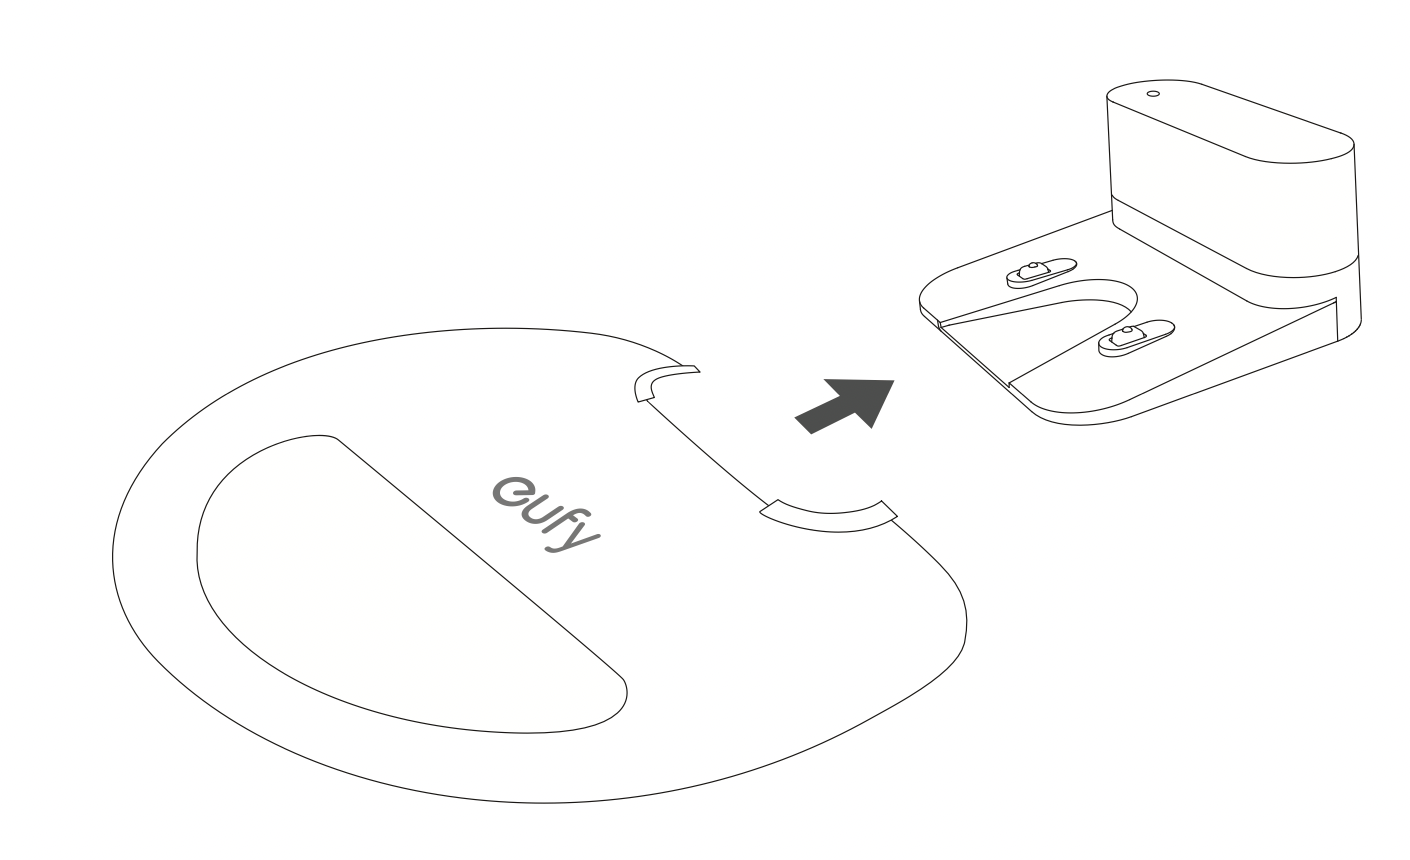
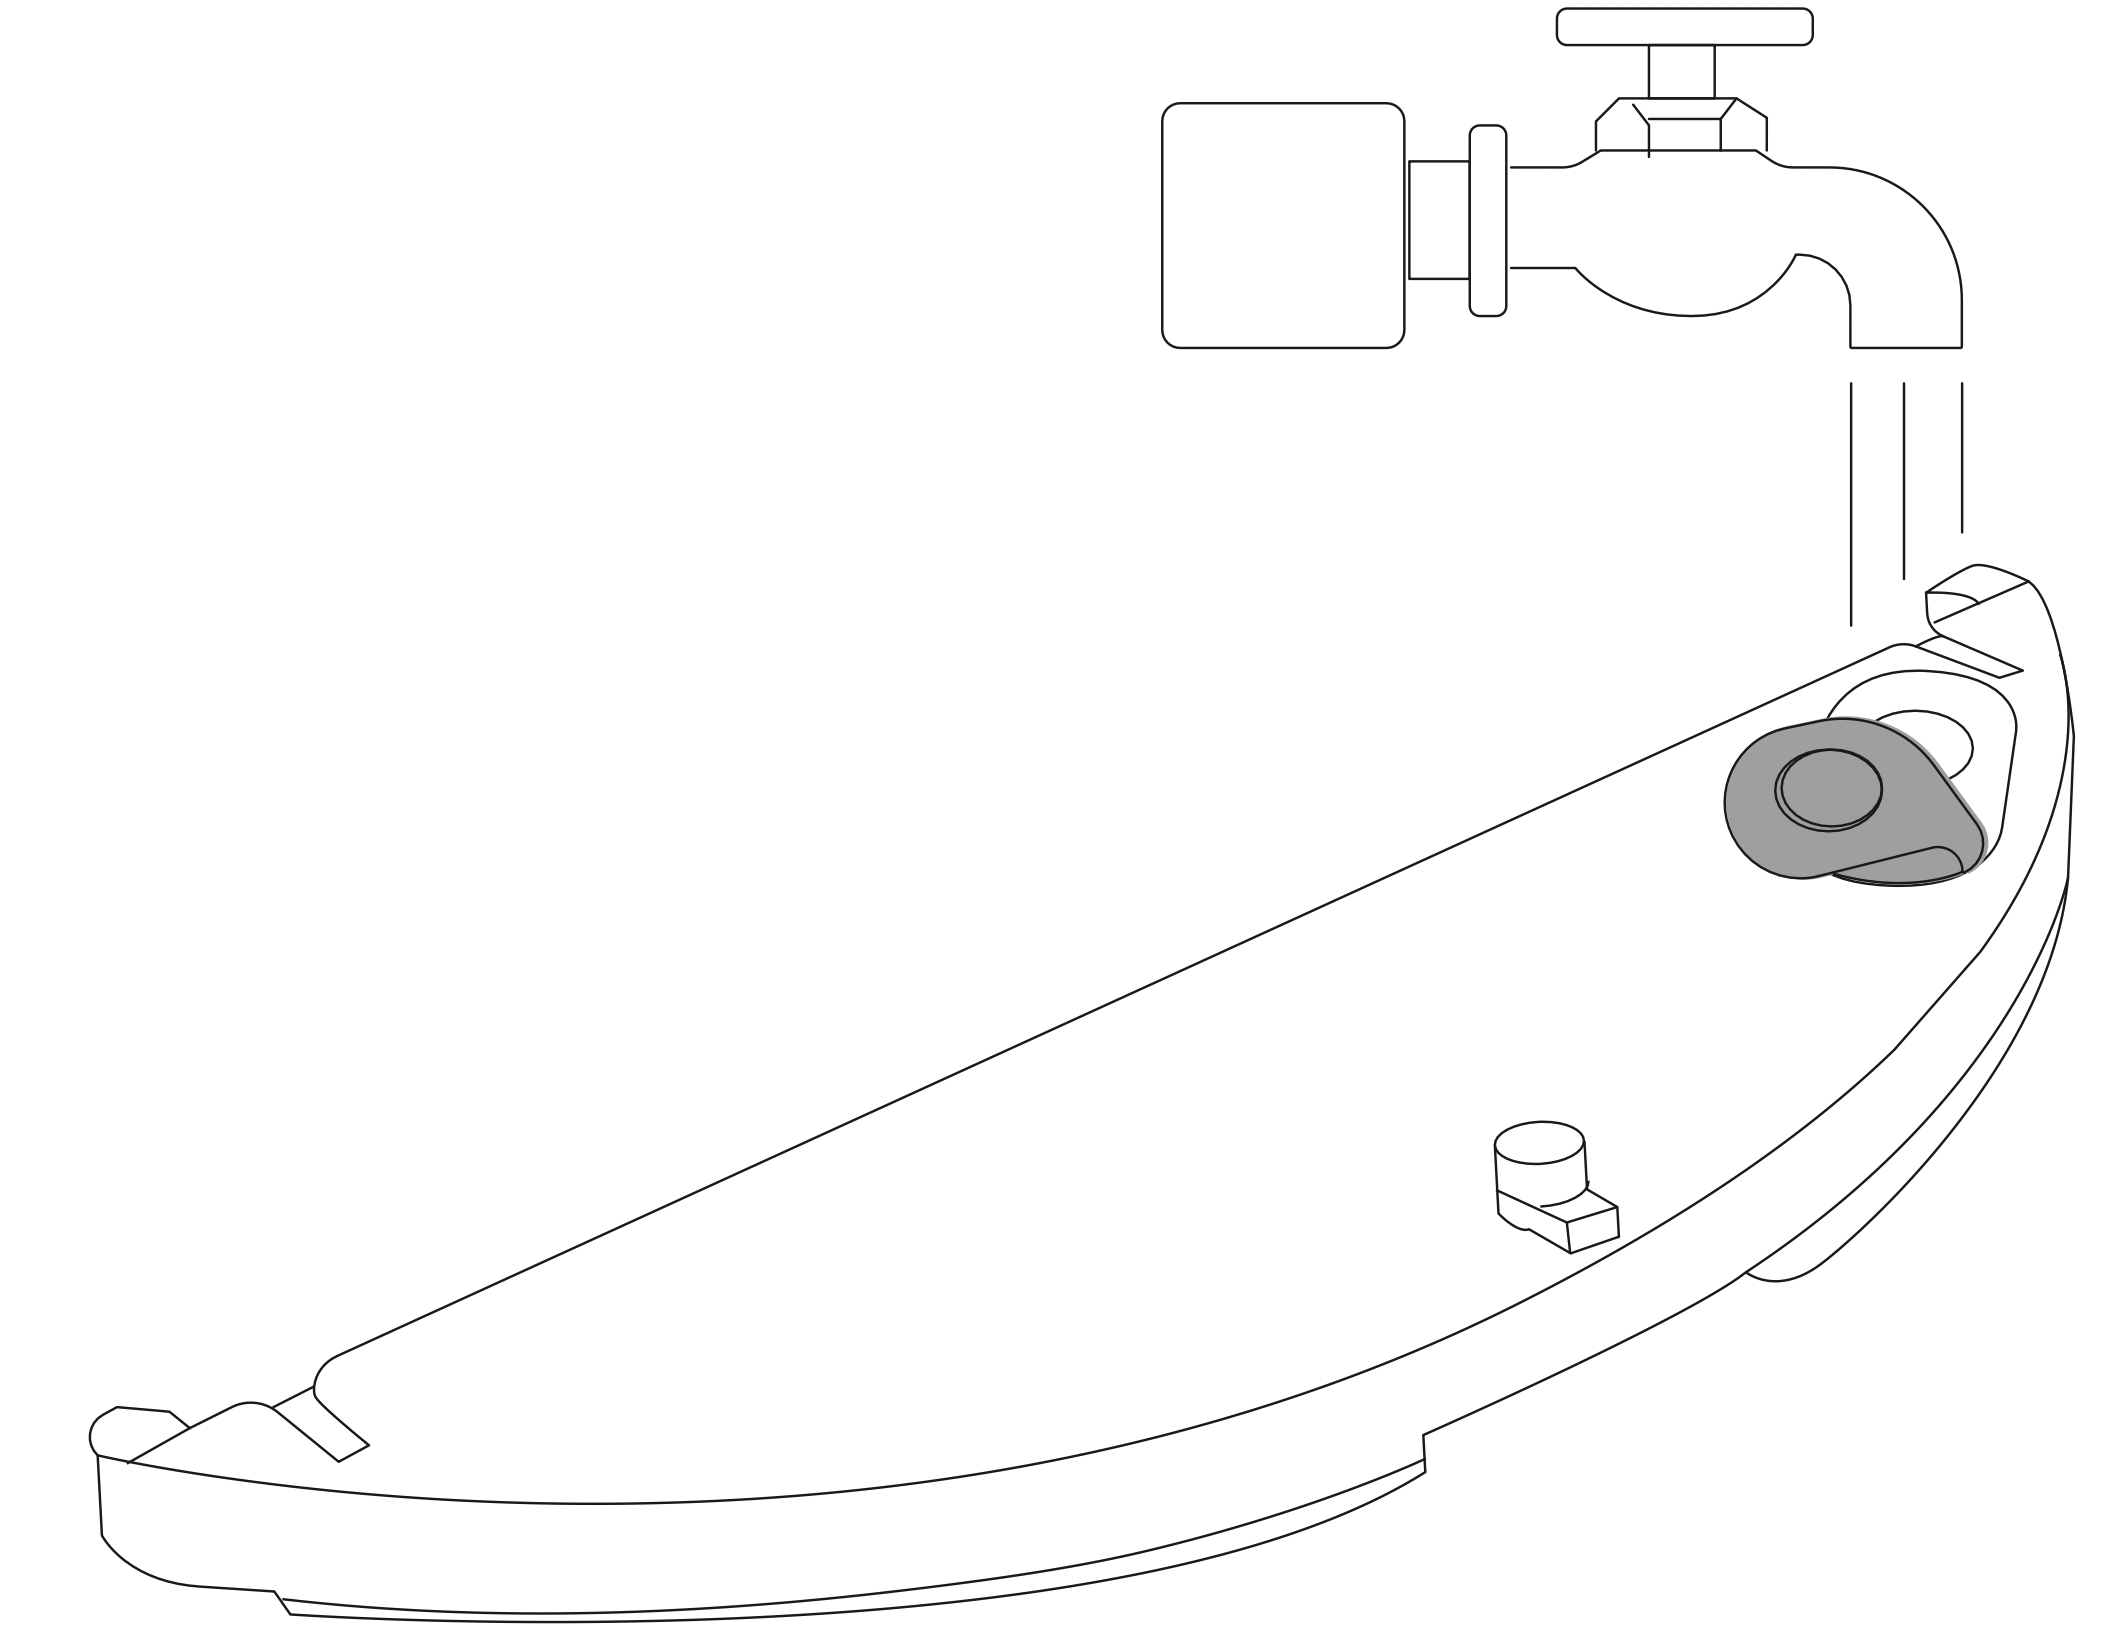
- Before mopping, attach the waterproof pad to the Charging Base to keep the floor dry. Make sure it is firmly installed. Skip this step if mopping is not needed.
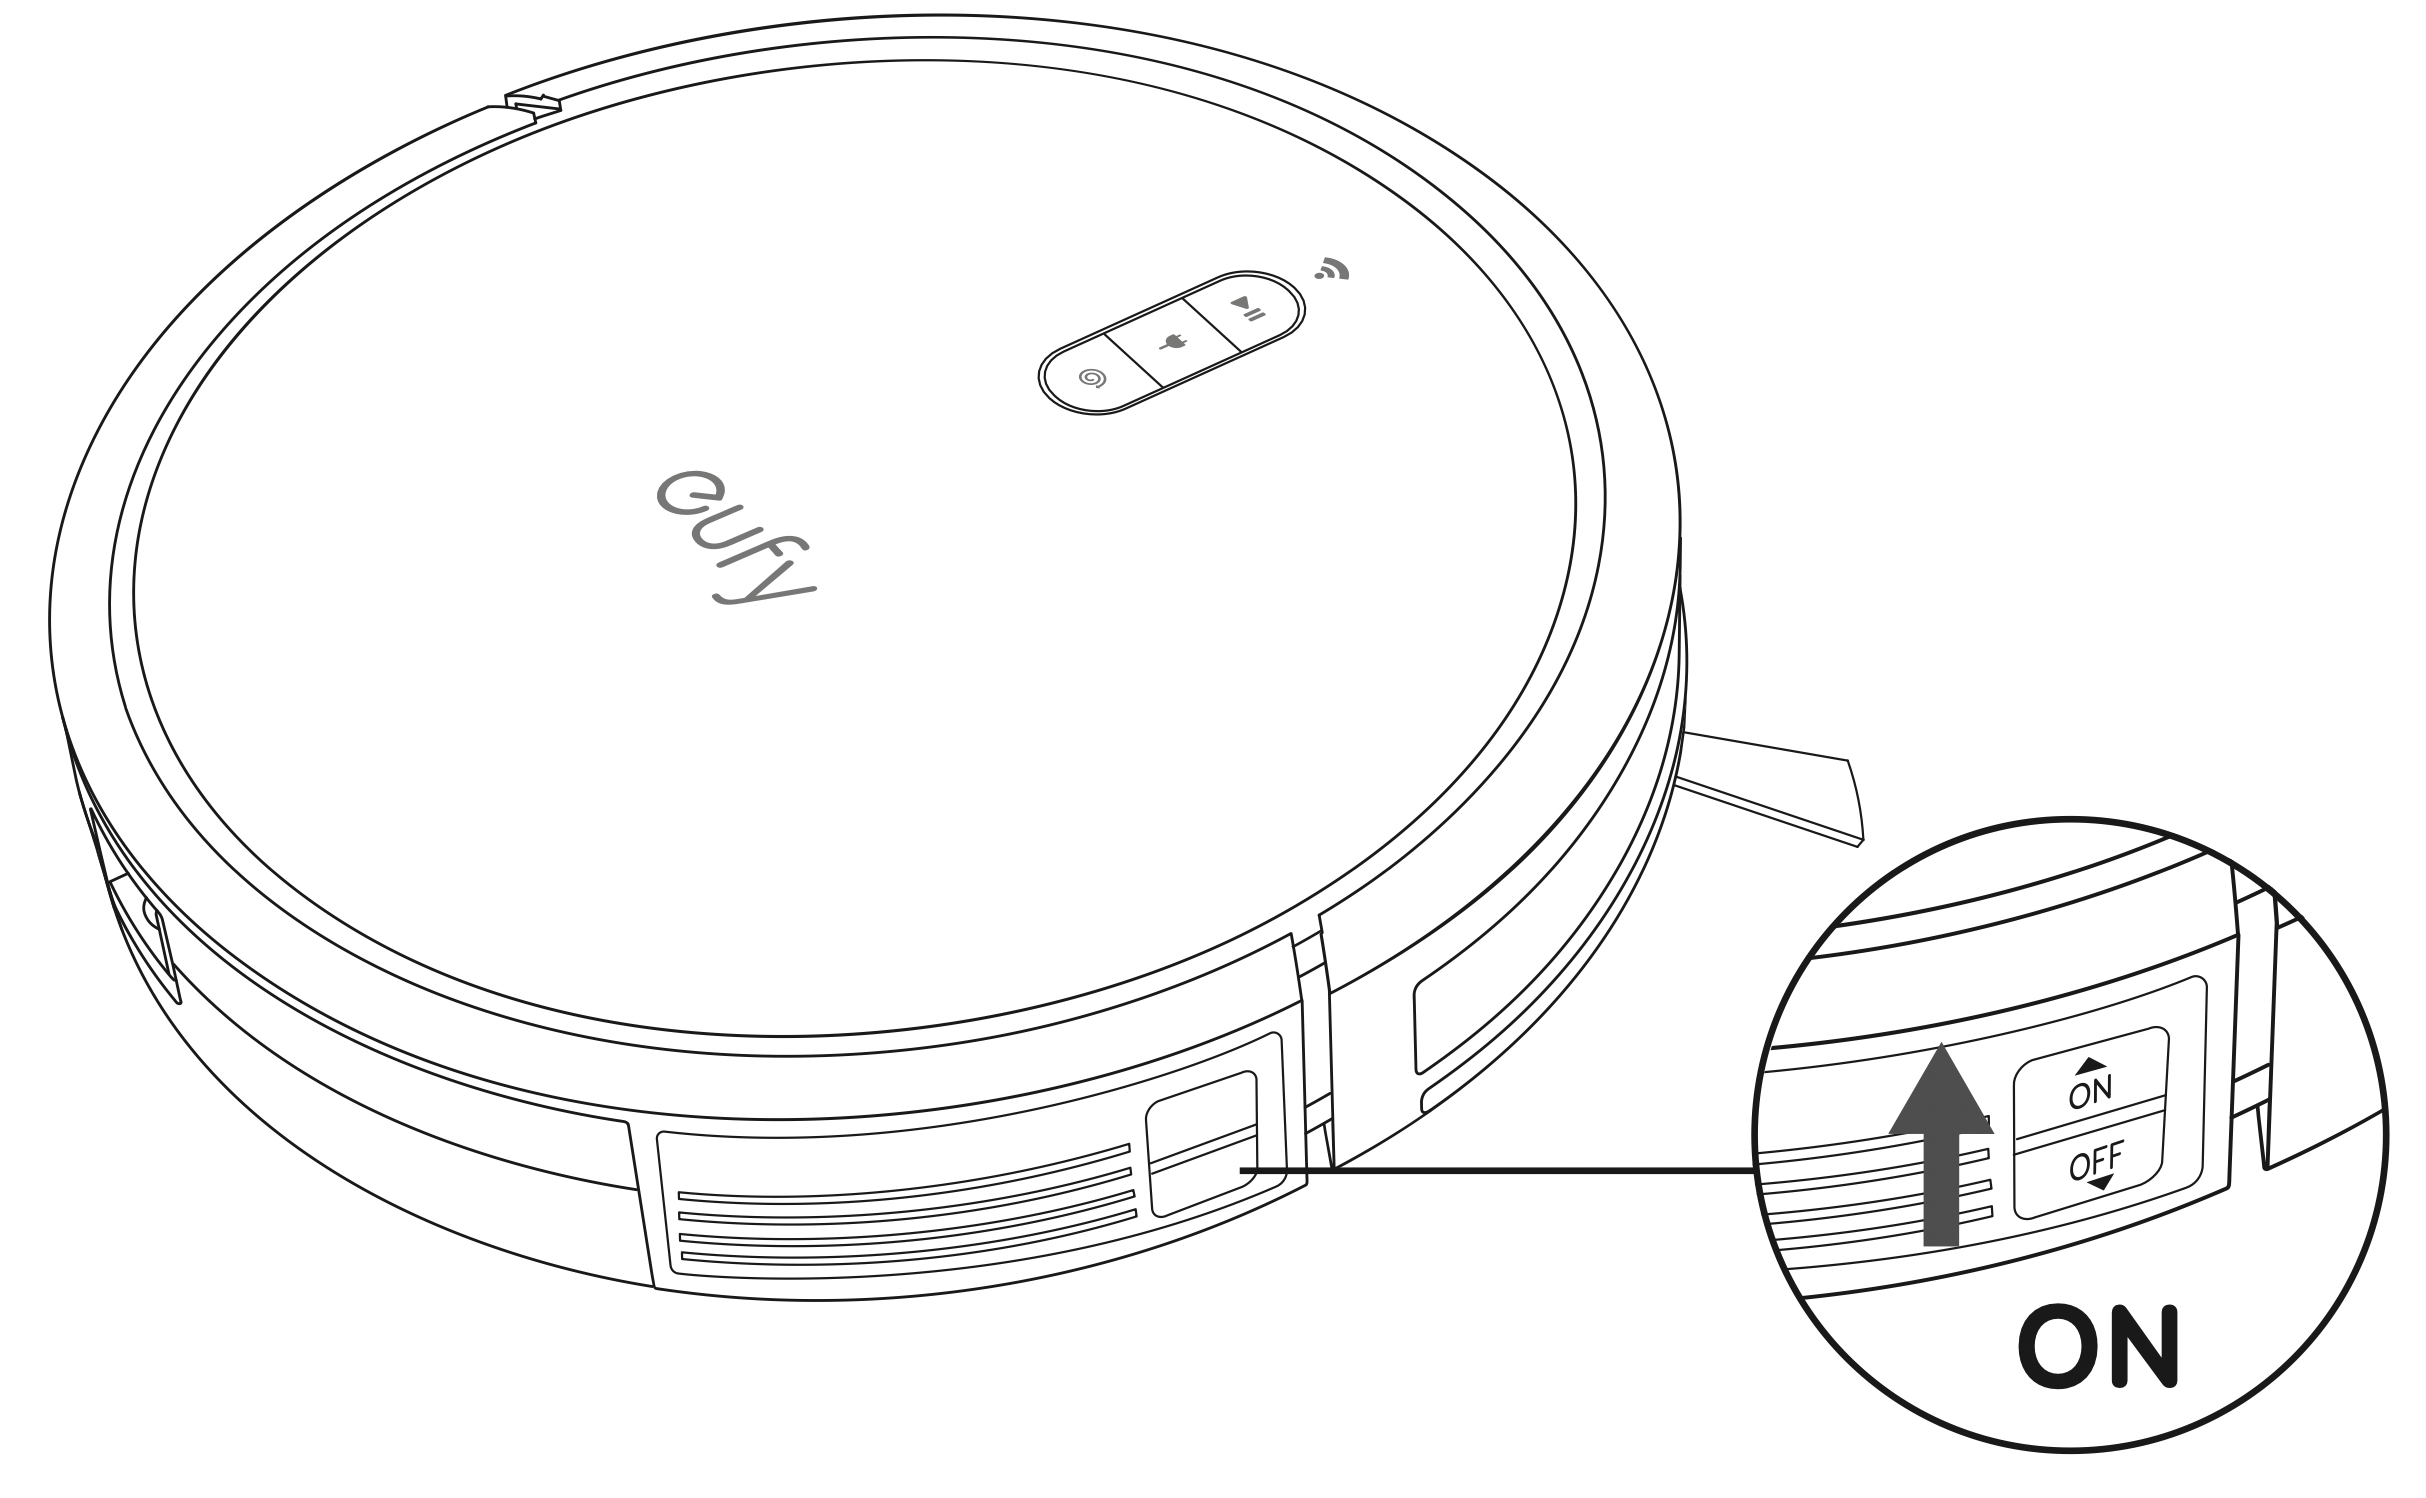
- Turn on the main power switch at the right side of RoboVac.
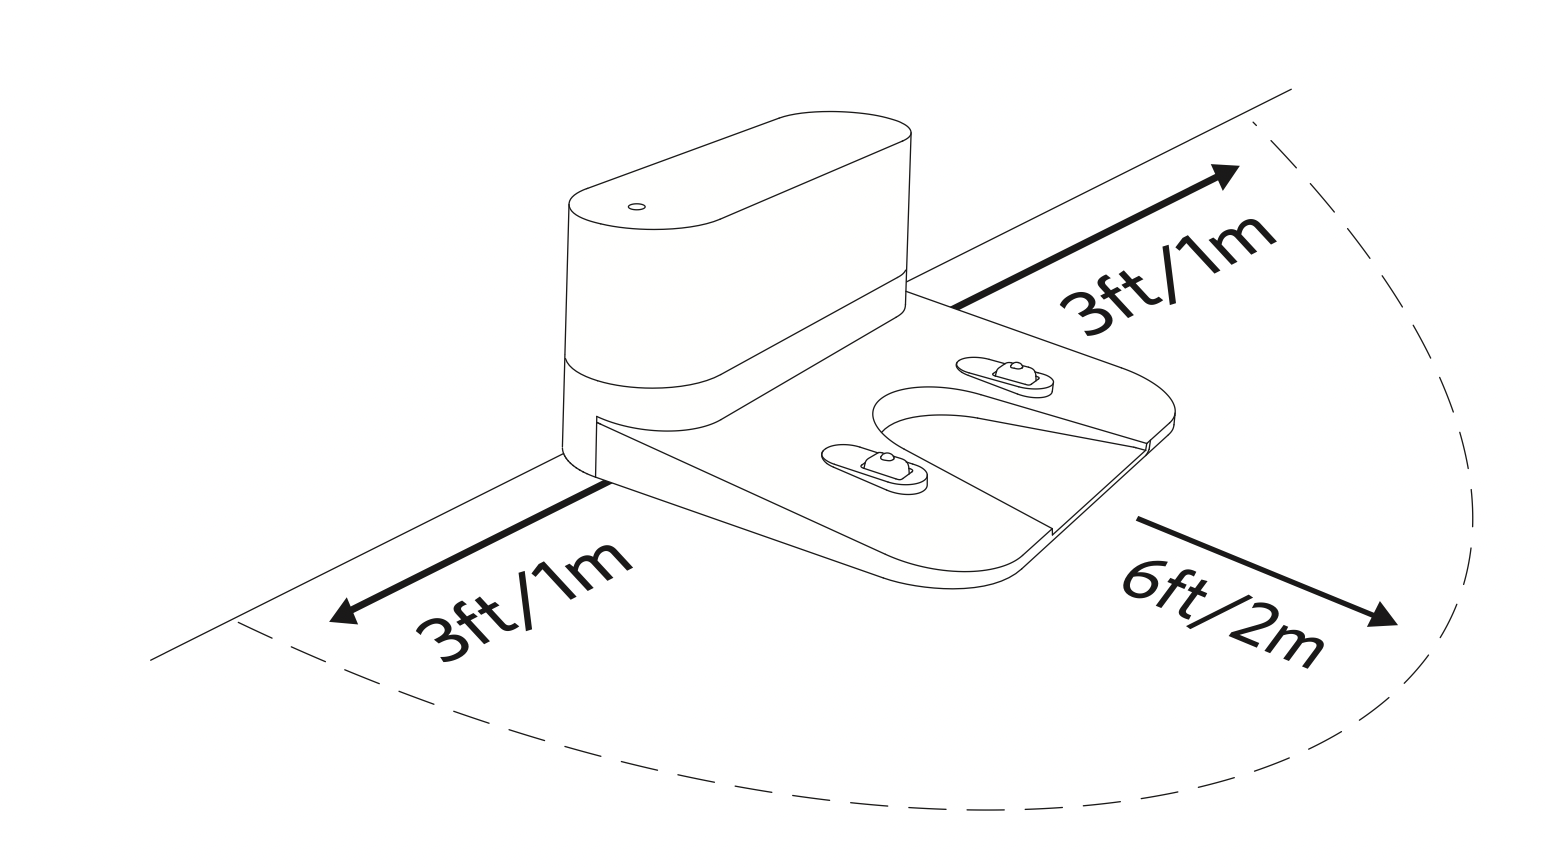
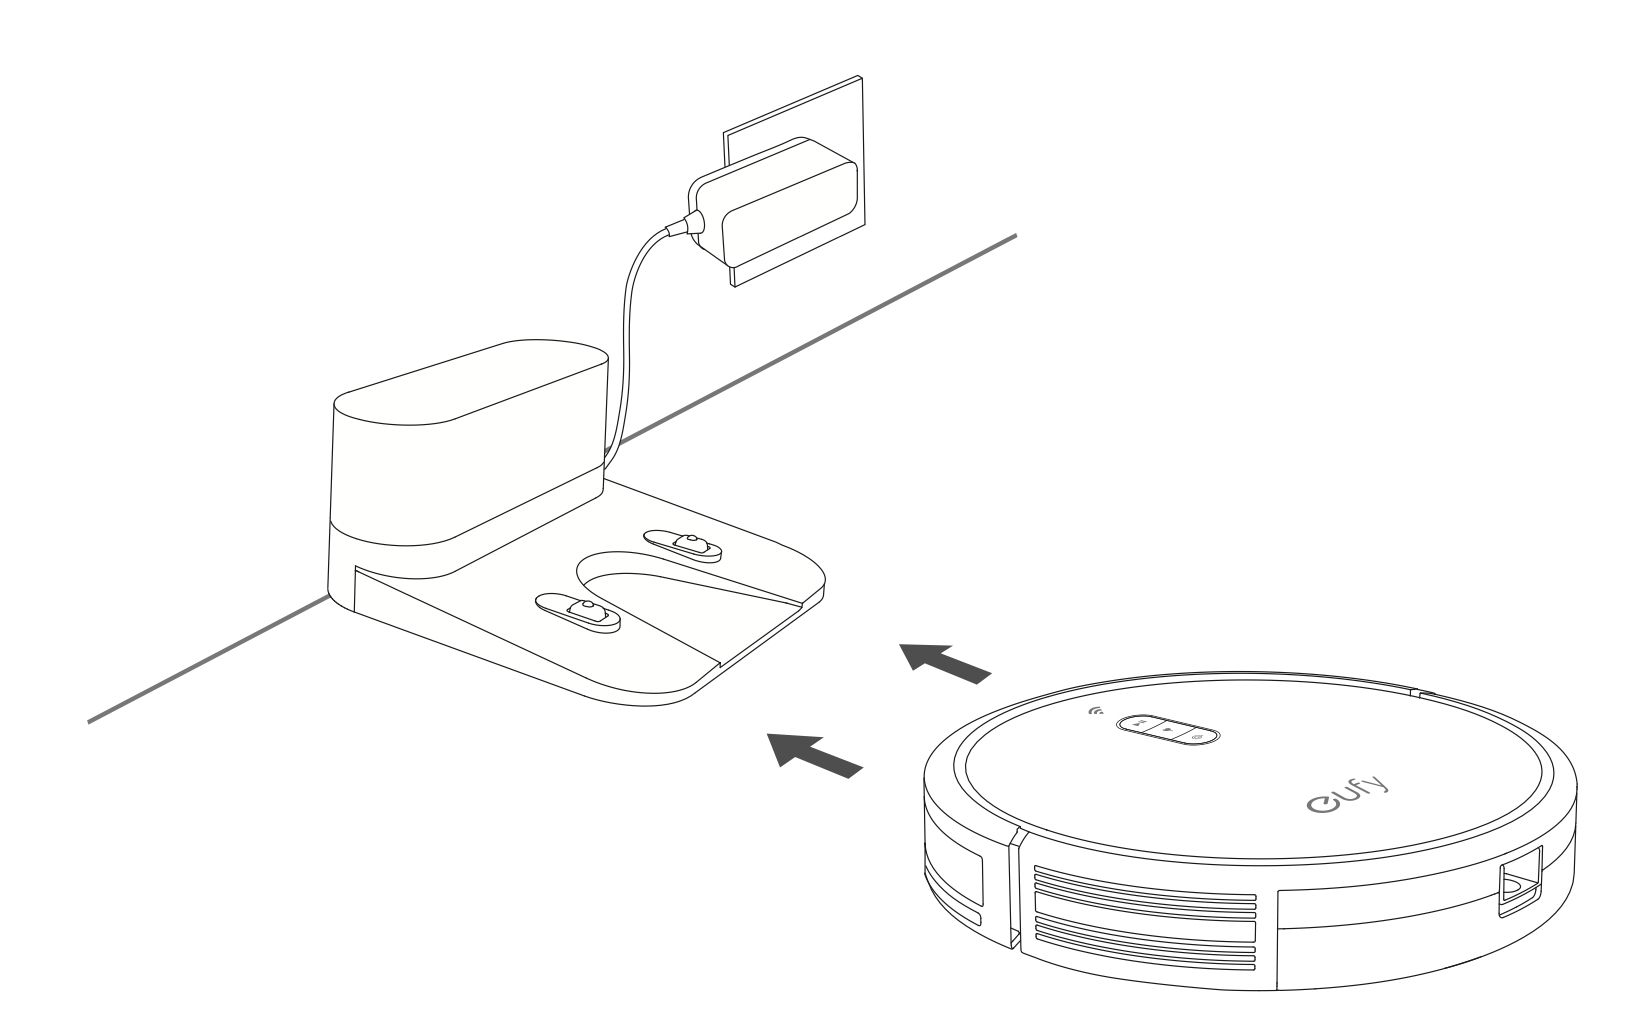
- Place the Charging Base on a level surface and against a wall.
- Allow the clearance of at least 3ft / 1m on each side and at least 6ft/2m in front of the Charging Base. If there is not enough room, move the Charging Base to a new place and check whether RoboVac can return to it normally; if not, contact eufy customer service for help.
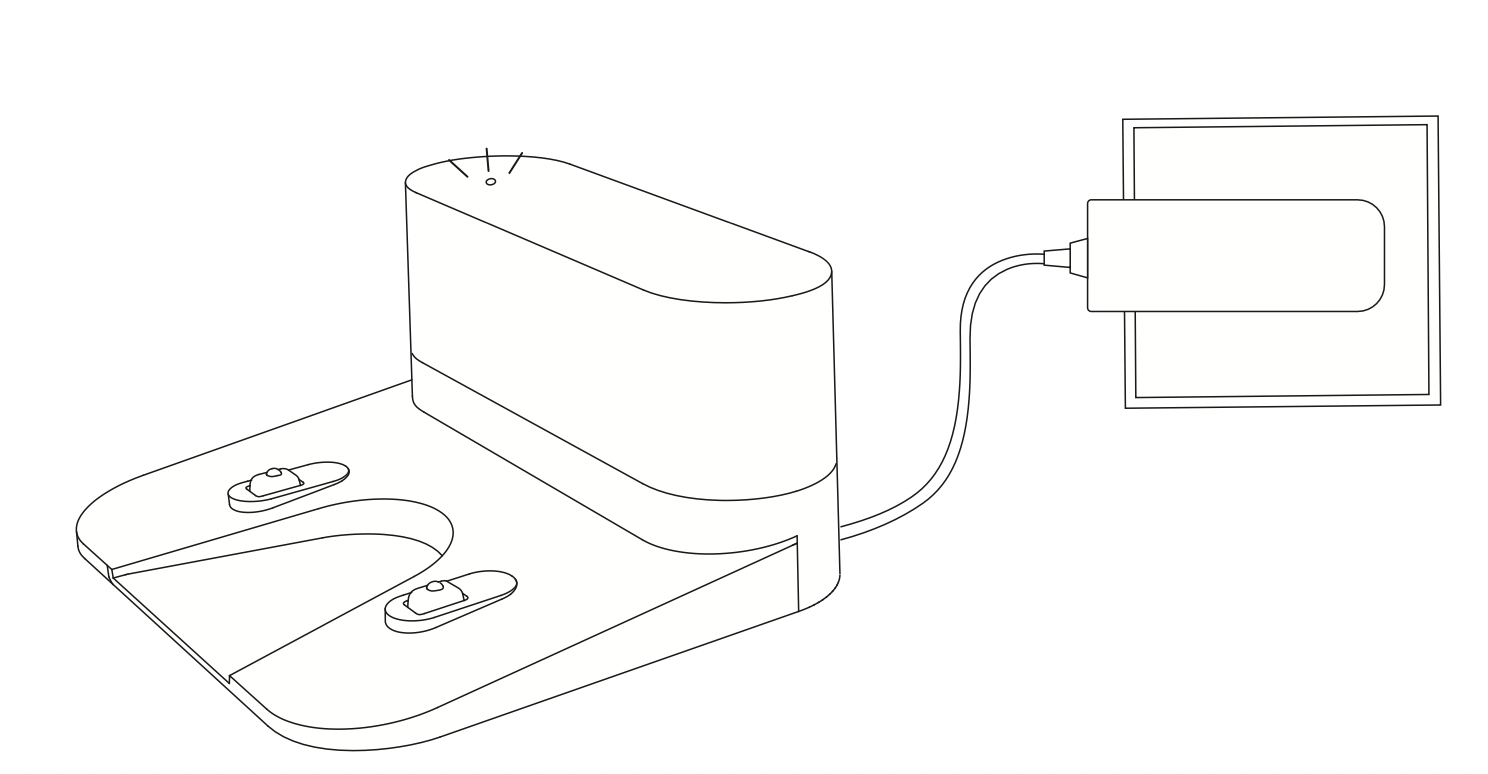
- Connect the round connector of the adapter into the power socket on the Charging Base and the other end into a wall outlet.
When the Charging Base connects to AC power, the LED indicator on the Charging Base is SOLID WHITE.
Tips:
- Install the Charging Base in a location that RoboVac can easily access. It is recommended to place the Charging Base against a wall, and on a hard-level surface rather than on rugs or carpets.
- Always keep the Charging Base plugged in, otherwise RoboVac will not automatically return to it.
Charge Your RoboVac
- Make sure RoboVac is fully charged before use.
- RoboVac returns to the Charging Base at the end of a cleaning cycle or when its battery is running low.
Method 1: Attach RoboVac to the Charging Base by aligning its charging pins with the charging pins on the base.
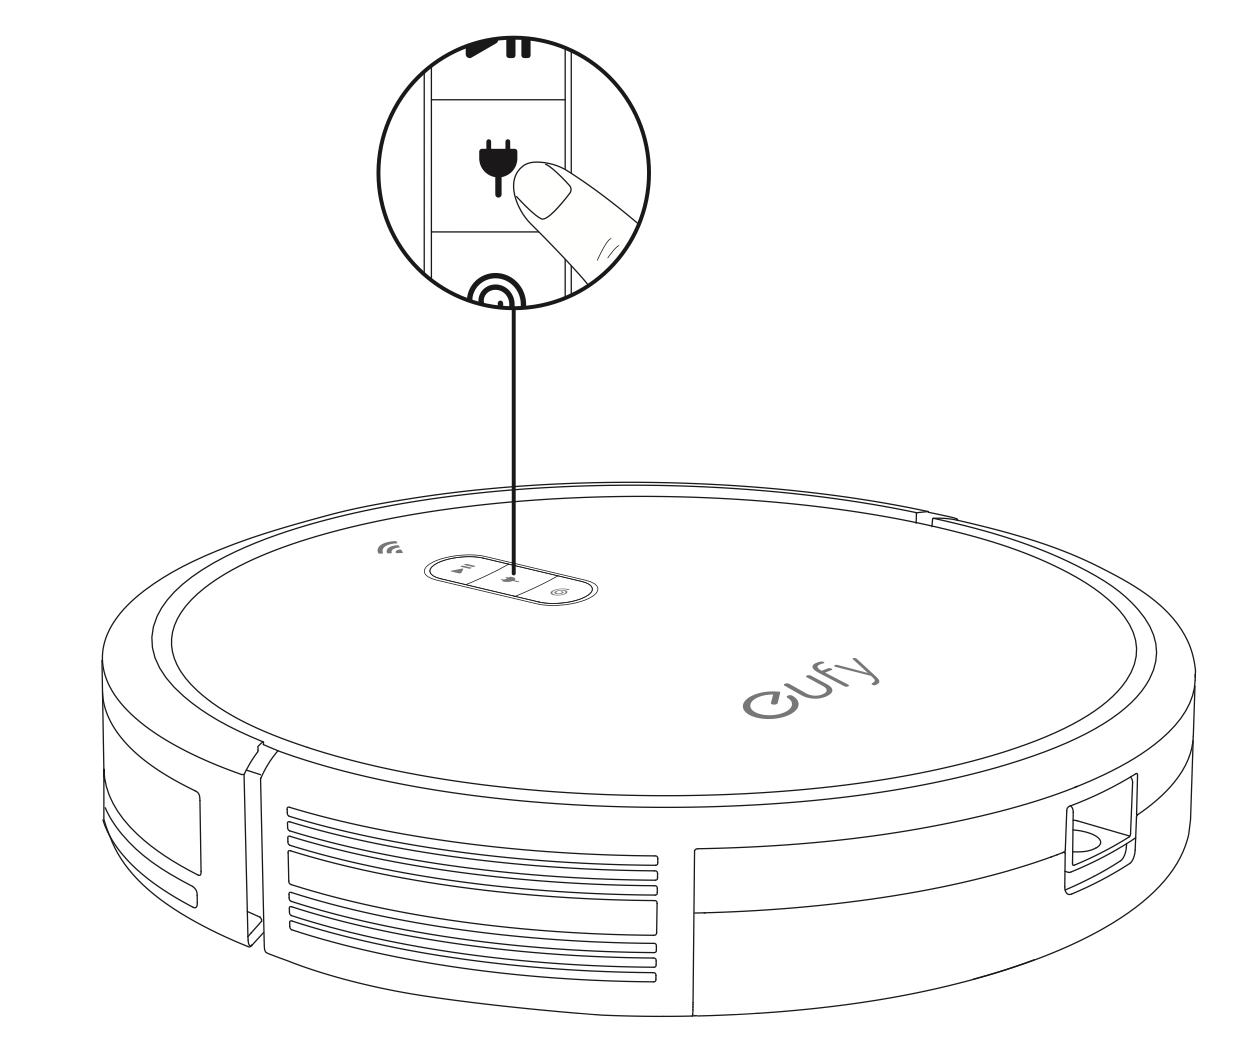
Method 2: Press  to return RoboVac to the Charging Base
Tips: Turn off the main power switch if RoboVac will not be used for along period of time. To preserve the battery's lifespan, recharge at least once every 6 months.
Start / Pause Cleaning
Tips:
- Make sure the main power switch at the side of RoboVac is turned on before use.
- You can also start or pause cleaning via the EufyHome app.
- Press
 on RoboVac to start cleaning in Auto Mode.
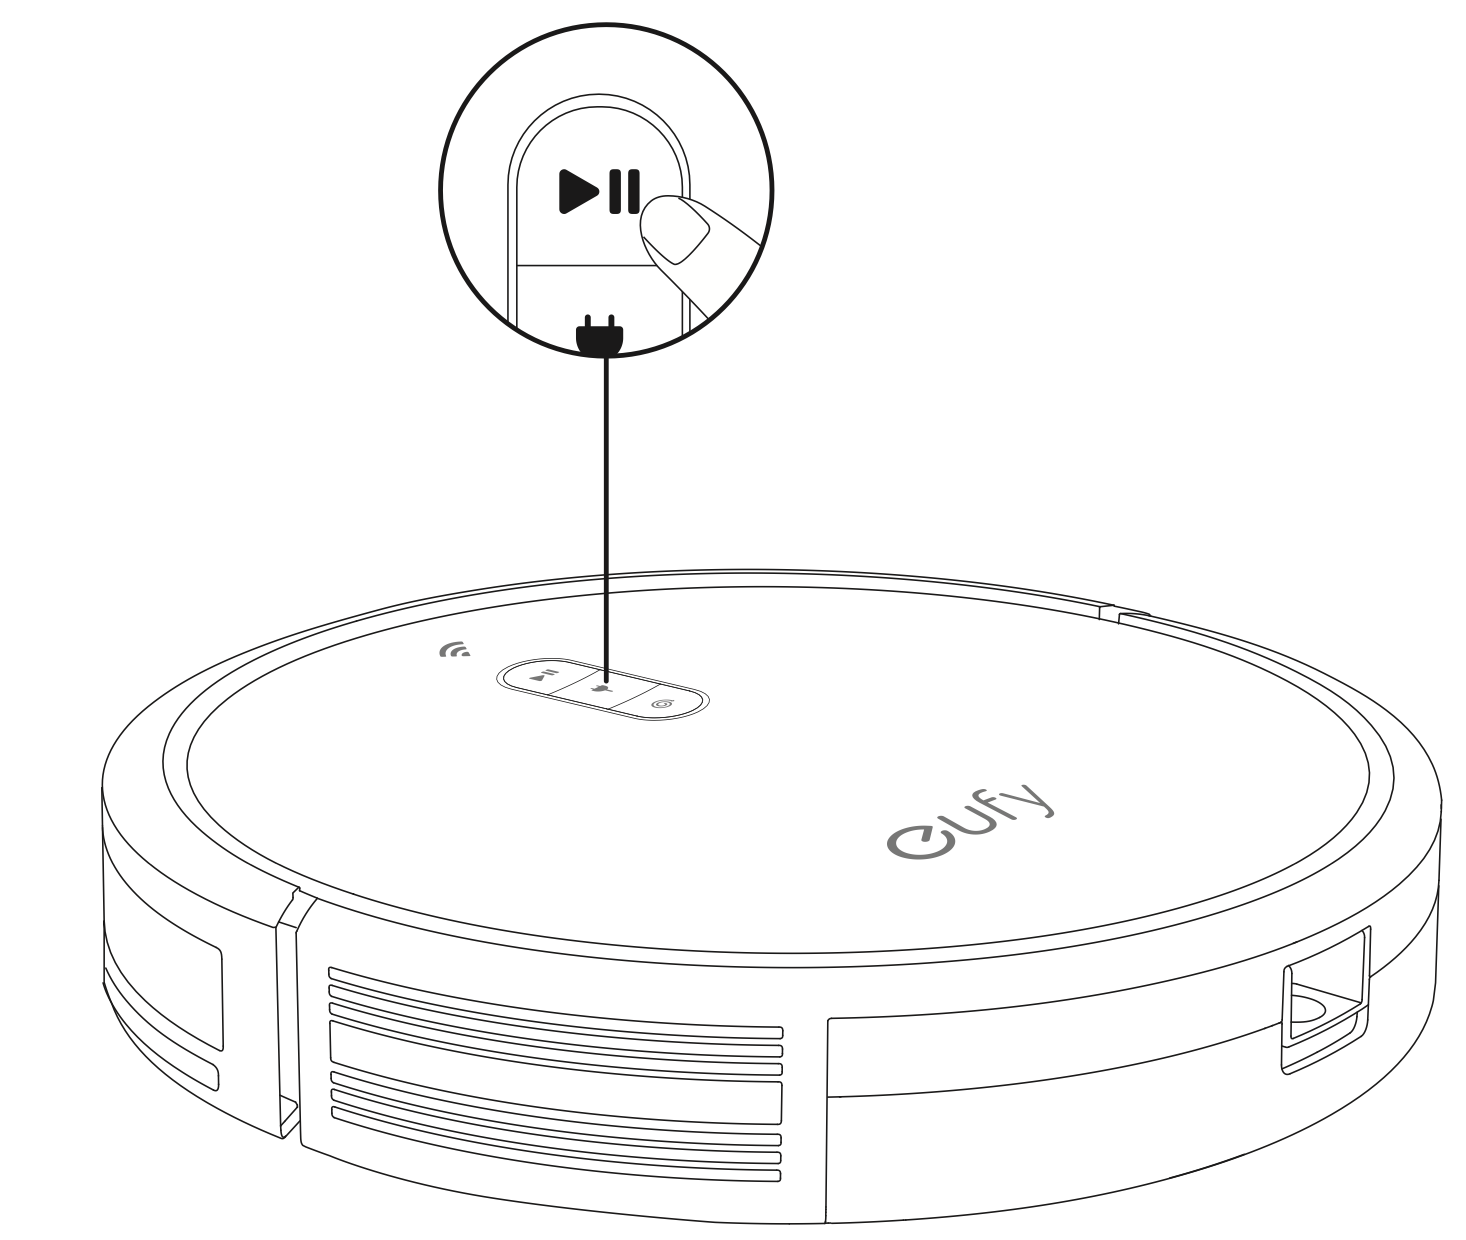
- Press again to pause cleaning.
Select a Cleaning Mode
Tips:You can also select a cleaning mode via the EufyHome app.
Auto-cleaning
After startup, RoboVac moves from the Charging Base and automatically determines its cleaning route, following a Z-shaped cleaning method. When the entire clean is finished, RoboVac automatically returns to the Charging Base.
Press on RoboVac to start cleaning in Auto Mode.

Tips:
- In the EufyHome app, RoboVac can be set to return to the Charging Base automatically if the battery level becomes low. Once recharged, RoboVac will resume to finish the remaining cleaning.
- By default, RoboVac starts in Auto cleaning mode when it is turned on.
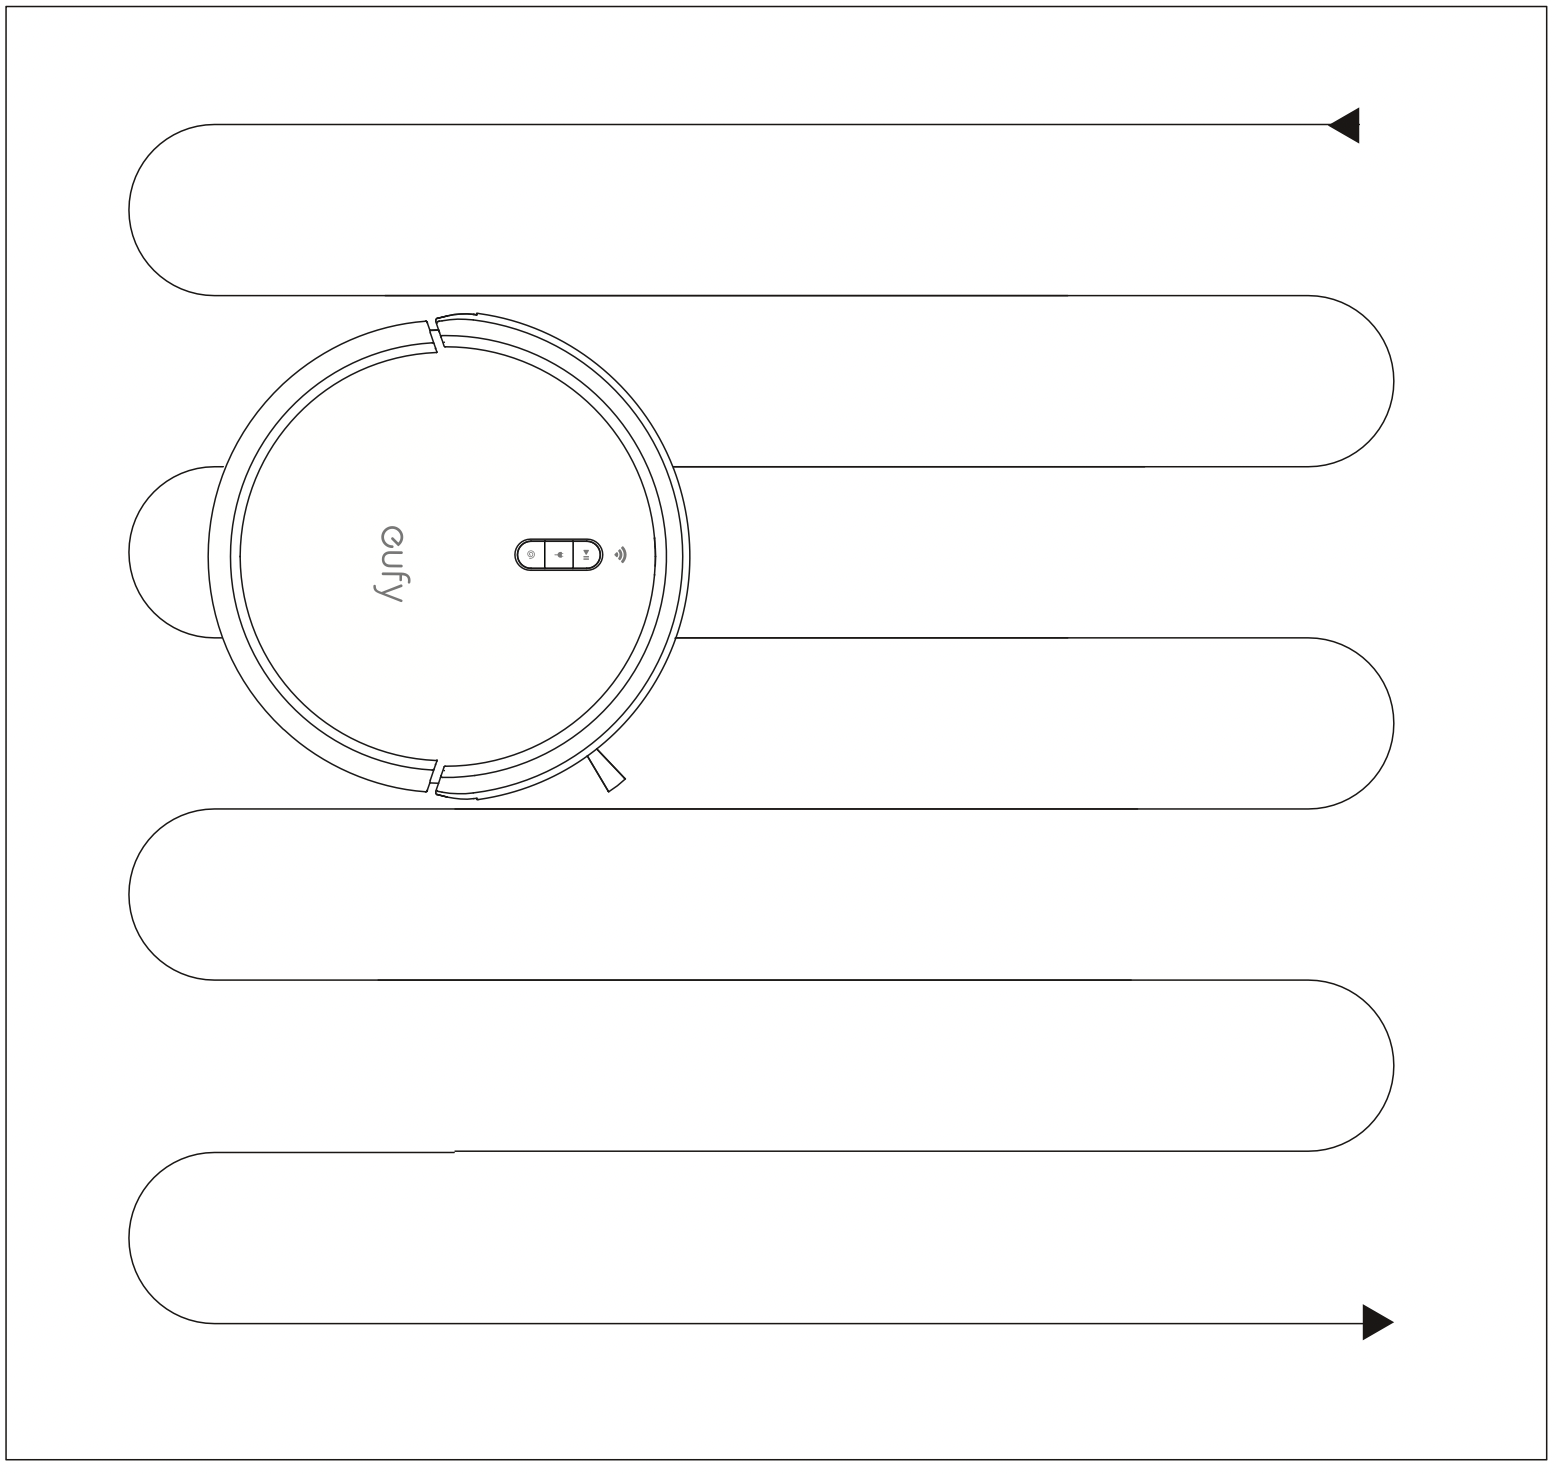
Spot cleaning
RoboVac intensively cleans a specific area in a spiral pattern, useful if there is a concentrated area of dust or debris. In Spot mode, RoboVac will stop cleaning after 2 minutes.
Press  on RoboVac to start cleaning in Spot Mode.

Select a Suction Power Level
In the EufyHome app, select a suction power level according to your needs:
- Standard(Default)
- Turbo
- Max
- BoostlQTM
Tip: When RoboVac starts cleaning the next time, it will clean according to the suction power level you previously selected.
Select BoostlQTM feature
In the EufyHome app, select the BoostlQTM feature according to your needs. While cleaning at standard suction power level, RoboVac will automatically increase the suction power if it detects that stronger power is needed to ensure the best clean. BoostlQTM is ideal for cleaning thicker carpets and hard-to-sweep messes, which will reduce the total cleaning time, but increase the noise level. If the vacuuming noise caused by BoostlQTM disturbs you, you can disable this feature.
Use Mopping System
Tips
- The mopping mode is not recommended when no one is at home.
- Only use the mopping mode on a floor without carpets.
- Remove the water tank when RoboVac is under charging or not in use.
- Before mopping, install the waterproof pad under the Charging Base to protect the floor.
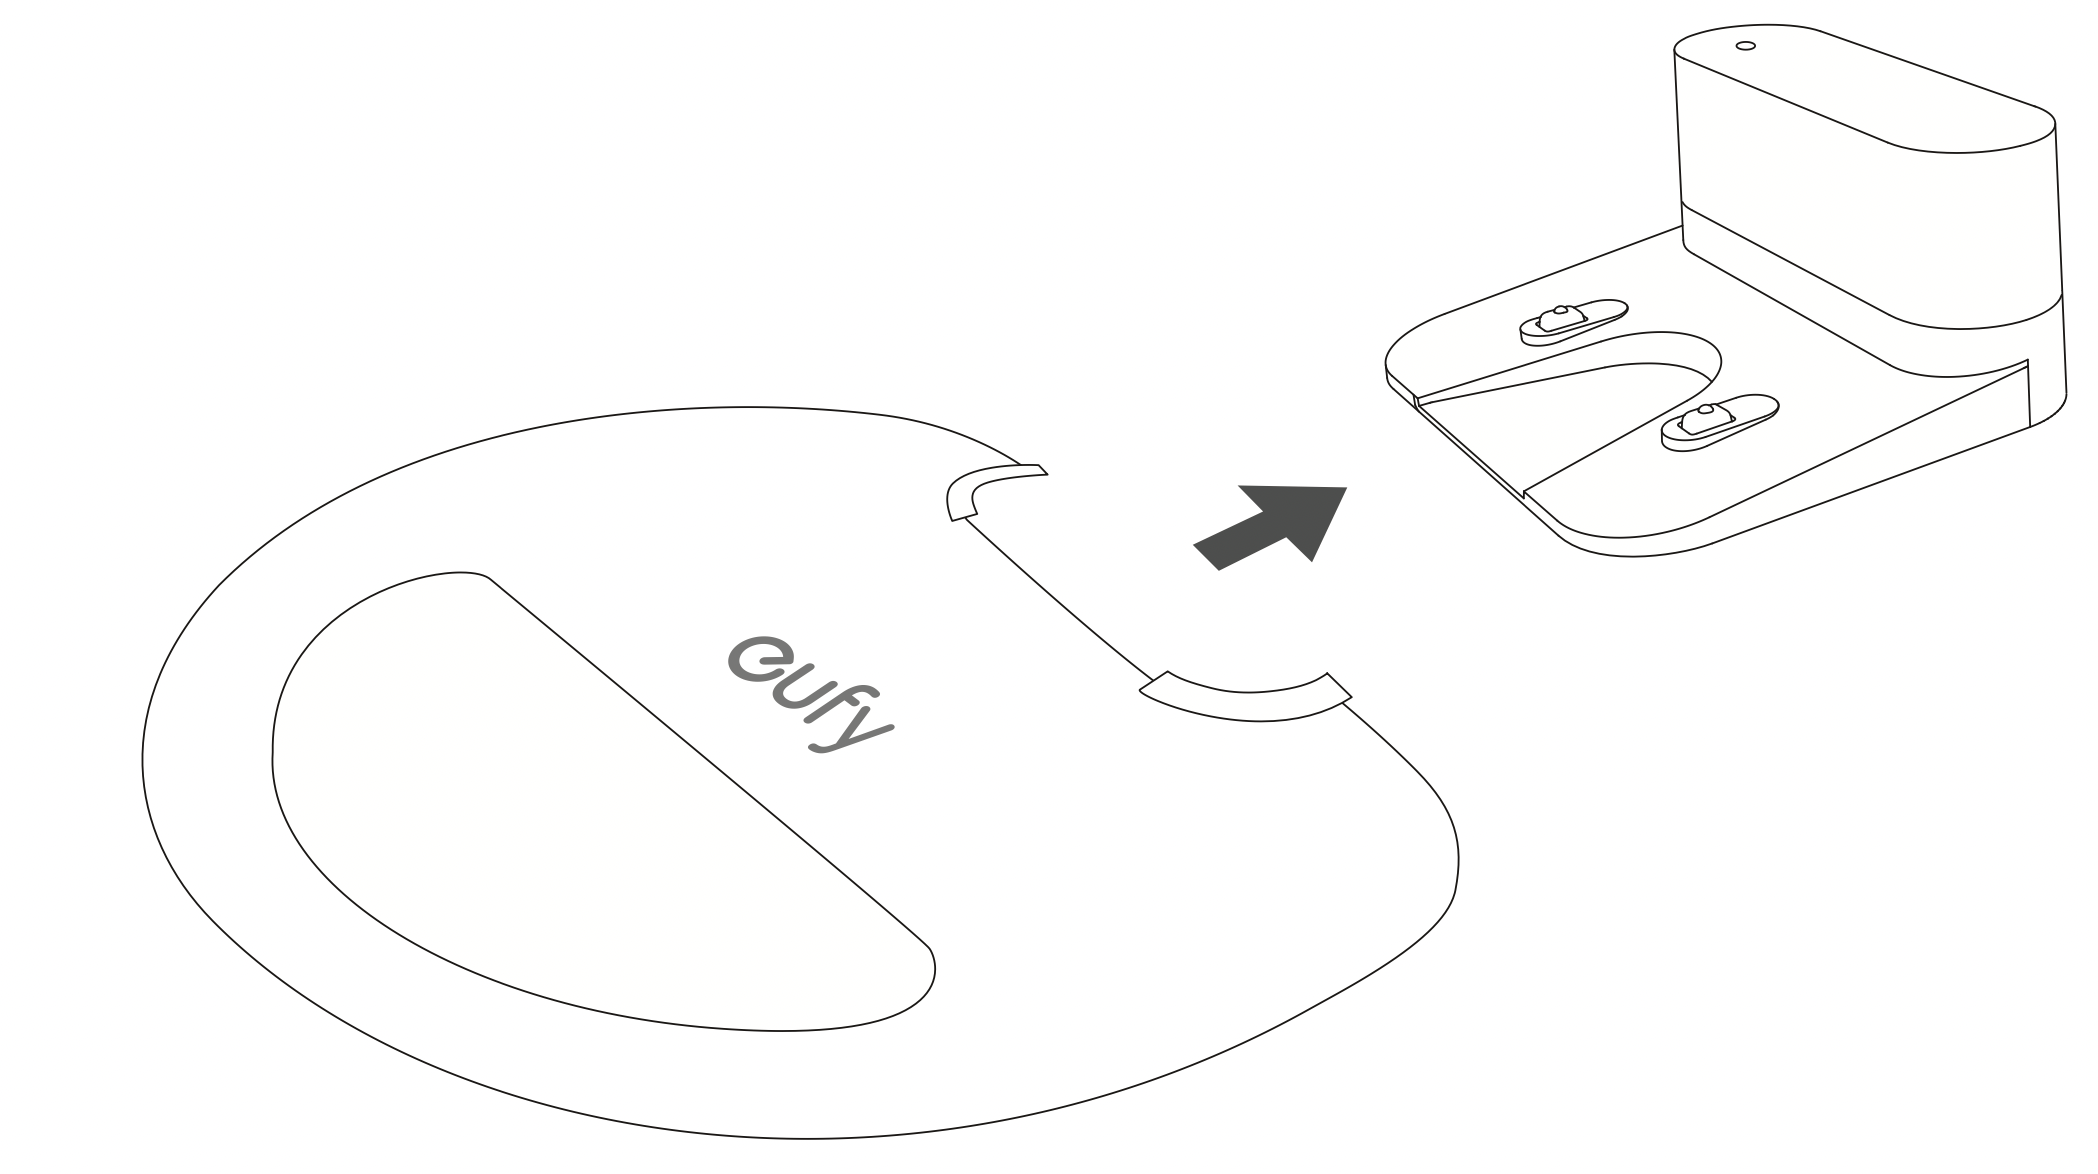
- Wet the mopping cloth and wring it until it does not drip. Insert the cloth along the bracket slot and stick it firmly.
Use either the washable mopping cloth or the disposable cloth for mopping.
- Open the water inlet cover to fill the water tank, then close the cover.
Tip: Do not use floor cleaner or detergent which may block the filter elements.
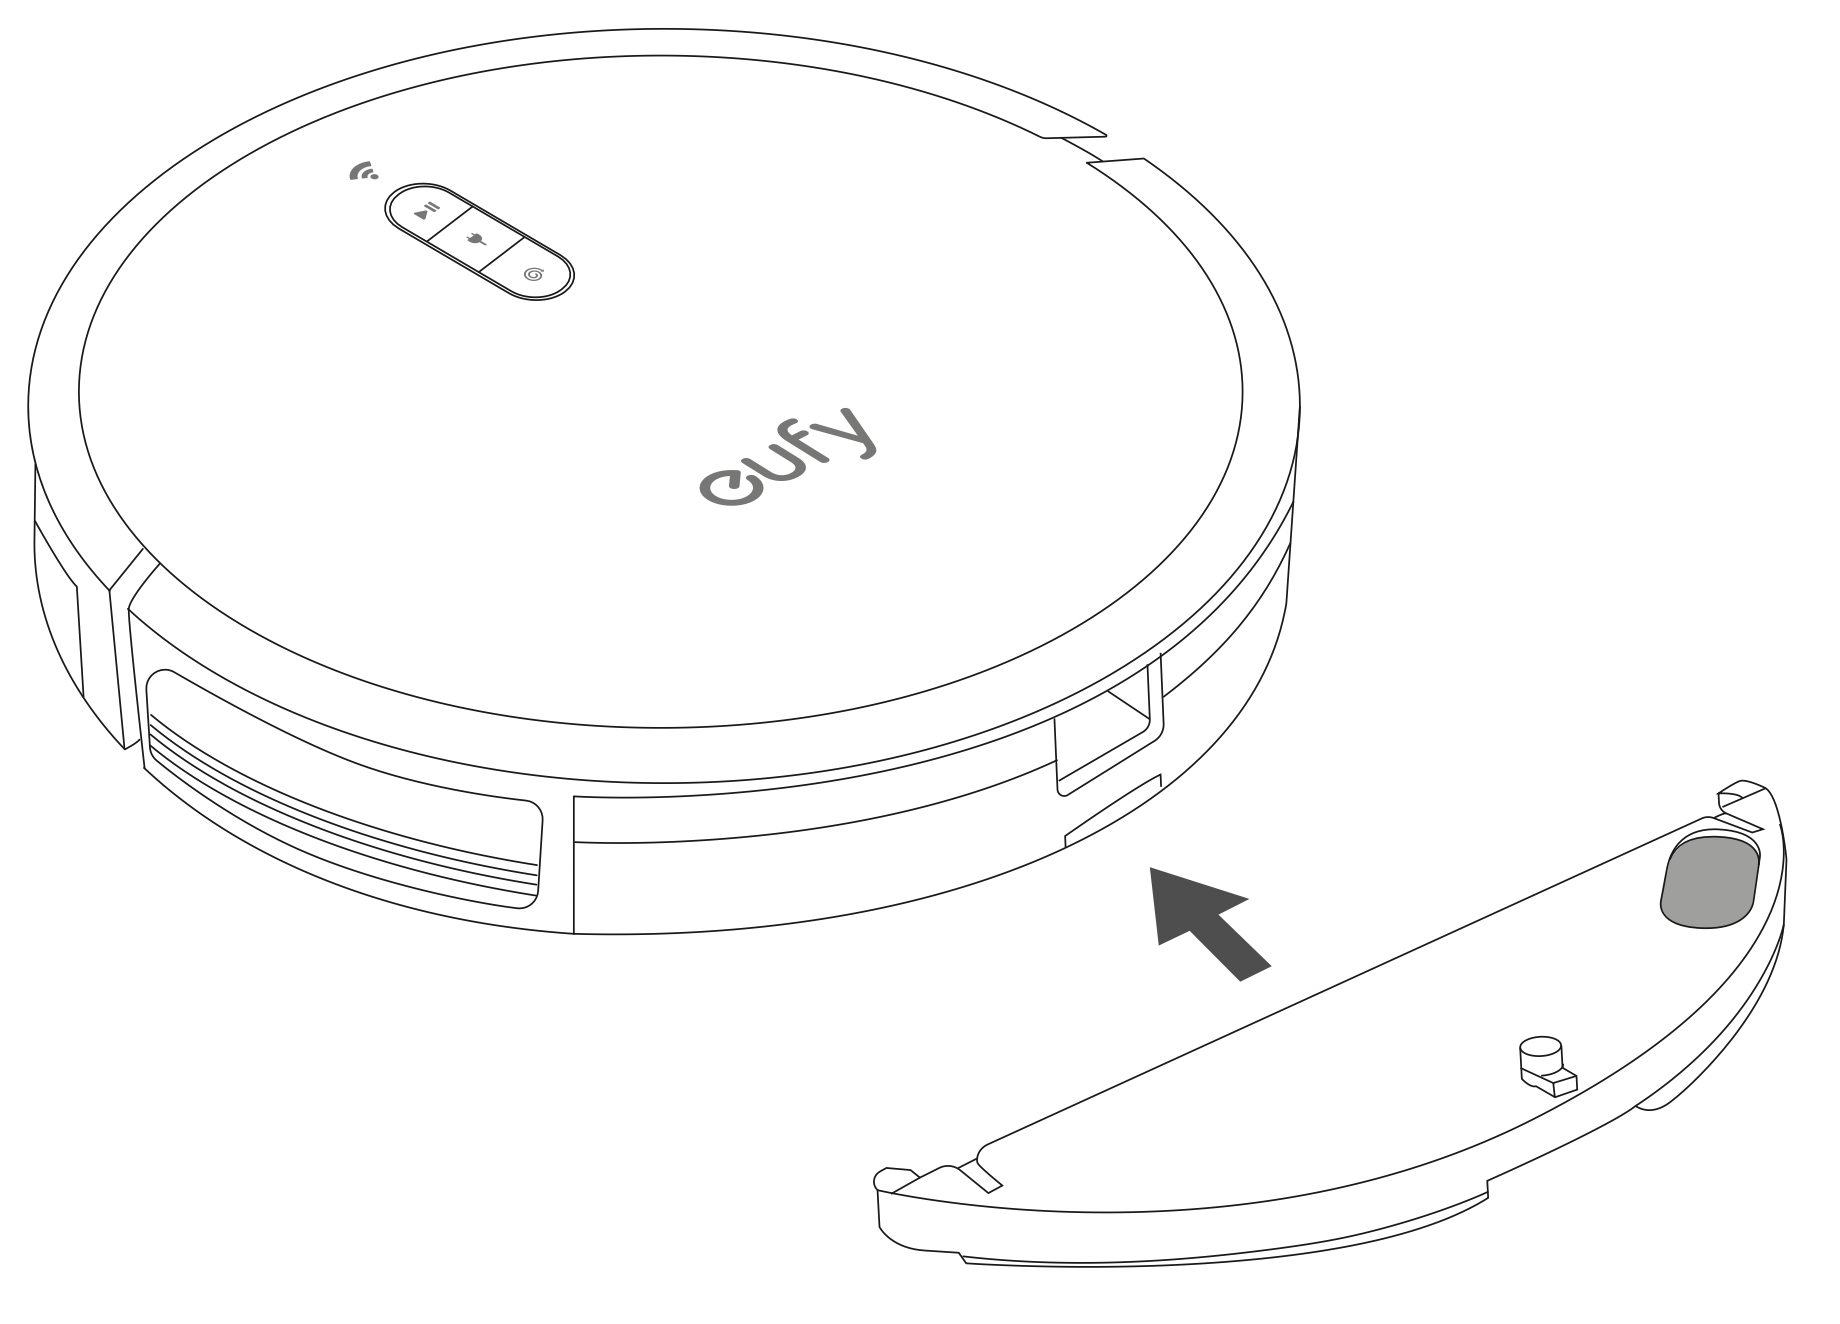
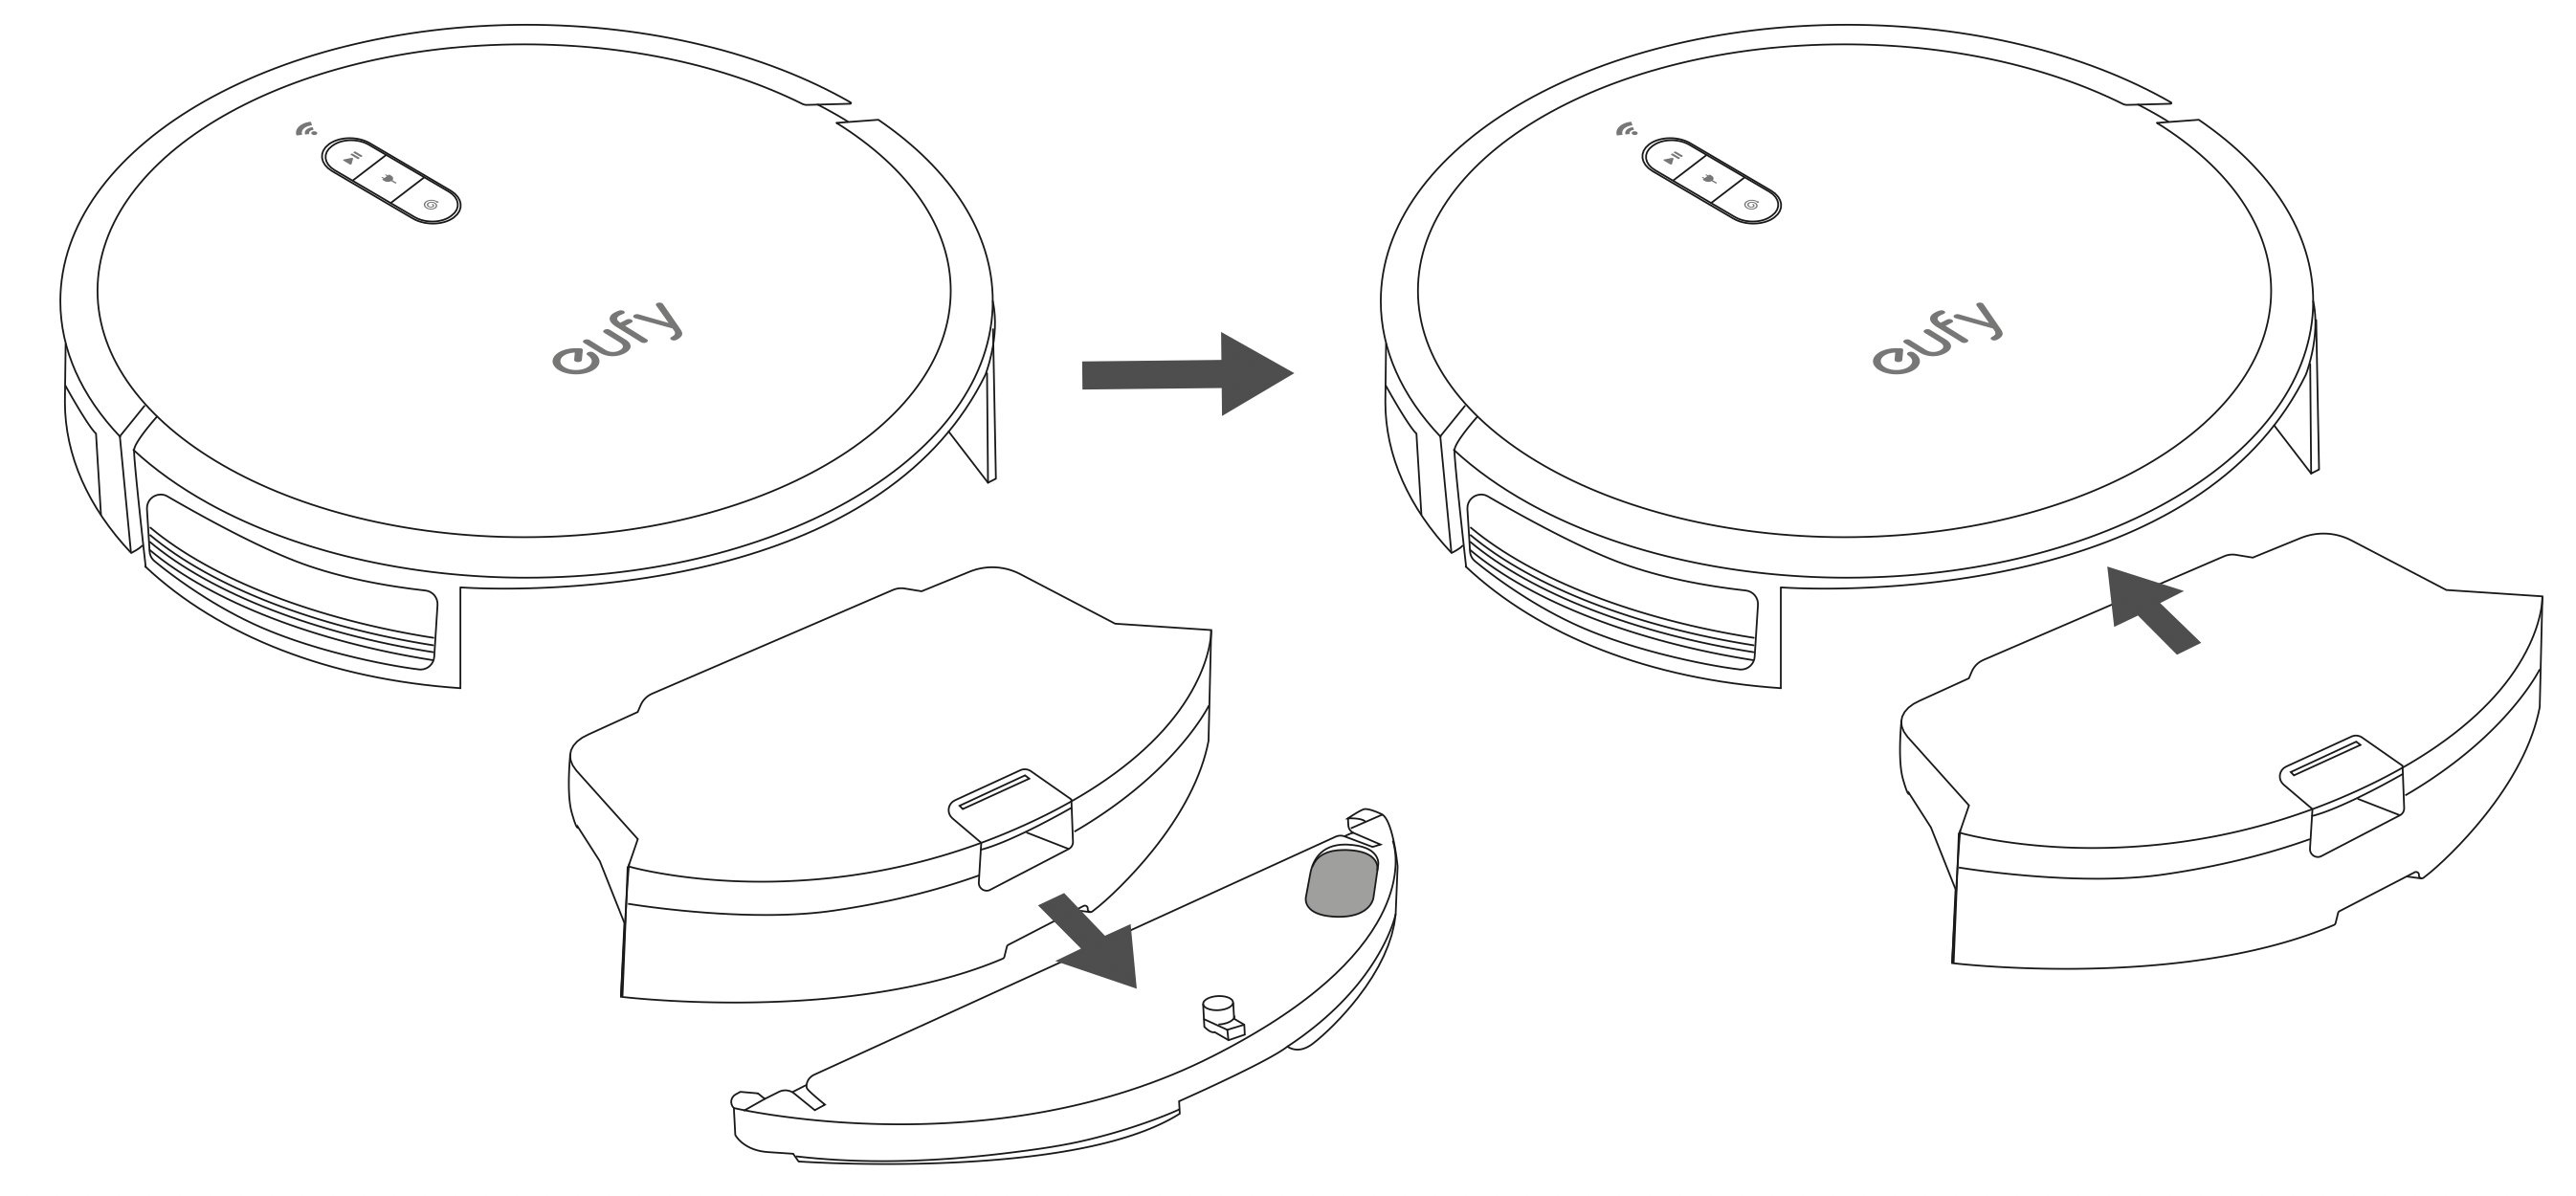
- Install the water tank into the bottom of RoboVac until a click is heard.
Tip: The mopping mode is only intended for a clean floor without stubborn stains. To achieve a better mopping effect, it is recommended to clean the floor with RoboVac three times before installing the mopping module.
- Select a cleaning mode to start cleaning.
RoboVac automatically sweeps and mops in the selected mode.
- When RoboVac finishes working and returns to the Charging Base, press the release button to remove the dust collector and the water tank.
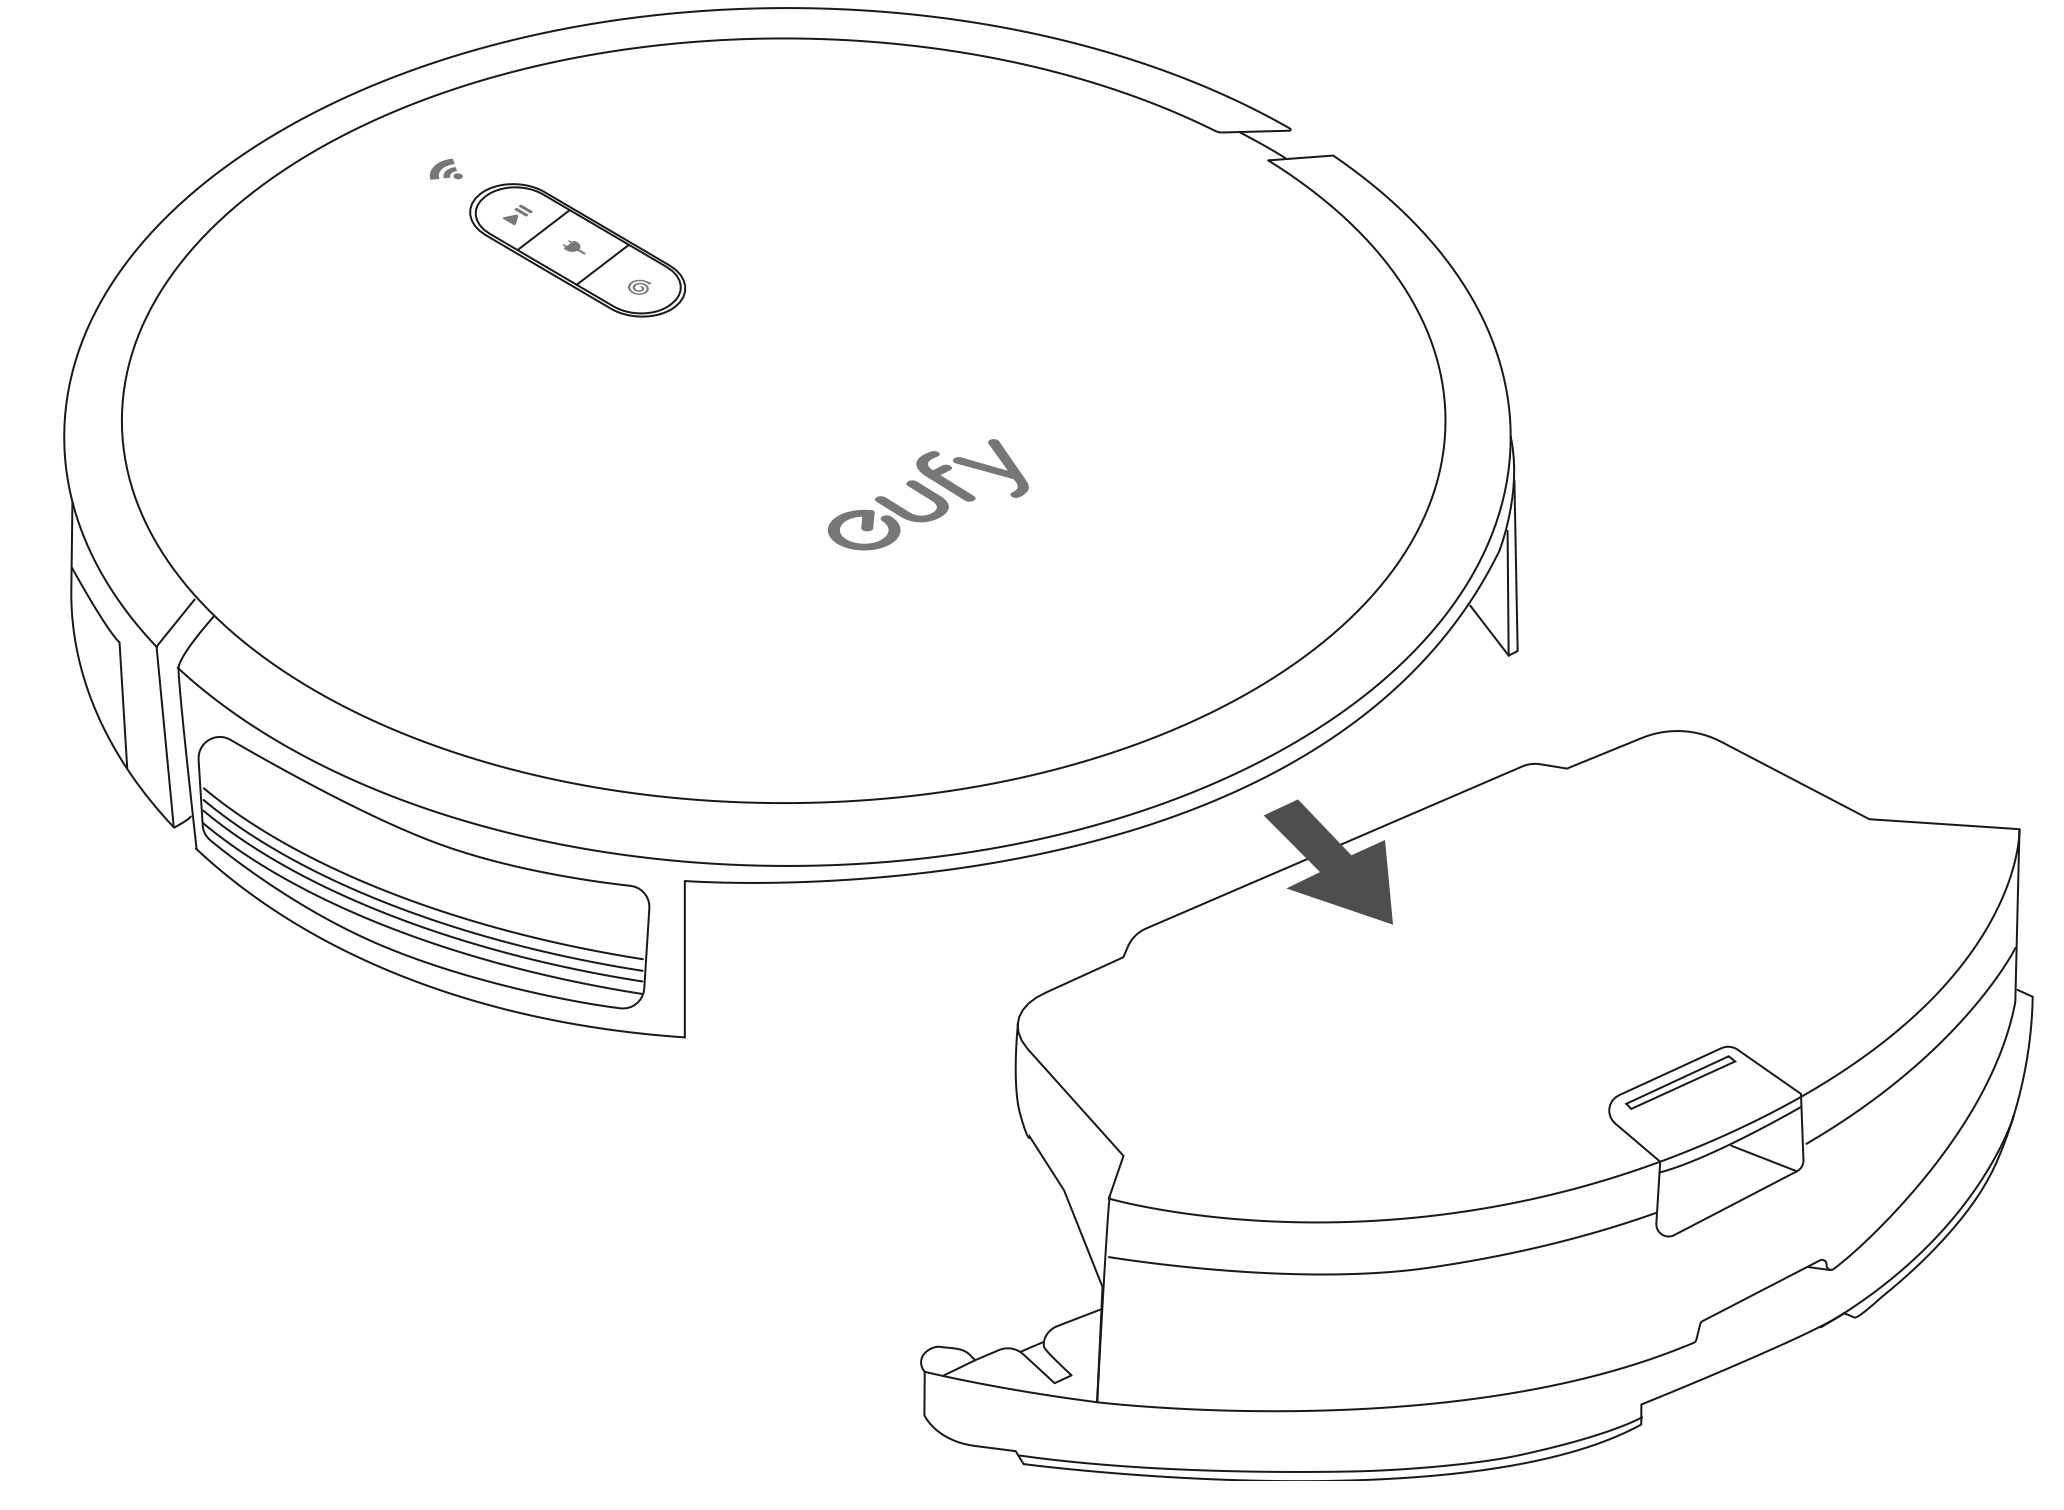
- Remove the water tank and put the dust collector back into the main unit.
Tip: After mopping, remove the water tank, empty any remaining water and clean the washable mopping cloth to prevent the cloth becoming mildewed or producing a peculiar smell. The disposable mopping cloth is for single-use only. For how to maintain the mopping cloth and water tank, refer to the "Cleaning and Maintenance" section in this manual.
Use the Boundary Strip
With the Boundary Strip, you can keep RoboVac away from any area or item you do not want RoboVac to clean. RoboVac will recognize the Boundary Strip and will not cross into the blocked-off area.
- Identify the area or item you do not want RoboVac to get close to.
- If necessary, use scissors to cut the Boundary Strip to a shorter length. Be sure to correctly measure the length before cutting.
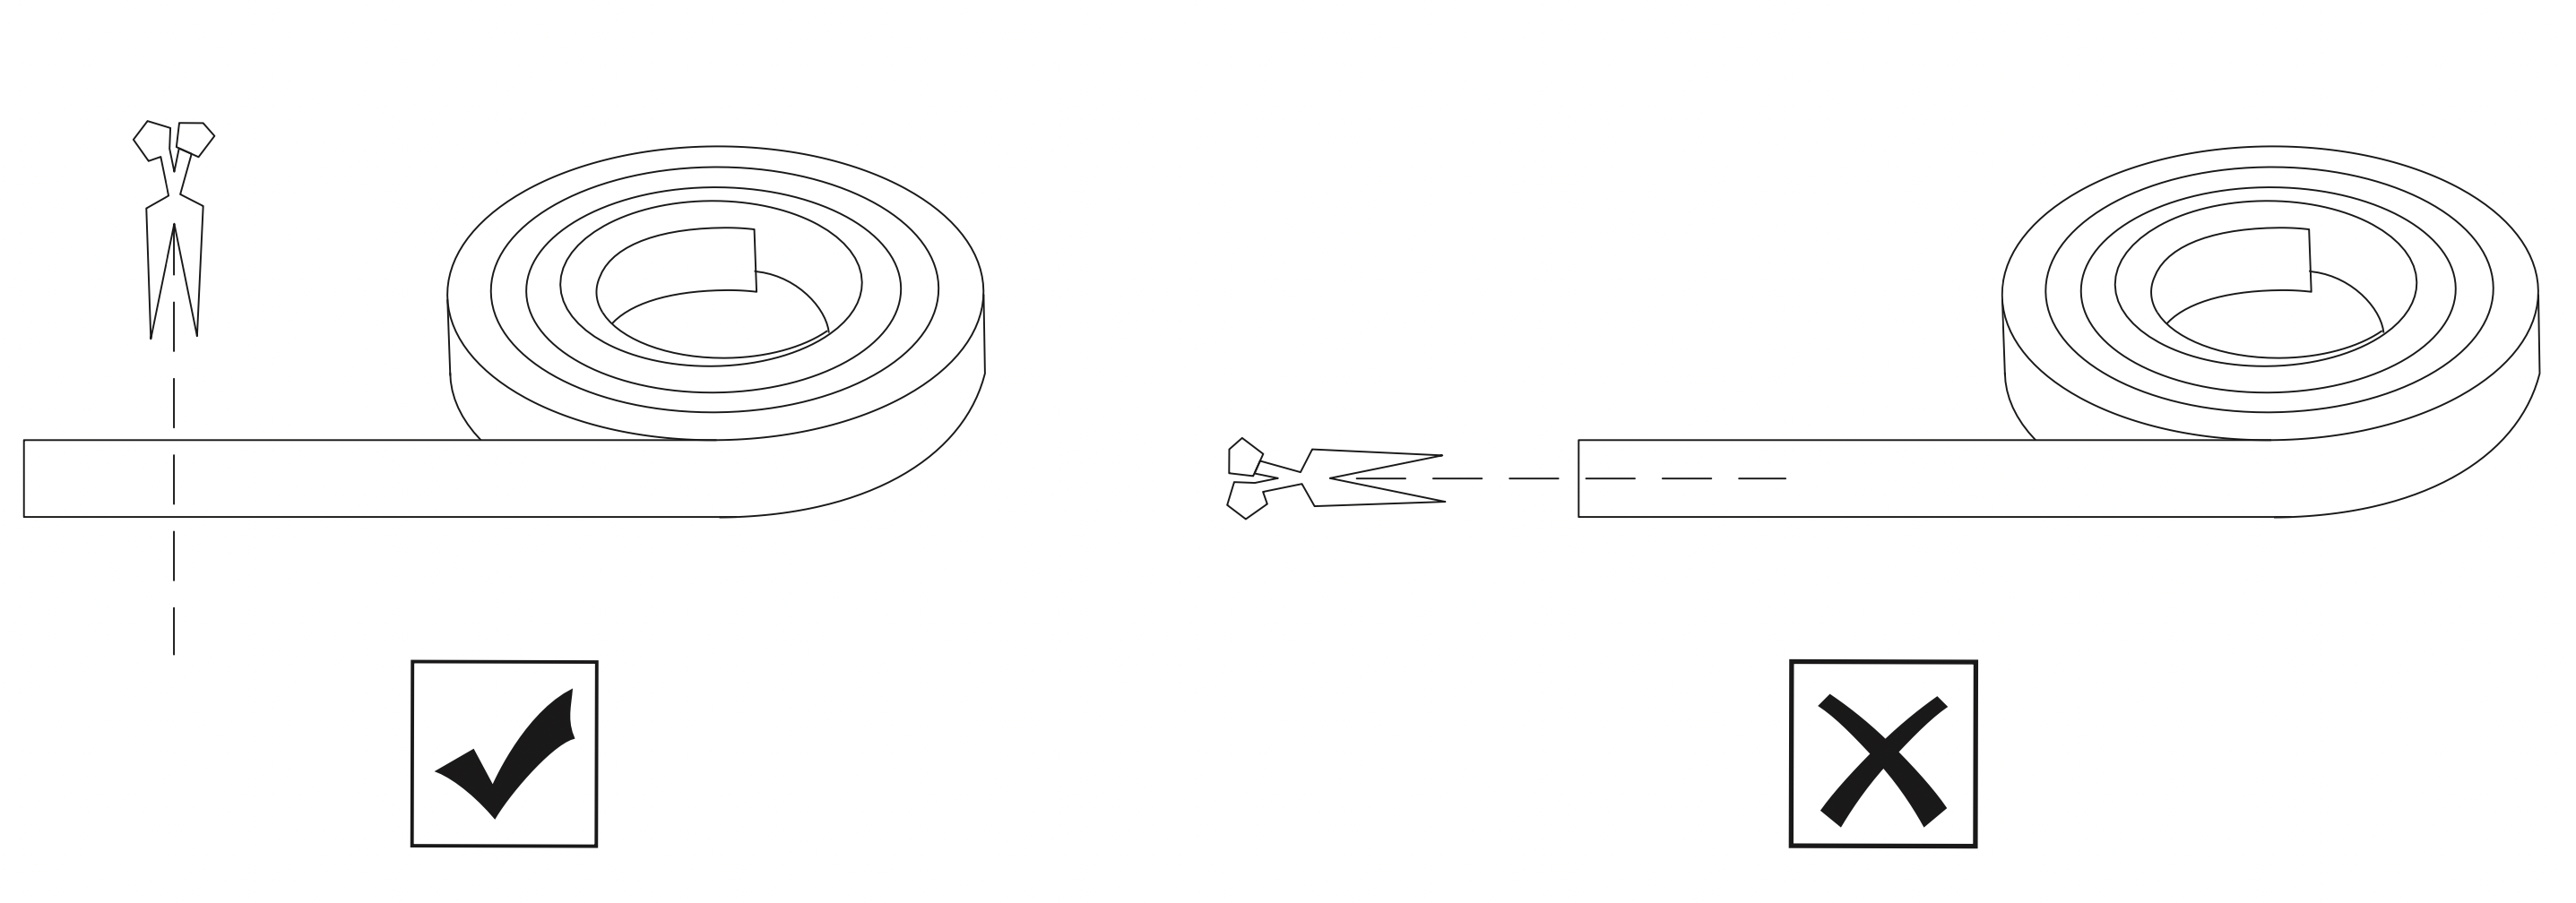
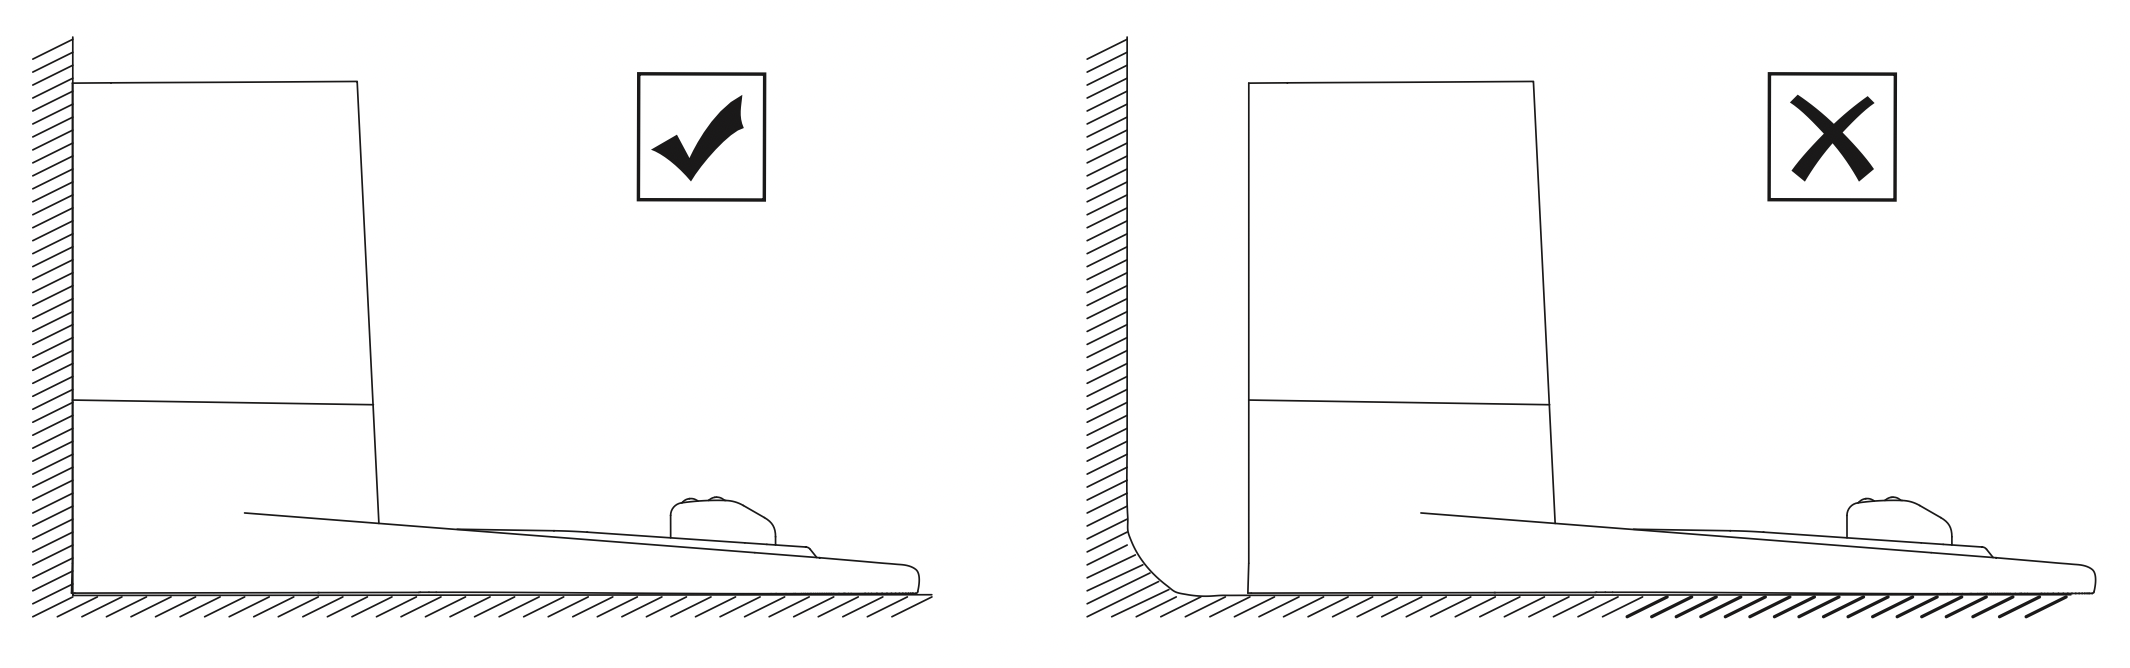
- Apply the supplied strips of adhesive tape to lay the Boundary Strip flat on the floor. Make sure the strip is placed FLAT on the floor or under an area rug.
Tips:
- If the Boundary Strip is rolled up, remove and then re-apply on the floor with adhesive tape. Otherwise the Boundary Strip may not work well.
- Make sure the Boundary Strip is placed on the same surface plane RoboVac is used on.
- Be careful not to damage the floor when using adhesive tape. It is not recommended for use on carpets.
- Keep the Boundary Strip away from objects that emit excessive heat.
Cleaning and Maintenance
Before cleaning and maintaining, turn off the device and unplug the adapter.
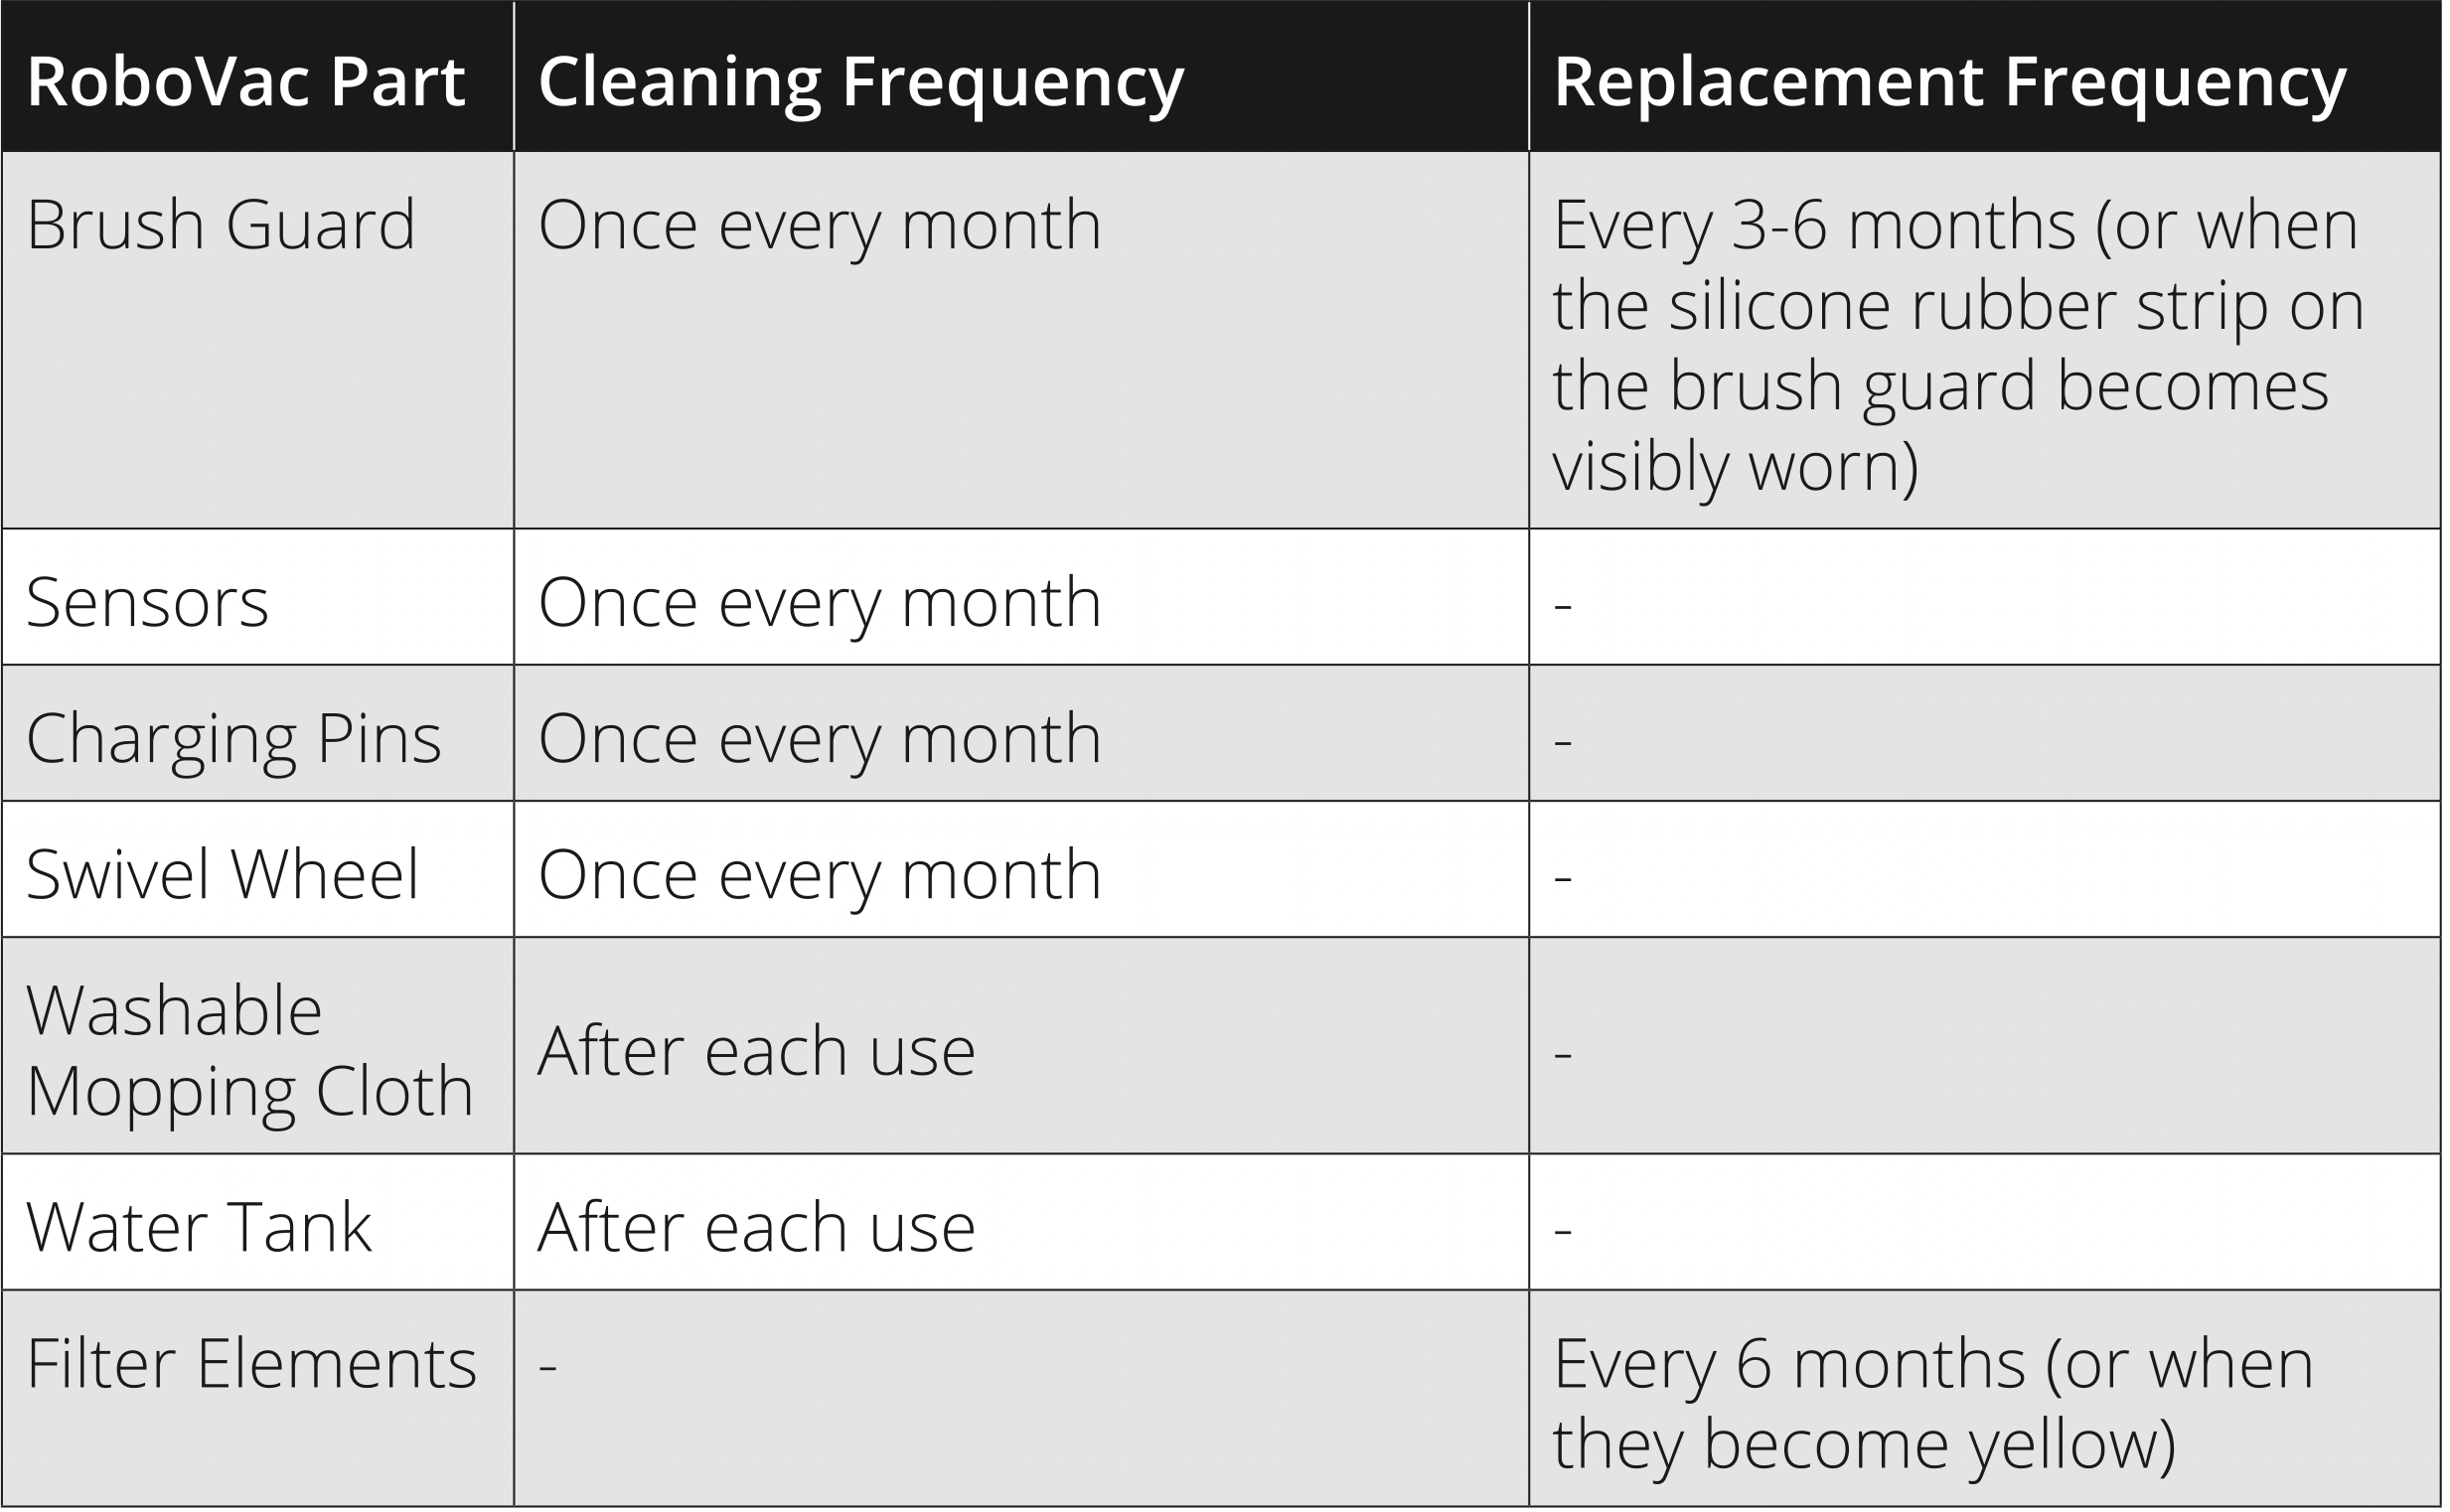
For optimal performance, follow the instructions below to clean and maintain RoboVac regularly. The cleaning/replacement frequency will depend on your RoboVac usage habits.
Recommended cleaning/replacement frequency
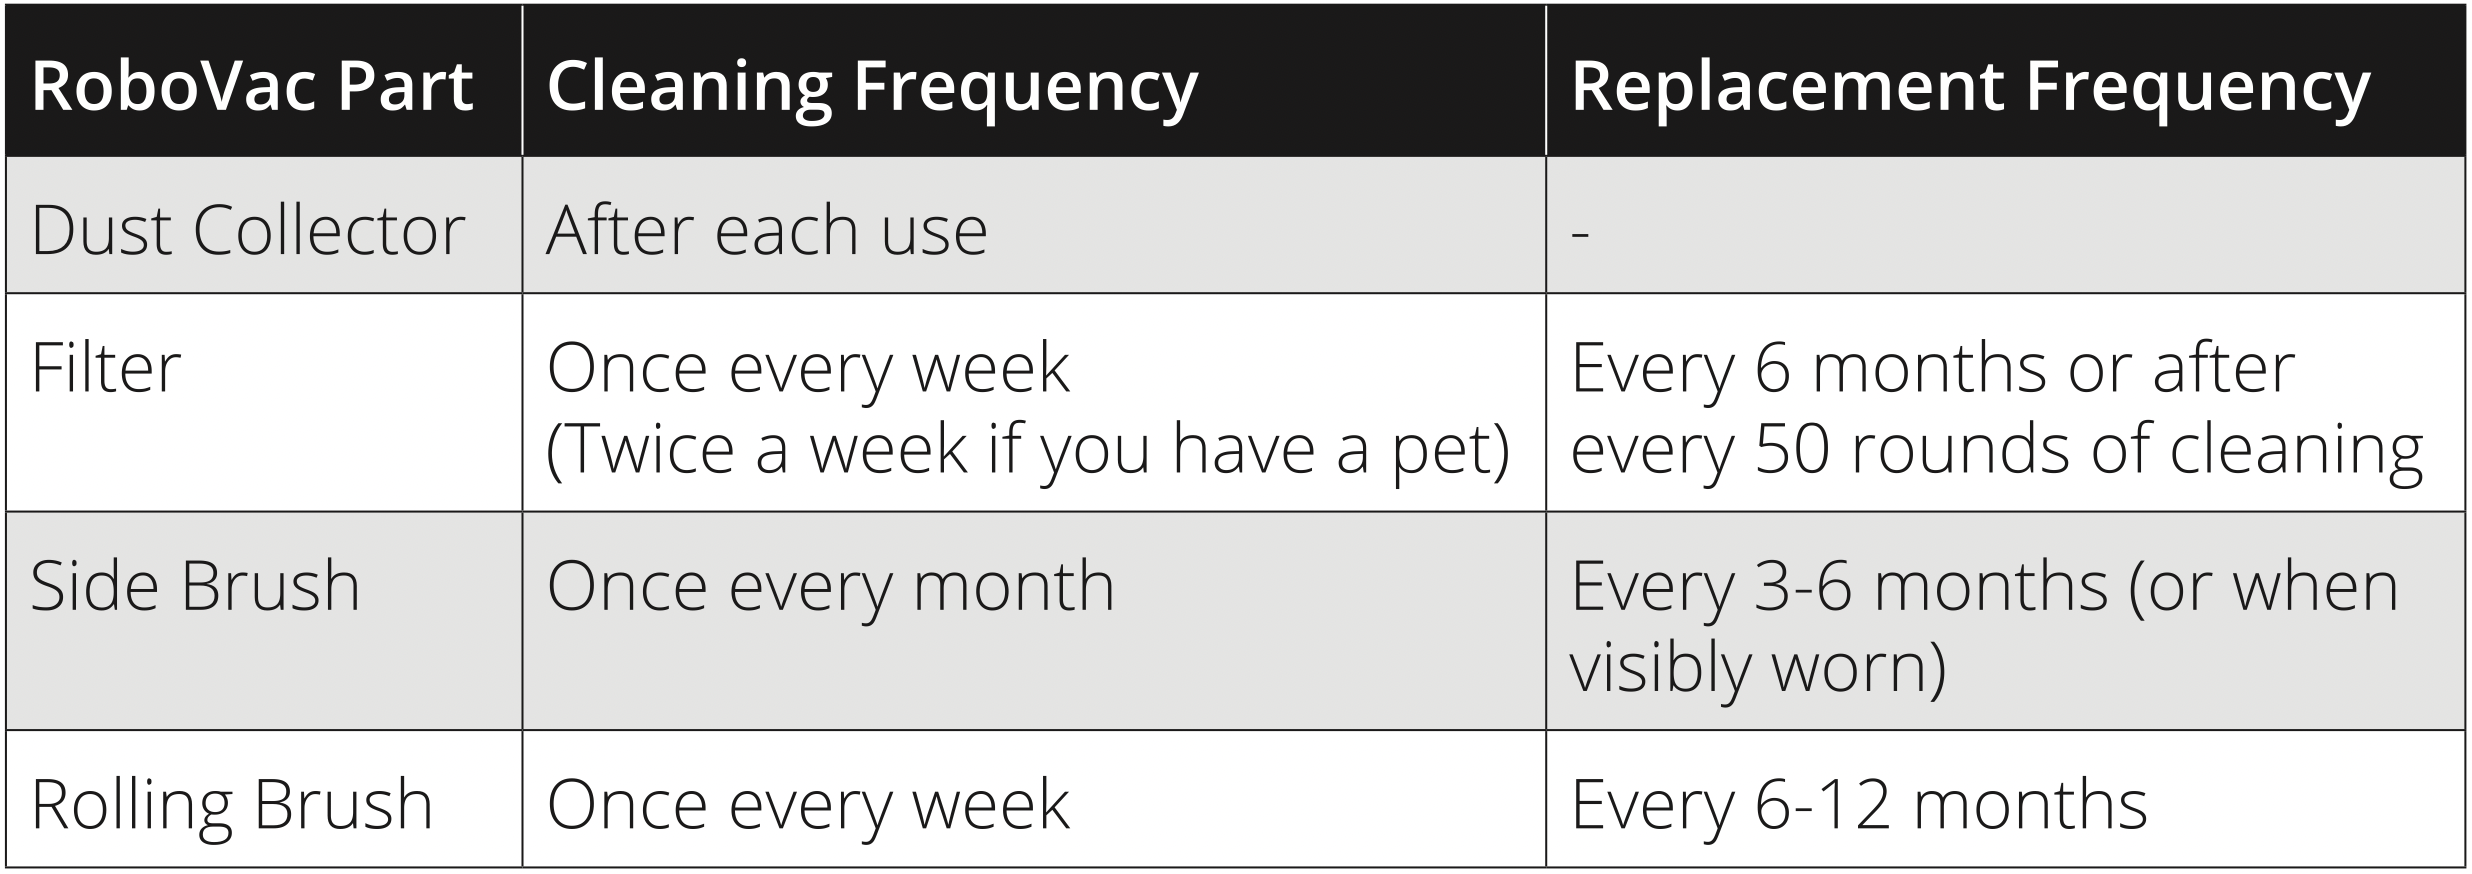
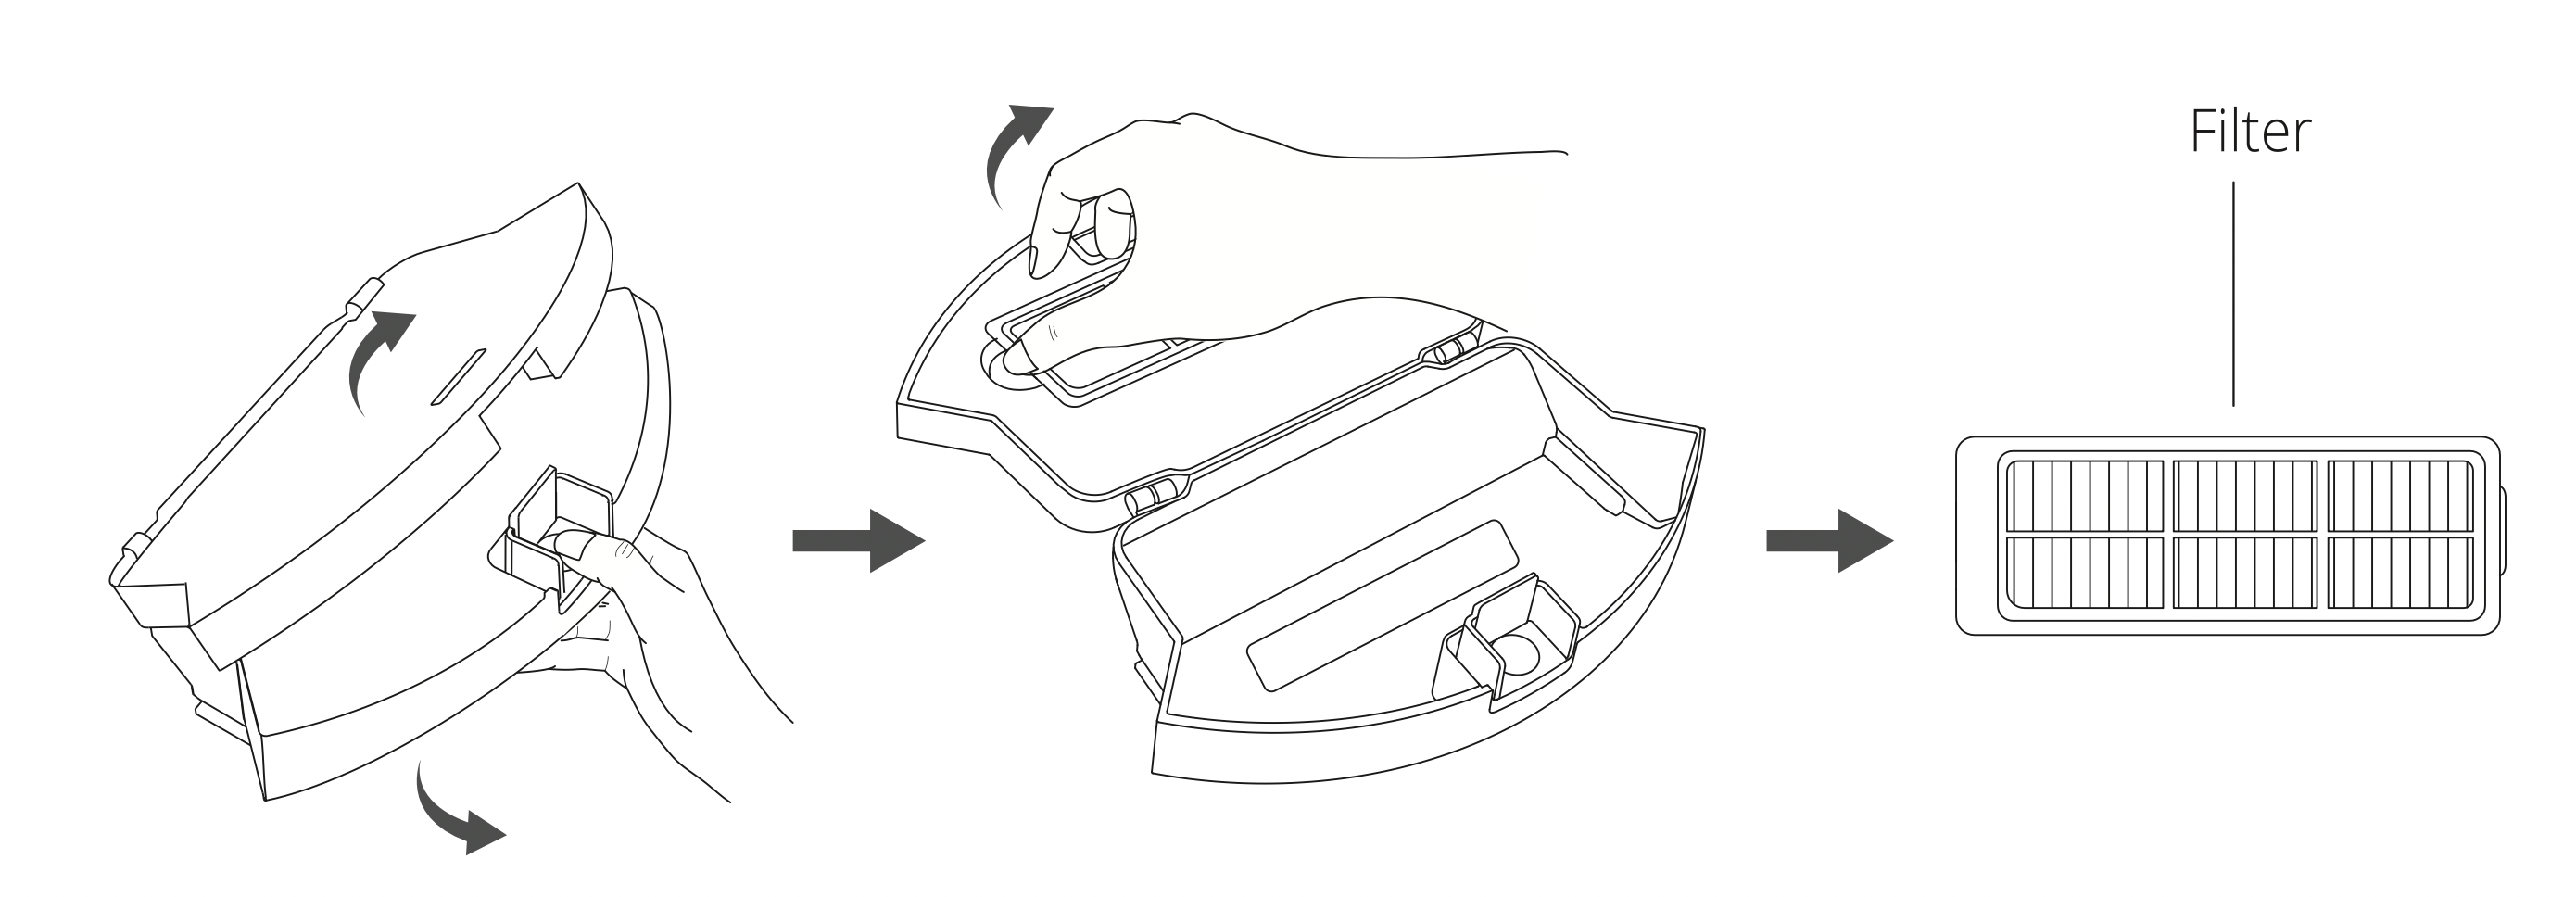
Clean the Dust Collector and Filter
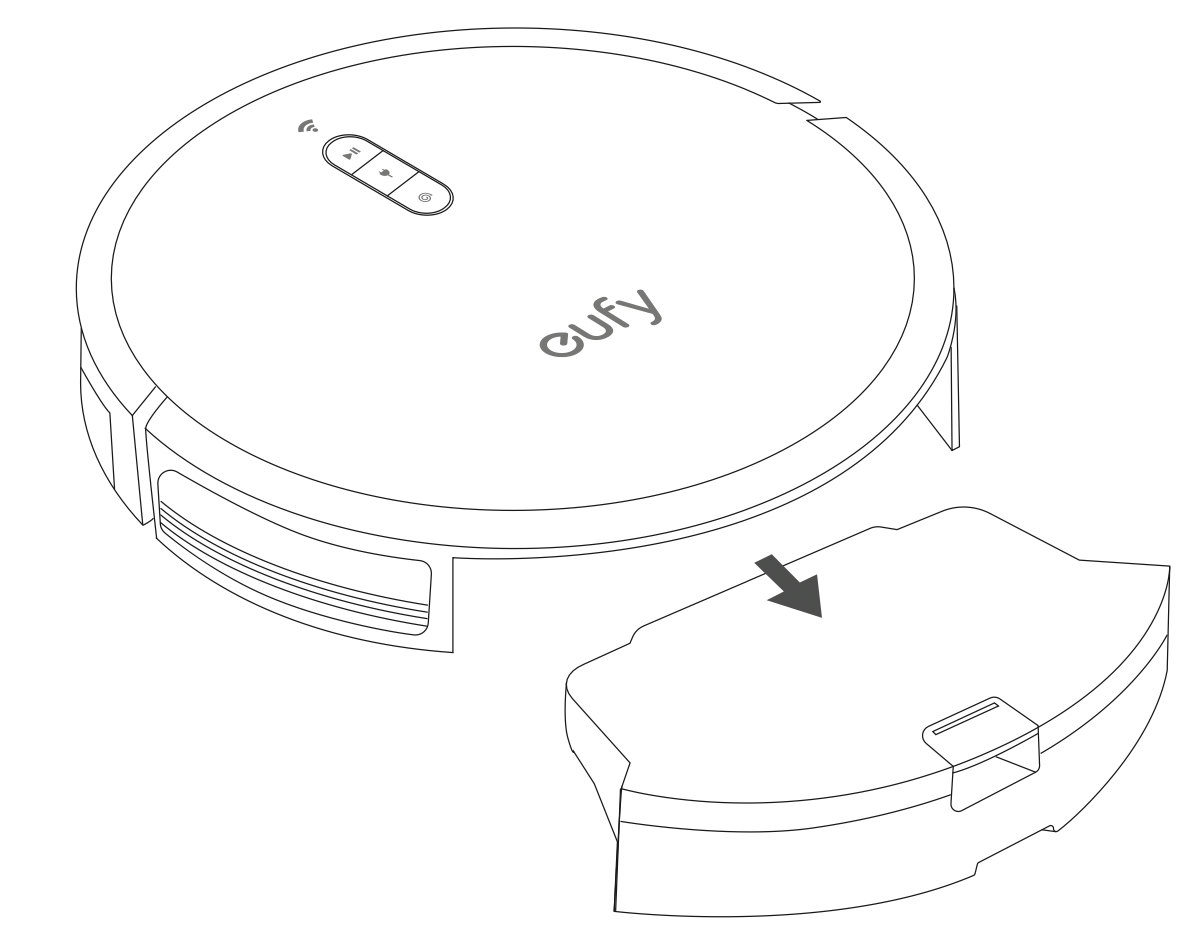
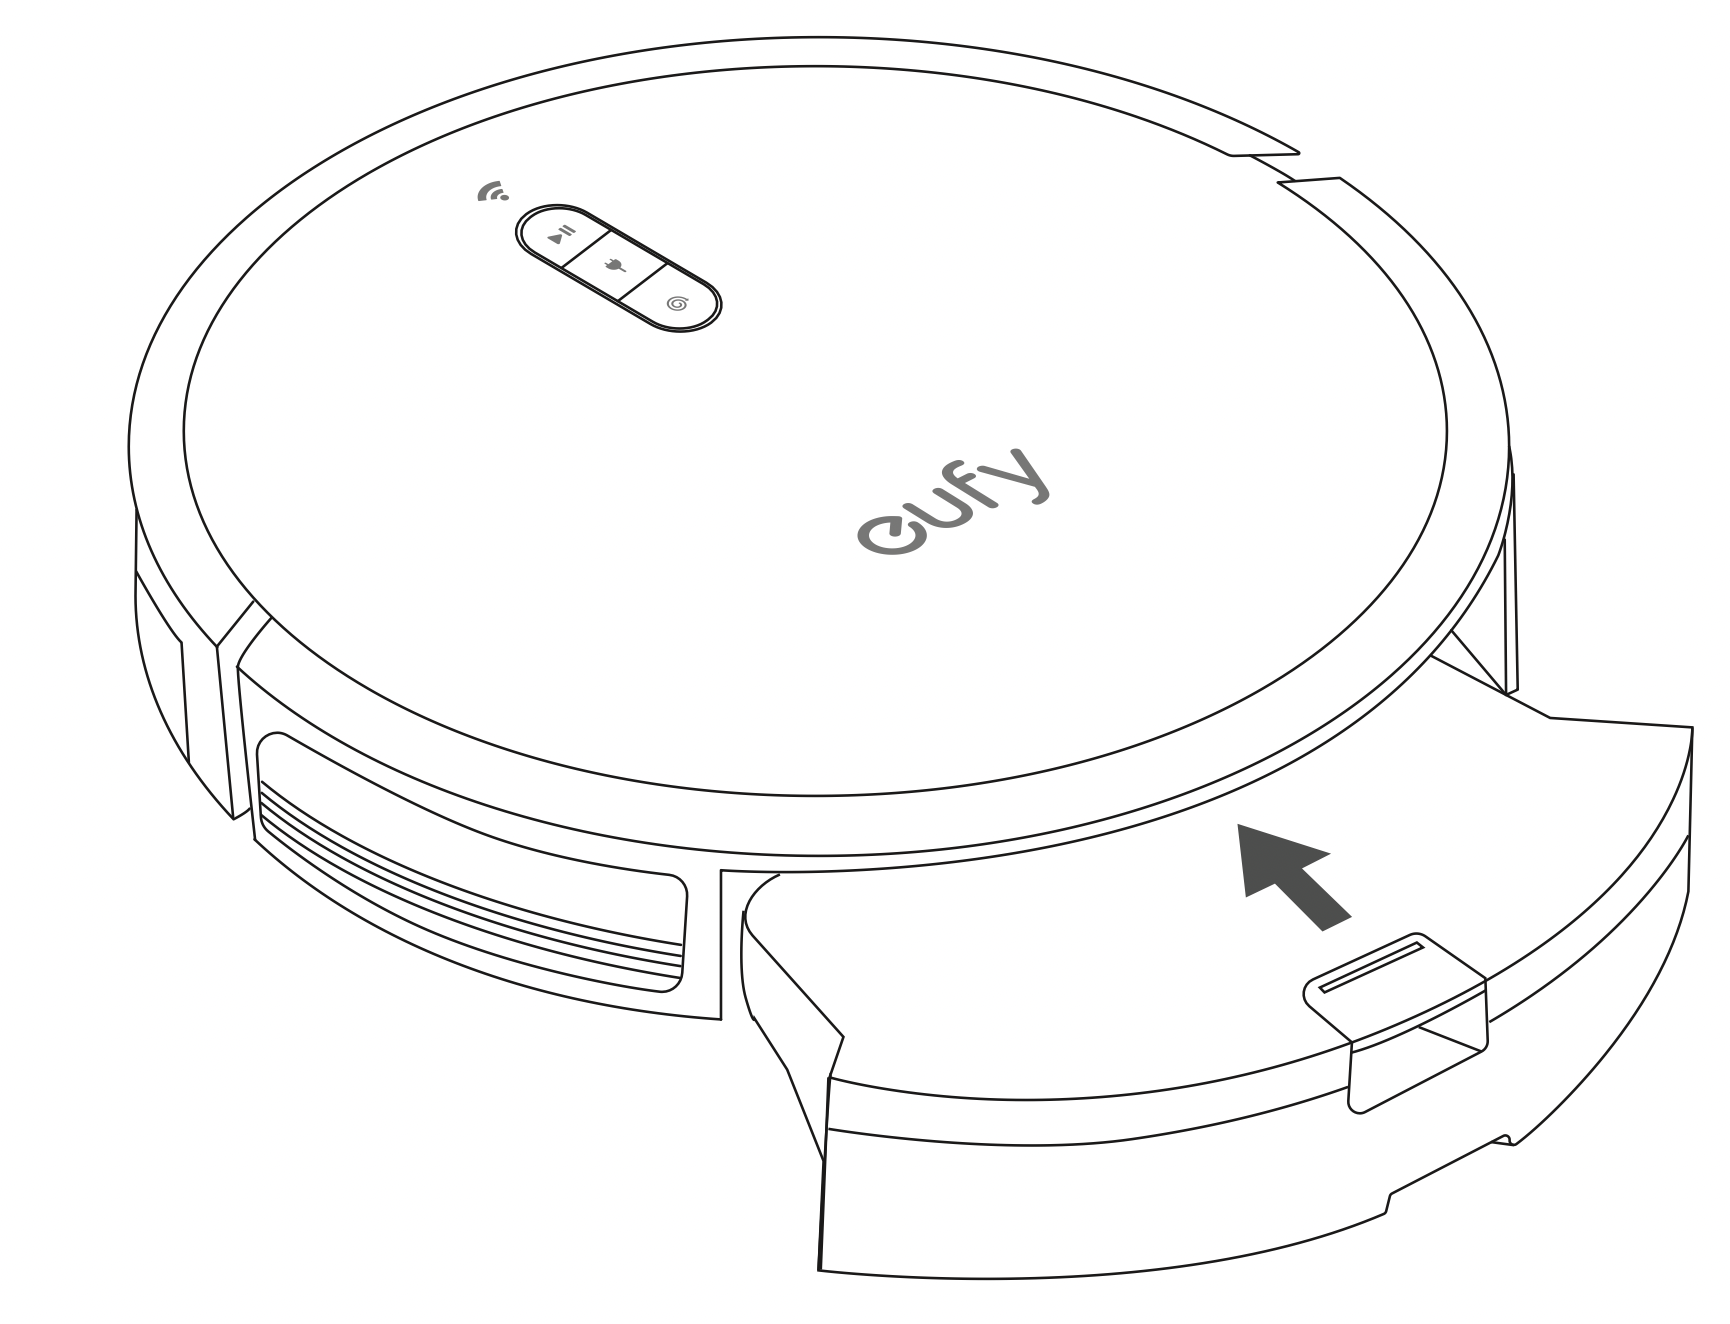
- Press the dust collector release button to pull the dust collector out.
- Open and empty the dust collector.
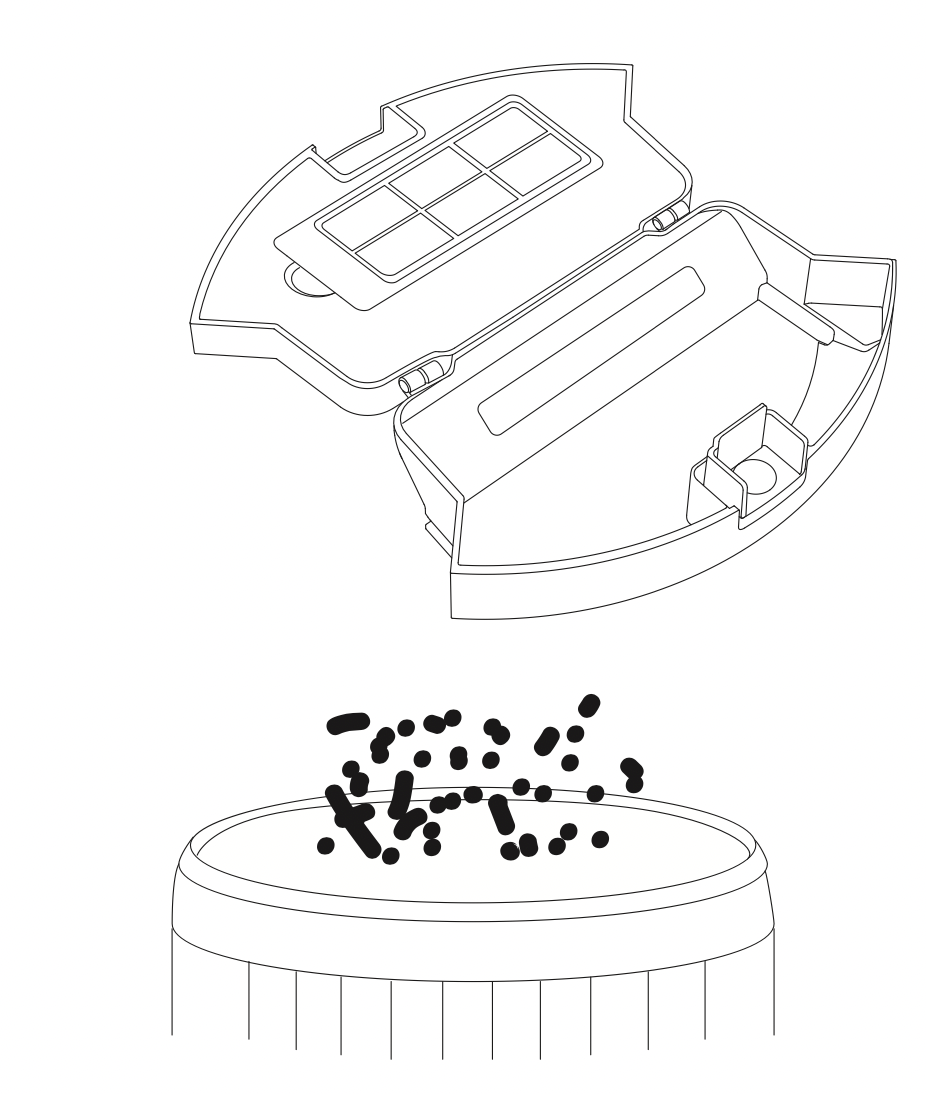
- Remove the filter.
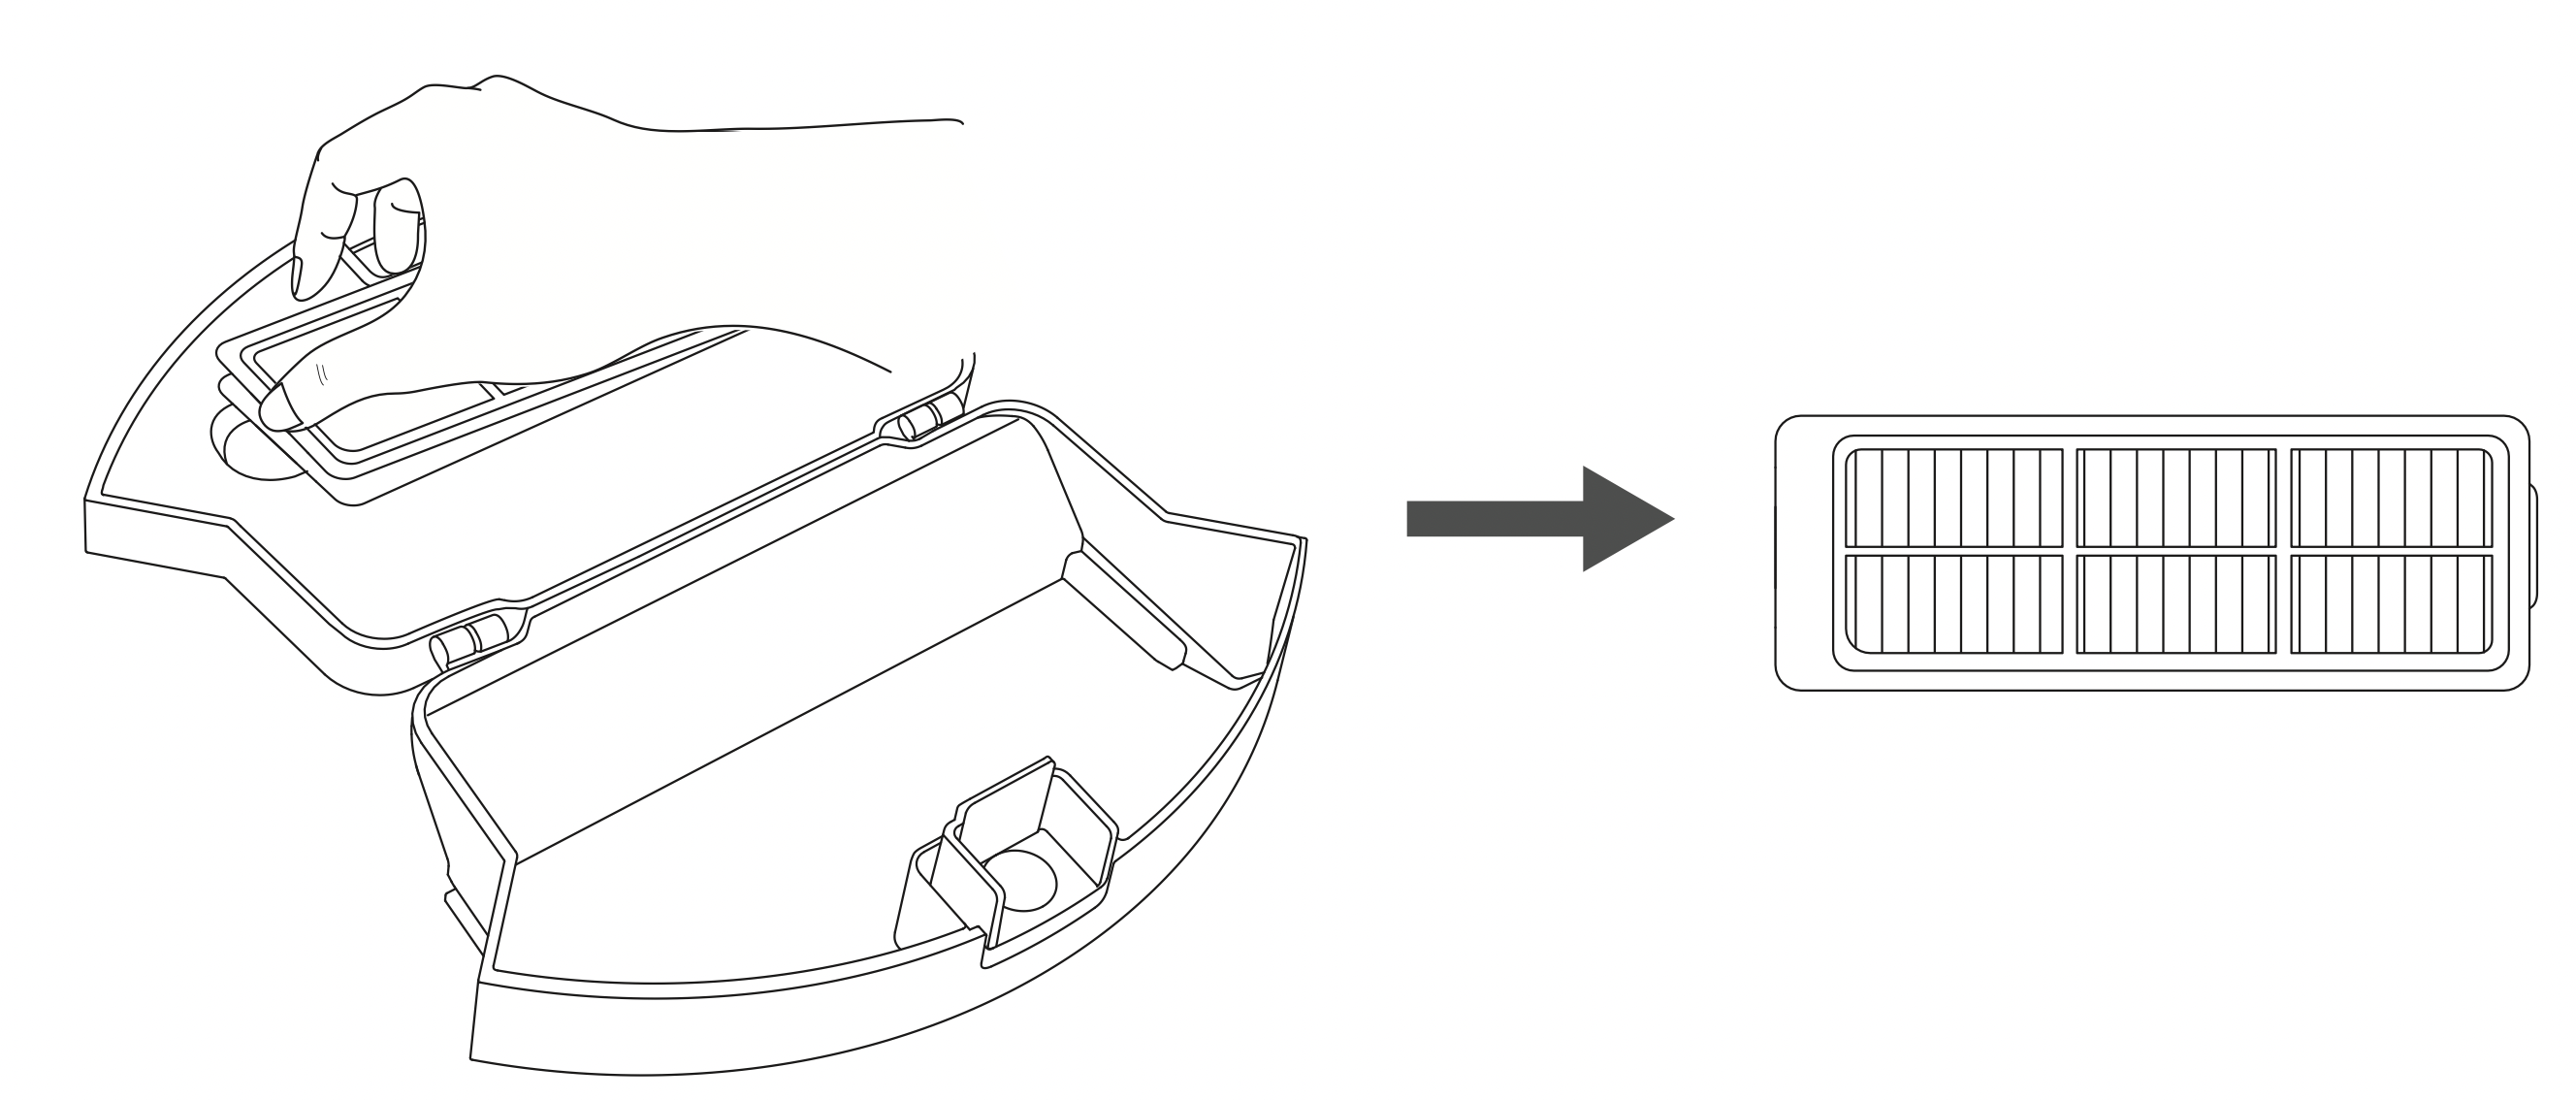
- Tap the filter to remove dust.
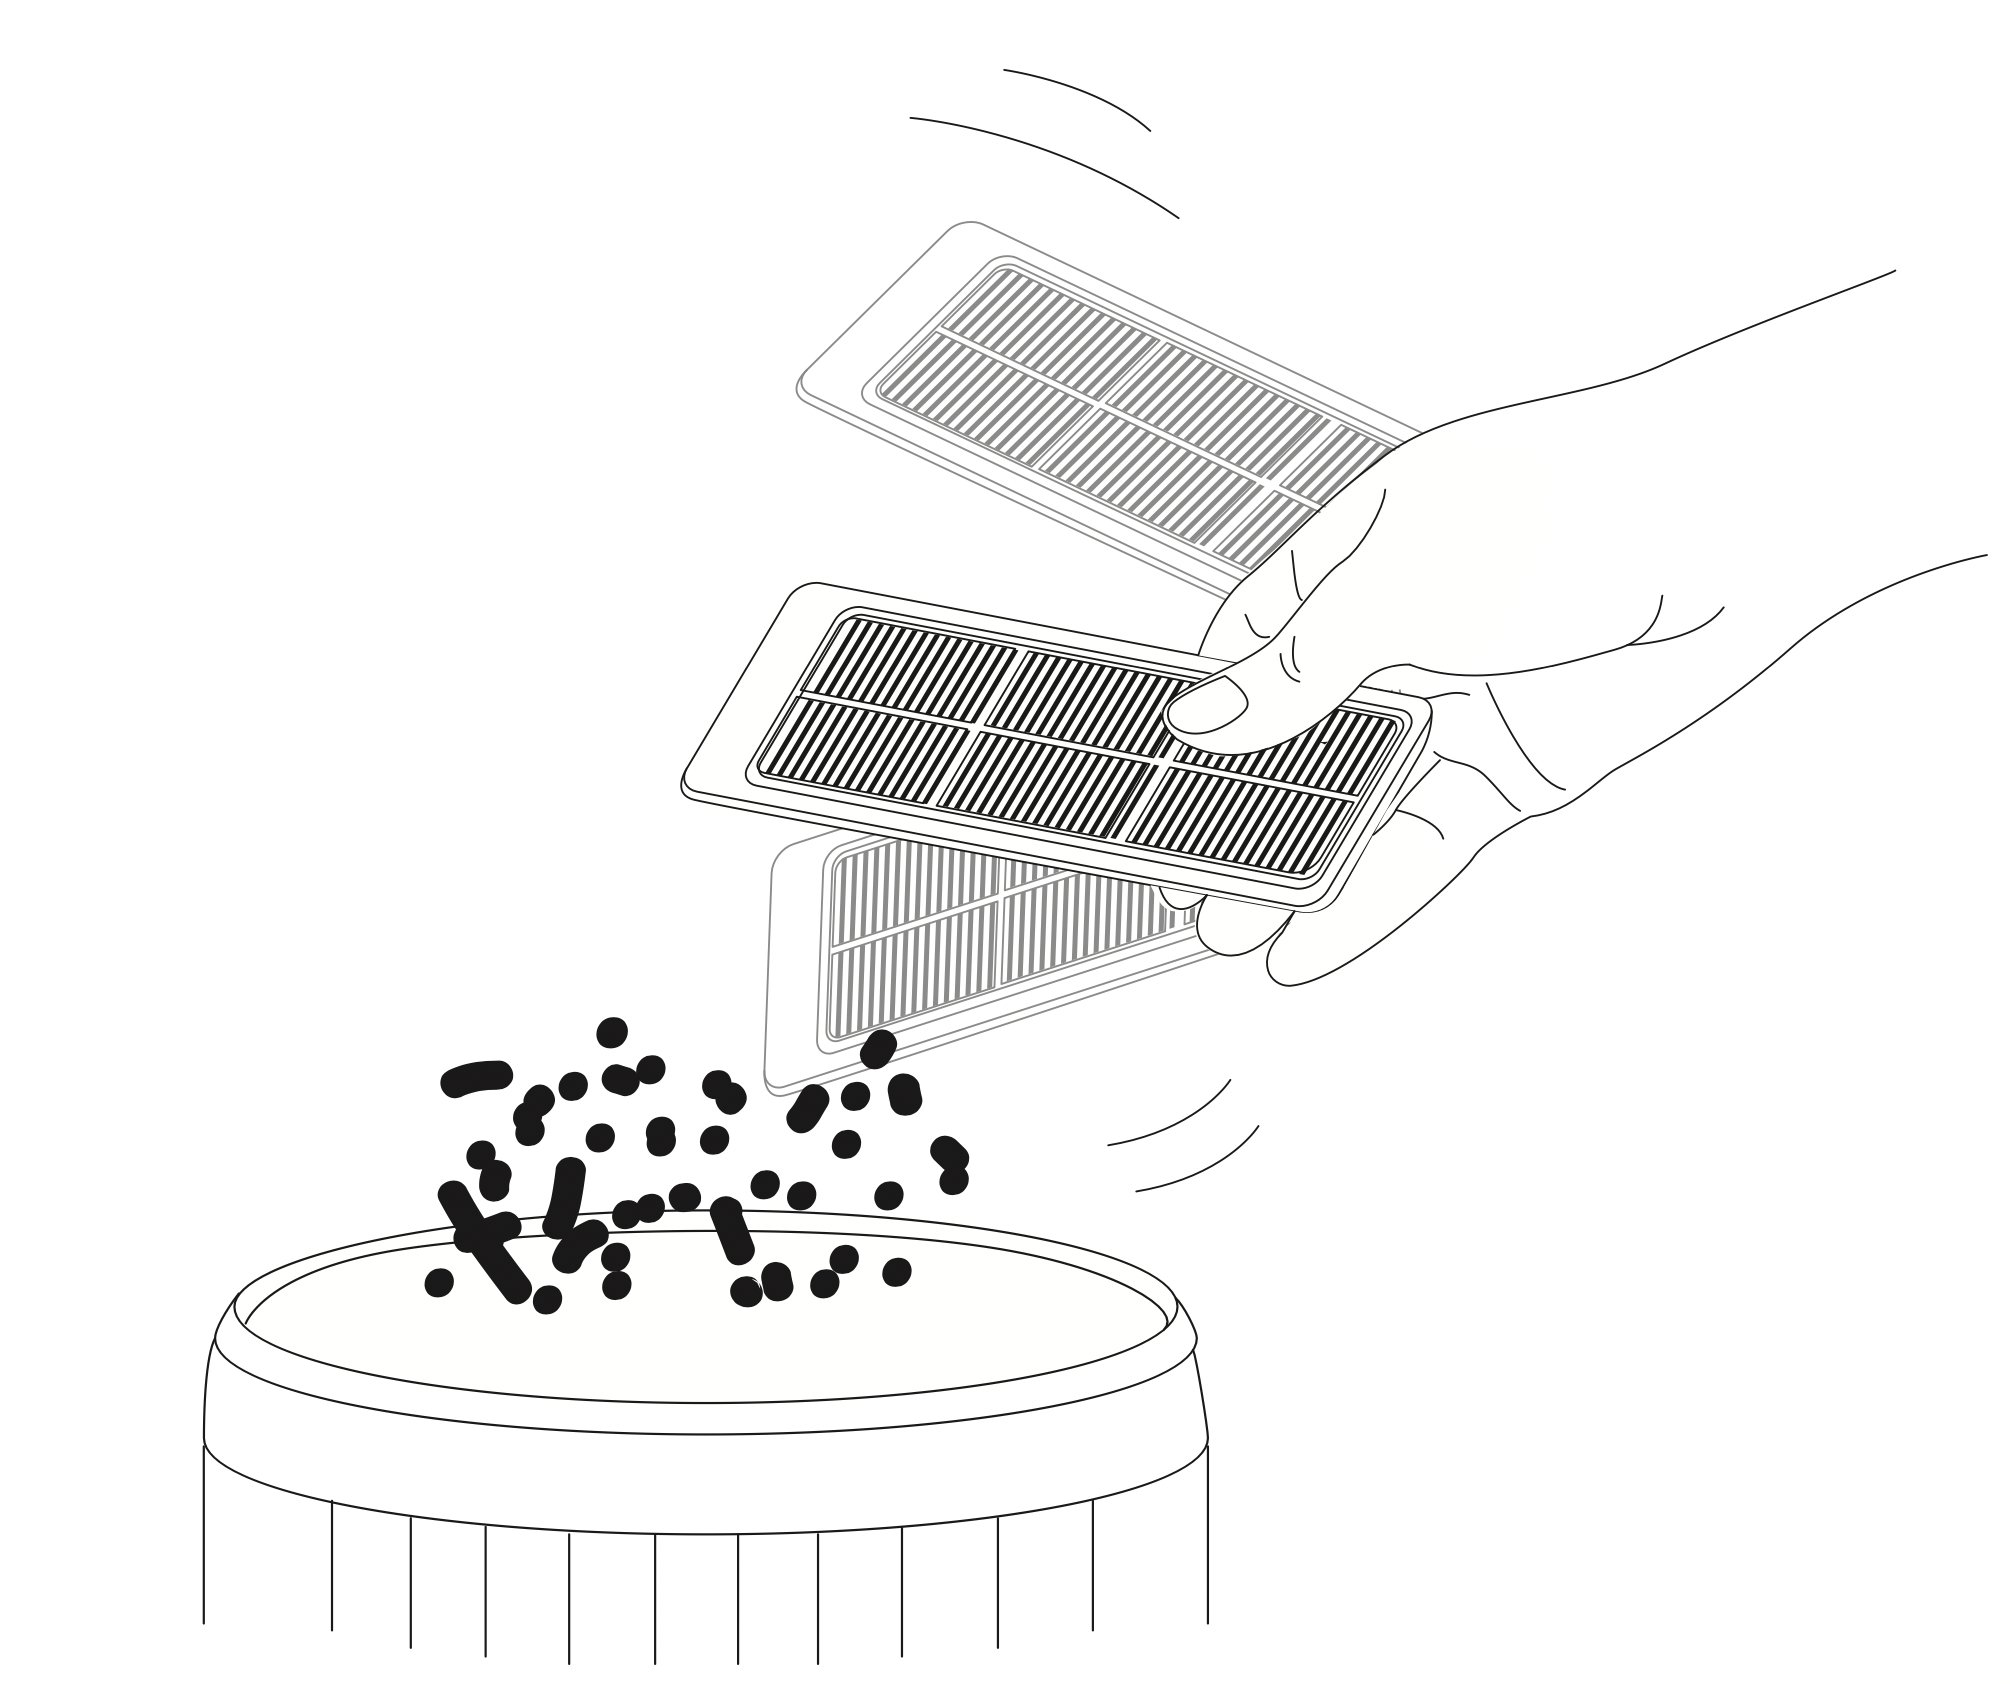
- Rinse the dust collector and filter thoroughly with water.
Tip: Do not use a brush, hot water, or any detergent to clean the filter.
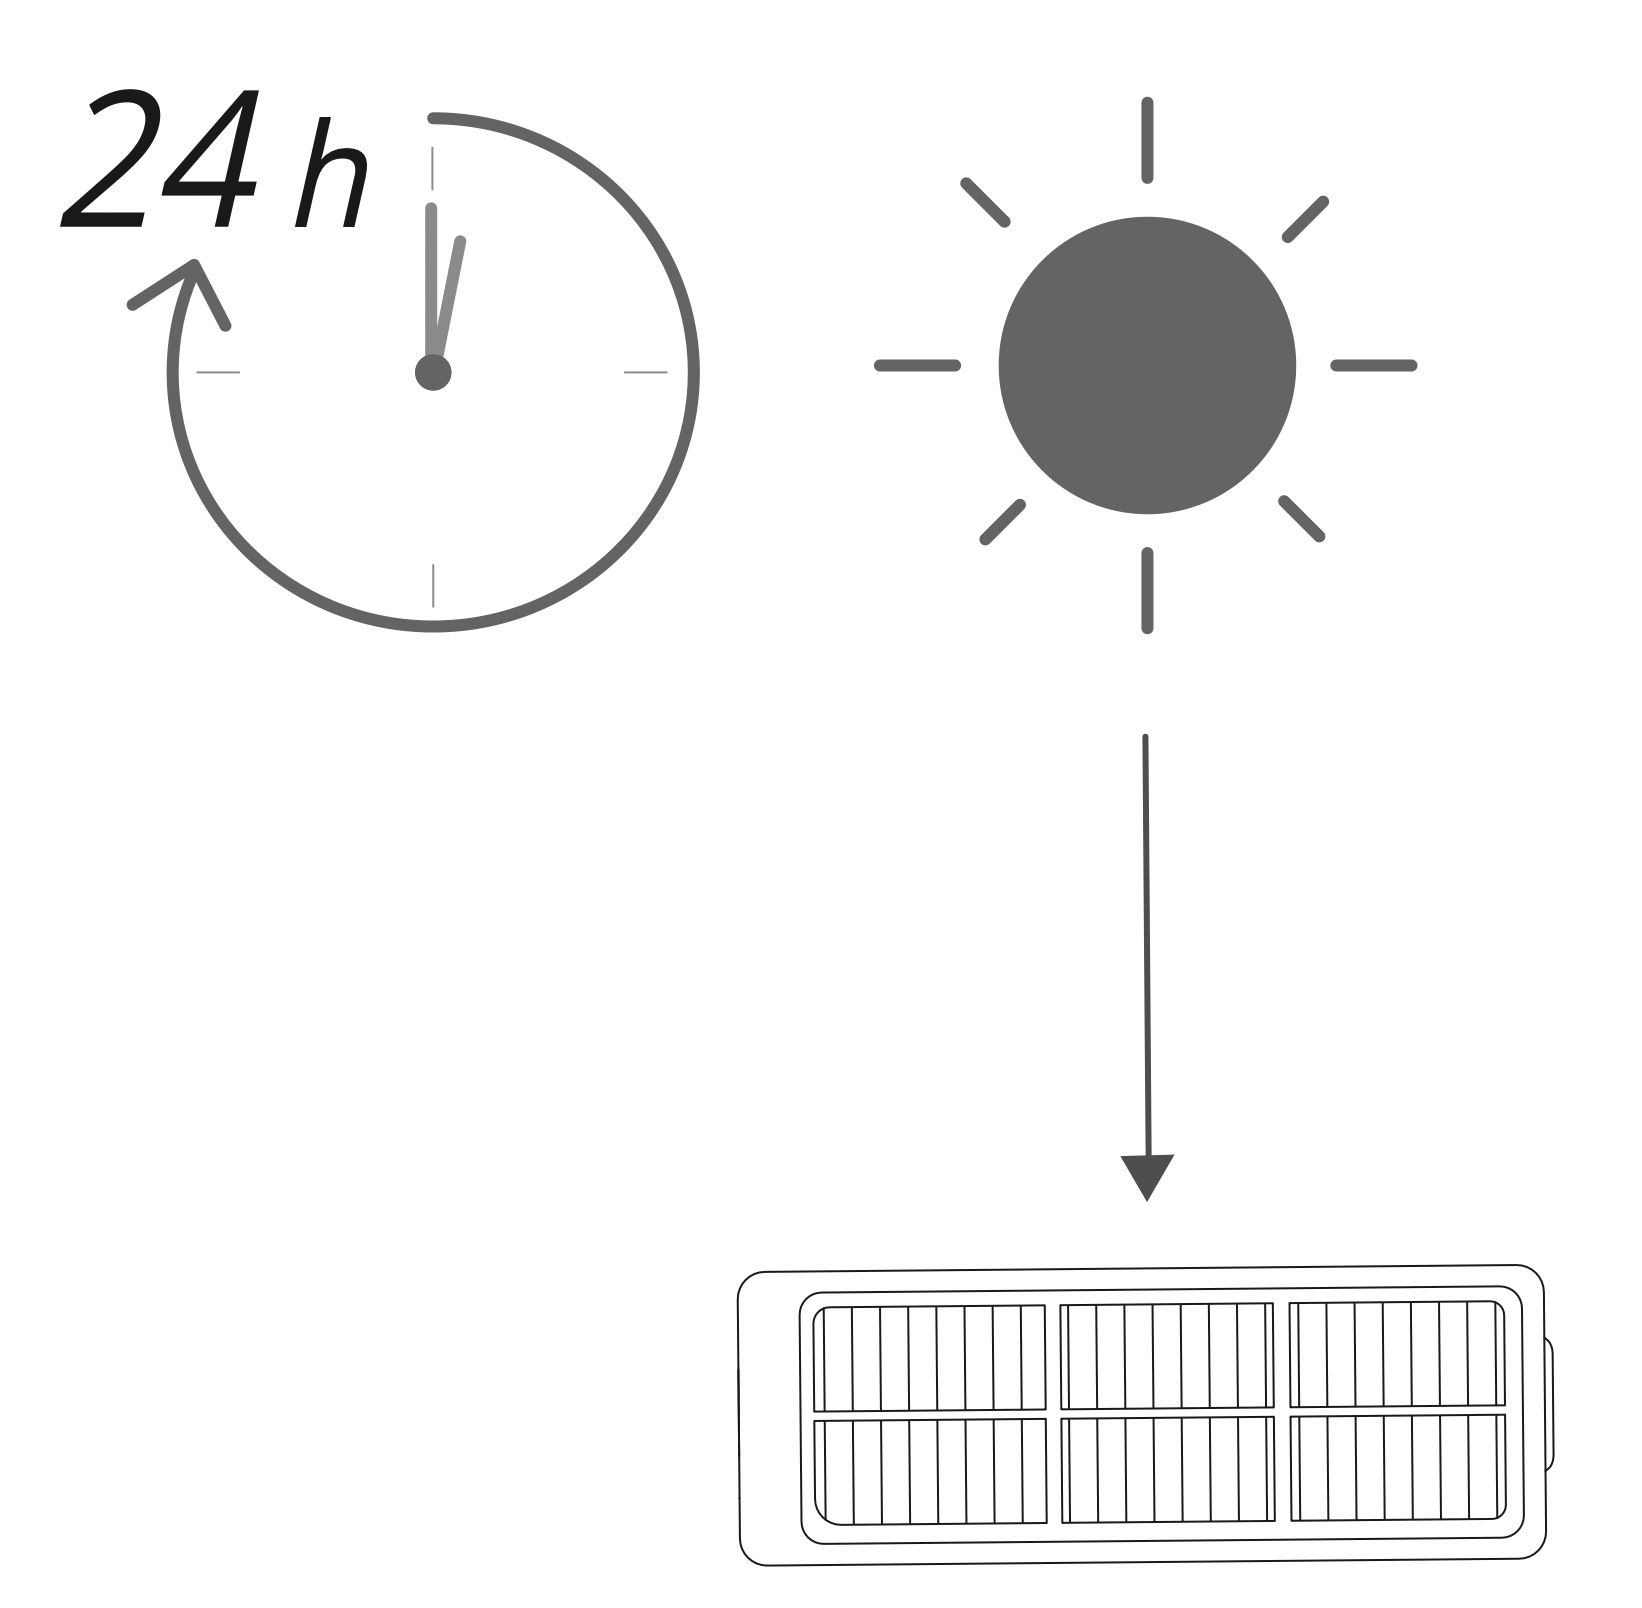
- Air-dry the dust collector and filter completely before next use.You may change to use the other filter if the original one is not completely dry.
- Place the filter back into the dust collector.
- Push the dust collector back into the main unit.
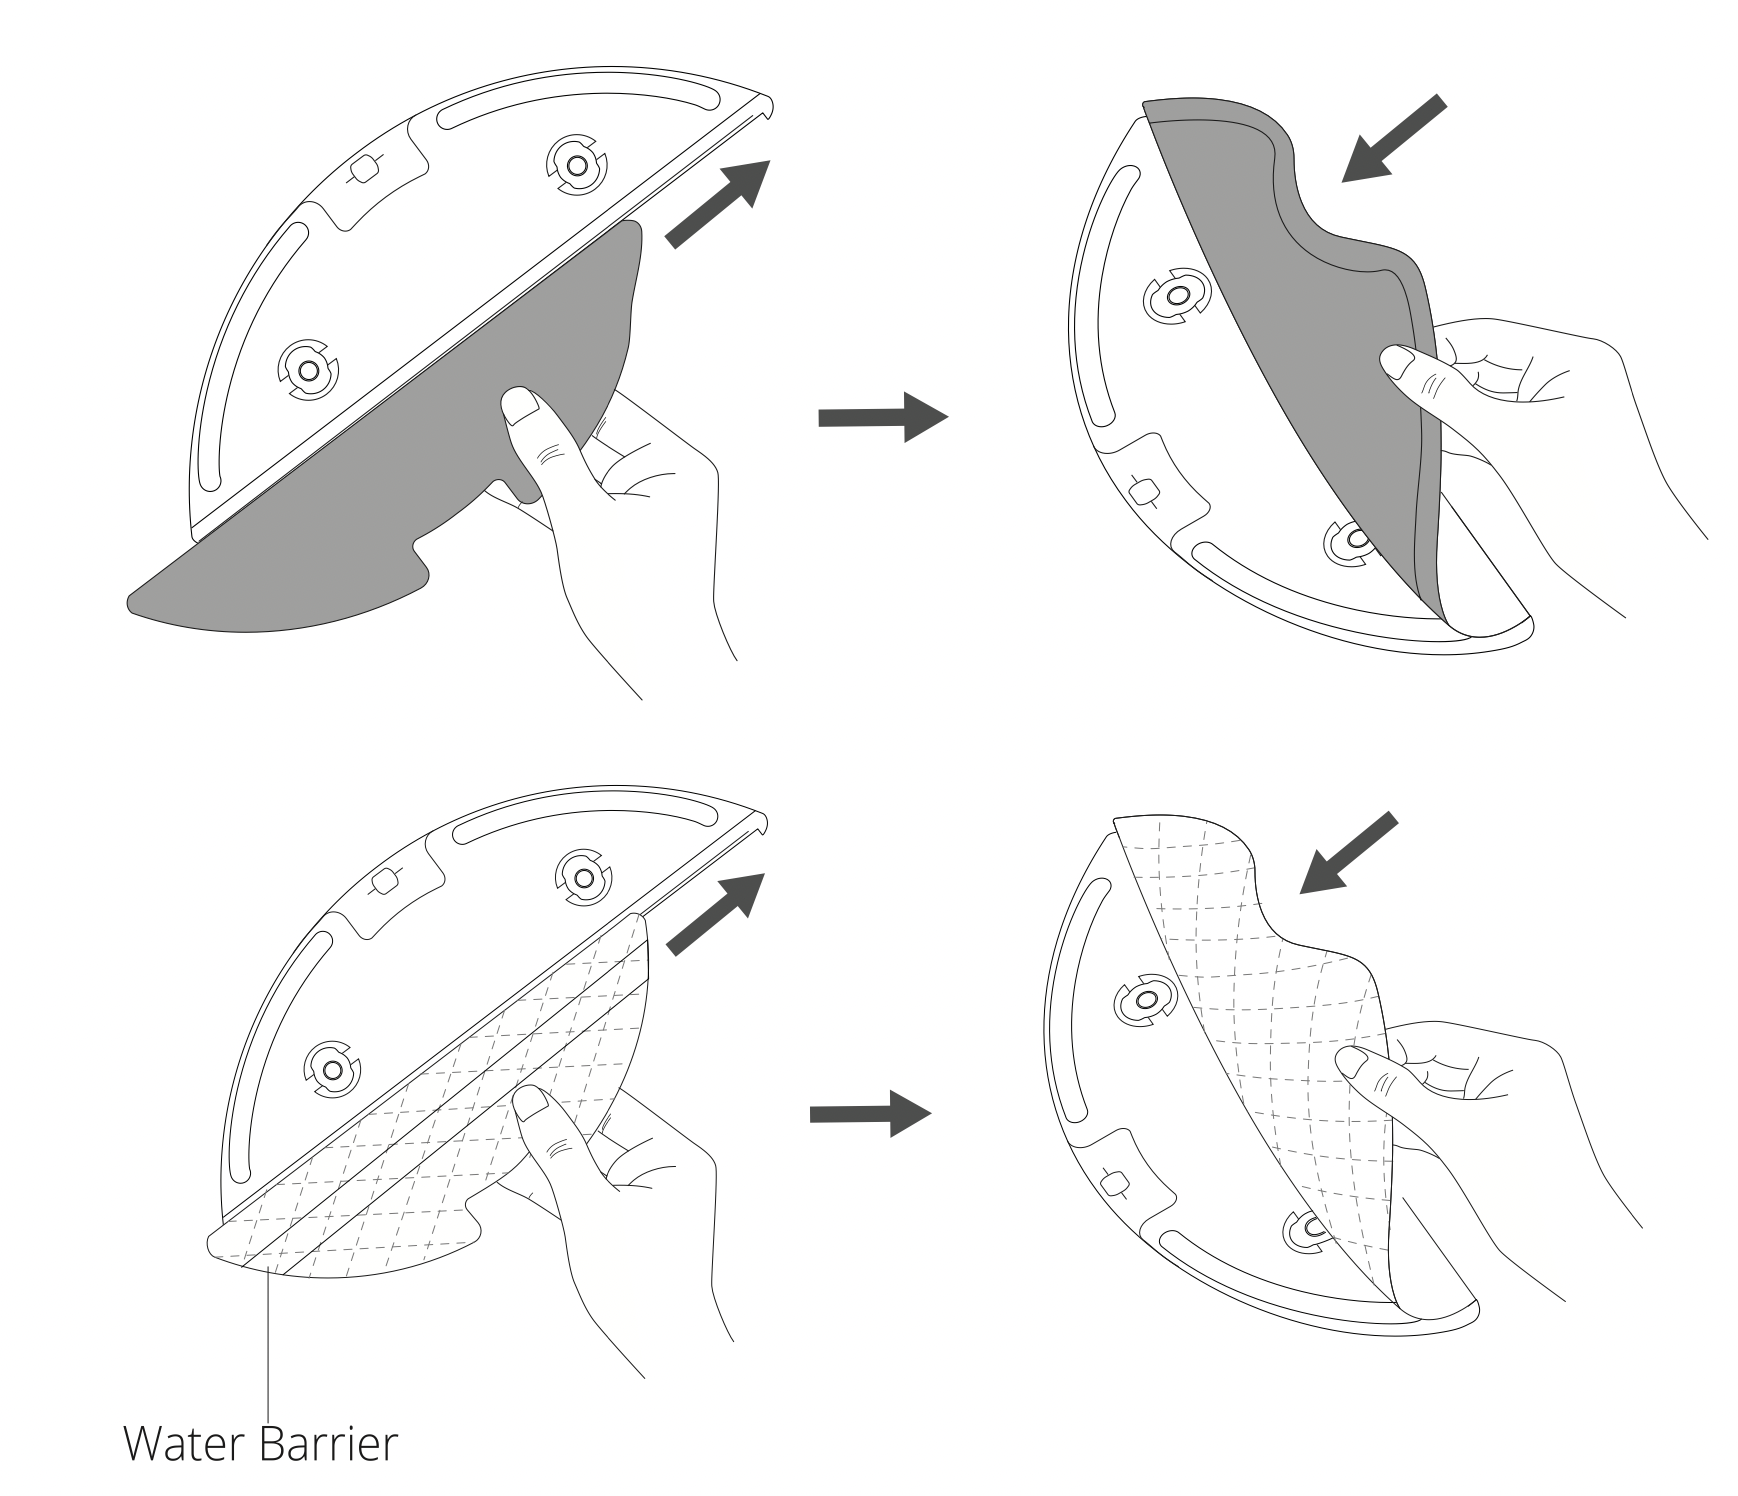
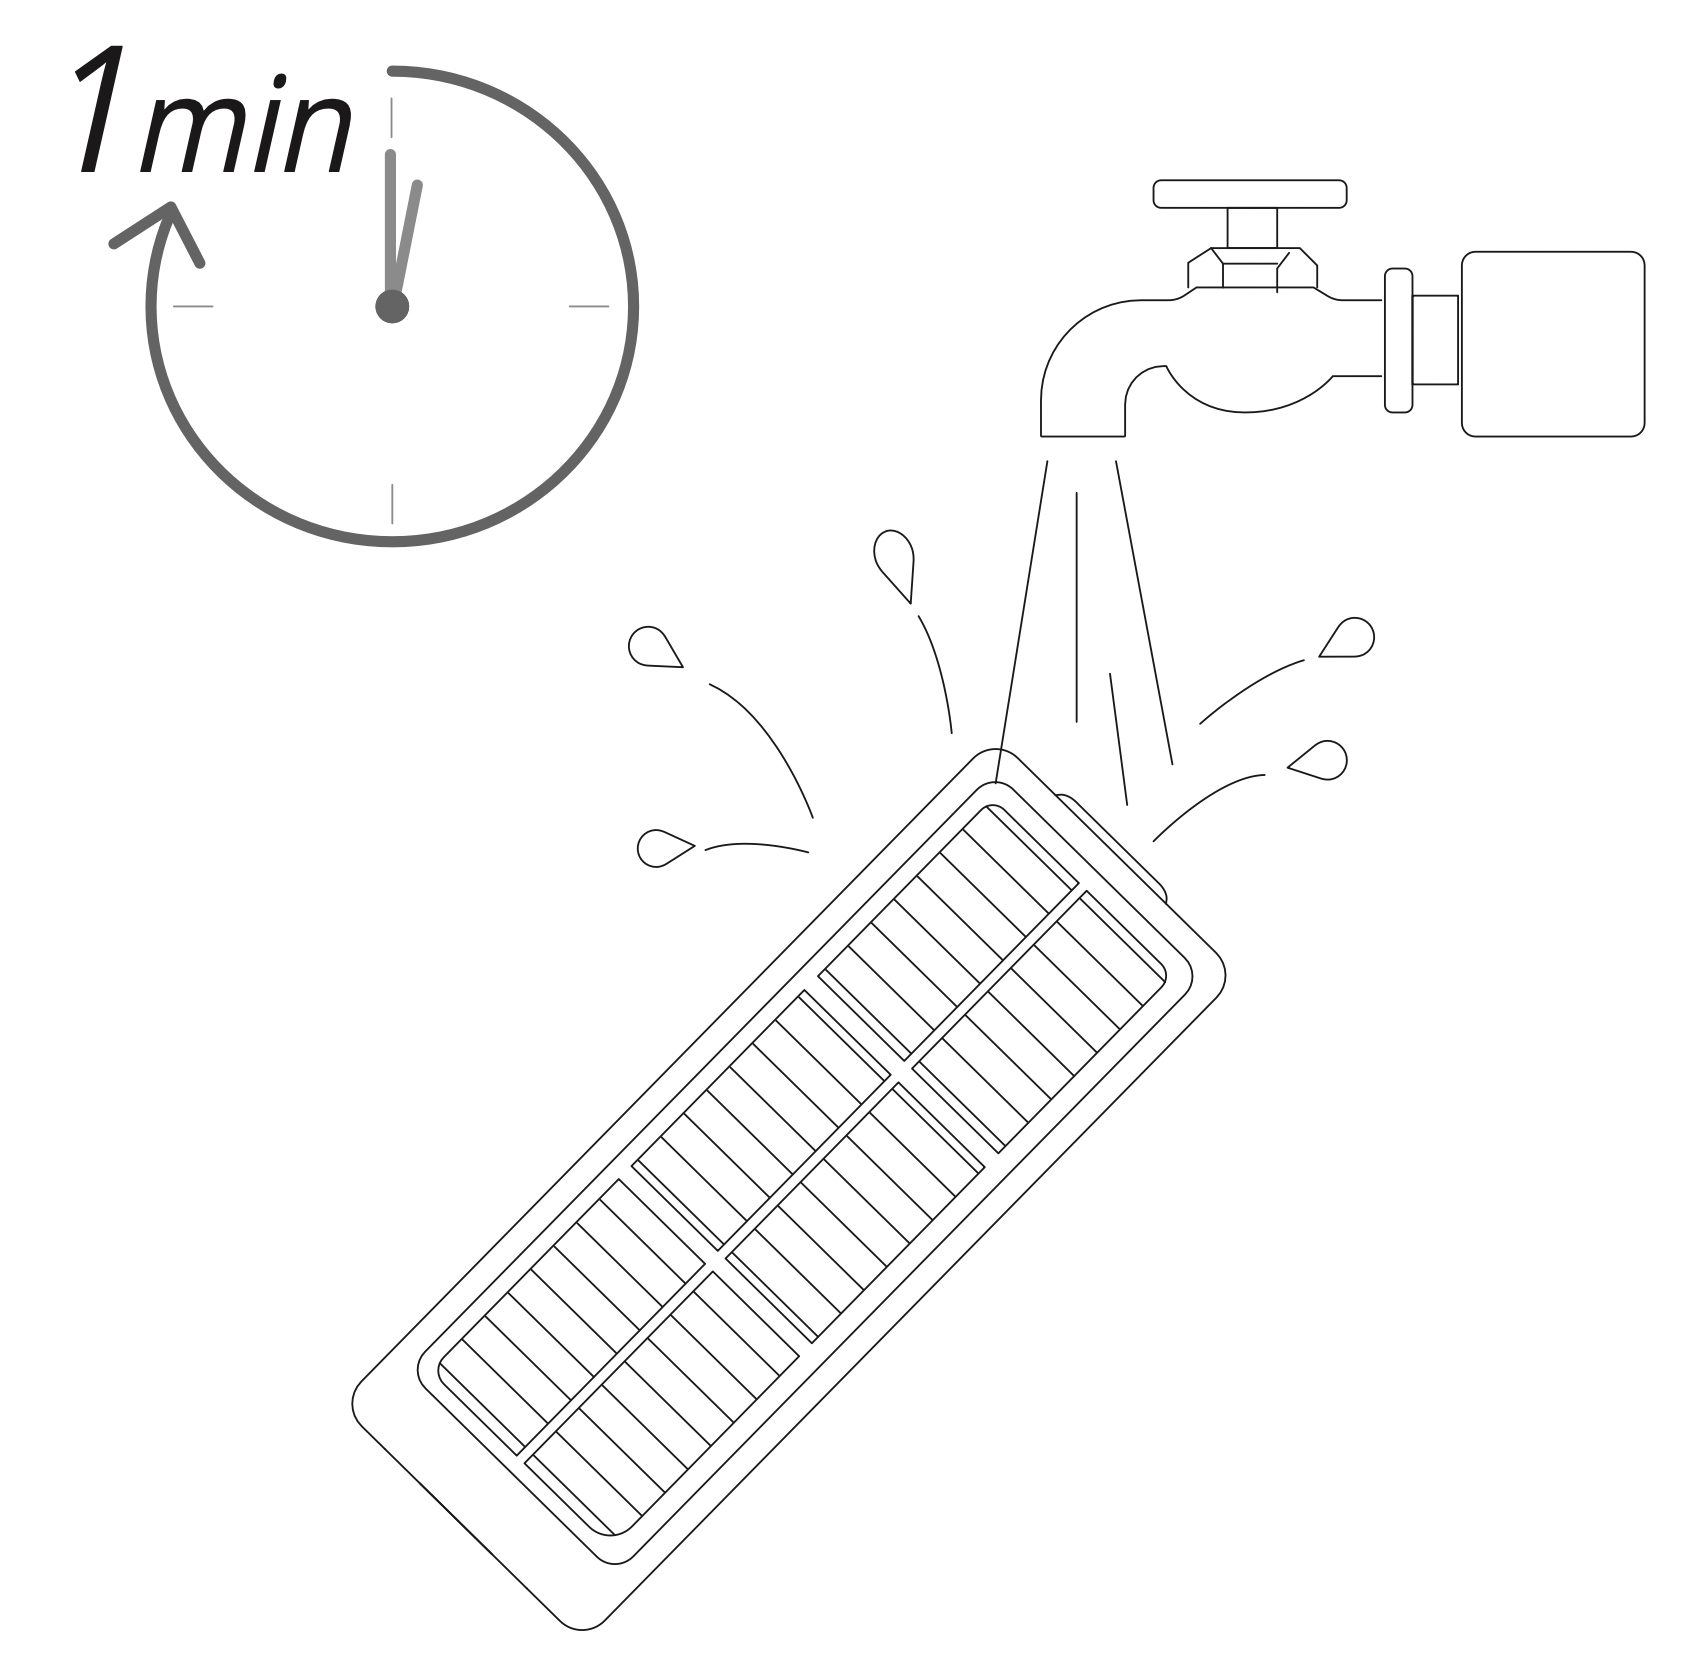
Clean the Mopping Cloth and Water Tank
A dirty mopping cloth will affect the mopping performance.Clean the wash able mopping cloth and water tank before use.
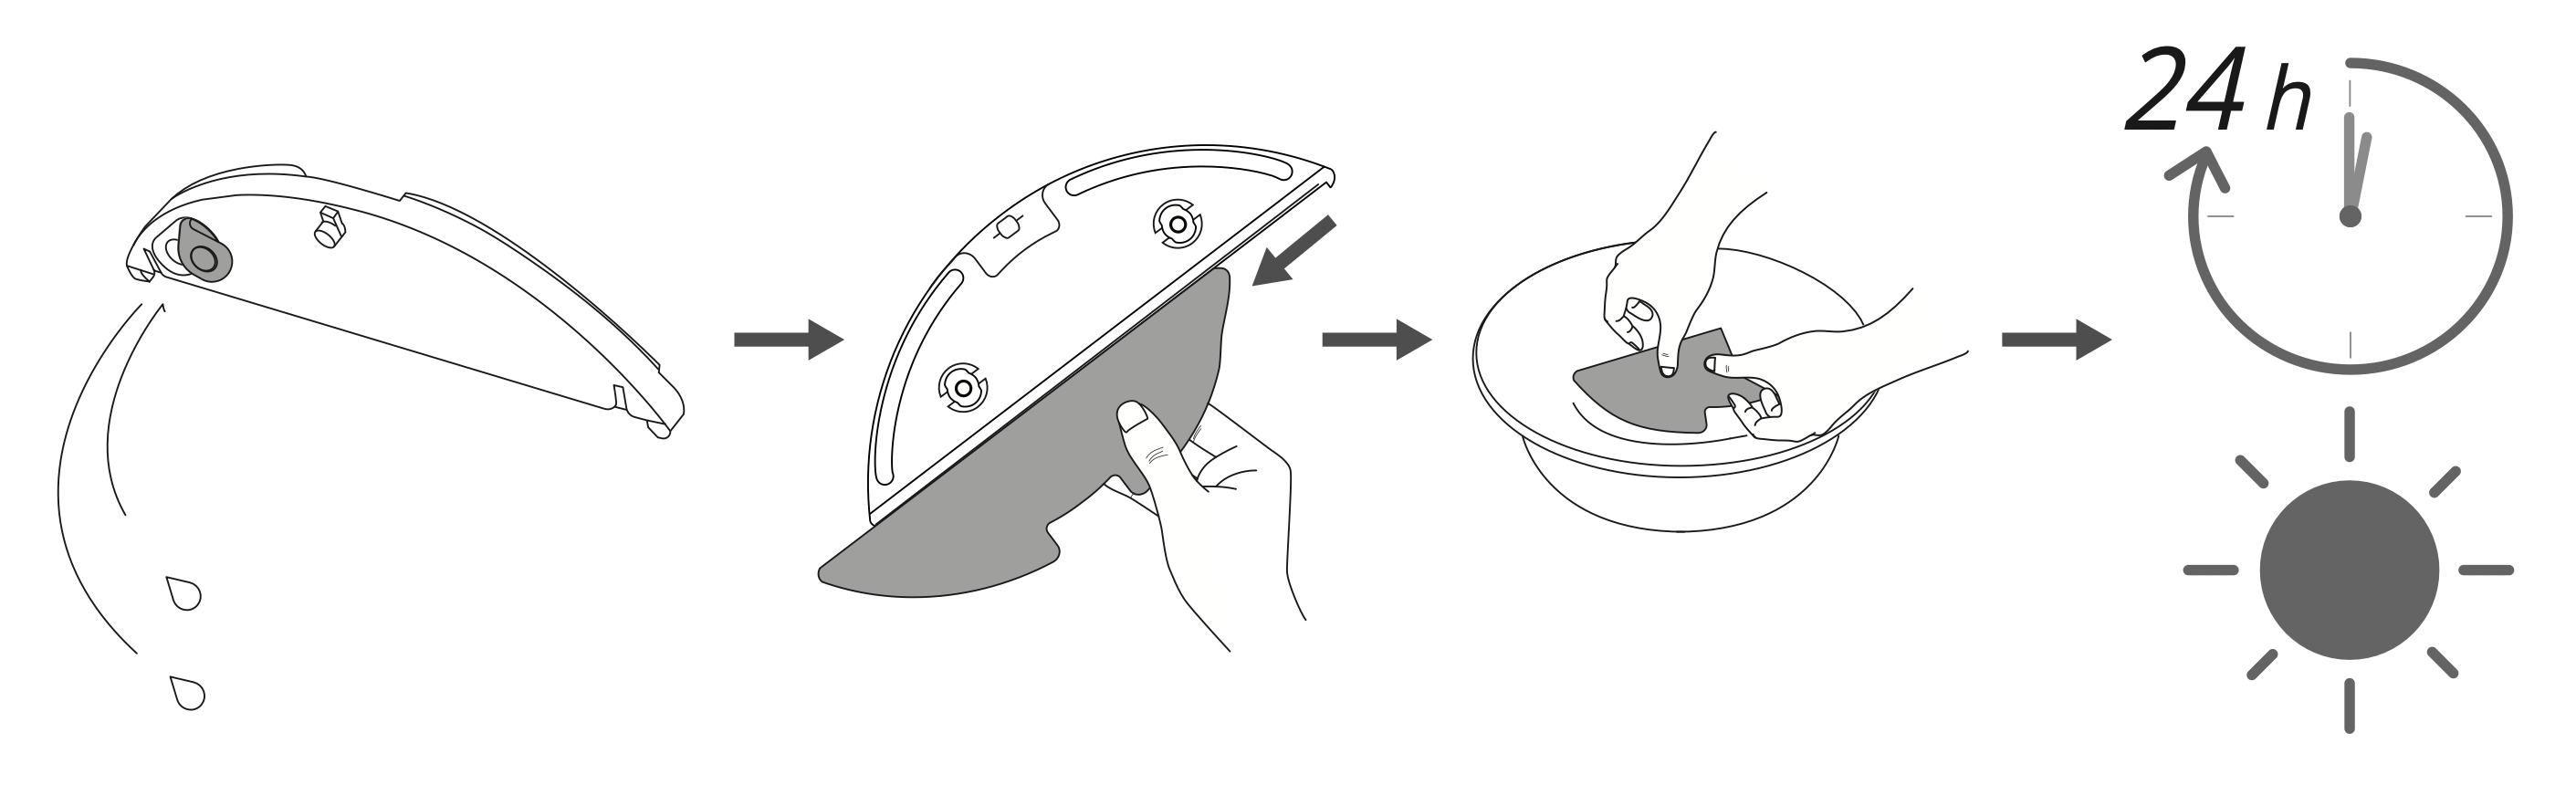
- After each use, remove the mopping cloth from the water tank.
- Rinse the mopping cloth and water tank thoroughly with water.
- Air-dry the mopping cloth and water tank completely to avoid being mildewed or producing unpleasant smell.
- To discard your single-use mopping cloth, remove and drop it into a trash container.
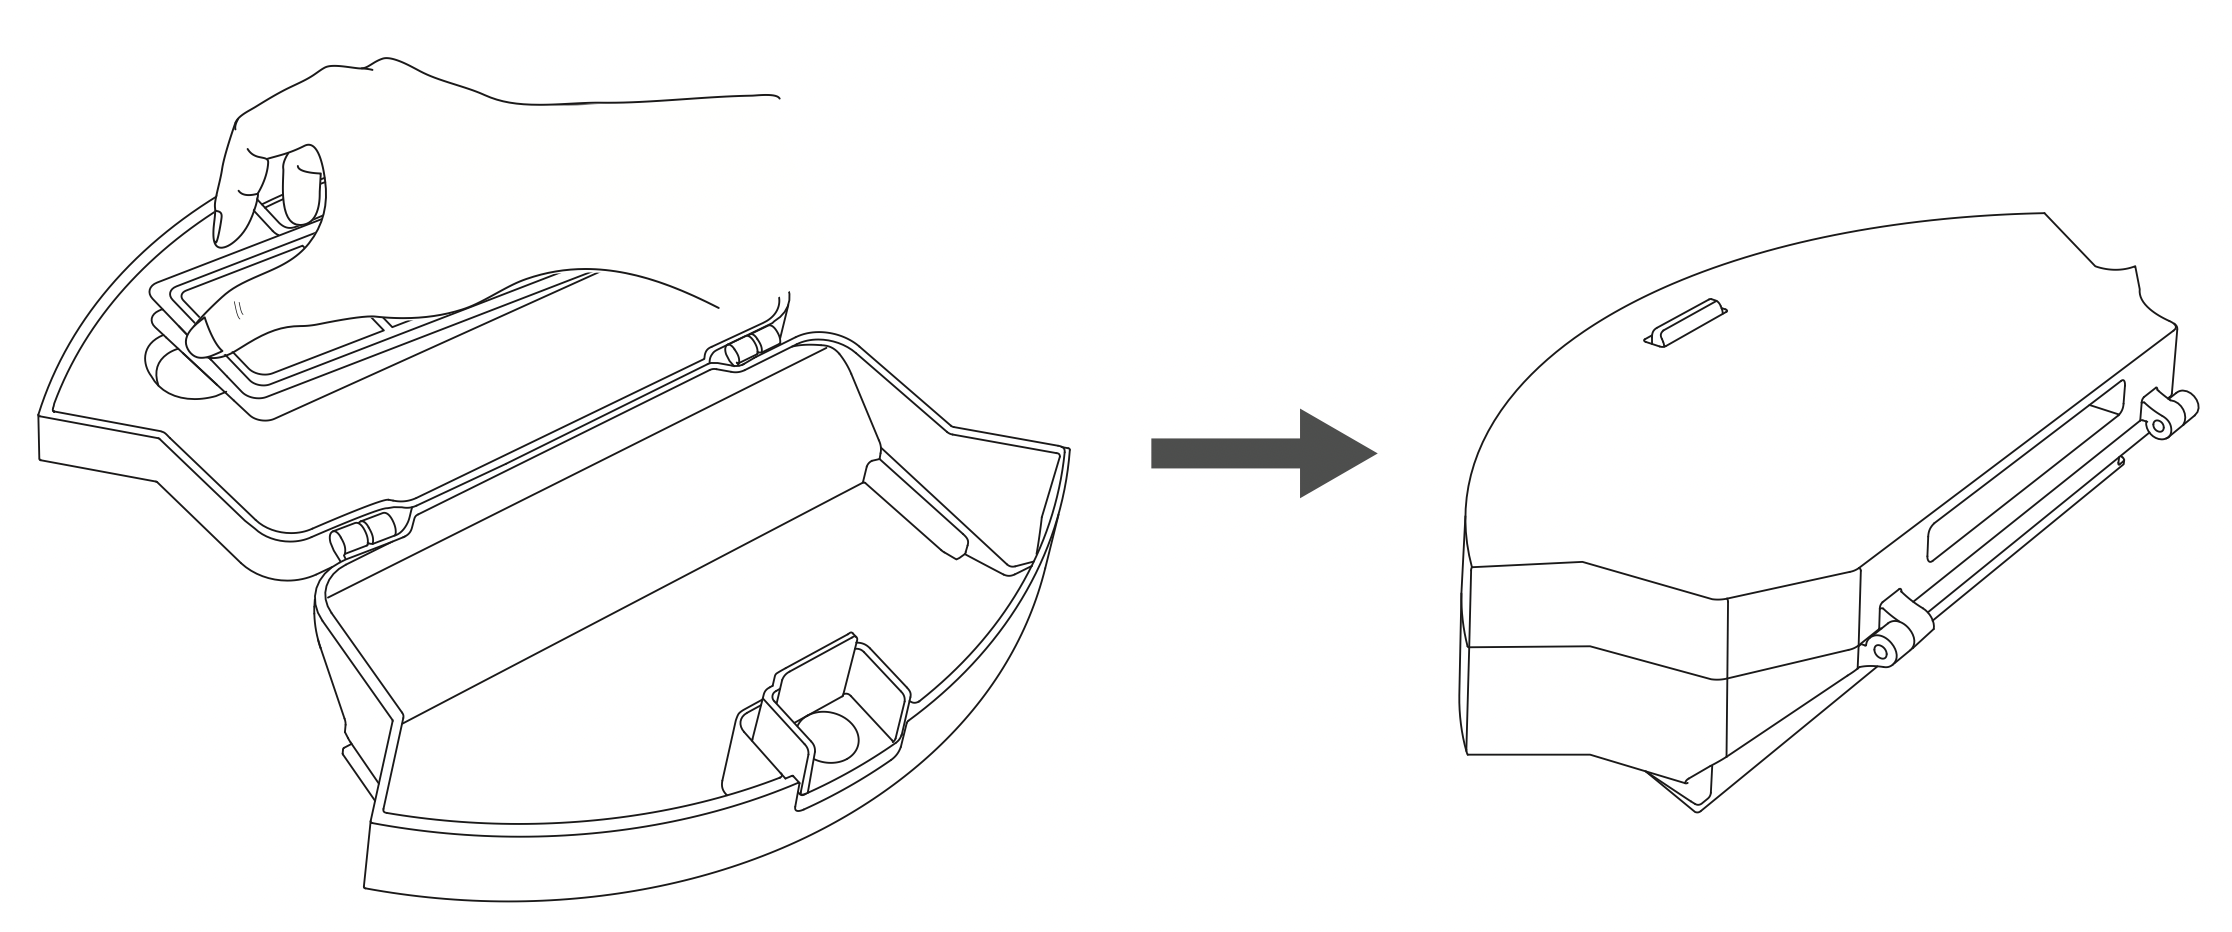
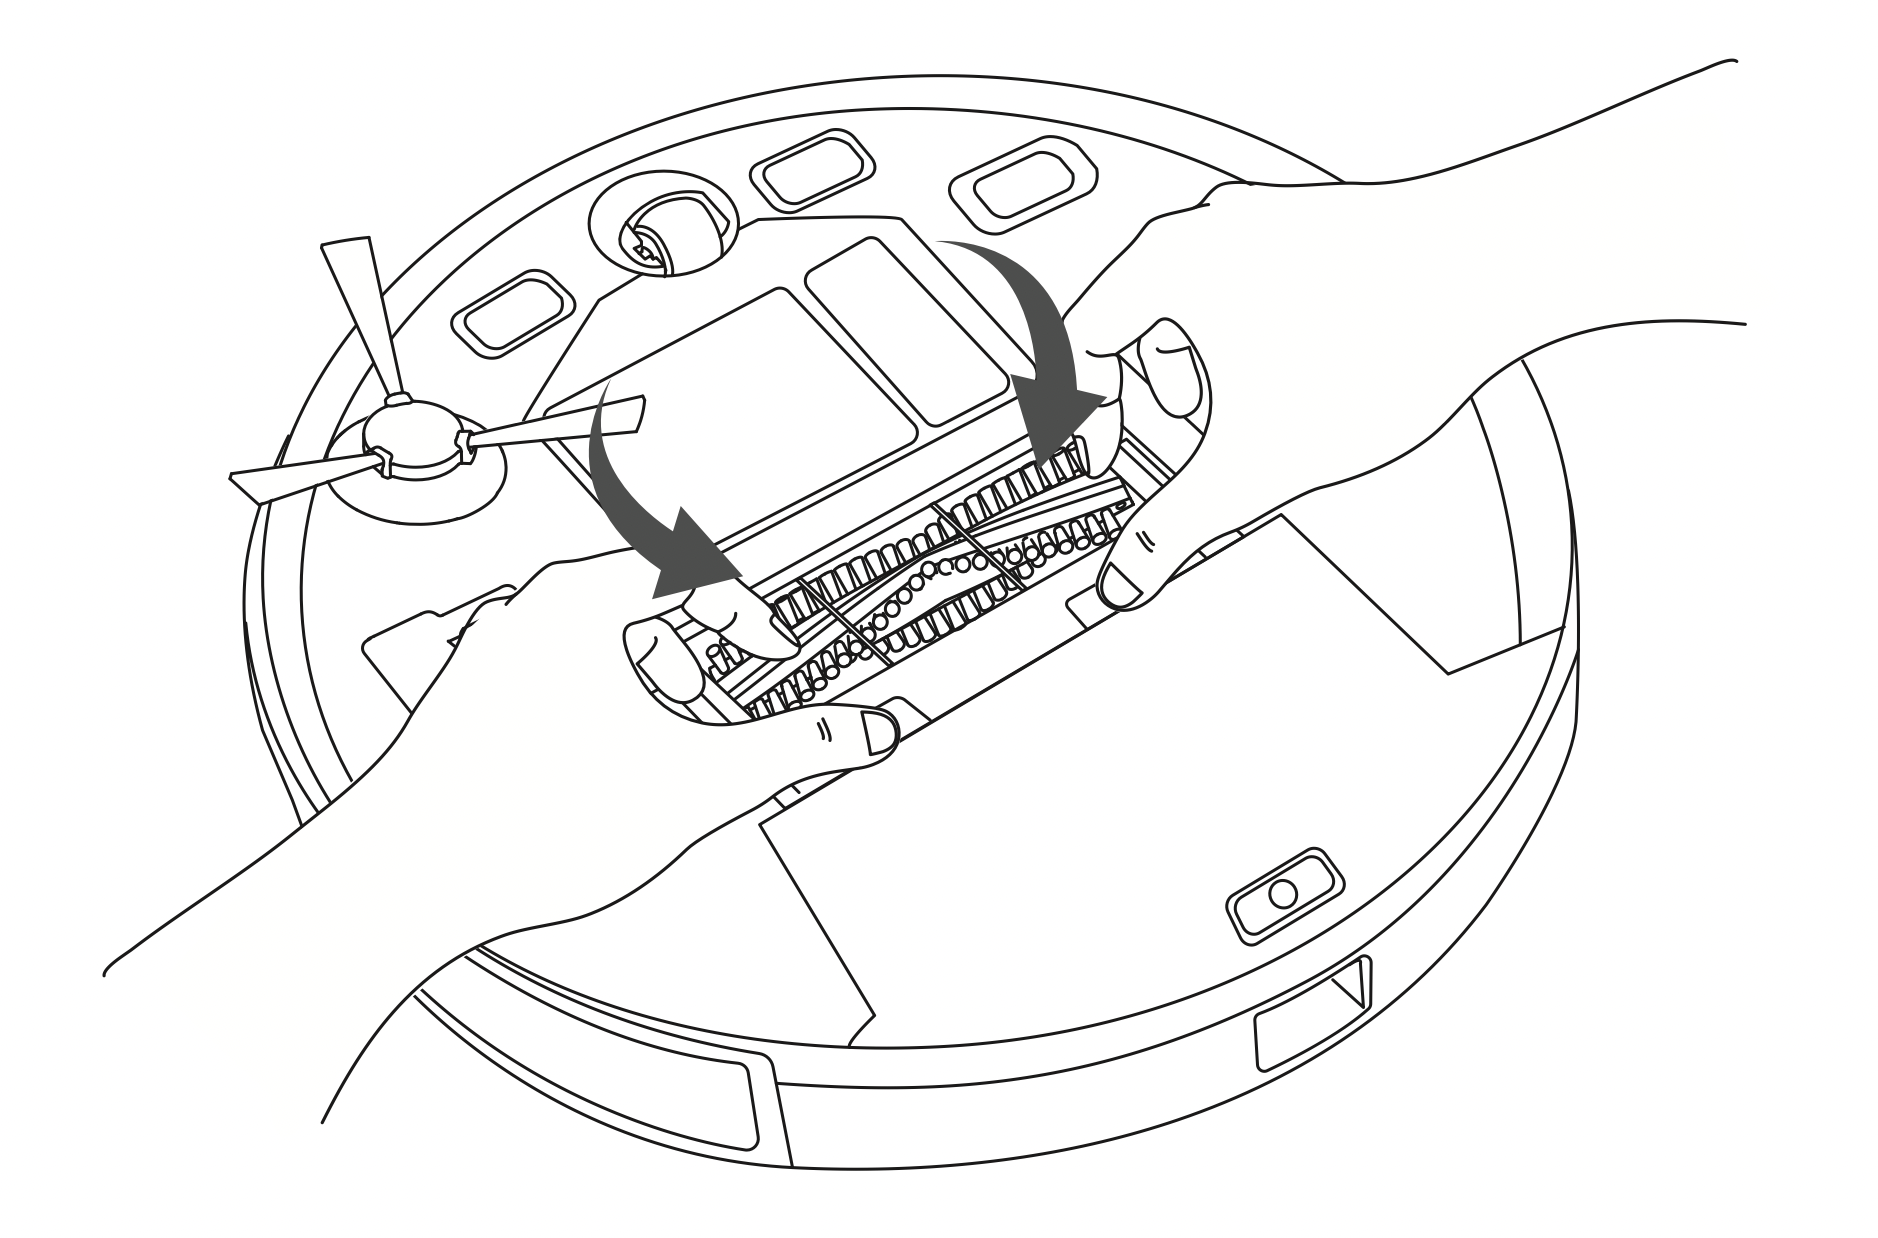
Clean the Rolling Brush
- Pull the release tabs to unlock the brush guard as shown.
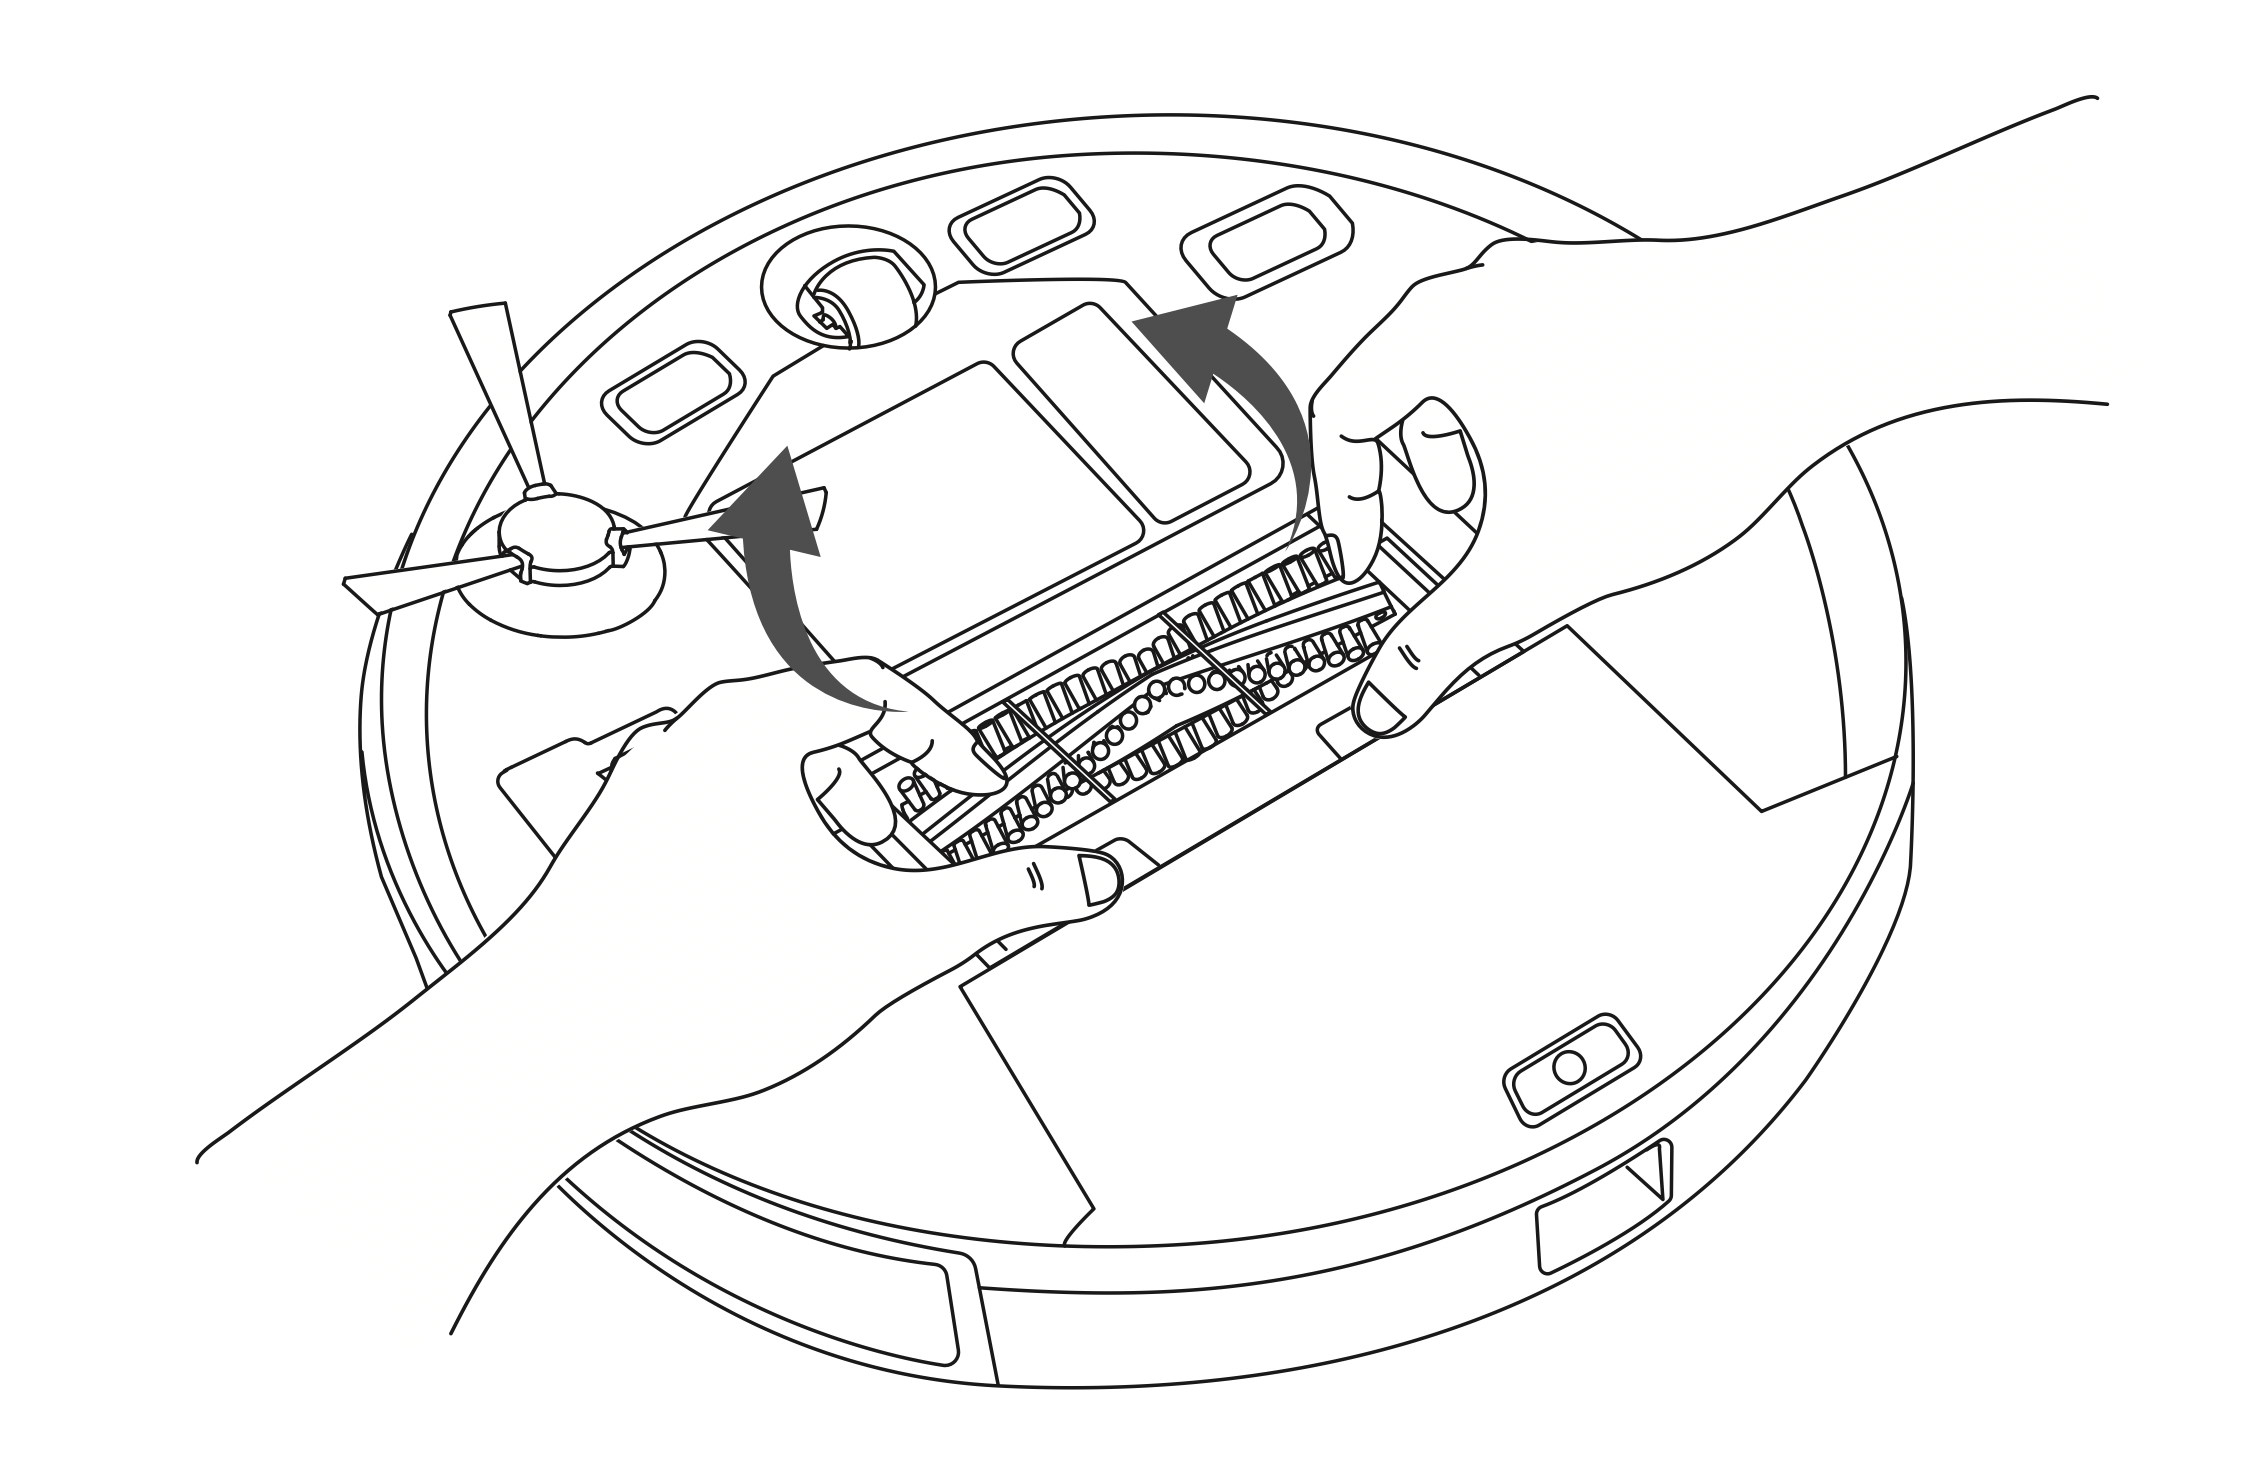
- Lift the rolling brush to remove.
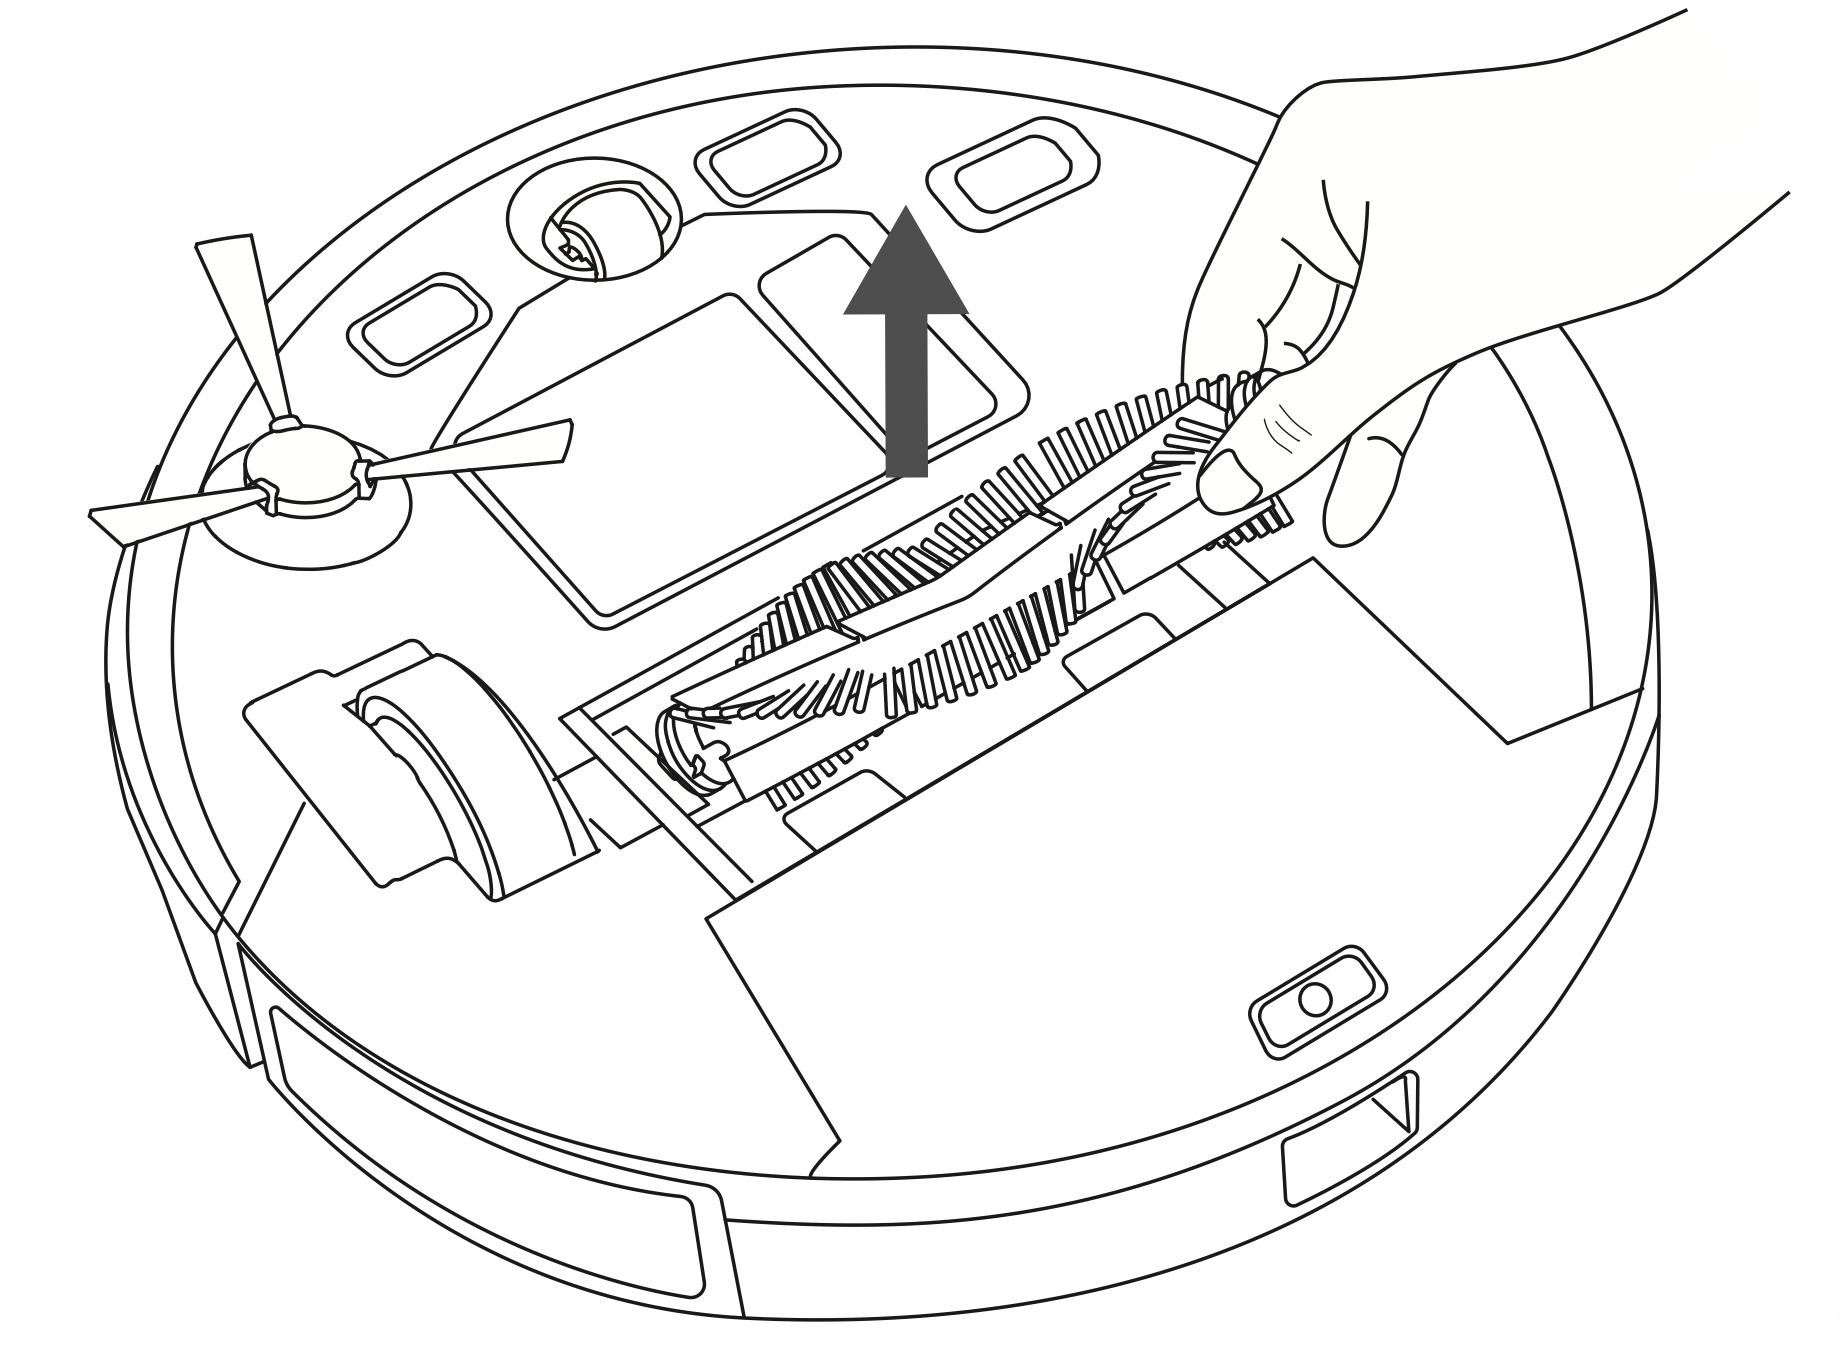
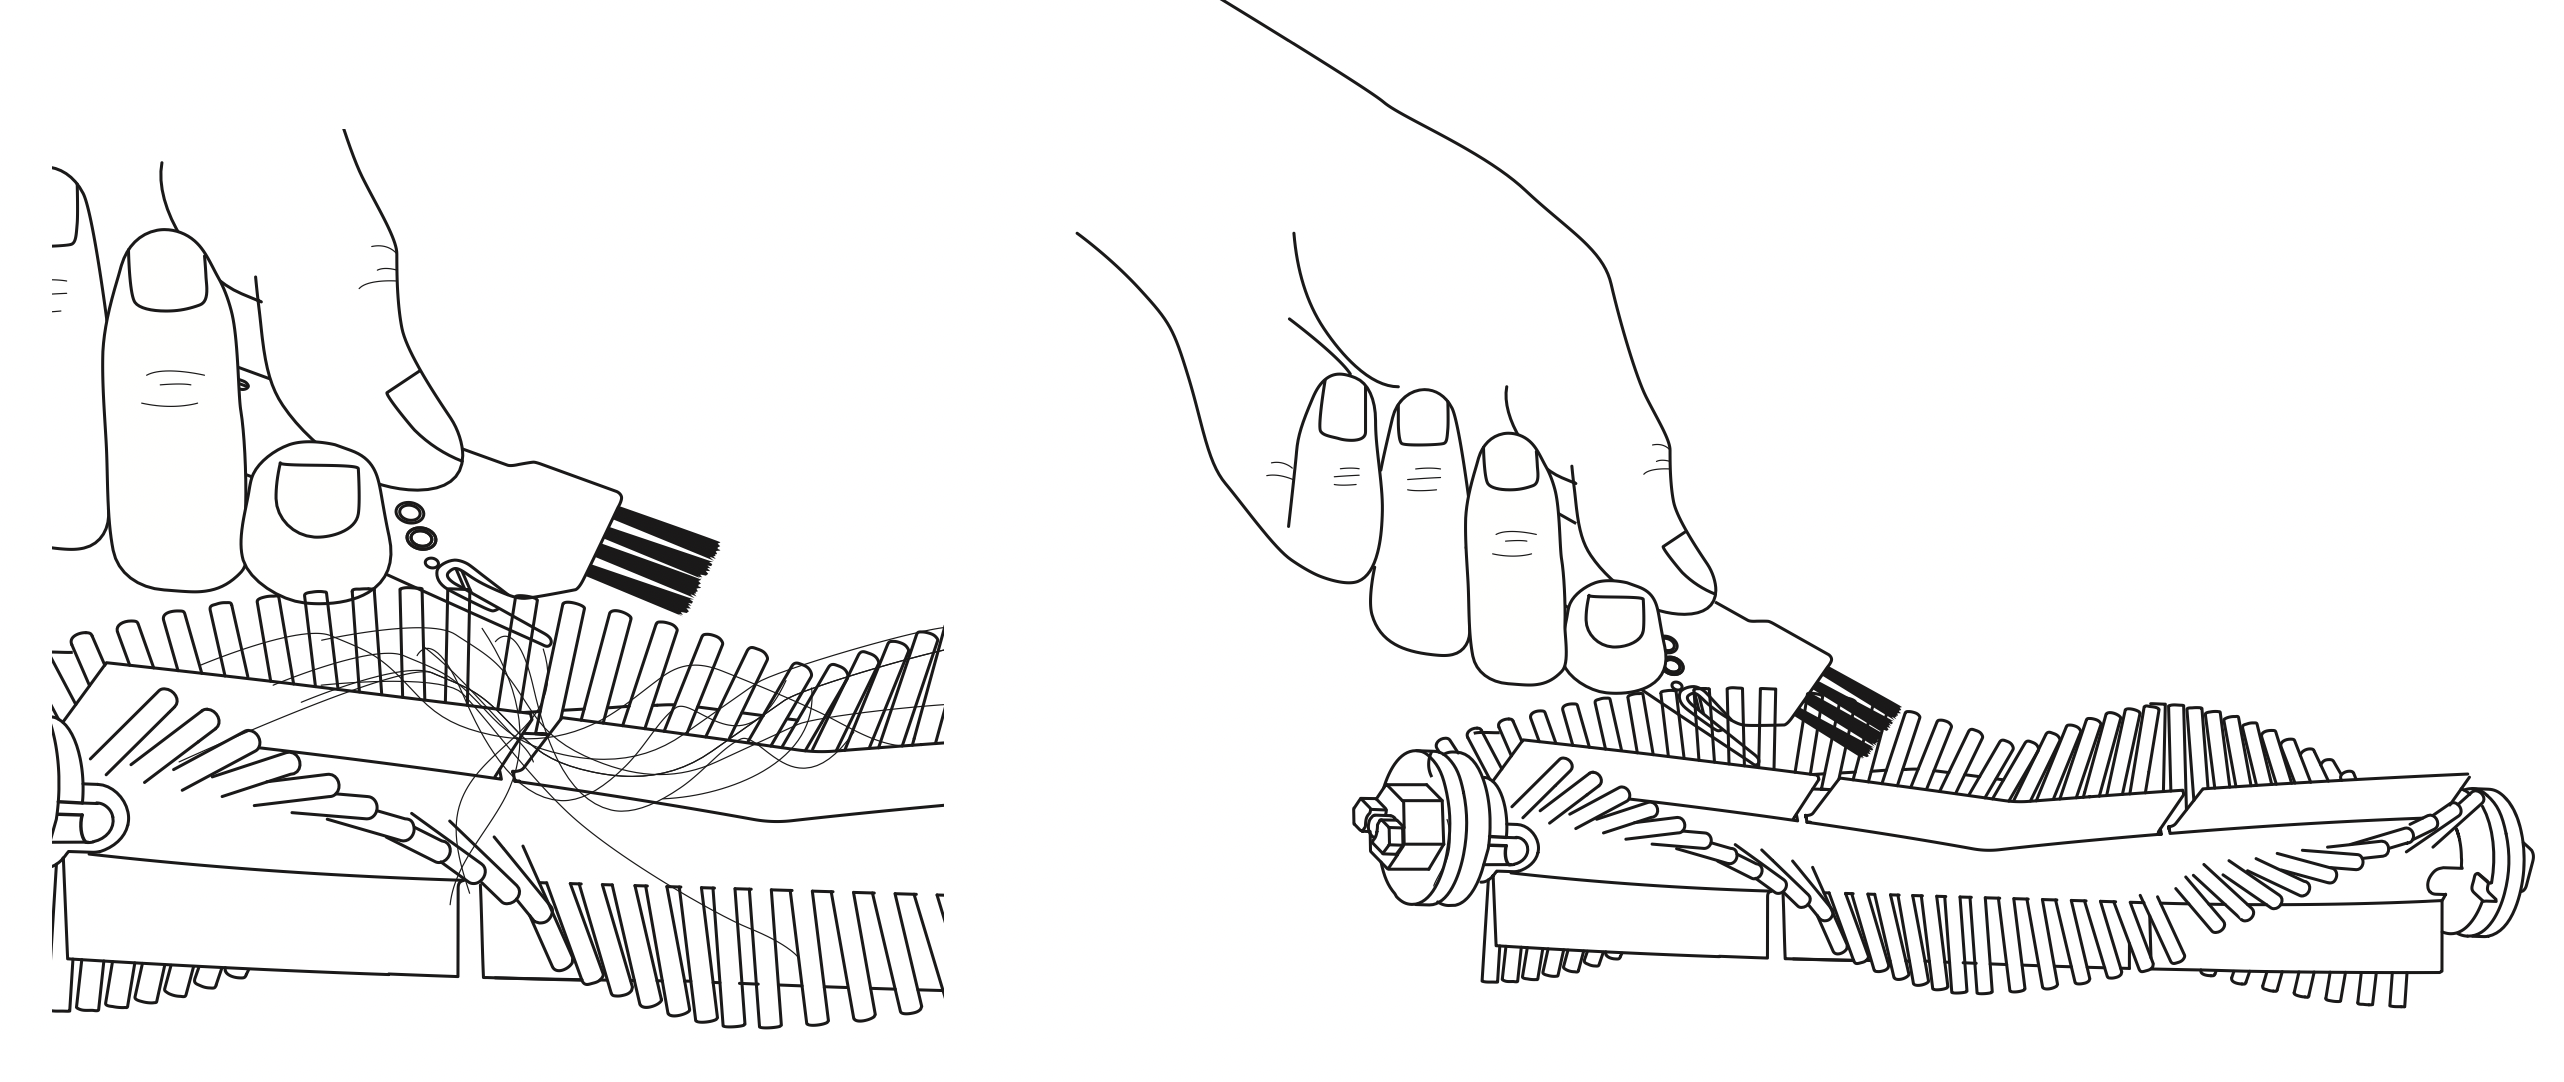
- Clean the rolling brush with the provided cleaning tool or a vacuum cleaner.
- Reinstall the rolling brush by inserting the fixed protruding end first and then clicking it into place.
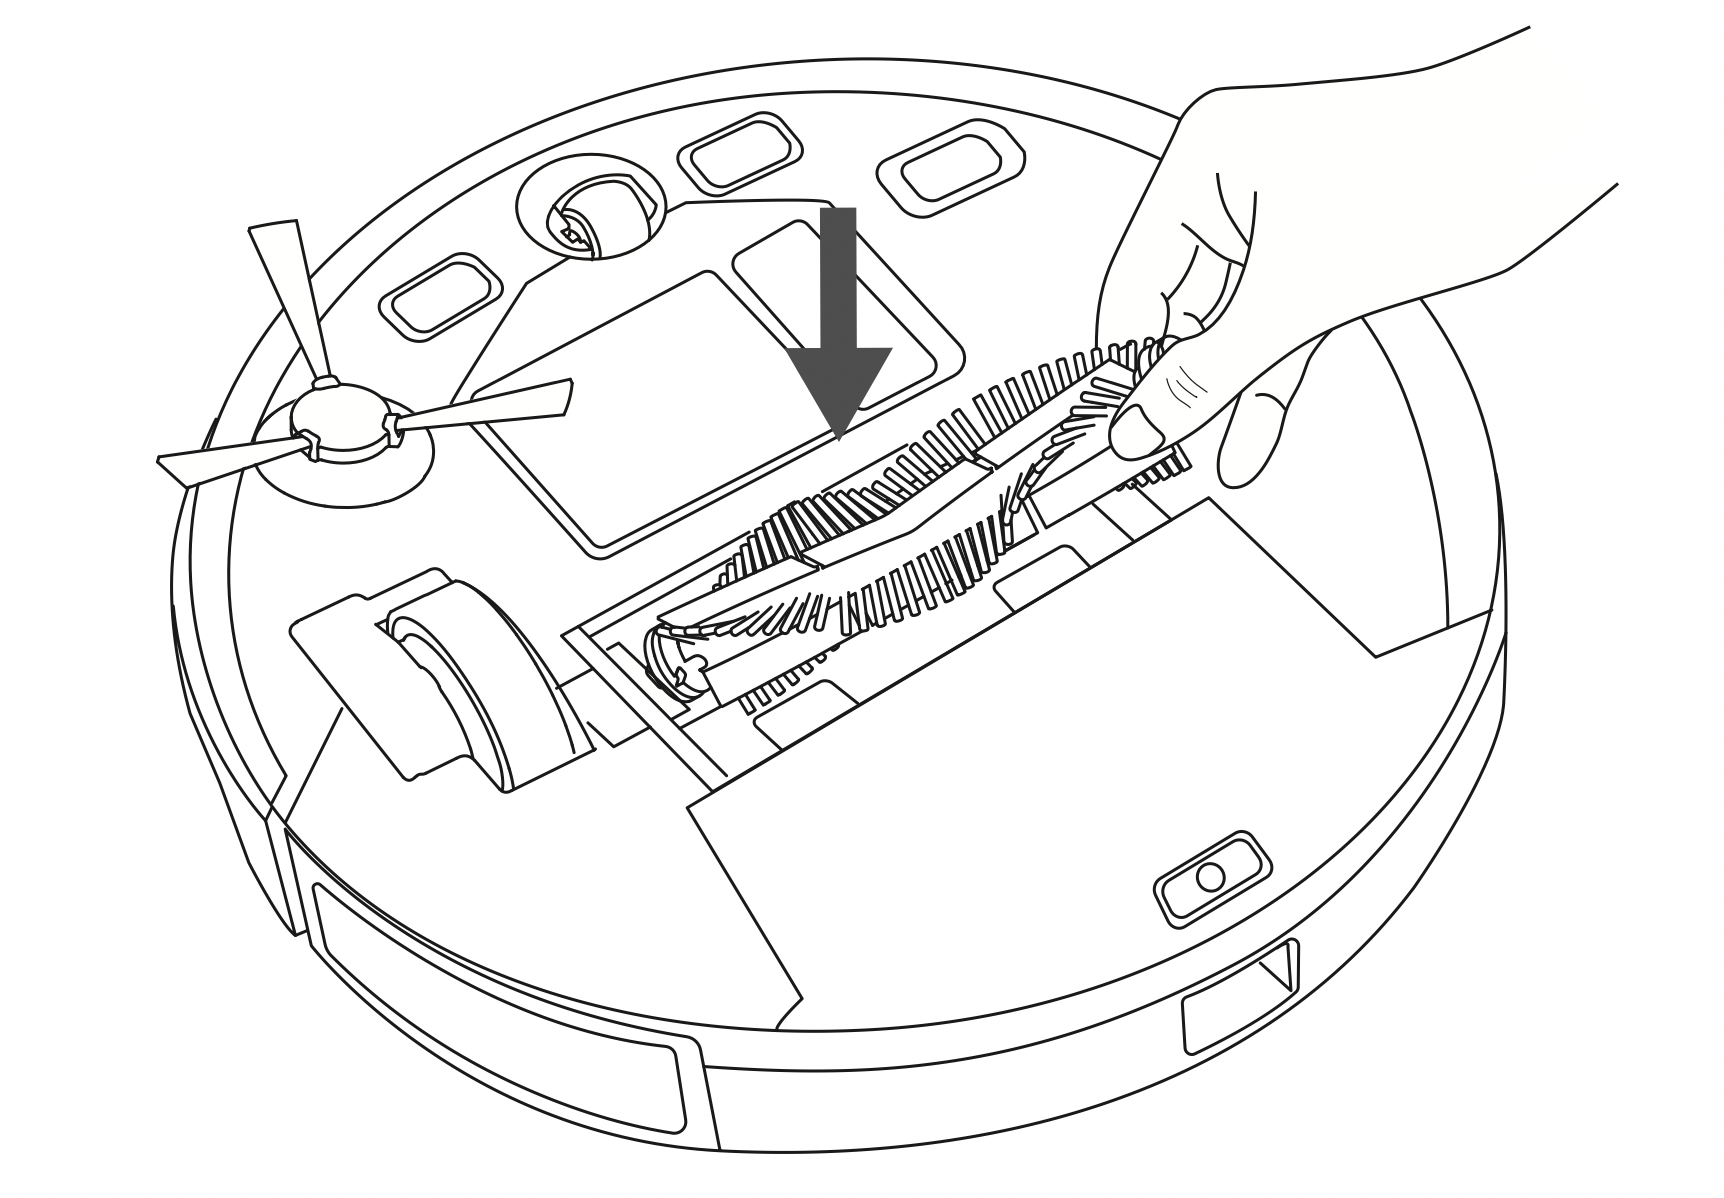
- Press down to snap the brush guard into place.
Clean the Side Brush
Foreign substances, such as hair, can easily get tangled in the side brush, and dirt may adhere to it. Be sure to clean it regularly.
- Remove the side brush.
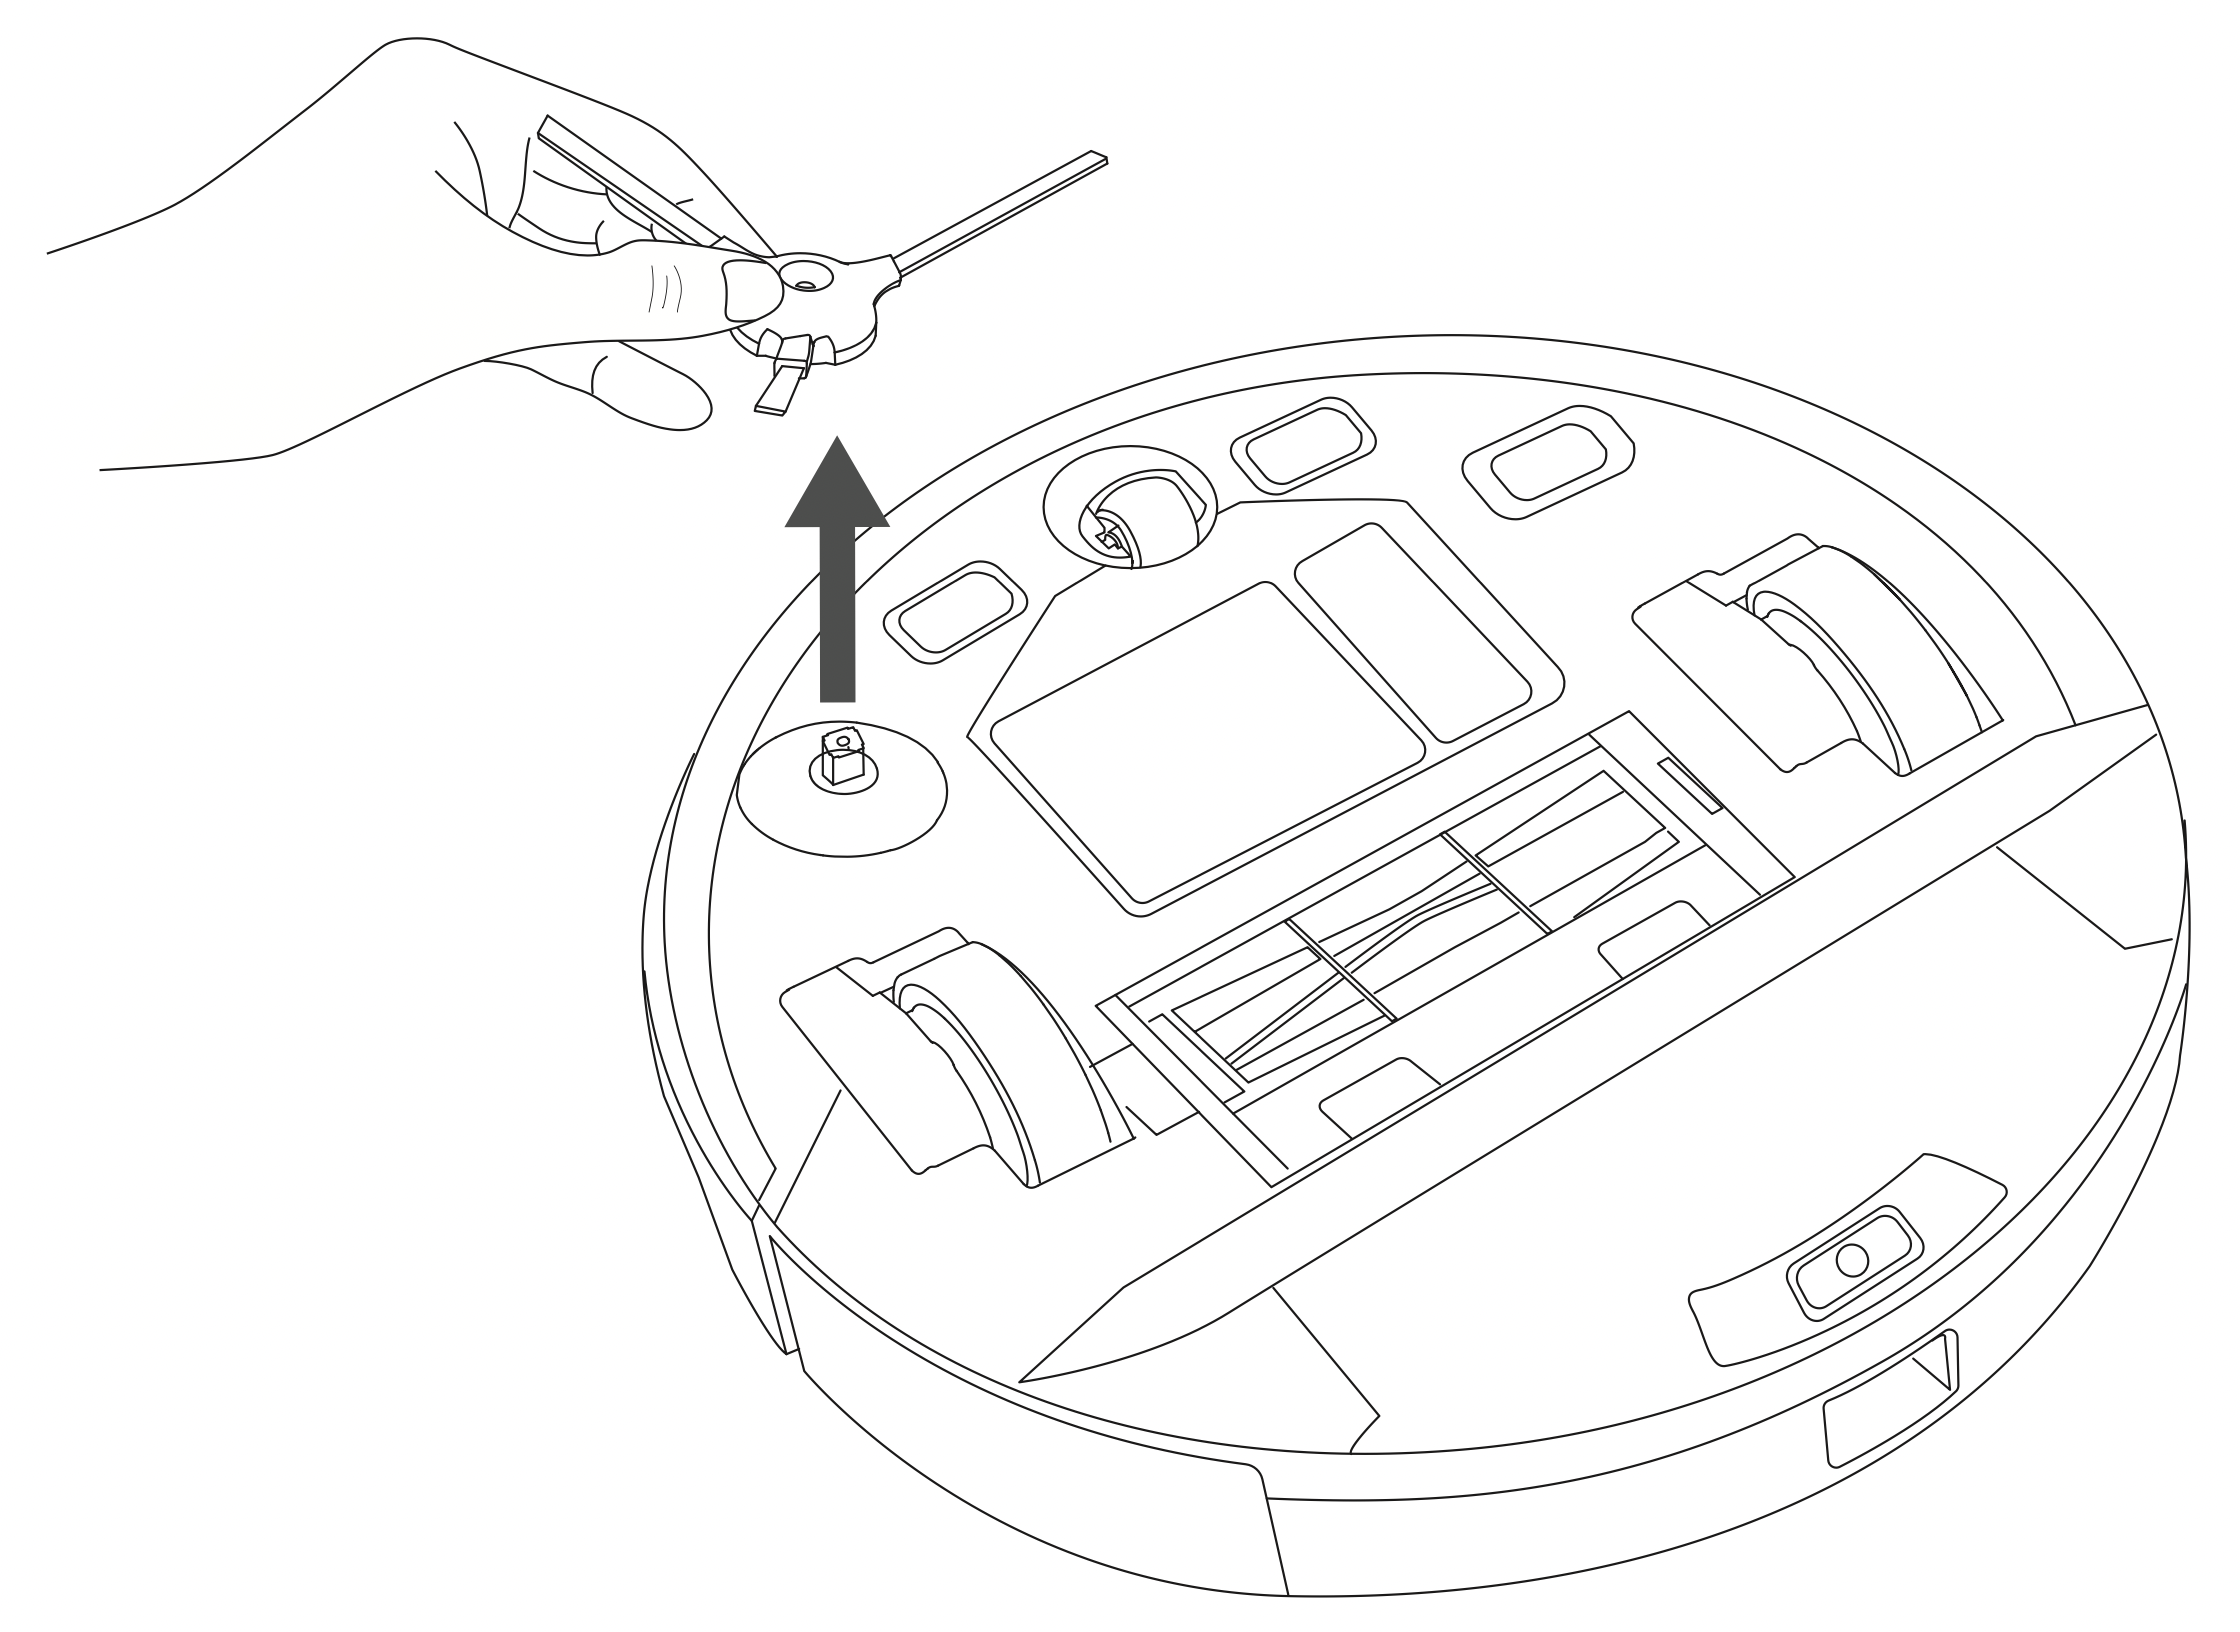
- Carefully unwind and pull off any hair or string that is wrapped between the main unit and the side brush.
- Use a cloth dampened with warm water to remove dust from the brush or to gently reshape it.
Tip: Only use the side brush when it is completely dry.
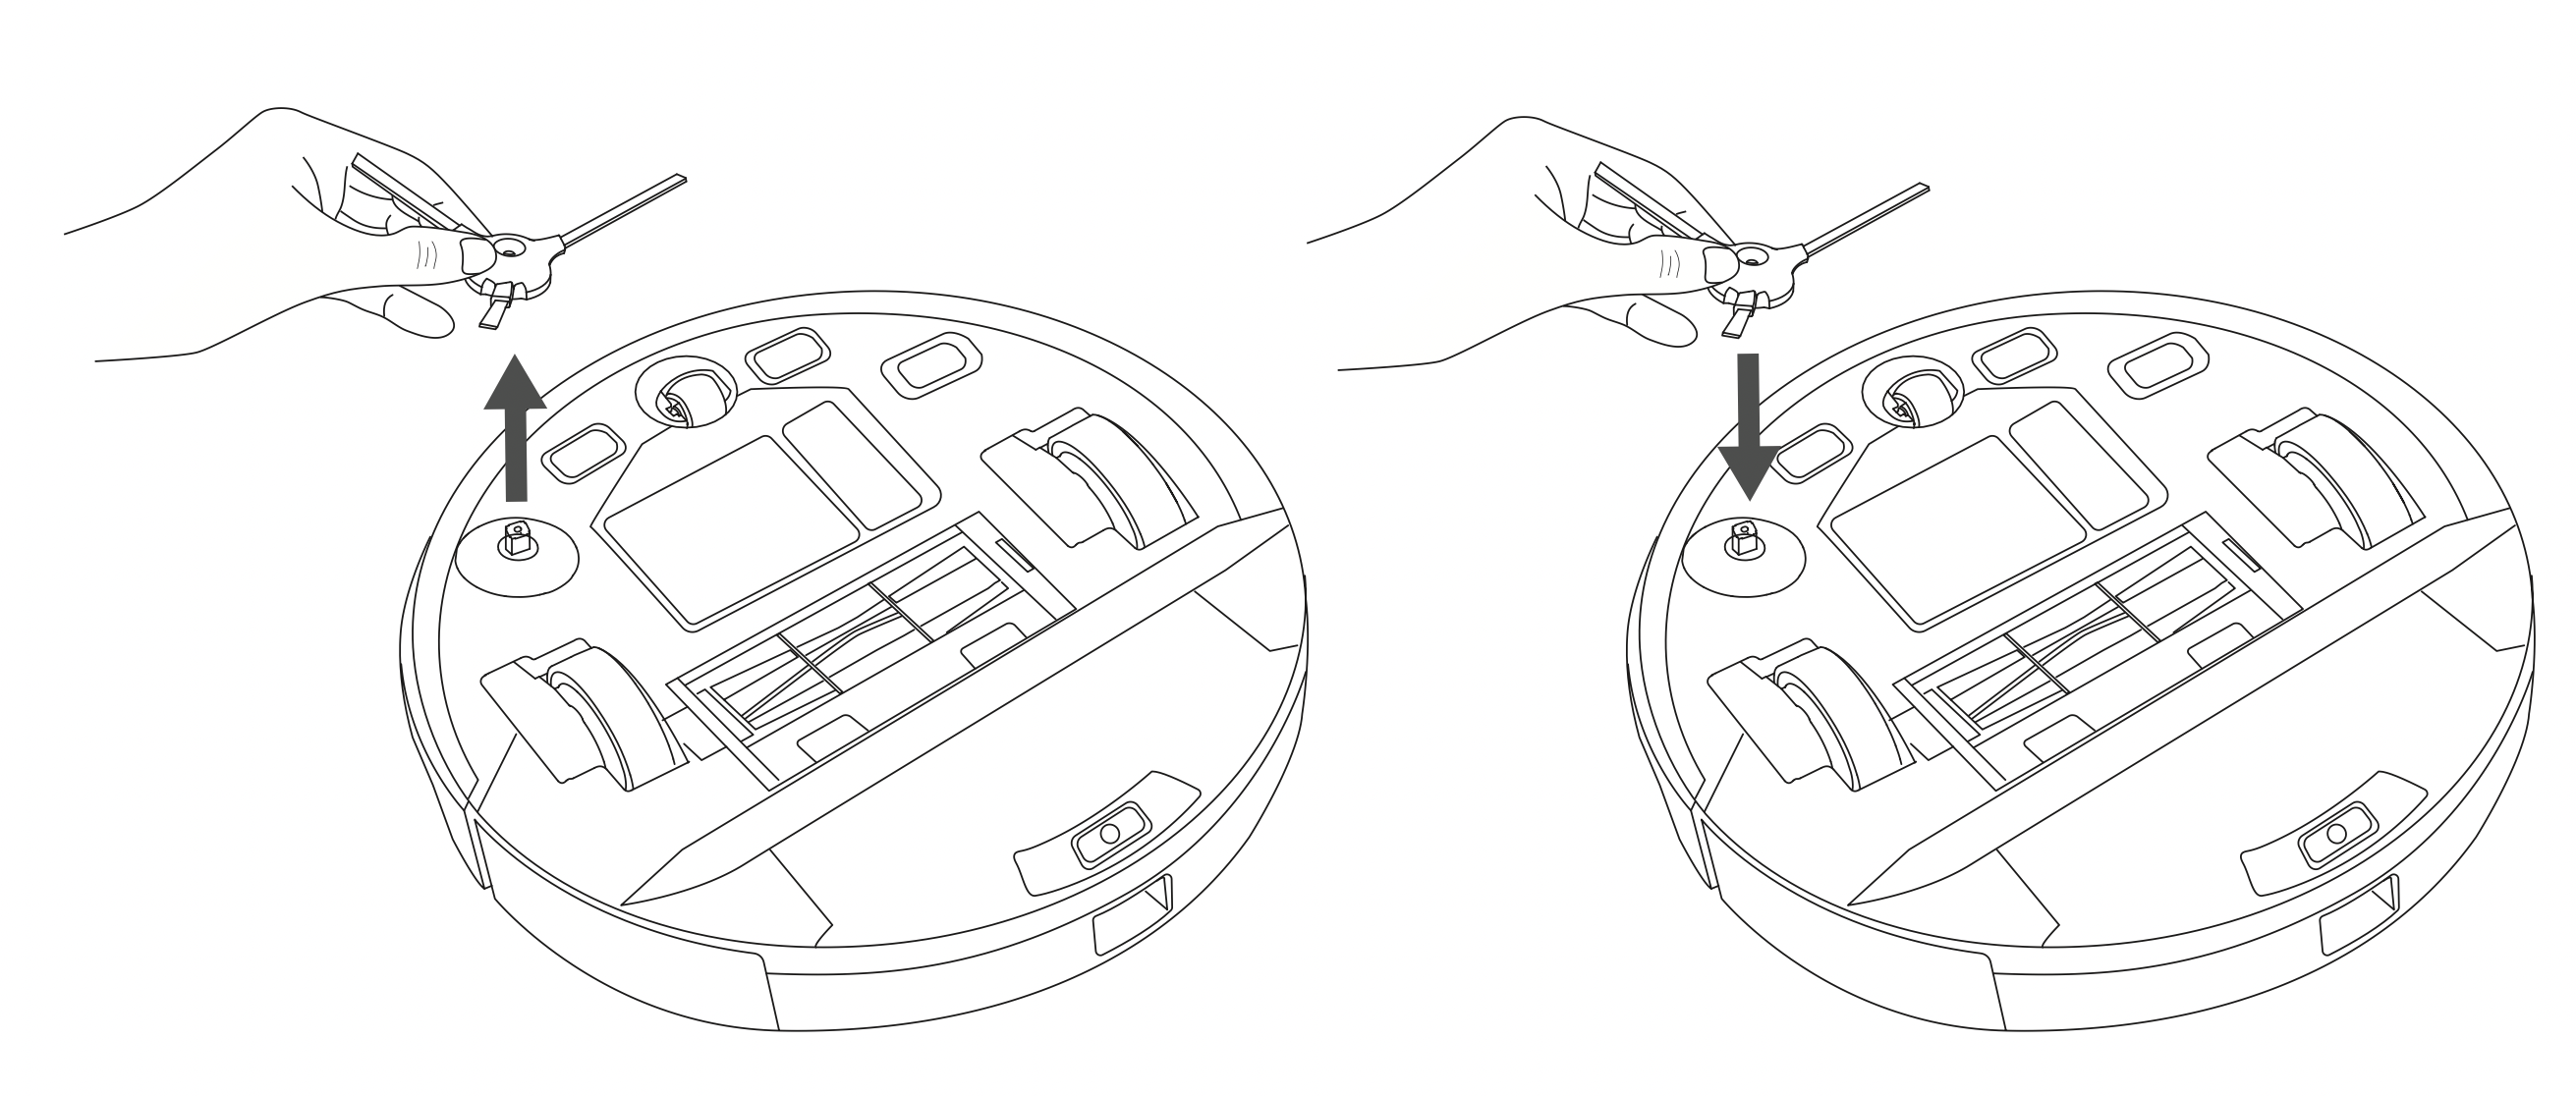
Replace the Side Brush
The side brush may become bent or damaged after being used for a period of time. Follow the instructions below to replace it.
- Pull off the old side brush and snap the new one into place.
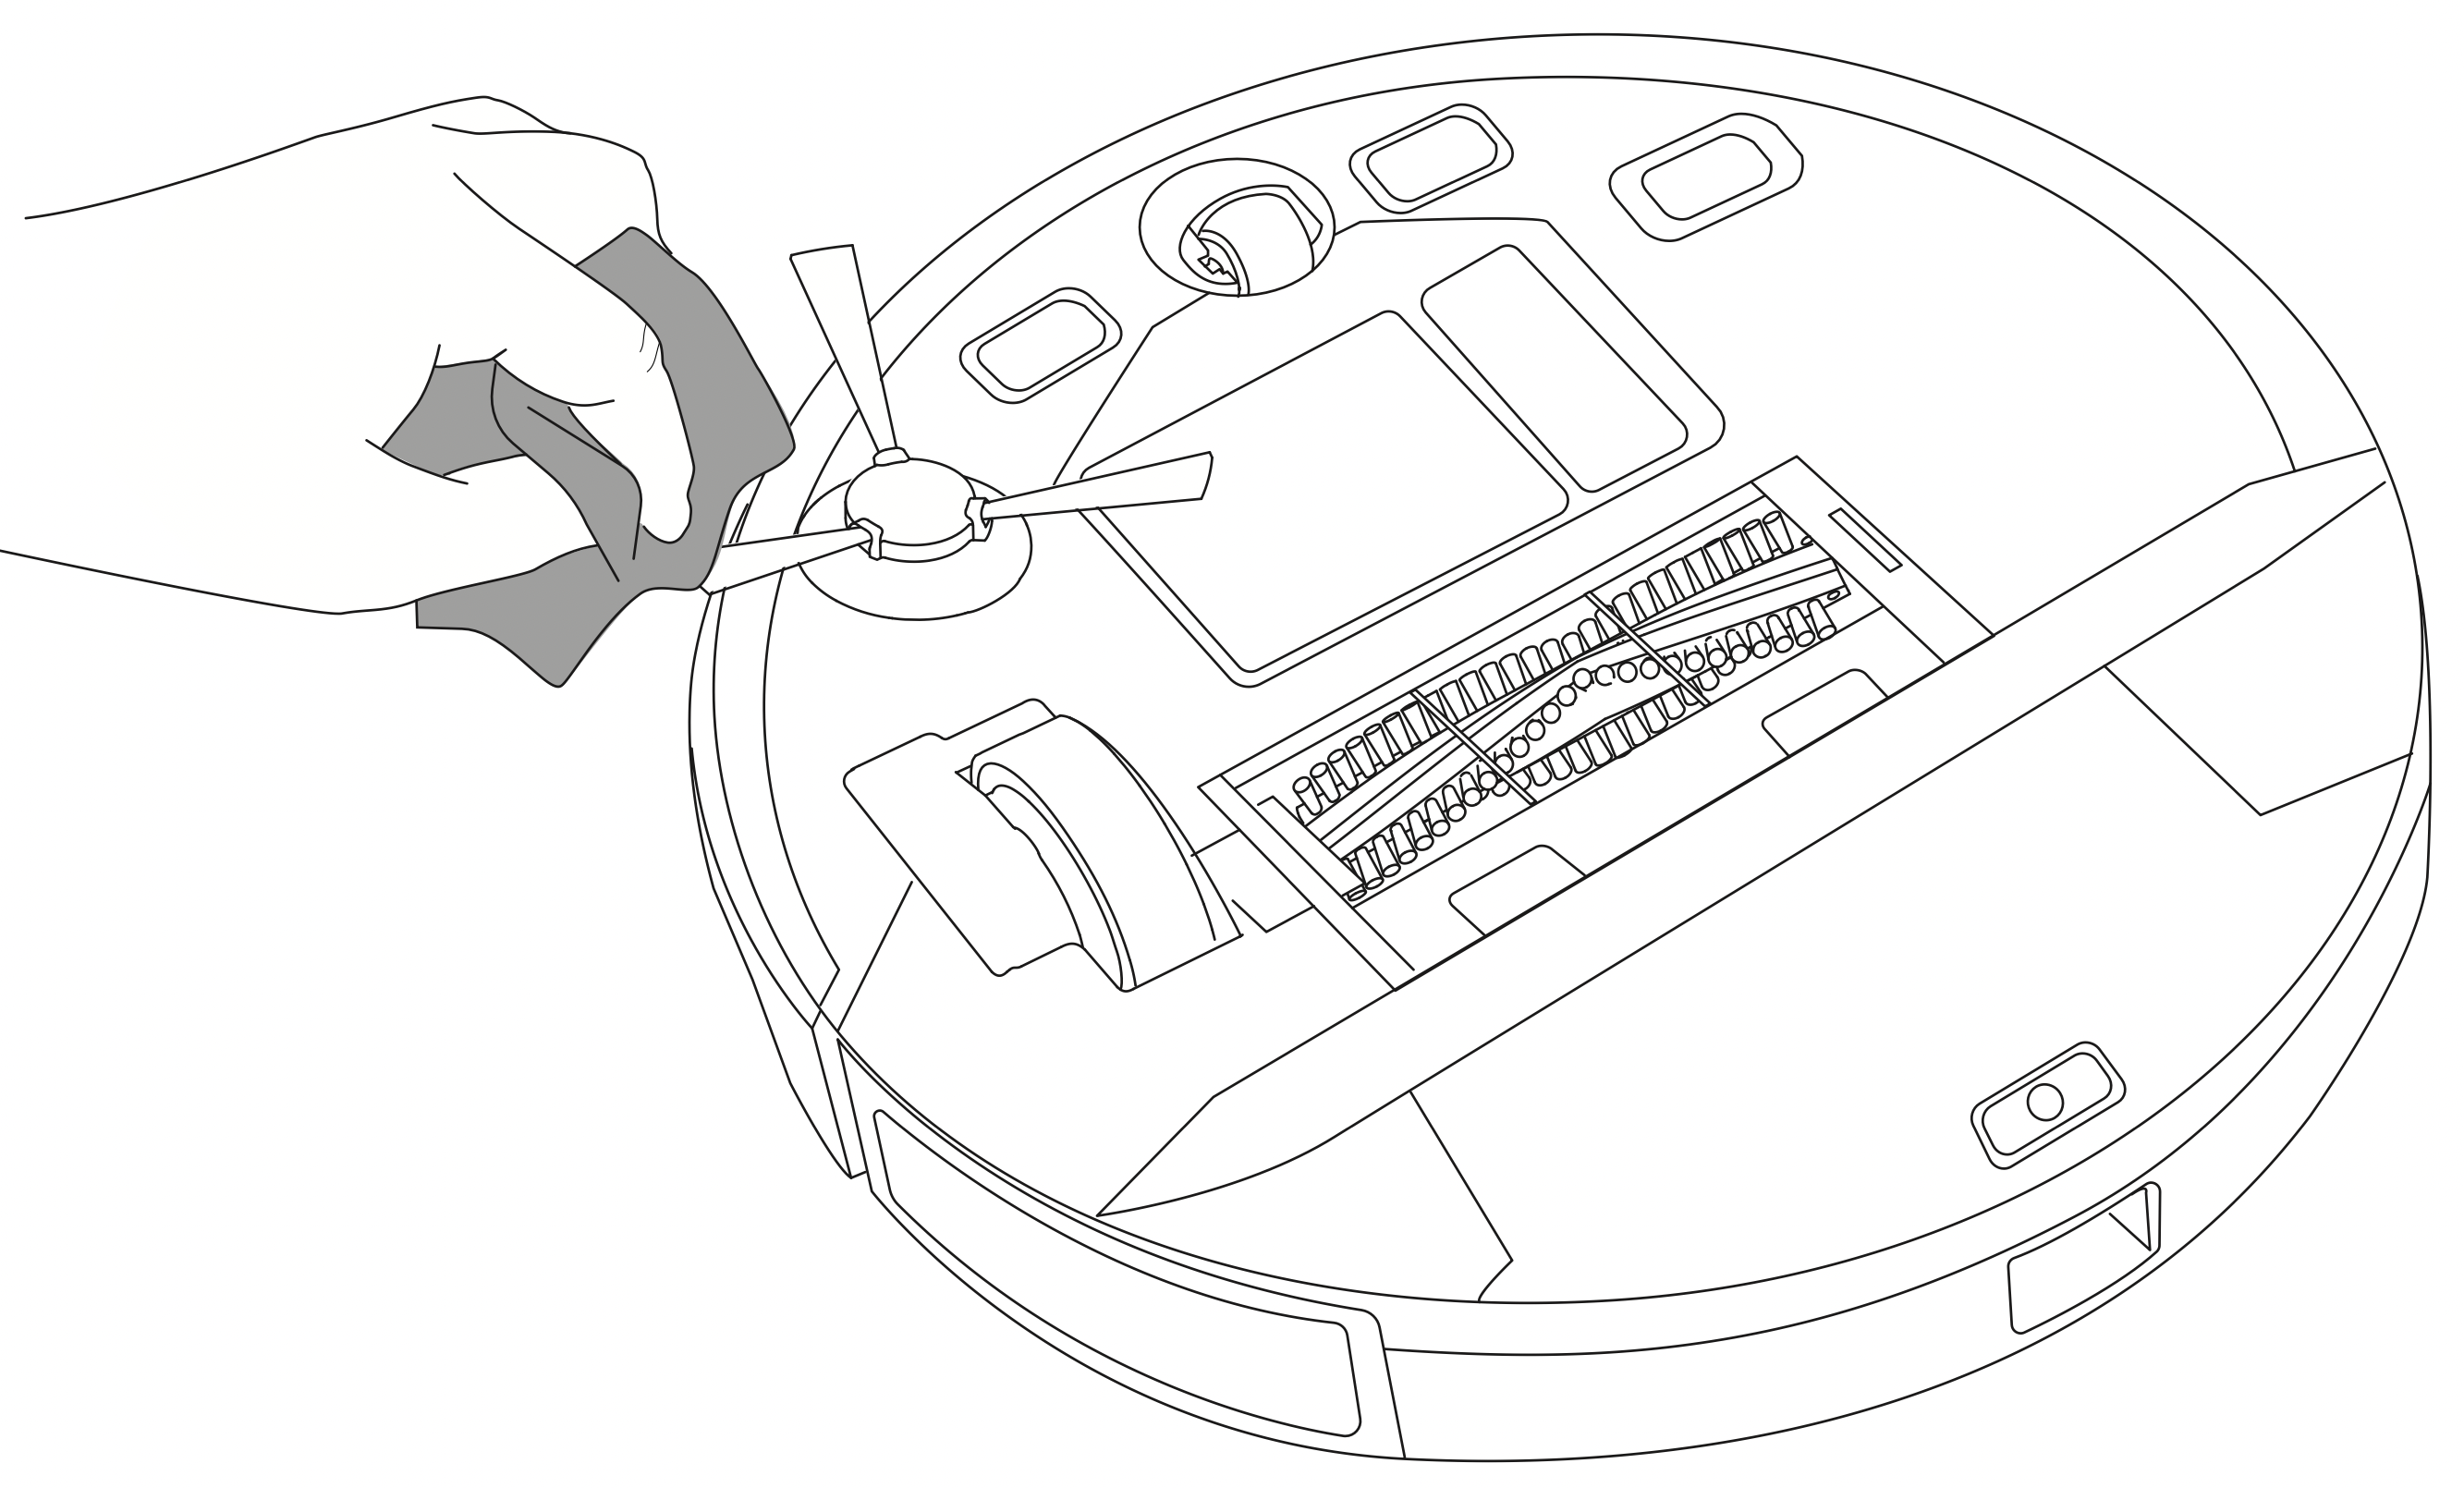
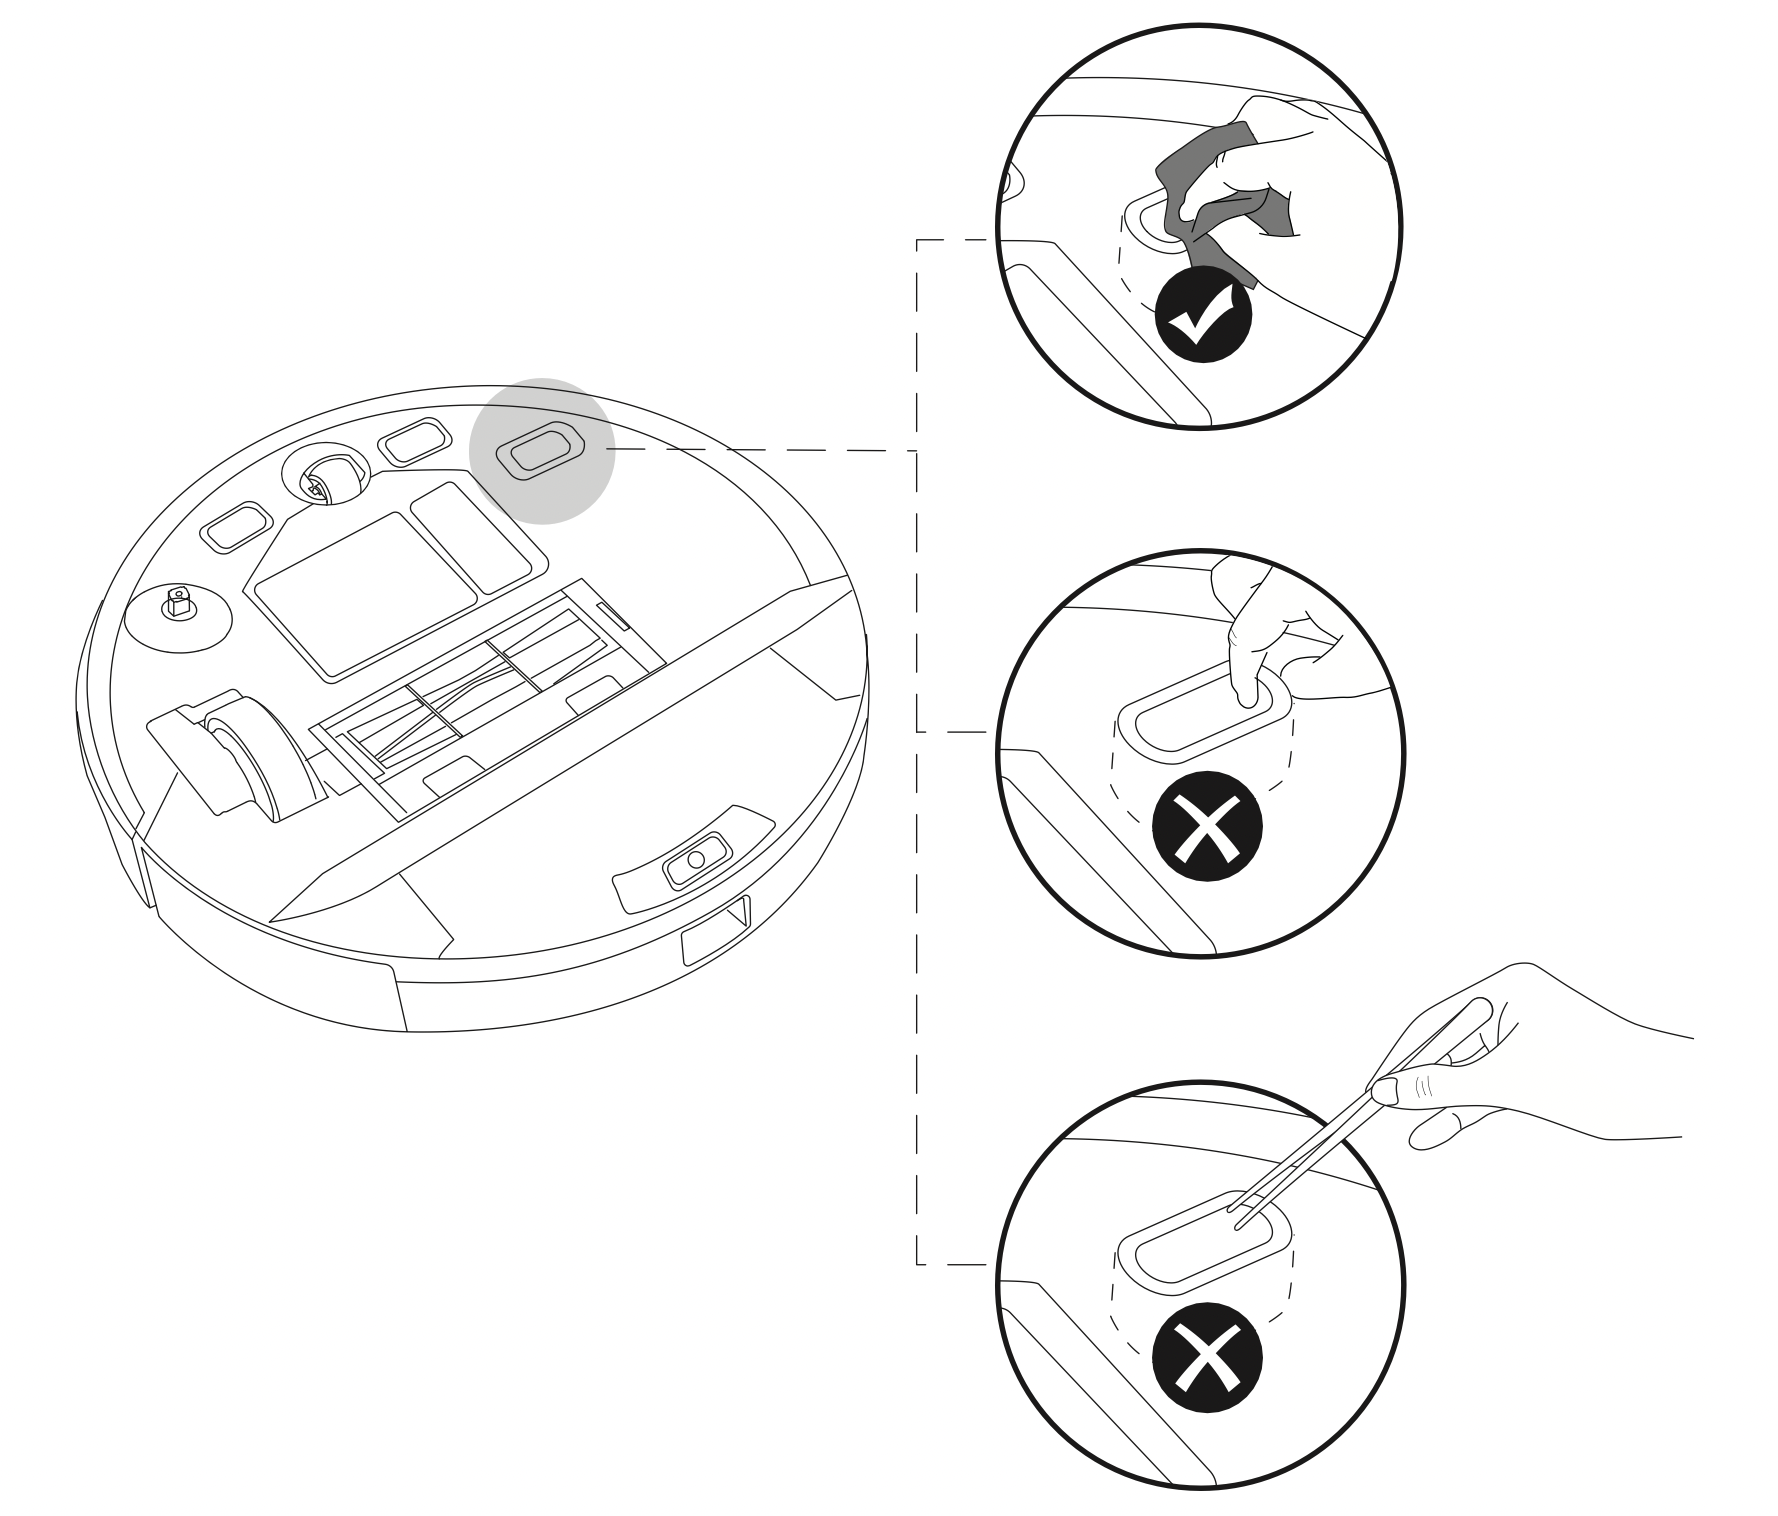
Clean the Sensors and Charging Pins
To maintain the best performance, clean the drop sensors, path tracking sensor and charging pins regularly.
- Dust off the sensors and charging contact pins using a cloth or cleaning brush.
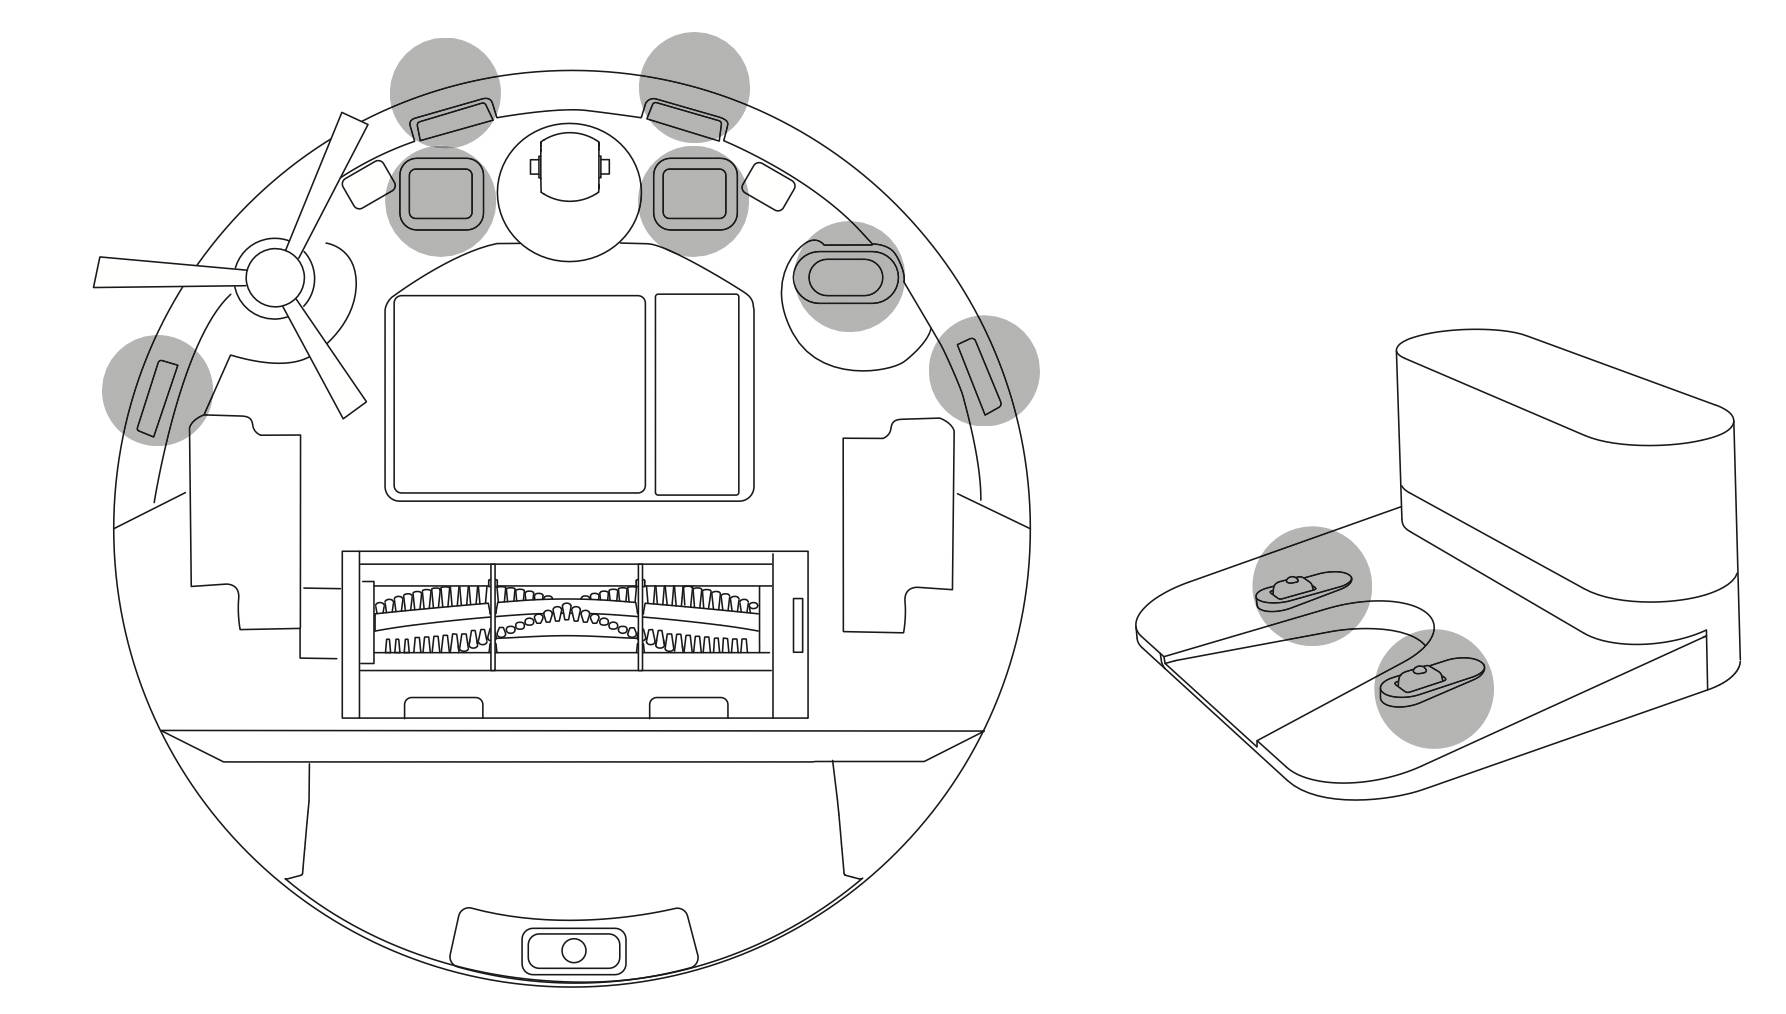
- Clean the path tracking sensor with a soft, dry cloth.
Tips:
- Be careful not to touch the path tracking sensor with your hands to make it dirty.
- Do not clean the path tracking sensor with sharp-pointed objects, as it may damage the sensor.
Clean the Swivel Wheel
Hair or dust particles can easily get entangled in the swivel wheel. Be sure to clean the swivel wheel periodically and as needed.
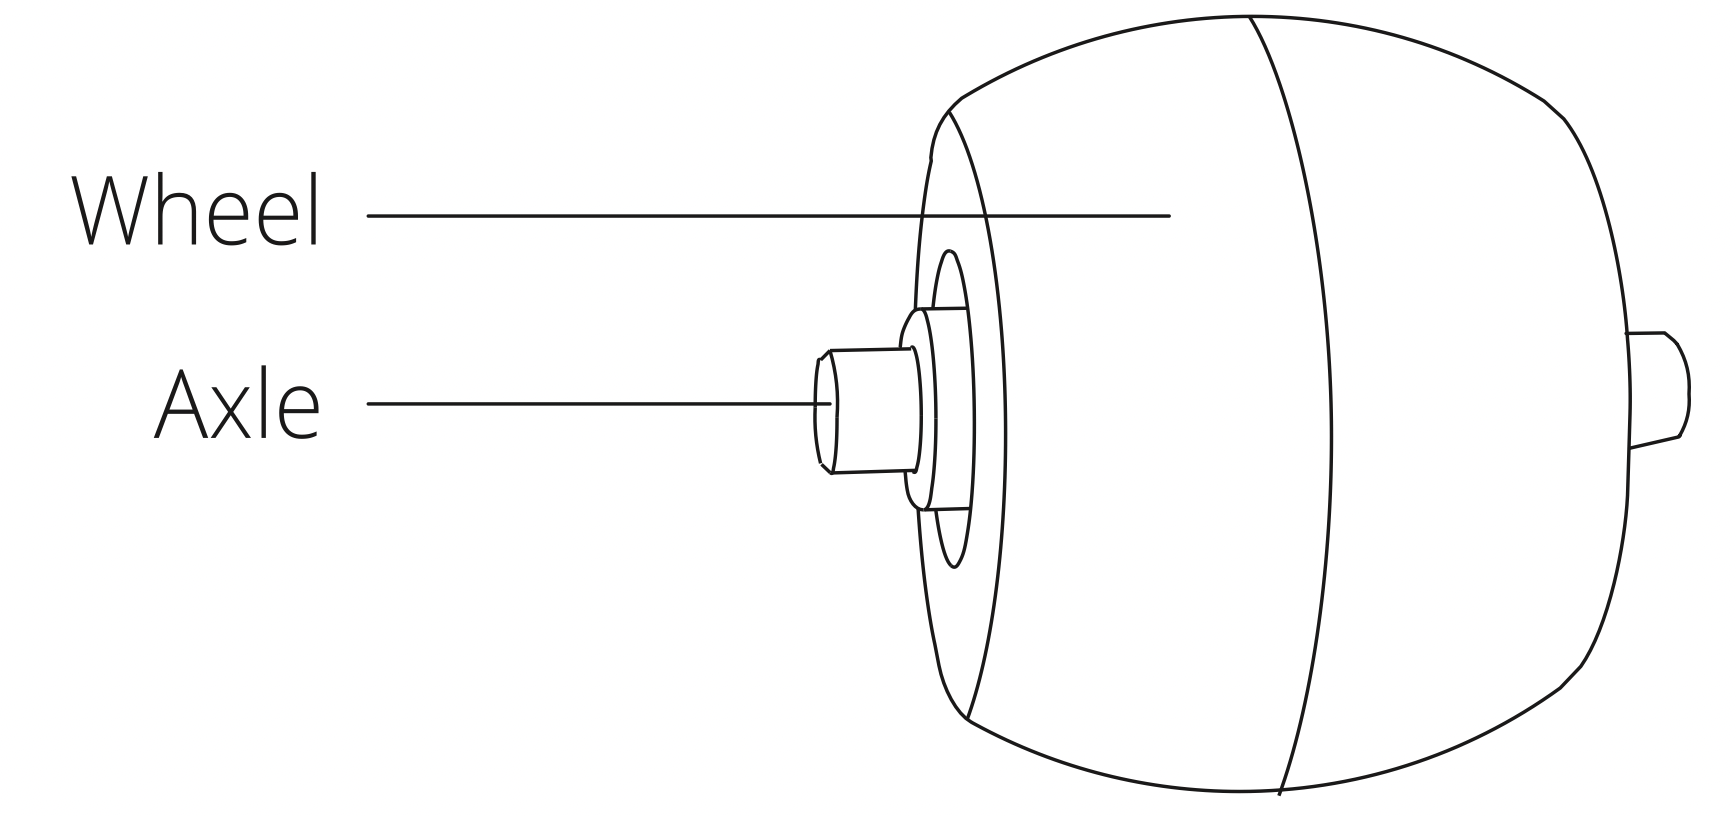
- Remove the swivel wheel.
- Clean any hair or debris wrapped around the wheel or entangled inside the wheel cavity.
- Reinstall the wheel and push in until it clicks into place.
Tip: Do not clean the swivel wheel with water.
Troubleshooting
| Problems |
Solutions |
| RoboVac cannot be activated. |
- Make sure the main power switch is in the ON position.
- Make sure the battery is fully charged.
- If you still have trouble, turn off the main powers witch and then turn it back on.
|
| RoboVac suddenly produces a loud noise. |
- Adjust the suction power level in the EufyHome app.
- Check if the rolling brush, filter, dust collector or suction inlet is stuck.
- Make sure the filter and the brush guard have been properly installed.
|
| RoboVac suddenly stops working. |
- Check if RoboVac is trapped or stuck on an obstacle.
- Check if the battery level is too low.
- Check if RoboVac has alerted you with any voice prompts or LED indicators. Refer to the"VoiceAlert" section in this manual.
- If you still have trouble, turn off RoboVac, wait for 3seconds, and then turn it back on.
|
| You cannot schedule cleanings. |
- Make sure the main power switch is turned on.
- Make sure the scheduled time has been set correctly.
- Check if RoboVac's power is too low to start cleaning.
- RoboVac will not start a scheduled cleaning while already performing a cleaning task.
- Cleaning schedules are erased when RoboVac is powered off or when reset to factory default settings. If RoboVac is powered on without Internet access, cleaning schedules will not synchronize and must be reset via the app.
|
| Suction power is weak. |
- Check if any obstructions are blocking the suction inlet.
- Empty the dust collector.
- Clean the filter with water.
- Select the max suction power level in the EufyHome app.
- Check if the filter is wet due to water or other liquid on the floor. Air-dry the filter completely before use.
|
| RoboVac cannot be charged. |
- Check if the LED indicator on the Charging Base lights up (when RoboVac is not on the Charging Base). If not, reconnect the adapter with the Charging Base and try a new power outlet. If the problem persists, contact the eufy service center to repair or replace the Charging Base.
- Dust off the charging contact pins with a dry cloth.
- Check if you can hear the "Charging" voice prompt when RoboVac is docked onto the Charging Base. If not, contact the eufy service center to repair or replace the Charging Base.
|
| RoboVac cannot return to the Charging Base. |
- Remove objects within 3 ft/1 m to the left and right side and within 6 ft/2 m of the front of the Charging Base.
- When RoboVac is in the vicinity of the Charging Base, it will return more quickly. However, if the Charging Base is located far away, RoboVac will need more time to return. Please be patient as it works its way back.
- Clean the charging contact pins.
|
| The rolling brush does not rotate. |
- Clean the rolling brush. Remove the hair wrapped around the rolling brush or entangled in the two ends of the brush.
- Check if the rolling brush and brush guard have been installed properly.
|
|
RoboVac's movements or travel paths are abnormal.
|
- Clean the sensors carefully with a dry cloth.
- Restart RoboVac by turning the power switch off and on.
|
| Water does not come out during mopping. |
- Make sure there is enough water in the water tank.
- Check if the mopping module is correctly installed.
- Check if the water outlets are blocked. If yes, replace the filter elements.
|
|
Too much water comes out during mopping.
|
- Make sure the water tank has been installed properly.
- Make sure the filter elements are correctly installed in place.
|
| RoboVac's cleaning time becomes shorter or is less than 100 minutes. |
- Make sure RoboVac is fully charged (indicated by a solid blue LED light) before cleaning.
- The cleaning time will be affected by the suction mode and floors/carpets to be cleaned:
- Standard suction mode (on hardwood floors): approx.100 minutes of cleaning
- Turbo suction mode (on medium-pile carpets): approx.60 minutes of cleaning
- Max suction mode (on medium-pile carpets): approx.40 minutes of cleaning
- If your cleaning time is much less than the time mentioned above, contact eufy customer service for help.
|
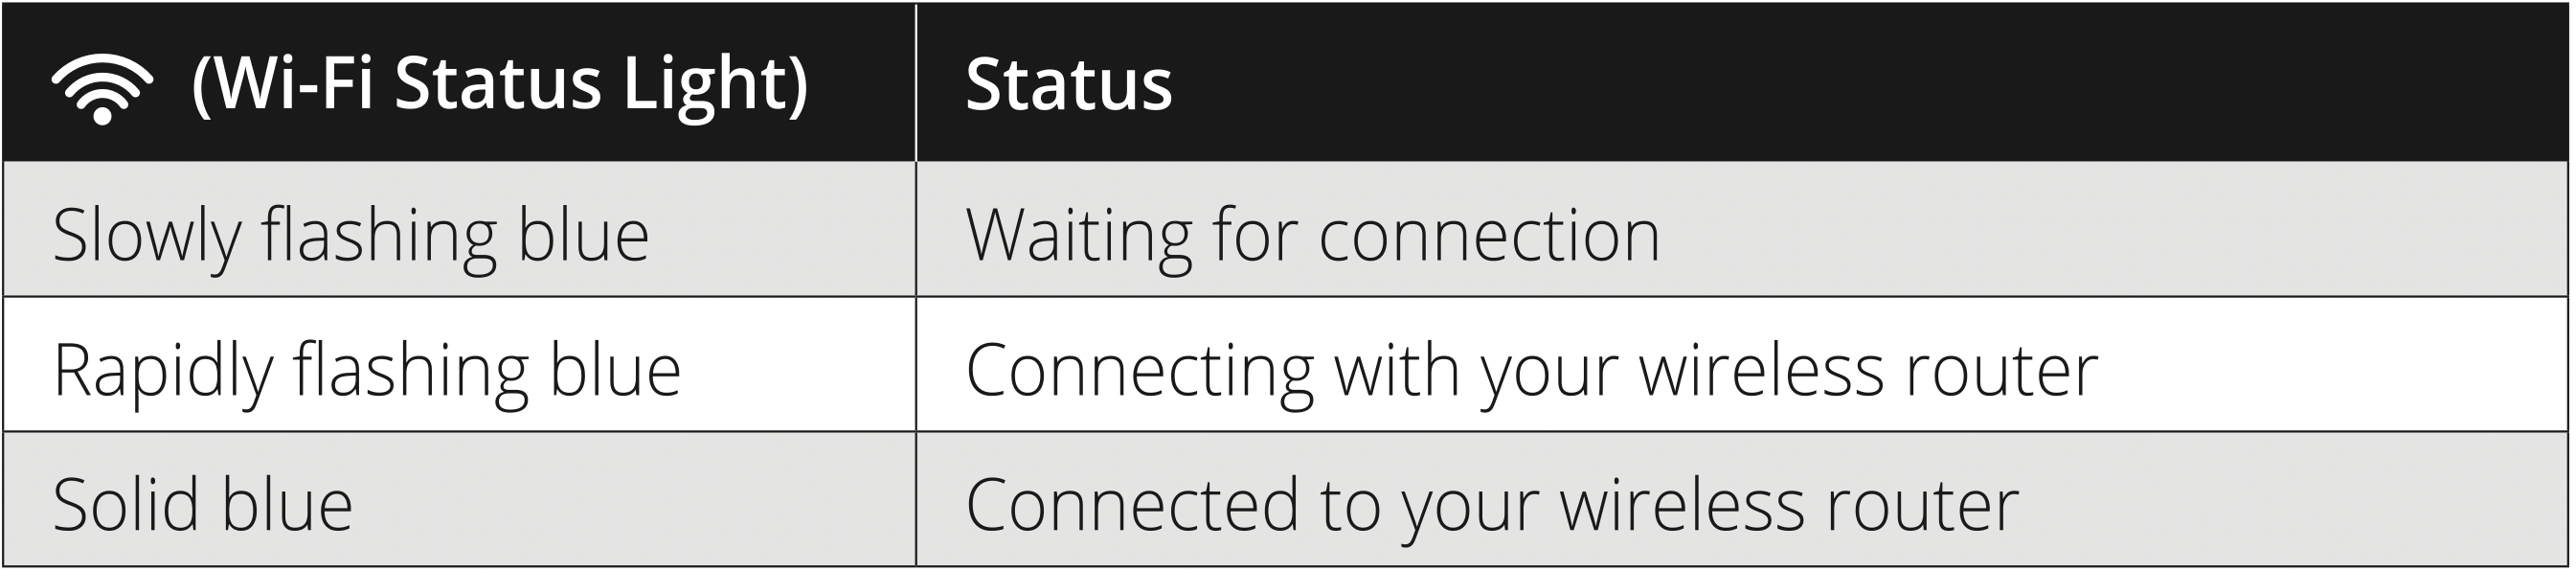
| RoboVac cannot connect to a Wi-Fi network. |
- Make sure you entered the Wi-Fi password correctly.
- Make sure your RoboVac, router, and mobile phone are close enough to ensure a strong signal strength.
- Make sure your Wi-Fi router supports the2.4GHz and 802.11b/g/n bands; the 5GHz band is not supported. For details, refer to the "Troubleshooting > Wi-Fi connection" section in this manual.
|
| You cannot control RoboVac with Amazon Alexa. |
- Check if there are any Internet connection problems.
- Check whether you have installed the Amazon Alexa app onto your smart device and enabled "EufyHome-RoboVac" Skill in the Amazon Alexa app.For details, refer to the "Smart Integrations" page in the EufyHome App.
- Make sure you have an EufyHome account and have connected to RoboVac.
- Make sure you are using correct Alexa voice-commands.
|
| You cannot control RoboVac with the Google Assistant. |
- Check if there are any Internet connection problems.
- Check if you have installed the Google Home app onto your smart device and initiated the "EufyHome" action in the Google Home app. For details, refer to the "Smart Integrations" page in the EufyHome App.
- Check if you are using the proper commands when talking to the Google Assistant. When making your request, first say the wake words "Ok Google".
- Repeat your question.Speak clearly to the Google Assistant.
|
Voice Alert
| Voice Prompt |
Cause and Solution |
| Error 1: Front bumper stuck |
- Front bumper is stuck. Tap it repeatedly to remove any dust; if not, then move the device to a new position and try again.
|
| Error 2: Wheel stuck. Check the wheel and move it to a new position |
- Wheel may be stuck or trapped. Clear any obstacles in the surrounding area and check the wheel for any trapped dust. Move the device to a new position and try again.
|
| Error 4: Rolling brush stuck. Remove and clean the rolling brush |
- Remove the rolling brush, roller joint, roller brush cover, and suction inlet to clean it. Once cleaned, place the items back into the device and try again.
|
| Error 5: Device trapped. Clear the surrounding area |
- Device is trapped. Clear any obstacles in the surrounding area and try again.
|
| Error 6:Device trapped. Place device near the position where the problem occurred. |
- Device may be suspended in air. Move it to a new position close to the original position and try again. If the device is still unable to start, clean the edge sensor and try again.
|
| Error 7: Wheel suspended. Please move the device to a new position |
- Wheels may be suspended in air. Move the device to a flat surface and a new position close to the original position then try again.
|
| Error 8: Low battery, shutting down device. Please charge your device |
- Low Battery; system will shut down.Charge the device and try again.
|
| Error 9: Magnetic Boundary Strip detected. Move device to a different area |
- Device is too close to a strong magnetic field or strip. Move the device to a different area and try again.
|
| Error 10: Path Tracking Sensor needs cleaning |
- Path tracking sensor is blocked by dust and requires cleaning.
|
| Error 21: Charging Base blocked by surrounding obstacles |
- Charging base is blocked by obstacles, clear any obstacles around the charging base and try again.
|
| Error S1: Battery Error. Refer to Owner's Manual or App for help |
- Open the battery compartment and check whether the battery is connected and restart the device
- Battery Temperature may be too high or low; wait until the battery falls to normal temperatures before usage (0°~40°C/C 32°F to 104°F)
- If the issue persists, contact customer support for help
|
| Error S2: Wheel Module Error. Refer to Owner's Manual or App for help |
- Check whether the wheels are stuck or dust is trapped inside before restarting the device
- If the issue persists, contact customer support for help
|
| Error S3: Side Brush Error. Refer to Owner's Manual or App for help |
- Check whether the side brush is stuck in an unknown object before restarting the device
- If the issue persists, contact customer support for help
|
| Error S4: Suction Fan Error.Refer to Owner's Manual or App for help |
- Check whether the fan blades are stuck in an unknown object before restarting the device
- Clean the dust collector and filter before restarting the device
- If the issue persists, contact customer support for help
|
| Error S5: Rolling BrushError. Refer to Owner'sManual or App for help |
- Remove and clean the roller brush, roller brush connection, roller brush cover and suction inlet before restarting the device
- If the issue persists, contact customer support for help
|
| Error S8: Path TrackingSensor Error. Refer toOwner's Manual or App for help |
- Check and clean the path tracking sensor for unknown objects before restarting the device
- If the issue persists, contact customer support for help
|