CAUTION- To reduce the risk of injury from moving parts, unplug before servicing.
Do not allow robot to clean anything that is burning or smoking, such as cigarettes, matches, or hot ashes.
Do not use without water tank in place.
Always insert batteries correctly with regard to polarity (+ and -) marked on the battery and the product.
Exhausted batteries should be immediately removed from product and properly disposed of.
Intended use
This product is intended for household use only. It is not intended for commercial use.
This product is intended to work in environment between -10°C and 50°C.
Tips and tricks
Stop the appliance promptly if error occurs during cleaning. Before using the appliance, remove all power cords and small objects from on the floor.
Roll up carpet tassels and make sure that curtains and tablecloths are not in contact with the floor.
If there are any raised floors such as steps or stairs, test if the appliance can detect the height difference to prevent it from falling.
Do not allow hair, clothes or fingers near openings or mechanical parts of the appliance.
Do not put any objects in the roller brush holder. To ensure smooth rotation of the roller brush, remove dust, batting and any hair from around it.
Important Tips
Shinebot W450 contains electronic parts. DO NOT immerse the robot’s main body in water.
How to start
Turn on/off
To turn the robot on, press for 0.5s. To turn it off, press for 3s. Release the button after a sound alert.
The robot will automatically enter sleep mode if no command is received within 20 minutes.
Pause/Resume
To pause the robot, press while it's cleaning. Press again to resume the cleaning cycle.
Clean
Install the main brush before use. Fill the clean water tank with clean water.
How to perform the best
Fill up the clean water tank before each use for better performance.
Choose the Spot mode for areas with stubborn stains.
Empty the dirty water tank after each use, and clean the water tank outlets and inlets regularly.
Remove the main brush and rinse with water once a week.
Clean both vents and remove the dust and debris regularly.
The robot is skilled at cleaning up different types of stains, like milk, ketchup, coffee and footprints.
The robot works on a variety of hard floor surfaces, such as porcelain tiles, vinyl flooring, and laminated floors.
The robot performs well on tile floor with small gaps.
The robot does not work properly on tile floors with gaps wider than 10mm.
The robot does not work properly on tile floors if the height difference between tiles is higher than 3mm.
The robot does not work properly on uneven tile floors (more than 2mm in height).
Don't use the robot on the upper floor if there is a risk of it falling down.
Don't use the robot on stairs to reduce the risk of it falling down.
In the Box
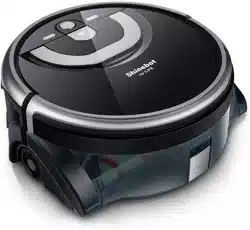
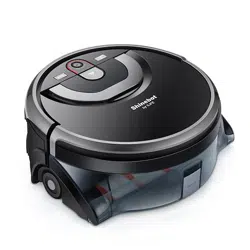
Product Anatomy
Main body
Display panel
Host machine
Remote control
Up
Right
Left
Down
Path mode
Area mode
Spot mode
Voice(Turn on/off the voice alert)
Water flow(Adjust water flow from lst-3rd level)
Repeat(Repeat cleaning 3 times at max)
Brush
* Up/Down/Left/Right Direction can only be changed when the robot is on standby.
Charging dock
Indicator
Lights
Status
Orange light flashes
Charging
Green Light goes out
Fully charged
Green light flashes
Select modes
Red light goes on
Machine fault
Orange light flashes
Low battery
Green light goes on
Auto Mode
Green light goes on
Area Mode
Green light goes on
Spot Mode
Green light goes on. Please refill the clean water according to voice alert.
Green light goes on. Please empty the dirty water tank according to voice alert.
Water
Green light flashing means it’s connecting to the server.
Green light going on means it’s connected.
Wi-Fi
Installation
Install the charging dock
Shinebot W450 is not a self-charging robot. Please take it to the dock manually for recharging after each use.
Step 1
Tum the charging dock upside down.
Plug in the power cord.
Secure wires around the cable channel.
Step 2
Put the charging dock somewhere level, dry and safe, and manually take the robot back to the charging dock to recharge.
Voice alert: Start Charging
Put charging dock and the robot in right direction.
Take the robot back to charging dock.
Note: Do not put the main brush on the metal chips of the charging dock. The brushes may have residual moisture and cause damage.
Battery condition
If the light on is orange, it means the battery is low. Please charge it immediately.
Working time
Green light: >30 mins
Orange light : <30 mins
Orange light flashes: Recharge immediately
Install the main brush
It's recommended to properly dampen the main brush before installation for better cleaning performance.
Insert the recessed end of the main brush into the gearwheel.
Press down on the capped end into the other end of the main body.
Add water and cleanser
Press down on the water tank release button, pull the handle up to detach the tank. Turn the integrated water tank upside down.
Open the clean water tank cap and fill up the tank with clean water.
After filling up the water, erect the water tank to ensure that the water volume exceeds the minimum water level.
Add the specific Shinebot cleanser (if necessary).
Note:
Do not use distilled or purified water.
Do not add any detergents except Shinebot cleanser.
Instructions
Cleanser to water dilution ratio is 1:100. Add a bottle cap of cleanser in the clean water tank before each cleaning.
Attention: Using excessive cleanser can damage the Shinebot, which should be avoided.
The Shinebot Hard Floor Cleanser
This concentrated cleanser is available to all kinds of hard floors that are sealed well.
Attention: Please keep it out of reach from children. If the ingestion happens to somebody, drink 2 cups of or more water or milk and visit the doctor immediately, do not induce vomiting.
Install the water tank
Align the bottom of the integrated water tank with the main body
Align the ends and move the water tank to insert it into the main body.
Press down, and a “click” will be heard if installed properly.
Start Cleaning
Select cleaning mode
Pressbutton or use the remote control/APP to change cleaning modes when the robot is in standby. Then press button to start cleaning your home.
Tap the button to switch cleaning modes.
Press button on the remote control to switch modes directly.
Note:
The remote control can only be used when the robot is turned on.
Standby mode
Press button to choose cleaning mode. Pressbutton 3s to connect the robot to Wi-Fi.
Press button to start cleaning, and pressbutton again for 3s to turn the robot off.
The robot will go to SLEEP mode if no command received in 20mins.
Note: The above can only be operated in standby mode.
Area mode
Recommended to clean a specific area. The robot will clean the area ahead of its starting point at zigzag path. It will return to the starting point when cleaning finished. Press button to pause the robot. (The below right picture shows the cleaning path of area mode, subject to the actual situation.)
Path mode
Recommended to clean large area. The robot cleans in zigzag path and return to the starting point when cleaning finished automatically.
Press button to pause the robot. (The below right picture shows the cleaning path of path mode, subject to the actual situation.)
Spot mode
Recommended to clean a localized area with heavy stains. The robot cleans in “spiral" path and return to the starting point and goes into standby mode when cleaning finished automatically.
The below right picture shows the cleaning path of Spot mode, subject to the actual situation.)
Place the robot
Select cleaning mode and press button start cleaning. For better cleaning efficiency, please place the robot stably against walls and keep 0.5m away from any obstacles.
Pressbutton again to stop the rc from cleaning.
The robot will work out the best cleaning path when running. If the robot is moved manually or by remote control, it gets disrupted and will work out a new cleaning path. In order to improve cleaning efficiency and reduce repeated cleaning, please do not move the robot when it’s cleaning.
Attention
The robot will return to the starting point when clean water runs out or the dirty water tank is full. Users should refill the clean water or empty the dirty water according to its voice prompts. Put the robot to the place where it stops cleaning and press the clean button to continue the work.
Please empty the dirty water tank after each cleaning, as well as cleaning up and maintaining the robot.
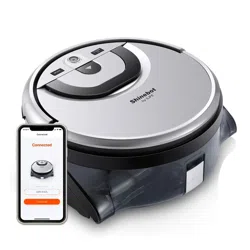
APP Download
Downloading the APP
The robot can be controlled by the “ILIFEHOME" app. Scan the QR code to install the app on your iOS or Android device.
Maintenance
To keep the robot running at peak performance, you are advised to perform the following maintenance regularly:
Component
Maintain
Replace 1
Water tank
After each use
/
Main brush
Once per week
3-5 months
Suction passage
Once per week
/
Fan-coil outlet
Once per week
/
Clean the dirty water tank
Detach the integrated water tank.
Open the cap and empty the waste.
Fill the dirty water tank with clean water. Close the cap and shake. empty the tank.
Open the cap again and empty the tank
Clean the main brush and scraper
Remove the integrated water tank and take out the main brush, then rinse with clean water.
Detach the integrated water tank.
Remove the main brush from the robot body.
Remove all the debris on the main brush.
Rinse the main brush with clean water, and air dry it before reinstallation.
Note: The scraper is screwed to the robot. Please do not try to disassemble it and rinse it after each running.
The scraper is fastened by the screws, which is not recommended to be detached. Please kindly rinse the scraper under the faucet.
In order to keep the cleaning efficiency of the scraper, please place the robot correctly on the charging dock after cleaning or machine maintaining. Otherwise, the severe squeezing of the scraper will affect the cleaning efficiency (as shown in the figure below).
Clean the filter
Remove the filter from the water tank and rinse with water.
Clean the water tank openings
After removing the filter, press the water tank lock button to open the fan-coil outlet. To maintain the water tank's proper functioning, clean both openings of the fan-coil outlet and remove dust and debris.
2. Press the lock button and clean the fan-coil outlet.
3. Clean the other suction passage.
To keep the tanks tightly sealed, clean the inlet and outlet, and the caps of both tanks regularly.
Clean the metal pins on the dirty water tank / main body/charging dock
Wipe the the metal pins on the dirty water tank /main body / charging dock regularly with dry clean cloth.
Metal pins on the dirty water tank
Metal pins on the main body
Metal pins on the charging dock
Clean the universal wheel
Turn the robot upside down and check if the universal wheel can rotate smoothly. Remove the universal wheel by pulling it out vertically. Check if there is any hair or debris stuck on it.
Turn the robot upside down.
Pull the universal wheel out vertically.
Check if there is any hair or debris stuck on it.
Note: After maintenance, reinstall all components and place the robot on the charging dock. Always store the robot in a safe environment.
Troubleshooting
Voice Alerts
Alerts
Light signal
Possible cause
Solution
Please install water tank correctly
The green light goes on
The red light goes on
Water tank isn't installed or properly installed.
Ensure the water tank is installed properly.
Please fill the clean water tank
Clean water tank is empty or clogged.
Fill with clean water
Check the clean water outlet.
Please empty the dirty water tank
Dirty water tank is full.
Empty the dirty water tank.
Please place the robot to an open area
The red light goes on
Robot is stuck in a narrow space
Put the robot in an open area and start cleaning again.
Please check the main brush
Main brush is jammed.
Check if the main brush is jammed because of an object.
Clean both ends of the main brush.
Please check and clean the universal wheel
Universal wheel is stuck.
Check if the wheel is jammed by debris or hair. Remove the wheel and clean it.
Please check and clean the cliff sensors
Cliff sensors are contaminated.
Check and clean the cliff sensors.
Please put robot back to ground
Robot isn't on a flat surface.
Put the robot on a flat floor.
Please check the front bumper
Front bumper is stuck.
Press front bumper several times to see if the bumper works properly.
Low battery, please charge
The orange light flashes
Battery is low.
Recharge the robot.
Others
Malfuntions
Solutions
Dirty water leak
Check the air inlet and outlet.
Clean up the sealing rings.
Do not suction
Check if the roller brush is installed. (Refer to page 12 as how to install)
Check if the filter is blocked. (Refer to page 19 as how to clean filter)
Cannot charge
Check if the metal pins of both charging dock and the robot.
 Shinebot W450 contains electronic parts. DO NOT immerse the robot’s main body in water.
 for 0.5s. To turn it off, press


 Green light goes on
 Green light goes on


 button or use the remote control/APP to change cleaning modes when the robot is in standby. Then press
  button on the remote control to switch modes directly.


 Green light goes on. Please refill the clean water according to voice alert.
 Green light flashing means it’s connecting to the server.
