Loading ...
Loading ...
Loading ...
en Rails
28
pRails
Rails
With good care and cleaning, your appliance will retain
its appearance and remain fully functional for a long
time to come. This will tell you how to remove the
shelves and clean them.
Detaching and refitting the rails
:Warning – Risk of burns!
The rails become very hot. Never touch the hot rails.
Always allow the appliance to cool down. Keep children
away from the appliance.
Detaching the rails
1. Lift the rail slightly at the front ‚ and detach it ƒ
(figure !).
2. Then pull the whole rail towards you and take it out
(figure ").
Clean the rails with cleaning agent and a sponge. For
stubborn deposits of dirt, use a brush.
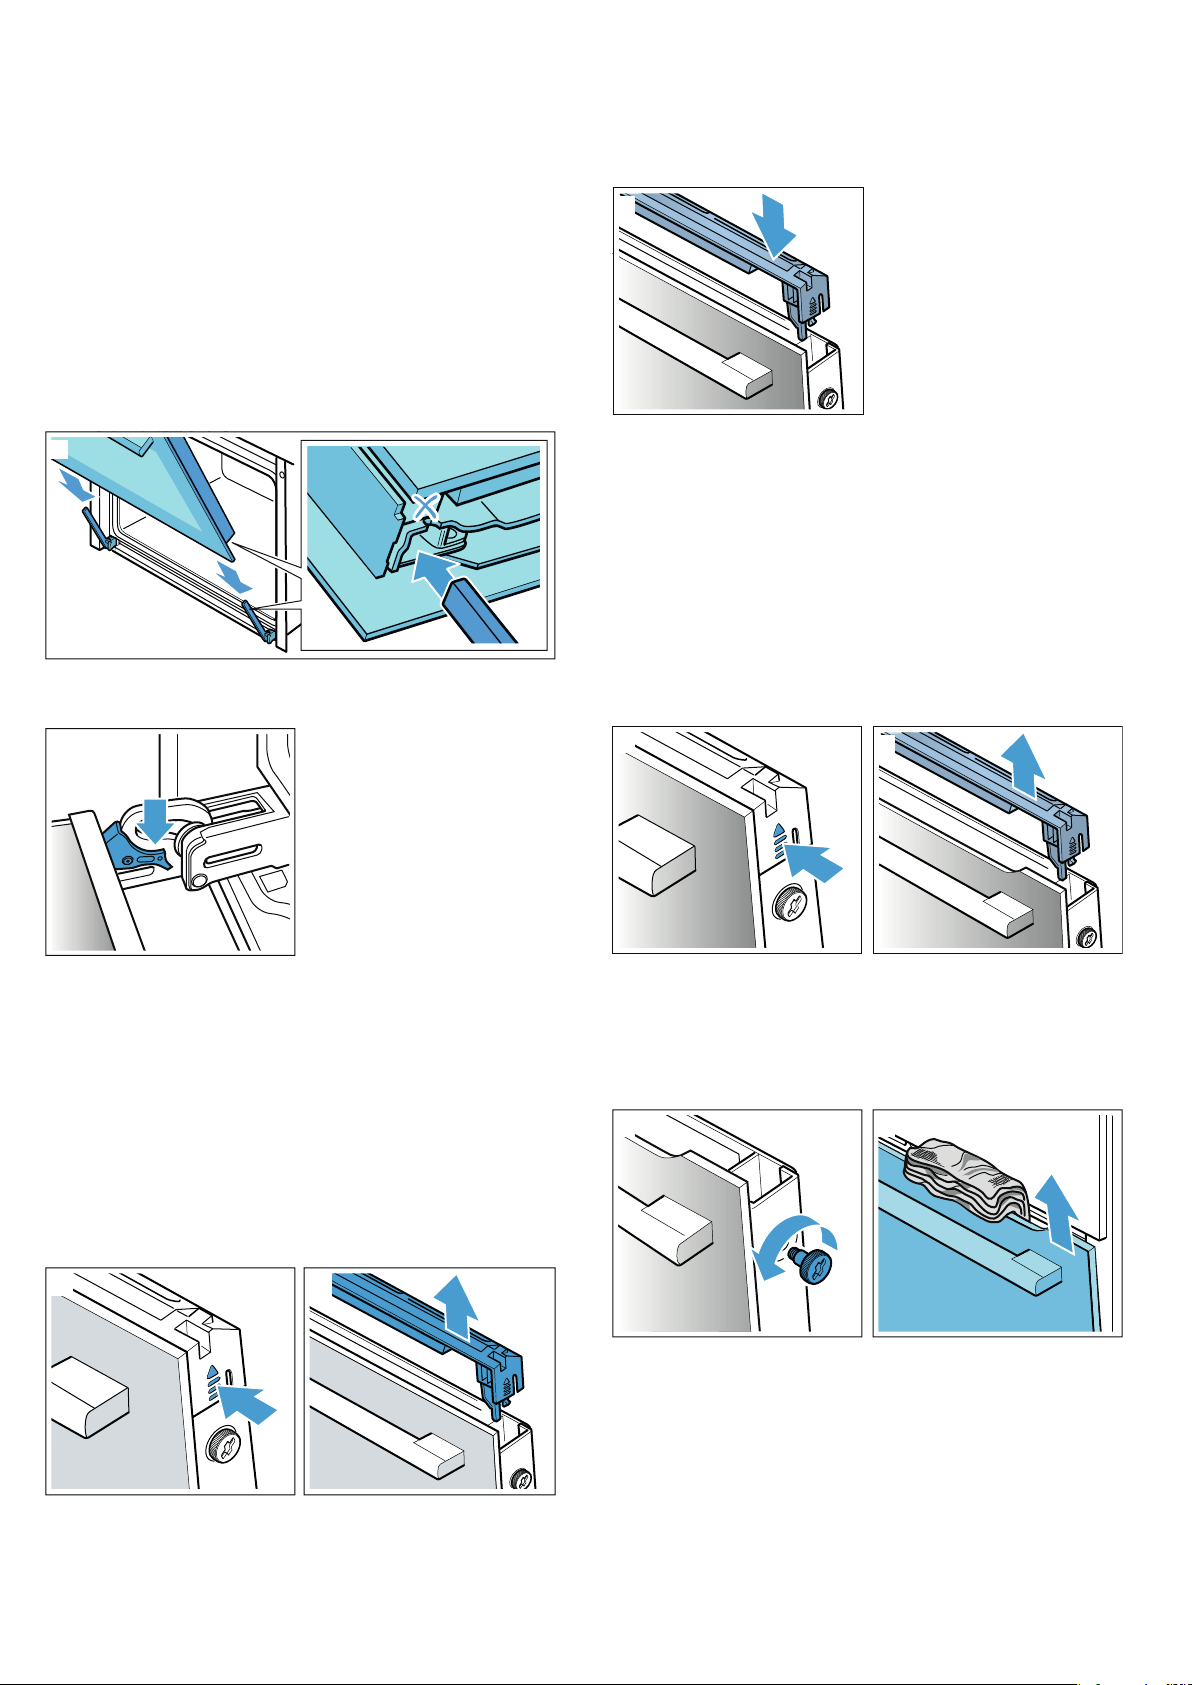
Attaching the rails
The rails only fit on the right or the left side. For both
rails, ensure that the curved rods are at the front.
1. First, insert the rail in the middle of the rear socket ‚,
until the rail rests against the cooking compartment
wall, and push it back ƒ (figure !).
2. Then insert the rail into the front socket „, until the
rail also rests against the cooking compartment wall
here, and press it downwards … (figure ").
qAppliance door
Appl i ance door
With good care and cleaning, your appliance will retain
its appearance and remain fully functional for a long
time to come. This will tell you how to remove the
appliance door and clean it.
Removing and fitting the appliance door
For cleaning purposes and to remove the door panels,
you can detach the appliance door.
The appliance door hinges each have a locking lever.
When the locking levers are closed (figure !), the
appliance door is secured in place. It cannot be
detached.
When the locking levers are open in order to detach the
appliance door (figure "), the hinges are locked. They
cannot snap shut.
:Warning
Risk of injury!
■ If the hinges are not locked, they can snap shut with
great force. Ensure that the locking levers are always
fully closed or, when detaching the appliance door,
fully open.
Risk of injury!
■ The hinges on the appliance door move when
opening and closing the door, and you may be
trapped. Keep your hands away from the hinges.
Removing the appliance door
1. Open the appliance door fully and push it in the
direction of the appliance.
2. Fold up the two locking levers on the left and right
(figure !).
3. Close the appliance door as far as it goes ‚. With
both hands, grip the door on the left- and right-hand
side and pull it up and out (figure ").
21
D
E
2
F
G
1
D
E
21
2
E
E
D
1I
Appliance door en
29
Fitting the appliance door
Reattach the appliance door in the opposite sequence
to removal.
1. When attaching the appliance door, ensure that both
hinges are inserted straight into the opening (figure
!).
Place both hinges at the bottom on the outer panel
and use this as a guide.
Ensure that the hinges are inserted into the correct
opening. You must be able to insert them easily and
without resistance. If you can feel any resistance,
check that the hinges are inserted into the correct
opening.
2. Open the appliance door fully. Fold both locking
levers closed again (figure ").
3. Close the cooking compartment door.
Removing the door cover
The stainless steel inlay in the door cover may become
discoloured. To carry out thorough cleaning, you can
remove the cover.
1. Open the appliance door slightly.
2. Press on the right and left side of the cover (figure
!).
3. Remove the cover (figure ").
Close the appliance door carefully.
Note: Clean the stainless steel inlay in the cover with
stainless steel cleaner. Clean the rest of the door
cover with soapy water and a soft cloth.
4. Open the appliance door again slightly. Put the
cover back in place and press on it until it clicks
audibly into place (figure #).
5. Close the appliance door.
Removing and installing the door panels
To facilitate cleaning, you can remove the glass panels
from the appliance door.
Removing the door from the appliance
1. Open the appliance door slightly.
2. Press on the right and left side of the cover (figure
!).
3. Remove the cover (figure ").
4. Loosen and remove the screws on the left and right
of the appliance door (figure #).
5. Before closing the door again, trap a tea towel which
has been folded several times in the door (figure $).
Pull out the front panel upwards and lay it on a flat
surface with the door handle facing downwards.
1
2I
2
1
21
Loading ...
Loading ...
Loading ...